CP Commerce Admin
Set up the website and mobile app your customers browse, register, order and book on. Nothing here posts to stock or the General Ledger: orders arrive as sales documents through the portal’s checkout, and the products and prices shown come from the item master and the pricing scheme or price book you assign to the website.
Overview
The CP Commerce Admin applet is the tenant-side console behind every Customer Portal (CP) storefront — the website and mobile app where customers browse, register, order, book activities and read your content. Marketing, e-commerce and operations staff open it to configure a Website (pricing model, menus, layouts, sign-in providers, shipping, legal agreements, linked accounts), and to run the surrounding services: rating configuration, newsletter topics, push notifications, template and dynamic forms, B2B spending limits, blocked customers, and the facilities / activities / events / calendar booking engine.
It is a configuration applet, not a document applet: nothing here posts to stock or the General Ledger. The orders that customers place arrive as sales documents through the Shopping Cart and the portal’s checkout, and the products they see come from the item master and the pricing scheme or price book you assign to the website.
Where it fits
| Position | Applet / system | Why |
|---|---|---|
| Module | E-Commerce, Membership | Storefront configuration; post-registration can create members and customers. |
| Front end | Customer Portal web and mobile app (the cross-platform Customer Portal app); the Website Builder dashboard the applet opens | Reads the website’s layouts, menus, images, agreements and auth configuration configured here. |
| Master data | Organisation, Doc Item Maintenance, Pricebook, Shipping Pricebook, Cashbook | Branch and merchant, items, pricing schemes / price books, shipping price books, settlement methods. |
| Customers and members | Customer, Membership Admin | Post Registration Config creates the customer and/or membership; the Account tab links entities to a gated website; Spending Limit applies per member class. |
| Promotions | Voucher Management, Commission Scheme | Linked to a website on their own tabs. |
| Orders | Shopping Cart, Shopping Cart Customer Access | Checkout produces the sales order; the website’s Sales Order Printable Format is used for the customer’s order document. |
| Catalogue | Doc Item Maintenance, PDG | Product data shown on the storefront: the items, categories, images, attributes and search filters are the item master’s; PDG generates the product descriptions. |
| Content | Content Management System | The same CMS tables — menus, posts, content categories, themes — edited without a website selector; this applet edits them per website. |
| Files | Media Library Applet | The tenant-wide drives whose files the gallery widgets, slideshow play lists, PDF menu items, post images and facility / activity media links read. |
| Events | Events Management | Fuller event workflow; this applet’s Activities group covers facilities, activities, calendars and scheduling for the portal. |
Screens and menus
Sidebar menus as defined in the applet (the Review, Shipping Provider and Users entries are commented out in the current build — their screens still exist and open from the routes review, shipping-provider and users, but they are not in the sidebar):
| Menu | Route | What it is |
|---|---|---|
| Website | website | Listing, create and the 21-tab edit screen for each storefront — the core of the applet. |
| Rating Configuration | rating | Rating scales for the website’s review headings — not the product ratings shoppers see (see Ratings and Reviews). |
| Topics | newsletter-topic | Newsletter topics with subscribers and member-label links. |
| Notification | notification | Push notifications with scheduling and posts. |
| Forms → Template Forms, Submitted Forms | template-form, submitted-form | Reusable form templates and the inbox of submitted responses. |
| Dynamic Forms | dynamic-form | Questionnaire builder with Question and Response tabs. |
| Spending Limit | spending-limit | B2B spending caps per member class. |
| Blocked Customers | blocked-customers | Portal blacklist. |
| Facilities | facilities | Bookable spaces with activities, events and a media library. |
| Audit Trail | audit-trail | Change log (added August 2026). |
| Activities → Activity, Activity Category, Calendars, Events, Scheduler | activity, activity-category, calendars, events, schedule | The booking engine. |
| (not in sidebar) Review, Shipping Provider, Users | review, shipping-provider, users | An unfinished review screen that saves nothing, 3PL shipping methods, portal user listing. |
| Settings | settings/… | Field Settings, Default Selection; also Webhook, Feature Visibility, Permission Set / User / Team / Role Permission listings. |
| Personalization | personalization/… | Field Settings, Default Selection, Sidebar. |
The Webstore Management Dashboard (Website Builder button)
Goal: Provide Store Managers a unified, simplified front-end console to configure their website without needing to navigate the complex backend ERP menus.
When an administrator clicks the Website Builder button from the backend (or navigates to https://[your-store-url]/page/website-builder/layout-menu/webstore), they are greeted by the Webstore Management Dashboard.
This dashboard acts as an aggregated shortcut center, presenting the most critical e-commerce configuration tools as large, easy-to-click tiles.
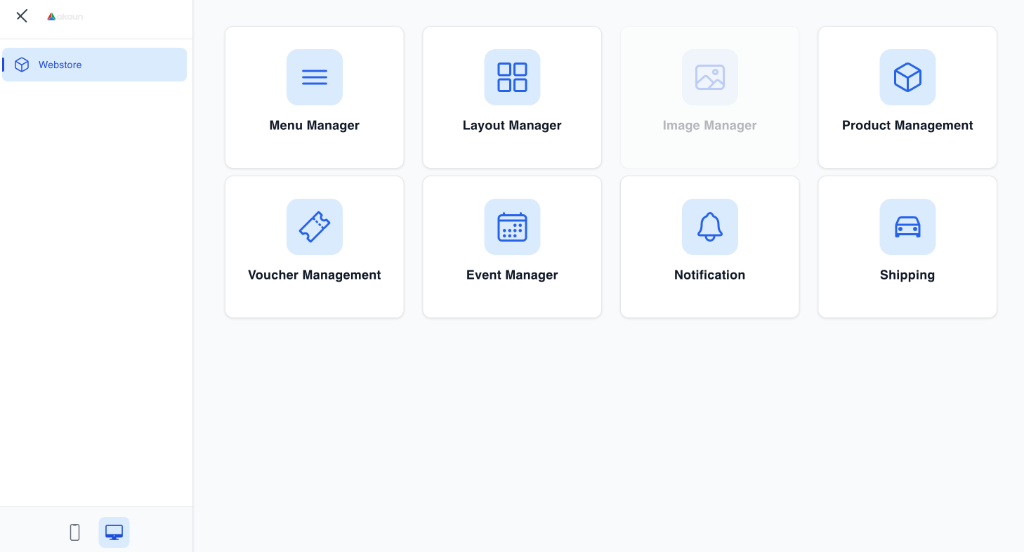
The dashboard tiles
Thirteen tiles are defined, not ten, and two of them are inert: Banners and Image Manager are switched off in the app, so they render and do nothing. The eleven that work are Menu Manager, Layout Manager, Product Management, Voucher Management, Event Manager, Notification, Shipping, QR Code Manager, Activity Manager, Highlight Manager and User Permission Manager.
Two things about this dashboard are worth knowing before you send a store manager to it, and neither is on the screen:
- It is part of the storefront, not of this applet. The tiles are defined in the Customer Portal app and route inside it. Menu Manager reaches the same menus as the Menu List tab here; Layout Manager the same layout instances; Product Management opens the item master, which is not a CP Commerce screen at all. Whatever a store manager changes there changes the same records your finance and merchandising teams see elsewhere.
- A tile that is hidden is not a tile that is protected. See below.
Hiding tiles — and the two you cannot hide from here
Website Edit → Details → Hide Website Builder Elements writes one HIDE_* extension row per ticked box,
and the storefront hides the matching tile. Eleven boxes exist here. The storefront also honours
HIDE_HIGHLIGHT_ACTIVITY_MANAGER and HIDE_USER_PERMISSION_MANAGER — and this applet offers no checkbox
for either, so Highlight Manager and User Permission Manager can only be hidden by writing the extension
row through the API.
Hide Voucher Management.Nothing hides a tile for you. A HIDE_* row only exists where somebody has ticked the box and saved, so a
storefront nobody has been through this screen for shows every tile it has.
Website Management (website route)
Website Listing
The default landing page of the applet. Shows all configured website/storefront entities.
Listing View:
- Each row = one website entity
- Key columns: Website Code, Website Title, Status
- Click any row to open the edit view
Website Create
Create asks for two things — a Website Title and a Branch — and drops you straight into the 21-tab
edit view, where Membership Class and Status are also required before the record will save. The branch you
pick here is not cosmetic: under the ECOMSYNC_BY_BRANCH pricing model it is the key the storefront uses to
look prices up, so changing it later changes what every shopper sees.
Website Edit — how the record is actually stored
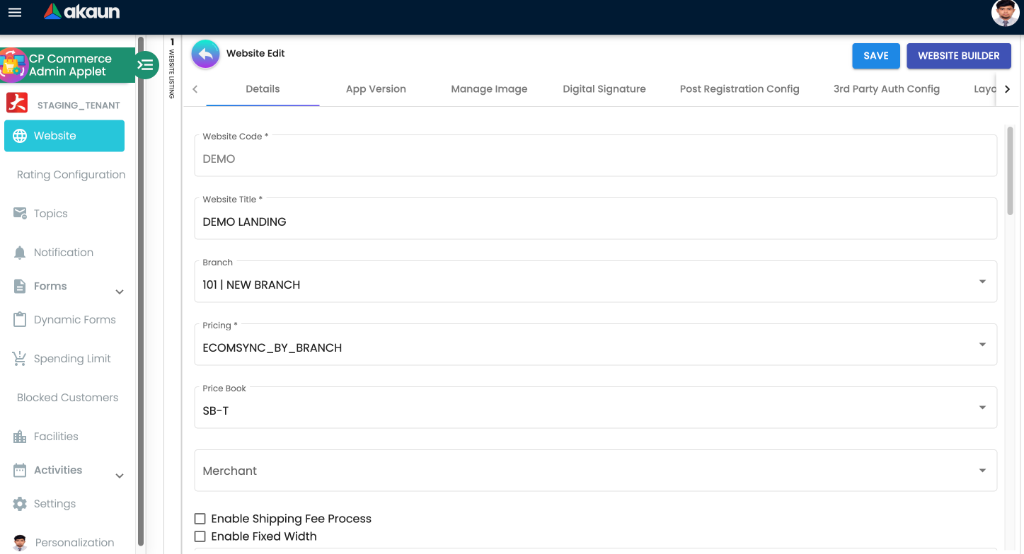
Twenty-one tabs: Details, App Version, Manage Image, Digital Signature, Post Registration Config, 3rd Party Auth Config, Layout Instance, Reviews, Menu List, Label List, Content Category, Posts, User Agreement, Account, Commission Scheme, Language, Branch, Region, Country, Voucher Management and Settlement Method.
The part the screen hides. Only a handful of what you type here becomes a column on the website record —
code, title, branch, pricing model, stock source, status. Everything else is a key/value extension row
on the website record, one per setting, identified by a parameter code such as RESTRICT_BY_ENTITY,
PUBLIC_CART or WEBCHAT_VIRTUAL_URL. Four consequences a reader cannot see from the form:
- A setting that has never been saved has no row, and the storefront falls back to its own default (almost always off) rather than to anything you can see here. “Blank” and “false” are the same picture.
- Some checkboxes are not stored at all — they are inferred. Enable Web-Chat is ticked on load if and
only if the
WEBCHAT_VIRTUAL_URLrow holds a non-empty value; Enable Fixed Width likewise fromWINDOWS_FIXED_WIDTH_VALUE. Untick the box and save and the applet clears the value, which is what actually turns the feature off. - Grouped settings share one row. The five Reseller Banner text and colour fields live inside the JSON
of the single
ENABLE_RESELLER_WEBSITErow, not in rows of their own. - Each tab saves its own rows independently. Saving the Details tab does not touch the reCAPTCHA rows, and saving 3rd Party Auth Config does not touch the Details rows — except on the Post Registration tab, where it does something more dangerous (see that tab).
Where a shopper is sent to change their e-mail or mobile number
A website can hold one more setting that none of the twenty-one tabs shows: a short list of web addresses kept against the website. No screen in this applet or on the storefront dashboard writes it. BigLedger sets it up through the API. The storefront reads one kind of entry from that list, the address of the sign-in site, and uses it for one thing.
What happens behind the screen. A signed-in shopper taps their e-mail address or mobile number on the
storefront’s profile page, where the storefront allows these to be changed. The storefront does not change
the detail itself. It asks BigLedger for a one-time access key that expires ten minutes after it is made. It
then opens the change screen on the sign-in site, passing the key and the website. If the website has a
sign-in entry, the storefront uses the one saved first and adds https:// in front of it. If it has none,
the shopper goes to BigLedger’s own sign-in site. The storefront looks this up once, when it loads.
What the list is not. It is not how the storefront finds its website. That comes from the Host Name record for the storefront’s domain, which BigLedger also keeps (see Storefront E-Invoice Request). Adding your shop’s domain to this list does not make the storefront answer on it. Removing an entry does not take the storefront offline. Entries of any other kind are read by nothing.
Five things to know before an entry is added:
- Give the bare domain. The storefront adds
https://itself. An entry saved ashttps://account.gadgetsphere.examplebecomes a link tohttps://https://…, and the change screen never opens. - Only the first sign-in entry counts. With two, the storefront uses the one saved earlier. Editing the later one changes nothing a shopper sees.
- Nothing checks the address. BigLedger accepts any text, as long as the website exists. It does not check that the address serves a sign-in site, or that no other website claims the same address. A wrong entry shows up only when a shopper follows the link.
- A change reaches a shopper when their storefront reloads. The address is read once, at load. A shopper with the storefront already open still goes to the old address.
- The key lasts ten minutes. A shopper who comes back to the change screen later starts again by tapping the detail on the profile page, which makes a new key.
Your job. Whoever owns the storefront’s domains keeps this entry right. That is the person who knows the sign-in site’s address, not the person who edits the website. When that address changes, or a new storefront goes live, ask BigLedger to set or update the entry. Then check it the way a shopper would. Sign in to the storefront with a test account, open the profile, tap the e-mail address, and confirm that the page which opens is on the address you expect. It should not be BigLedger’s own sign-in site, and it should not be an error.
Details Tab (Deep Dive)
The longest form in the applet. Most of it is what you would expect and does what its label says: the storefront’s title, code (read-only, generated), branch, description and meta description; the four navigation menus (Top, User, Left-side — labelled Lift-side Menu on screen — and Bottom); Content Category; Default Layout Routing and Default Authentication Portal; Default Topic; Membership Class; Sales Order Printable Format; the Privacy Agreement and Terms & Conditions Agreement documents; Merchant; Status; and the audit stamps at the foot.
The rest of this section is only the settings that behave in a way the form does not show you.
Pricing — and the third option only half the stack understands
Pricing decides where prices are looked up, and the drop-down offers three values:
| Pricing | Where the price comes from |
|---|---|
PRICING_SCHEME | By website — the website’s own GUID is the lookup key, so two storefronts on the same branch can price differently. Pricing Scheme and Pricing Scheme 2 appear beneath it. |
ECOMSYNC_BY_BRANCH | By branch — the branch GUID is the key, and Price Book replaces the scheme selectors. Changing the website’s branch silently repoints the whole catalogue. |
ENTITY_PRICING | By the signed-in customer — the backend reads the pricing scheme set on that customer’s own record, but only when Restrict View/Access by Entity (further down this form) is ticked. With the tick off, with no customer signed in, or with no scheme on the customer, it falls back to the branch’s default pricing scheme. It shows the same Pricing Scheme / Pricing Scheme 2 selectors as PRICING_SCHEME, and it is offered on Edit only — the Create form lists two values. |
PRICING_SCHEME and ECOMSYNC_BY_BRANCH only, so one path — the label-driven product list — fails, and the
shopper gets a red toast reading “Something went wrong. Please contact the admin to set up source pricing
scheme.” So if you choose it:
tick Restrict View/Access by Entity, put a pricing scheme on every B2B customer, and walk a category
listing and a product page as a signed-in customer before you go live.Shipping fee
Enable Shipping Fee Process only reveals the choice; the choice is what matters. Shipping Fee Options then decides which two follow-up fields you must fill, and getting the pair wrong is the commonest reason delivery options never appear at checkout:
| Shipping Fee Option | What you must also set | What it writes |
|---|---|---|
| Shipping Pricebook | Default Shipping Price Book Code and Item Code for Shipping Fee | SYS_AKN_WEB_CP_COMMERCE_SHIPPING_PRICEBOOK and …_SHIPPING_SERVICE_ITEM |
| Delivery Charges (and the by Country / by Region variants) | Item Code for Delivery Charges | the same service-item row |
The item code matters after the sale as much as during it: the shipping charge becomes a document line on the sales order, carrying that item’s tax code and GL mapping, so an item chosen carelessly posts the freight to the wrong account for every order the storefront takes.
Two more things about that line. Its amount is not the item’s price: the storefront works the fee out from the shipping price book’s rules and attaches it to the shipping item it loads for the website, and when that item fails to load the checkout shows RM 0 shipping and the order goes through with no fee and no message — if every order’s freight is zero, check the item before the price book. And every line a storefront order writes, product and shipping alike, arrives with no unit of measure: the cart copies the item’s transaction type and never its unit, so printables and anything keyed on the unit read a blank. That is a known issue, reported to engineering; until it ships, expect the blank and do not read it as a product set up wrong.
Access, cart and notification switches
| Setting | What it actually does |
|---|---|
| Restrict View/Access by Entity | Gates sign-in, in the backend, not the browsing experience. With it on, the login endpoint joins the website’s linked accounts to the person’s login and refuses the sign-in with “Unauthorised Access as website restricts its entity” unless a match exists. See the Account tab for the second half of the link, which is the half people miss. In the storefront it also swaps the login page’s Sign up! link for Become A Dealer and adds Total Value / Completed Orders cards to My Orders and My Invoices. |
| Enable Public Cart | Lets a shopper who is not signed in add to the cart and open product details. Leave it off and the same actions bounce the visitor to the login page. It does not make checkout anonymous. |
| Restrict Notification by Member | An audience filter, not a display setting: with it on, a push notification from this website reaches only people whose membership is active, so anybody whose membership has lapsed stops receiving them and nothing on the send screen says so. |
| Enable Web-Chat | A derived tick, not a stored one — see above. The real setting is Selected Webchat Endpoint, a UCC endpoint id. Untick the box and save to clear it. |
| Enable Website Preloader | Shows the loading animation. Cosmetic, and the only Details switch with no consequence outside the browser. |
| Enable Reseller Website | Turns on the reseller banner and stores its five text and colour fields inside this one row’s JSON. |
| Enable App Version Update Check | Turns on the mobile update prompt and reveals Google Store URL / Apple Store URL. This one row is read with a string comparison against 'true' rather than parsed as JSON like its neighbours, so a value written any other way through the API reads as off. |
| Select a sales agent label | An entity label that tags the storefront’s sales agent. Not documented on any screen and easy to miss. |
Layout width
Enable Fixed Width is derived from Fixed Width exactly as Web-Chat is derived from its endpoint: the number is the setting, the tick is a display of whether the number is there.
Hide Website Builder Elements
Eleven checkboxes, one HIDE_* extension row each, hiding tiles on the Webstore dashboard.
Read that section before you rely on them — hiding a tile does not close the route behind it.
App Version Tab (Deep Dive)
Two sub-tabs, iOS and Android, each holding a list of released app versions with a version number, a Is Mandatory Update flag and release notes.
The flag is the whole point of the tab: mark a version mandatory and everyone on an older build is stopped at launch with a prompt to the App Store or Play Store. Two things have to be right for that to work, and neither is validated here:
- Enable App Version Update Check must be ticked on the Details tab, and the Google Store URL / Apple Store URL it reveals must be filled — otherwise the prompt has nowhere to send the user.
- The version number must match the string the store reports, character for character. It is compared as
text, not parsed as a semantic version, so
3.5.2and3.5.02are different releases. This is the usual cause of “Update Required” appearing for users who already have the newest build.
Manage Image Tab (Deep Dive)
The website’s own image library: you upload a file, tag it with an Image Type (LOGO, BANNER,
FAVICON…) and give it a Param Code. The listing shows the param code, a thumbnail and the upload date,
and you can filter on either of the first two.
The param code is the load-bearing field, and it is the one that looks optional. Layout widgets and the website’s logo and favicon settings reference an image by its param code, not by its file name or its GUID, so renaming a param code on an image that is already in use silently blanks whatever was showing it. Uploading a replacement under the same param code is how you swap a banner without touching a single layout.
Post images can also be created from, and copied to, the tenant-wide Media Library Applet.
Digital Signature Tab
Generates an RSA or DSA key pair (512, 1024, 2048 or 4096 bits) against this website, shows you the public and private key, and lets you mark the pair ACTIVE or INACTIVE.
What the screen does not say is what the pair is for and where it lives. It is a price-book
signing pair, stored as extension rows on the website record under the param code
PRICEBOOK_KEY_PAIR_HASHING — not, as the tab’s position might suggest, a general credential for the
Customer Portal’s own API traffic. Nothing inside BigLedger verifies anything with it: BigLedger generates
it and hands it back, and the signing and verifying happen in whatever external system you hand the key to.
Two consequences:
- Only an ACTIVE pair is displayed. Set Key Status to INACTIVE and the tab comes back empty on the next load — the rows are still there, the screen simply stops matching them.
- Generating again does not replace the old pair, it adds another. Deactivate the pair you are retiring, or the tab shows whichever active pair it finds first.
Post Registration Config Tab
Four checkboxes and a Team picker that decide what BigLedger creates for a portal user automatically: add the user to the tenant, create a customer record, create a membership and a customer, create a membership without a customer, and assign them to one or more internal Teams.
Everything interesting about this tab is invisible on it.
It is not only post-registration. The same configuration is read and the same steps are run on every sign-in to a storefront, not just on the first one. The backend fetches the config by website code inside the login path and runs the steps before returning the session. Nothing here fires on registration alone.
The tab writes a JSON blob, and Save rewrites the whole blob. The configuration lives in one extension row
(SYS_POST_REGISTRATION_CONFIG) whose JSON the backend reads into a richer object than this screen exposes —
it also honours reward-point currency configuration, referral rewards, catalogue links, role links, a
consolidated AR/AP link, an MLM link and an entity-configuration template. This tab rebuilds the JSON from
its five fields and overwrites the row, so anything set through the API or by an implementation team is
discarded the moment somebody opens this tab and presses Save.
A Team assignment always lands as rank MEMBER. The picker chooses the team; the rank is fixed in code and
is not on the screen.
What the defaults are. A website that has never had this row saved shows all four boxes unticked, but the model the applet builds from defaults Add user to tenant, Create customer and Create membership and customer to on. The screen and the fallback disagree, so treat an untouched tab as “unknown”, not as “off”, and save it deliberately once.
And the order matters. The steps run in a fixed sequence — tenant user, then customer entity, then membership-with-entity, then the entity/login link, then membership-without-entity — so ticking both Create membership and customer and Create membership without customer produces two membership records for the same person, not one.
3rd Party Auth Config Tab
Seven sub-tabs, each holding the credentials for one external service: Google reCAPTCHA (site key, secret key, and per-page toggles for login, registration and forgotten password), Google Login, Facebook Login, Apple Login, Mini-Orange SSO, Google Analytics and Zendesk Live Chat.
Three things the screen does not show:
- Mini-Orange is not a per-website setting, although it sits on a per-website tab. Its API key and customer id are stored once for the whole tenant. Edit it under Website A and you have changed it for Website B.
- Every other provider on this tab writes a website extension row, so those genuinely are per-storefront:
RECAPTCHA_SITE_KEY,RECAPTCHA_SECRET_KEY,RECAPTCHA_IMPLEMENTATION,GOOGLE_LOGIN_CONFIG,FACEBOOK_LOGIN_CONFIG,APPLE_LOGIN_CONFIG,GOOGLE_ANALYTICSandZENDESK_KEY. - A provider button appears only when its credential row is filled. If a storefront’s login page is missing a Google, Facebook or Apple button, the empty credential row is the first thing to check — nothing renders the button until the config is present, and no message tells you it is absent.
Each sub-tab saves on its own. Saving one provider does not disturb another, and does not disturb the Details tab.
Layout Instance Tab
The Layout Instance tab is the control center for your site’s pages. A “Layout Instance” represents a specific page (e.g., Homepage, About Us, Landing Page).
A layout instance opens on four tabs. Main carries its identity — a Code, which becomes part of the page’s URL and is what the Details tab’s Default Layout Routing and Default Authentication Portal selectors point at, plus a name and a description. Nodes is the page structure: a tree of rows, columns and widgets, each node configured on five sub-tabs of its own (Main, Config, Json Params, Input Params, Preview). Json is the same tree as raw JSON. Platform Config decides how the layout renders per platform — the supported values are desktop, iOS, Android, mobile, mobile web, iPhone, PWA, phablet, iPad, tablet and Electron.
Two things worth knowing before you rename anything:
- The Code is a route, not a label. Changing it on a layout that is already set as the website’s default routing or authentication portal leaves those selectors pointing at a page that no longer exists, and the storefront’s home or login page comes up blank. Re-pick them on the Details tab in the same sitting.
- Json Params is the escape hatch for widgets with no form. A widget registered without a parameter definition — the e-invoice widget is the clearest example — still takes its parameters, but only by editing the node’s JSON directly.
How the Visual Website Builder Works
Accessible via the Website Builder button in the header, this drag-and-drop environment allows you to design your pages using a hierarchical node system:
- Rows: Horizontal containers that define the page flow.
- Columns: Vertical dividers inside rows to control content width.
- Widgets: Functional UI components (Product Sliders, Banners, Form Embeds).
Configuration Palette:
- Elements Palette (Left): Drag Rows, Columns, and Widgets onto the canvas.
- Interactive Canvas (Center): Rearrange elements visually.
- Properties Panel (Right): Configure the specific settings for the selected element.
Widget Reference Guide
Below is the complete catalog of all available widgets, organized by category. When configuring a node as a Widget, select the appropriate Widget ID from the dropdown and configure its parameters.
Structure & Header Widgets
| Widget ID | Widget Name | What It Does | Key Configurable Parameters |
|---|---|---|---|
GENERIC_HEADER | Generic Header | Standard website header with logo, search, and cart icon. | Sticky mode, image width, search route, search button color/text, hide cart, menu background/color |
MOBILE_HEADER | Mobile Header | Header optimized for mobile app views. | Cart route, show logo, show menu, enable sidebar, show back button, search bar toggle |
FOOTER | Footer | Website footer with contact info and links. | Mobile mode, header size, mobile footer field, email, Facebook URL, Instagram URL, display logo |
BIO_FOOTER | Bio Footer | Footer with company bio, address, and social links. | Footer line 1/2/3, postal code, city, state, email, phone, social links (FB/IG/TikTok/YT) |
Product Display Widgets
| Widget ID | Widget Name | What It Does | Key Configurable Parameters |
|---|---|---|---|
PRODUCT_SLIDER | Product Slider | Horizontal carousel of products, filterable by category. | Title, category group (label list), category (label hdr), add to cart toggle, favourite toggle |
PRODUCT_SLIDER_V2 | Product Slider V2 | Enhanced product slider with visibility and arrow controls. | All Product Slider params + visible items (desktop/mobile), hide arrows |
PRODUCT_LIST | Product List | Grid/list view of all products. | Product details layout URL |
PRODUCT_DETAILS | Product Details | Full product detail page with images, price, description. | Enable auth guarantee, show socials, show vouchers |
PRODUCT_CATEGORY | Product Category | Display product categories as browsable sections. | Category group filter, label list, product listing layout URL |
CATEGORY_FILTER_PRODUCT_LIST | Category Filter Product List | Product list with a category filter bar on top. | Background/text/active colors, infinite scrolling toggle, column count |
POWER_SEARCH_FILTER | Power Search Filter | Advanced search with sorting and filtering controls. | Sorting functions (Latest/Popular/Top Sales/Price), display attribute icons |
Navigation & Menu Widgets
| Widget ID | Widget Name | What It Does | Key Configurable Parameters |
|---|---|---|---|
VERTICAL_MENU | Vertical Menu | Sidebar-style vertical navigation menu. | Menu list selection |
HORIZONTAL_MENU | Horizontal Menu | Top-bar horizontal navigation menu. | Menu list selection |
TAB_MENU | Tab Menu | Tab-style navigation for sub-sections. | Menu list selection |
MOBILE_TAB_MENU | Mobile Tab Menu | Bottom tab bar for mobile app navigation. | Menu list selection |
E-Commerce Workflow Widgets
| Widget ID | Widget Name | What It Does | Key Configurable Parameters |
|---|---|---|---|
SHOPPING_CART | Shopping Cart | The customer’s shopping cart view. | Checkout route URL |
CHECKOUT_STEP_V2 | Checkout Step (V2) | Multi-step checkout flow widget. | Enable shipping, membership points, cash voucher, payment gateway, style configuration for each step |
ORDER_LISTING | Order Listing | List of customer’s past orders. | Order details layout, tracking website URL, show received button |
MY_INVOICE | My Invoice | List of customer’s invoices. | Invoice detail layout URL |
REQUEST_REFUND | Request Refund | Refund request form. | Reasons array, email recipient for notifications |
User Account & Membership Widgets
| Widget ID | Widget Name | What It Does | Key Configurable Parameters |
|---|---|---|---|
LOGIN_WIDGET | Login Widget | Login and registration page. | Reset password route, sign-up route, privacy/T&C doc links, registration type |
MEMBERSHIP | Membership | Display membership tier cards. | Membership class array, icon color, background color |
MEMBER_POINTS_COUNTER | Membership Points Counter | Display member’s loyalty points balance. | Point color, line color |
Form & Interaction Widgets
| Widget ID | Widget Name | What It Does | Key Configurable Parameters |
|---|---|---|---|
DYNAMIC_FORM_WIDGET | Dynamic Form Widget | Embed a dynamic form/survey on the page. | Dynamic form selection |
TEMPLATE_FORM_WIDGET | Template Form Widget | Embed a template form on the page. | Template form selection, custom field array |
BUTTON_SINGLE | Button Single | A standalone CTA button with full styling. | Text, font, destination URL, link type, styling (colors/borders/radius) |
E-Invoice Widget
| Widget ID | Widget Name | What It Does | Key Configurable Parameters |
|---|---|---|---|
EINVOICE WIDGET | Storefront E-Invoice Request | Lets a shopper — including a guest with no account — look up their own cash bill and request a Malaysian LHDN e-invoice for it, then track, download or cancel it. | None in this applet. The widget is registered with no parameter form, so its four working parameters are set by editing the layout JSON on the node’s Json Params tab. See Storefront E-Invoice Request. |
Product views: what “Customers viewed this item” actually counts
The Product Details widget (and the promotion-bundle widget) can show a line under the price: “12 Customers
viewed this item”, or “No views yet”. The line appears only when the node’s Json Params carry
enableProductViews. It is not on the widget’s parameter form, and it is off until someone adds it. No screen in
this applet or in Doc Item Maintenance shows the figure. The product page is the only place you will see it.
What happens behind the scene. Each time the product page opens with the switch on, the storefront gives the browser a marker that lasts 90 minutes. It then asks BigLedger to count a view. BigLedger stores a view row for the item and writes a new total onto the item record. The total is the sum of the item’s view rows as they stood before this one was added. The page then shows that total.
Where the number comes from, and why it is not customers:
- Every page open counts, not every shopper. The server is meant to count one shopper at most once an hour. That check never finds the shopper’s earlier row, so every open adds a new row. A shopper on GadgetSphere Online who refreshes a laptop page five times adds five views.
- The figure shown is one behind. It is the total before your own view, so the first visitor sees “No views yet” and the second sees 1.
- It is a running total since the feature was switched on. There is no period, no reset and no per-branch or per-channel split. No screen reads it, and the storefront cannot sort products by it: its product sort offers only name, code and price, plus date in the category listing (the Popular button beside them is not wired to anything).
What it is good for, and the job that stays yours. The line is social proof on a product page. It is not demand data. Nothing in BigLedger tells you which products shoppers look at and then do not buy. Whoever decides which products to push makes that comparison outside BigLedger, before planning a promotion. They set the storefront’s own page analytics beside the sales in Sales Report. If a new product already shows views before launch, those are your own team’s test visits. Each one counted.
Menu List Tab
The navigation structures used across the storefront — the top bar, the user drop-down, the sidebar and the footer. A menu has a Menu Title and a Status; each item inside it has a link text, a destination URL, a display order, an optional parent item for sub-menus, and its own Manage Image tab for an icon.
A menu is not attached to anything by creating it. It has to be picked in two places, and forgetting the second is the usual reason a new footer never appears:
- on the Details tab, as the website’s Top, User, Left-side or Bottom menu —
all four live in one extension row keyed
SYS_AKN_WEB_CP_COMMERCE_DEFAULT_MENU_LISTS, so the four selections save together; - or in a layout, by the Generic Header, Vertical Menu, Horizontal Menu, Tab Menu, Mobile Tab Menu or Footer widget, each of which takes a menu list as a parameter.
A menu chosen on the Details tab is the site-wide default; a menu chosen on a widget wins on the page that carries it.
Posts Tab
The website’s content entries — blog articles, news, brand stories, FAQs, announcements. A post carries a Title, a URL Key, a Status, an optional publish and expiry date, an optional Content Category, an optional Layout Instance, a body, and a Manage Image tab for the featured image.
What the form does not show:
- The URL Key is the address, and it is not regenerated from the title. Rename the title and the link stays; change the URL key and every link you have shared, printed or indexed breaks.
- Publish and expiry dates hide a post from the storefront without unpublishing it. A post that has quietly vanished is far more often past its expiry date than set to Inactive — check the date before you check the status.
- Content Category is a label list. The Posts tab, the Content Category tab and the Label List tab all read and write the same two CMS label services, so a category created in one appears in the others.
Views and comments: what the storefront counts, and where you see it
A post’s view count and its comments are written by your storefront, not by this tab, and nothing in this applet shows either. The Posts tab has no views column, and there is no screen here to read, hide or delete a comment. The only place the two figures appear is the storefront’s blog widget, where each post card carries a reader icon with the view count and a speech-bubble icon with the comment count.
- Both are switched on in the layout, not on the post. The storefront widget that displays a post counts views and offers a comment box only when its own parameters say so, and both are off until they do. That widget has no form in this applet, so the switches live in the node’s Json Params (see the Layout Instance Tab). The comment box can take comments from signed-in shoppers only, or from anyone.
- A view is counted at most once an hour per post, however many people read it. Each reader’s browser is given its own marker and the storefront records it, but that record carries no count. The figure comes from a single shared record for the post, which moves by one only when an hour has passed since it last moved. A buying guide on GadgetSphere Online read by 300 shoppers between 10:00 and 11:00 gains one view, not 300. The figure says someone has opened this lately; it is not readership.
- A new post starts at 1 view and 1 comment. Both figures are set to 1 when the post is created. The comment figure is recounted from the real comments each time the post is opened on the storefront, so a post nobody has opened since it went live still shows a comment it does not have.
- A comment is published the moment it is submitted. There is no approval step, and with no screen here that lists comments, nothing in this applet takes one down.
User Agreement Tab
What is the User Agreement Tab?
This is your central repository for legally binding documents — Privacy Policies, Terms & Conditions, Data Protection Agreements — that customers must agree to when registering or making purchases on the portal. Beyond storage, this tab gives you a full audit trail: you can see exactly who agreed to which version of a document, when they agreed, and how (IP address, consent method).
Creating an Agreement Document:
| Field | Purpose | Required | Example |
|---|---|---|---|
| Title | Display name shown to customers during registration/checkout | Yes | “Privacy Policy v2.1 — January 2026” |
| Document Code | Unique internal code used to reference this document in Login Widget configurations | No | “PP-2026-V2” |
| Expiry Date | When this version expires — after this date, customers will be prompted to agree to a newer version | No | 2027-01-01 |
| Status | Must be set to ACTIVE for the document to appear on the portal | Yes | ACTIVE |
| PDF Upload | Drag-and-drop or click to upload the legal document as a PDF file | Yes | privacy-policy-v2.pdf |
An existing agreement opens on two tabs: Main, where you edit the details, replace the PDF or delete the document, and Agreed Users, a searchable grid of everyone who has consented to this exact document.
How the re-consent prompt actually works
The storefront checks consent per document GUID, not per version number and not against the expiry date. When a signed-in shopper has no consent row for the Privacy Agreement or the Terms & Conditions Agreement currently selected on the Details tab, a dialog opens that they cannot dismiss until they agree.
So the workflow that works is: upload the new document, then re-point the Details tab at it. Setting an expiry date on the old document does not, by itself, prompt anybody — the check never looks at the date.
There is a second, optional mechanism for the date: a document with auto-switch enabled becomes the default
once its commencement date passes and while its expiry date has not, and an expired default is switched off.
That is a scheduled job (AGREEMENT_CONSENT_CALIBRATION_PROCESSOR), not something the platform does by
itself: unless someone has added a crontab entry for it on your tenant, nothing switches and nothing
expires.
What the Agreed Users grid can and cannot prove
The grid has eight columns — user name, e-mail, phone, member id, IP address, consent method, creation date and updated date — and three of them are never filled in:
- IP Address and Consent Method are written by nothing. The consent row is created with the document, the login subject and the timestamps, and no code path sets either column. They will be blank on every row.
- Name, e-mail and phone are copied from the membership record, and only when the same sign-up created one. A consent recorded for a portal user who did not get a membership in that run carries a login subject and a date and nothing else you can read.
- What it does prove is the pairing you actually need: this login subject consented to this exact document on this date. Treat the identity columns as a convenience, and the login subject as the record.
Reviews Tab
Two sub-tabs. Review Settings holds review headings for this website: a title, a rating scale picked from Rating Configuration, a default rating, a minimum and a maximum rating, a status and a summary. Review Votes holds ratings recorded against a heading: the heading, a star rating from its scale, feedback and a status. Nothing here sets approval thresholds, a minimum review length or required fields.
No storefront build reads what these two sub-tabs hold. The stars, averages and comments a shopper sees under a product, and the rating form a shopper fills in, come from the item’s own review heading and rating scale, set up on Doc Item Maintenance — see Rating Configuration and the Reviews tab. A heading created here changes nothing a shopper sees.
Label List Tab
Labels are the classification tags that drive the Category Group selectors in the product widgets and the category filters in post listings. A label list has a name, a code and a status, and a Child Label tab for sub-labels beneath it — Apparel → T-Shirts, Jeans, Accessories.
The code is the contract, not the name. Layout widgets reference a label by its code; the name is only what a shopper reads. Renaming is safe, re-coding is not.
Content Category Tab
Content Category is the same thing as a Label List, reached through a second door: both tabs read and write the same two CMS label services, so a category created here appears in the Label List tab and vice versa. The Content Category selector on the Details tab is picking a label list.
Knowing this saves a common confusion — a “missing” content category is usually a label list created on the other tab under a code nobody recognised.
Account Tab
Which customer accounts (entities) are linked to this website. The + button opens a picker over the existing accounts in your ERP — you are linking, never creating — and the listing shows each linked account’s name, contacts, type and its customer / supplier / employee / merchant codes, plus a credit-limit bar that reads “No Credit Limit Information is available.” when the account has no limit. Opening a row gives a read-only view; account details are maintained in the Customer applet, not here. Delete on that view unlinks the account from the website and leaves the account itself alone.
The link that actually gates the storefront — and the half people miss
With Restrict View/Access by Entity on, the backend refuses a sign-in with “Unauthorised Access as website restricts its entity” unless it can walk a chain of two links:
this website → the linked customer account → the person’s portal login
This tab writes the first link only. The second — customer account to portal login — is written when the person registers (the Post Registration Config entity link step) or by linking them on the customer record.
And note what the restriction does not do: it gates the sign-in, not the browsing. An anonymous visitor still reaches the storefront’s public pages. If the catalogue itself must be private, put the product pages behind a layout that requires a session.
Branch Tab
Links branches to this storefront — for pickup points, and for the ECOMSYNC_BY_BRANCH pricing and stock
lookups. Branches themselves are created in the
Organisation applet; this tab only links them, so a branch that
is not in the picker is missing from Organisation, not from here.
The website’s own branch, set on Details at create time, is separate from this list and is the one the pricing model uses. Linking a branch here does not make it the pricing branch.
Region Tab
Regional zones — name, code and status — owned by the website rather than linked from master data. They exist to be referenced by the Delivery Charges by Region shipping fee option and by localisation rules, and they do nothing on their own: a region with no shipping rule pointing at it changes nothing a shopper sees.
Country Tab
What is the Country Tab?
This tab allows you to configure country-specific settings for your storefront. If your portal supports customers from multiple countries, each country can have its own language options, payment methods, support contacts, and financial label configurations.
Country Edit — Tabs:
When you open a country record, you’ll see 5 tabs:
| Sub-Tab | Purpose | What You Can Do |
|---|---|---|
| Main | Set the primary country name and ISO code | Define the country identity for localization rules |
| Language Selection | Assign which languages are enabled for this country’s portal view | Add or remove language options that customers from this country can choose |
| Support | Configure country-specific customer support information | Set up support contact details, helpdesk URLs, or escalation paths for this region |
| Fi Label List Link | Link financial label lists to this country for accounting classification | Connect label lists used for financial categorization in invoices and reporting for this country. Each linked label has its own sub-view with Details and Label Hdrs tabs |
| Settlement Method | Configure which payment methods are available to customers in this country | Choose which settlement methods customers from this country are offered at checkout. The gateway behind each method is set on its payment channel, not here — see E-commerce configuration |
Voucher Management Tab
Links vouchers to this storefront. The voucher itself — its code, its discount logic, its validity and its limits — is defined in the Voucher Management applet; this tab only decides which of them this website’s checkout will accept.
A voucher can be Active and still be rejected at checkout because it was never linked here, and that is the harder of the two failures to spot: the voucher screen looks correct.
Commission Scheme Tab
The same pattern as vouchers. Schemes are defined in the Commission Scheme applet; this tab links one to the website, which is what makes the storefront’s sales count towards it.
Language Tab
The languages a shopper may choose, as records owned by the website: a display name, a locale code such as
ms-MY and a status.
Adding a language here adds it to the selector. It does not translate anything — layouts, posts, menus and item descriptions have to exist in that language too, and a language switched on with no translated content shows the shopper the original strings.
Settlement Method Tab
Links settlement methods — FPX, card acquirer, bank transfer, a payment gateway — to this website’s checkout. The methods themselves are configured in the Cashbook applet, which is also where each one’s GL account lives, so the choice here decides where the money lands in the ledger as well as which button the shopper sees.
Settlement methods can also be linked per country, on the Country tab. A country list is a narrowing of this one, not an addition to it.
Shipping Providers (shipping-provider route — not in the sidebar)
What are Shipping Providers?
This section lets you configure all the delivery options your customers see at checkout. Whether you use a flat fee, weight-based rates, or a real-time API from a logistics partner, each shipping option is set up here as a “provider method.”
Shipping Provider Types:
The provider type is chosen at create time and is read-only afterwards, along with the provider title — so a typo in either means creating the provider again. Three types, and the type decides the shape of the edit view:
| Type | What it computes | Extra tab |
|---|---|---|
| Flat Rate | One fixed Rate, plus an optional Handling Fee and a Min Purchase floor below which the storefront hides the option | — |
| Table Rate | A rate looked up from rules you enter — weight tiers, zones, order-value bands | Table Rate |
| Integration | A rate fetched live from a third-party logistics API | API Details — key, secret, endpoint URL |
All three carry a Duration string (shown to the shopper as the delivery estimate — it is free text, not a date calculation), a Currency, and an Active toggle that is what actually puts the option on the checkout page.
Forms — Dynamic, Template and Submitted
Two builders and one inbox, all three reached from the sidebar.
Dynamic Forms (dynamic-form) is the questionnaire builder: a form with a name, status and website on its
Main Details tab, a Question tab where each question has a name, a type (text, multiple choice,
drop-down, file upload), a required flag and a status, and a Response tab holding what shoppers have
submitted. The Dynamic Form Widget puts it on a page.
Template Forms (template-form) is the simpler one — a reusable form with a name, code, description and a
Manage Images tab — placed by the Template Form Widget, which can also add custom fields per placement.
Submitted Forms (submitted-form) is the shared inbox: every response from both builders, filterable and
exportable.
Three things the screens do not say:
- A form is bound to a website, so a form built while editing one storefront will not appear in the widget selector of another. Duplicating a form across storefronts means rebuilding it.
- Deleting a question does not delete the responses already given to it. Old submissions keep the answer; the Response tab simply stops showing a column for it.
- Forms are not a registration mechanism. They collect answers; they create no customer, no member and no document. If a submitted form has to become a customer, someone reads the inbox.
Activities and Facilities (booking engine)
Manage bookable spaces, the programmes that run in them, the events that fill them and the calendars that schedule them. For a fuller event workflow with expenses, guest management and advanced scheduling, see the Event Management applet.
The four records nest, and the order you create them in is the order the pickers expect:
Facilities (facilities) — the bookable space itself, with tabs for its details, the Activities
offered in it, the Events associated with it, and a Media Library tab that links images and media
from the Media Library applet into the portal listing.
Activities (activity) and Activity Categories (activity-category) — the programmes, classes or
services, with their own images and the events that include them, grouped into categories a shopper can
filter by. Both require a code and a name.
Events (events) — the dated occurrence, with tabs for details, calendars, guests, attachments, linked
events and announcement posts. Title and start date are required; end date and location are required on a
facility event, which is the validator people hit when creating an event from the Facilities tab rather
than from the Events listing.
Calendars (calendars) and Scheduler (schedule) — the admin views. A calendar has members, added by
user e-mail, which is a required field and must match an existing portal or tenant user.
Highlights: which activities a shopper sees on a given day
A highlight puts one activity on one day of the storefront’s highlight strip, a widget you place on a page with the Layout Manager. Shoppers see cards for the selected day and can step through the week that follows. Highlights are managed from the Highlight Manager tile on the storefront dashboard; this applet has no screen for them.
What happens behind the scene. When you create a highlight, you pick an activity, a date range and either every day or chosen weekdays. BigLedger does not keep that as a rule. It saves one highlight for each day the choice covers, each running from the start to the end of its day. A two-week run on Saturdays and Sundays becomes four separate days.
On the storefront the strip loads the selected day and the seven days after it. It shows the day’s highlights in display order, lowest first, and the manager can reorder a day. Clicking a card opens the page the activity’s settings link to. A card whose activity has no page link does nothing.
Things to know before you rely on it:
- Editing changes one day. There is no series to edit. To move a run to other dates or weekdays, delete its days and create it again. Choosing weekdays while editing does not spread it: the strip still shows that highlight on its own day only.
- The activity must be Active. The form offers only active activities. Set an activity to Inactive and every highlight for it leaves the strip at once, and comes back if you reactivate it.
- An inactive highlight stays saved but is not shown. That is the way to pause one day without losing it.
- A day with nothing on it says so. The strip shows No Highlights for and the date. It never falls back to another day’s cards.
- It is a display, not a booking or a count. A highlight holds no time of day, no branch and no capacity, and nothing records who clicked it.
The job that stays with a person. The strip shows what someone chose, and nothing chooses for you. Whoever plans the programme fills the coming week before it starts, one weekly check at a fixed time. Then open the storefront, step through the next seven days, and look for empty days and for activities that have ended but still sit on the strip. Retiring an activity (setting it Inactive) is the one change that clears all of its days in one step.
Spending Limits (spending-limit route)
A rule here says: for members of this class, paying in this currency, an order of this size or more should raise an alarm.
What a rule holds
Name, Code, Status, Currency, Member Class, the audit stamps, and five fields worth explaining:
| Field | What it really does |
|---|---|
| Spending Limit Amount | The threshold a single order must reach to raise an alarm. Not a running total — see below. |
| Spending Limit Period (Days) | Labelled Days on the screen and read as hours by the backend. A rule you enter as 30 gives a 30-hour window, not 30 days. |
| Ban Period (Days) | Same mismatch: labelled Days, applied as hours when the third alert fires. |
| Spending Limit Amount New Member | Stored and filterable in the listing, and that is all. No behaviour keys off it: the alert logic only ever compares against Spending Limit Amount. |
| Phone Number | Stored and never read. All three alert levels send e-mail; SMS and messaging alerts do not exist. Only the Email field is used, as a comma-separated list. |
What happens, step by step
When an internal sales order is posted FINAL, the spending-limit alert job runs:
- It fetches every spending-limit rule matching the document’s currency. A rule in MYR is invisible to a USD order.
- It finds the buyer’s active membership and keeps the rule whose member class matches. No active membership, no alert — this is the single commonest reason a rule appears to do nothing.
- Where more than one rule matches that member class, it keeps the one with the longest period. There is no priority field and no indication on the screen that the others were discarded.
- It compares this one order’s amount against Spending Limit Amount, and checks the order date falls inside the window measured from the member’s last recorded transaction.
- If both are true it raises the alert level by one and e-mails the addresses in the rule’s Email field, with a subject of ALERT FOR SPENDING LIMIT EXCEEDED. At level 3 it also writes a “banned member” extension on the customer record.
Clearing an alert
A second job, SPEND_ALERT_RESET_PROCESSOR, exists to clear alert levels and unblock the customer once
the ban window has passed. It is a scheduled job: it runs only where an administrator has added a crontab
entry for it, and nothing adds that entry for you. Without it an alert level never falls on its own — plan to
clear it by hand, or schedule the job before you rely on the ban period at all.
Before you configure this
Know where enforcement actually lives before you build rules here. The figures a limit is checked against are the per-customer spending-limit lines on the Customer record, and a background step recalculates those on every finalised sales document. This screen works as described above; the half that lifts a ban again does not run at all unless somebody schedules it — see What actually happens later, and what never does.
Ratings and Reviews
Three screens carry these names, and none of them is what a shopper meets on a product page:
- Rating Configuration (
rating, in the sidebar) — rating scales for the website’s review headings: a title, a sort order, an Is Active tick and two to five labelled values running from poor to excellent. A scale is edited and deleted here; the Reviews tab picks one for each heading. - Website Edit → Reviews tab — the website’s review headings and the votes recorded against them.
- Review (
review, not in the sidebar) — unfinished. Its listing shows a fixed set of sample reviews built into the screen, not yours, and its Create button saves nothing.
The product ratings on the storefront come from Doc Item Maintenance, which has its own Rating Configuration screen and a Reviews tab on every item: see Rating Configuration and the Reviews tab. If you are setting up product ratings, that is the page you want.
Users (users route — not in the sidebar)
A read-only listing of the registered Customer Portal users, with profile, registration date, e-mail and status on a Details tab. The menu entry is commented out of the sidebar in the current build, so reach it by opening the route.
It is a view, not an administration screen: the records themselves are managed as tenant users and as customer entities, and the link between a portal login and a customer account — the one the Account tab depends on — is not created here.
Blocked Customers (blocked-customers route)
Blacklist management — block abusive, fraudulent, or defaulting users from accessing the Customer Portal entirely.
Topics (newsletter-topic route)
What are Newsletter Topics?
Newsletter Topics let you group your Customer Portal audience by interest. You define topics (e.g., “Weekly Deals”, “New Arrivals”, “Events”) and customers choose which ones to subscribe to. What we have read of topics is app push notifications — a topic subscription is a member’s registered app device subscribed to the topic; whether topics also drive e-mail anywhere was not established, so do not treat a topic as a mailing list until you have seen it send one.
A topic has four tabs: Details (its name, description and status), Manage Image for the header artwork, Subscribers — who has opted in, with a sub-view per subscriber — and Member Label Link.
That last tab is the one worth knowing about. It links membership labels to the topic, and a background run then subscribes the labelled members’ registered app devices to it for push notifications, without anyone enrolling them: label your VIP members, link the label to Exclusive Deals, and they receive that topic’s pushes. It maintains the segment in one direction only. A member with no registered app device is not subscribed, and removing a label does not take anyone off the topic — by design the subscribing run never unsubscribes, because that would mean a large number of requests to the push service. Removal is a separate unassignment run; to correct a wrong label link, run that first, then subscribe again.
Two cautions:
- A topic is not a send. Subscribing people to a topic does not mail them anything; the topic is the audience, and the Notification screen or your campaign tooling is what sends.
- The Details tab’s Default Topic setting pre-selects one topic for new portal sign-ups. If nobody has ever been subscribed to anything, check that first.
Notifications (notification route)
What is the Notification section?
Send push notifications directly to Customer Portal mobile app users. Each notification can include a title, detailed content, images, and can be scheduled for future delivery — ideal for flash sale announcements, order status updates, or event reminders.
Notification Edit — Tabs:
| Tab | Purpose | What You Can Do |
|---|---|---|
| Details | Notification title, body content, and targeting rules | Write the notification message and choose which customer segments receive it |
| Scheduled | Set date/time for scheduled delivery | Schedule the notification to be sent at a specific future time (e.g., “Send ‘Flash Sale’ notification at 9:00 AM Monday”) |
Each notification can have Posts (sub-items) with their own tabs:
| Tab | Purpose |
|---|---|
| Main | Post title, content, and details |
| Manage Image | Upload images for the notification post |
Configuration
Before you can use it
| Prerequisite | Where | Why |
|---|---|---|
| Branch (and merchant entity) | Organisation | Branch is required on Website create; Merchant on the Details tab. |
| Items with prices in a pricing scheme or price book | Doc Item Maintenance, Pricebook | The website’s Pricing model decides which price the storefront shows. Only PRICING_SCHEME and ECOMSYNC_BY_BRANCH resolve — see Pricing. An item without a price in the chosen scheme shows without a price or not at all. |
| Membership class | Membership Admin | Membership Class is required on Website create; Spending Limit rules are per member class. |
| Shipping price book or a delivery-charge item | Shipping Pricebook, Doc Item Maintenance | Needed once Enable Shipping Fee Process is on, depending on the Shipping Fee Option. |
| Settlement methods | Cashbook | Linked per website (Settlement Method tab) and per country. |
| Sales order printable format | Sales Order applet’s Printable Format Settings | Sales Order Printable Format on the Details tab. |
| Third-party credentials | Google reCAPTCHA / Login / Analytics, Facebook, Apple, Mini-Orange, Zendesk consoles | Entered on the 3rd Party Auth Config tab. |
| Legal documents as PDF | — | Uploaded on the User Agreement tab and selected as Privacy Agreement / Terms & Conditions Agreement. |
Typical order for a new storefront: create the Website (title, branch, pricing, membership class) → Details tab (menus, default layout routing, authentication portal, content category, printable format) → Layout Instance (build pages in the Website Builder) → App Version (mobile) → set Status to Active.
Applet settings
Settings → Field Settings and Settings → Default Selection open the shared configuration screens that every applet gets. CP Commerce Admin reads neither. Nothing you set on either screen changes what this applet does.
On the screen and doing nothing
Named rather than quietly left out, so nobody spends an afternoon on one of them:
| What you see | What reads it |
|---|---|
| Settings → Field Settings toggles | Nothing in this applet. |
Settings → Default Selection — DEFAULT_BRANCH, DEFAULT_LOCATION, DEFAULT_TIMEZONE | Nothing in this applet. In particular the time zone is not applied to listings or to scheduled notifications: every date you see and every date range you search is in the browser’s local time. |
Pricing → ENTITY_PRICING | Nothing. The storefront resolves the other two values and errors on this one. |
| Spending Limit → Spending Limit Amount New Member | Nothing. Stored and searchable; the alert logic only reads Spending Limit Amount. |
| Spending Limit → Phone Number | Nothing. All three alert levels send e-mail. |
| User Agreement → Agreed Users → IP Address, Consent Method | Nothing writes them, so they are blank on every row. |
All real behaviour is configured per website, on the Website edit tabs — which is why this applet has no meaningful applet-level settings to document.
Document behaviour settings
Not applicable — CP Commerce Admin is not a document applet. Order posting is governed by the sales documents the checkout creates.
Feature visibility / permissions
- Settings → Feature Visibility hides sidebar menus per team; Personalization → Sidebar hides them per user.
- Settings → Permission Set / User / Team / Role Permission assign server-side permissions on the CMS entities (websites, forms, notifications, events) with targets.
- Client-side permissions: none exist for this applet. There is no per-user field or button gating inside the applet.
- Storefront-side access is configured per website: Restrict View/Access by Entity (with the Account tab), Restrict Notification by Member and Enable Public Cart.
- The Hide Website Builder Elements checkboxes are not permissions. They remove tiles from the Webstore dashboard and leave every route open — see Hiding tiles.
Fields
The create and edit forms are documented tab by tab above under Screens and menus: the Website Details tab (the largest form), App Version, Post Registration Config, 3rd Party Auth Config, Layout Instance, Menu List, User Agreement, Account, Country, the Shipping Provider types, Dynamic Forms and Spending Limits. Required fields, from the form validators: Website Title, Branch, Membership Class, Status; Dynamic Form name, status, website (create) and code (edit); Question name, type, required, status; Activity and Activity Category code, name; Event title, start date; Calendar name; Calendar member user email; Facility event end date, location.
Lifecycle and effects
Nothing in this applet is a document, so there is no posting proof to give: no server document type, no signums, no journal, no stock movement, no e-Invoice. Every screen here writes configuration — website rows, CMS menus and posts, forms, notifications, facilities, spending-limit rules, blocked customers — and the storefront reads that configuration when a shopper next asks for a page.
There is no publish step, and that is the thing to know before you edit a live storefront. A website, a menu, a layout or a post is saved and it is live; the only switch between “visible” and “not visible” is the record’s own Status (and, for a post, its publish and expiry dates). Work on a draft website and switch it Active when you are ready, rather than editing the one customers are looking at.
What actually happens later, and what never does
Three of this applet’s screens configure things that only take effect when a background job runs, and the jobs are not equal. Some run the moment a document is finalised; some run only if somebody has scheduled them in the Scheduler applet on your tenant; and some are never triggered by anything today.
| What you configured | Does it run? | What that means for you |
|---|---|---|
| Spending Limit rules | Yes — on every finalised sales document | The buyer’s spending-limit usage is recalculated immediately. This half works, and it is why the per-customer spending-limit lines on the customer record are the cumulative figure |
| Membership points from portal orders | Yes — on every finalised sales document | Points move as the order finalises, not on a schedule |
| Spending-limit alert e-mails | No — nothing triggers it | Configure the alert levels if you like; no e-mail is sent |
| Submitted Forms follow-up | No — nothing triggers it | The form submission is stored and appears in the Submitted Forms inbox; nothing downstream is triggered |
| Lifting a spending-limit ban | Only if you schedule it — SPEND_ALERT_RESET_PROCESSOR in the Scheduler applet | A ban does not lift by itself. See the caution below before you try to schedule it |
| Retiring an expired agreement and clearing consents | Only if you schedule it — AGREEMENT_CONSENT_CALIBRATION_PROCESSOR in the Scheduler applet | Default agreements are not rotated automatically today. Its keep all consents property is what stops it deleting consent history when somebody does schedule it |
The two jobs that nothing triggers are not something you can fix from this applet, and neither produces an error — they simply never run, which is why the behaviour they would provide has never been seen.
What this applet will not do
- It does not create, price or post an order. The storefront’s checkout does that through Shopping Cart, and the resulting sales document is where stock and the ledger move.
- It does not own product data. Items, categories, images and attributes come from the item master; this applet only chooses which pricing model the storefront resolves them through.
- It keeps no audit of its own beyond the Audit Trail screen, and that screen logs changes made through this applet — not changes made to the same CMS records through Content Management System or the API.
- It has no undo. There is no VOID, no version history and no draft-versus-published copy of a website; a saved change replaces the previous value.
Related applets
- Shopping Cart and Shopping Cart Customer Access — the checkout that the storefront drives.
- Doc Item Maintenance, PDG — the item master behind the storefront’s products, and the generated product descriptions.
- Content Management System — the flat editors over the same CMS tables this applet edits per website.
- Media Library Applet — the drives and files the storefront’s galleries, play lists, PDF menu items, post images and facility media read.
- Membership Admin — membership classes, points and member labels used by Post Registration Config, Spending Limit and Topics.
- Voucher Management, Commission Scheme — linked on their website tabs.
- Events Management — the fuller event workflow.
- Customer, Organisation, Doc Item Maintenance, Pricebook, Shipping Pricebook, Cashbook — master data the website references.
Troubleshooting
| Symptom | Cause | Fix |
|---|---|---|
| Website created but customers cannot see it | Status not Active, no Default Layout Routing, or branch / merchant not linked. | Set the three on the Details tab. |
| Need to take a storefront offline | — | Set the website Status to Inactive; the portal stops serving it. |
| An item appears on the storefront without a price (or with the wrong one) | The website’s Pricing model points at a scheme or price book in which the item has no price, or the second pricing scheme wins. | Check Pricing, Pricing Scheme / Pricing Scheme 2 / Price Book on the Details tab against the item’s prices; for ECOMSYNC_BY_BRANCH check the branch price book. |
| Product listings show “Something went wrong. Please contact the admin to set up source pricing scheme.” | Pricing is set to ENTITY_PRICING, which no storefront code path resolves. | Change Pricing to PRICING_SCHEME or ECOMSYNC_BY_BRANCH and set the matching scheme or price book. |
| A linked account still cannot sign in to a restricted storefront | The Account tab writes only the website-to-account link. The account-to-login link is missing, or one of the three records is not ACTIVE. | Link the portal login to the customer account (Post Registration Config, or the customer record); check the website, the account link and the login link are all ACTIVE. |
| Post-registration behaviour changed after someone opened the config tab | Saving the Post Registration Config tab rebuilds the whole JSON from its five fields, discarding reward-point, referral, catalogue, role, MLM and consolidated AR/AP settings written through the API. | Re-apply them through the API. Treat that tab as read-only on any portal configured beyond its five checkboxes. |
| Mini-Orange credentials changed on a storefront nobody edited | Mini-Orange is stored once per tenant, not per website, although its tab is per website. | Expect one set of credentials for the whole tenant. |
| The Digital Signature tab is empty although a key was generated | Only an ACTIVE pair is displayed; the pair was set INACTIVE, or a newer pair is being matched. | Set the pair you want back to ACTIVE, and deactivate the ones you have retired. |
| Agreed Users shows blank IP Address and Consent Method | Nothing writes either column. | Use the login subject and the date as the record; neither column will ever populate. |
| Consent records disappeared after a policy expired | The agreement calibration job deletes consent history for a retired default document unless it is started with its keep all consents property. | Check the job’s properties before scheduling it; restore from backup if it has already run. |
| A spending limit rule never fires | The buyer has no ACTIVE membership, the rule’s currency does not match the document, or the order is below Spending Limit Amount on its own — the check is per order, not cumulative. | Confirm the membership and currency. For a cumulative cap, use the per-customer spending-limit lines on the customer record instead. |
| A spending limit window behaves far shorter than expected | Spending Limit Period (Days) and Ban Period (Days) are labelled days and applied as hours. | Enter the number of hours you want, and expect the label to disagree. |
| A vanished post is not where you left it | Its publish or expiry date has passed, which hides it without changing its status. | Check the dates before the status. |
| Mobile app shows “Update Required” although users have the latest version | Version Number on App Version does not match the store version string exactly, or the update-check pop-up misfired in older builds (fixed 2025). | Enter the exact semantic version; update the app. |
| Tapping the e-mail address or mobile number on the storefront profile opens BigLedger’s own sign-in site, or a page that does not load | The website has no sign-in address entry, the entry was saved with https:// in front, or a later entry was edited instead of the first. | Ask BigLedger to check the website’s sign-in address; give the bare domain. See Where a shopper is sent to change their e-mail or mobile number. |
| Customers cannot sign in with Google / Facebook / Apple | Wrong or expired client ID / secret on 3rd Party Auth Config, or a redirect URI that does not match the portal domain. | Re-enter the credentials; check the provider console. |
| Sidebar items missing that colleagues can see | Feature Visibility (team) or Personalization → Sidebar (user). | Adjust either. |
| Review, Shipping Provider or Users not in the sidebar | These menu entries are commented out in the current build. | Open the route directly (…/review, …/shipping-provider, …/users). Review opens an unfinished screen that saves nothing — see Ratings and Reviews. |
| Account tab shows the wrong rows or does not page | Pagination bug fixed July 2026 (Account tab also moved next to Details). | Update the applet. |
| Listing search returns NO MATCHING RECORD FOUND for a name typed in capitals | Case-sensitive search in older builds (fixed 2025). | Update the applet. |
| A menu item’s parent menu is not saved | Fixed 2025 (parent menu and menu level now shown and saved). | Update the applet. |
| Deep links from the app open the wrong page | Fixed September 2025. | Update the app and applet. |
| Email confirmation on the portal fails silently (wrong TAC) | Older portal builds did not surface the error; a toaster message was added in September 2026. | Update the portal app. |
| Shipping options do not appear at checkout | Enable Shipping Fee Process off, no Shipping Fee Option, or the shipping provider is not Active. | Tick the checkbox, choose the option and its price book / item, set the provider Active. |
| A ban never lifts | SPEND_ALERT_RESET_PROCESSOR is a scheduled job, and nothing schedules it for you. | Schedule it, or clear the alert by hand. |
| Highlight Manager or User Permission Manager will not hide | This applet has no checkbox for those two tiles. | Write HIDE_HIGHLIGHT_ACTIVITY_MANAGER / HIDE_USER_PERMISSION_MANAGER through the API — and remember hiding is not a permission. |
Related documentation
- E-Commerce module
- Push Notification Configuration — Firebase setup for the mobile app
- Storefront E-Invoice Request — the e-invoice widget a Customer Portal page can carry, what a shopper can do with it, and the one hostname setting it depends on
- Website Builder — User Manager — admin users and permissions for the webstore dashboard