My E-Invoice Admin Applet
Purpose and Overview
Managing e-invoices shouldn’t be a compliance nightmare—it should be a streamlined process that ensures regulatory adherence while maintaining business efficiency. The My E-Invoice Admin Applet transforms e-invoicing from a complex, error-prone task into an efficient, automated system that saves time for finance teams and ensures LHDN compliance.
Who Benefits from This Applet?
Accounts Receivable (B2B):
- Issue individual e-invoices to business customers
- Real-time validation tracking
- Automated compliance checks
- Quick error resolution
Counter Sales (B2C):
- Manage walk-in customer transactions
- Monthly consolidated submissions
- Upgrade to individual invoices within 72 hours
- Simplified batch processing
Finance Managers:
- Oversee entire e-invoice workflow
- Monitor key compliance metrics
- Dashboard analytics and reporting
- Ensure regulatory adherence
Procurement Teams:
- Create self-billed e-invoices
- Handle supplier non-compliance
- Automated validation workflows
- Seamless integration with purchasing
Auditors & Compliance Officers:
- Complete traceability and audit trails
- Export capabilities for regulatory reviews
- QR code verification
- Historical data access
What Problems Does This Solve?
The Manual E-Invoice Problem:
Traditional invoicing processes struggle with LHDN compliance requirements. Common issues include:
- Manual data entry errors causing rejections
- Missing mandatory fields discovered too late
- Delayed submissions and penalties
- Difficult tracking of validation status
- No centralized compliance monitoring
The My E-Invoice Admin Applet Solution:
- Automated validation - Pre-submission checks catch errors early
- Queue-based processing - Intelligent routing and batch handling
- Real-time monitoring - Track every submission from creation to validation
- Complete audit trail - Full history with QR codes and LHDN references
- Role-based workflows - Customized processes for different user types
- Integration ready - Connects with sales, purchasing, and accounting modules
Key Features Overview
Key Concepts
Understanding the E-Invoice Framework
Every e-invoice must address three fundamental compliance aspects. The My E-Invoice Admin Applet provides structured handling:
| Aspect | Component | Practical Example |
|---|---|---|
| What is being invoiced? | Document Type & Items | Sales Invoice, Credit Note, Purchase Invoice |
| Who is involved? | Buyer/Supplier Details | Customer TIN, Supplier BRN, Contact Info |
| How is it validated? | Submission Workflow | Queue processing, LHDN validation, QR generation |
E-Invoice Processing Hierarchy
Think of the e-invoice process as a structured validation flow:
Source Document (Sales/Purchase Invoice)
│
├── Master Data Validation ──→ Customer/Supplier/Item details
│   │
│   └── Mandatory Fields Check ──→ TIN, BRN, Address, Tax codes
│
├── Posting Queue ──→ Pre-submission validation
│   │
│   ├── PROCESSED ──→ Ready for LHDN submission
│   └── UNPROCESSED ──→ Errors requiring correction
│
├── Batch Pool (for B2C) ──→ Consolidation staging
│   │
│   ├── Individual Pool ──→ Named customer invoices
│   └── Single-General Pool ──→ Anonymous retail transactions
│
├── LHDN Submission ──→ MyInvois system transmission
│   │
│   ├── Document Accepted ──→ Initial receipt
│   └── Document is Valid ──→ Full approval with QR code
│
└── Internal Submission History ──→ Permanent archive
    │
    └── Audit Trail ──→ Complete compliance records
Flow Through the Hierarchy:
- Source Document: Create invoice in Sales/Purchase applet
- Master Data: Validate all mandatory LHDN fields
- Posting Queue: Automatic validation and error detection
- Batch Pool: Consolidation for B2C transactions (optional)
- LHDN Submission: Transmission to MyInvois system
- Validation: Receive QR code and IRBM reference
- Archive: Permanent storage with audit trail
This structure enables:
- Early error detection before LHDN submission
- Flexible processing for different transaction types
- Clear accountability at each stage
- Complete traceability for audits
Core Features in Detail
1. Master Data Configuration
Why Master Data Matters
E-invoice validation failures are almost always caused by incomplete or incorrect master data. LHDN requires specific information for every transaction, and missing even one field will cause rejection.
The Business Case:
Incomplete master data results in:
- Immediate LHDN rejection
- Processing delays and resubmissions
- Compliance penalties
- Customer dissatisfaction
Proper master data setup reduces rejection rates by 95% and ensures first-time submission success.
Setting Up Master Data Step-by-Step
Organization Profile Configuration
Navigate to Organization Applet and ensure these fields are complete:
| Field | Purpose | Example |
|---|---|---|
| TIN | Tax Identification Number | C1234567890 |
| BRN | Business Registration Number | 202001234567 |
| MSIC | Business activity classification | 46510 (Wholesale of computers) |
| Company Address | Full registered address | Complete with City, State, Postcode |
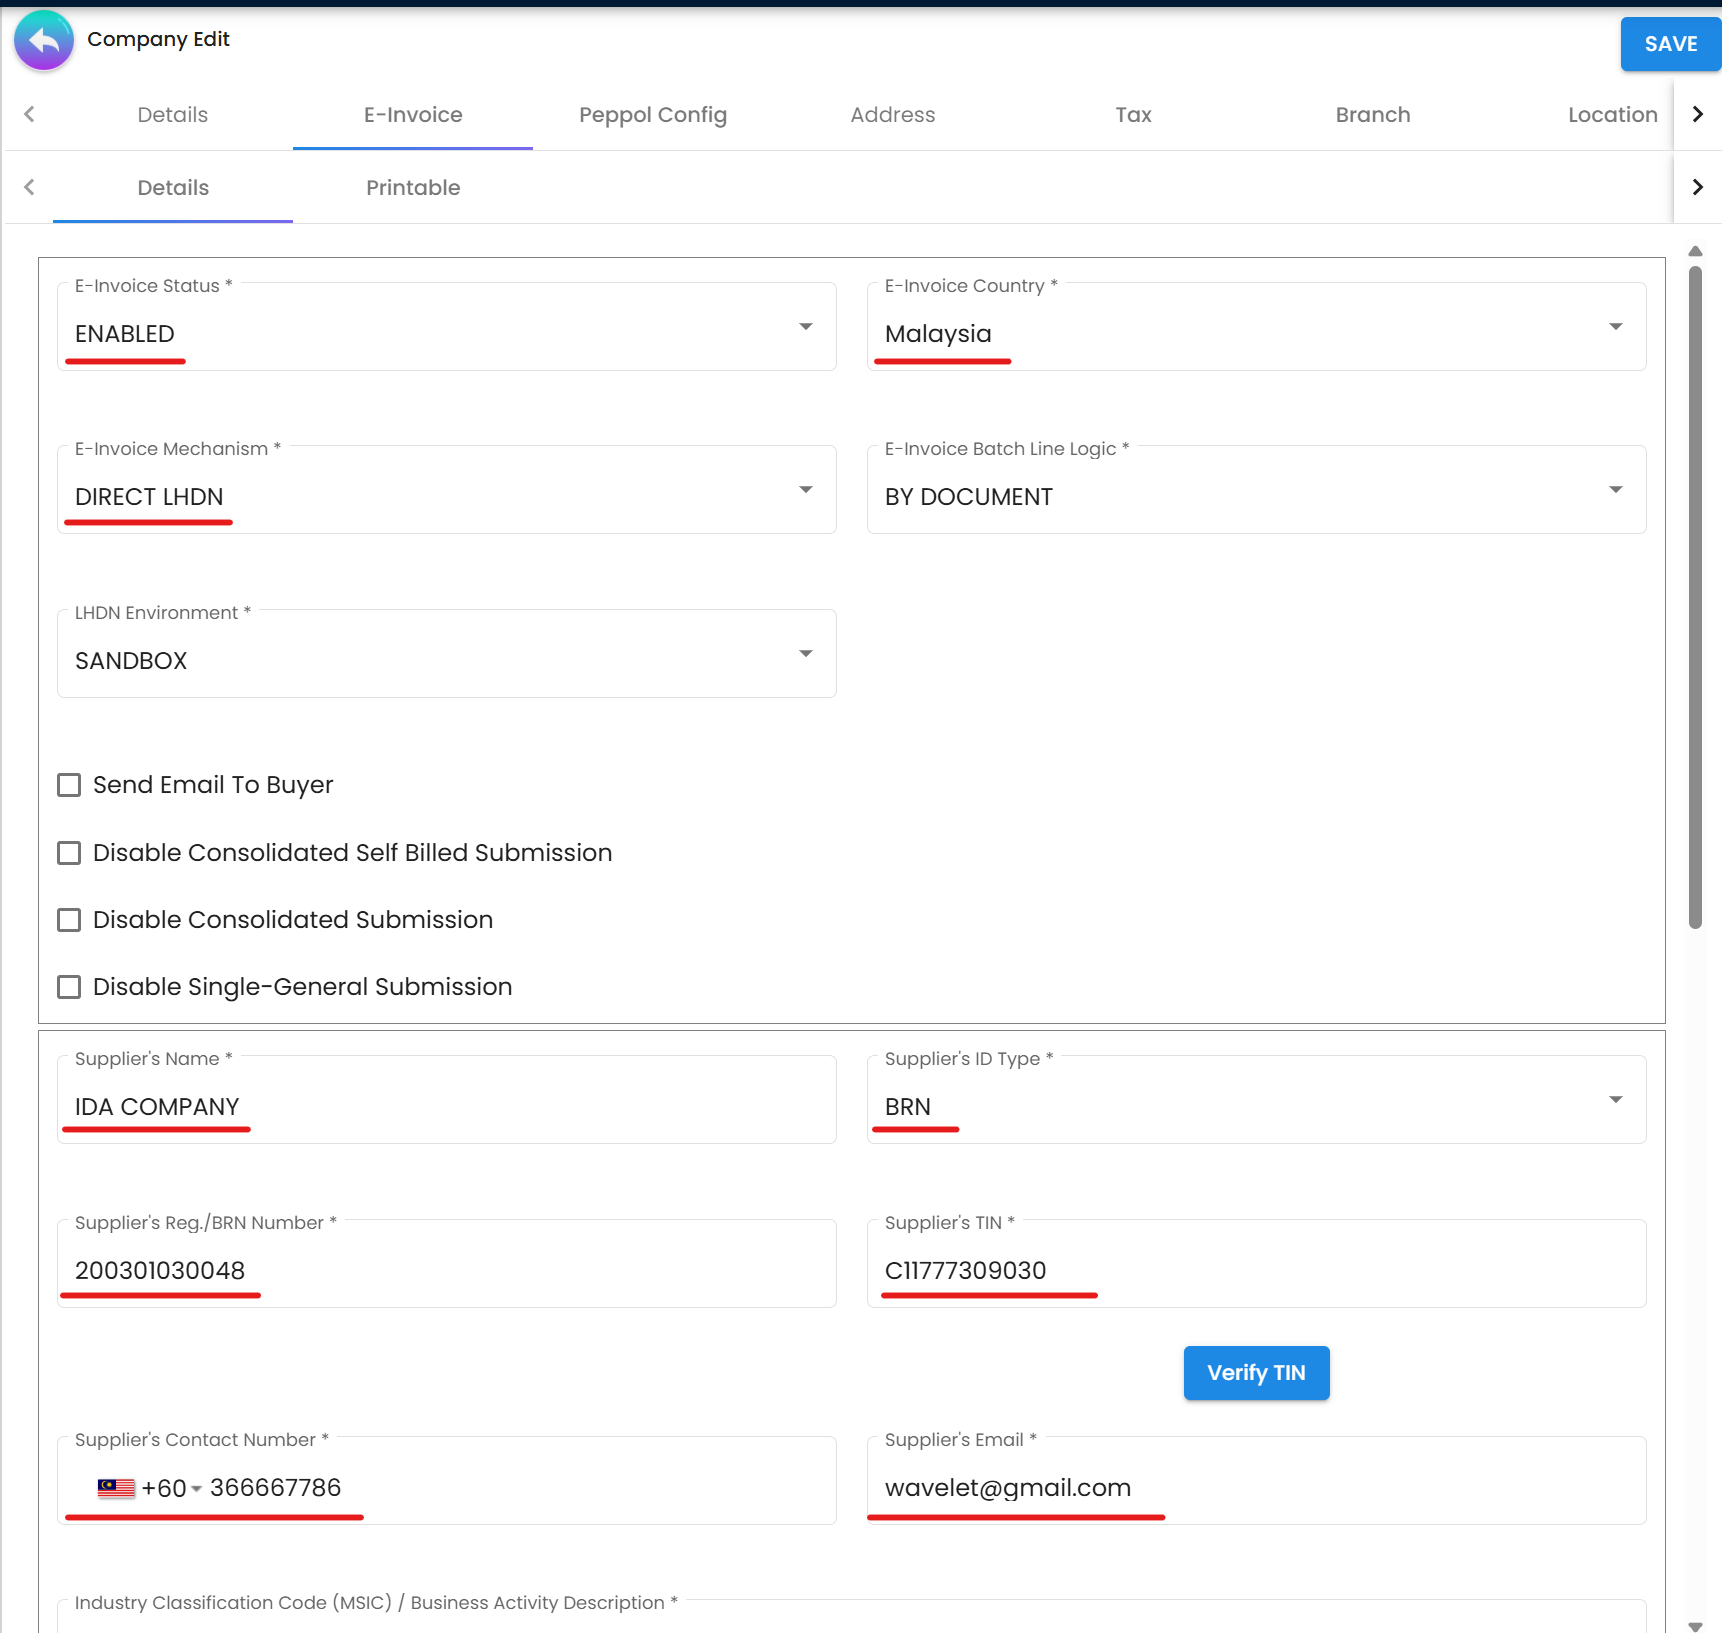 Figure 1: Organization Applet - Essential company details for e-invoicing
Customer Maintenance (For B2B Sales)
Navigate to Customer Maintenance Applet and configure:
| Field | Purpose | Example |
|---|---|---|
| ID Type | Identification type | BRN, NRIC, Passport, Army ID |
| Registration/ID Number | Official ID number | 202001234567 (for BRN) |
| TIN | Customer’s tax number | C9876543210 |
| Email Address | For e-invoice notifications | accounts@customer.com |
| Complete Address | Including City, State, Postcode | Full registered address |
| MSIC Code | Customer’s business activity | 47110 (Retail in non-specialized stores) |
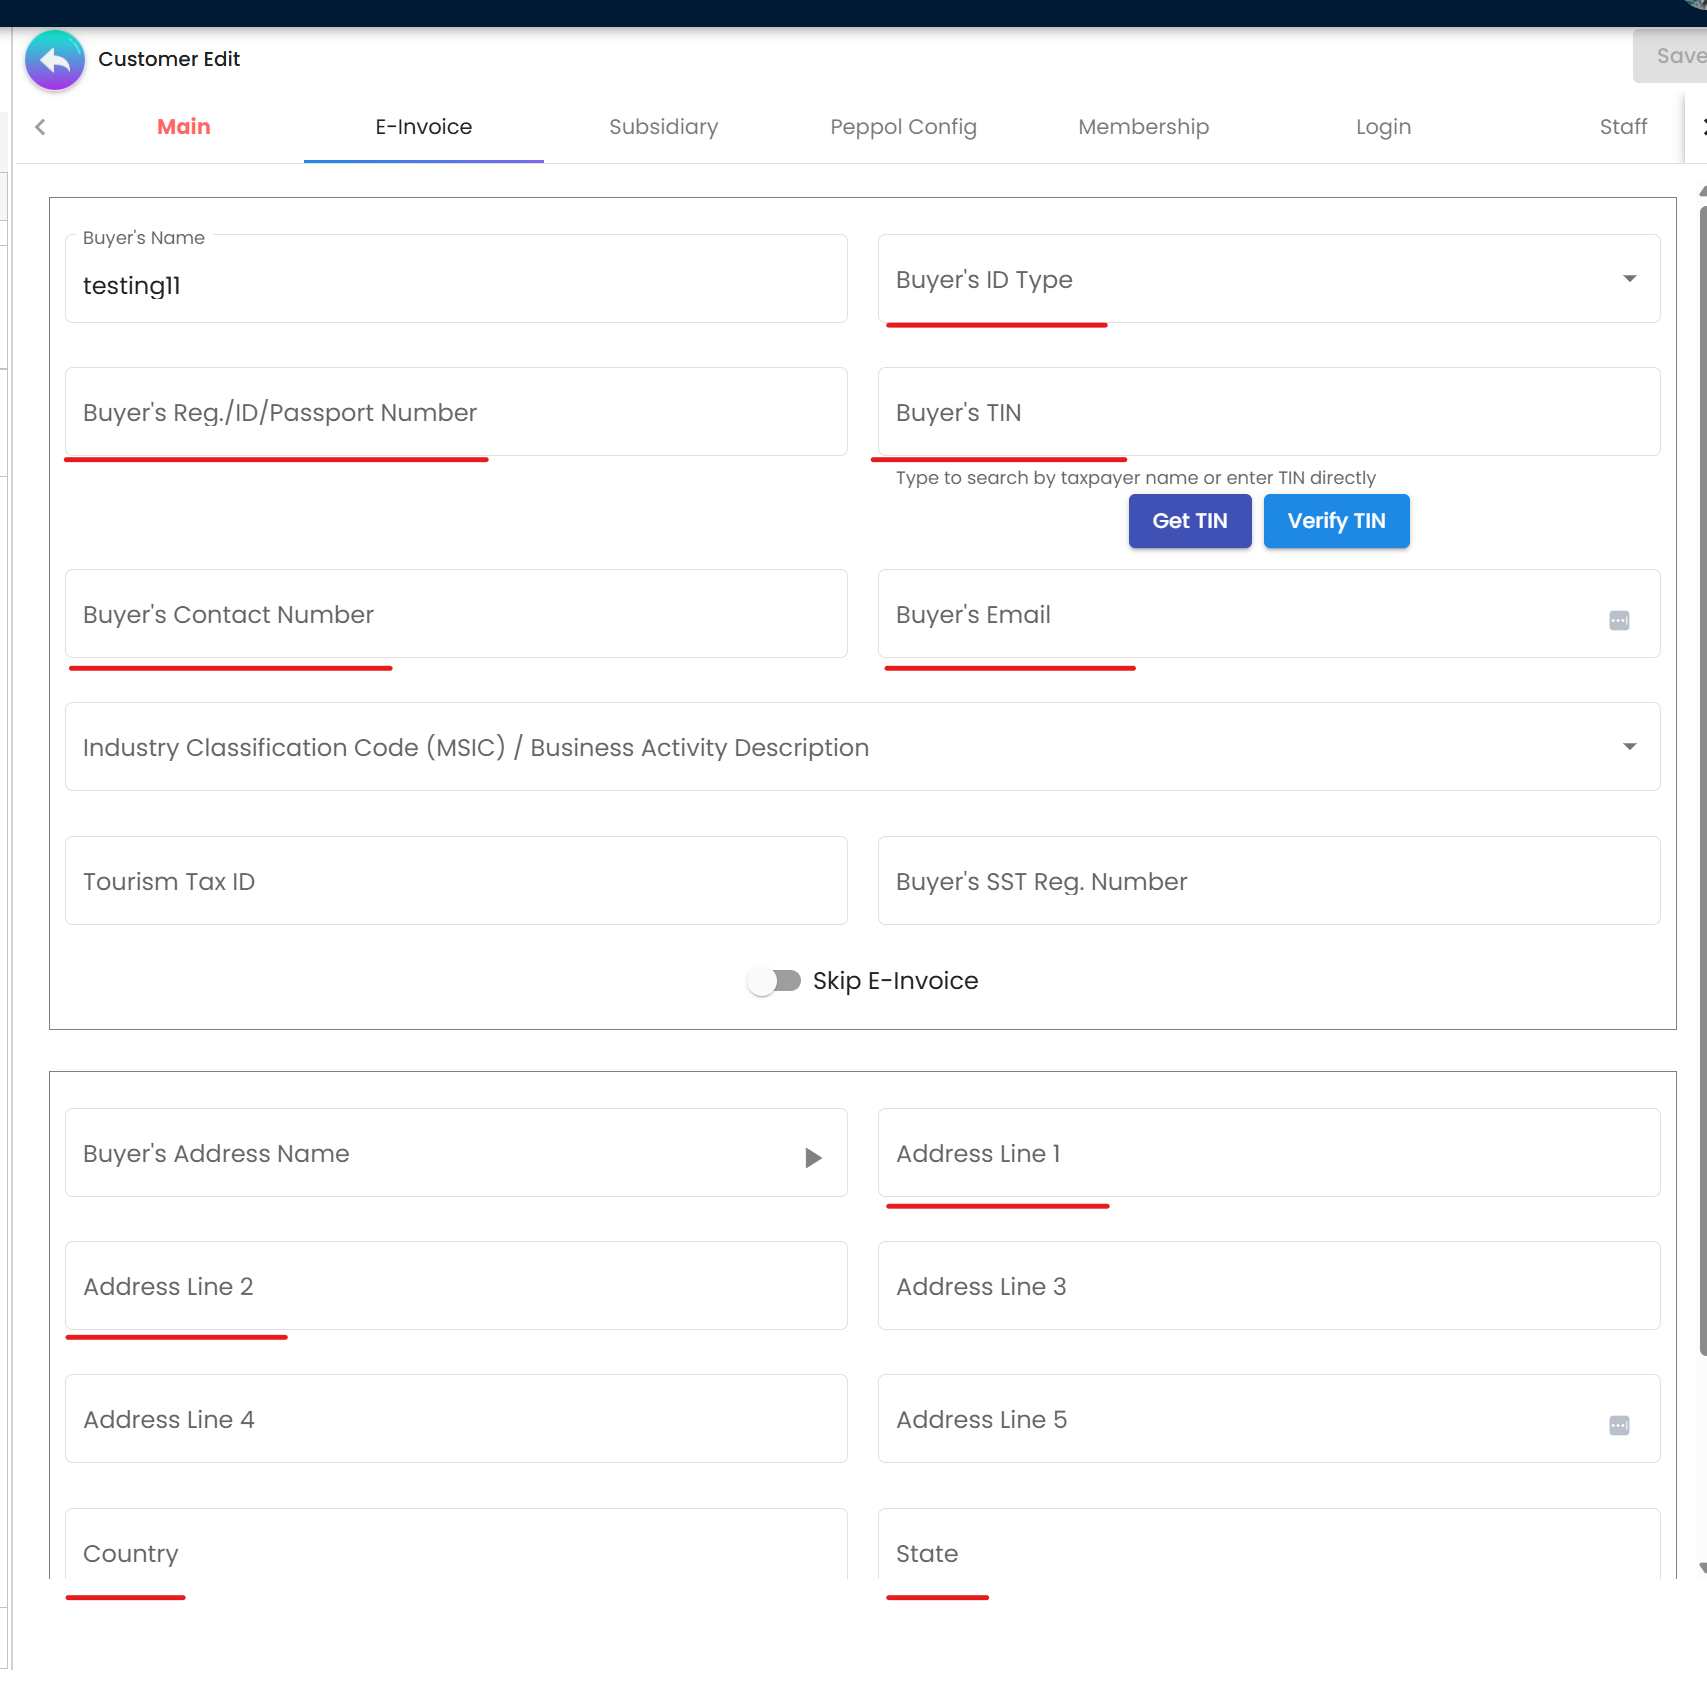 Figure 2: Customer Maintenance - Mandatory fields for B2B e-invoices
Supplier Maintenance (For Self-Billed Purchases)
For suppliers who don’t issue e-invoices, configure in Supplier Maintenance Applet:
| Field | Purpose | Example |
|---|---|---|
| E-invoice Self-Billed | Enable self-billing flag | TRUE |
| ID Type | Supplier identification type | BRN, NRIC, Passport |
| Registration/ID Number | Official ID number | 201901234567 |
| TIN | Supplier’s tax number | C5555555555 |
| Email & Contact | Communication details | supplier@company.com |
| Complete Address | Full address with postcode | Including City, State |
| MSIC Code | Supplier’s business activity | 46900 (Non-specialized wholesale) |
Document Item Maintenance
Navigate to Doc Item Maintenance Applet → E-Invoice Tab:
| Field | Purpose | Example |
|---|---|---|
| CLASSIFICATION_CODE | Product/service classification | 001 (Live animals) |
| EINVOICE_TAXABLE_TYPE_CODE | Tax treatment | 01 (Taxable), 02 (Zero-rated) |
| EINVOICE_UOM | Unit of measure | PCS, KG, UNIT, SET |
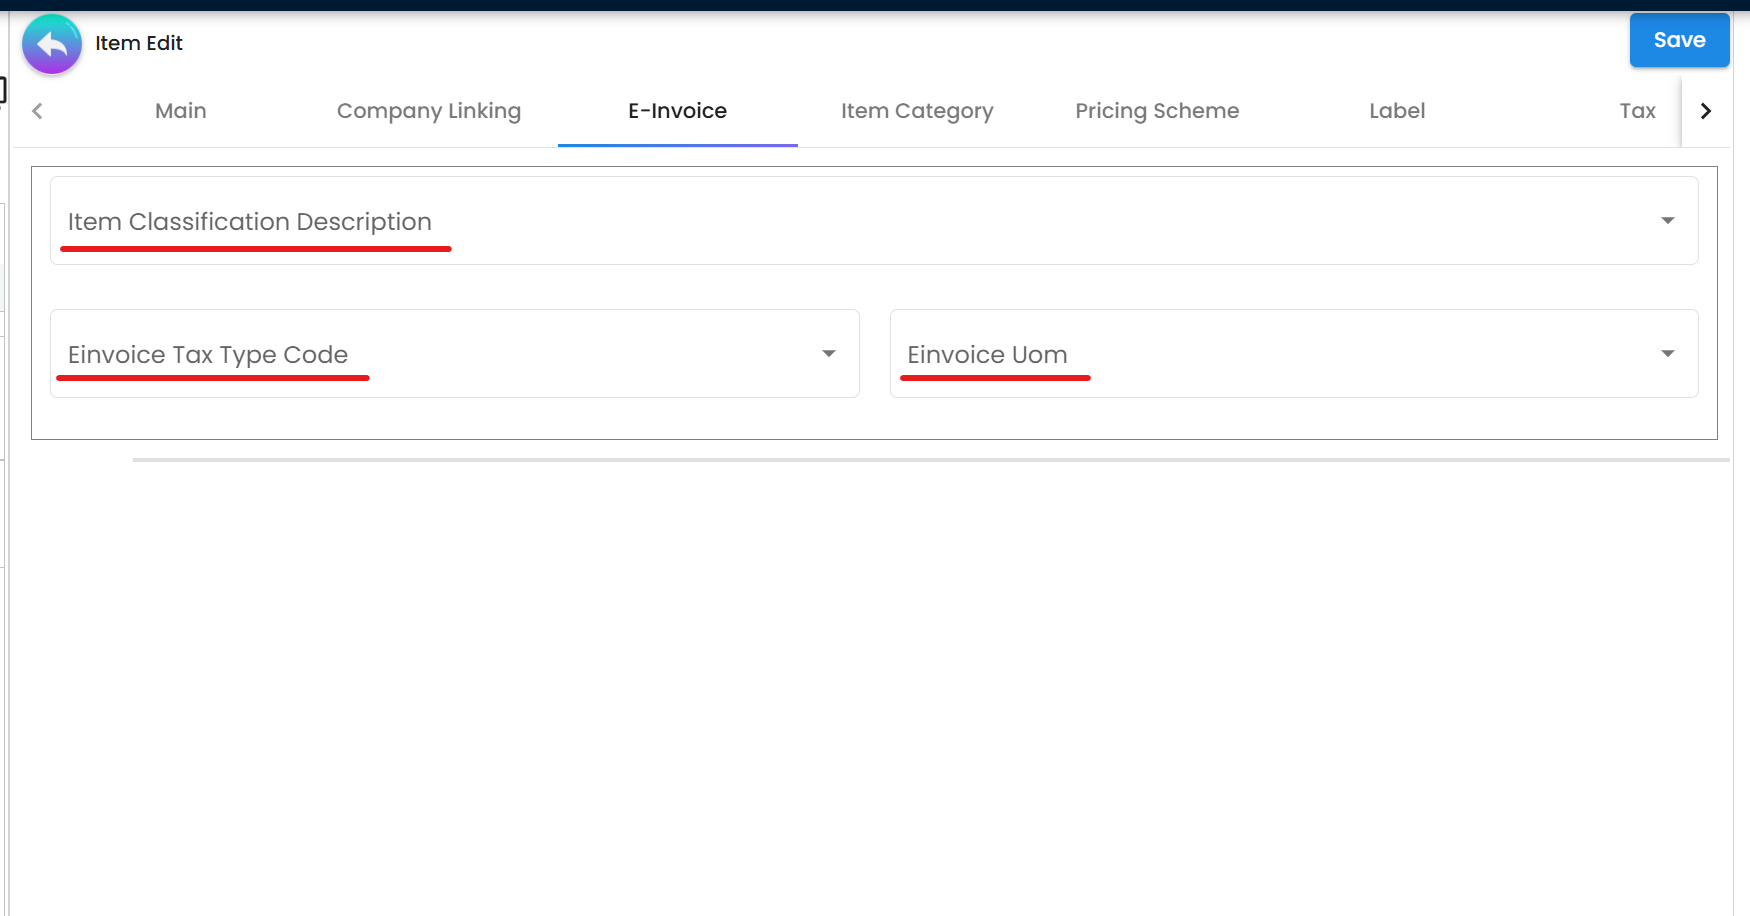 Figure 3: Doc Item Maintenance - E-invoice specific fields
Quick Start: Your First E-Invoice in 5 Steps
Get up and running quickly with your first validated e-invoice for a B2B sale. This streamlined guide assumes you’ve completed the master data setup from the previous section.
Step-by-Step Instructions
Step 1: Create the Sales Invoice
Navigate to the Sales Invoice Applet from your Akaun homepage:
- Click "+" or New Sales Invoice button
- Select the customer from your master data
- The system automatically pulls customer details including TIN, BRN, and address
Step 2: Enter Invoice Details
Complete the invoice in three tabs:
| Tab | Required Information | Tips |
|---|---|---|
| Main | Invoice date, due date, reference numbers | Use clear reference numbers for tracking |
| Account | Verify customer details, payment terms | Double-check TIN and address accuracy |
| Lines | Items, quantities, prices, SST codes | Ensure items have e-invoice fields configured |
Step 3: Finalize the Document
- Click Save to store your changes
- Click FINAL to lock the invoice
- The system automatically queues it for e-invoice processing
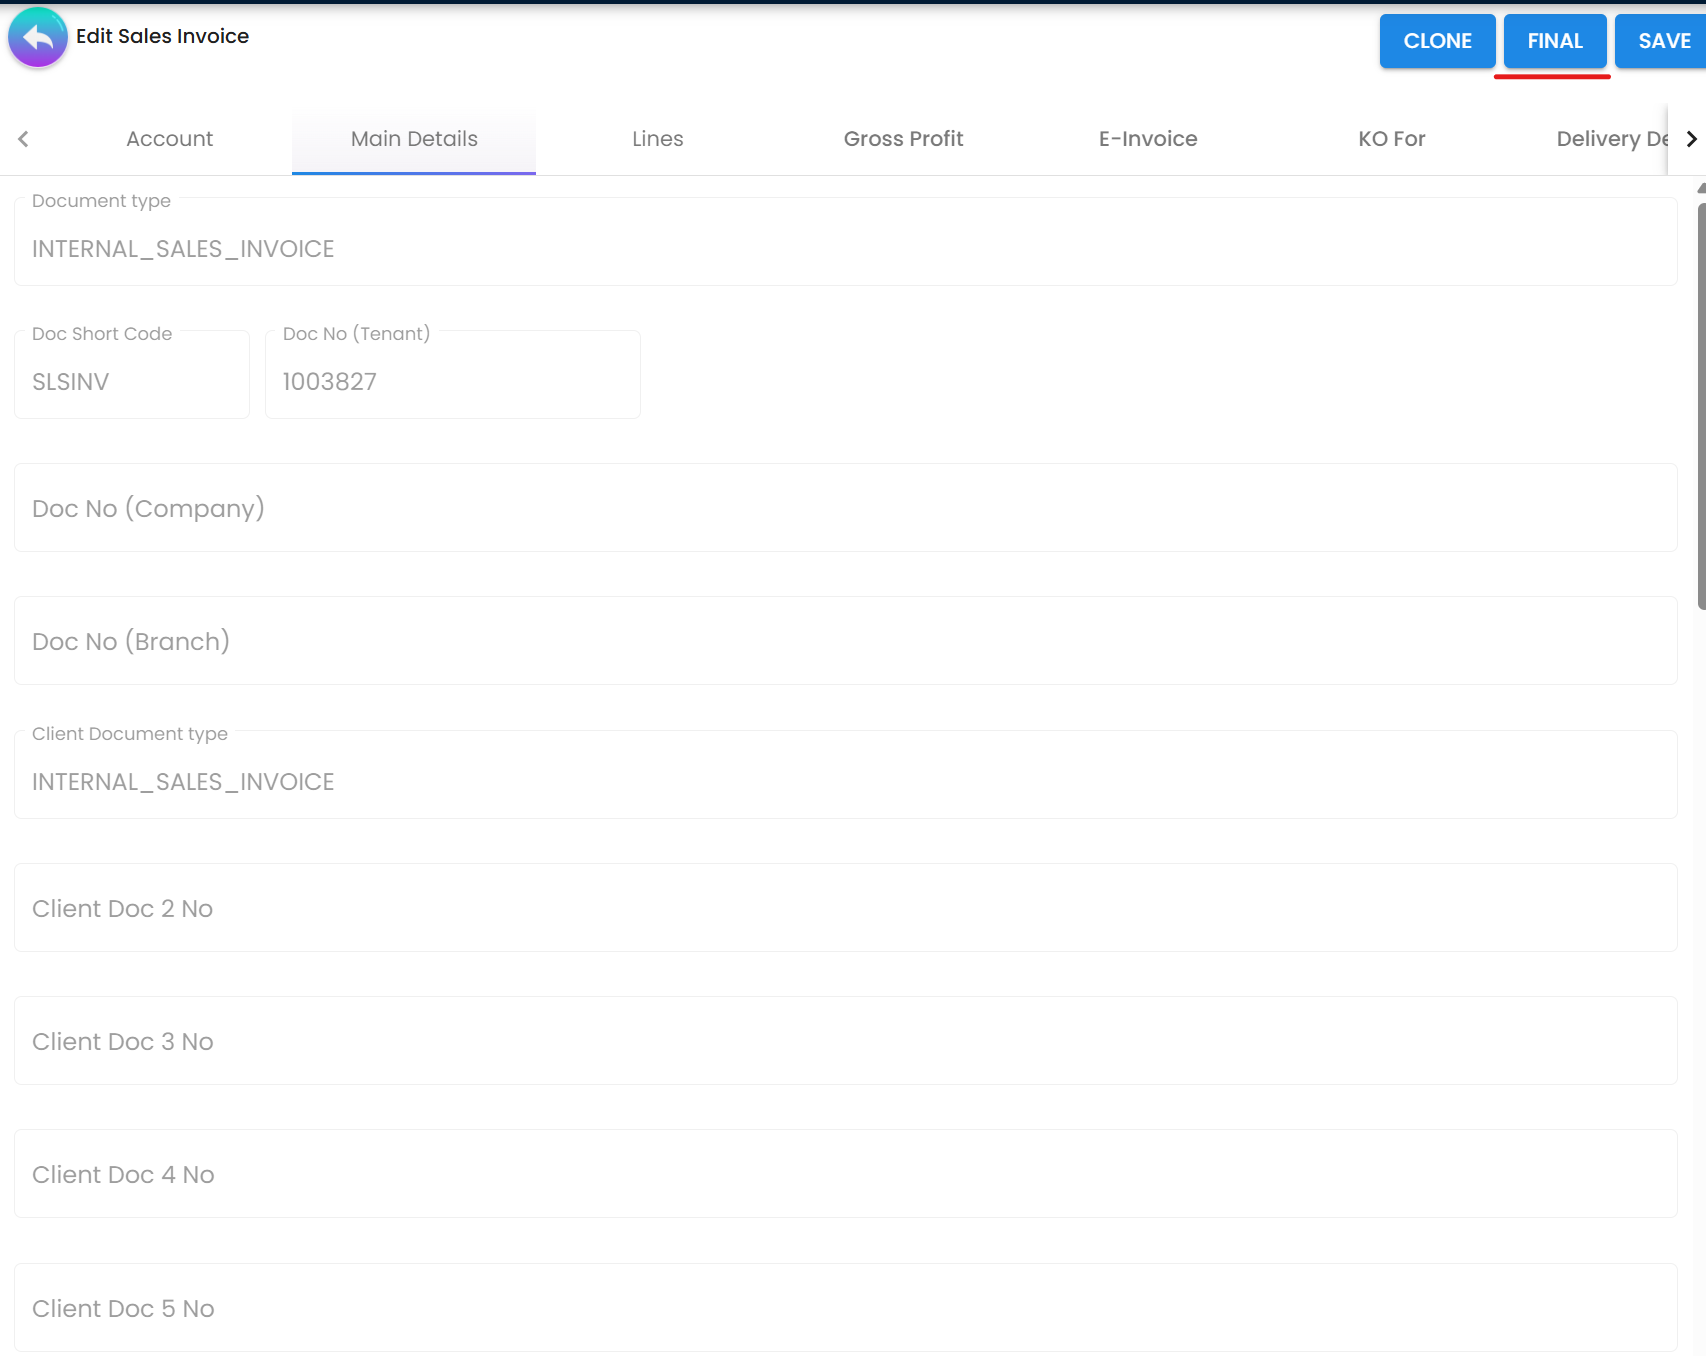 Figure 4: Finalizing a sales invoice for e-invoice submission
Step 4: Monitor Posting Queue
Switch to the My E-Invoice Admin Applet → Posting Queue:
- Locate your invoice in the list
- Check the status indicator:
PROCESSED✅ - Passed validation, ready for LHDN submissionUNPROCESSED❌ - Has validation errors requiring correction
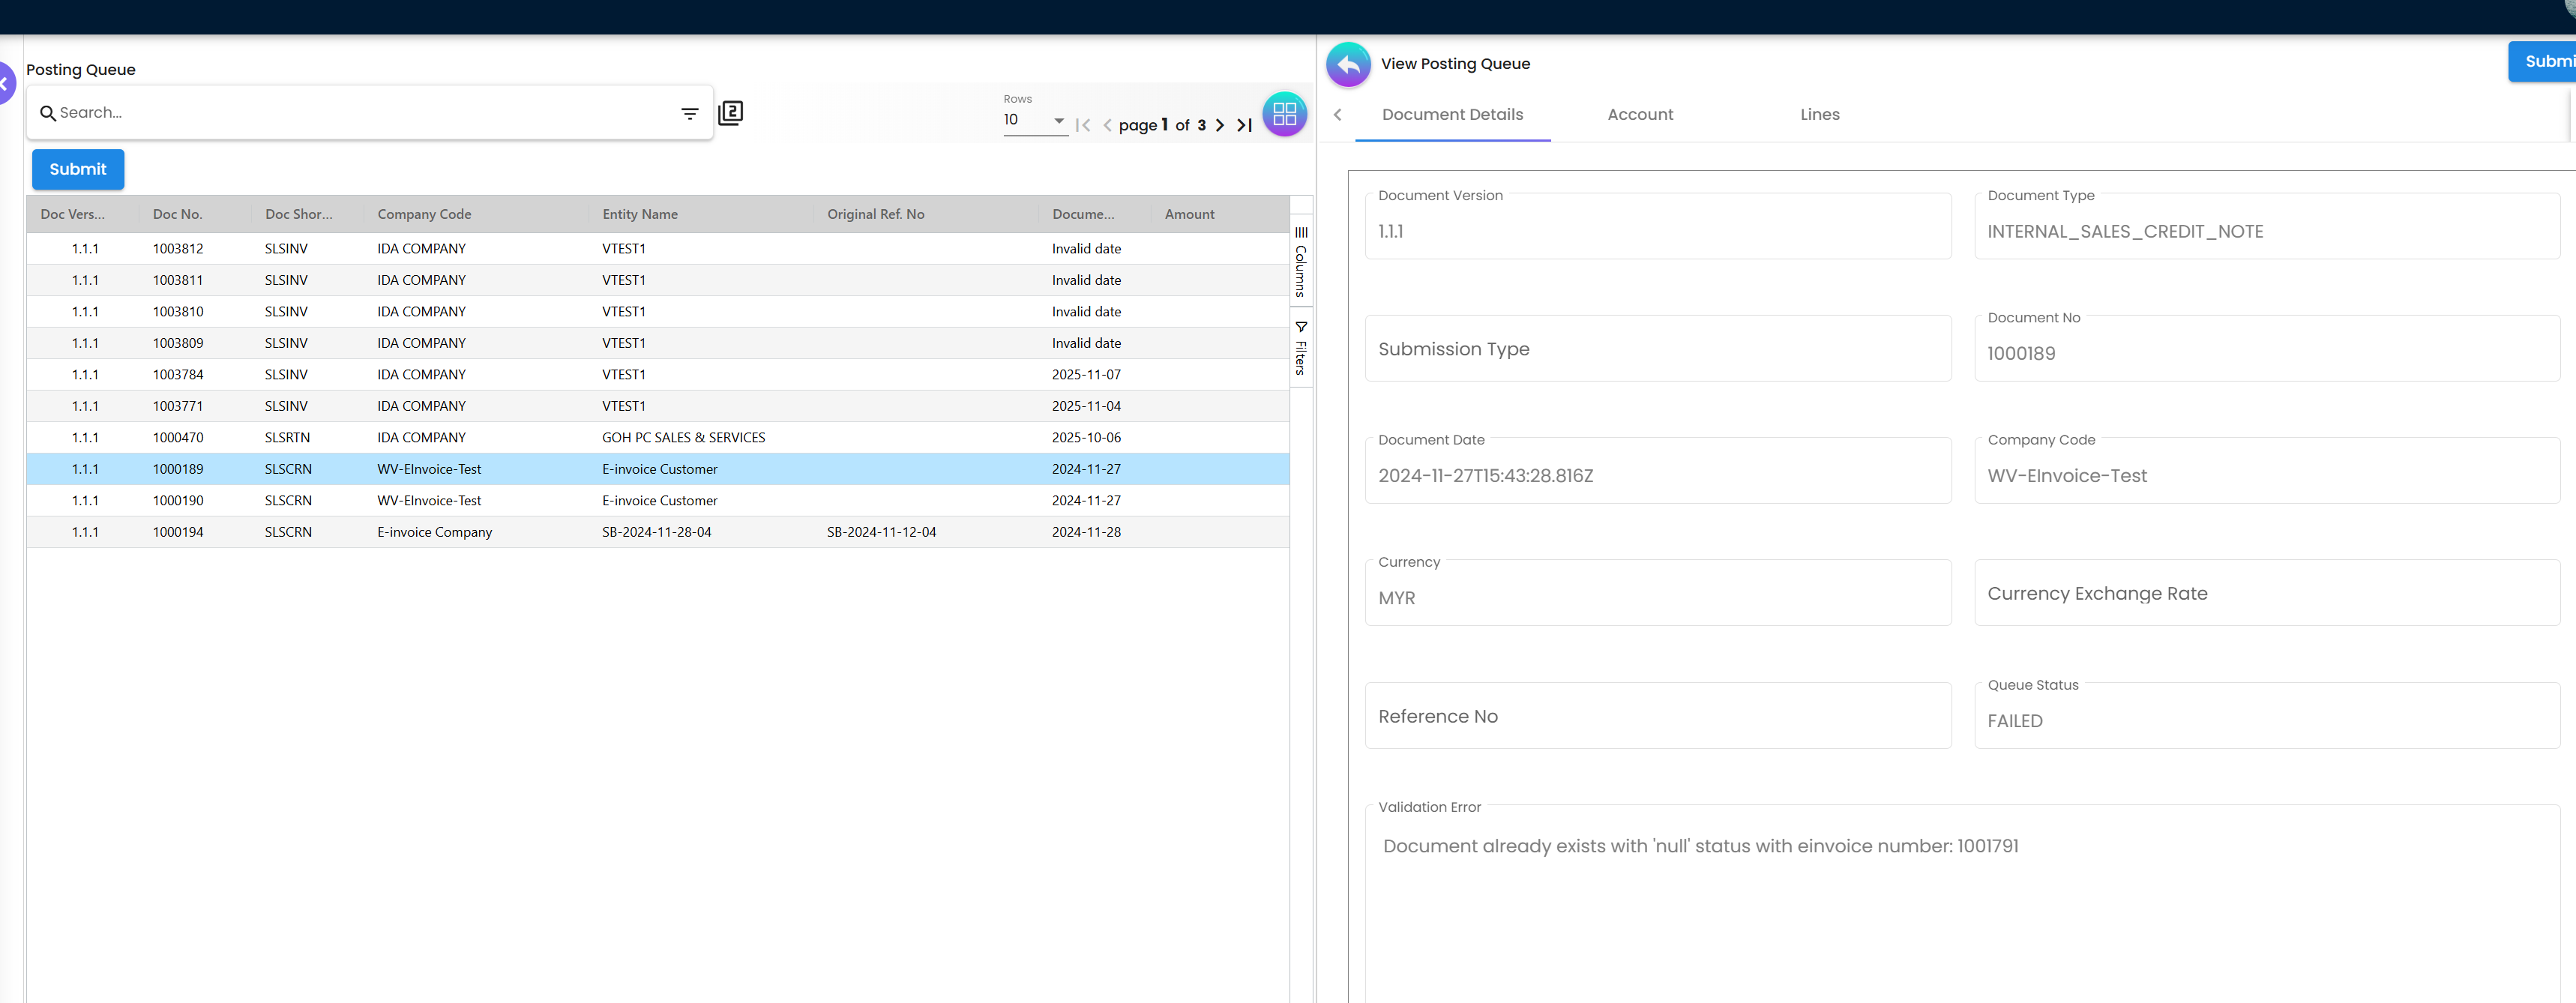 Figure 5: Posting Queue showing processed and unprocessed invoices
If UNPROCESSED:
- Click on the invoice to view error details
- Note the specific validation errors
- Return to the source Sales Invoice
- Correct the errors
- Save the invoice (system auto-requeues for validation)
If PROCESSED:
- The automated processor will submit to LHDN within 15-20 minutes
- For urgent submissions, select the invoice and click Submit manually
Step 5: Track LHDN Validation
Navigate to To IRB E-Invoice section:
Monitor real-time status updates:
Document Accepted- LHDN received the submissionDocument is Valid- Full approval with QR code generatedSubmission Failed- LHDN rejected (see error details)
Once validated, open the invoice to access:
- QR Code for verification
- IRBM Reference Number for official records
- Validation URL for third-party checks
Confirmation of Success
You’ll know your e-invoice is successfully validated when you see these indicators:
✅ Status Shows “Document is Valid” in Internal Submission History ✅ IRBM Reference Number is assigned and visible ✅ QR Code appears with scannable validation URL ✅ Email Notifications sent to customer (if configured) ✅ Audit Trail complete with timestamps
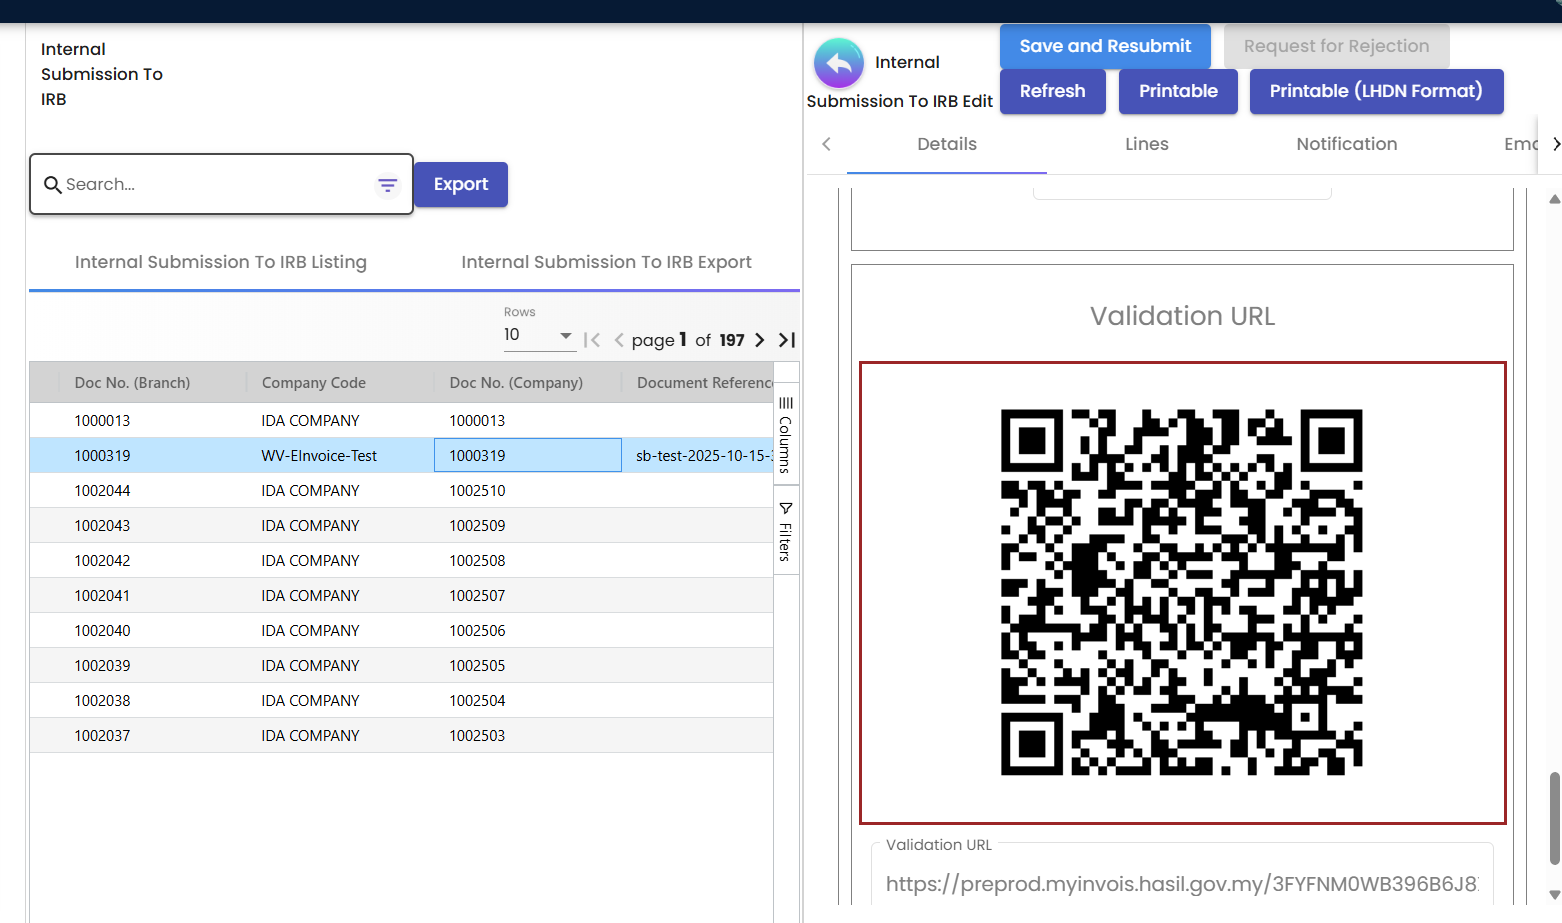 Figure 6: Successfully validated e-invoice with QR code and IRBM reference
If you encounter validation errors, refer to the Troubleshooting section below for common issues and quick fixes.
2. The E-Invoice Lifecycle
Understanding the full lifecycle helps you navigate the system efficiently. The e-invoice process flows through four key stages, each with specific tools and queues in the applet. This structured approach ensures compliance and minimizes errors.
Preparation and Validation
Key Tools: Posting Queue & Batch Pool
This initial stage is where transactions are collected, checked for completeness, and prepared for submission. It’s your opportunity to catch and fix errors before they reach LHDN.
- What Happens Here: Automatic validation scans for missing data, incorrect formats, or compliance issues.
- Common Activities: Reviewing unprocessed documents, fixing master data, and deciding between individual or consolidated submissions.
- Tips: Regularly check this queue to prevent backlogs.
Transmission and Monitoring
Key Tools: Internal Submission Queue & To IRB E-Invoice
This is the transmission phase where e-invoices are sent to LHDN’s MyInvois system for official validation.
- What Happens Here: Documents are packaged, digitally signed, and submitted. Real-time status updates track progress.
- Common Activities: Monitoring for acceptance, handling initial rejections, and resubmitting corrected documents.
- Tips: Use filters to track high-priority submissions.
Archiving and Reporting
Key Tools: Internal Submission History
Once validated, e-invoices enter this permanent archive stage for record-keeping and auditing.
- What Happens Here: Storage of validated documents with QR codes, reference numbers, and full audit trails.
- Common Activities: Exporting PDFs, generating reports, and verifying compliance metrics.
- Tips: Set up automated backups for this archive.
Corrections and Adjustments
Key Tools: Rejection Request & Cancellation Queue
This stage handles post-validation changes within the 72-hour window.
- What Happens Here: Processing rejection requests, creating reversals, or voiding documents.
- Common Activities: Reviewing requests from staff or customers, choosing processing logic, and monitoring outcomes.
- Tips: Act quickly to stay within time limits.
3. Submission Process Management
The My E-Invoice Admin Applet employs an advanced queue-based system to handle e-invoice submissions with maximum efficiency and minimal errors. This section provides a detailed breakdown of how the various queues and pools interconnect, complete with best practices and troubleshooting tips to ensure smooth operations.
Why Queue-Based Processing Matters
Manual e-invoice submission is prone to errors and delays. The queue-based system ensures systematic validation and processing.
The Business Case:
Manual submission processes result in:
- High rejection rates from LHDN
- Delayed error detection
- Processing bottlenecks
- Compliance risks
Queue-based processing reduces errors by 90% and ensures systematic compliance checks before LHDN submission.
Understanding the Queue-Based Processing System
At the heart of the applet is a multi-stage queue system that automates much of the submission process while allowing manual intervention when needed. This setup prevents bottlenecks and ensures compliance by validating data at each step.
Posting Queue Operations: Your Entry Point
The Posting Queue serves as the initial gateway for all newly created invoices, acting as a validation checkpoint before anything reaches LHDN.
 Figure 1: Posting Queue - Your entry point for e-invoice submissions
- Auto-Processing Mechanism: The system runs automatic processing cycles every 15-20 minutes, scanning for new documents and validating them against LHDN requirements.
- Key Status Indicators:
PROCESSED: Indicates the document has passed all internal checks and is submission-ready. No action needed unless you want to submit immediately.UNPROCESSED: Signals validation errors. Review the error details to identify issues like missing fields or invalid data.
- Manual Submission Options: For time-sensitive
PROCESSEDinvoices, select them individually or in batches and click Submit to send directly to LHDN. - Best Practices: Set up notifications for unprocessed items to address errors promptly. Regularly clear this queue to maintain workflow efficiency.
Batch Pool Scenarios: Handling Consolidated and Special Cases
The Batch Pool functions as a flexible staging area for documents requiring grouping or additional processing, particularly useful for high-volume operations.
 Figure 2: Batch Pool - Managing consolidated submissions
- Auto Consolidated Submission:
- The system intelligently groups eligible transactions (e.g., B2C sales) into a single consolidated e-invoice.
- Powered by the
E_INVOICE_BATCH_PROCESSING_CYCLE_RUN_PROCESSORautomation. - Standard timeline: All transactions from one month are automatically consolidated and submitted by the 7th of the next month to meet LHDN deadlines.
- Benefits: Reduces submission volume and simplifies monthly reporting.
- Manual Consolidated Submission:
- Select specific transactions from the pool and consolidate them on-demand.
- Perfect for scenarios like end-of-day closings or urgent regulatory needs outside the automated cycle.
- Steps: Filter transactions, select, and click Consolidate Now.
- Individual E-Invoice Submission from Batch:
- For cases where a batched transaction needs individual treatment (e.g., customer requests a named invoice), update the entity details in the customer record.
- The system automatically reclassifies and submits it as a standalone e-invoice with instant validation feedback.
- Tip: This is common for upgrading B2C to B2B invoices within the 72-hour window.
Specialized Pools: Targeted Error Handling
These dedicated pools isolate specific types of issues, making resolution faster and more organized.
Individual Pool: For Standalone Submissions
This pool captures documents set for individual submission (einvoice submission type = INDIVIDUAL) that fail initial validation due to missing LHDN-mandated fields.
- Common Problems: Incomplete customer data such as TIN, ID Type, or address.
- Resolution Steps: Update the customer master data directly, then use the Save And Resubmit button to re-validate and move the document forward.
- Tip: Prevent entry by running pre-submission checks on customer records.
Single General Pool: For Consolidated Candidates
This pool holds documents earmarked for consolidation (einvoice submission type = SINGLE-GENERAL) but blocked by data deficiencies.
- Common Problems: Often missing basic customer info like TIN, ID, or address, common in walk-in sales.
- Resolution Steps: Correct the underlying data in the source document or master records, then Save And Resubmit to qualify it for the next consolidation batch.
- Tip: Use this pool for quick fixes to maintain monthly submission schedules.
4. Role-Based Workflows
These tailored playbooks provide step-by-step guidance customized to your role in the organization. Each includes key responsibilities, daily/weekly/monthly tasks, and pro tips to optimize your workflow while ensuring LHDN compliance.
Counter Sales (B2C): Managing Retail Transactions
- Core Responsibility: Handle high-volume walk-in sales using
Single-Generalsubmission type for anonymous buyers. - Step-by-Step Workflow:
- Create a
Cash Billdirectly in the POS Applet for immediate transactions. - If a buyer requests a personalized invoice within 72 hours, upgrade by updating customer fields (TIN, ID, etc.) and resubmit from the Batch Pool as
Individual. - At month-end, review the
Batch Pooland initiate consolidated submission by the 7th of the following month.
- Create a
- Best Practices: Always capture basic buyer info at point-of-sale to simplify potential upgrades. Monitor the Batch Pool daily for exceptions.
- Pro Tip: Set up alerts for requests exceeding the 72-hour window to avoid compliance issues.
Accounts Receivable (B2B): Issuing Business Invoices
- Core Responsibility: Generate and track
Individuale-invoices for named business customers. - Step-by-Step Workflow:
- Pre-verify customer master data for completeness (
ID Type,Reg/ID,TIN,Email,Address). - Create and detail a
Sales Invoicein the Sales Applet, thenFINALize it. - Submit from the
Posting Queueand track status inTo IRB E-Invoice. - Upon validation, send buyer notifications and archive the PDF with QR code.
- Pre-verify customer master data for completeness (
- Best Practices: Integrate with CRM for automated data checks. Batch submissions for efficiency.
- Pro Tip: Use the Internal Submission History for quick status reports to stakeholders.
Finance Manager: Overseeing Compliance
- Core Responsibility: Manage consolidated flows and monitor overall e-invoicing performance.
- Step-by-Step Workflow:
- Daily: Review
Posting Queuefor errors and clear backlogs. - Weekly: Address exceptions in the
Batch Pooland run test consolidations. - Monthly: Execute auto-consolidated submissions (or manual if needed) by the 7th, verifying all statuses.
- Track KPIs like success rate, average validation time, and rejection percentage.
- Daily: Review
- Best Practices: Implement dashboard monitoring for real-time metrics. Conduct monthly compliance audits.
- Pro Tip: Automate reports from Internal Submission History to streamline board presentations.
Procurement (Self-Billed): Handling Supplier Invoices
- Core Responsibility: Create self-billed documents when suppliers fail to issue e-invoices.
- Step-by-Step Workflow:
- In the supplier profile, enable
E-invoice Self-Billed = TRUE. - Create a
Purchase Invoice (Self-Billed)in the Procurement Applet andFINALize. - Submit via
Posting Queueand reconcile incoming data throughPeppol Incomingor email OCR scanning. - Monitor validation in
To IRB E-Invoice.
- In the supplier profile, enable
- Best Practices: Maintain a supplier watchlist for frequent self-billing needs. Verify all tax codes before finalizing.
- Pro Tip: Integrate with inventory systems for automatic self-billing triggers on receipts.
Auditor & Compliance: Ensuring Traceability
- Core Responsibility: Verify transaction integrity and prepare audit evidence.
- Step-by-Step Workflow:
- Use filters in
Internal Submission Historyto search by date, document, or status. - Confirm validation (
Document is Valid) and presence of IRBM Reference Number. - Export comprehensive records including PDFs, XML/JSON data, QR codes, and audit trails.
- Cross-reference with source documents for discrepancies.
- Use filters in
- Best Practices: Schedule regular exports for offsite backups. Use advanced filters for compliance reporting.
- Pro Tip: Leverage the validation URL in QR codes for quick third-party verifications during audits.
5. Troubleshooting and Error Resolution
Understanding LHDN Validation Errors
LHDN validation errors are feedback mechanisms that help you correct issues before final submission. Understanding error patterns speeds up resolution.
Why Errors Occur:
Most validation failures stem from:
- Incomplete master data (70% of errors)
- Incorrect tax codes or classifications (15%)
- Format mismatches (10%)
- System configuration issues (5%)
Resolving LHDN Submission Failures
Follow this systematic approach to resolve any validation error:
Step 1: Identify the Failure
- Navigate to Internal Submission Queue
- Filter by status:
Submission Failed - Note the document number and timestamp
Step 2: Diagnose the Error
- Click on the failed transaction
- Open the From LHDN tab
- Read the specific error message and code
- Cross-reference with the error table below
Step 3: Correct the Data
- Return to the source document (Sales Invoice, Purchase Invoice, etc.)
- Fix the identified issue in the appropriate field
- Save the document
- The system automatically requeues for validation
Step 4: Resubmit and Verify
- Monitor the Posting Queue for updated status
- Verify the document shows
PROCESSED - Track in To IRB E-Invoice for LHDN validation
- Confirm
Document is Validstatus
Common Error Codes and Quick Fixes
| Message / Code | What it means | Where to fix | Quick fix |
|---|---|---|---|
| “CD is required” | Buyer city missing | Customer → Address | Add the city, save, and resubmit. |
| Missing TIN | Taxpayer ID not provided | Customer/Supplier → Tax | Enter the TIN (e.g., C1234567890). |
| Invalid ID Type | Wrong ID type (BRN/NRIC/Passport) | Customer/Supplier → Identity | Set the correct ID Type. |
| Currency not supported | Unsupported or incorrect currency | Organization/Document → Currency | Use a supported currency and ensure the forex rate is recorded. |
| Amount rounding mismatch | Totals don’t match the line sums | Lines Tab / Tax calc | Correct the decimals and rounding rule, then re-save. |
| Invalid UOM | Unit of measure not valid | Doc Item Maintenance → UOM | Use a valid UOM (e.g., PCS, KG). |
| Tax code mismatch | Wrong SST/Tax mapping | Doc Item Maintenance → Tax | Map to the correct Tax Type Code. |
| Duplicate document number | Existing invoice number reused | Numbering / Source doc | Use a unique number and verify the history. |
| Document not FINAL | Submission from draft status | Source document | Click FINAL before submitting. |
| Self-billed flag missing | Supplier not marked as self-billed | Supplier → Flags | Set E-invoice Self-Billed = TRUE. |
| Invalid email/contact | Buyer contact missing or invalid | Customer → Contact | Add a valid email and phone number. |
| Credentials/Intermediary not set | MyInvois not configured | MyInvois Portal Setup | Set the intermediary and complete the registration. |
| 429 Too Many Requests | Rate limit exceeded | Submission Processor | Retry with backoff; stagger batches. |
| Network/Timeout | Connectivity issue | Infra / Endpoint | Check the network and retry the submission. |
6. MyInvois Portal Configuration
Initial Portal Setup
Before using the My E-Invoice Admin Applet, you must configure your organization’s access to the LHDN MyInvois portal.
Environment Selection
LHDN provides two environments for e-invoicing:
| Environment | URL | Purpose |
|---|---|---|
| Sandbox | https://preprod-mytax.hasil.gov.my/ | Testing and development |
| Production | https://mytax.hasil.gov.my/ | Live business transactions |
Configuration Steps
Step 1: Register with LHDN MyInvois Portal
- Access the appropriate environment URL
- Complete your organization registration
- Verify your company details with LHDN
Step 2: Set Intermediary Access
- Designate BigLedger as your authorized intermediary
- This allows the system to submit e-invoices on your behalf
- Complete this for both Sandbox and Production environments
Step 3: Digital Certificate Setup
- Complete the digital certificate registration process
- This ensures secure transmission of e-invoices
- Certificates are environment-specific
Step 4: Configure Company Representatives
- Assign authorized personnel for e-invoice management
- Set up access levels and permissions
- Configure notification preferences
Step 5: Integration Testing
- Submit test invoices in Sandbox environment
- Verify QR code generation
- Confirm validation workflows
- Test error handling procedures
Automated Processing Configuration
The system includes automated processors that handle e-invoice submissions without manual intervention.
Key Automated Processors
E_INVOICE_BATCH_PROCESSING_CYCLE_RUN_PROCESSOR
- Runs automatically every 15-20 minutes
- Processes documents in Posting Queue
- Validates against LHDN requirements
- Submits PROCESSED documents to MyInvois
- Handles consolidated submissions for B2C transactions
Configuration Options:
- Adjust processing frequency (default: 15-20 minutes)
- Set batch size limits
- Configure retry logic for failed submissions
- Enable/disable automatic submission
7. Post-Validation: Rejection and Cancellation
Understanding the 72-Hour Window
LHDN regulations allow e-invoice corrections only within a strict 72-hour window after validation. This time limit ensures tax record integrity while allowing reasonable error correction.
Why the 72-Hour Rule Exists
The time limit serves several purposes:
- Tax integrity: Prevents retroactive manipulation of tax records
- Audit trail: Maintains clear chronological records
- Business certainty: Ensures transactions are finalized promptly
- Compliance: Aligns with LHDN regulatory requirements
Rejection Request Sources
Rejection requests can originate from multiple sources:
| Source | Access Method | Common Scenarios |
|---|---|---|
| Internal Staff | System interface | Data entry errors, pricing mistakes |
| Customers | Customer portal | Disputed amounts, incorrect details |
| System Alerts | Automated detection | Duplicate submissions, validation issues |
All requests appear in the Rejection Request menu under the Cancellation tab for centralized management.
Applicable Document Types
The rejection workflow applies to:
✅ Sales Invoices - Standard B2B and B2C invoices ✅ Credit Notes - Sales returns and adjustments ✅ Debit Notes - Additional charges ✅ Sales Credit Notes - Customer refunds
❌ Not Applicable:
- Self-billed e-invoices (use reversal documents instead)
- Consolidated e-invoices (individual line adjustments not supported)
Processing Rejection Requests
When a rejection request is received, you must choose the appropriate processing method based on the nature of the error and business requirements.
Three Processing Options
The system provides three distinct approaches to handling rejections, each suited to different scenarios:
Option 1: Regenerate New E-Invoice
| Aspect | Details |
|---|---|
| Action | Cancels current e-invoice and auto-creates a new one |
| Impact | Original source document remains unchanged |
| LHDN Effect | Old e-invoice marked as cancelled, new one submitted |
| Best For | Minor corrections (typos, wrong amounts, incorrect tax codes) |
| Audit Trail | Both old and new e-invoices retained in history |
When to Use:
- Incorrect pricing or quantities
- Wrong tax classification
- Typos in descriptions
- Minor customer detail corrections
Option 2: Void Original Document
| Aspect | Details |
|---|---|
| Action | Cancels e-invoice AND voids the source document |
| Impact | Irreversible - document marked as void in system |
| LHDN Effect | E-invoice cancelled, no replacement generated |
| Best For | Major errors requiring complete restart |
| Audit Trail | Void marker prevents accidental reuse |
When to Use:
- Wrong customer selected
- Duplicate invoice created
- Transaction should not have occurred
- Complete data overhaul needed
Option 3: New Reversal Document
| Aspect | Details |
|---|---|
| Action | Creates offsetting reversal document (e.g., Credit Note) |
| Impact | Original document and e-invoice remain valid |
| LHDN Effect | Both original and reversal e-invoices in system |
| Best For | Maintaining complete audit trail |
| Audit Trail | Full transaction history preserved |
When to Use:
- Accounting period already closed
- Audit requirements demand full trail
- Partial refunds or adjustments
- Customer disputes requiring documentation
Decision Flow Chart
Rejection Request Received
│
├─ Is it a minor error? ──→ YES ──→ Option 1: Regenerate
│                                    (Quick fix, same document)
│
├─ Is the entire transaction wrong? ──→ YES ──→ Option 2: Void
│                                              (Start over completely)
│
└─ Need full audit trail? ──→ YES ──→ Option 3: Reversal
                                      (Keep all records)
Processing Steps
Step 1: Review the Request
- Navigate to Rejection Request menu
- Review the reason and requester details
- Verify the request is within 72-hour window
- Check the original e-invoice details
Step 2: Choose Processing Logic
- Assess the nature of the error
- Consider accounting period status
- Evaluate audit requirements
- Select appropriate option (1, 2, or 3)
Step 3: Execute and Monitor
- Approve the request with chosen logic
- System processes the cancellation/reversal
- Monitor in To IRB E-Invoice for LHDN confirmation
- Verify completion in Internal Submission History
Step 4: Notify Stakeholders
- Inform customer of the change
- Update accounting records
- Document the reason for rejection
- Archive correspondence for audit
8. Reporting and Analytics
Available Reports
The My E-Invoice Admin Applet provides comprehensive reporting capabilities for compliance monitoring and business intelligence.
Submission Status Reports
Track the health of your e-invoicing operations:
| Report Type | Purpose | Key Metrics |
|---|---|---|
| Daily Submission Summary | Monitor daily processing | Total submitted, validated, failed |
| Error Rate Analysis | Identify problem areas | Error types, frequency, resolution time |
| Queue Performance | Track processing efficiency | Queue depth, processing time, bottlenecks |
| Validation Success Rate | Measure first-time success | Percentage validated without resubmission |
Compliance Reports
Essential for regulatory audits and internal reviews:
- Complete Submission History - All e-invoices with LHDN status
- QR Code Verification Log - Validation URL access records
- Rejection and Cancellation Log - All post-validation changes
- Audit Trail Export - Complete transaction history with timestamps
Business Intelligence Reports
Analyze e-invoice data for business insights:
- Revenue by Customer - Track B2B sales patterns
- Tax Collection Summary - SST and other tax totals
- Processing Time Analysis - Identify efficiency improvements
- Department/Branch Performance - Multi-location comparisons
Exporting Data
Export capabilities for external analysis and archiving:
Export Formats:
- PDF (for official records and customer distribution)
- Excel (for data analysis and reporting)
- XML/JSON (for system integration and backup)
- CSV (for accounting software import)
Export Options:
- Single invoice export
- Batch export by date range
- Filtered export by status or customer
- Scheduled automated exports
9. Frequently Asked Questions
General Questions
Q: Which document type should I use for a walk-in retail customer?
A: Use a Cash Bill with submission type Single-General for anonymous walk-in customers. If the buyer later requests a personalized invoice, you can upgrade it by updating the customer details and resubmitting as Individual within 72 hours.
Q: What is the difference between Individual and Consolidated e-invoices?
A:
- Individual: For B2B named invoices with complete customer details. Each transaction is validated separately and immediately.
- Consolidated: For aggregated B2C retail transactions (Single-General). Multiple transactions are grouped and submitted monthly by the 7th of the following month.
Q: Where can I find the QR code for a validated e-invoice?
A: Navigate to To IRB E-Invoice and locate your transaction. Once the status shows Document is Valid, click to open the invoice details. The QR code and IRBM Reference Number will be displayed and available for download.
Q: What exactly is the 72-hour window?
A: This is the period after LHDN validation during which you can request a rejection or cancellation of an e-invoice. It starts from the moment LHDN validates the invoice (status: Document is Valid) and is not extendable under any circumstances.
Processing Questions
Q: Can I cancel a consolidated e-invoice?
A: No, consolidated e-invoices cannot be cancelled through the standard rejection workflow. Instead, you must create reversal or adjustment documents (Credit Notes) to correct any errors in consolidated submissions.
Q: How do I submit a self-billed purchase invoice?
A: Follow these steps:
- In Supplier Maintenance, set
E-invoice Self-Billed = TRUE - Create a Purchase Invoice in the Procurement Applet
- Click
FINALto lock the document - The system automatically queues it in Posting Queue
- Monitor progress in
To IRB E-Invoice - Verify validation in
Internal Submission History
Q: How do I correct a validated e-invoice?
A: You have three options within the 72-hour window:
- Regenerate: Cancel and auto-create a new e-invoice (for minor errors)
- Void: Cancel e-invoice and void the source document (for major errors)
- Reversal: Create an offsetting document like a Credit Note (for audit trail)
Choose based on the error severity and your accounting requirements.
Q: My invoice shows UNPROCESSED in Posting Queue. What should I do?
A:
- Click on the invoice to view validation error details
- Note the specific error messages
- Return to the source Sales/Purchase Invoice
- Correct the identified issues
- Save the document (it will auto-requeue)
- Refresh Posting Queue to verify
PROCESSEDstatus
Technical Questions
Q: Where is the official archive of my e-invoices?
A: The Internal Submission History serves as the permanent archive. It contains:
- All validated e-invoices with status
Document is Valid - IRBM Reference Numbers
- QR codes with validation URLs
- Complete audit trails with timestamps
- Export capabilities for compliance reporting
Q: How often does the automated processor run?
A: The E_INVOICE_BATCH_PROCESSING_CYCLE_RUN_PROCESSOR runs automatically every 15-20 minutes. It processes documents in the Posting Queue, validates them, and submits PROCESSED invoices to LHDN without manual intervention.
Q: Can I manually submit an invoice instead of waiting for the automated processor?
A: Yes, for urgent submissions:
- Navigate to Posting Queue
- Verify the invoice status is
PROCESSED - Select the invoice
- Click Submit button
- Monitor in
To IRB E-Invoicefor immediate tracking
Q: What happens if LHDN’s system is down?
A: The system includes retry logic:
- Failed submissions are automatically retried
- Exponential backoff prevents system overload
- You’ll see status updates in
To IRB E-Invoice - Manual resubmission is available if needed
Q: How do I handle rate limit errors (429 Too Many Requests)?
A: This occurs when submitting too many invoices simultaneously:
- The system automatically staggers resubmissions
- Reduce batch sizes for manual submissions
- Allow the automated processor to handle submissions
- Contact support if errors persist
Compliance Questions
Q: Are e-invoices required for all transactions?
A: Yes, LHDN mandates e-invoices for all business transactions in Malaysia. This includes:
- B2B sales (Individual e-invoices)
- B2C retail sales (Consolidated e-invoices)
- Self-billed purchases (when suppliers don’t issue e-invoices)
- Credit and Debit Notes
Q: What are the penalties for non-compliance?
A: LHDN penalties for e-invoice non-compliance can include:
- Fines for late submissions
- Penalties for incorrect information
- Audit triggers for repeated violations
- Business operation restrictions in severe cases
Always ensure timely and accurate e-invoice submissions.
Q: How long must I retain e-invoice records?
A: LHDN requires retention of e-invoice records for at least 7 years. The Internal Submission History provides permanent archiving, but you should also:
- Schedule regular exports for offsite backup
- Maintain copies of QR codes and validation URLs
- Archive complete audit trails
- Document any rejections or cancellations