External Sales Invoice Applet
Purpose and Overview
The External Sales Invoice Applet is a powerful invoicing solution designed to streamline the entire sales billing process for external customers. It goes beyond simple invoice creation by integrating multi-source document linking, advanced pricing configurations, serial number tracking, and flexible tax management.
Key Features Overview
Who Benefits from This Applet?
Sales Representatives:
- Quick invoice creation from sales orders and quotations
- Real-time pricing and tax calculations
- Easy document linking and tracking
- Multi-line item support with flexible quantities
Finance & Accounting Teams:
- Automated tax calculations (SST, VAT, GST, WHT)
- Draft-to-final workflow for review before posting
- Accurate revenue recognition
- Seamless GL (General Ledger) integration
- Complete audit trail for compliance
Warehouse & Operations:
- Delivery requirement tracking per line item
- Serial number management for trackable inventory
- Stock conversion from sales orders
- Multi-location fulfillment support
Management & Administrators:
- Fine-grained permission controls
- Customizable field visibility and pricing schemes
- Branch and location-based operations
- Comprehensive reporting and analytics
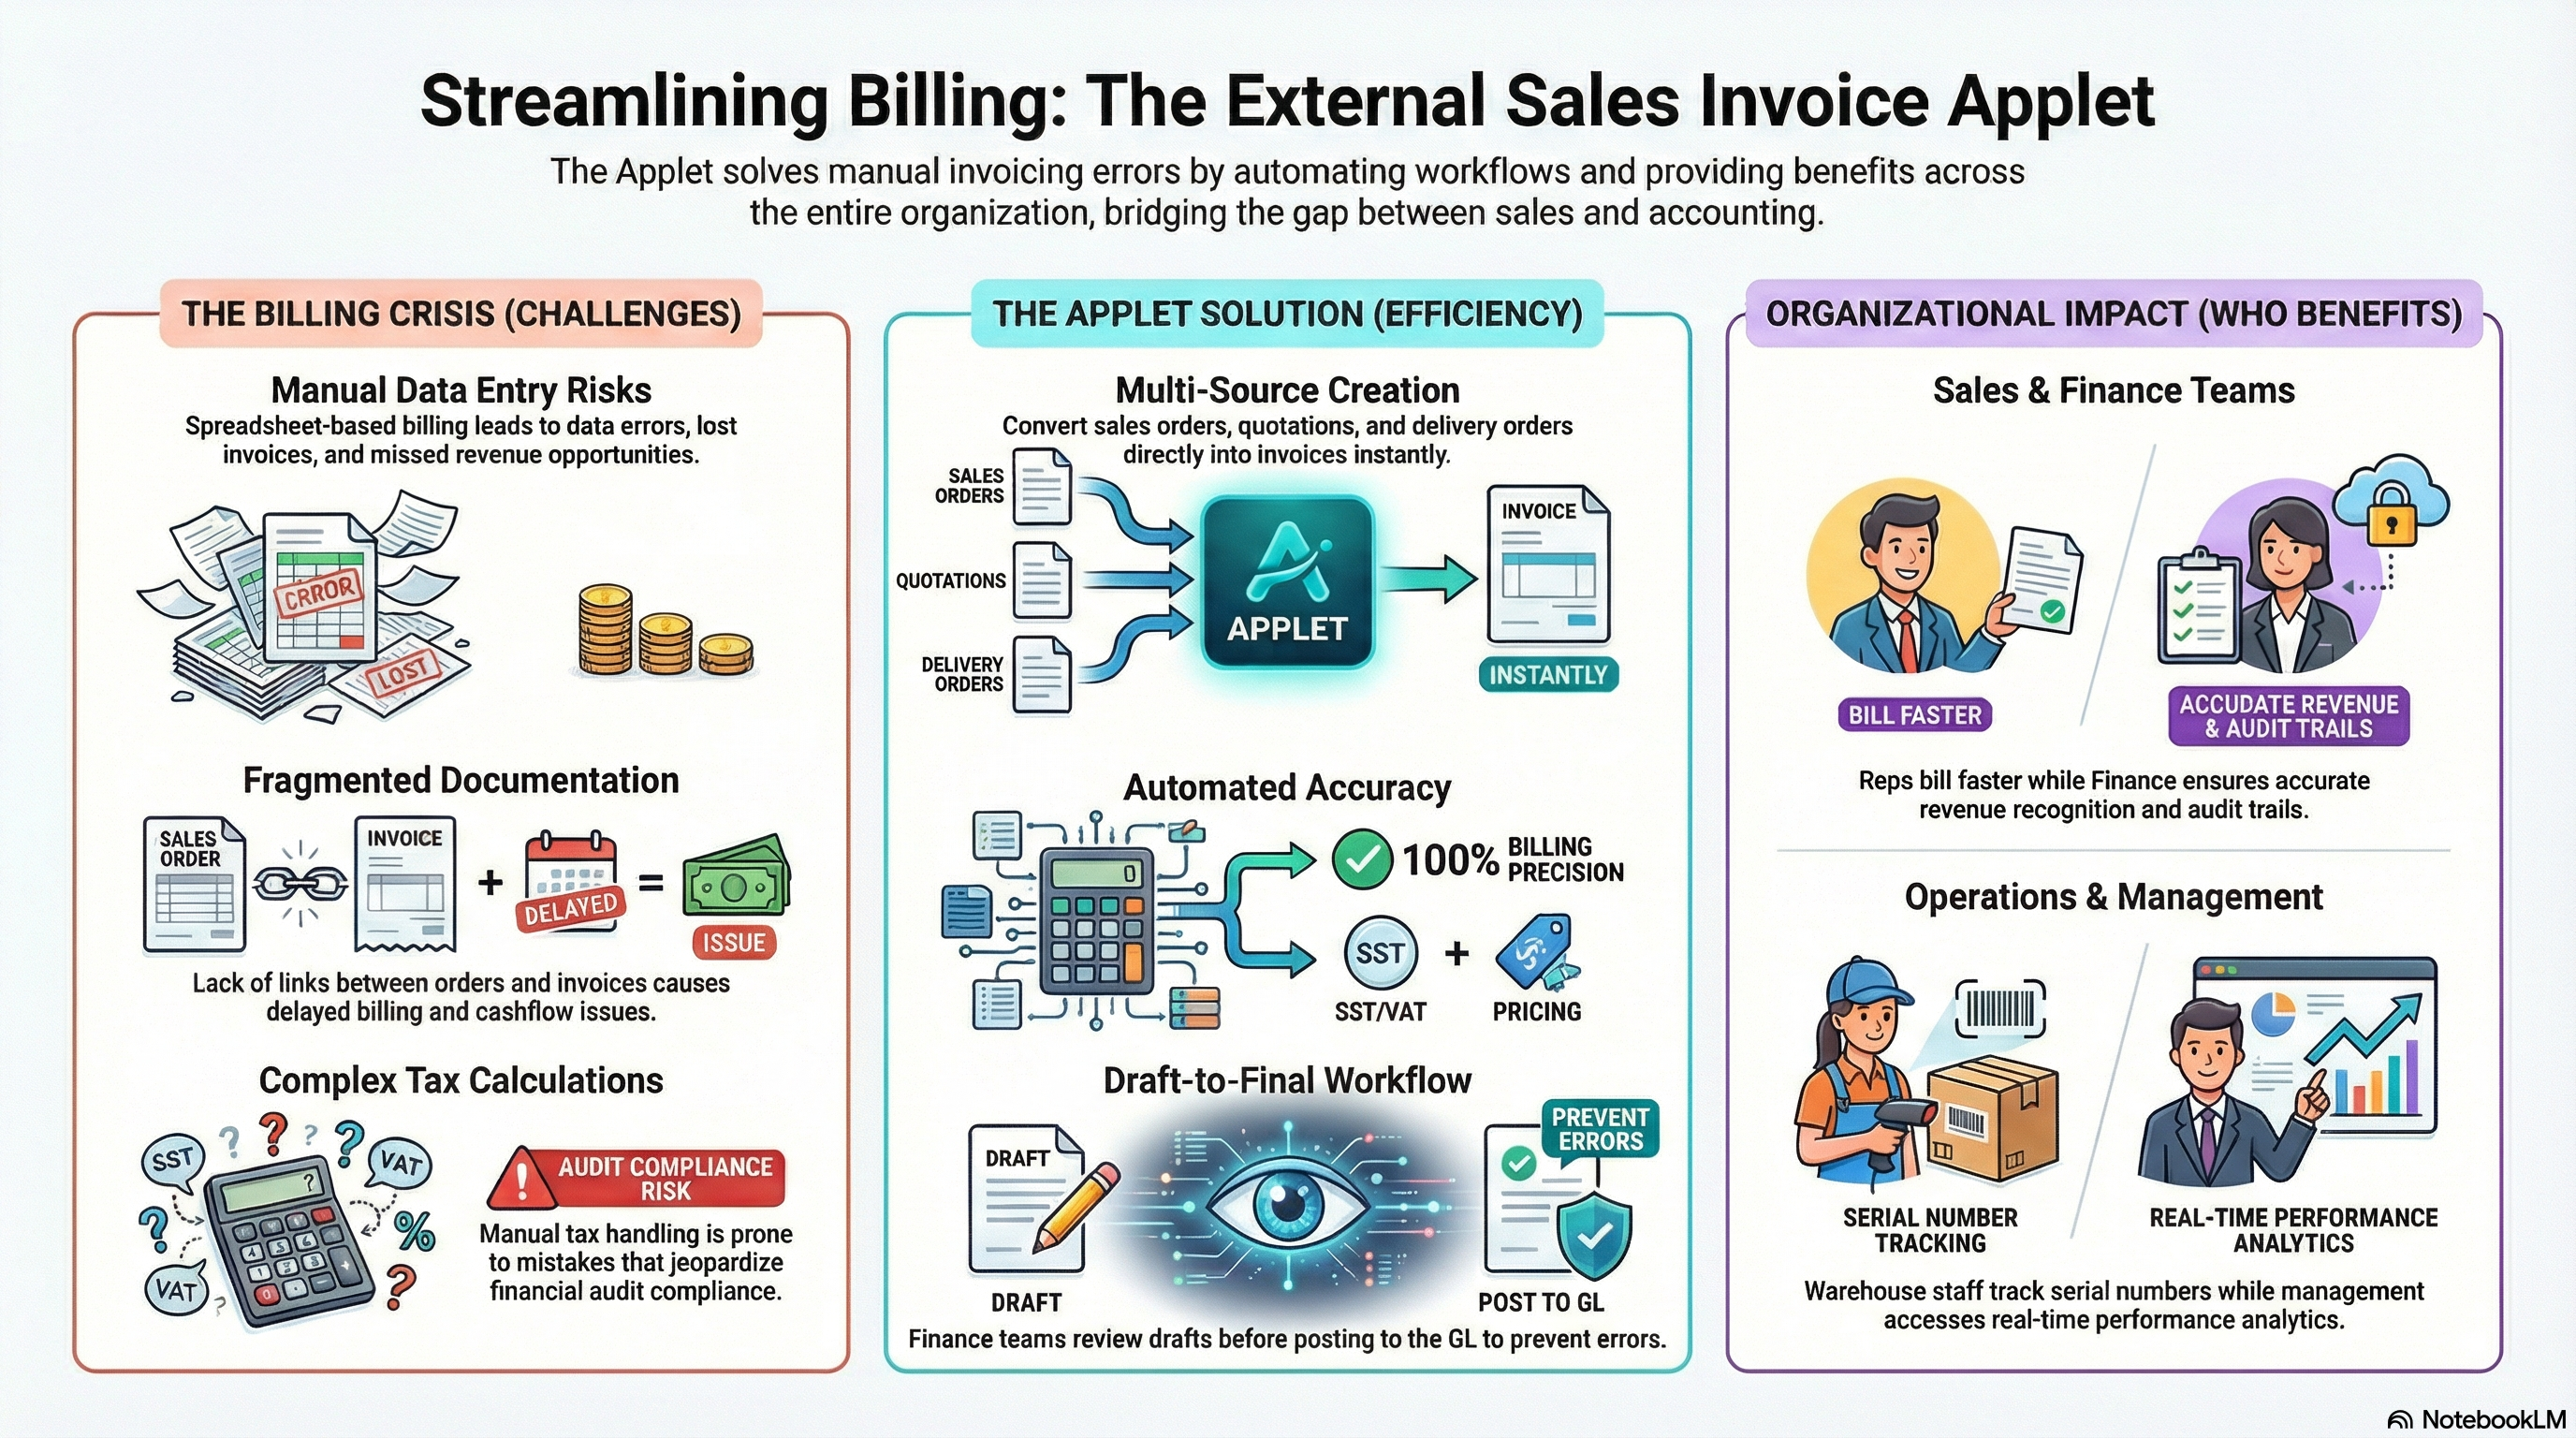
What Problems Does This Solve?
The Manual Invoicing Problem:
Traditional invoicing relies on spreadsheets, email chains, and manual data entry. Common issues include:
- Data entry errors leading to incorrect billing
- Lost invoices and missing revenue
- Manual tax calculations prone to mistakes
- No link to source documents (orders, quotations)
- Serial number tracking done separately
- Delayed billing affecting cash flow
The External Sales Invoice Applet Solution:
- Multi-source creation - Convert sales orders, delivery orders, quotations, or jobsheets directly into invoices
- Automated calculations - Pricing, discounts, taxes, and totals computed instantly
- Smart document linking - Track invoice back to original order or quotation
- Serial number integration - Validate and track serialized items automatically
- Draft workflow - Review before finalizing to prevent errors
- Flexible tax support - SST, VAT, GST, WHT all handled automatically
- Branch/location control - Multi-location businesses operate efficiently
Key Features Overview
Key Concepts
Understanding the Invoice Framework
Every invoicing system must address three fundamental aspects. The External Sales Invoice Applet provides structured handling:
| Aspect | Component | Practical Example |
|---|---|---|
| What are you selling? | Item/Product | Laptops, Services, Spare Parts |
| Who is the customer? | Customer Account | Corporate client, Walk-in customer |
| How is it processed? | Document Workflow | Draft review, Tax calculation, GL posting |
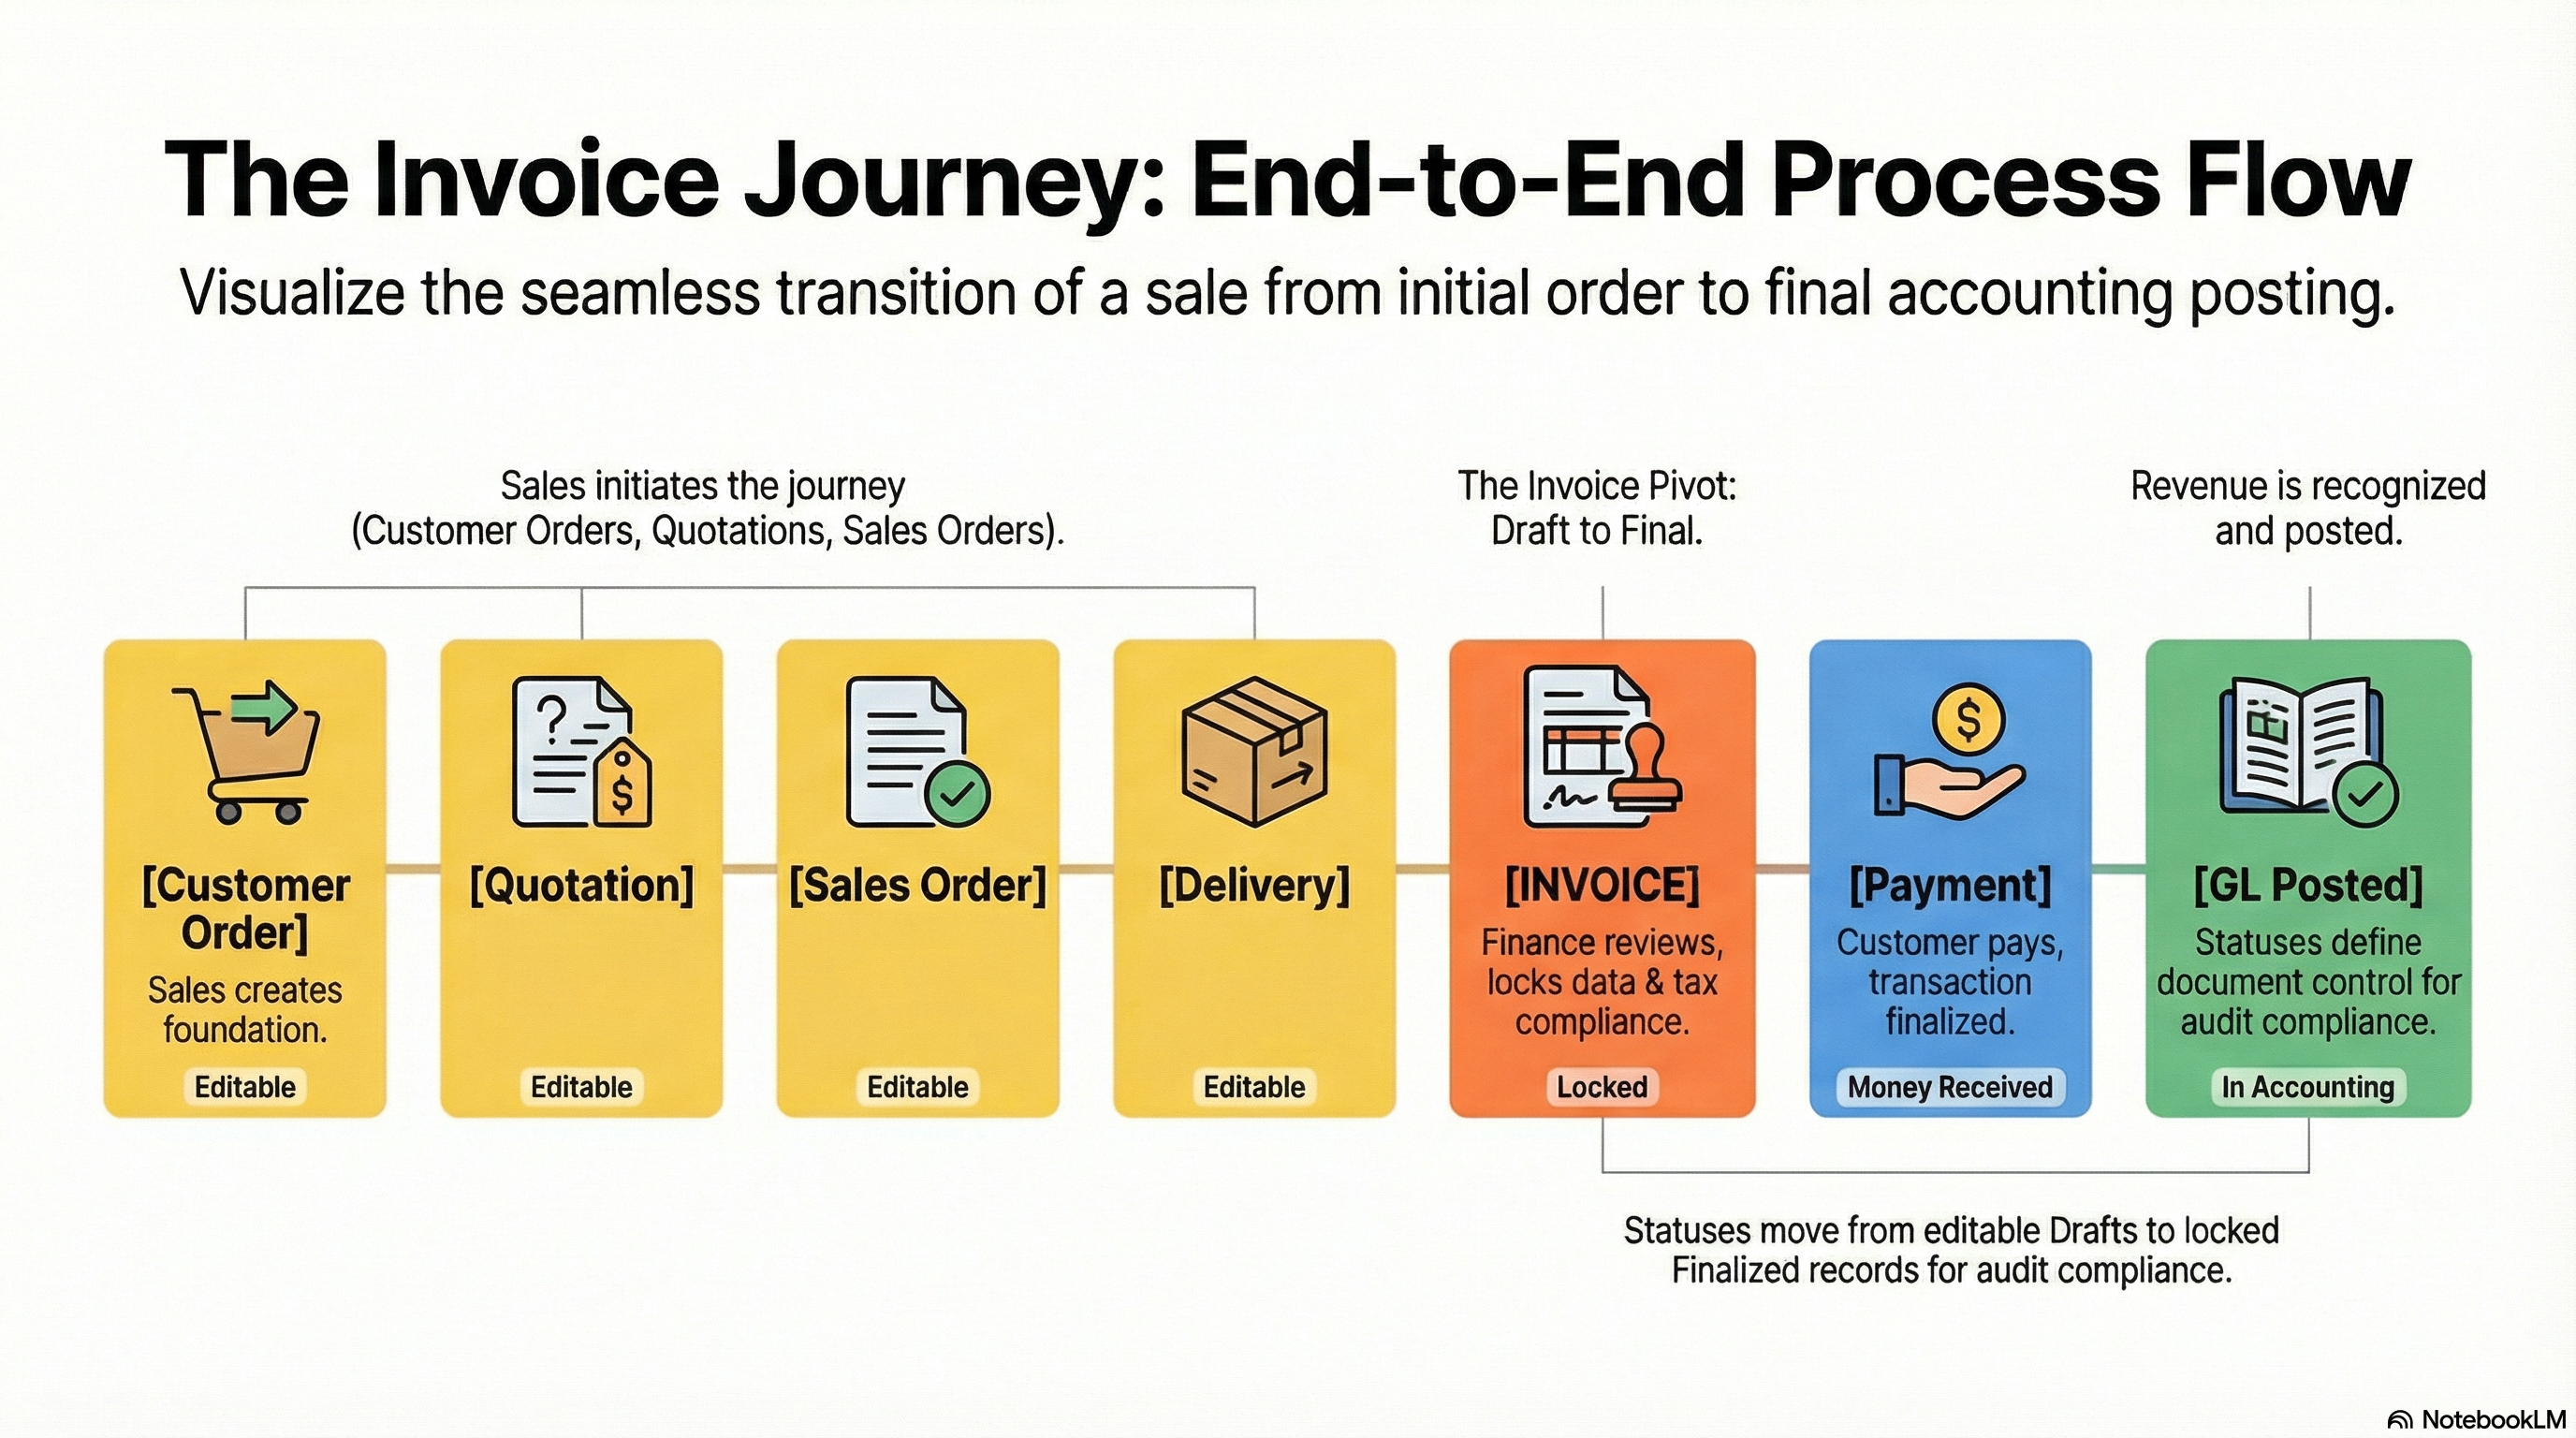
Document Flow Hierarchy
Think of the invoicing process as a structured document flow:
Customer Order
│
├── Quotation (Optional) ──→ Initial pricing proposal
│
├── Sales Order ──→ Confirmed order
│   │
│   └── Delivery Order ──→ Fulfillment confirmation
│       │
│       └── External Sales Invoice ──→ Billing document
│           │
│           └── Payment Receipt ──→ Collection
│
└── GL Posting ──→ Accounting records
Flow Through the Hierarchy:
- Quotation: Initial price proposal to customer
- Sales Order: Confirmed order with agreed pricing
- Delivery Order: Goods delivered to customer
- Invoice: Bill customer for delivered goods
- Payment: Customer pays invoice
- GL: Accounting entry for revenue recognition
This structure enables:
- Complete traceability from quotation to payment
- Flexible workflows (skip steps if not needed)
- Document linking for audit purposes
- Status tracking at each stage
The “Core Triangle” of Sales Invoicing
To effectively manage the system, understand how Items, Pricing, and Taxes work together.
| Component | Analogy | Definition | Example |
|---|---|---|---|
| Item/Product | The “What” | What you’re selling to the customer. | Dell Laptop XPS 15 |
| Pricing Scheme | The “Value” | How much it costs (standard, promotional, negotiated). | RM 5,500 (VIP customer RM 5,000) |
| Tax Configuration | The “Obligation” | Tax applied based on item type and regulations. | SST 10% = RM 500 |
How they link:
- You select an Item (e.g., Dell Laptop)
- System applies Pricing (standard RM 5,500 or special customer rate)
- System calculates Tax (SST 10% if applicable)
- Invoice total = Item Price + Tax - Discounts
Quick Start Guide
Get up and running quickly with these essential workflows.
For Sales Representatives: Create Your First Invoice
Goal: Create and submit an invoice for customer billing in 5 steps.
Step 1: Create Invoice Header
- Navigate to “External Sales Invoice” from the sidebar
- Click "+" (Add New) button
- Fill in required fields:
- Branch: Select your operating branch
- Location: Choose fulfillment location
- Conversion Code: Auto-generated invoice number (e.g., “INV-2024-001”)
- Conversion Name: Invoice reference (e.g., “ABC Corp - January Invoice”)
- Description (Optional): Additional notes
- Click “Create” (saves as DRAFT)
Step 2: Add Line Items
Choose ONE of these methods to add items:
Method A: Search Items Directly
- Go to “Lines” tab
- Click “Search Item”
- Search for product by code or name
- Select item from results
- Enter:
- Quantity: How many units
- UOM: Unit of measure (pieces, boxes, kg)
- Delivery Required: YES/NO
- System auto-calculates: Unit Price, Tax, Total Amount
Method B: Convert Sales Order (Most Common)
- Go to “Lines” tab
- Click “KO For Sales Order” (Knock Off)
- Search for customer’s outstanding sales order
- Select order - System imports all line items with pricing
- Review and adjust quantities if needed
Method C: Convert Quotation
- Click “KO For Sales Quotation”
- Select approved quotation
- System converts quotation items to invoice lines
Method D: Convert Delivery Order
- Click “KO For Delivery Order”
- Select completed delivery
- System imports delivered items for billing
Step 3: Review Calculations
- Check Summary Totals at bottom:
- Total Transaction Amount
- Total SST/VAT/GST Amount
- Rounding Adjustments (if any)
- Verify each line’s pricing and tax
- Confirm serial numbers (if required for items)
Step 4: Save as Draft
- Click “Save”
- Invoice status: DRAFT (editable)
- Finance can review before final posting
Step 5: Submit for Finalization
- Send notification to Finance team
- Finance reviews and clicks “FINAL” button
- Invoice posts to accounting system
- Customer receives bill
What happens next? Invoice moves from DRAFT to FINAL to Posted to GL to Revenue recognized to Customer billed
Pro Tip: Enable serial number validation in Settings if you sell electronics or high-value items requiring tracking.
For Finance Teams: Review and Finalize Invoices
Goal: Review draft invoices and post to accounting in 3 steps.
Step 1: Access Draft Invoices
- Go to “External Sales Invoice” listing
- Filter by: Posting Status = “DRAFT”
- See all invoices awaiting review
Step 2: Review Invoice Details Click on a draft invoice to review:
- Header: Branch, location, invoice code, description
- Lines: All items with quantities, pricing, taxes
- Totals: Transaction amount, tax amount, rounding
- Source Documents: Linked sales orders or quotations
- Serial Numbers: Valid serial numbers for trackable items
Key Checks:
- Pricing matches approved rates
- Tax calculations are correct (SST/VAT/GST)
- Quantities match source documents
- Serial numbers are valid (if applicable)
- Customer details are accurate
- No duplicate invoices
Step 3: Finalize and Post
- Select invoice(s) ready for posting
- Click “FINAL” button
- Confirm action
- System:
- Changes Posting Status: DRAFT to FINAL
- Posts to General Ledger
- Recognizes revenue
- Updates inventory (reduces stock)
- Generates customer bill
Rejection Scenario: If invoice has errors:
- Click “Edit”
- Leave comment for Sales: “Incorrect pricing for Item X - please revise”
- Sales receives notification
- Sales corrects and re-saves
- You review again
Going on Leave? Set up delegation in User Permissions so another finance team member can finalize invoices on your behalf.
For Administrators: Initial System Setup
Goal: Configure the invoicing system for your organization in 6 steps.
Step 1: Configure Default Settings (Settings > Default Selection)
- Set Default Branch: Primary operating branch
- Set Default Location: Default warehouse/location
- These apply to all users unless personalized
Step 2: Configure Application Settings (Settings > Application Settings)
Enable features your business needs:
- Enable SST (Sales & Service Tax) - For Malaysia
- Enable VAT (Value Added Tax) - For other regions
- Enable WHT (Withholding Tax) - If required
- Enable Dimension Tracking - For cost center analysis
- Enable Project Tracking - For project-based billing
Configure Pricing Visibility: Choose which price fields users can see:
- Unit Price Standard (Inclusive/Exclusive of Tax)
- Unit Price UOM
- Unit Price Net
- Transaction Price
- Discount fields
Step 3: Set Up Printable Formats (Settings > Printable Format Settings)
- Design invoice templates (letterhead, logo, layout)
- Configure multiple formats (Standard, Detailed, Summary)
- Set default format for printing/emailing
Step 4: Configure Permissions (Settings > Permission Management)
Define who can:
- Create invoices: Sales team
- Finalize invoices: Finance team
- Delete invoices: Finance Manager only
- Edit finalized invoices: No one (for audit compliance)
Step 5: Set Up Webhooks (Optional - Settings > Webhook)
- Integrate with external systems (CRM, accounting software)
- Configure triggers: On Invoice Create, On Finalize, On Delete
- Set webhook URLs for real-time data sync
Step 6: Test End-to-End
- Sales creates test invoice from sales order
- Finance reviews draft
- Finance finalizes invoice
- Verify GL posting
- Check inventory reduction
- Confirm all workflows operate correctly
Ongoing Maintenance:
- Review field visibility settings quarterly
- Update printable formats as needed
- Monitor permission access logs
- Train new users on the system
New to the system?
- Sales Reps should practice creating invoices from sales orders (most common scenario)
- Finance Teams should review draft invoices daily to prevent billing delays
- Admins should configure default settings before rolling out to users
For Sales Representatives
This section guides you through creating and managing invoices for your customers.
Multi-Source Invoice Creation
What is Multi-Source Creation?
Instead of manually entering invoice data, the system lets you convert existing documents (Sales Orders, Quotations, Delivery Orders, Jobsheets) directly into invoices. This saves time and prevents errors.
Why This Matters:
- Faster billing - No re-entering data from orders
- Error reduction - Pricing and quantities auto-imported
- Document traceability - Always know which order generated which invoice
- Customer confidence - Invoice matches what they ordered
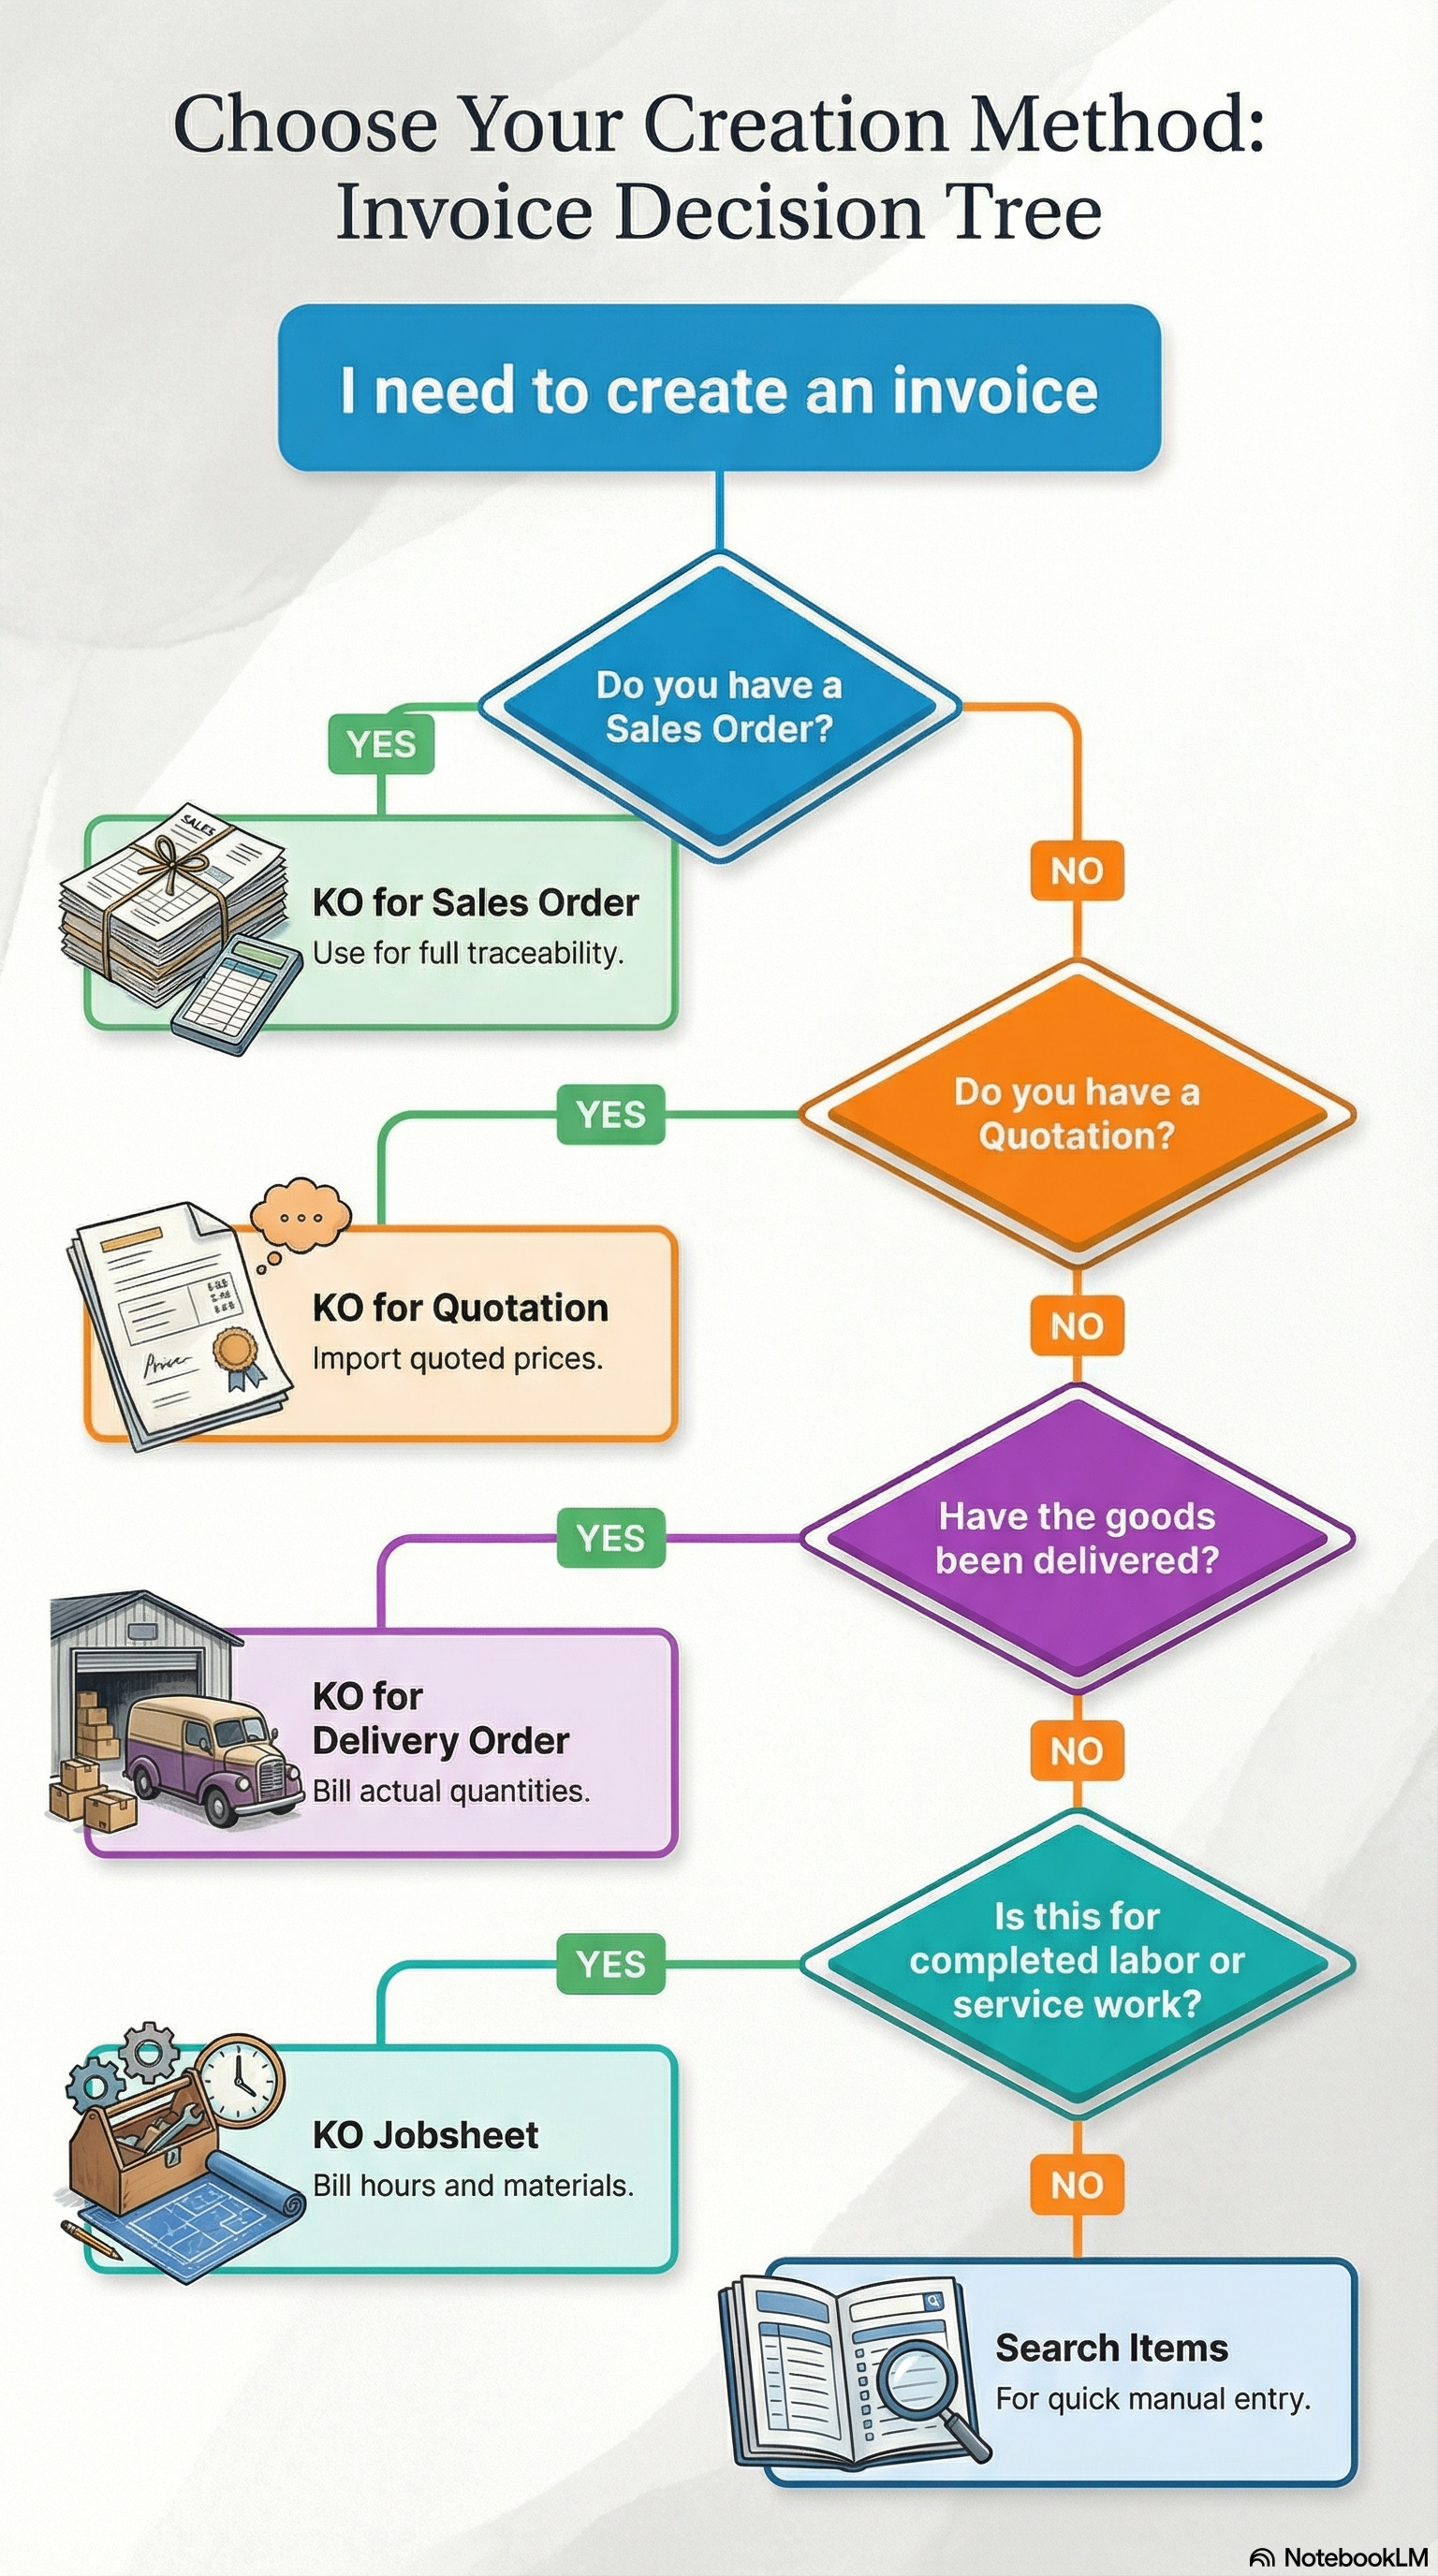
Method 1: Convert Sales Order (Most Common)
When to Use: Customer has approved sales order, goods are ready/delivered, time to bill.
How It Works:
Create Invoice Header
- Branch: Select customer’s branch
- Location: Choose fulfillment warehouse
- Conversion Code: INV-2024-001 (auto-generated)
- Conversion Name: “ABC Corp - SO-2024-050”
Link Sales Order
- Go to Lines tab
- Click “KO For Sales Order” (KO = Knock Off = Link)
- Search for: Customer name or SO number
- Select sales order: SO-2024-050
System Auto-Imports
- All line items from sales order
- Quantities ordered
- Agreed prices
- Tax rates
- Discounts
Review and Adjust
- If partial delivery: Reduce quantities invoiced
- If price changed: Finance adjusts (with approval)
- If items substituted: Add/remove lines
Save as Draft
- Finance reviews before finalizing
Real-World Example:
ABC Corporation ordered 100 laptops @ RM 2,500 each = RM 250,000

Sales Order SO-2024-050:
- 100 x Dell Latitude 5420 @ RM 2,500 = RM 250,000
- SST 10% = RM 25,000
- Total = RM 275,000

You delivered 100 laptops. Time to invoice.

Steps:
1. Create invoice header: "ABC Corp - SO-2024-050"
2. Click "KO For Sales Order"
3. Select SO-2024-050
4. System imports: 100 laptops @ RM 2,500 = RM 275,000 (incl. SST)
5. Save as DRAFT
6. Finance finalizes and ABC Corp receives invoice
Method 2: Convert Quotation
When to Use: Customer approved quotation, skipped sales order step, billing immediately.
How It Works:
- Create invoice header
- Click “KO For Sales Quotation”
- Search for approved quotation
- Select quotation - System imports items and pricing
- System converts quoted prices into invoice amounts
Use Case:
Customer: XYZ Retail
Quotation QT-2024-010: Office furniture package RM 15,000

Customer says: "Approved. Please invoice and deliver."

You:
1. Skip sales order (saves time)
2. Create invoice directly
3. Link to QT-2024-010
4. System imports furniture items @ quoted prices
5. Bill customer RM 15,000
Pro Tip: This method works best for small orders or repeat customers where formal sales orders aren’t required.
Method 3: Convert Delivery Order
When to Use: Goods already delivered, delivery order exists, now billing based on actual delivery.
How It Works:
- Create invoice header
- Click “KO For Delivery Order”
- Select completed delivery order (DO)
- System imports actual delivered quantities (not ordered quantities)
Why This Matters:
If customer ordered 100 units but only accepted 95 (5 damaged), the delivery order shows 95. Invoice reflects what customer actually received.
Use Case:
Sales Order: 100 boxes of tiles
Delivery Order DO-2024-075: 97 boxes delivered (3 boxes damaged in transit)

Correct Invoice:
1. Link to DO-2024-075 (not the SO)
2. System imports: 97 boxes @ agreed price
3. Customer billed for 97 boxes only
4. Remaining 3 boxes: New delivery order + separate invoice later
Method 4: Convert Jobsheet
When to Use: Service-based business, completed work, jobsheet documents labor/materials, now billing.
How It Works:
- Create invoice header
- Click “KO For Jobsheet”
- Select completed jobsheet
- System imports:
- Labor hours × Rate
- Materials used × Cost
- Service charges
Use Case:
Customer: DEF Manufacturing
Jobsheet JS-2024-030: Equipment repair

Jobs performed:
- Labor: 8 hours @ RM 150/hr = RM 1,200
- Spare parts: RM 500
- Service call: RM 200

Total: RM 1,900

You:
1. Link jobsheet to invoice
2. System imports all charges
3. Customer billed RM 1,900 for completed work
Method 5: Search Items Directly (Manual Entry)
When to Use: Quick invoice, no prior documents, one-off sale, ad-hoc billing.
How It Works:
- Create invoice header
- Go to Lines tab
- Click “Search Item”
- Type item code or name: “Laptop” or “ITEM-001”
- Select item from results
- Enter quantity: 5
- System shows: Unit Price, Tax, Total
- Add more lines as needed
Use Case:
Walk-in customer buys:
- 5 x Office Chair @ RM 250 = RM 1,250
- 2 x Desk Lamp @ RM 80 = RM 160

Total: RM 1,410 + SST

You:
1. Search "Office Chair" - Select - Qty 5
2. Search "Desk Lamp" - Select - Qty 2
3. System calculates total: RM 1,410 + SST = RM 1,551
4. Invoice ready
Pro Tip: This method is fastest for simple, small orders with no prior documentation.
Comparison: Which Method Should I Use?
| Scenario | Use Method | Why |
|---|---|---|
| Customer has approved sales order | KO Sales Order | Most common, full traceability |
| Goods delivered, delivery order exists | KO Delivery Order | Bill for actual delivered quantity |
| Customer approved quotation, no formal order | KO Quotation | Skip order step, faster billing |
| Service work completed, jobsheet exists | KO Jobsheet | Bill for labor + materials |
| Quick sale, no prior documents | Search Items | Fastest for ad-hoc sales |
At a Glance: Best Practices
80% of invoices should come from Sales Orders for best traceability and audit compliance. Use other methods strategically:
- Delivery Orders: When actual delivered quantity differs from order
- Quotations: For fast-track approvals without formal sales orders
- Jobsheets: Service-based businesses only
- Direct Search: Emergency or walk-in sales only
When in doubt, always link to a source document for complete audit trail.
Common Questions - Multi-Source Invoice Creation
Q: Can I combine multiple sales orders into one invoice?
A: Yes! Add lines from SO-001, then click “Add Line” again and import from SO-002. Both orders will appear on the same invoice.
Q: What if customer pricing changes after I create the invoice?
A: The invoice uses pricing from the linked source document (Sales Order/Quotation) at time of creation. Future price changes do not affect existing invoices.
Q: Can I edit line items after importing from a sales order?
A: Yes, while in DRAFT status. You can adjust quantities, change pricing (with authorization), or remove lines. Changes do not affect the original sales order.
Q: What happens if I import from the wrong sales order?
A: While in DRAFT status, delete all line items and re-import from the correct sales order. If already finalized, you must create a Credit Note to reverse.
Q: How do I invoice partial deliveries?
A: Use “KO For Delivery Order” instead of “KO For Sales Order”. The Delivery Order shows actual delivered quantities, not ordered quantities.
Q: Can I manually adjust prices after importing from a quotation?
A: Yes, while in DRAFT status, but this requires proper authorization. System logs all price changes for audit purposes.
Line Item Management
What You Can Control Per Line:
- Item Selection: Product code and name
- Quantity: How many units
- UOM (Unit of Measure): Pieces, boxes, kg, liters
- Delivery Required: YES/NO flag
- Serial Numbers: For trackable items (electronics, machinery)
- Pricing: Unit price, discounts, tax
- Totals: Auto-calculated transaction amount
Understanding Quantities and UOMs:
Base Quantity vs UOM Quantity:
Example: You sell paint in 5-liter cans, but customers order in liters.
Item: Premium Paint
Base UOM: Liter (how you track inventory)
Transaction UOM: Can (how customer buys)
Ratio: 1 Can = 5 Liters

Customer orders: 10 cans

System calculates:
- Quantity UOM: 10 cans (what customer sees on invoice)
- Quantity Base: 50 liters (what inventory system tracks)
- UOM to Base Ratio: 1:5
Why This Matters:
- Invoice shows customer-friendly units (cans)
- Inventory tracks actual stock (liters)
- Pricing applies to transaction UOM (price per can)
Delivery Required Flag:
What It Does: Marks whether this line item needs physical delivery or is already delivered.
When to Use:
- YES - Customer expects delivery (furniture, electronics, bulk orders)
- NO - Customer picked up, or digital product, or service
Impact:
Line 1: 50 boxes of tiles - Delivery Required: YES
  - Warehouse team prepares delivery
  - Logistics schedules truck
  - Delivery order created

Line 2: Software license key - Delivery Required: NO
  - Email sent to customer
  - No warehouse action needed
Serial Number Tracking:
What Are Serial Numbers?
Unique IDs for individual items (like your phone’s IMEI number). Used for high-value or trackable products.
When Required:
- Electronics (laptops, phones, servers)
- Machinery (generators, equipment)
- Medical devices
- Warranty-tracked items
How It Works:
- Add line item: “Dell Laptop XPS 15”
- Enter quantity: 3
- Click “Serial Numbers” field
- System prompts: Enter 3 serial numbers
- Enter:
- SN-DELL-001234
- SN-DELL-001235
- SN-DELL-001236
- System validates:
- Serial numbers exist in inventory
- Not already invoiced
- Status = VALID
- If any invalid - Warning: “Serial SN-DELL-001235 already invoiced”
Why This Matters:
- Warranty tracking: Which specific laptop did customer receive?
- Fraud prevention: Can’t invoice same serial number twice
- Returns: Customer returns laptop, serial number links back to this invoice
- Compliance: Some industries require serial number tracking
Visual Example:
Invoice INV-2024-100
Line 1: Dell XPS 15 | Qty: 3 | Unit Price: RM 5,500

Serial Numbers: SN-DELL-001234, SN-DELL-001235, SN-DELL-001236

If customer returns laptop SN-DELL-001235:
- System traces back to INV-2024-100
- Verifies purchase date, warranty status
- Processes return/replacement
Adding Multiple Line Items:
Scenario: Mixed Product Invoice
Customer: GHI Trading
Order:
- 100 boxes Paper A4 @ RM 15 = RM 1,500
- 50 boxes Pens @ RM 25 = RM 1,250
- 10 Printers @ RM 800 = RM 8,000 (Serial numbers required)
- Delivery charge = RM 200

Invoice Lines:
Line 1: Paper A4 | 100 boxes | RM 15 | RM 1,500 | Delivery: YES | Serial: N/A
Line 2: Pens | 50 boxes | RM 25 | RM 1,250 | Delivery: YES | Serial: N/A
Line 3: Printer | 10 units | RM 800 | RM 8,000 | Delivery: YES | Serial: 10 numbers
Line 4: Delivery | 1 service | RM 200 | RM 200 | Delivery: N/A | Serial: N/A

Summary:
- Total Transaction Amount: RM 10,950
- SST 10%: RM 1,095
- Grand Total: RM 12,045
Pro Tips:
Always verify quantities before saving (prevent over/under-billing) Check serial numbers for high-value items (avoid disputes later) Mark delivery required accurately (warehouse needs to know) Review totals in summary section before finalizing
Pricing and Tax Configuration
Quick Summary: How Pricing and Tax Work
The system supports multiple pricing tiers (Standard, VIP, Negotiated) and automatically calculates taxes (SST, VAT, GST, WHT). Prices can be displayed inclusive or exclusive of tax based on your business model. Discounts can be applied at unit level or invoice level. All calculations are automated—you just need to select the right configuration during invoice creation.
Pricing Tiers Explained
The system supports multiple pricing tiers to accommodate different scenarios:
1. Standard Price (Pricing Scheme)
- Base price from product master
- Default for all customers
- Example: Laptop standard price = RM 3,000
2. Unit Price (Negotiated Price)
- Customer-specific pricing
- Overrides standard price
- Example: VIP customer gets RM 2,800
3. Transaction Price (Final Price)
- Includes all adjustments (discounts, taxes)
- What customer actually pays
- Example: RM 2,800 - 5% discount = RM 2,660 + SST
Price Display Options
Inclusive vs Exclusive of Tax:
Exclusive of Tax (Common in B2B):
Item: Office Chair
Unit Price: RM 1,000 (excl. tax)
SST 10%: + RM 100
Total: RM 1,100

Invoice shows:
Unit Price: RM 1,000
Tax: RM 100
Amount: RM 1,100
Inclusive of Tax (Common in Retail):
Item: Office Chair
Unit Price: RM 1,100 (incl. tax)
SST 10% embedded: RM 100
Net Amount: RM 1,000

Invoice shows:
Unit Price: RM 1,100 (incl. SST)
Tax embedded: RM 100
Net Amount: RM 1,000
Admin Controls: Settings > Application Settings > Configure which price fields are visible to users.
Tax Calculations
SST (Sales & Service Tax) - Malaysia:
Item Price: RM 1,000
SST 10%: RM 100
Total: RM 1,100

Applied to: Most goods and services
Collected: By seller from buyer
Remitted: To government monthly/quarterly
VAT (Value Added Tax) - Other Regions:
Similar to SST but with input/output tax credit mechanism.
WHT (Withholding Tax):
Invoice Amount: RM 10,000
WHT 5%: -RM 500 (withheld by customer, paid to government)
Customer Pays: RM 9,500
You Receive: RM 9,500 (claim back RM 500 from government later)

Applied to: Service fees, professional fees, commissions
GST (Goods & Services Tax):
Comprehensive tax on all transactions (replaced by SST in Malaysia).
Discount Management
Unit Discount (Per Item):
Item: Laptop
Quantity: 10
Unit Price: RM 2,500
Unit Discount: RM 100 (4%)

Calculation:
Discounted Price: RM 2,500 - RM 100 = RM 2,400 per laptop
Total: RM 2,400 × 10 = RM 24,000
SST 10%: RM 2,400
Grand Total: RM 26,400
Discount Amount (Total Discount):
Invoice Subtotal: RM 50,000
Discount: RM 2,500 (5%)
Net Amount: RM 47,500
SST 10%: RM 4,750
Grand Total: RM 52,250
Admin Configuration: Control whether discounts apply before tax or after tax in Settings.
Rounding Adjustments
Why Rounding?
Tax calculations often result in decimals: RM 1,234.567
Systems round to: RM 1,234.57 (2 decimal places)
But, summing multiple lines may cause small discrepancies:
Line 1: RM 1,234.567 to Rounded: RM 1,234.57
Line 2: RM 2,345.678 to Rounded: RM 2,345.68
Line 3: RM 3,456.789 to Rounded: RM 3,456.79

Sum: RM 7,037.04
Actual: RM 7,037.034

Rounding Adjustment: +RM 0.01
System Auto-Adjusts: Ensures invoice total matches accounting precision.
Real-World Pricing Example
Customer: JKL Enterprises (VIP Customer)
Item: Industrial Generator

Standard Price: RM 50,000
VIP Price: RM 45,000 (10% discount)
Quantity: 1
Unit Discount: RM 2,000 (promotional offer)
---
Calculation:
VIP Price: RM 45,000
Unit Discount: -RM 2,000
Net Price: RM 43,000
SST 10%: +RM 4,300
Transaction Price: RM 47,300

Invoice Line Shows:
Unit Price: RM 45,000 (incl. VIP discount)
Discount: RM 2,000 (promo)
Net Amount: RM 43,000
SST: RM 4,300
Total: RM 47,300
Pro Tip: Always verify pricing with Finance before finalizing if discounts exceed authorized limits (e.g., >10%).
Common Questions - Pricing and Tax
Q: Can I change the tax rate on an invoice?
A: Yes, while in DRAFT status, if you have proper authorization. After finalization, the tax rate is locked. You would need to void and recreate the invoice.
Q: Why is my discount not showing correctly?
A: Check if admin configured discounts to apply before or after tax. Also verify you have authorization to apply discounts exceeding your limit (typically 10% for sales reps).
Q: What if the customer is tax-exempt?
A: Select the customer’s tax configuration profile which should be set to “Tax Exempt” or “Zero-Rated”. The system will automatically apply 0% tax.
Q: Can I mix tax rates on the same invoice?
A: Yes. Each line item has its own tax configuration. For example, Line 1 might have SST 10%, while Line 2 is Zero-Rated.
Q: How do I apply WHT (Withholding Tax)?
A: WHT is configured at the customer level. When you select a customer with WHT enabled, the system automatically calculates and deducts the withholding amount.
Q: What causes rounding adjustments?
A: When individual line items are rounded to 2 decimal places, small differences (0.01 to 0.05) can occur. The system auto-adjusts to ensure the total matches accounting precision.
Serial Number Management
What Are Serial Numbers?
Unique identifiers for individual items—like a birth certificate for products. Essential for warranty tracking, fraud prevention, and returns management.
When to Use Serial Numbers:
High-value items: Laptops, phones, servers, machinery Warranty-tracked products: Electronics with manufacturer warranties Regulated items: Medical devices, safety equipment Returns-prone products: Items with high return rates
Don’t Use For:
- Consumables (paper, pens, office supplies)
- Low-value items (< RM 100)
- Bulk commodities (screws, nails)
How Serial Number Tracking Works:
Step 1: Enable Serial Tracking (Admin)
Settings > Application Settings > Enable Serial Number Tracking- Configure per item: Which products require serial numbers
Step 2: Assign Serial Numbers at Invoice Creation
Sales Rep creates invoice:
- Line Item: Dell Laptop XPS 15
- Quantity: 5

System prompts: "Enter 5 serial numbers"

Sales rep enters:
1. SN-DELL-100234
2. SN-DELL-100235
3. SN-DELL-100236
4. SN-DELL-100237
5. SN-DELL-100238
Step 3: System Validates
Real-time checks:
- Serial number exists in inventory?
- Not already invoiced/sold?
- Status = VALID (not DAMAGED, RETURNED)?
- Matches item type (Dell laptop serial for Dell laptop)?
Step 4: Lock Serial Numbers
Once invoice finalized:
- Serial numbers marked as SOLD
- Locked to this invoice
- Cannot be reused on another invoice
Real-World Example: Electronics Store
Customer: MNO Corporation
Order: 10 laptops for new employees

Invoice Creation:
1. Create invoice header
2. Add line: 10 x Dell XPS 15 @ RM 5,500 = RM 55,000
3. Click "Serial Numbers" field
4. System opens serial number entry form

Warehouse provides list:
SN-DELL-100234
SN-DELL-100235
SN-DELL-100236
SN-DELL-100237
SN-DELL-100238
SN-DELL-100239
SN-DELL-100240
SN-DELL-100241
SN-DELL-100242
SN-DELL-100243

System validates all 10 and all are VALID

Invoice finalized and serial numbers locked and laptops shipped

---

3 Months Later: Customer Returns 1 Laptop

Return Document:
- Returns laptop with serial: SN-DELL-100237
- Reason: Screen flicker

System:
1. Searches serial: SN-DELL-100237
2. Finds original invoice: INV-2024-150
3. Checks warranty: Within 12-month warranty period (valid)
4. Processes return/replacement
5. Un-locks serial SN-DELL-100237 for new sale
Why This Matters:
- Warranty verification: Proves purchase date and source
- Fraud prevention: Customer can’t return item not purchased from you
- Tracking: Know exactly which customer received which specific item
Serial Number Validation Errors:
Error 1: Serial Number Already Invoiced
You enter: SN-DELL-100245

System Warning: "Serial number SN-DELL-100245 already invoiced on INV-2024-090 (Customer: XYZ Trading)"

Cause: Someone else already sold this laptop
Fix: Check inventory, use a different serial number
Error 2: Serial Number Not Found
You enter: SN-DELL-999999

System Warning: "Serial number SN-DELL-999999 not found in inventory"

Cause: Typo, or serial not yet received in warehouse
Fix: Verify serial number with warehouse, correct typo
Error 3: Serial Number Status Invalid
You enter: SN-DELL-100250

System Warning: "Serial number SN-DELL-100250 status = DAMAGED (not available for sale)"

Cause: Item failed quality check
Fix: Use a different unit, report damaged unit to supervisor
Bulk Serial Number Entry:
For large orders (50+ items with serial numbers), use bulk upload:
- Click “Upload Serial Numbers”
- Download template (Excel)
- Fill in serial numbers:
Row 1: SN-DELL-100234 Row 2: SN-DELL-100235 Row 3: SN-DELL-100236 ... Row 50: SN-DELL-100283 - Upload file
- System validates all 50 serials at once
- Displays any errors for correction
Pro Tip: Use barcode scanners to scan serial numbers directly into the system—faster and fewer typos!
Critical: Serial Number Lock Warning
Once an invoice is finalized, serial numbers are permanently locked to that invoice. They cannot be reused on another invoice until:
- The original invoice is voided through proper procedures, OR
- A return is processed that releases the serial number
Always double-check serial numbers before finalizing to avoid inventory discrepancies and customer disputes.
Common Questions - Serial Number Management
Q: What if I accidentally enter the wrong serial number?
A: While in DRAFT status, you can edit and correct the serial number. After finalization, contact Finance to void the invoice and recreate it.
Q: Can I use the same serial number on multiple invoices?
A: No. Each serial number can only be invoiced once. The system validates in real-time and prevents duplicate entries.
Q: What happens if a serialized item is returned?
A: Process a return through the Returns module. The system will unlock the serial number, changing its status from SOLD back to AVAILABLE for resale.
Q: How do I find which invoice a specific serial number was sold on?
A: Use the Serial Number Search function: Enter the serial number, and the system displays the invoice number, customer, date, and warranty status.
Q: Do I need serial numbers for all items?
A: No. Only items configured as “Serial Number Required” need them. Typically high-value electronics, machinery, and warranty-tracked items.
Q: Can I bulk upload serial numbers?
A: Yes. Use the “Upload Serial Numbers” feature with a CSV/Excel template. Useful for large orders with 20+ serialized items.
Document Workflow
Understanding Draft vs Final:
DRAFT Status:
- Invoice created but not finalized
- Editable (can change quantities, prices, items)
- Not posted to accounting (no GL entries)
- Not visible to customer
- Finance can review before posting
FINAL Status:
- Invoice finalized and posted
- Not editable (audit compliance)
- Posted to General Ledger (revenue recognized)
- Customer receives bill
- Inventory reduced
Why This Two-Step Process?
Prevents Billing Errors:
Sales Rep Scenario:
- Creates invoice quickly: INV-2024-200
- Status: DRAFT
- Makes mistake: Quantity 1000 instead of 100

Finance catches error during review:
- Rejects invoice with comment: "Quantity error"
- Sales rep edits draft
- Corrects: Quantity 100
- Re-submits for finalization
- Finance finalizes: Status changes to FINAL
- Customer billed correctly
Without draft workflow:
- Invoice posts immediately and customer billed RM 100,000 instead of RM 10,000
- Requires credit note to reverse (messy)
- Customer loses confidence
Complete Workflow: Draft to Final to Posted
Stage 1: Sales Creates Draft
- Sales rep creates invoice
- Adds line items from sales order
- Reviews totals
- Saves as DRAFT
- Notifies Finance team
Stage 2: Finance Reviews
- Finance opens draft invoice
- Checks:
- Pricing matches approved rates
- Quantities match source documents
- Tax calculated correctly
- No duplicate invoices
- Customer credit limit ok
- Decision:
- Approve: Click “FINAL” - Proceeds to Stage 3
- Reject: Leave comment - Back to Sales
Stage 3: System Posts Automatically upon “FINAL” click:
- Change status: DRAFT to FINAL
- Post to GL:
Dr. Accounts Receivable (Customer) RM 52,250 Cr. Sales Revenue RM 47,500 Cr. SST Payable RM 4,750 - Update Inventory:
- Reduce stock quantities
- Update serial number status (AVAILABLE to SOLD)
- Generate Documents:
- PDF invoice for customer
- Delivery order (if delivery required)
- Send Notifications:
- Email to customer with invoice PDF
- Email to sales rep: “Invoice finalized”
Stage 4: Customer Payment (Handled in separate Accounts Receivable module)
Important: Draft vs Final Status
The two-step workflow exists to prevent billing errors:
- DRAFT: Fully editable, not posted to accounting, allows review
- FINAL: Locked permanently, posted to GL, cannot be edited
Once you click “FINAL”, there is no undo button. To correct errors in finalized invoices, you must create a Credit Note to reverse the transaction. Always review carefully before finalizing.
Invoice Statuses Explained:
| Status | What It Means | What You Can Do | Impact |
|---|---|---|---|
| Draft | Created but not finalized | Edit all fields, add/remove lines, delete invoice | No accounting impact, not visible to customer |
| Final | Locked and posted | View only - no edits allowed | Posted to GL, customer receives invoice |
| Posted to GL | In accounting system | Track payment status | Revenue recognized, inventory reduced |
| Partially Paid | Customer paid partial amount | Follow up for remaining balance | Some receivables outstanding |
| Fully Paid | Completely settled | Archive for records | Accounts receivable closed |
| Cancelled | Voided invoice | Create credit note if needed | Reversed in accounting |
| Overdue | Past payment due date | Send payment reminder, apply late fees | Affects customer credit rating |
Status Progression:
DRAFT → FINAL → Posted to GL → Partially Paid → Fully Paid
  ↓
Cancelled (if errors found)Best Practice Timing:
- Sales Reps: Create and save as DRAFT within same business day
- Finance Teams: Review and finalize within 24-48 hours maximum
- Customer: Receives invoice immediately upon finalization
- Payment: Track receivables and follow up at 7, 14, 30 days
Faster finalization = Faster customer billing = Better cash flow
Common Questions - Document Workflow
Q: Can I edit an invoice after it’s finalized?
A: No. Once finalized, invoices are locked for audit compliance. You must create a Credit Note to reverse any errors, then create a new correct invoice.
Q: What if I accidentally finalized the wrong invoice?
A: Contact Finance or Admin immediately. Only authorized personnel can void finalized invoices. They will create a Credit Note to reverse it.
Q: How long do draft invoices stay in the system?
A: Indefinitely, but best practice is to finalize within 24-48 hours to maintain healthy cash flow and prevent backlogs.
Q: Can I delete a finalized invoice?
A: No. Finalized invoices cannot be deleted for audit trail purposes. Use Credit Notes to reverse transactions.
Q: What happens if Finance rejects my draft?
A: The invoice remains in DRAFT status. Finance will leave comments explaining what needs correction. You edit the draft, fix the issues, and resubmit.
Q: Can I bypass the draft workflow and finalize immediately?
A: Only if you have special authorization (typically Finance roles). Best practice is to always use the two-step workflow to catch errors.
Q: Who gets notified when an invoice is finalized?
A: The system sends email notifications to: (1) The sales rep who created it, (2) The customer with invoice PDF attached, (3) Finance team for records.
Editing Invoices:
Can Edit:
- DRAFT invoices: Fully editable (quantities, prices, items)
- Before finalization: Change anything needed
Cannot Edit:
- FINAL invoices: Locked for audit compliance
- Posted invoices: Requires reversal process (credit note)
How to Edit a Draft:
- Go to invoice listing
- Filter: Posting Status = DRAFT
- Click on invoice number
- System opens edit view
- Make changes:
- Add/remove line items
- Adjust quantities
- Change pricing (with authorization)
- Update serial numbers
- Click “Save”
- Re-submit for Finance review
Deleting Invoices:
Delete Draft:
- Go to invoice listing
- Select draft invoice
- Click “Delete” button
- Confirm action
- Invoice status: ACTIVE to DELETED
- Not permanently removed (audit trail preserved)
Cannot Delete Final:
- FINAL invoices cannot be deleted
- Must use Credit Note to reverse
- Maintains accounting integrity
Real-World Workflow Example:
Monday 9:00 AM: Sales Rep Creates Invoice
- Customer: PQR Industries
- Amount: RM 25,000
- Status: DRAFT
- Notifies Finance

Monday 11:00 AM: Finance Reviews
- Reviews draft
- Notices: Pricing 10% too low (missed discount expiration)
- Rejects with comment: "Pricing error - discount expired, use standard rate"

Monday 2:00 PM: Sales Rep Corrects
- Opens draft invoice
- Adjusts pricing: RM 25,000 to RM 27,500
- Re-saves draft
- Notifies Finance: "Pricing corrected"

Monday 3:00 PM: Finance Approves
- Re-reviews draft
- Pricing correct (approved)
- Clicks "FINAL"
- System posts to GL
- Customer receives invoice via email

Monday 4:00 PM: Warehouse Ships
- Delivery order generated
- Goods shipped to customer
- Tracking number updated in system

Tuesday: Customer Pays
- Customer transfers RM 27,500
- Finance records payment
- Invoice marked as PAID
Pro Tip: Establish SLA (Service Level Agreement) with Finance team—e.g., “Review drafts within 4 hours” to prevent billing delays.
For Finance & Accounting Teams
This section helps finance teams review, finalize, and manage the accounting impact of sales invoices.
Finalizing Invoices: The Finance Gateway
Your Role: Quality Control + Accounting Integrity
Finance teams are the checkpoint before invoices hit the books and customers receive bills. Your review ensures:
- Pricing accuracy
- Tax compliance
- Policy adherence
- Accounting integrity
What to Check Before Finalizing:
1. Pricing Verification
Compare invoice pricing against approved sources:
Sales orders: Does invoice match SO pricing? Quotations: Does invoice match quoted amounts? Price lists: Are prices from current, valid price list? Discounts: Are discounts within authorized limits?
Example:
Invoice: RM 45,000
Sales Order: RM 50,000

Question: Why the difference?

Check:
- Discount applied: 10% promotional discount
- Authorized by: Sales Manager (approval email attached)
- Valid until: Oct 31, 2024 (Valid)

Decision: Approve
Red Flag:
Invoice: RM 30,000
Sales Order: RM 50,000

Discount: 40% (!!!)

Question: Who authorized 40% discount?

Check:
- No approval email
- Exceeds limit (Sales Manager max: 15%)

Decision: Reject and request proper authorization
2. Tax Calculation Accuracy
SST Verification:
Subtotal: RM 10,000
SST 10%: Should be RM 1,000
Invoice shows: RM 1,000 (Correct)

Approve
Common Errors:
Error 1: SST applied twice
Subtotal: RM 10,000
SST: RM 1,100 (should be RM 1,000)
Cause: Manual override error
Fix: Regenerate tax calculation

Error 2: Wrong tax rate
Subtotal: RM 10,000
SST 5%: RM 500 (should be 10% = RM 1,000)
Cause: Old tax rate not updated
Fix: Apply current rate

Error 3: Tax-exempt item taxed
Item: Medical supplies (tax-exempt)
SST charged: RM 500
Fix: Remove SST, issue corrected invoice
3. Quantity Reconciliation
Match invoice quantities against source documents:
Sales Order: 100 units
Delivery Order: 100 units delivered
Invoice: 100 units

Perfect match and approved
Partial Delivery Scenario:
Sales Order: 100 units
Delivery Order 1: 60 units delivered (Oct 1)
Delivery Order 2: 40 units delivered (Oct 15)

Invoice Option A: Bill 100 units at once (Oct 15)
Invoice Option B: Bill 60 units (Oct 1) + 40 units (Oct 15) separately

Company Policy: Bill upon delivery
Decision: Two separate invoices preferred
4. Serial Number Validation (High-Value Items)
For items requiring serial numbers:
Line Item: 10 x Servers @ RM 15,000 = RM 150,000

Check:
- Serial numbers entered: 10
- All serials VALID
- No duplicates
- Match item type

Warehouse confirmation:
- Physical count: 10 servers packed for delivery
- Serial list matches system

Decision: Approve
Red Flag:
Line Item: 10 servers
Serial numbers entered: 8 (!!!)

Missing 2 serial numbers

Decision: Reject
Comment: "Missing serial numbers for 2 units - verify with warehouse"
5. Customer Credit Limit Check
Customer: RST Corporation
Credit Limit: RM 100,000

Outstanding Invoices:
- INV-2024-150: RM 45,000 (unpaid)
- INV-2024-175: RM 30,000 (unpaid)
Total Outstanding: RM 75,000

New Invoice: INV-2024-200: RM 35,000

Check:
Outstanding + New = RM 75,000 + RM 35,000 = RM 110,000
Exceeds Credit Limit by RM 10,000

Decision Options:
A) Reject invoice and request Sales to get payment first
B) Escalate to CFO for credit limit increase
C) Request 50% down payment before finalizing
6. Duplicate Invoice Check
New Invoice: INV-2024-225
Customer: UVW Trading
Amount: RM 25,000
Date: Oct 20

Search Existing:
- INV-2024-220: UVW Trading, RM 25,000, Oct 20 (!!!)

Possible duplicate!

Verify:
- Check source docs: Different sales orders
- Check items: Different products
- Confirm with sales: Two separate orders

Decision: Not duplicate and approve both
7. GL Account Mapping
Verify invoice posts to correct accounts:
Invoice Type: Product Sale
Should post to:
- Dr. Accounts Receivable | Customer
- Cr. Sales Revenue - Product Sales | Revenue Account 4100
- Cr. SST Payable | Liability Account 2500

Invoice Type: Service Fee
Should post to:
- Dr. Accounts Receivable | Customer
- Cr. Sales Revenue - Services | Revenue Account 4200
- Cr. WHT Payable | Liability Account 2501

Verify correct accounts before finalizing.
Finalization Process:
Step 1: Access Queue
- Go to External Sales Invoice
- Apply filter: Posting Status = DRAFT
- Sort by: Date Created (oldest first—clear backlog)
Step 2: Review Each Invoice
- Open draft invoice
- Run through checklist above (1-7)
- Document any issues
Step 3: Make Decision
Option A: Approve and Finalize
- All checks passed
- Select invoice(s)
- Click “FINAL” button
- Confirm action
- System posts to GL immediately
Option B: Reject for Correction
- Found errors
- Click “Edit” or “Comment”
- Leave detailed comment:
"Pricing incorrect - Sales Order SO-2024-100 shows RM 50,000 but invoice shows RM 45,000. Please verify discount authorization or adjust pricing." - System notifies Sales Rep
- Sales corrects and resubmits
Option C: Query for Clarification
- Uncertain about something
- Click “Query”
- Send message:
"Customer credit limit exceeded by RM 10,000. Has customer provided down payment? Attach proof of payment before I finalize." - Wait for response
- Re-review after clarification
Step 4: Bulk Processing (High Volume)
For routine, low-risk invoices:
- Filter: Amount < RM 5,000 (low-value, low-risk)
- Quick review (spot check 20%)
- Select multiple invoices (Ctrl+Click)
- Click “Bulk Finalize”
- System finalizes all at once
Pro Tip: Reserve bulk finalization for small, routine invoices only. Always individually review high-value invoices (> RM 50,000).
After Finalization: What Happens?
Immediate System Actions:
GL Posting:
Date: Oct 20, 2024
Invoice: INV-2024-225
Customer: XYZ Corporation

Journal Entry:
Dr. 1200 - Accounts Receivable (XYZ)    RM 55,000
   Cr. 4100 - Sales Revenue                       RM 50,000
   Cr. 2500 - SST Payable                          RM 5,000
Inventory Update:
- Stock quantities reduced
- Serial numbers marked as SOLD
- Inventory value updated
Customer Notification:
- Email sent to customer
- PDF invoice attached
- Payment instructions included
Internal Notifications:
- Sales rep: “Invoice finalized”
- Warehouse: Delivery order generated (if delivery required)
- Accounts Receivable: New receivable added to aging
Handling Errors After Finalization:
Problem: Invoice finalized with error (wrong amount, wrong customer, wrong items)
Solution: Credit Note Process
Cannot simply “un-finalize” or edit—accounting integrity requires proper reversal.
Steps:
- Create Credit Note to reverse incorrect invoice
- Create New Correct Invoice
- Both documents visible in audit trail
Example:
Original Invoice: INV-2024-250
Customer: ABC Corp
Amount: RM 100,000 (WRONG - should be RM 90,000)
Date: Oct 20
Status: FINAL (cannot edit!)

Error: Quantity 100 instead of 90

Correction Process:
1. Create Credit Note: CN-2024-050
   - Reverses INV-2024-250
   - Amount: -RM 100,000
   - Date: Oct 21

2. Create New Invoice: INV-2024-251
   - Correct quantity: 90
   - Amount: RM 90,000
   - Date: Oct 21

Accounting Impact:
- Original Invoice: +RM 100,000 revenue
- Credit Note: -RM 100,000 revenue
- Corrected Invoice: +RM 90,000 revenue
- Net Effect: RM 90,000 revenue (correct)

Customer sees:
- Invoice INV-2024-250: RM 100,000
- Credit Note CN-2024-050: -RM 100,000
- Invoice INV-2024-251: RM 90,000
- Total Due: RM 90,000
Daily Finalization Workflow:
Morning (9:00 AM):
- Check overnight drafts (after-hours sales orders)
- Review queue: Sort by oldest first
- Target: Clear backlog <12 hours old
Midday (12:00 PM):
- Process high-value invoices (>RM 50,000) individually
- Escalate any issues to Finance Manager
Afternoon (3:00 PM):
- Bulk process routine invoices (<RM 5,000)
- Respond to sales queries/clarifications
End of Day (5:00 PM):
- Final sweep: Clear all drafts older than 4 hours
- Report: Invoices finalized today (count + total value)
- Alert: Drafts pending overnight (if any)
Month-End (Last Working Day):
- Finalize ALL drafts (clear queue completely)
- Run reports: Total invoices for month
- Reconcile: Invoice totals vs GL revenue
Pro Tip: Set up automated alerts—email when draft invoice sits unfinalized >8 hours (prevents revenue delays).
GL Posting and Accounting Impact
Understanding the Accounting Flow:
Every finalized invoice creates accounting entries that affect multiple financial accounts. Here’s the complete impact:
Basic Invoice GL Entry:
Simple Product Sale: RM 10,000 + SST 10%

Dr. Accounts Receivable (Customer)    RM 11,000
   Cr. Sales Revenue                            RM 10,000
   Cr. SST Payable                              RM 1,000
Explanation:
- Dr. Accounts Receivable: Increases asset (customer owes you money)
- Cr. Sales Revenue: Increases income (you earned revenue)
- Cr. SST Payable: Increases liability (you owe tax to government)
Complex Invoice with Multiple Elements:
Invoice Details:
- Product Sale: RM 50,000
- Discount: -RM 5,000
- Net Amount: RM 45,000
- SST 10%: RM 4,500
- WHT 5% (withheld by customer): -RM 2,250
- Customer Pays: RM 47,250

GL Entries:
Dr. Accounts Receivable (Customer)    RM 47,250
Dr. WHT Receivable (Gov't refund)      RM 2,250
   Cr. Sales Revenue                            RM 45,000
   Cr. SST Payable                              RM 4,500

Total: Balanced
Explanation:
- WHT receives separate Dr: You’ll claim this back from government
- Customer pays less: Because they withheld tax on your behalf
- You receive: RM 47,250 from customer + RM 2,250 from gov’t = RM 49,500 total
Inventory Impact:
When invoice finalized:
Physical Inventory:
Before Invoice:
- Item: Dell Laptop XPS 15
- Stock Qty: 50 units
- Stock Value: RM 250,000 (RM 5,000 per unit)

Invoiced: 10 units @ RM 5,500 per unit = RM 55,000

After Invoice:
- Stock Qty: 40 units
- Stock Value: RM 200,000
- Reduction: -RM 50,000 (10 units @ cost price RM 5,000)

Accounting Entry:
Dr. Cost of Goods Sold (COGS)         RM 50,000
   Cr. Inventory                                 RM 50,000
Complete P&L Impact:
Sales Revenue: +RM 55,000
Cost of Goods Sold: -RM 50,000
Gross Profit: RM 5,000 (9% margin)
Branch/Location Accounting (Multi-Entity):
For businesses with multiple branches:
Invoice:
- Branch: KL North
- Location: Warehouse KL01
- Customer: ABC Corp
- Amount: RM 100,000

GL Posting (with branch dimension):
Dr. AR - ABC Corp (Branch: KL North)   RM 110,000
   Cr. Sales Revenue (Branch: KL North)         RM 100,000
   Cr. SST Payable (Branch: KL North)            RM 10,000

Branch P&L Reports:
- KL North sales: +RM 100,000
- KL South sales: No impact
- JB Branch sales: No impact

Consolidated Report:
- Total company sales: +RM 100,000
Why This Matters:
- Performance tracking per branch
- Profitability analysis by location
- Tax filing per branch (if required)
Month-End Reconciliation:
Step 1: Invoice Total Reconciliation
System Report: External Sales Invoice Applet
Total finalized invoices (Oct 2024): RM 5,000,000

GL Report: Account 4100 - Sales Revenue
Total credits (Oct 2024): RM 5,000,000

Match - Balanced
Step 2: Tax Reconciliation
Invoice System:
Total SST collected (Oct 2024): RM 500,000

GL Report: Account 2500 - SST Payable
Total credits (Oct 2024): RM 500,000

Tax Return:
SST declared (Oct 2024): RM 500,000

All match - Balanced
Step 3: Accounts Receivable Aging
Finalized Invoices (Oct 2024):
- Total: RM 5,000,000
- Paid: RM 3,500,000 (70%)
- Unpaid: RM 1,500,000 (30%)

AR Aging Report:
- Current (0-30 days): RM 1,200,000
- Overdue 31-60 days: RM 200,000
- Overdue 61-90 days: RM 100,000

Total Outstanding: RM 1,500,000

Matches invoice system - Balanced
Audit Trail Requirements:
For compliance and audit purposes, the system maintains complete history:
Document Trail:
- Sales Order SO-2024-100 (origin)
- Delivery Order DO-2024-075 (fulfillment)
- Invoice INV-2024-225 (billing)
- Payment Receipt PR-2024-300 (collection)
Click any document → Navigate to related documents
User Activity Log:
Action History - Invoice INV-2024-225:
- Oct 20, 10:00 AM: Created by Sarah (Sales Rep)
- Oct 20, 10:15 AM: Saved as DRAFT by Sarah
- Oct 20, 11:00 AM: Reviewed by John (Finance)
- Oct 20, 11:05 AM: Queried by John: "Verify discount authorization"
- Oct 20, 2:00 PM: Responded by Sarah: Attached approval email
- Oct 20, 2:15 PM: Finalized by John (Finance)
- Oct 20, 2:15 PM: Posted to GL automatically
- Oct 20, 2:16 PM: Email sent to customer
GL Posting Details:
Journal Entry Je-2024-3456:
Date: Oct 20, 2024, 2:15 PM
User: John (Finance)
System Reference: INV-2024-225

Dr. 1200 - Accounts Receivable    RM 55,000
   Cr. 4100 - Sales Revenue                RM 50,000
   Cr. 2500 - SST Payable                  RM 5,000

Posting Status: POSTED
Reversal: Not allowed (use Credit Note)
Pro Tip: Never delete FINAL invoices. Use Credit Notes for reversals to preserve audit trail integrity.
Configuration & Settings
This section guides administrators through configuring the applet for your organization.
Default Selection Settings
Purpose: Set company-wide defaults that apply to all users (unless personalized).
Access: Settings > Default Selection
What You Can Configure:
1. Default Branch
What It Is: The primary operating branch for your company.
Why It Matters:
- Pre-fills Branch field when creating invoices
- Saves time for single-branch businesses
- Multi-branch: Users can override
How to Set:
- Go to
Settings > Default Selection - Select Default Branch dropdown
- Choose: (e.g., “Head Office” or “KL North Branch”)
- Click “Save”
Example:
Single-Branch Business:
Default Branch: Head Office

Effect: All new invoices auto-fill "Head Office"

Multi-Branch Business:
Default Branch: None (forces users to select)

Effect: Users must choose branch per invoice
2. Default Location
What It Is: The primary warehouse or fulfillment location.
Dependency: Location options depend on selected Branch (cascading dropdown).
How to Set:
- Select Default Branch first
- Choose Default Location from available options
- Click “Save”
Example:
Branch: KL North
Available Locations:
- Warehouse KL01
- Warehouse KL02
- Retail Store KL

Select: Warehouse KL01

Effect: New invoices auto-fill "Warehouse KL01"
Use Cases:
Warehouse Business:
- Branch: Operations
- Location: Main Warehouse
- Users: All create invoices from same location
Retail Chain:
- No default branch/location (forces selection)
- Users: Each store selects their own branch/location per invoice
Cascading Selection Logic:
User creates invoice:

Step 1: Select Branch → "KL North"
Step 2: System loads locations for KL North:
   - Warehouse KL01
   - Warehouse KL02
   - JB Warehouse (belongs to different branch)

Step 3: User selects Location → "Warehouse KL01"

Invoice saved with:
- Branch: KL North
- Location: Warehouse KL01
Pro Tip: For multi-branch businesses, leave defaults blank and train users to always select branch/location consciously (prevents cross-branch invoice errors).
Application Settings (Field Configuration)
Purpose: Control which features and fields are enabled/visible across the system.
Access: Settings > Application Settings or Settings > Field Settings
Key Configuration Areas:
1. Tax Settings
Enable tax types your business needs:
Enable SST (Sales & Service Tax):
- Check: Enable SST calculations
- Effect: SST fields appear on invoices, auto-calculated
Enable VAT (Value Added Tax):
- Check: Enable VAT calculations
- Effect: VAT fields appear instead of SST
Enable GST (Goods & Services Tax):
- Check: Enable GST calculations
- Effect: GST fields and rates applied
Enable WHT (Withholding Tax):
- Check: Enable WHT deductions
- Effect: WHT fields appear, auto-calculates deductions
Example:
Malaysia Business:
Enable SST (10% standard rate)
Disable VAT
Disable GST
Enable WHT (for B2B service invoices)

Singapore Business:
Disable SST
Enable GST (8% standard rate)
Disable VAT
Disable WHT
2. Dimension Tracking
Enable financial dimensions for detailed reporting:
Enable Dimension:
- Purpose: Track costs by custom dimensions
- Example: Department, Cost Center, Region
- Effect: Dimension field appears on invoice header
Enable Profit Center:
- Purpose: Track profitability by business unit
- Example: Product Division A, Service Division B
- Effect: Profit Center field appears, GL posts by profit center
Enable Project:
- Purpose: Track revenue by project or engagement
- Example: Project ABC-2024, Client Engagement XYZ
- Effect: Project field appears, enables project-based reporting
Enable Segment:
- Purpose: Track revenue by market segment
- Example: B2B, B2C, Government, Education
- Effect: Segment field appears on invoices
Use Case:
Consulting Firm:
Enable Project (critical for billing clients)
Enable Profit Center (track division profitability)
Enable Dimension (cost center allocation)
Disable Segment (not needed)

Manufacturing:
Enable Dimension (production line tracking)
Enable Segment (export vs domestic sales)
Disable Project (not project-based)
Disable Profit Center (single profit center)
3. Pricing Field Visibility
Control which pricing fields users see:
Unit Price Standard (Pricing Scheme):
- Show: Base price from price list
- Hide: If confusing for users (simplified view)
Unit Price Inclusive of Tax:
- Show: For retail (customers expect tax-inclusive prices)
- Hide: For B2B (prefer exclusive pricing)
Unit Price Exclusive of Tax:
- Show: For B2B (clearer tax breakdown)
- Hide: For retail (simpler for customers)
Unit Discount:
- Show: If discounts applied per unit
- Hide: If only invoice-level discounts
Discount Amount:
- Show: If percentage-based discounts
- Hide: If fixed amount discounts only
Quantity Base vs Quantity UOM:
- Show Both: If selling in multiple UOMs (e.g., cases vs pieces)
- Show UOM Only: Simpler for single-UOM businesses
Amount Standard, Net, Transaction:
- Show Transaction Only: Simplest view
- Show All: Transparency for complex pricing
Configuration Example:
Retail Store (Consumer Sales):
Show: Unit Price Inclusive of Tax
Hide: Unit Price Exclusive of Tax
Hide: Unit Price Standard
Show: Discount Amount (%)
Hide: Quantity Base (UOM only)
Show: Transaction Amount only

Effect: Simple invoice, easy to understand

---

B2B Distributor:
Hide: Unit Price Inclusive of Tax
Show: Unit Price Exclusive of Tax
Show: Unit Price Standard (reference)
Show: Unit Discount
Show: Quantity Base AND UOM
Show: All amounts (Standard, Net, Transaction)

Effect: Detailed pricing breakdown, full transparency
Pro Tip: Start with minimal fields visible. Add more as users request (prevents overwhelming new users).
4. Custom Status Fields
Configure custom fields for workflow tracking:
Header-Level Custom Status (5 fields):
- Custom Status 1: Example - “Delivery Status”
- Custom Status 2: Example - “Payment Terms”
- Custom Status 3: Example - “Priority Level”
- Custom Status 4: (Unused)
- Custom Status 5: (Unused)
Line-Level Custom Status (5 fields):
- Custom Status 1: Example - “QC Status”
- Custom Status 2: Example - “Serial Number Status”
- Custom Status 3: (Unused)
- Custom Status 4: (Unused)
- Custom Status 5: (Unused)
How to Configure:
Settings > Application Settings > Custom Status- Enable field (toggle ON)
- Set field label: “Delivery Status”
- Define options: “Pending”, “Dispatched”, “Delivered”
- Set default: “Pending”
- Save
Use Case:
Custom Status 1 (Header): "Delivery Status"
Options:
- Pending Dispatch
- Dispatched
- In Transit
- Delivered
- Delivery Failed

Default: Pending Dispatch

Effect:
- Sales creates invoice → Status: Pending Dispatch
- Warehouse dispatches goods → Status: Dispatched
- Courier updates → Status: In Transit
- Customer receives → Status: Delivered

Reporting: Track % of invoices delivered on time
Printable Format Settings
Purpose: Design custom invoice templates for printing and emailing to customers.
Access: Settings > Printable Format Settings
What You Can Configure:
1. Invoice Template Design
Standard Elements:
- Company logo and letterhead
- Company name, address, tax ID
- Invoice number, date, due date
- Customer name, address
- Line items table (items, quantities, prices)
- Summary totals (subtotal, tax, grand total)
- Payment instructions
- Terms and conditions
Customizable:
- Layout: Portrait or Landscape
- Colors: Brand colors for header/footer
- Fonts: Standard fonts (Arial, Times, etc.)
- Fields: Show/hide optional fields
- Sections: Add custom sections (e.g., special instructions)
How to Create Template:
- Go to
Settings > Printable Format Settings - Click "+ Add New Template"
- Name template: “Standard Invoice”
- Select base template: Standard Layout
- Click “Design” to open template editor
- Drag-and-drop elements:
- Upload company logo
- Position header fields
- Configure line items table
- Add footer (payment terms)
- Preview template with sample data
- Save template
2. Multiple Template Types
Create different templates for different scenarios:
Standard Invoice:
- Full details
- All line items
- Complete tax breakdown
- For B2B customers
Summary Invoice:
- Grouped line items
- Totals only
- Simplified view
- For quick billing
Detailed Invoice:
- Extended descriptions
- Serial numbers listed
- Delivery details included
- For high-value sales
Tax Invoice:
- SST/VAT compliant format
- Legal requirements met
- Tax registration numbers
- For government compliance
3. Default Template Selection
Set which template auto-applies:
Default Template: Standard Invoice

Effect: When clicking "Print Invoice", system uses Standard template

Users can override:
Print → Select Template dropdown → Choose "Summary Invoice"
4. Multi-Language Support
Create templates in different languages:
Template: Standard Invoice (English)
Template: Standard Invoice (Malay)
Template: Standard Invoice (Mandarin)

User selection:
Invoice → Print → Language: English / Malay / Mandarin
5. Delivery Order vs Invoice Format
Delivery Order Template:
- Focus: Items, quantities, serial numbers
- No pricing shown (warehouse use only)
- Signature sections for delivery confirmation
Invoice Template:
- Focus: Pricing, totals, payment terms
- Customer-facing document
- Professional format
Pro Tip: Design templates with your branding team—professional invoices enhance customer perception.
Permission Management
Purpose: Control who can perform which actions in the applet.
Access: Settings > Permission Management
Permission Levels:
1. Client-Side Permissions
Granular control over UI elements:
Create Invoice:
- Granted to: Sales teams
- Effect: Can create new invoices
Edit Invoice:
- Granted to: Sales teams (DRAFT only), Finance (with restrictions)
- Effect: Can modify invoice details
Delete Invoice:
- Granted to: Finance Manager only
- Effect: Can delete DRAFT invoices
Finalize Invoice:
- Granted to: Finance teams only
- Effect: Can change DRAFT → FINAL
View Pricing:
- Granted to: Finance, Sales Managers
- Denied: Junior Sales Reps (security)
- Effect: Controls price visibility
Apply Discounts:
- Granted to: Sales Managers (up to 15%)
- Denied: Sales Reps (require approval)
- Effect: Controls discount authorization
Configure:
Settings > Client-Side Permission Listing- Select permission: “Create Invoice”
- Grant to: Role “Sales Representative”
- Save
2. User-Level Permissions
Assign permissions to individual users:
User: John Doe (Sales Rep)
Permissions:
Create Invoice
View Own Invoices
Not Allowed: Finalize Invoice (Finance only)
Not Allowed: Delete Invoice (Manager only)
Configure:
Settings > User Permission Listing- Search user: “John Doe”
- Assign permissions (checkboxes)
- Save
3. Team-Level Permissions
Assign permissions to entire teams:
Team: Sales Team
Members: 15 sales reps
Permissions:
Create Invoice
Edit DRAFT Invoice
View Team Invoices
Not Allowed: Finalize Invoice
Not Allowed: Delete Invoice
Configure:
Settings > Team Permission Listing- Select team: “Sales Team”
- Assign permissions (checkboxes)
- Save
4. Role-Based Permissions
Define permissions by role:
Role: Finance Manager
Permissions:
All Create/Edit/Delete
Finalize Invoices
View All Invoices
Configure Settings
Generate Financial Reports

Role: Sales Representative
Permissions:
Create Invoice
Edit Own DRAFT Invoices
View Own Invoices
Not Allowed: Finalize Invoice
Not Allowed: View Others' Invoices
Configure:
Settings > Role Permission Listing- Select role: “Finance Manager”
- Assign permissions (checkboxes)
- Save
5. Permission Set Listing
Create reusable permission sets:
Permission Set: "Standard Sales Access"
Includes:
- Create Invoice
- Edit DRAFT Invoice
- View Own Invoices
- Search Items
- View Pricing (standard only)

Assigned To:
- Sales Team (15 users)
- Customer Service Team (5 users)

Effect: Quick onboarding—assign permission set instead of individual permissions
Common Permission Scenarios:
Scenario 1: New Sales Rep
User: Sarah (New Sales Rep)
Assign: Permission Set "Standard Sales Access"
Effect:
Can create invoices
Can edit own drafts
Cannot finalize (Finance only)
Cannot see co-workers' invoices (privacy)
Scenario 2: Finance Team Member
User: John (Finance Officer)
Assign: Role "Finance Team Member"
Effect:
Can view all DRAFT invoices
Can finalize invoices
Can query/reject invoices
Cannot delete FINAL invoices (Manager only)
Scenario 3: Branch Manager
User: Mary (Branch Manager)
Assign: Role "Branch Manager"
Effect:
Can view all branch invoices
Can approve high-value discounts
Can override credit limits (within authority)
Can generate branch reports
Pro Tip: Follow principle of least privilege—grant minimum permissions needed for job function. Add more as needed.
Personalization Options
Purpose: Allow individual users to customize their experience.
Access: Personalization > Personal Default Selection
What Users Can Personalize:
1. Personal Default Branch
Overrides system-wide default:
System Default: Head Office

User: Sarah (works at KL North Branch)
Personal Default: KL North

Effect:
- Sarah creates invoice → Auto-fills "KL North" (not Head Office)
- Other users → Still get "Head Office"
How to Set:
- Click Personalization menu
- Select Personal Default Selection
- Choose Default Branch: “KL North”
- Save
2. Personal Default Location
Sarah's Branch: KL North
Sarah's Location: Warehouse KL01

Effect:
- New invoices auto-fill: Branch "KL North" + Location "Warehouse KL01"
- Saves time (no manual selection needed)
3. Sidebar Customization
Customize navigation menu:
Default Sidebar:
- External Sales Invoice
- Settings
- Personalization
- Reports
Sarah’s Custom Sidebar:
- External Sales Invoice (most used - moved to top)
- My Pending Approvals (added shortcut)
- Branch Report (custom link)
- Settings (less used - moved down)
How to Customize:
- Click Personalization > Sidebar
- Drag-and-drop menu items
- Add custom shortcuts
- Save layout
4. Grid View Preferences
Customize invoice listing columns:
Default Columns:
- Invoice Number
- Customer
- Date
- Amount
- Status
Sarah’s Customized:
- Invoice Number
- Customer
- Branch (added - important for Sarah)
- Amount
- Status
- Created By (added - tracks team)
- Posting Status (added - sees DRAFT vs FINAL quickly)
How to Customize:
- In invoice listing view
- Click Column Visibility icon
- Check/uncheck columns
- Drag to reorder
- System saves preferences automatically
Benefits of Personalization:
Efficiency: Pre-filled defaults save time
Focus: Customized views show relevant info only
Productivity: Navigation shortcuts for frequent tasks
Comfort: Interface adapts to individual workflow
Pro Tip: Encourage new users to personalize after 2 weeks (once they understand the system workflows).
Organizational Structure
Branch and Location Management:
What Are Branches?
Branches represent separate business units, offices, or legal entities within your organization.
Examples:
- Head Office
- KL North Branch
- JB Branch
- Singapore Office
What Are Locations?
Locations represent physical places where inventory is stored or transactions occur (warehouses, retail stores, service centers).
Examples:
- Warehouse KL01 (under KL North Branch)
- Retail Store KL (under KL North Branch)
- JB Warehouse (under JB Branch)
Branch-Location Relationship:
Company: ABC Corporation

Branch: KL North
├─ Location: Warehouse KL01
├─ Location: Warehouse KL02
└─ Location: Retail Store KL

Branch: JB Branch
├─ Location: JB Warehouse
└─ Location: JB Retail Store

Branch: Singapore Office
└─ Location: SG Warehouse
Key Rule: Locations belong to specific branches (one-to-many relationship).
How It Works in Invoicing:
Step 1: Select Branch
- User creates invoice
- Selects Branch: “KL North”
Step 2: Location Options Load
- System filters locations for “KL North”
- Dropdown shows:
- Warehouse KL01
- Warehouse KL02
- Retail Store KL
- (JB Warehouse not shown—belongs to JB Branch)
Step 3: Select Location
- User chooses: “Warehouse KL01”
Step 4: Invoice Saved
- Branch: KL North
- Location: Warehouse KL01
Why This Structure Matters:
1. Inventory Accuracy
Item: Dell Laptop XPS 15

Stock by Location:
- Warehouse KL01: 50 units
- Warehouse KL02: 30 units
- JB Warehouse: 40 units

Invoice from Warehouse KL01:
- Reduces KL01 stock: 50 → 45 units
- Does NOT affect KL02 or JB (separate inventory)
2. Financial Reporting
Monthly Sales Report:

KL North Branch:
- Warehouse KL01: RM 500,000
- Warehouse KL02: RM 300,000
- Retail Store KL: RM 200,000
Total KL North: RM 1,000,000

JB Branch:
- JB Warehouse: RM 400,000
- JB Retail: RM 300,000
Total JB: RM 700,000

**Company Total: RM 1,700,000**
3. Tax Compliance
Different branches may have different tax obligations:
Branch: Malaysia Office → SST 10%
Branch: Singapore Office → GST 8%
Branch: Export Branch → Zero-rated (0% tax)
Admin Configuration:
Set Up Branches:
Settings > Organization > Branches- Click “+ Add Branch”
- Enter: Branch Code “KL-NORTH”, Branch Name “KL North Branch”
- Save
Set Up Locations:
Settings > Organization > Locations- Click “+ Add Location”
- Enter: Location Code “WH-KL01”, Location Name “Warehouse KL01”
- Link to Branch: Select “KL North Branch”
- Save
Result: Location “Warehouse KL01” now appears only when “KL North Branch” is selected.
Reporting & Analytics
Key Reports Available:
1. Invoice Listing Report
- All invoices by date range
- Filter by: Branch, Location, Customer, Status
- Columns: Invoice #, Customer, Amount, Tax, Status, Date
- Export: Excel, PDF
- Use for: Daily monitoring, month-end reconciliation
2. Sales Revenue Report
- Total revenue by period (daily, weekly, monthly)
- Breakdown by: Branch, Location, Customer, Product
- Visuals: Charts, graphs, trend lines
- Use for: Performance tracking, forecasting
3. Tax Report (SST/VAT/GST)
- Total tax collected by type and period
- Output for government filing
- Includes all invoices finalized in period
- Use for: Tax compliance, government submissions
4. Accounts Receivable Aging
- Outstanding invoices by age bucket
- 0-30 days, 31-60 days, 61-90 days, >90 days
- Total receivables by customer
- Use for: Collections management, cash flow forecasting
5. Customer Analysis
- Top customers by revenue
- Sales trends per customer
- Average invoice value
- Use for: Customer relationship management, sales strategy
6. Product Performance
- Top-selling items
- Revenue by product category
- Quantity sold analysis
- Use for: Inventory planning, product mix optimization
7. User Activity Report
- Who created how many invoices
- Finalization turnaround time (Draft to Final)
- User productivity metrics
- Use for: Performance reviews, process improvement
FAQs (Frequently Asked Questions)
General Questions
Q: What is the difference between External Sales Invoice and Internal Sales Invoice?
A: External Sales Invoice is for billing external customers (companies or individuals outside your organization). Internal Sales Invoice is for inter-company transactions (billing between branches or subsidiaries within the same corporate group).
Use External for: Customer sales, normal business transactions
Use Internal for: Head office billing branches, branch transfers
Q: Can I create an invoice without a sales order?
A: Yes! You have multiple options:
- KO Sales Order (most common—links to existing order)
- Search Items (manual entry—no prior order needed)
- KO Quotation (converts approved quotation directly)
- KO Delivery Order (bills based on actual delivery)
- KO Jobsheet (service-based billing)
Quick sales or walk-in customers: Use “Search Items” for fastest invoice creation.
Q: What happens if I accidentally finalize the wrong invoice?
A: You cannot un-finalize an invoice (maintains accounting integrity). Solution:
- Create Credit Note to reverse the incorrect invoice
- Create New Correct Invoice
- Both documents remain in audit trail
- Customer sees: Original invoice + Credit note reversal + Correct invoice
Prevent errors: Always review DRAFT invoices carefully before finalizing.
Q: How do I handle partial deliveries/invoicing?
A:
Scenario: Customer ordered 100 units, you delivered 60 now, 40 later.
Option A: Two Separate Invoices (Recommended)
- Create Invoice 1: 60 units (bill upon first delivery)
- Create Invoice 2: 40 units (bill upon second delivery)
Option B: Single Invoice, Adjust Quantity
- Create invoice from Sales Order (100 units)
- Manually reduce quantity to 60
- Save as DRAFT, add note: “Partial delivery 1 of 2”
- Later: Create second invoice for remaining 40
Pro Tip: Separate invoices are cleaner for accounting and customer records.
Q: Can customers access their invoices online?
A: Depends on your system configuration. The applet generates invoices; customer access requires integration with a customer portal or ERP system.
Typical workflow:
- Invoice finalized → PDF generated
- System emails PDF to customer automatically
- Customer receives invoice via email
- (Optional) Customer logs into portal to view invoice history
Check with your IT team about customer portal integration.
Q: What if a customer’s credit limit is exceeded?
A: System behavior depends on configuration:
Option A: Hard Block
- Finance attempts to finalize invoice
- System error: “Customer credit limit exceeded by RM X”
- Invoice cannot be finalized until:
- Customer makes payment (reduces outstanding balance)
- Finance Manager increases credit limit
- Customer provides down payment
Option B: Warning with Override
- System warns: “Credit limit exceeded”
- Finance Manager can override with authorization
- Requires approval comment/justification
- Logged in audit trail
Best Practice: Resolve credit limit issues before finalizing—reduces financial risk.
Technical Questions
Q: How do I fix a “Serial Number Already Invoiced” error?
A: This error means the serial number was already used on another invoice.
Troubleshooting:
- Click the error message to see which invoice used it
- Verify:
- Is this a duplicate entry mistake? (Use a different serial)
- Is the other invoice incorrect? (Contact Finance to investigate)
- Is the serial number returned? (Check return/RMA records)
Resolution:
- If duplicate mistake: Enter correct serial number
- If other invoice wrong: Finance creates credit note to release serial
- If serial returned: Update serial status to AVAILABLE in inventory system
Q: Why is the tax calculation wrong?
A: Common causes:
1. Wrong tax rate applied:
- Check:
Settings > Application Settings > Tax Rates - Verify current SST rate (e.g., 10%)
- Update if government changed rates
2. Tax-exempt item taxed:
- Some items are tax-exempt (medical supplies, education materials)
- Check item master: Is tax exemption flag set?
- Solution: Update item master, regenerate invoice
3. Manual override error:
- Someone manually changed tax amount
- Solution: Remove override, let system auto-calculate
4. Rounding discrepancy:
- Small differences (RM 0.01) due to rounding
- System auto-adjusts in “Rounding” field
- This is normal and correct
Prevention: Enable “Lock Tax Calculations” in settings to prevent manual tax overrides.
Q: Can I import invoices in bulk from Excel?
A: The applet currently doesn’t have built-in bulk import (based on codebase review). Options:
Option A: Programmatic Import
- Use API integration (developer required)
- Prepare data in JSON format
- POST to invoice creation endpoint
- System validates and creates invoices
Option B: Semi-Automated
- Create invoice templates with common items
- Sales reps duplicate templates
- Adjust quantities and customer details
- Faster than creating from scratch
Option C: Request Feature
- Contact your system administrator
- Request bulk import feature development
- Typical development time: 2-4 weeks
Q: How do I correct an invoice after it’s finalized?
A: Finalized invoices are locked (cannot edit). Correction process:
Step 1: Create Credit Note
Original Invoice: INV-2024-300
Amount: RM 10,000 (incorrect)

Create: Credit Note CN-2024-050
Amount: -RM 10,000
Effect: Reverses original invoice
Step 2: Create Corrected Invoice
New Invoice: INV-2024-301
Amount: RM 9,000 (correct)
Reference: "Replaces INV-2024-300"
Step 3: Notify Customer
Email customer:
- Original invoice INV-2024-300 canceled (credit note attached)
- Corrected invoice INV-2024-301 issued
- Please disregard INV-2024-300
- Pay INV-2024-301: RM 9,000
Accounting Impact:
Original: +RM 10,000 revenue
Credit Note: -RM 10,000 revenue
Corrected: +RM 9,000 revenue
Net Effect: RM 9,000 revenue (correct)
Q: What is the difference between Unit Price and Transaction Price?
A:
Unit Price (Standard/Base Price):
- Price from product master
- Before discounts
- Example: RM 100 per item
Transaction Price (Final Price):
- After all adjustments (discounts, taxes)
- What customer actually pays
- Example: RM 100 - 10% discount + 10% SST = RM 99
Complete Breakdown:
Unit Price Standard: RM 100 (base price)
Unit Discount: -RM 10 (10% off)
Unit Price Net: RM 90
SST 10%: +RM 9
Transaction Price: RM 99 (final price customer pays)
Which appears on invoice?
Depends on settings: Settings > Field Visibility
- Show all prices (full transparency)
- Show transaction price only (simplified view)
Q: How long are invoices retained in the system?
A: Depends on your company’s data retention policy, but typical settings:
Active Invoices (Unpaid):
- Retained indefinitely until paid
Paid Invoices:
- Minimum: 7 years (accounting regulations)
- Typical: 10 years
- Accessible for audit purposes
Deleted Invoices:
- Not permanently deleted (soft delete)
- Status changed to DELETED
- Still visible in audit logs
- Can be restored by admin if needed within 90 days
Archived Invoices:
- Older than X years (e.g., 7 years)
- Moved to archive storage
- Still accessible but slower retrieval
- Compliance requirement
Check with your finance team for your organization’s specific retention policy.
Q: Can I invoice in multiple currencies?
A: The system supports doc_ccy (Document Currency) field, indicating multi-currency capability.
How it works:
- Create invoice
- Select Document Currency: USD, EUR, SGD, etc.
- Enter amounts in selected currency
- System converts to base currency (e.g., MYR) for accounting
- Invoice displays foreign currency amount
- GL posts converted amount
Exchange Rate:
- Uses system exchange rate (configured by admin)
- Or manual rate entry (if allowed)
- Rate locked when invoice finalized
Example:
Invoice: USD 1,000
Exchange Rate: 1 USD = 4.50 MYR
GL Posting: RM 4,500

Customer sees: USD 1,000
Accounting books: RM 4,500
Tax Implications: Different countries may have different tax rules for foreign currency invoices. Consult your tax advisor.
Q: How do I handle returns or refunds?
A: Returns Process:
Step 1: Customer Returns Item
- Customer notifies you of defect or change of mind
- Verify return policy eligibility
- Check serial number (if applicable)
Step 2: Create Credit Note
- Do NOT edit original invoice (locked)
- Create Credit Note referencing original invoice
- Amount: Negative value equals original invoice line
- Reason: “Item returned - defective” or “Customer cancellation”
Step 3: Process Refund
- Finance processes credit note
- GL entry reverses revenue
- Refund customer or apply credit to future invoices
Step 4: Update Inventory
- Return item to inventory (if resellable)
- Update serial number status to AVAILABLE
- Scrap item (if defective)
Example:
Original Invoice: INV-2024-500, RM 5,000 (Laptop)
Customer returns laptop (screen defect)

Credit Note: CN-2024-080, -RM 5,000
Inventory: Laptop serial returned, status = DEFECTIVE
Refund: RM 5,000 credited to customer account
Q: Can I edit an invoice after sending to customer but before finalizing?
A: Yes, if still in DRAFT status:
- Go to External Sales Invoice listing
- Find your draft invoice
- Click to open
- Click “Edit” button
- Make changes:
- Add/remove line items
- Adjust quantities or pricing
- Update customer information
- Modify serial numbers
- Click “Save”
- Re-send to customer (if already sent)
If Already FINAL:
- Cannot edit directly
- Must use Credit Note + New Invoice process
Best Practice: Keep invoices in DRAFT until customer confirms all details are correct. Only finalize after confirmation.
Q: How do I track which invoices have been paid?
A: Payment Tracking Options:
Option 1: Within Invoice Applet
- Go to External Sales Invoice listing
- Filter by: Status = “PAID” or Status = “UNPAID”
- See payment status for each invoice
Option 2: Accounts Receivable Module
- More comprehensive payment tracking
- Match payments to invoices
- Generate aging reports
- Track collection activities
Option 3: Custom Reports
- Generate “Outstanding Invoices” report
- Filter by:
- Date range
- Customer
- Amount outstanding
- Export to Excel for follow-up
Payment Workflow:
1. Invoice finalized (Status: FINAL, Unpaid)
2. Customer pays (bank transfer/check)
3. Finance records payment in system
4. System matches payment to invoice
5. Invoice status updated: PAID
6. AR balance reduced
Troubleshooting Common Issues
Issue 1: “Branch Required” Error
Symptom: Cannot save invoice, error message “Branch is required”
Cause: Branch field not selected (mandatory field)
Solution:
- Scroll to top of invoice form
- Locate Branch dropdown
- Select your branch (e.g., “KL North”)
- Click Save again
Prevention: Set default branch in Settings > Default Selection or Personalization > Personal Default Selection
Issue 2: “Location Not Available” Error
Symptom: Location dropdown is empty or disabled
Cause: Location depends on Branch selection (cascading dropdown)
Solution:
- First select Branch
- Wait 1-2 seconds (system loads locations)
- Location dropdown populates
- Select location
If still empty:
- No locations configured for selected branch
- Contact admin to add locations
Issue 3: Invoice Stuck in DRAFT
Symptom: Created invoice days ago, still shows DRAFT status, customer not billed
Cause: Finance team hasn’t finalized yet
Solution:
- Check if Finance received notification
- Contact Finance: “Please review invoice INV-2024-XXX”
- Finance finalizes → Status changes to FINAL → Customer billed
If urgent:
- Escalate to Finance Manager
- Provide business reason for urgency
Issue 4: Serial Numbers Won’t Validate
Symptom: Entered serial numbers, system shows “Invalid Serial Number”
Possible Causes + Solutions:
Cause A: Typo
- Solution: Double-check serial number spelling
- Use barcode scanner to avoid typos
Cause B: Serial already invoiced
- Solution: Check which invoice used it (click error details)
- Use a different serial number
Cause C: Serial not in inventory
- Solution: Verify serial number with warehouse
- Ensure serial number added to inventory system first
Cause D: Serial status is DAMAGED or RETURNED
- Solution: Check serial status in inventory
- Use serial with AVAILABLE status only
Issue 5: Tax Amount Seems Wrong
Symptom: System calculates SST RM 950, but you expect RM 1,000
Troubleshooting Steps:
Step 1: Verify Tax Base
Expected: RM 10,000 x 10% SST = RM 1,000
Actual: RM 9,500 x 10% SST = RM 950

Cause: Tax base is RM 9,500 (after discount), not RM 10,000
Step 2: Check Tax Settings
Settings > Application Settings > Tax- Verify: “Calculate Tax on Net Amount (after discount)” is enabled
- This is correct behavior
Step 3: Check Item Tax Exemptions
- Some items may be tax-exempt
- Example: 10 items, 1 is tax-exempt
- Tax calculated on 9 items only
Step 4: Rounding
- RM 950.345 rounds to RM 950.35
- Small discrepancies are normal
If still wrong: Contact Finance Manager to review tax configuration.
Issue 6: Cannot Delete Invoice
Symptom: Delete button disabled or error “Cannot delete FINAL invoice”
Cause: FINAL invoices cannot be deleted (accounting rule)
Solution: Use Credit Note to reverse:
- Create Credit Note referencing this invoice
- System reverses accounting entries
- Invoice effectively canceled (audit trail preserved)
Can Delete:
- DRAFT invoices only
- Click Delete button
- Confirm action
- Invoice status: DELETED (soft delete)
Issue 7: Invoice Not Emailing to Customer
Symptom: Finalized invoice, customer says they didn’t receive email
Troubleshooting:
Step 1: Verify Email Address
- Check customer master data
- Ensure email address is correct
- Update if needed
Step 2: Check Email Logs
Reports > System Logs > Email Logs- Search: Invoice number
- Status: Sent / Failed / Pending
Step 3: Check Spam Folder
- Instruct customer to check spam/junk folder
- Add your company domain to customer’s safe senders
Step 4: Re-send Email
- Open invoice
- Click “Resend Email” button
- System queues email again
Step 5: Manual Send
- Click “Download PDF”
- Email PDF manually to customer
- Log issue with IT team for investigation
Need More Help?
Internal Support:
- Contact IT Help Desk: [support@yourcompany.com]
- Internal wiki: [Company knowledge base URL]
- Training videos: [Company training portal]
System Administrator:
- For configuration issues
- Permission requests
- Feature requests
Finance Team:
- For accounting questions
- Tax compliance queries
- GL posting issues
Best Practices
For Sales Representatives
Create invoices promptly after delivery (improves cash flow)
Verify customer details before finalizing (prevents payment delays)
Link to source documents (Sales Orders, Quotations) for traceability
Add clear descriptions on line items (helps customer understand charges)
Check serial numbers carefully for high-value items (prevents disputes)
Use DRAFT status wisely - Save drafts if uncertain, let Finance review
Respond quickly to Finance queries (prevents billing delays)
Avoid:
- Skipping serial numbers when required—causes errors later
- Manually overriding taxes unless authorized
- Rushing through invoice creation—errors = credit notes = delays
For Finance Teams
Review drafts within 4 hours (SLA target—prevents revenue delays)
Document rejection reasons clearly (helps sales learn)
Spot-check calculations even if system-generated (trust but verify)
Reconcile daily invoice totals vs GL revenue (catch errors early)
Monitor credit limits before finalizing (reduces bad debt risk)
Bulk-finalize routine invoices (<RM 5,000) for efficiency
Individually review high-value invoices (>RM 50,000) carefully
Avoid:
- Finalizing invoices with missing serial numbers (fraud risk)
- Overriding tax calculations without CFO approval
- Letting drafts sit unreviewed for days (hurts cash flow)
For Administrators
Configure defaults before rollout (branch, location, tax settings)
Train users thoroughly before going live (reduces support tickets)
Start with minimal field visibility and add complexity gradually
Review permissions quarterly (remove access when roles change)
Monitor system logs for unusual activity (security audit)
Back up data regularly (disaster recovery)
Test end-to-end workflows after configuration changes
Avoid:
- Granting unnecessary permissions (security risk)
- Changing tax settings without accounting team approval
- Skipping user training (leads to errors and support burden)
Conclusion
The External Sales Invoice Applet streamlines your entire customer billing process from order to payment collection. By integrating multi-source document linking, automated tax calculations, serial number tracking, and branch/location management, it reduces errors while improving cash flow and customer satisfaction.
Key Takeaways:
- Multi-Source Creation saves time and prevents data entry errors
- Draft-to-Final Workflow ensures accuracy before posting
- Advanced Pricing & Tax handles complex scenarios automatically
- Serial Number Tracking protects high-value inventory
- Flexible Configuration adapts to your business needs
Next Steps:
- Sales Teams: Practice creating invoices from sales orders
- Finance Teams: Set up daily review workflow for drafts
- Administrators: Complete system configuration and user training
- Everyone: Refer to this guide whenever questions arise
Support Resources:
- Internal training videos
- IT help desk
- Your system administrator
- This documentation
Document Version: 1.0
Last Updated: February 2026
Feedback: [Share feedback to improve this documentation]