Tenant Admin Applet
Purpose and Overview
The Tenant Admin Applet is the central nervous system of your BigLedger environment. It provides organizational administrators with the master controls required to govern user access, subscribe to business modules, and maintain a secure, audit-ready platform. It is the single source of truth for “who can do what” within your digital workspace.
A short introduction to the Tenant Admin Applet
Updated walkthroughs covering the latest menus and features. Click any video to play.
Catalogue Management Menu — Browse and activate business modules from the platform marketplace.
Permissions and Role Management — Build role hierarchies and assign permission sets.
Applet User Management — Onboard users and assign them to applets.
Admin vs Member: Key Differences — Understand the privilege boundary between tenant admins and standard members.
TL;DR: The Administrative Cockpit
This applet is the “Master Switchboard” for your entire organization:
- The Catalogue: Where you “install” business tools (Accounting, HR, POS).
- Tenant Users: Where you create digital identities for your staff.
- Roles & Permissions: Where you define the “keys” each staff member holds (e.g., can they view an invoice or delete it?).
It is the foundation that ensures your business data is only accessible to authorized personnel.
When is this Applet used?
Administrators reach for this applet during critical organizational milestones:
- Employee Onboarding/Offboarding: Quickly granting a new hire access to their required tools or revoking access instantly when a staff member leaves.
- Security Audits: Reviewing the Audit Trail to investigate who authorized a specific system change or permission override.
- Module Activation: Expanding your business capabilities by subscribing to new applets (like Fixed Assets or E-Invoice) in the Catalogue.
- Role Standardization: Creating uniform access tiers (e.g., “Branch Manager” vs. “Cashier”) to ensure consistent security across different locations.
Why is this Important in Platform Governance?
A disciplined Tenant Admin process is the backbone of organizational security and compliance:
- Segregation of Duties (SoD): By carefully mapping permissions, you ensure that no single person has enough access to commit and conceal fraud (e.g., the person who creates a payment cannot be the same person who approves it).
- Regulatory Compliance: Many industries (and tax authorities) require a permanent, unalterable record of who accessed sensitive financial data. This applet provides the Audit Evidence required for these certifications.
- Cost Management: By overlooking Catalogue Subscriptions, you can identify underutilized modules and optimize your platform investment.
- Operational Continuity: Centralized user management ensures that if an admin is unavailable, the organization can still maintain access control through shared administrative roles.
What is the Tenant Admin Applet? (Explained Simply)
Imagine your company is a building.
- The Catalogue is the store where you decide which “appliances” (applets) to buy and install (e.g., Accounting, HR, CRM).
- Tenant Users is the list of employees who have keys to the building.
- Roles & Permissions are the specific rules for those employees—who has a key to the server room, who can open the front door, and who can only enter the break room.
The Tenant Admin Applet is where the landlord (the Admin) manages the keys, the appliances, and the security logs for the entire building.
Relationship to Other Applets
This applet is the foundation upon which all other applets operate:
- All Functional Applets (Sales, Purchase, GL, etc.): These applets only become available to your users if they are correctly configured and assigned within the Tenant Admin Applet.
- Audit Traceability: Actions taken in this applet are recorded to ensure that administrative changes (like giving someone “Admin” rights) are tracked.
- Permission Wizard: A specialized tool within the settings that simplifies the complex task of mapping thousands of individual permissions into manageable Roles.
Key Features Overview
Who Benefits from This Applet?
Platform Administrators:
- High-level oversight of all installed applets and subscription statuses.
- Ability to quickly add or remove users from the platform.
- Manage top-level security settings and system webhooks.
IT & Compliance Managers:
- Build and maintain complex Role hierarchies (e.g., “Junior Accountant” vs. “CFO”).
- Audit every administrative change to ensure compliance with security protocols.
- Use the Permission Wizard to verify exactly which “Actions” a specific user is allowed to perform.
HR & Operations Leads:
- Seamless onboarding of new employees into the digital workspace.
- Linking physical employees to their digital Platform Users.
- Managing “Team” groupings for faster permission broadcasting.
What Problems Does This Solve?
The “Administrative Chaos” Problem: When you have 50 different apps and 200 users, managing access manually is impossible. This applet provides a centralized dashboard to map everyone to everything in one place.
The “Security Over-Privilege” Risk: Without granular control, admins often give users “Master” access just to make things work. The Tenant Admin Applet allows for “Least Privilege” security—giving users only the specific permissions they need for their job.
Subscription Visibility Gap: Organizations often lose track of what applets they are paying for or which ones are underutilized. The Catalogue and Subscription tabs provide clear visibility into your active platform footprint.
Data Inconsistency Across Environments: The Data Sync feature helps manage information flow between different tenants or environments, ensuring that critical metadata stays updated.
Key Features Overview
Key Concepts
Roles vs. Permission Sets
- Permission Set: A collection of specific technical permissions (e.g., “CAN_CREATE_INVOICE”). Think of this as a “Bag of Tools.”
- Role: A functional identity (e.g., “Accountant”) that can contain multiple Permission Sets. Think of this as a “Job Title.”
By assigning a Role to a user, you give them all the Permission Sets inside that role. This makes management significantly easier than assigning individual permissions to every person.

The Intercompany Link
In many configurations, the Tenant Admin Applet manages how your branch interacts with external entities. It handles the “Platform Identity” of your organization, which is crucial for intercompany document syncing.
Primary Menu Navigator
The sidebar menu is organized to move from high-level platform configuration to granular user security.
| Menu Item | Purpose | Key Activity |
|---|---|---|
| Catalogue | The platform marketplace. | Browse and install new business modules (Accounting, POS, HR). |
| Subscription | Financial control of applets. | Manage active versions and billing status of your subscribed tools. |
| Tenant Users | Local identity management. | Create and manage users specific to your business environment. |
| Platform Users | Global identity bridge. | Link local tenant users to their master BigLedger platform ID. |
| Applets | Instance Management. | Configure specific settings for each applet instance active in your tenant. |
| Tenant Admins | Privilege Governance. | Designate and manage users with master administrative control. |
| Tenant Roles | Security Packaging. | Group permission sets into functional job titles (e.g., “Cashier”). |
| Role File Import | Bulk Migration. | Upload and batch-create multiple roles from external JSON/CSV files. |
| Permission Sets | Atomic Access Control. | Define reusable groups of granular technical permissions. |
| Data Sync | Environment Alignment. | Synchronize metadata and critical settings across different platform nodes. |
| Audit Trail | Accountability Log. | View a permanent record of every administrative system change. |
Quick Start Guide
For Admins: Onboarding a New Employee
Goal: Give a new staff member access to the Sales Applet.
- Navigate: Go to Tenant Users.
- Link Platform User: Ensure they are linked to a platform identity (this allows them to log in).
- Assign Role: Stay in the user’s profile and go to the Roles or Permissions tab.
- Save & Notify: The system will now grant them access to the appropriate apps on their next login.
For IT Managers: Creating a Custom Role
Goal: Create a “ReadOnly Auditor” role who can see everything but change nothing.
- Navigate: Go to Role.
- Define Role: Name it “Auditor_ReadOnly”.
- Map Permissions: Go to the Permissions tab within the Role or use the Permission Wizard in Settings.
- Select Read-Only Flags: Filter for “READ” permissions and exclude “CREATE”, “UPDATE”, or “DELETE”.
- Assign to Users: Go to the users who need this role and add “Auditor_ReadOnly” to their profile.
For System Architects: Managing Subscriptions
Goal: Activate a new applet for the organization.
- Navigate: Go to Catalogue.
- Find Applet: Search for the desired applet (e.g., “Fixed Assets”).
- Subscribe: Check the subscription status and activate it for your tenant.
- Configure Instance: Once subscribed, go to the Applet tab to verify the instance is running and configured correctly.
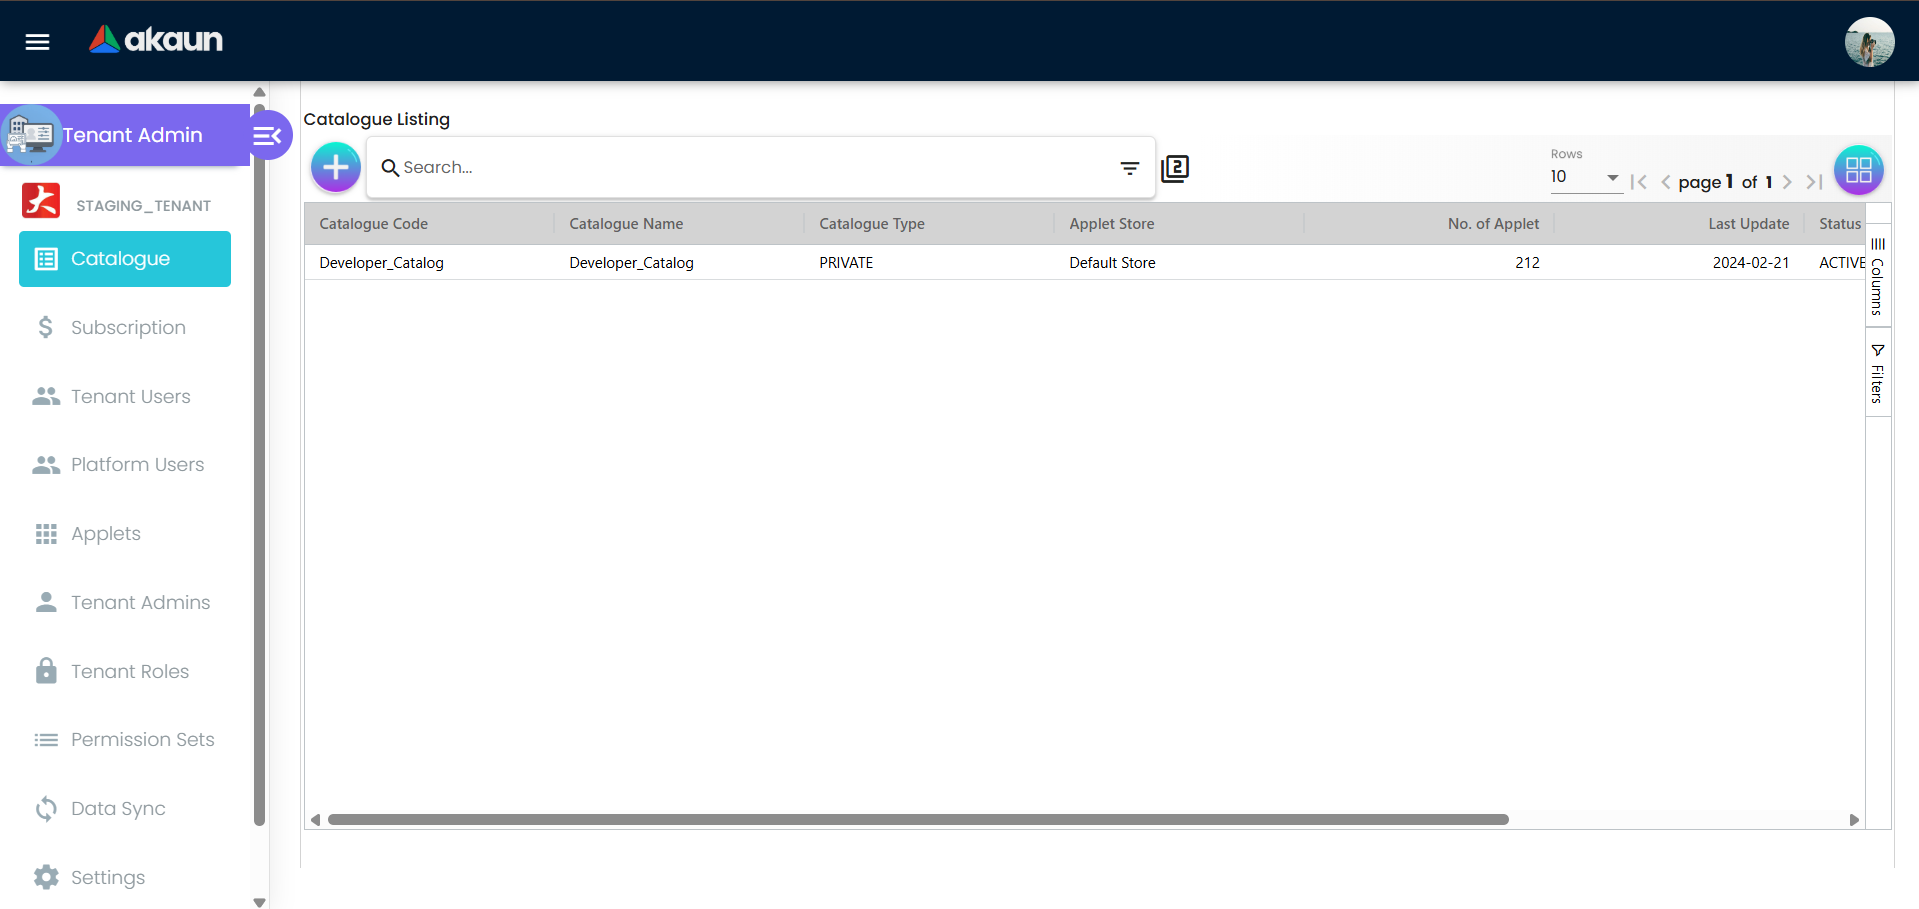
Deep Dive: Catalogue Menu
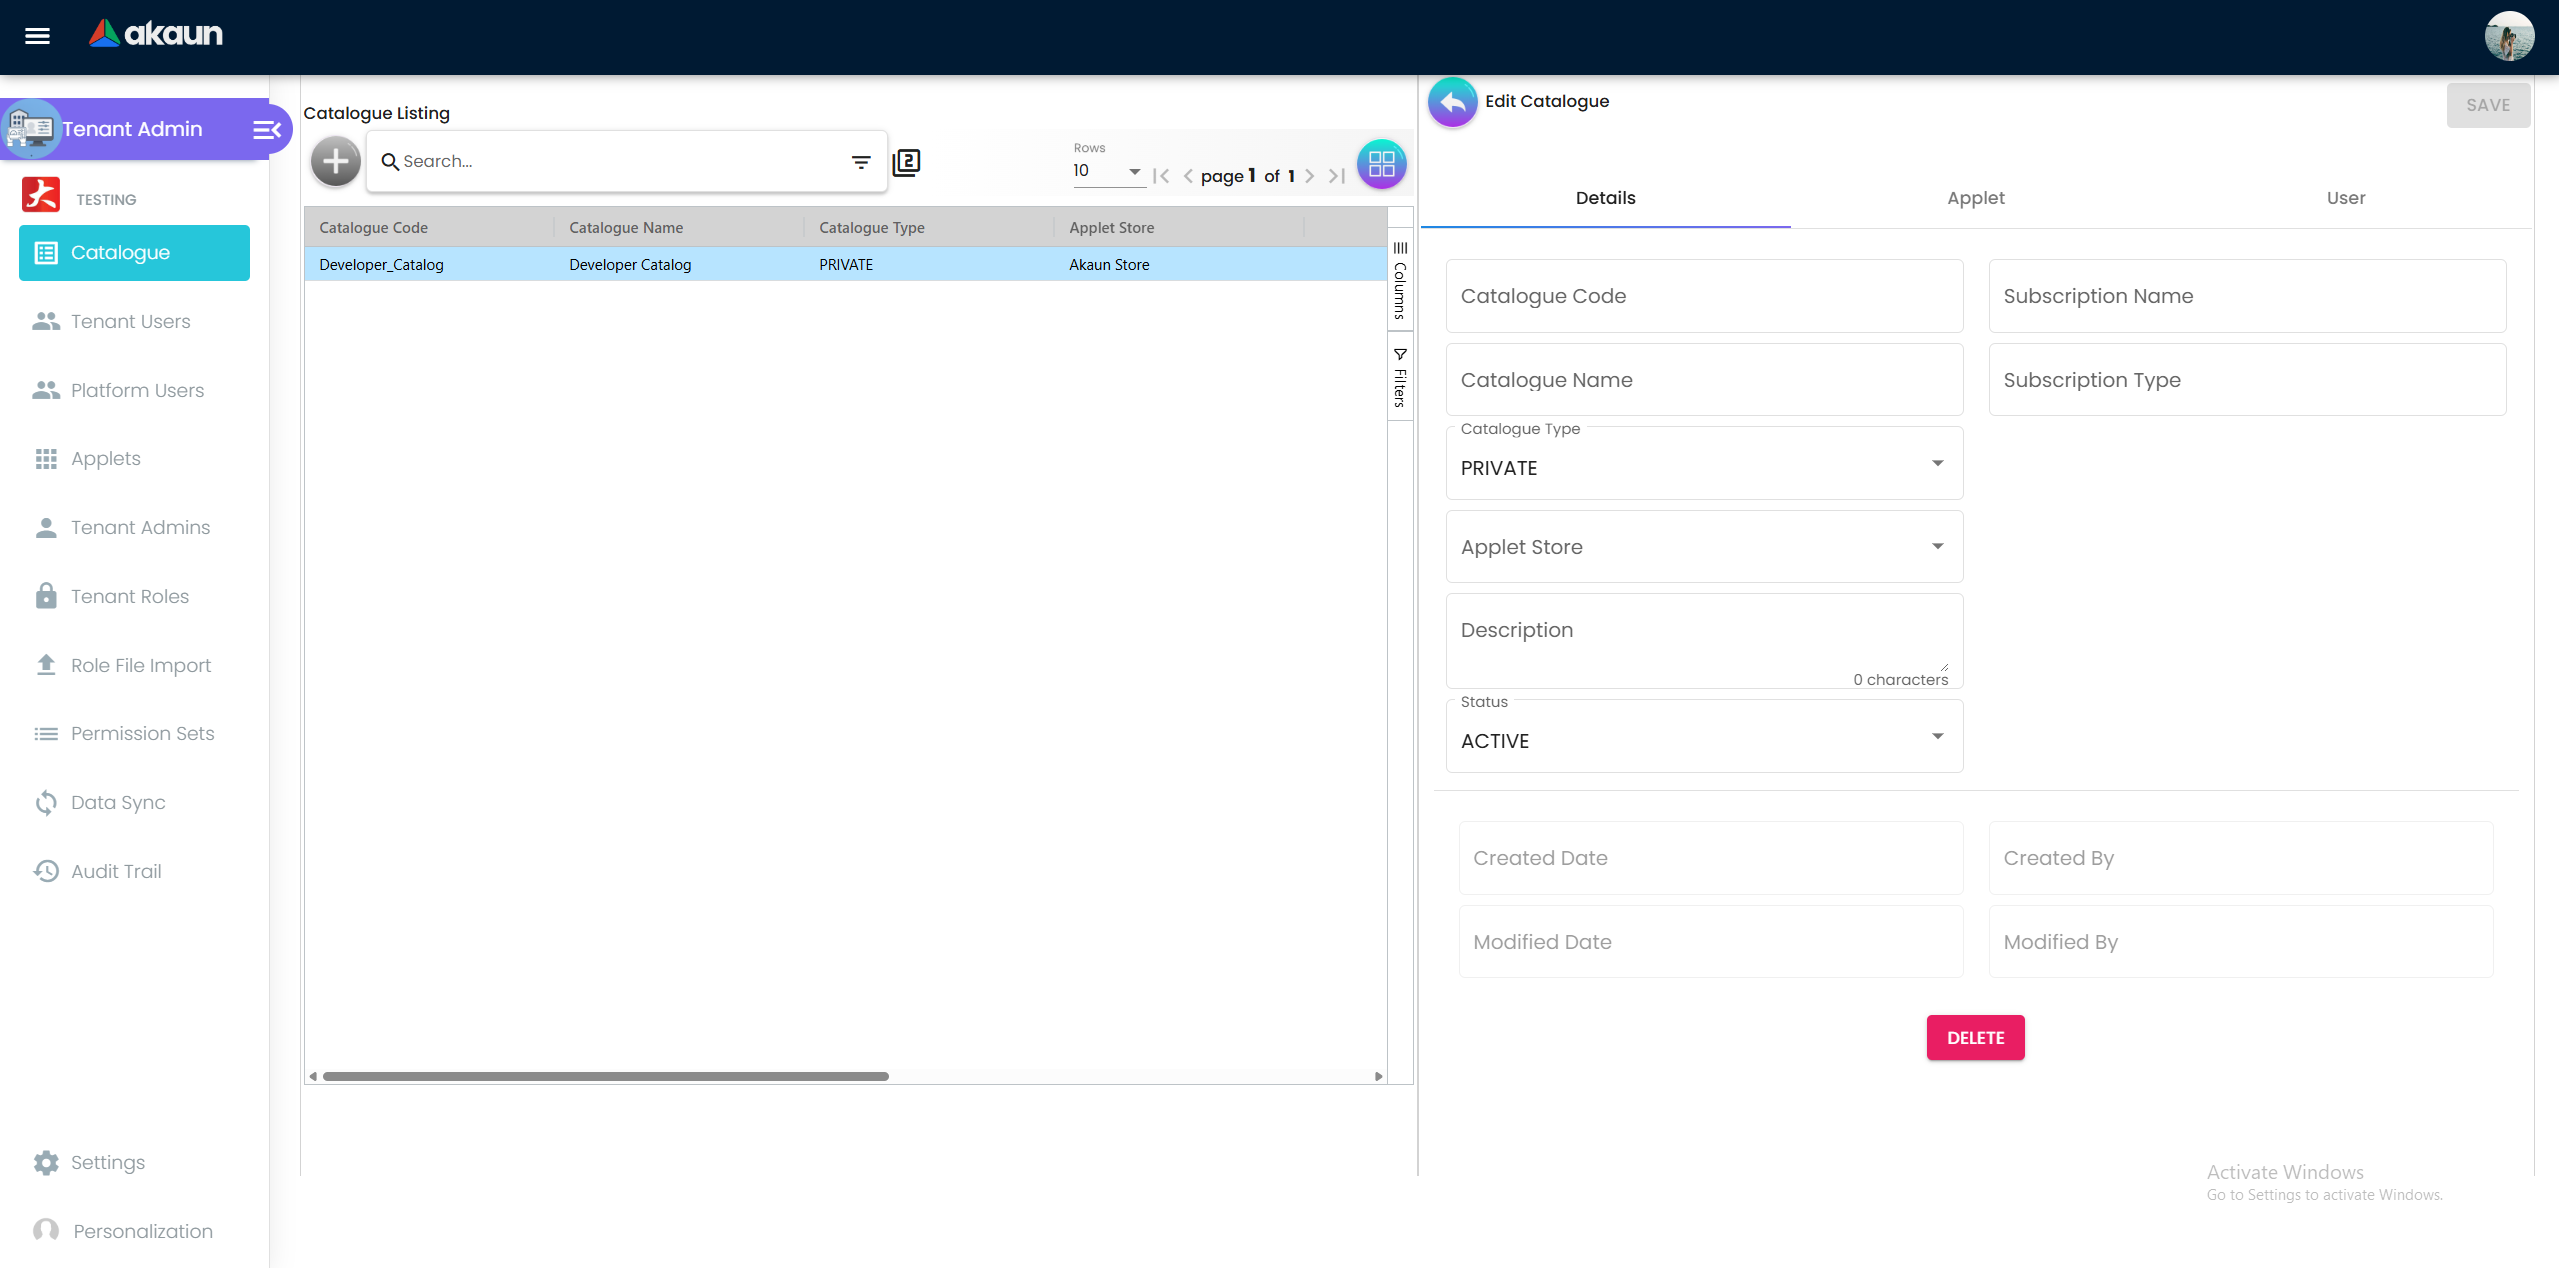
Catalogue Listing: Shows every available applet. You use this to scale your business by adding new functional modules as you grow.
Subscription Management: Displays the status of your active tools. This is critical for Subscription Lifecycle Management, allowing you to see which versions of an applet are currently deployed.
Applet Info: Technical metadata that explains what the applet does and, more importantly, the Permission Dependencies—the hidden technical “gates” that must be opened for the applet to function for your users.
Tabs & Components:
- Details Tab: Control the core metadata of your catalogue entries.
- Applet Listing Tab: View and manage specific applet instances associated with a catalogue item.
- User Listing Tab: Monitor which users are currently utilizing the applets from this catalogue selection.
Deep Dive: Subscription Menu
Concept: Financial & License Governance. Ensures your organization is correctly licensed and that the infrastructure (hostnames) is mapped to your business entities.
- Tabs & Components:
- Details Tab: Primary subscription settings and tier management.
- Akaun HQ Entity Tab: Maps the subscription to your master financial entity for billing and intercompany identification.
- Hostname Tab: Manages the technical URLs (domains) that point to your tenant’s digital workspace.
Deep Dive: Tenant Users Menu
Concept: Identity Management. This tab is the “Digital Directory” of your personnel. It bridges the gap between a physical human being and their digital platform identity.
User Listing: A searchable grid of all staff. This is where you manage User Activation/Deactivation—the most fundamental security action.
User GUID & Email: The unique digital fingerprint of the user. This ensures that permissions are linked to a specific, unique person across the entire platform.
Installed Applet Sub-tab: A powerful diagnostic view. If a user says “I can’t see the Sales applet,” you check here to verify if it is assigned to their profile.
Employee Link: Connects the software account to the Physical Employee Record (from the HR applet), ensuring that payroll, performance, and access data stay synchronized.
Tabs & Components:
- Details Tab: Core user profile management (Email, Status, Name).
- Employee Link Tab: A critical synchronization component that links the platform user to their physical record in the Employee Maintenance Applet.
- Installed Applet Tab: A diagnostic view of exactly which business tools this specific user has in their sidebar.
- Catalogue Tab: View which catalogue subscriptions are driving the user’s current access levels.
Deep Dive: Platform Users Menu
Concept: The Global ID Pool. While a Tenant User belongs to your company, a Platform User is their universal key to the BigLedger ecosystem.
Identity Pinning: Allows a single person to log in once and switch between different companies (Tenants) they belong to.
Security Linking: By linking local staff to platform identities, you ensure that password resets and multi-factor authentication are handled at the highest security level.
Tabs & Components:
- Details Tab: Global ID pinning and credential health.
- Installed Applet Tab: High-level view of applets assigned to this platform ID across the tenant.
- Available Applet Tab: Displays applets that can be assigned but are not yet active for this user.
- Catalogue Tab: Cross-reference platform identity with organizational catalogue availability.
Deep Dive: Applets Menu
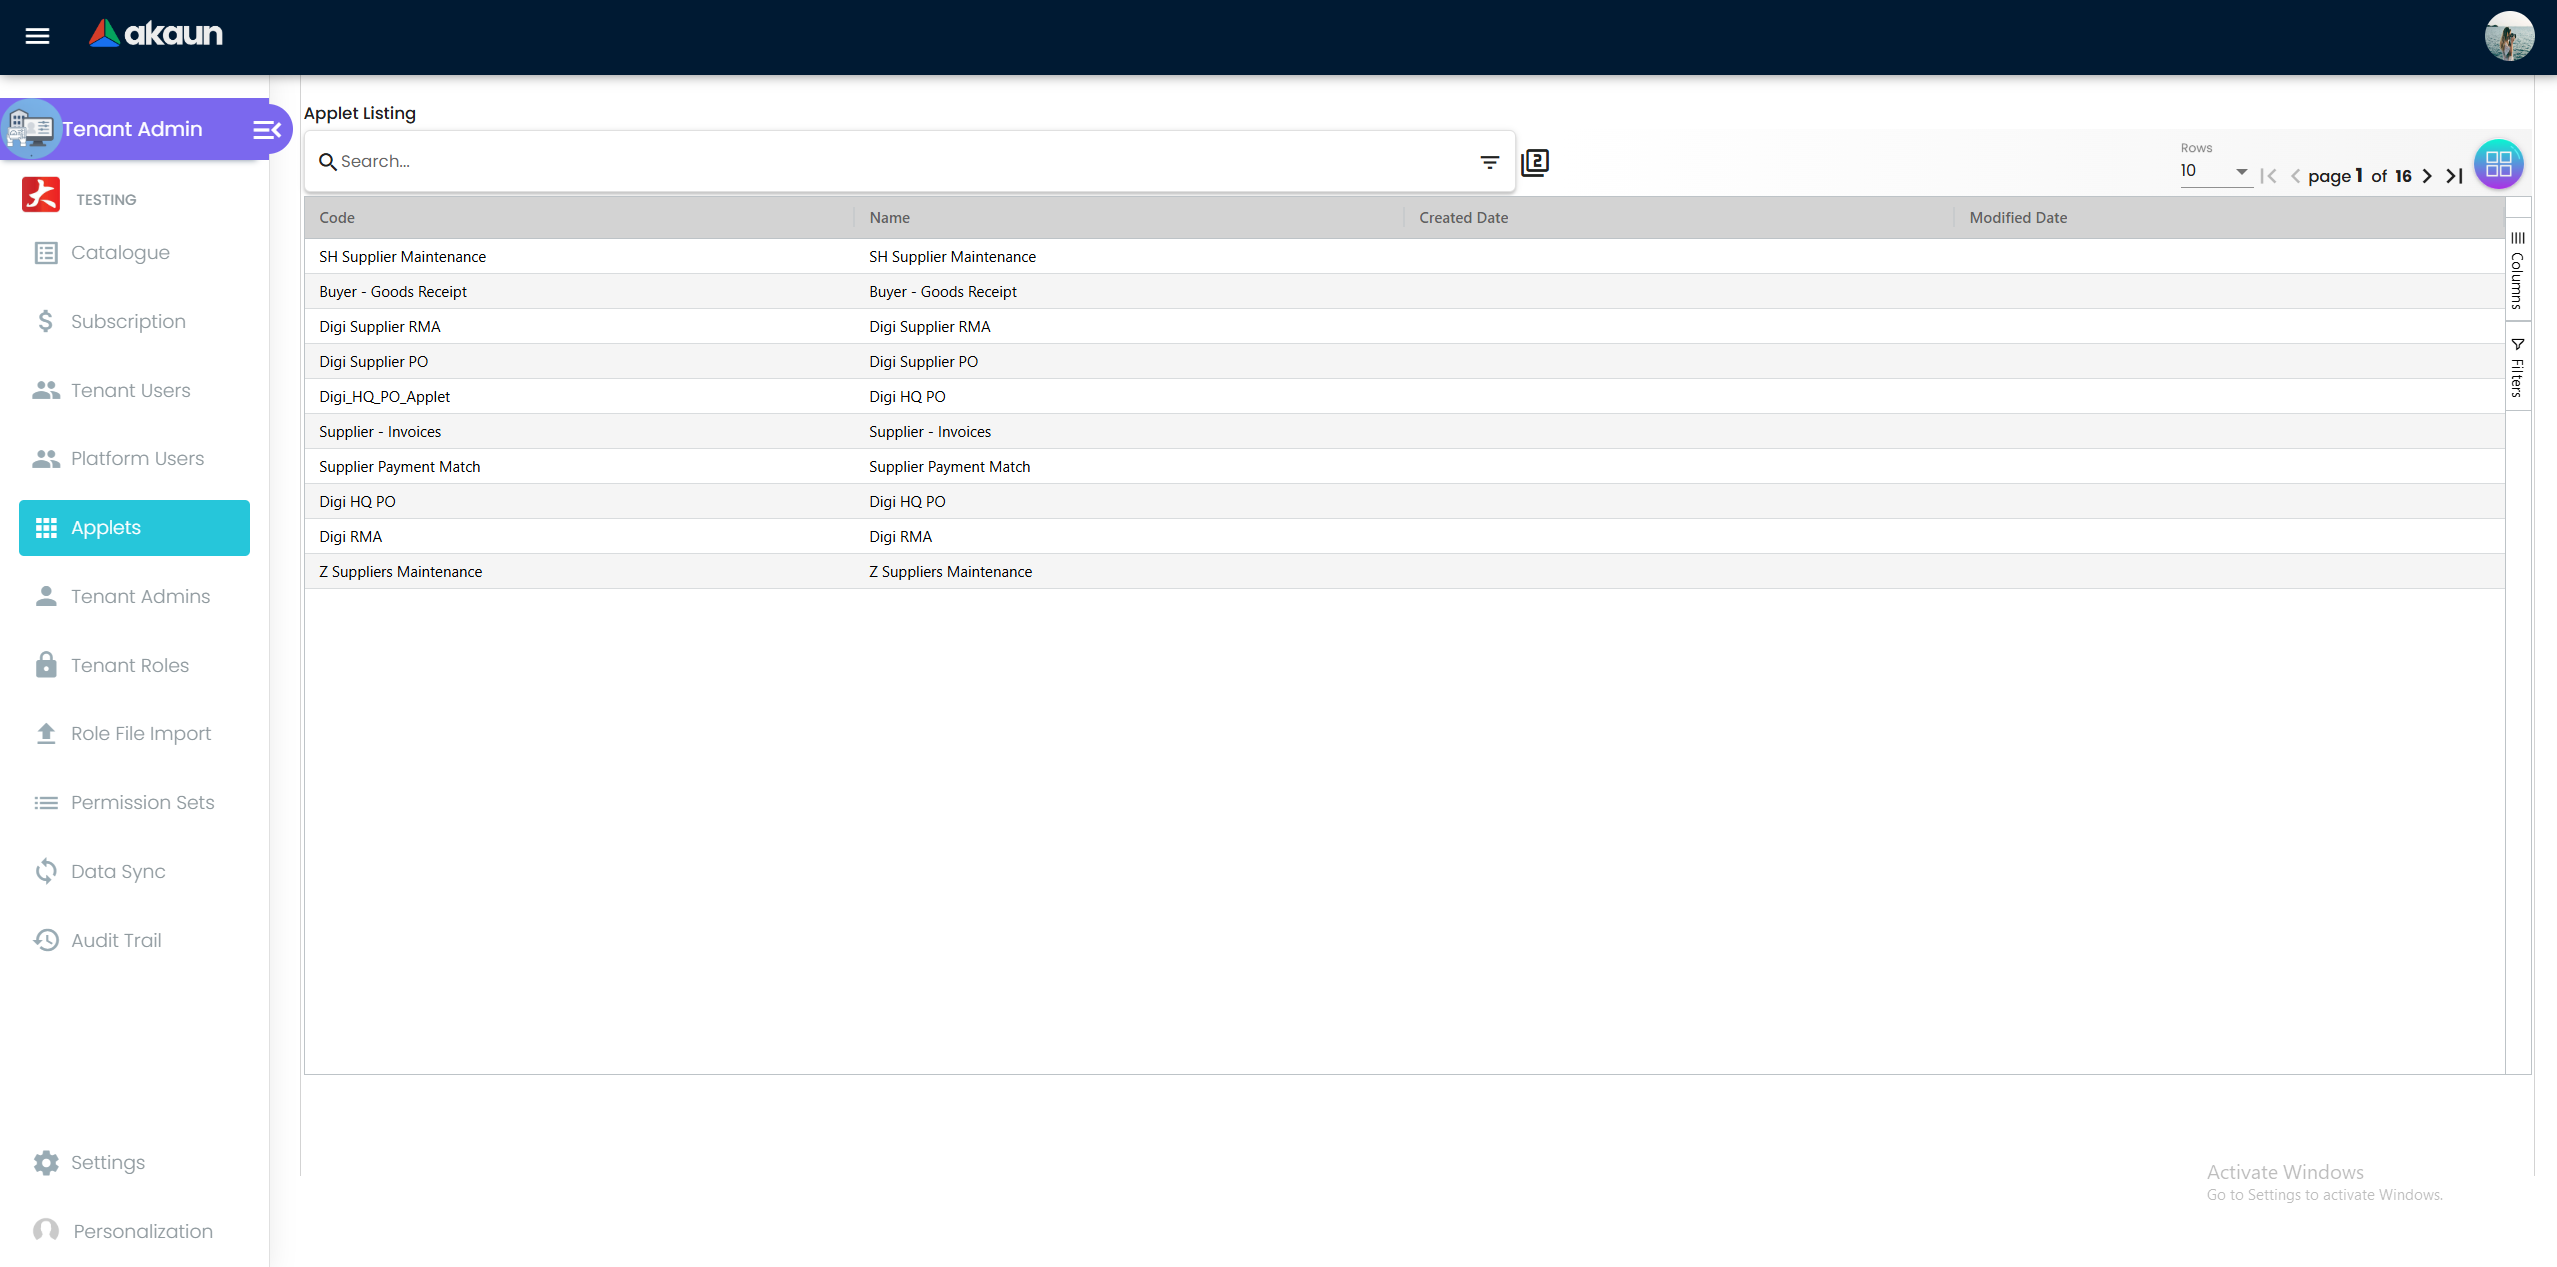
Applet Instance ID: The unique code identifying your specific installation.
Version Control: See which specific release of the applet your team is currently using, which is vital for troubleshooting and feature updates.
Tabs & Components:
- Details Tab: Displays Instance IDs, build versions, and technical health status.
- Permission Sets Tab: List of all backend API “gates” available for this specific applet.
- Clientside Permissions Tab: Manage UI-level toggles (e.g., hiding a specific button or menu item in the applet for certain roles).
Deep Dive: Roles & Permissions Menu
Concept: Role-Based Access Control (RBAC). Instead of giving permissions to users one by one, you create “Job Packages” called Roles.
Role Name & Code: Defines the functional identity (e.g.,
ROLE_JUNIOR_ACC). This makes it easy to broadcast security changes to groups of users simultaneously.Permission Set Mapping: A granular matrix where you toggle thousands of specific actions. This is where you enforce Operational Boundaries (e.g., allowing a user to see a list of invoices but not click the ‘Delete’ button).
Role File Import: A “Hidden Power User” feature. Instead of clicking checkboxes for 500 permissions, you can upload a Permission Template in bulk, which is essential for setting up new tenants or branches rapidly.
Tabs & Components:
- Details Tab: Role naming, descriptions, and status.
- User Tab: See exactly which employees are assigned to this specific role.
- Applet Tab: Control which applets this role has permission to access.
- Permission Set Tab: The core matrix where you assign functional groups of permissions to the role.
- Copy Permission Set Tab: Accelerate setup by duplicating existing security templates from other roles.
Deep Dive: Permission Sets Menu
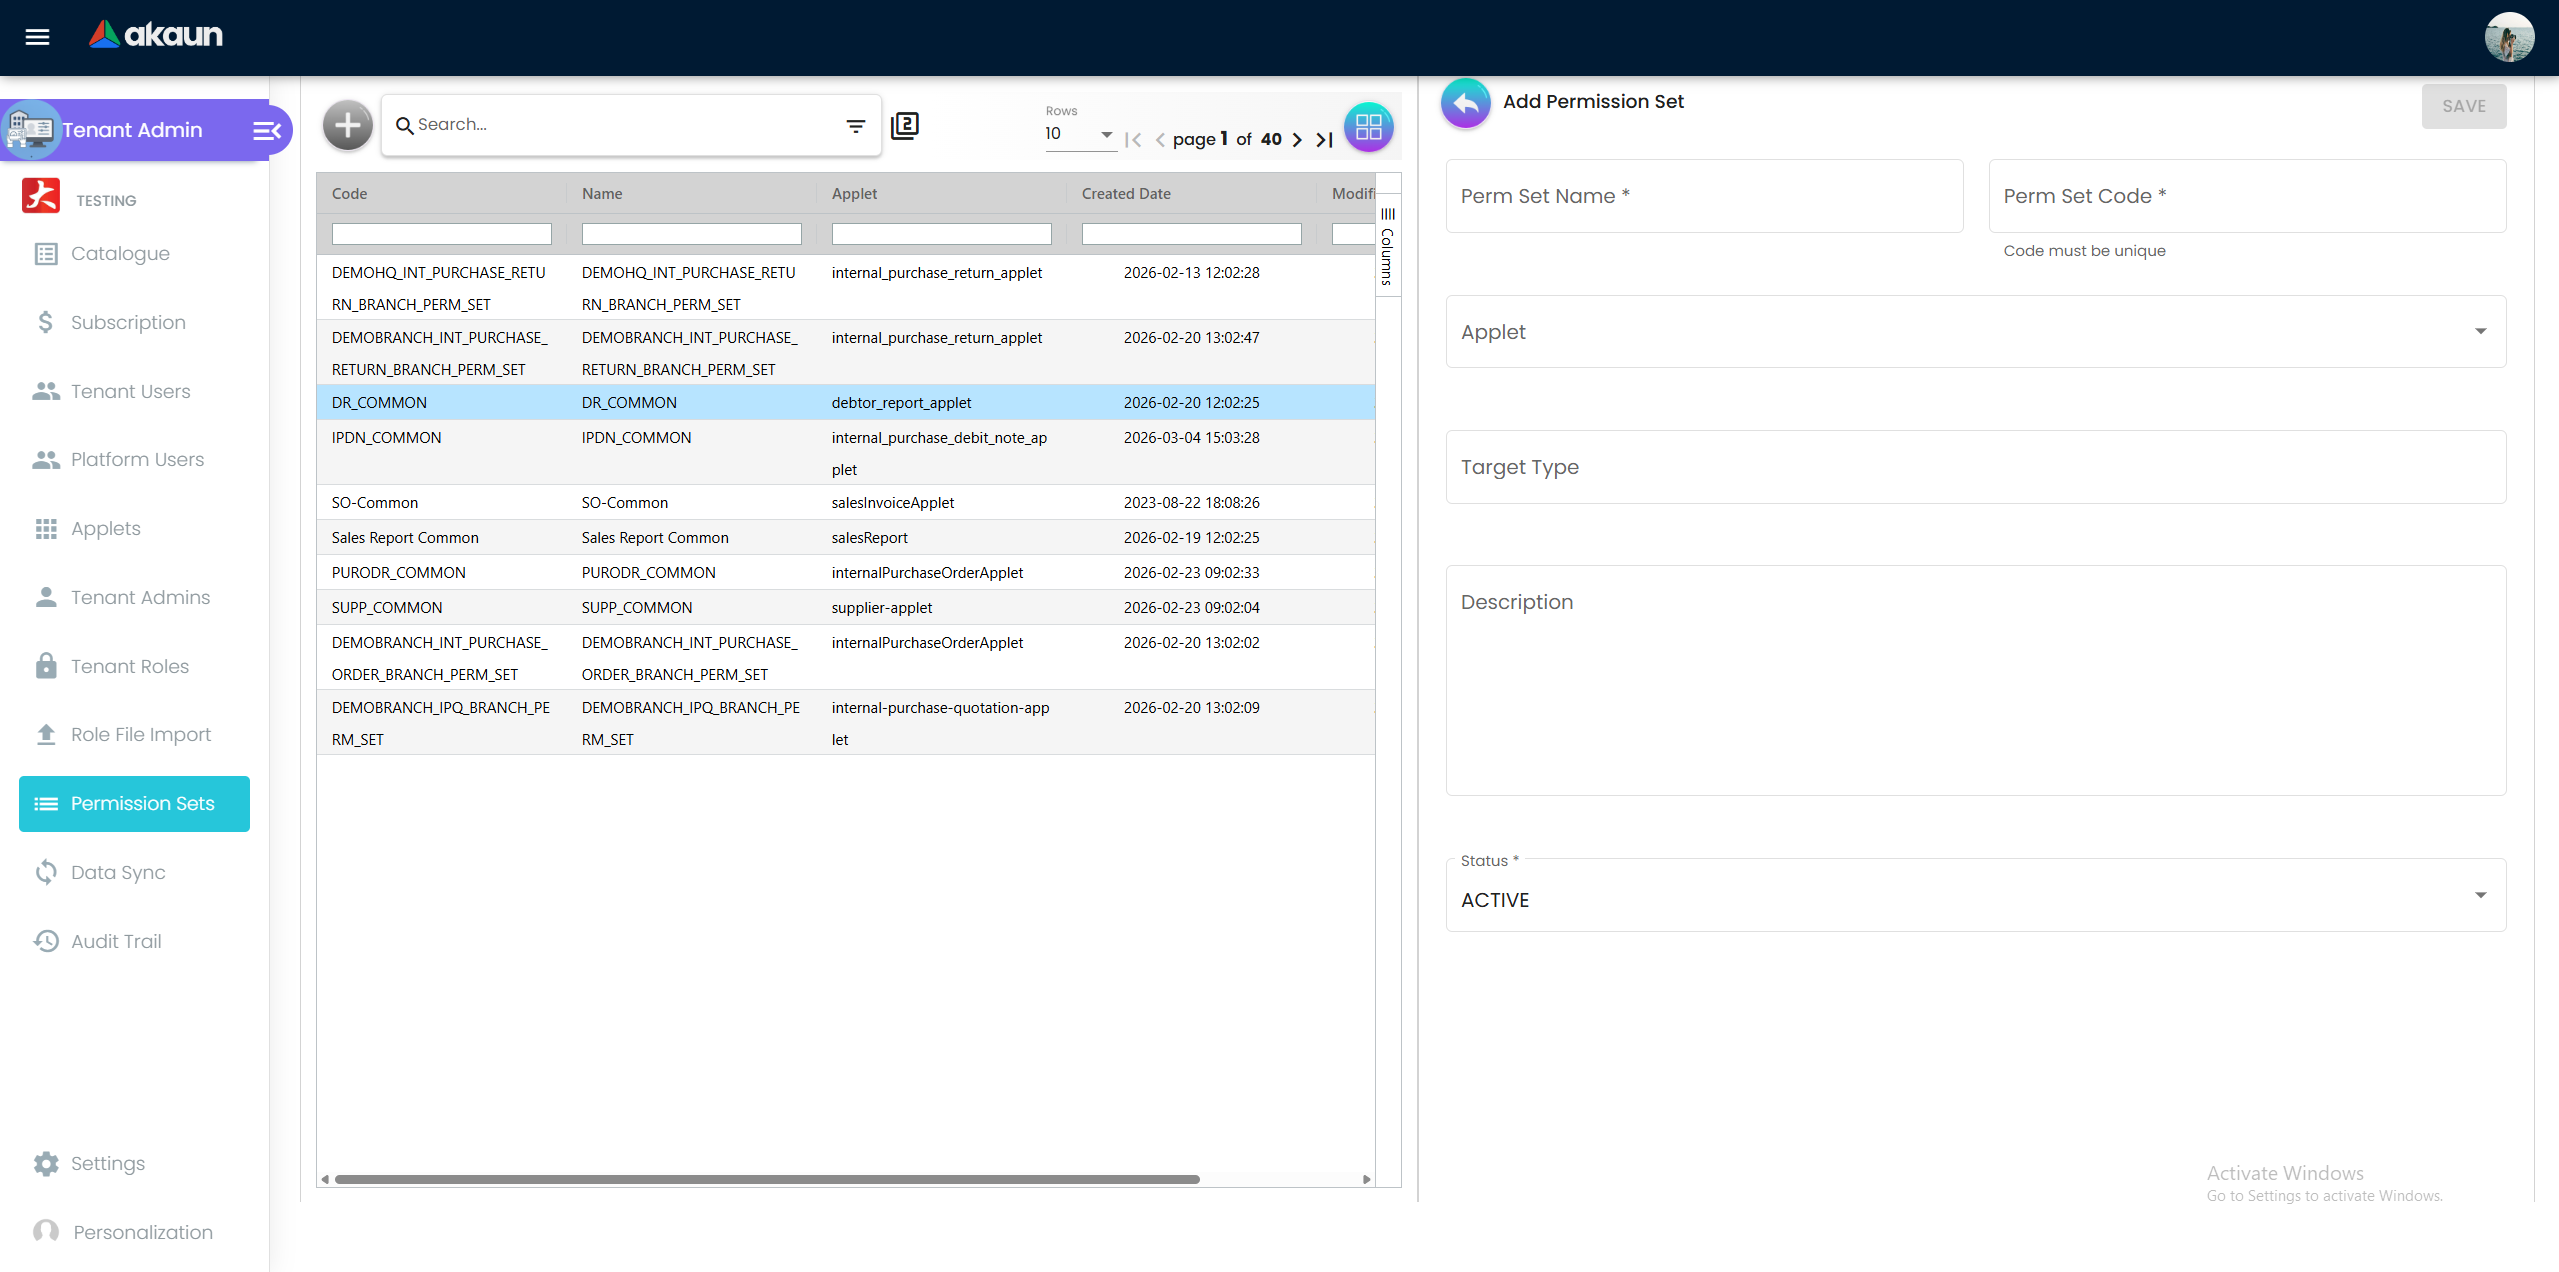
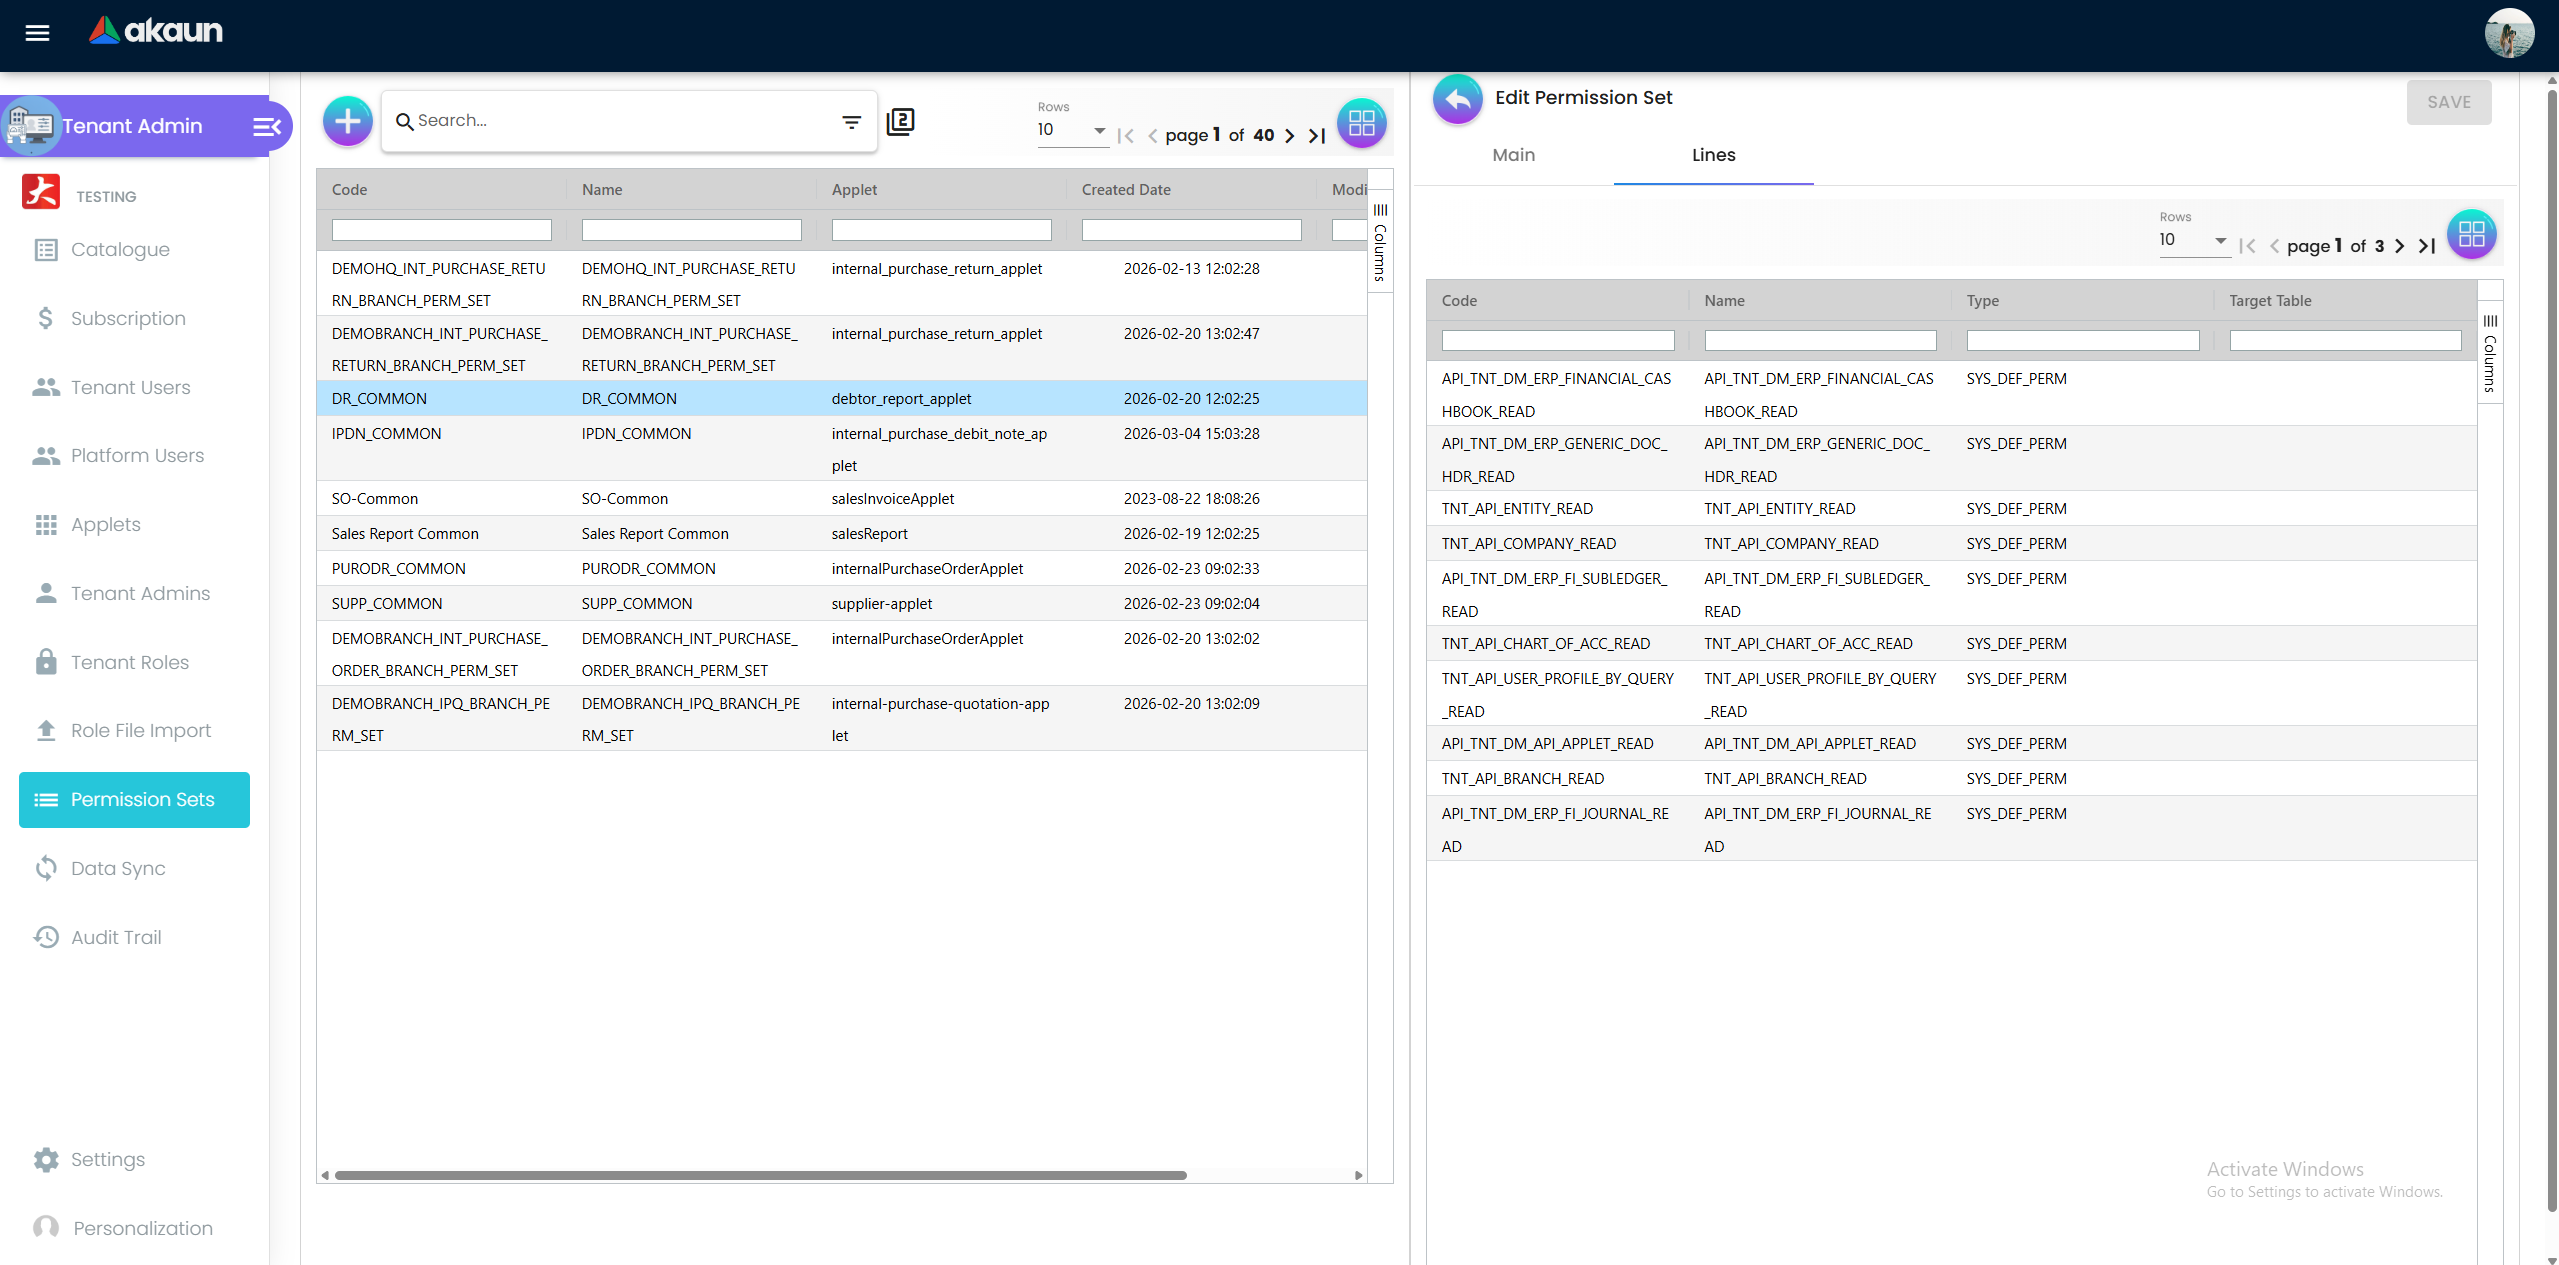
- Tabs & Components:
- Main Details Tab: Manage the code, name, and target type of the permission set.
- Lines Tab: A granular editor for selecting individual technical permission strings (e.g.,
CREATE_INVOICE,VIEW_GL_HISTORY).
Deep Dive: Tenant Admins Menu
Concept: Privilege Governance. A specialized view to manage users who hold the “Master Keys” to the system.
- Tabs & Components:
- Details Tab: Manage the profile and active status of designated system administrators.
Deep Dive: Audit Trail Menu
Concept: The “Immutable Ledger” of Actions. This tab is for Forensic Investigation and Compliance Reporting. It records every administrative “Who, What, and When.”
Action Tracking: Logs every
CREATE,UPDATE, andDELETEon security tables (e.g.,bl_aas_subject_to_role_link). It proves who gave a certain user “Admin” rights.Before/After JSON: Shows the exact data change. This is critical for Change Management Audits, allowing you to see exactly what a configuration looked like before it was modified.
Search & Filter: Allows auditors to pinpoint specific dates or user IDs, turning millions of rows into a targeted Compliance Report.
Tabs & Components:
- Listing Component: Searchable grid of actions (Who, What, When).
- Detail Component: Displays the “Before/After” JSON data, allowing you to see exactly what a configuration looked like before it was changed.
Deep Dive: Data Sync Menu
Concept: The Synchronized Backbone. For large organizations with multiple environments, the Data Sync ensures that your system nodes “talk” to each other correctly.
Consistency Checks: Monitors the health of data flows between your tenant and the master platform.
Metadata Propagation: Ensures that global changes (like new tax rules or currency updates) are synchronized into your local environment without manual entry.
Tabs & Components:
- Listing Component: Real-time monitor of data flow health between nodes.
Deep Dive: Role File Import
Purpose: Rapid Deployment & Migration. Essential for high-scale environments. Instead of manually clicking checkboxes for hundreds of permissions, you can upload structured templates to define roles instantly.
- Tabs & Components:
- Main Tab: Displays file metadata (Name, Size) and the Process Status (e.g., Processing, Completed, Error).
- Checking Tab: A validation layer that previews the mapping before it is permanently committed to the database.
Configuration & Settings
The settings are divided into organizational configurations and user-specific personalizations.
Field Settings (Settings > Field Settings)
Allows administrators to simplify the user interface by toggling the visibility of specific sidebar menus.
- Sidebar Menu Toggles: Instantly hide/show menus like Catalogue, Subscription, or Audit Trail based on the tenant’s operational needs.
Organizational Defaults (Settings > Default Selection)
Establish the baseline operational environment for the applet instance.
- Default Branch & Location: Set the primary branch and physical location used as the default starting point for all administrative actions within this applet.
Personalization (Personalization > Default Selection)
User-specific overrides that allow for individual efficiency.
- User Default Settings: Allows a specific admin to override the organizational defaults for their own session (e.g., a specific branch they manage).
- Default Row Count: Control the density of data in grids (e.g., 20, 50, or 100 rows per page).
Webhooks (Settings > Webhook)
For advanced integrations, webhooks allow BigLedger to push real-time notifications to external systems when administrative events occur (e.g., a new user creation).
Audit Trail
Admin Audit Trail (Audit Trail)
This is the “Black Box” of your platform. It records modifications to high-level system tables.
What to Look For:
- Table Name:
bl_aas_subject_to_role_link(Who was given a role?) - Action:
CREATE/DELETE/UPDATE - Description: Displays the “Before” and “After” values for JSON configurations.
FAQ
Q: What is the difference between a Tenant User and a Platform User?
A: A Tenant User is a person who belongs to your company (your tenant). A Platform User is their global identity on the BigLedger infrastructure. One Platform User can belong to multiple tenants (e.g., a Consultant working for three different companies).
Q: I gave a user a Role, but they still can’t see the applet. Why?
A: Ensure the applet itself is Subscribed in the Catalogue and that the user’s Role has both the Backend API permissions and the Client-Side UI permissions enabled.
Q: Can I restore a Role after I’ve deleted it?
A: Deleting a role is a permanent action in the UI. Check the Audit Trail to see exactly what permissions that role had so you can manually recreate it if necessary.
Q: What does “Inheritance” mean in Roles?
A: If Role B is a “Child” of Role A, it automatically gets every permission Role A has, plus whatever unique permissions you give to Role B. This is great for creating “Junior” and “Senior” variants of the same job.
Q: How do I hide a specific button in an applet for certain users?
A: Go to the Applet tab, select the applet, and go to Client-Side Perm Listing. Find the permission related to the button (e.g., HIDE_GENDOC_VOID_BUTTON) and toggle it for their Role.
Related Applets
External Tenant Admin Applet
Purpose: For Platform Providers (Super Admins) to manage multiple tenants from a single master dashboard.
Employee Maintenance Applet
Purpose: Manages the HR data of the personnel.
Relation: The Tenant Users Tab links these HR records to their platform access permissions.
Settings Applet
Purpose: Regional and global configurations (GST/SST, Currency, Timezones).
Relation: While Tenant Admin manages Access, the Settings applet manages how the Data behaves.