Bank Reconciliation
Watch this as a presentation — 1 on this page, slides with narration.
Prove that a cashbook agrees with the bank for a period. Its lines come from finalised vouchers, POS settlements and cash transfers whose settlement method points at a cashbook; a manual journal against the bank GL code never does, so bank charges and interest must go in as vouchers or cash transfers to be reconcilable. Nothing here posts to the ledger.
Overview
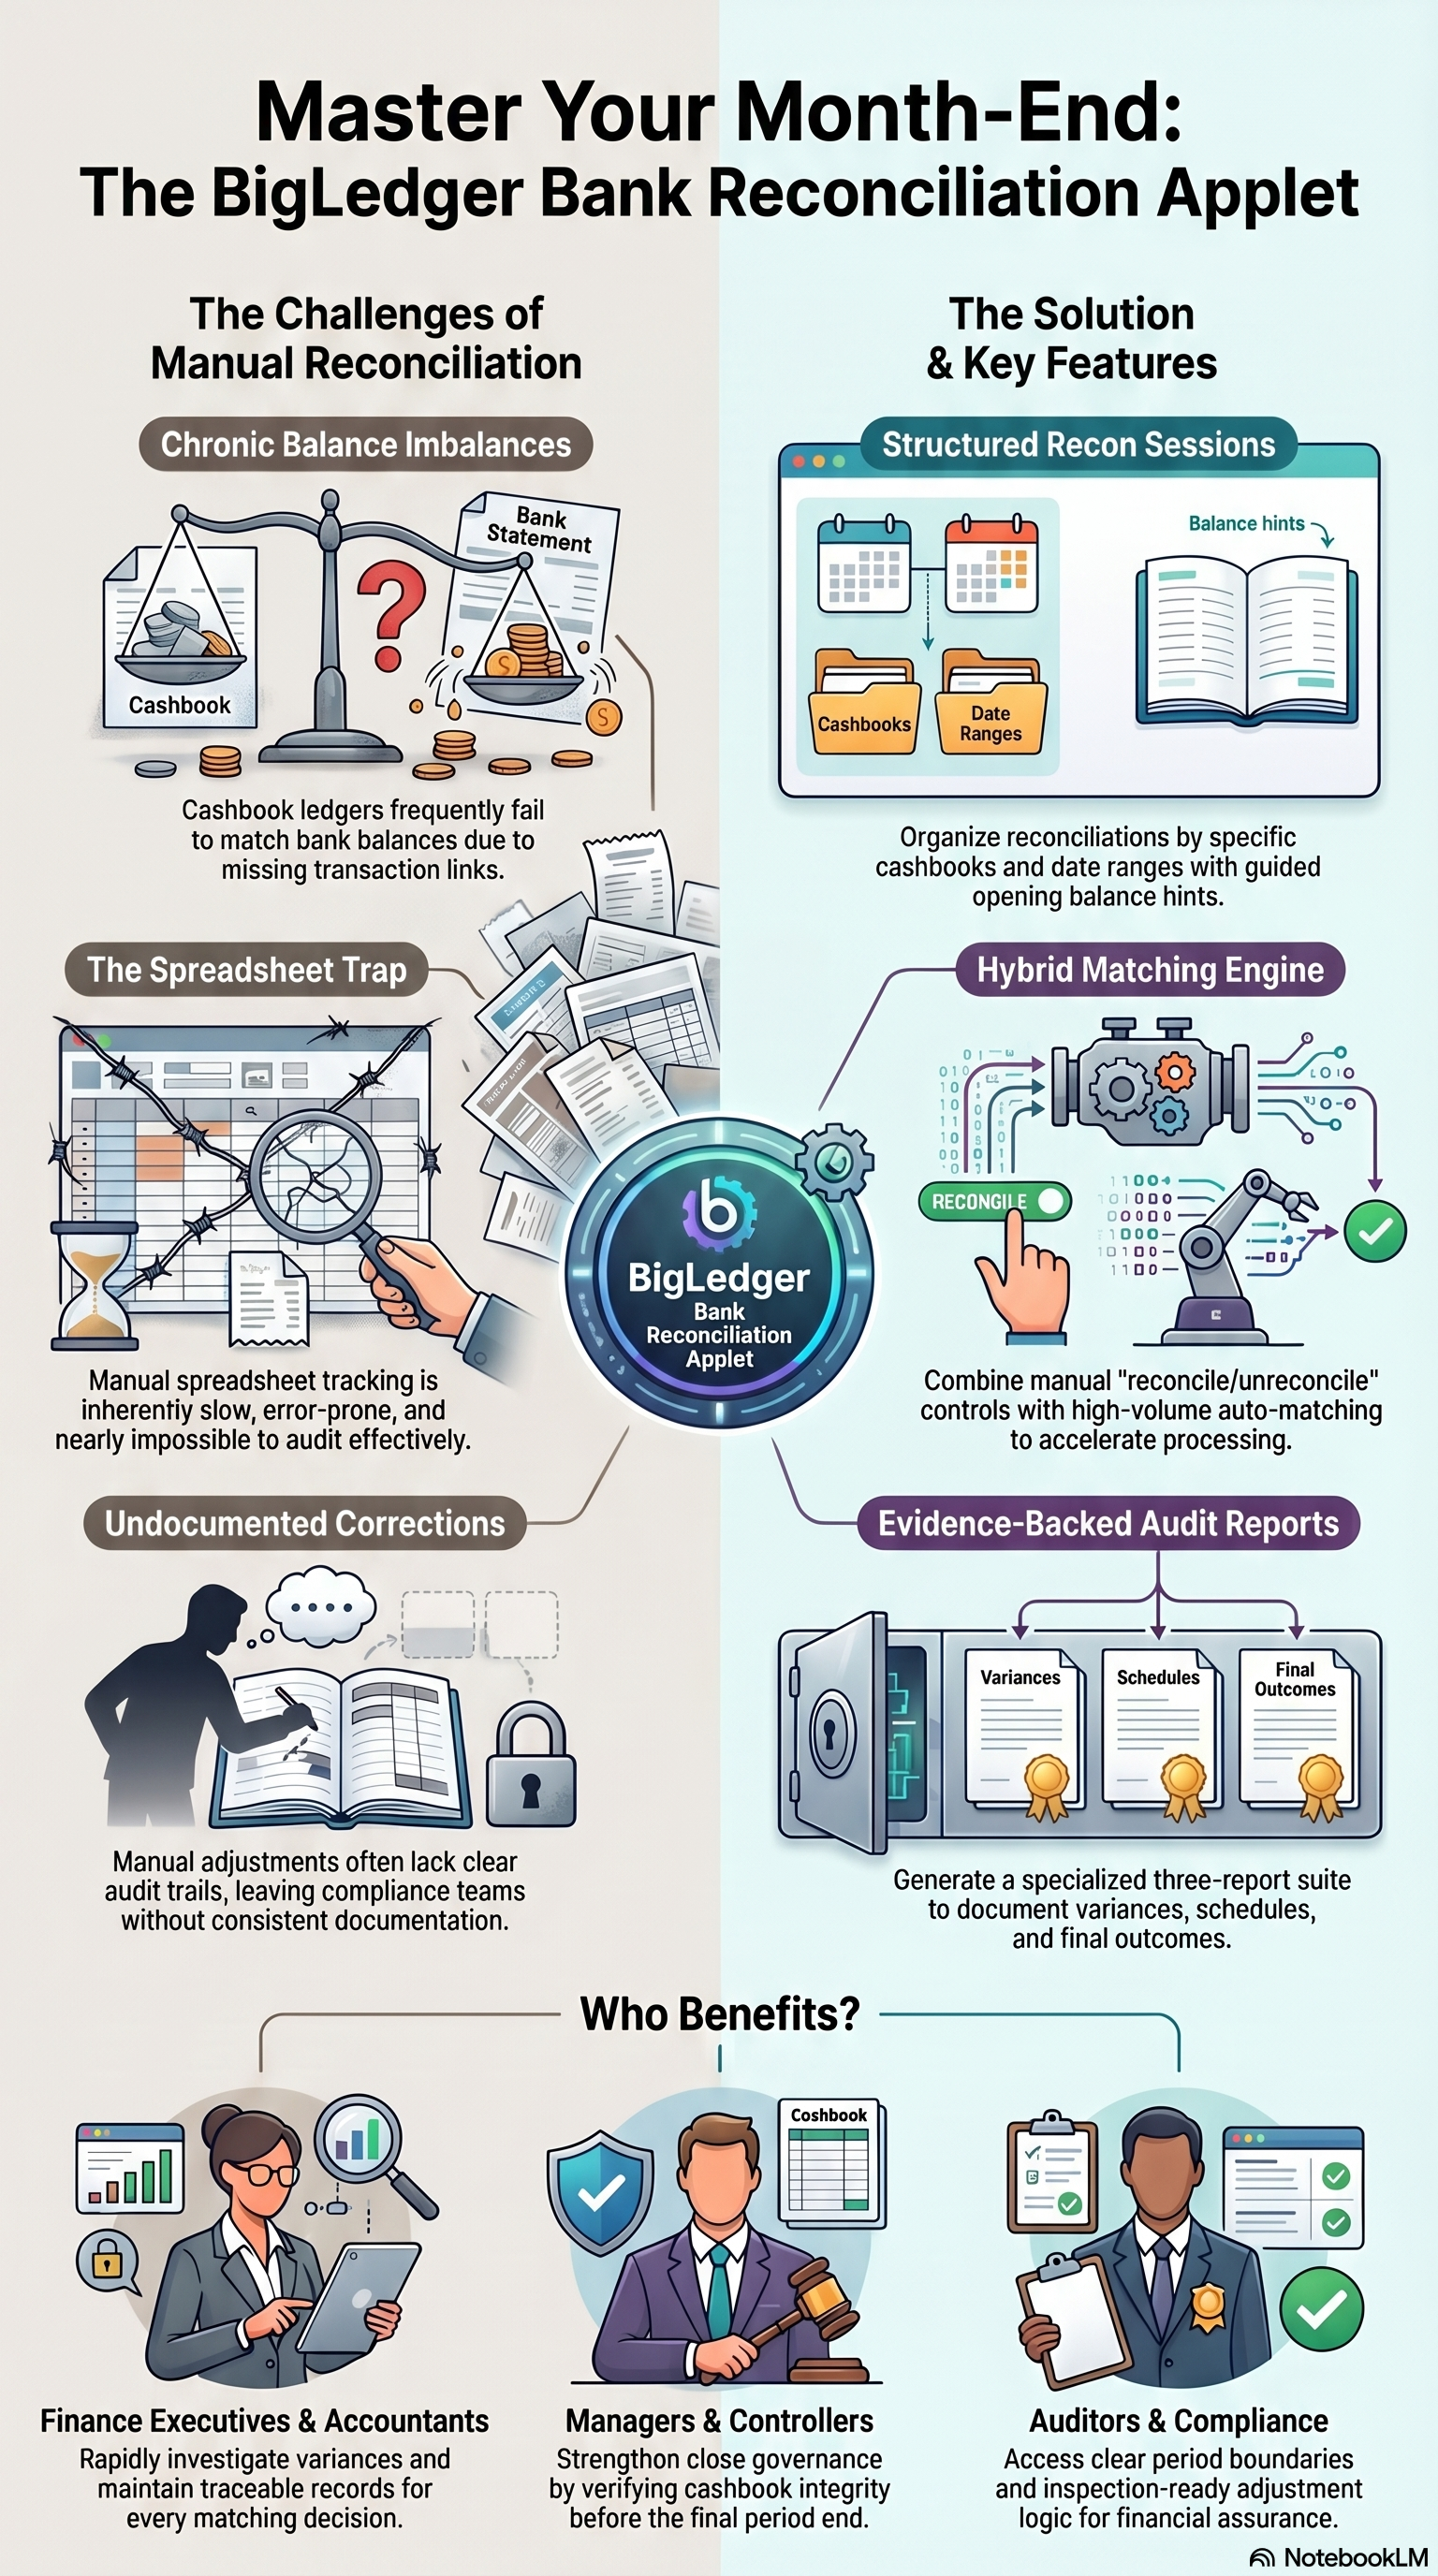
The Bank Reconciliation applet proves that a cashbook in BigLedger agrees with the bank. You open one reconciliation session per cashbook and period, import the bank’s statement for that period, and link each bank statement line to the cashbook transaction line (or lines) it settles — either by hand on the Manual Matching tab or by running the weighted auto-matcher. Three reports then show the closing positions, the matched and unmatched balances on each side, and the variance.
The applet does not post to the General Ledger. It reads cashbook transaction lines that were created when Receipt Vouchers, Payment Vouchers, POS settlements and cash transfers reached FINAL, and it writes reconciliation links that reduce the open amount on both the cashbook line and the bank statement line.
Where it fits
| Direction | Applet / document | Why it matters here |
|---|---|---|
| Upstream | Cashbook | Defines the cashbook being reconciled, its bank account number, its members, and the Weightage Configuration the auto-matcher uses |
| Upstream | Receipt Voucher (Internal), Payment Voucher (Internal) | Their FINAL settlement lines (STL_MTHD) become cashbook transaction lines on the cashbook their settlement method points to |
| Upstream | POS General | Cash, card and e-wallet settlements post the same way, through the settlement method’s cashbook |
| Upstream | Cash Transfer (cash document, FINAL) | FINAL cash transfers also post cashbook transaction lines |
| Alongside | Ledger and Journal | Manual journals against the bank GL code do not create cashbook transaction lines; bank charges and interest must be entered as vouchers or cash transfers to become reconcilable |
| Downstream | Report 1 / 2 / 3 (inside this applet) | The audit pack for the period |
Screens and menus
| Menu item | What it holds |
|---|---|
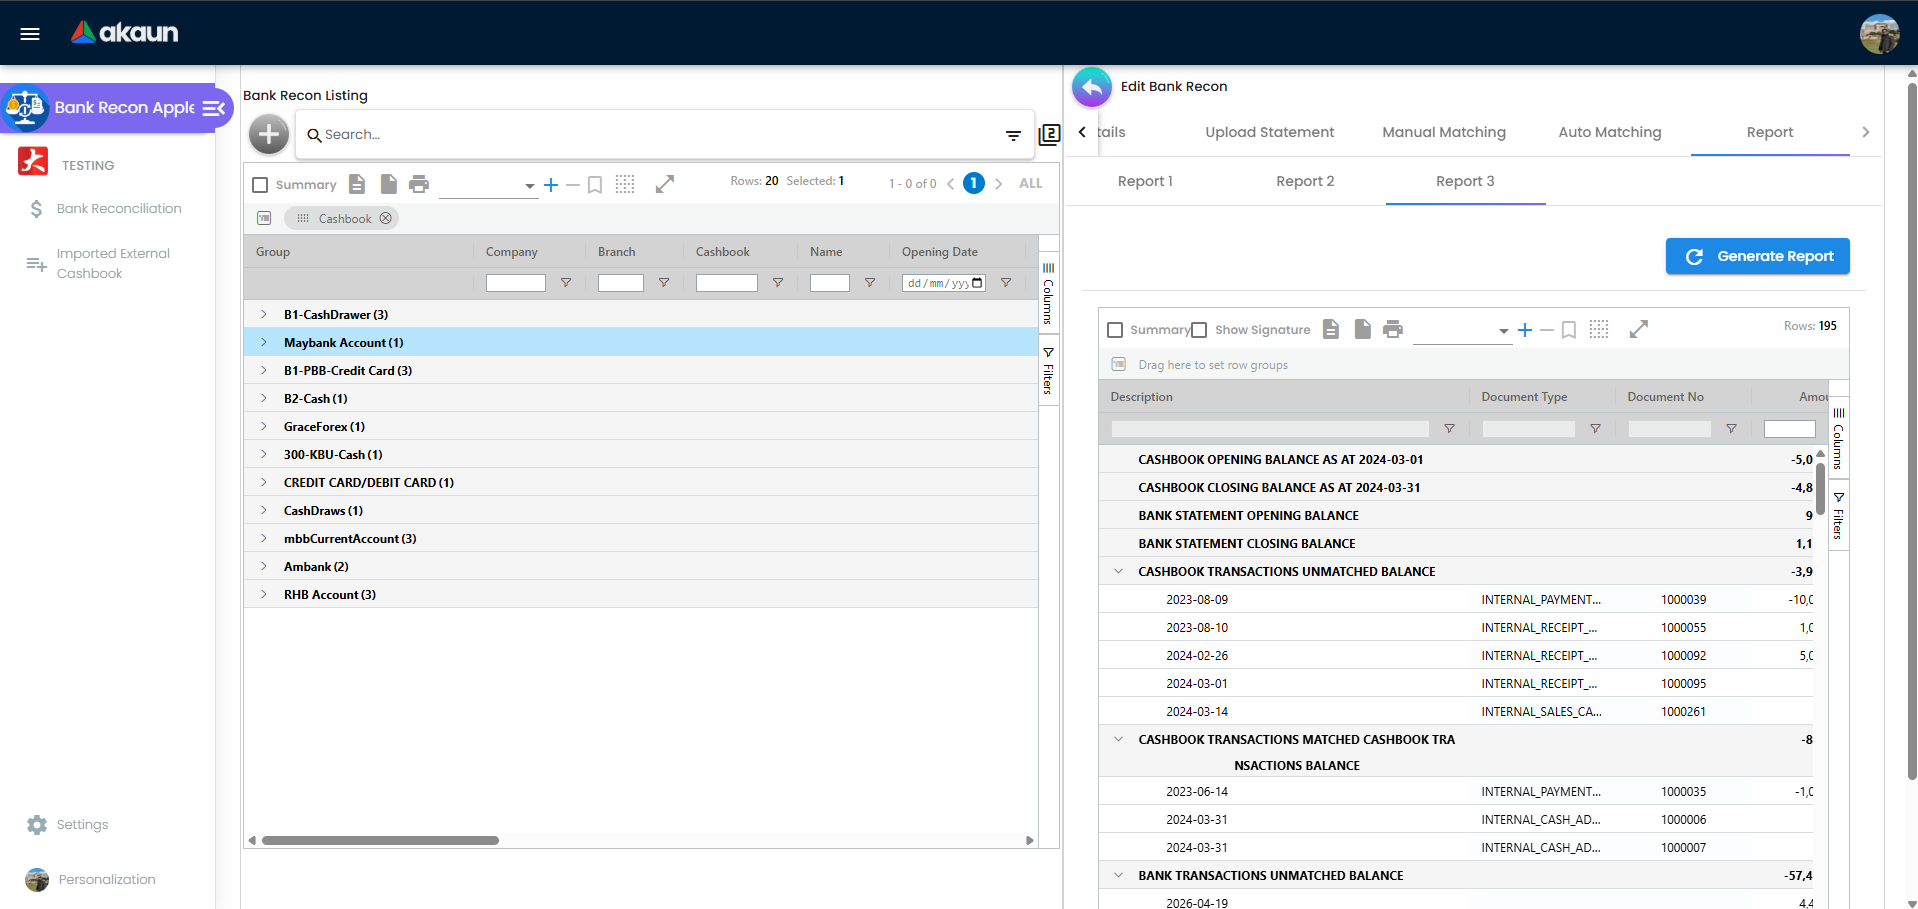
| Bank Reconciliation | Listing of reconciliation sessions; create and edit. The edit screen has five tabs: Details, Upload Statement, Manual Matching, Auto Matching, Report (tab order is configurable — see Default Selection) |
| Imported External Cashbook | Upload a CSV of external cashbook movements and generate cashbook transaction lines from it — for cashbooks whose transactions are not produced by BigLedger documents |
| Settings → Application Settings | The applet’s own hide/show switches (a local form, not the shared field-configuration screen) |
| Settings → Default Selection | Drag-and-drop ordering of the five edit tabs (its branch and location pickers are saved but read by nothing here) |
| Personalization → Default Selection | Per-user branch and location pickers, saved but read by nothing here |
The Settings menu also carries the standard permission screens (Client Side Permission, Permission Wizard, Permission Set, User Permission, Role Permission), Webhook and Release Notes.
Listing
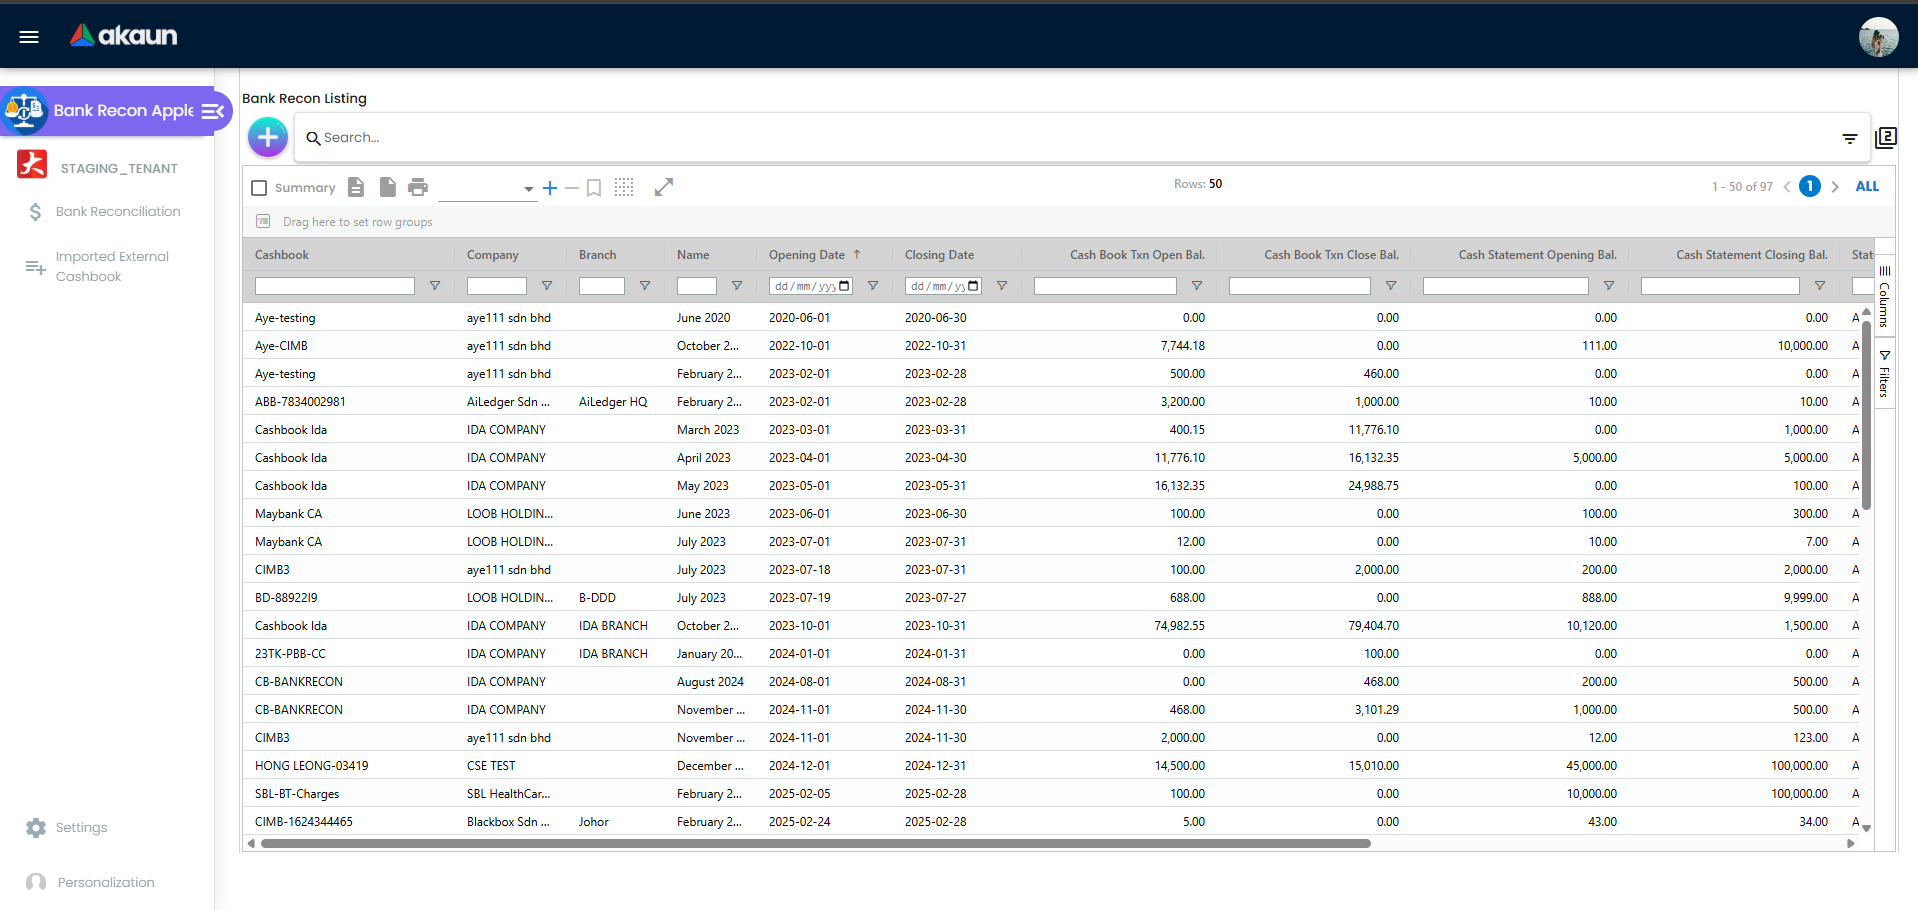
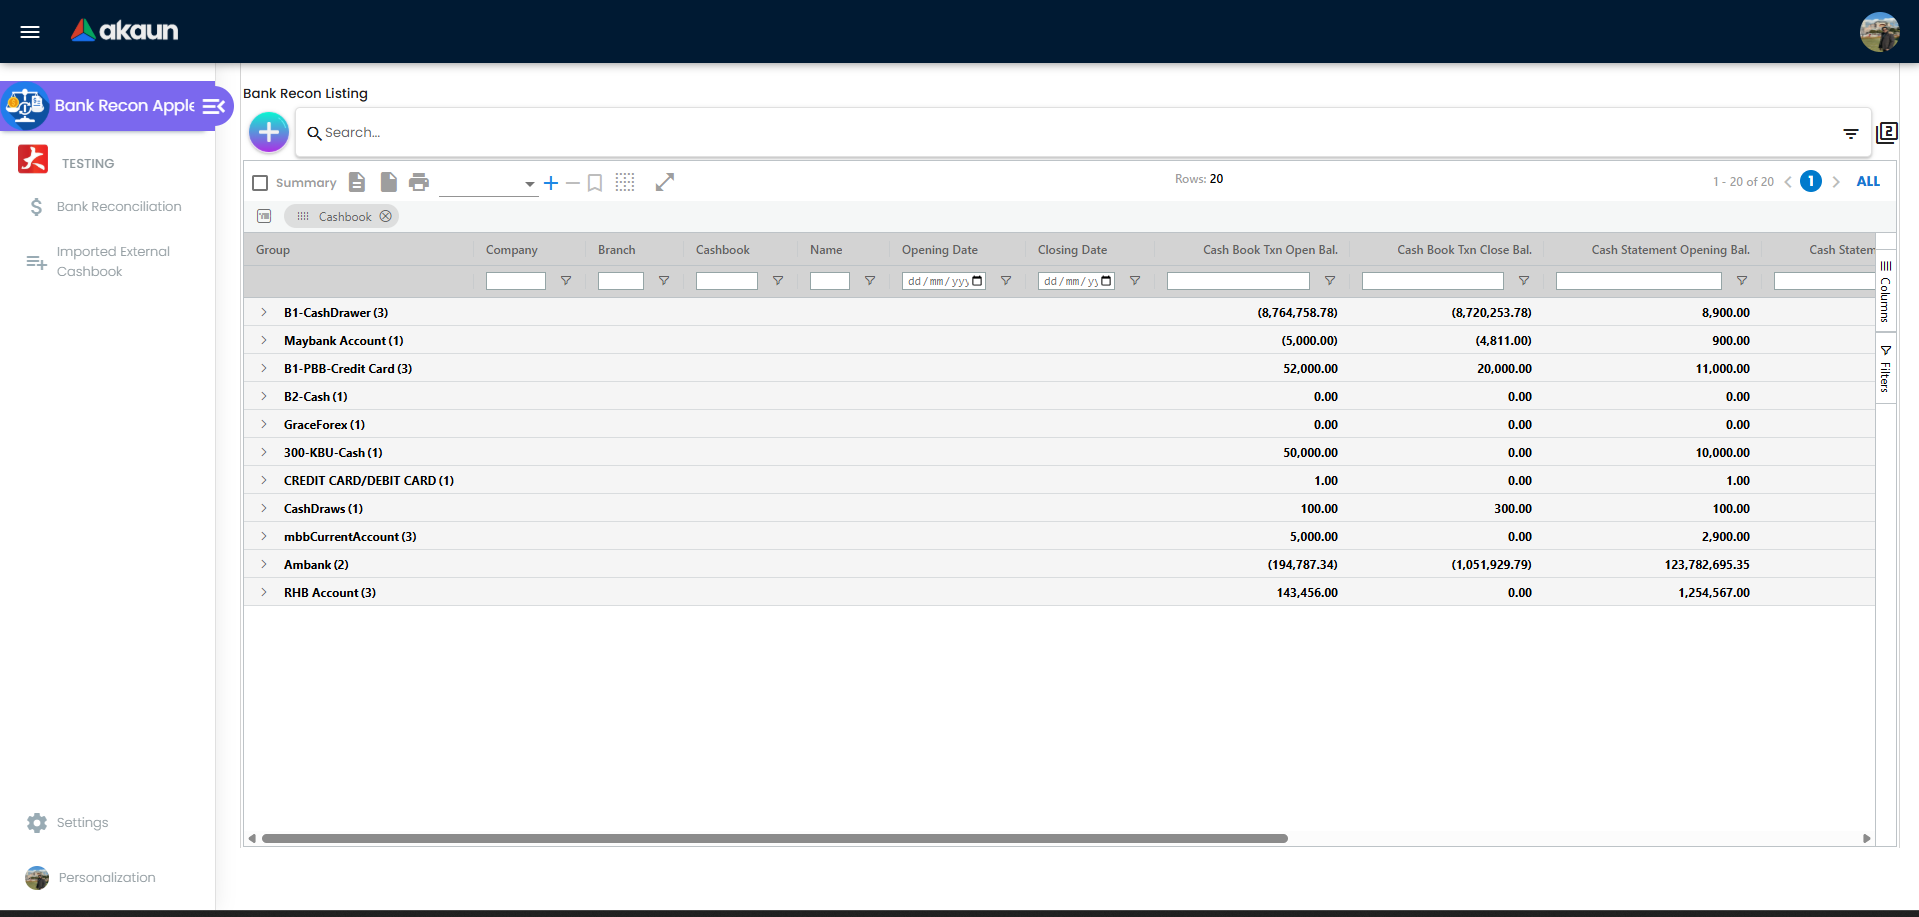
Columns: Company, Branch, Cashbook, Name, Opening Date, Closing Date, Cash Book Txn Open Bal., Cash Book Txn Close Bal., Cash Statement Opening Bal., Cash Statement Closing Bal., Processing Auto Matching, Status, Created/Updated Date and By. The listing can be grouped by cashbook.
Details tab
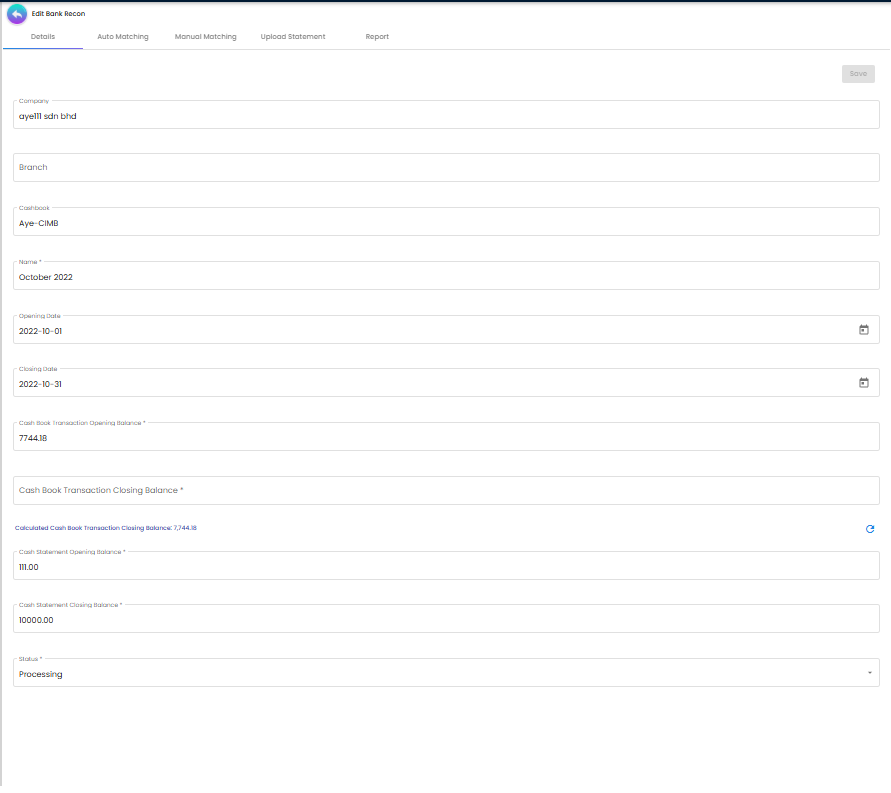
Company, Branch, Cashbook, Name, Opening Date, Closing Date, the two cashbook balances (read-only, calculated) and the two bank statement balances (entered). Status is one of five sign-off labels: Processing, Ready for review, Pending amendment, Approved by HOD, Reviewed and Approved. There is no CLOSE. The two cashbook balances are worked out when the session is created and stored, and refreshed by a background job every 30 minutes where that job is scheduled on the tenant; beneath the closing one, a greyed Calculated Cash Book Transaction Closing Balance line is worked out again each time the session is opened. The refresh icon beside it is greyed out and does nothing.
Upload Statement tab
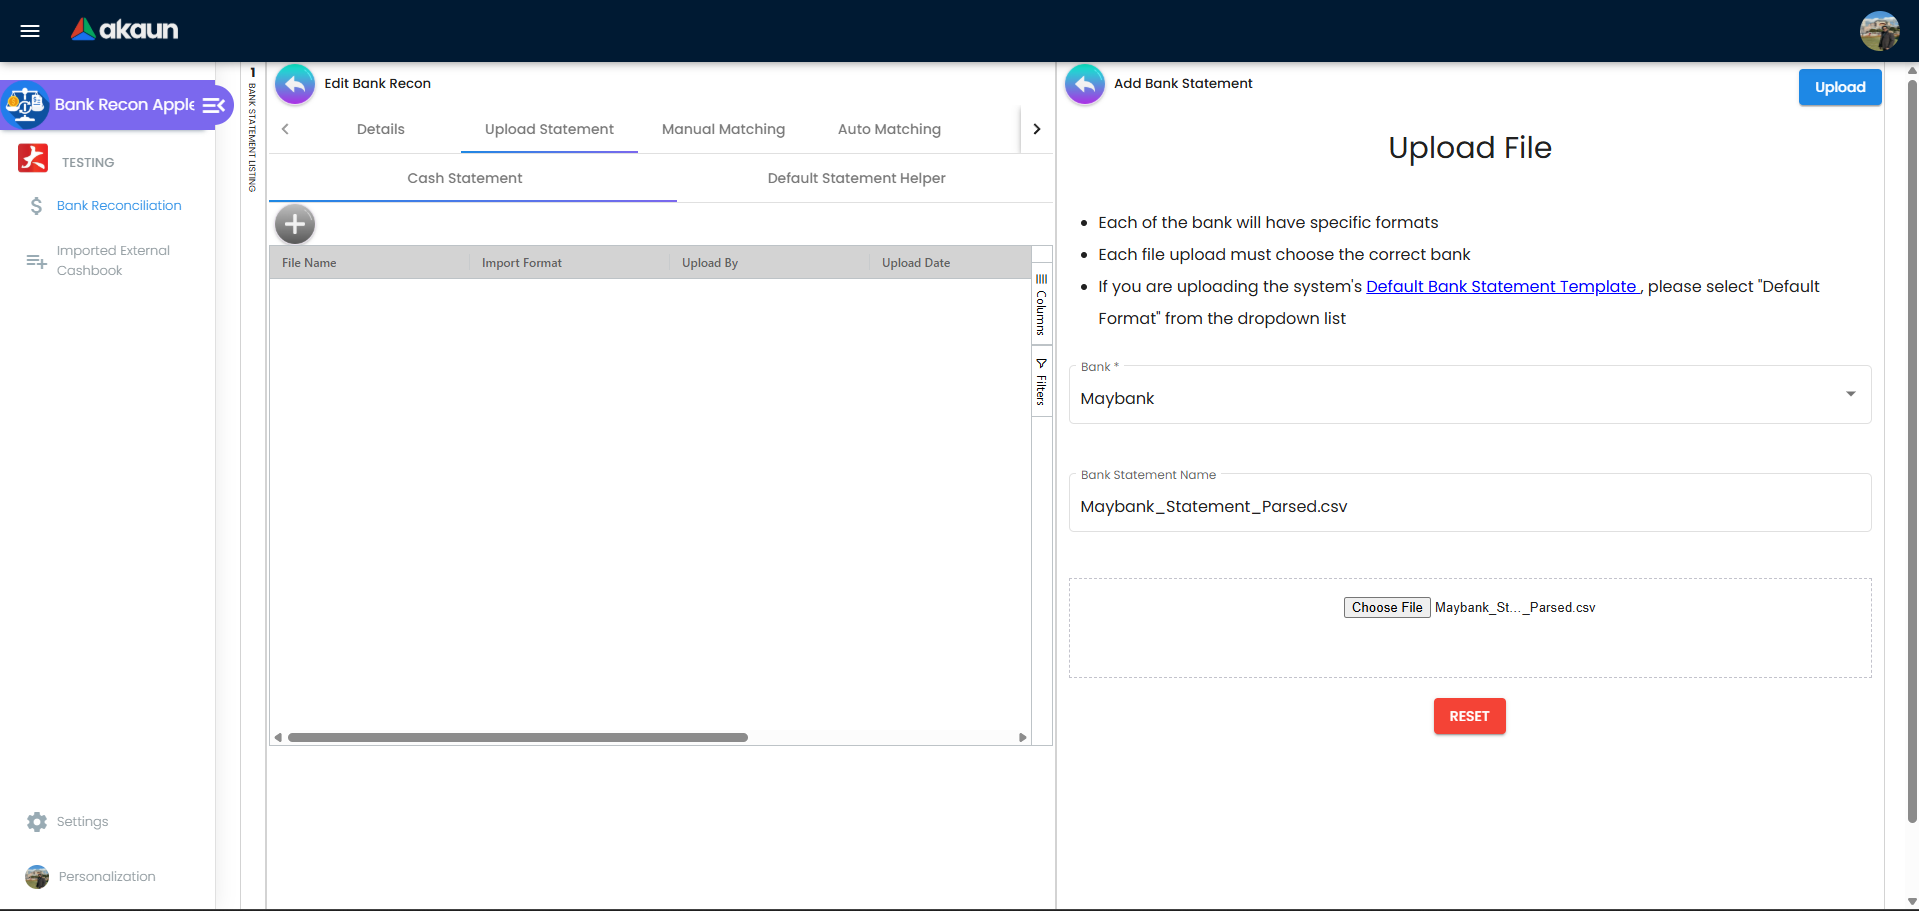
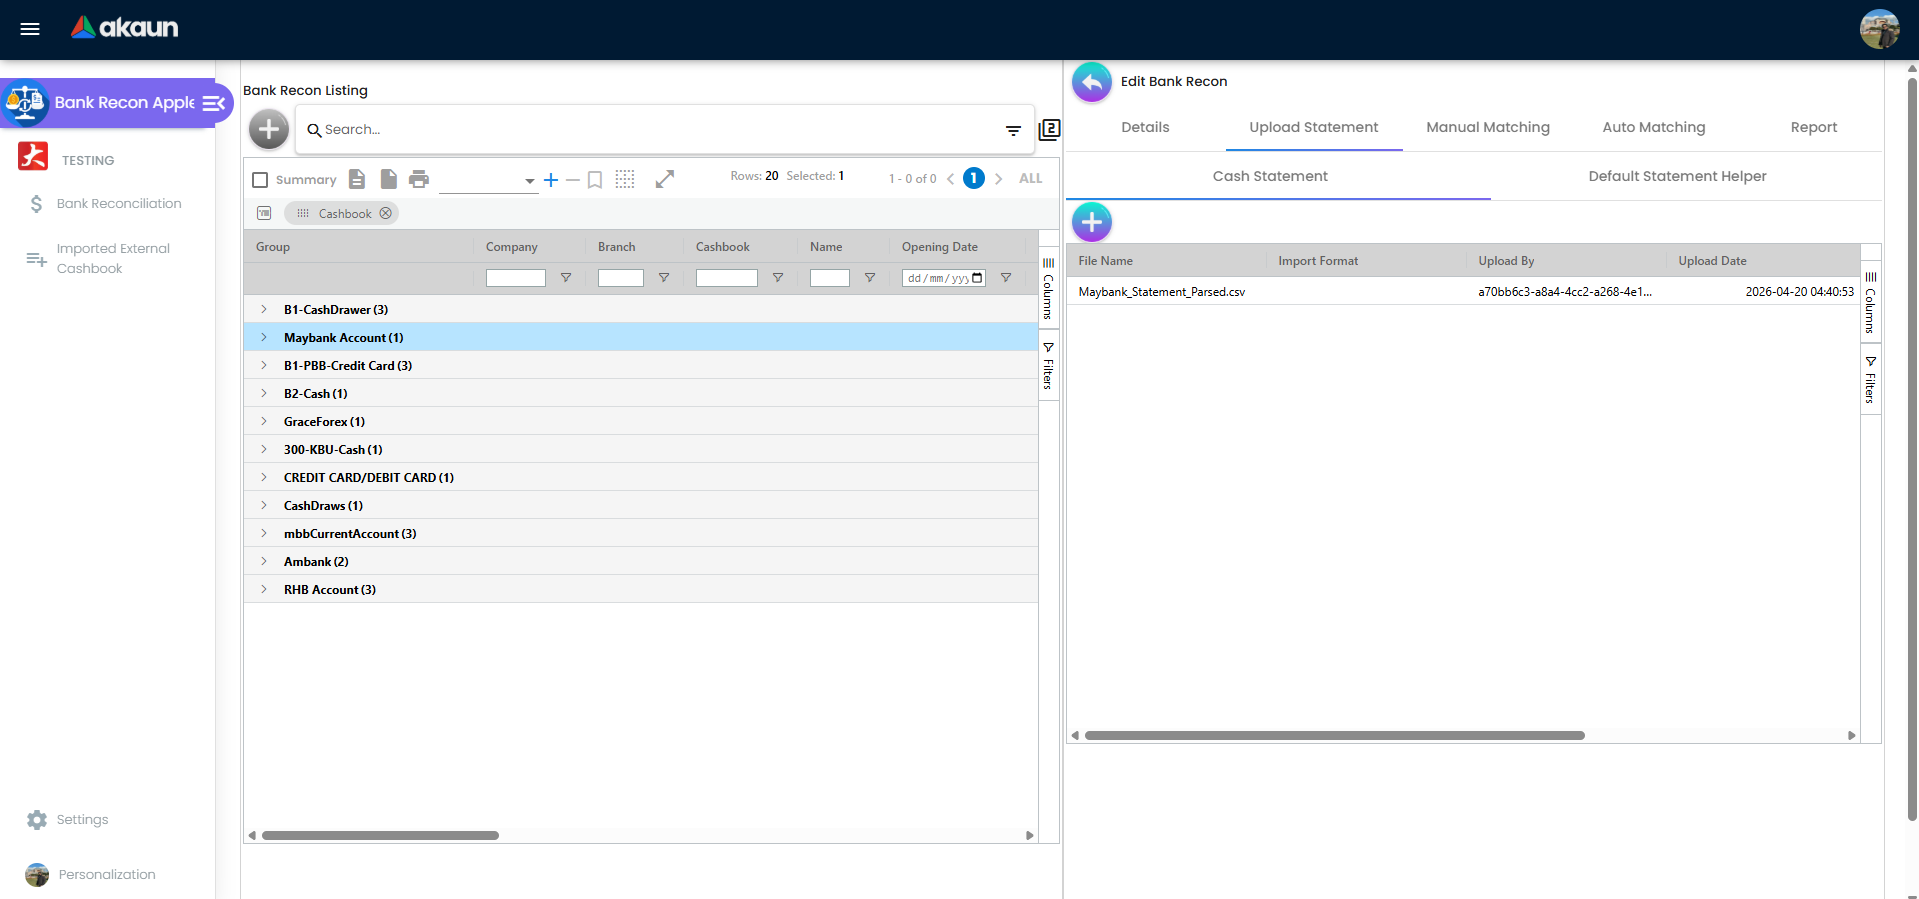
Two sub-tabs. Upload Statement lists the files already imported for this session (File Name, Import Format, Upload Date/By, Modified Date/By) and opens the upload form (Bank, Bank Statement Name, file). Each imported file becomes a Cash Statement record with its own Details (Company, Branch, Cashbook, Name, Opening/Closing Date and Balance) and View Statement tab listing the parsed lines. Default Statement Helper lists files imported with the Default Format and shows, per file, a Checking tab with each row’s validation result.
Manual Matching tab
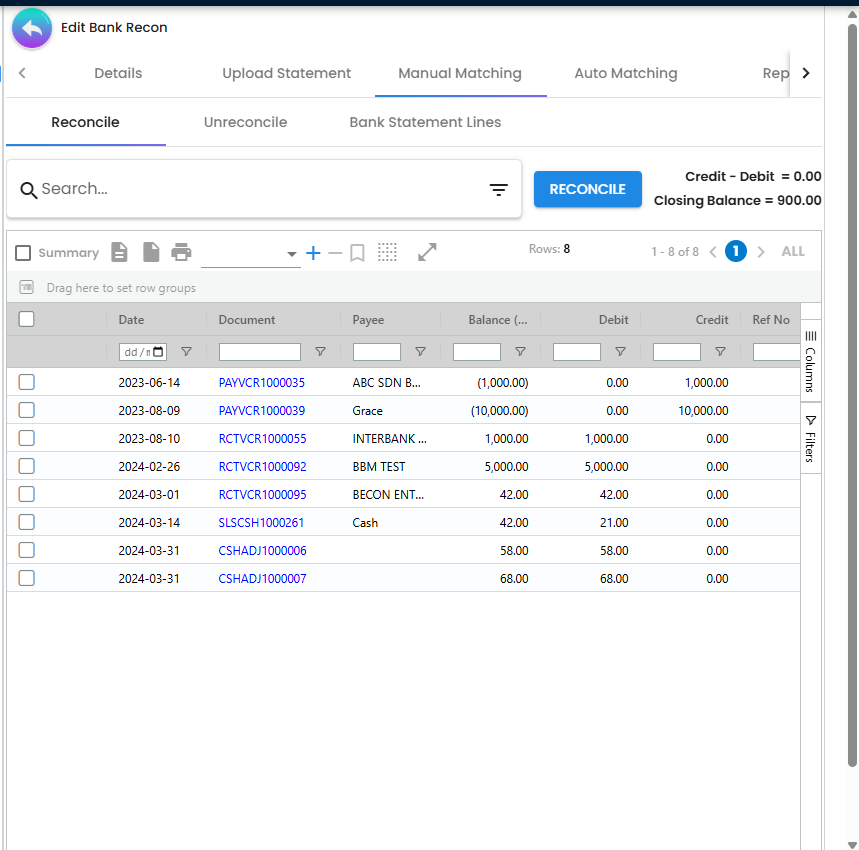
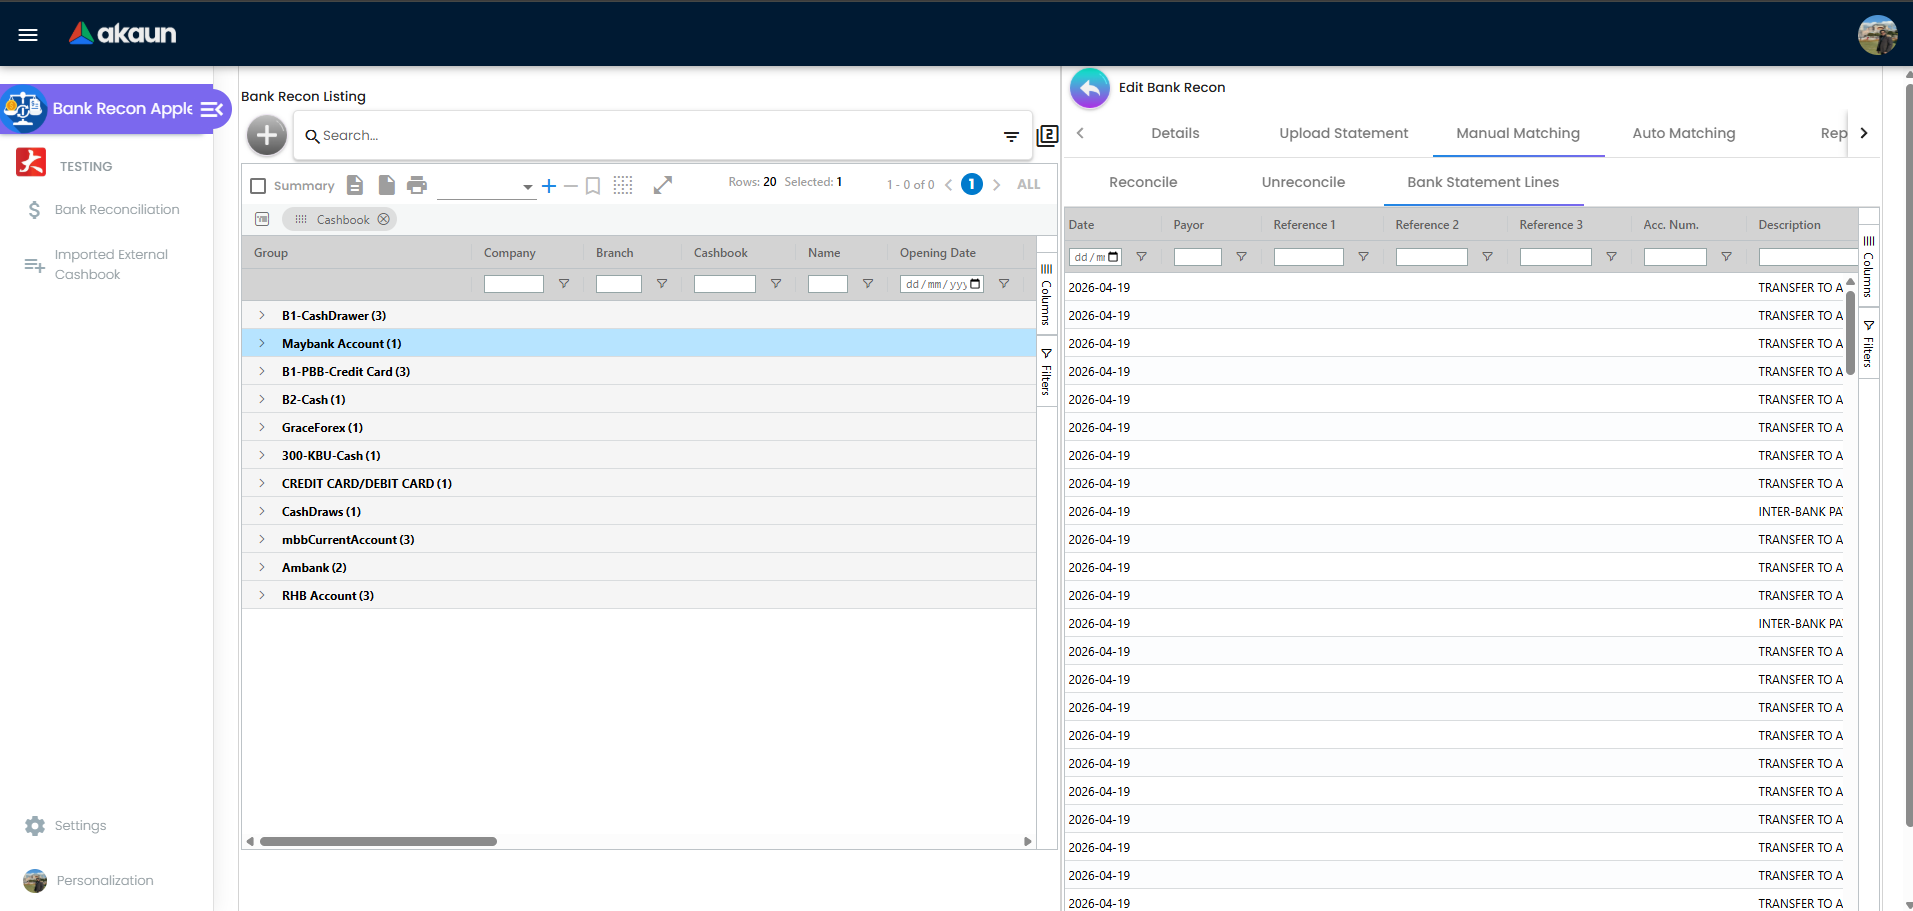
Three sub-tabs, all filtered to the session’s cashbook and to dates on or before the session’s Closing Date:
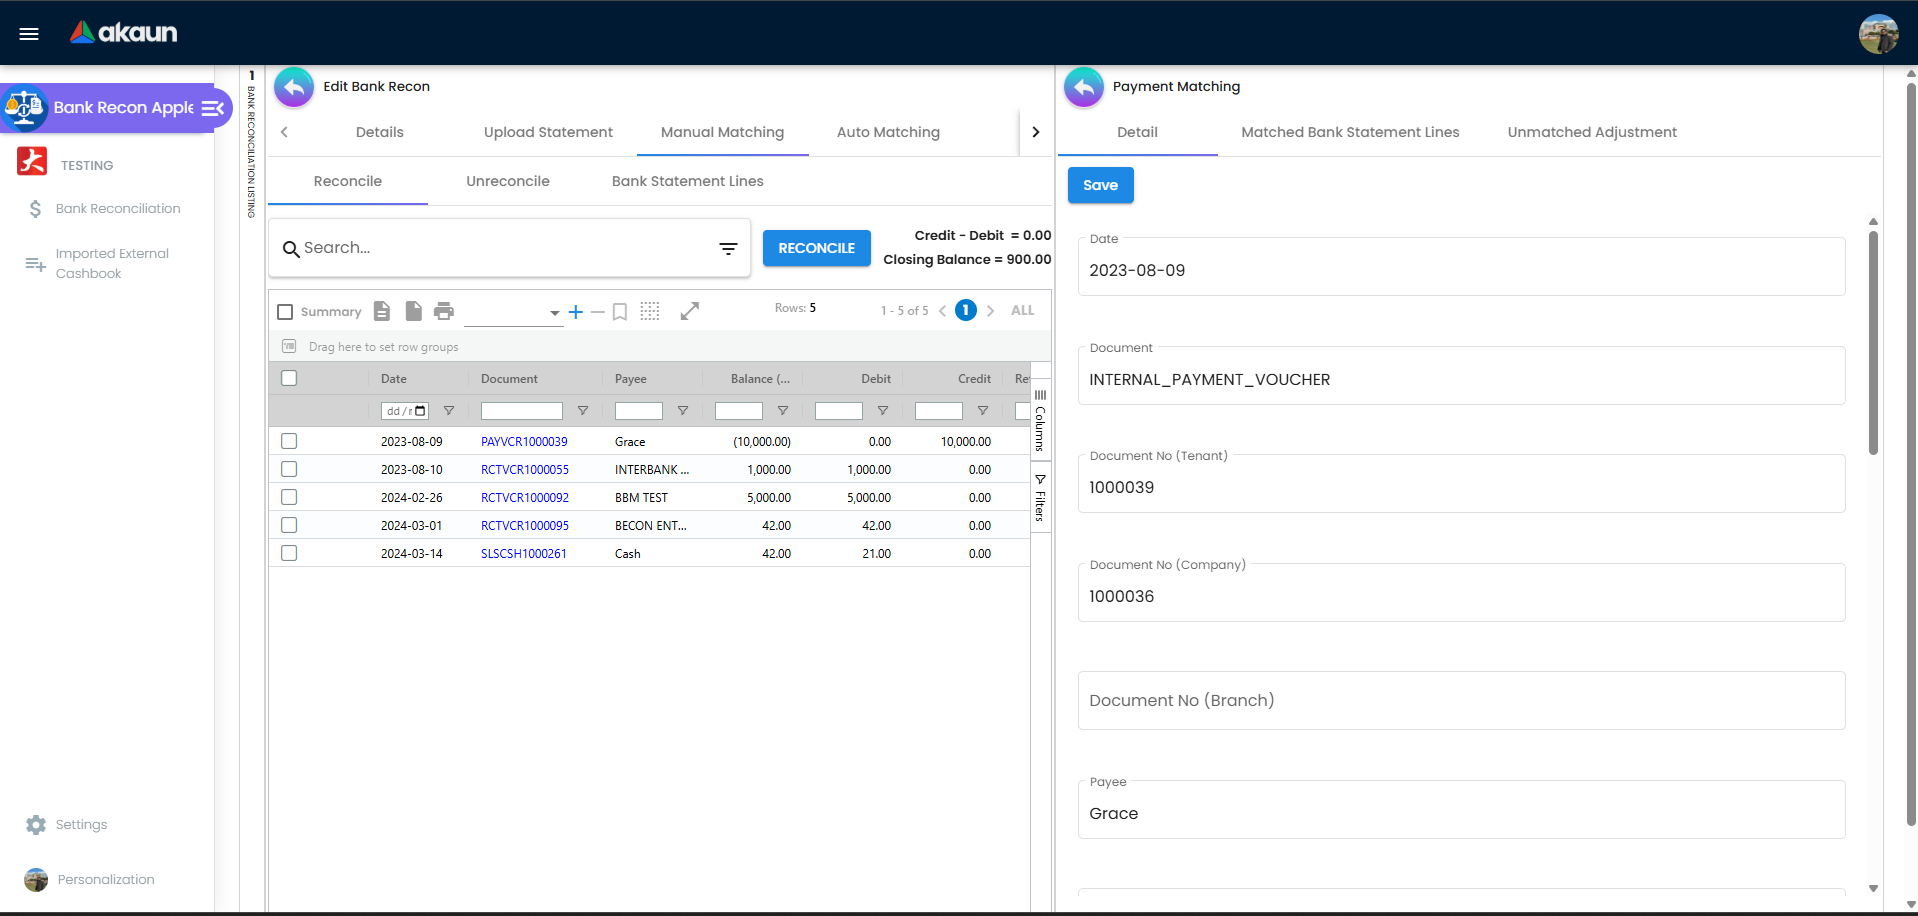
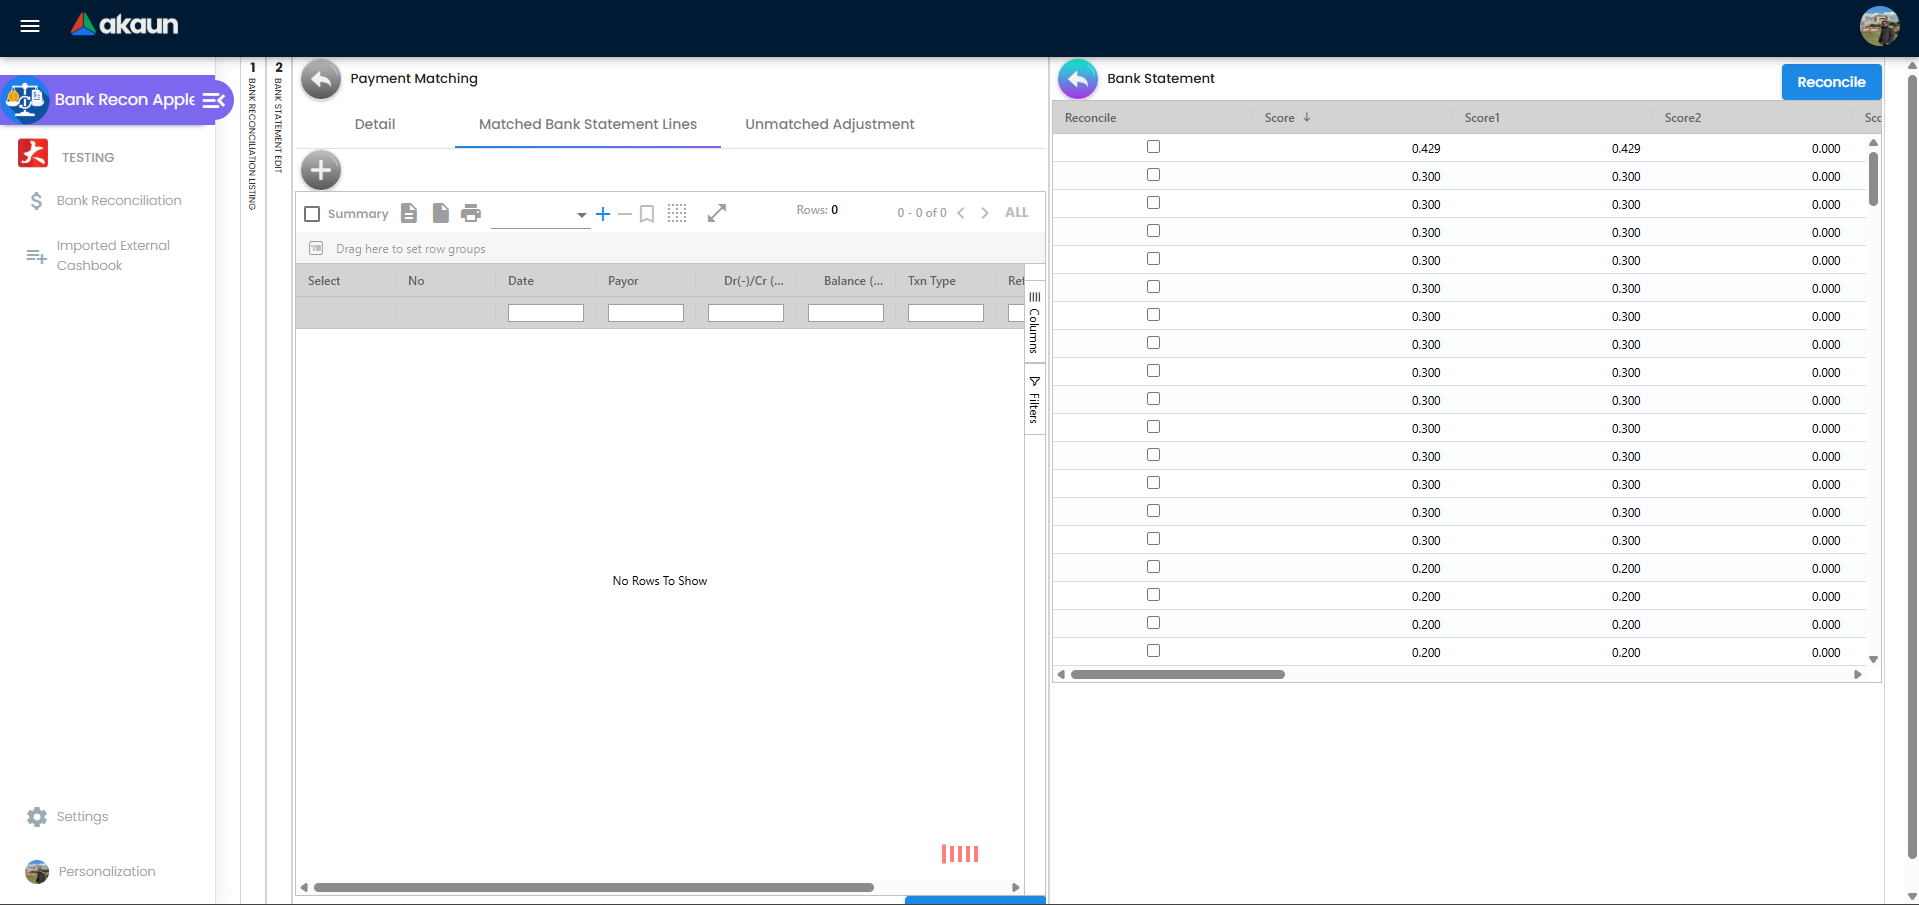
- Reconcile — cashbook transaction lines of FINAL documents that have not yet been fully settled by a match or an adjustment. Clicking a line opens its matching screen (Detail, Matched Bank Statement Lines, Unmatched Adjustment), from which Reconcile picks one or more bank statement lines, Undo Reconcile removes a link, and the adjustment screen books an unmatched residue against the line.
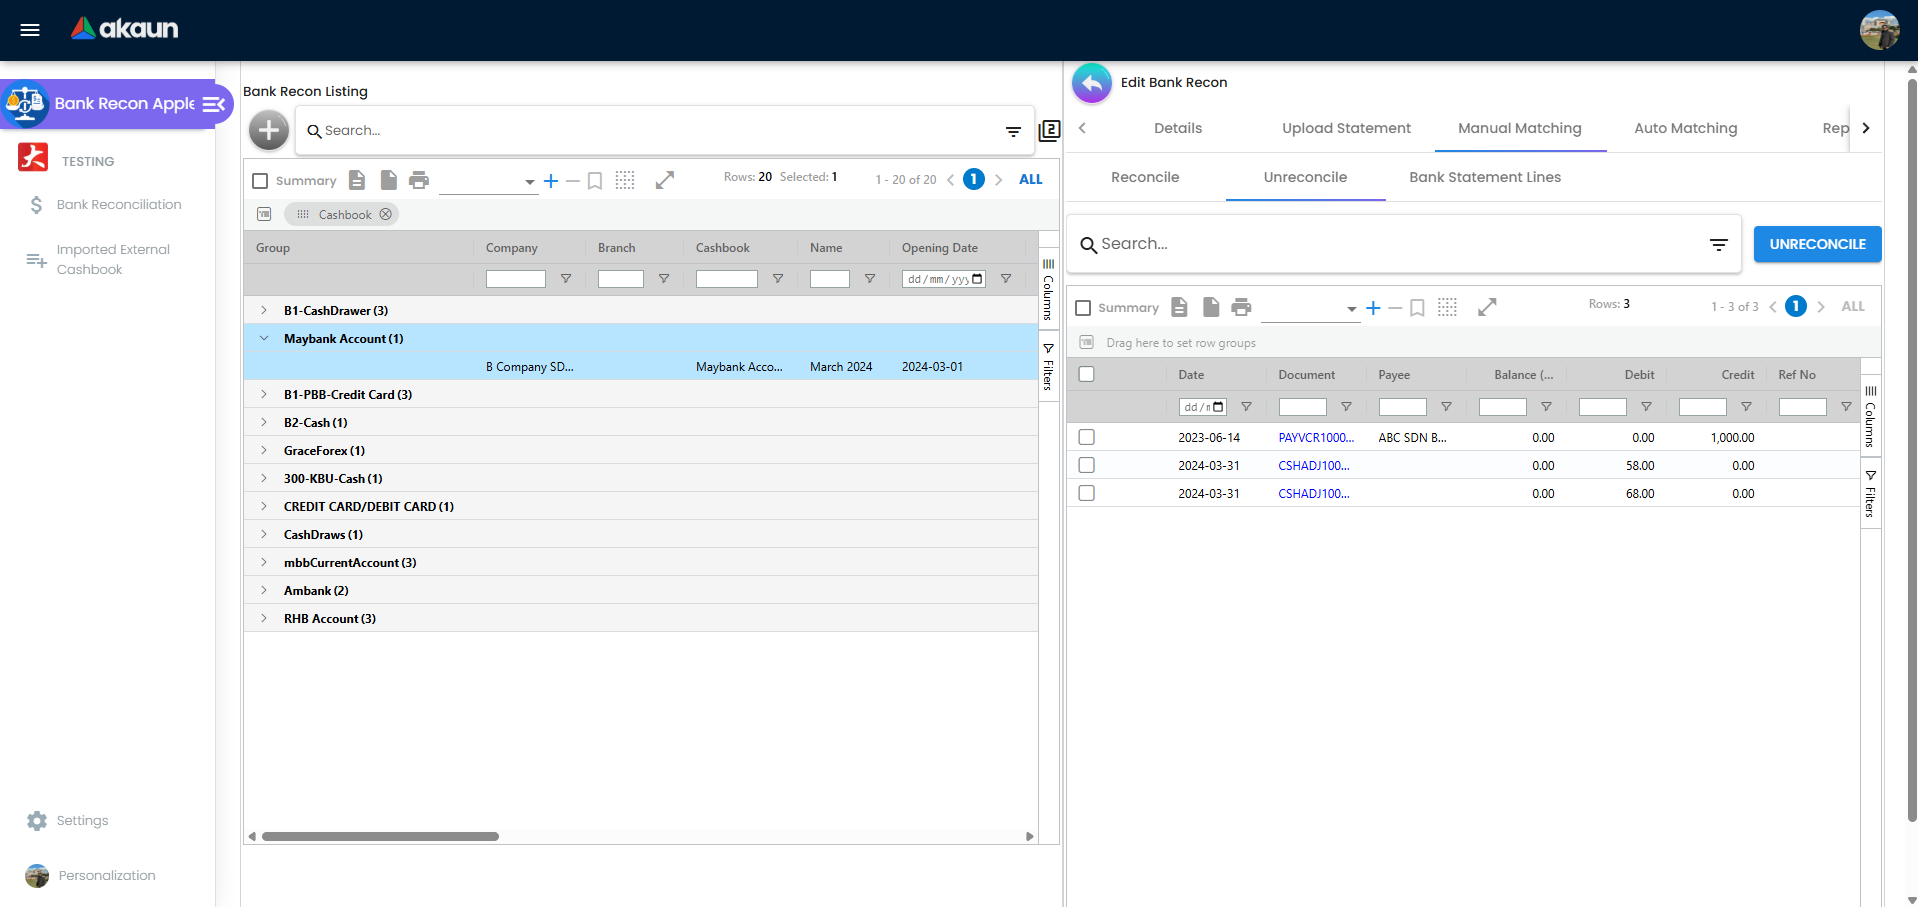
- Unreconcile — cashbook lines that a match or an adjustment has fully settled, so a wrong match can be undone from the same screen.
The two tabs do not test the open amount. They split on a settled marker on the cashbook line, which BigLedger sets whenever a match or an Unmatched Adjustment brings the line’s open amount to zero. Undo Reconcile gives the amount back but leaves the marker set. So a line you unmatched stays on the Unreconcile tab, now showing a balance, and does not come back to Reconcile. To match it again, open it from the Unreconcile tab, or find its bank line on Bank Statement Lines and match from the bank side; both open the same matching screen.
- Bank Statement Lines — every imported statement line (Date, Payor, Reference 1–3, Acc. Num., Description, Dr(-)/Cr, Balance, Txn Type, Remarks). Clicking a line opens the mirror screen (Bank Transactions, Matched GL Transactions, Unmatched Adjustment) so you can match from the bank side.
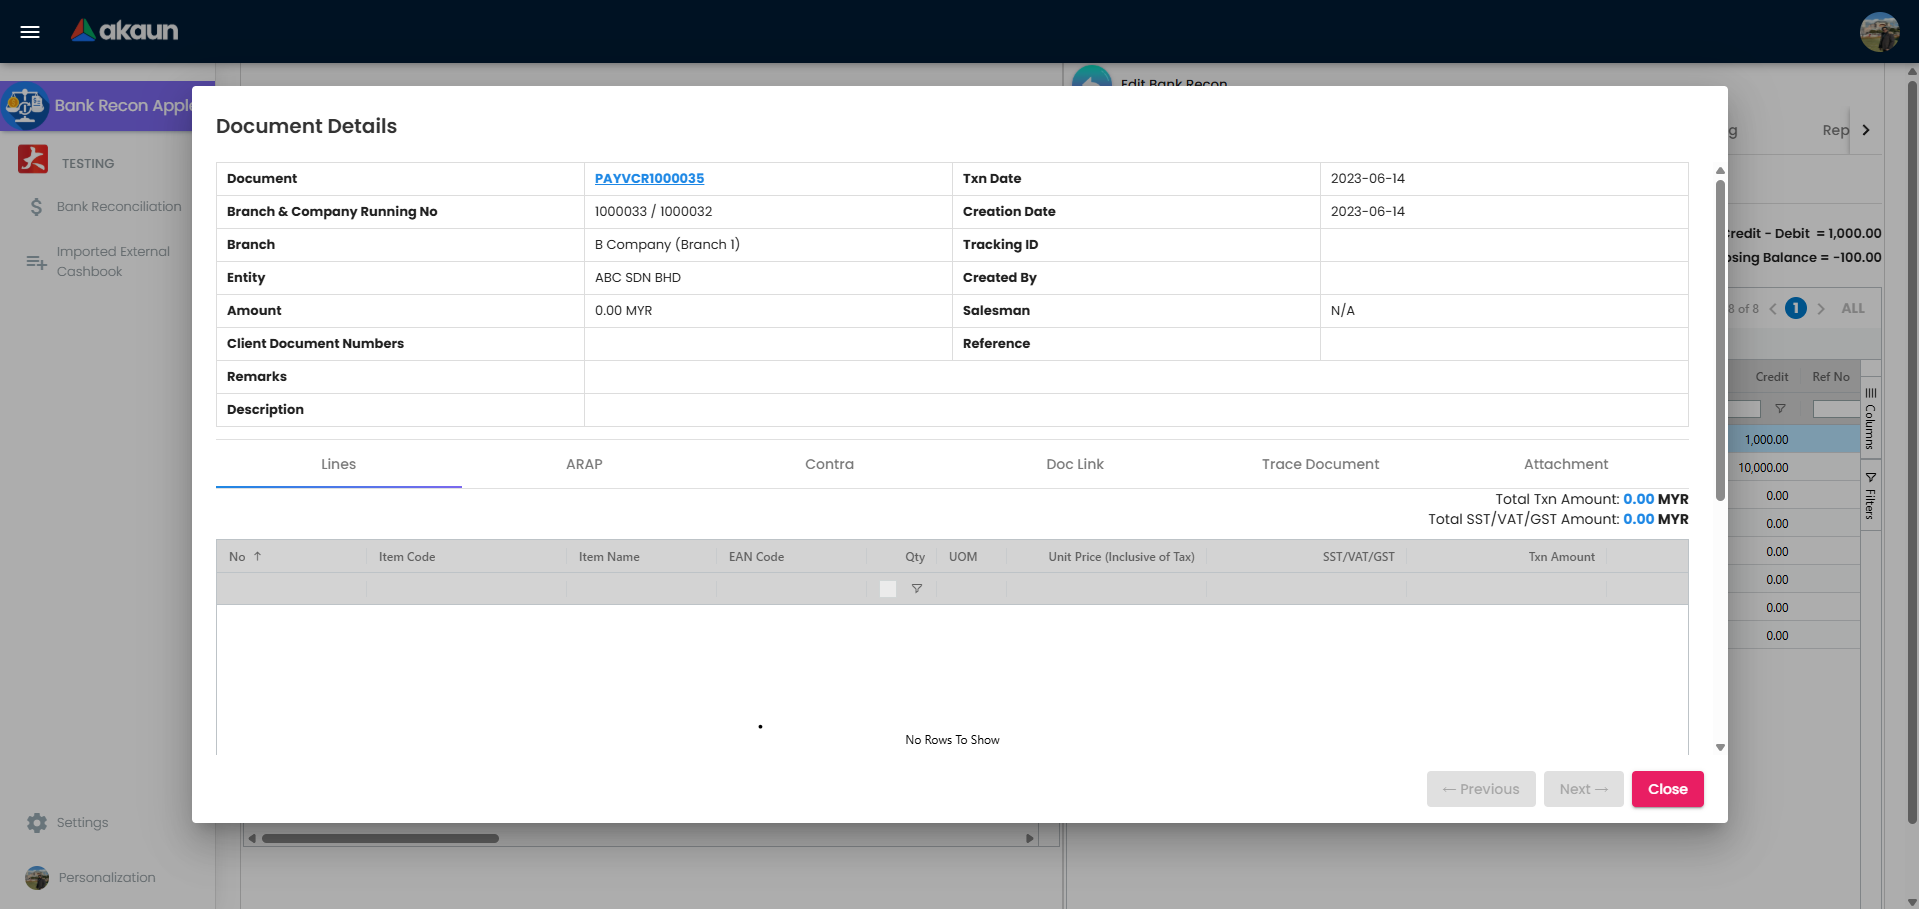
Columns on the Reconcile and Unreconcile grids: Date, Document (with a pop-up of the source document), Payee, Balance, Debit, Credit, Forex Amount, Forex Balance, Forex Exchange Rate, Ref No, Ref 1–6, Doc Reference, Doc Remarks.
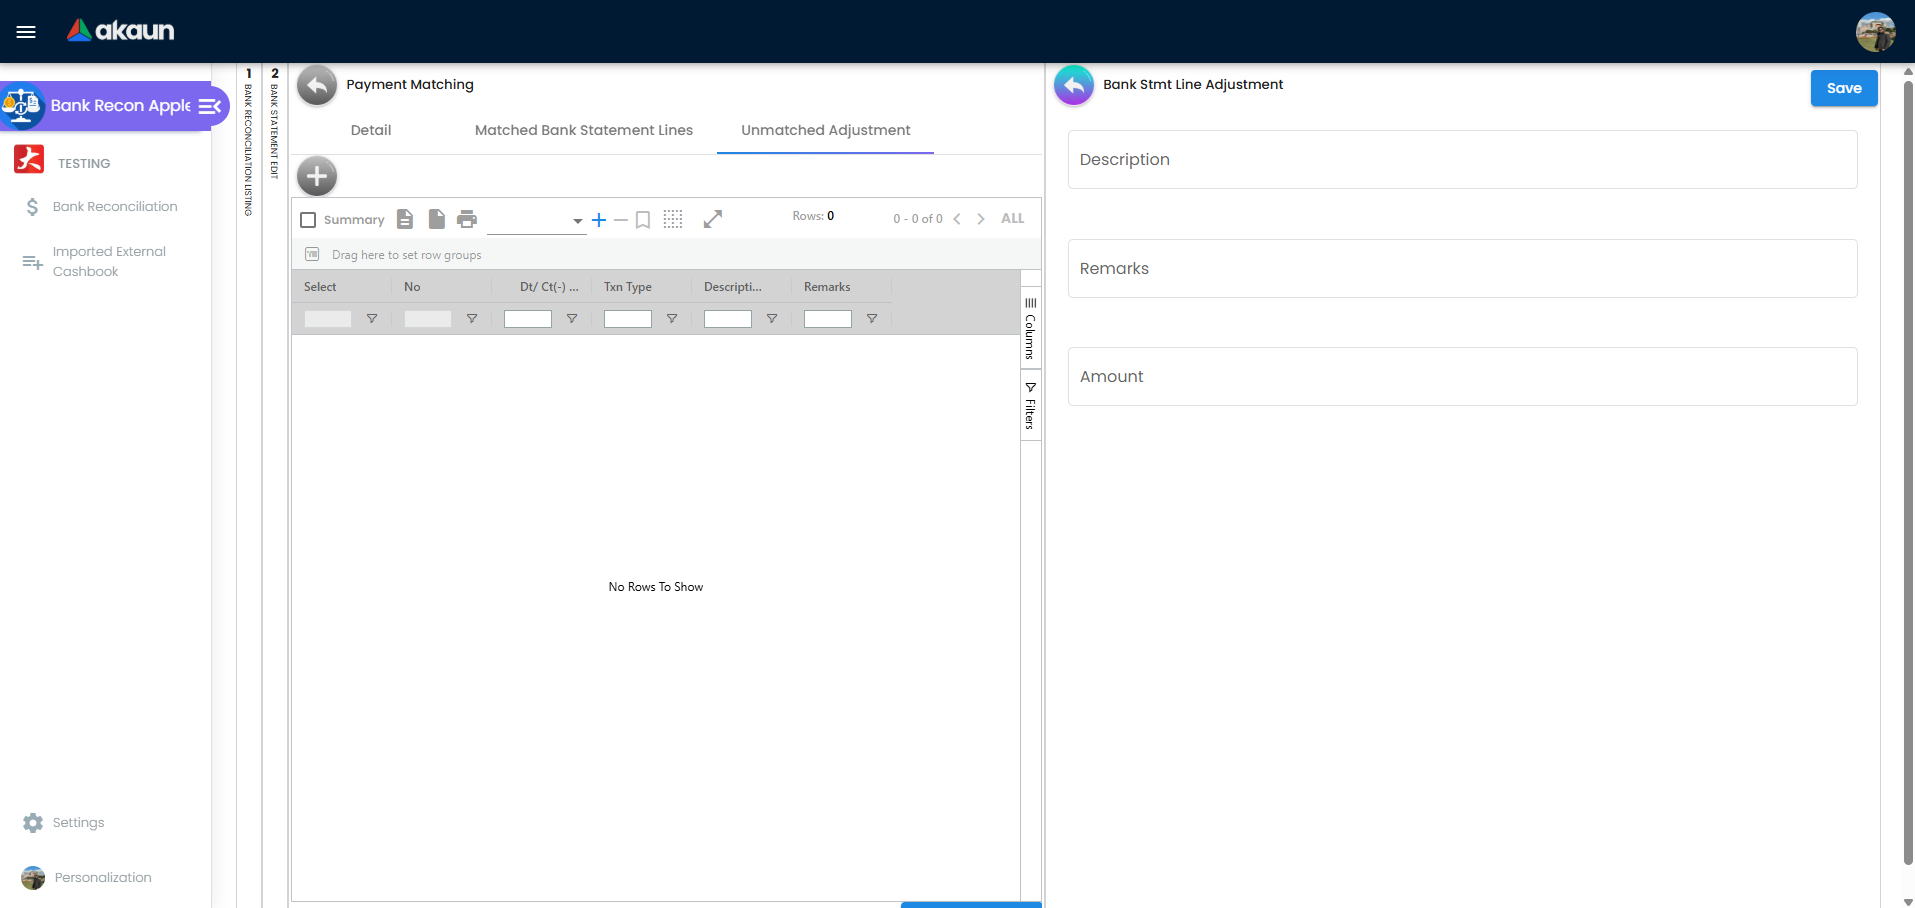
Auto Matching tab
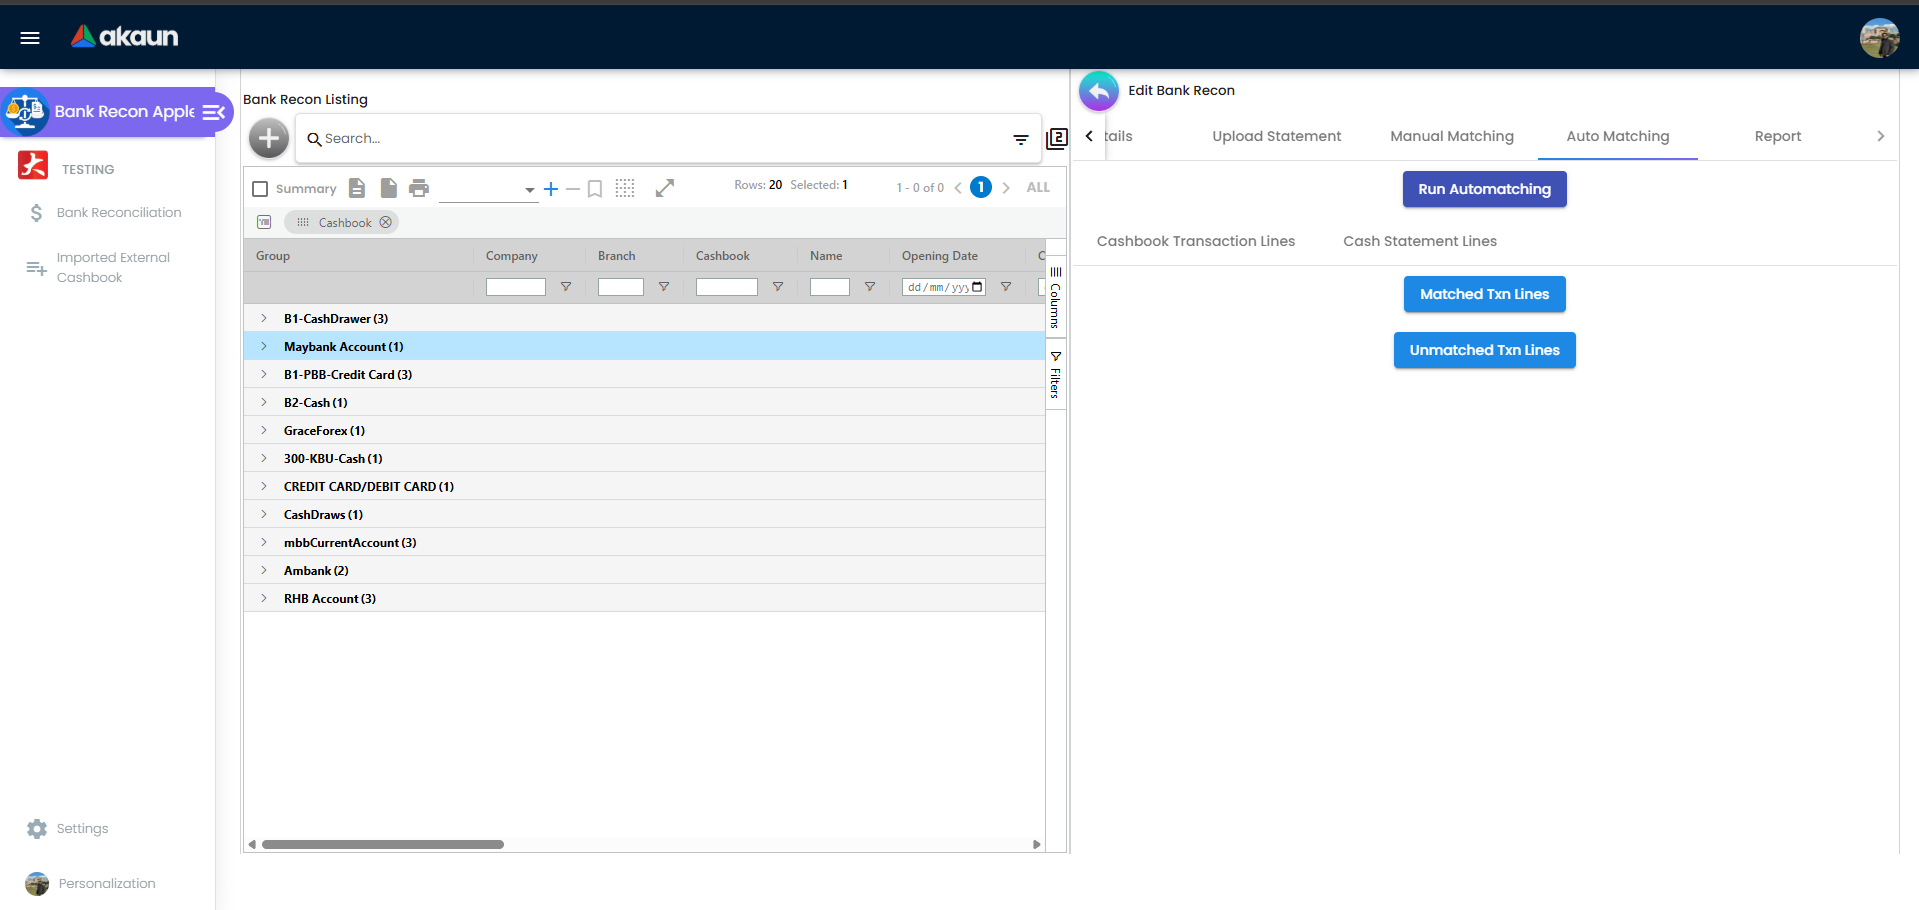
Run Automatching queues the background job. The buttons Matched Cash Stmt Lines, Matched Txn Lines, Unmatched Cash Stmt Lines and Unmatched Txn Lines open the four result listings; all five buttons are disabled while Processing Auto Matching is true. Possible matches that the job did not auto-link appear as candidate rows with a Reconcile (bank side) or Add (cashbook side) button that confirms the pair. The tab shows no totals of its own: read what is still open on the four result listings, or on Report 3.
Report tab
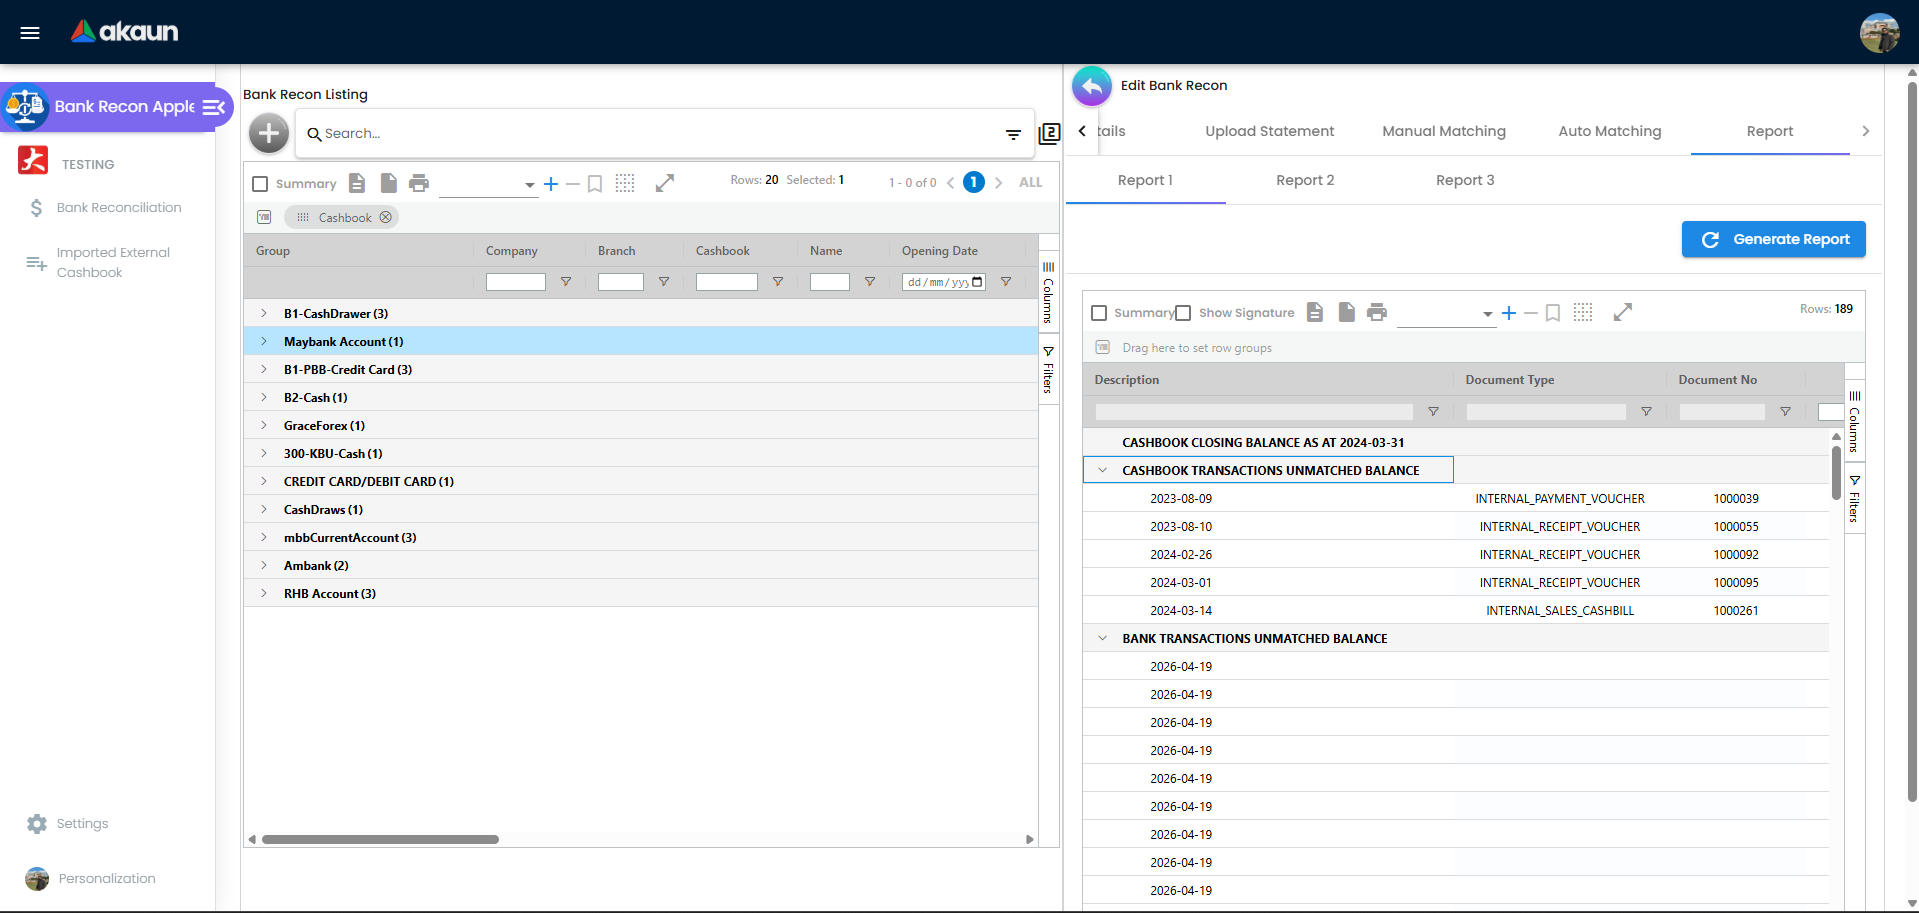
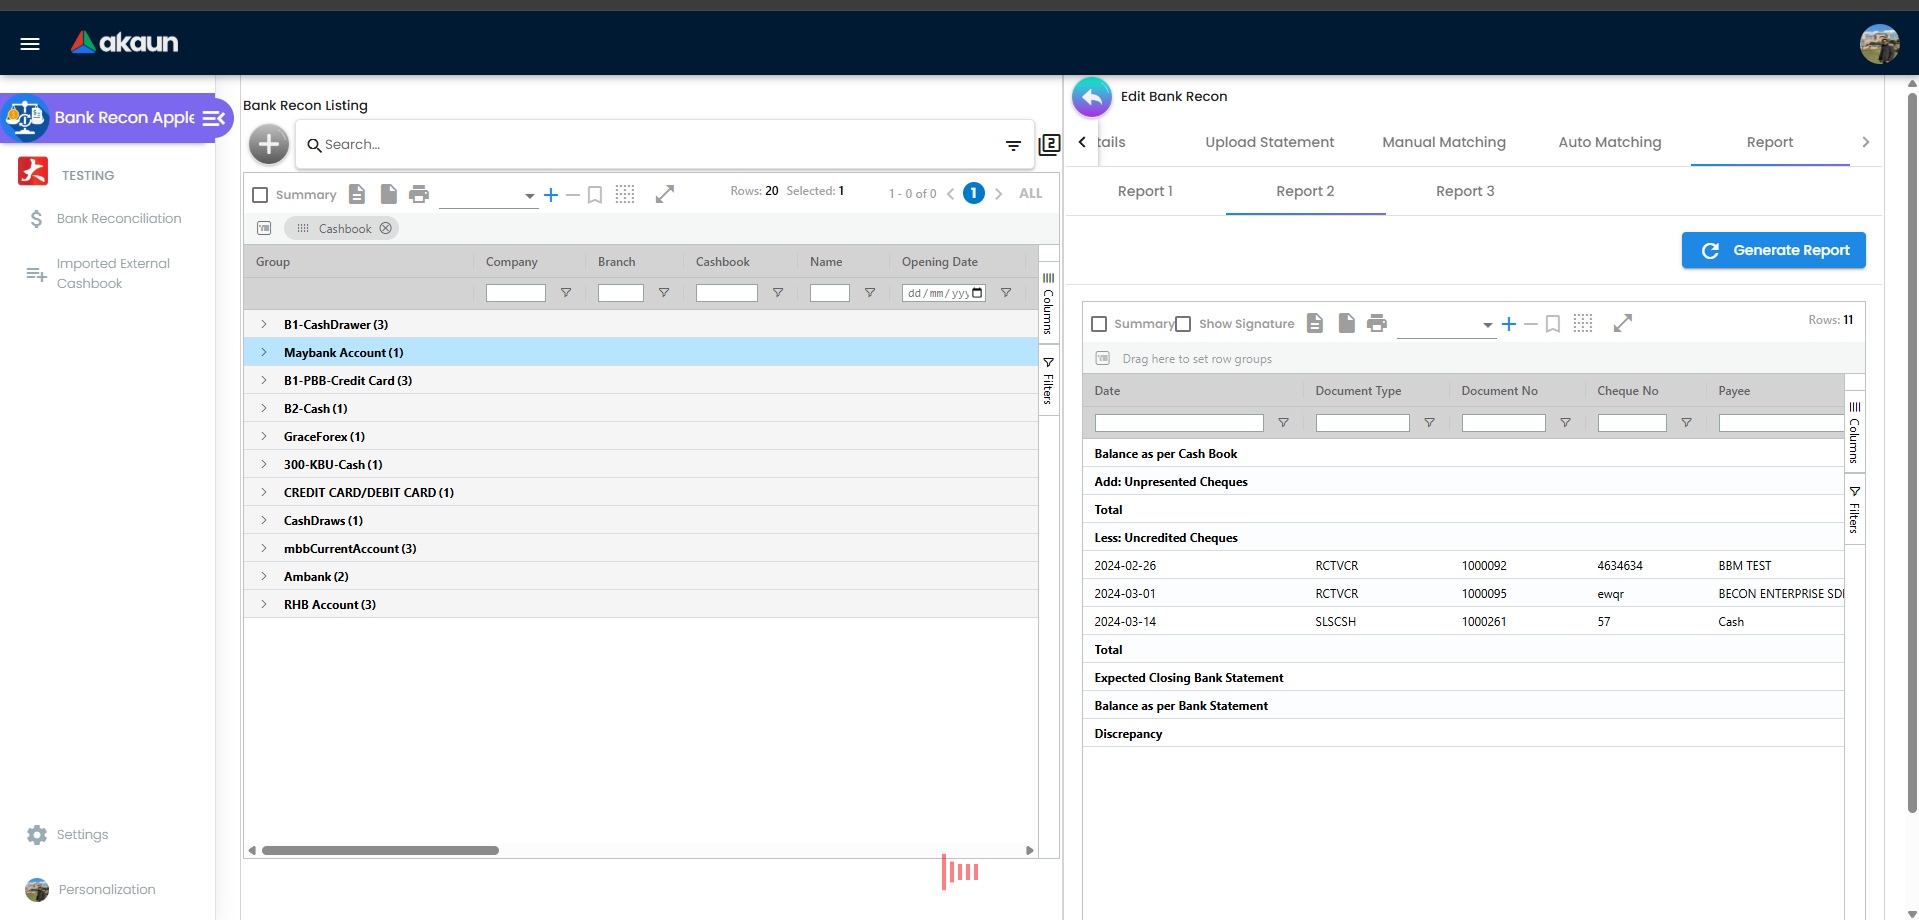
Report 1, Report 2 and Report 3, each with a Generate Report button and an export-capable grid. Their content is described under Lifecycle and effects.
Imported External Cashbook
Create: choose a Cashbook and attach the CSV — there is no delimiter or text-qualifier choice, and the column headers are not customisable: the file must follow one fixed layout (see Fields below). Edit: Details (Cashbook, File Name, created/modified) and a Cashbook Txn Lines tab (Document, Payee, Reference, Description, Dt/Ct(-), Date Txn, Entry Date) with a Generate transaction lines action and DELETE.
Configuration
Before you can use it
| Prerequisite | Where | Why |
|---|---|---|
| A cashbook for the bank account, with the user as a member | Cashbook → Details, Members | The create screen only lists cashbooks the user can access (cashbook-get-by-user) |
| Settlement methods mapped to that cashbook (and branch where required) | Cashbook / POS General | This is what routes voucher and POS settlements into the cashbook’s transaction lines |
| Company timezone | Organisation → Company | Every date filter, balance calculation and report uses the company’s default_timezone (fallback Asia/Kuala_Lumpur) |
| An ACTIVE Weightage Configuration on the cashbook (optional) | Cashbook → Weightage Configuration | Without it the auto-matcher uses the built-in defaults described below |
| Source documents at FINAL | Receipt / Payment Voucher, POS, Cash Transfer | Only FINAL documents create cashbook transaction lines; DRAFT lines never appear here |
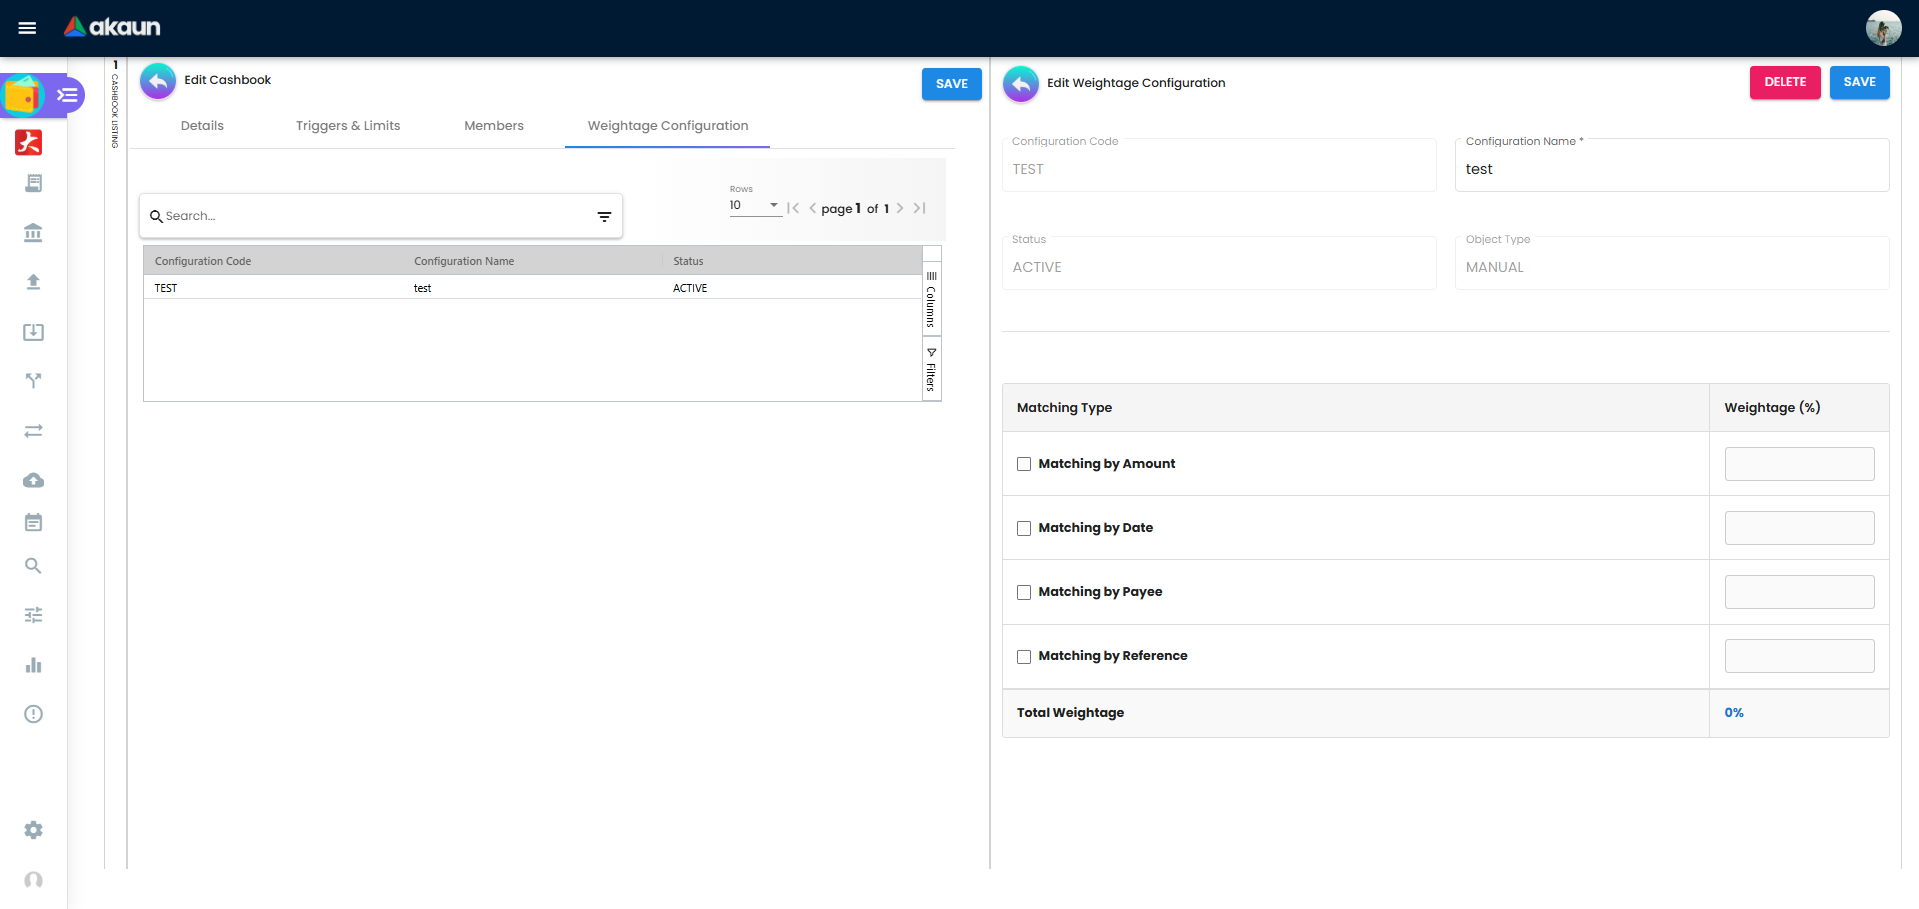
The weightage configuration is stored on the cashbook and read by the auto-matcher each time it runs:
| Config key | Screen label | Effect |
|---|---|---|
matching_by_amount {is_checked, weightage} | Amount | Weight of the amount score (0–100). Unticked dimensions carry weight 0 |
matching_by_date | Date | Weight of the date-proximity score |
matching_by_reference | Reference | Weight of the best reference-field similarity (Levenshtein) |
matching_by_payee | Payee | Weight of the payee / payor name similarity (Levenshtein) |
auto_link_threshold | Threshold (70 - 100) | Net score (÷100) at or above which a pair is linked automatically; values outside 70–100 fall back to 0.85 |
match_one_to_one | one-to-one checkbox | When true the one-to-many pass (several cashbook lines summing to one bank line) is skipped |
The Cashbook applet’s form disables Save when the ticked weightages total more than 100 or the threshold is outside 70–100 (a client-side check); the auto-matcher only reads a configuration whose status is ACTIVE.
Applet settings
Where the settings live: Settings → Application Settings is this applet’s own form of slide toggles, not the shared settings screen. Settings → Default Selection and Personalization → Default Selection are the applet’s own too. There are no branch-level settings.
Any user who can open the Settings menu can change these; there is no separate permission on the form. Every toggle is created as an empty form control and patched from the saved master settings, so the default for all of them is not set (off — nothing hidden). Saving dispatches the applet master settings, and every component below reads them from the session store; a change applies to all users of the tenant the next time the screen loads.
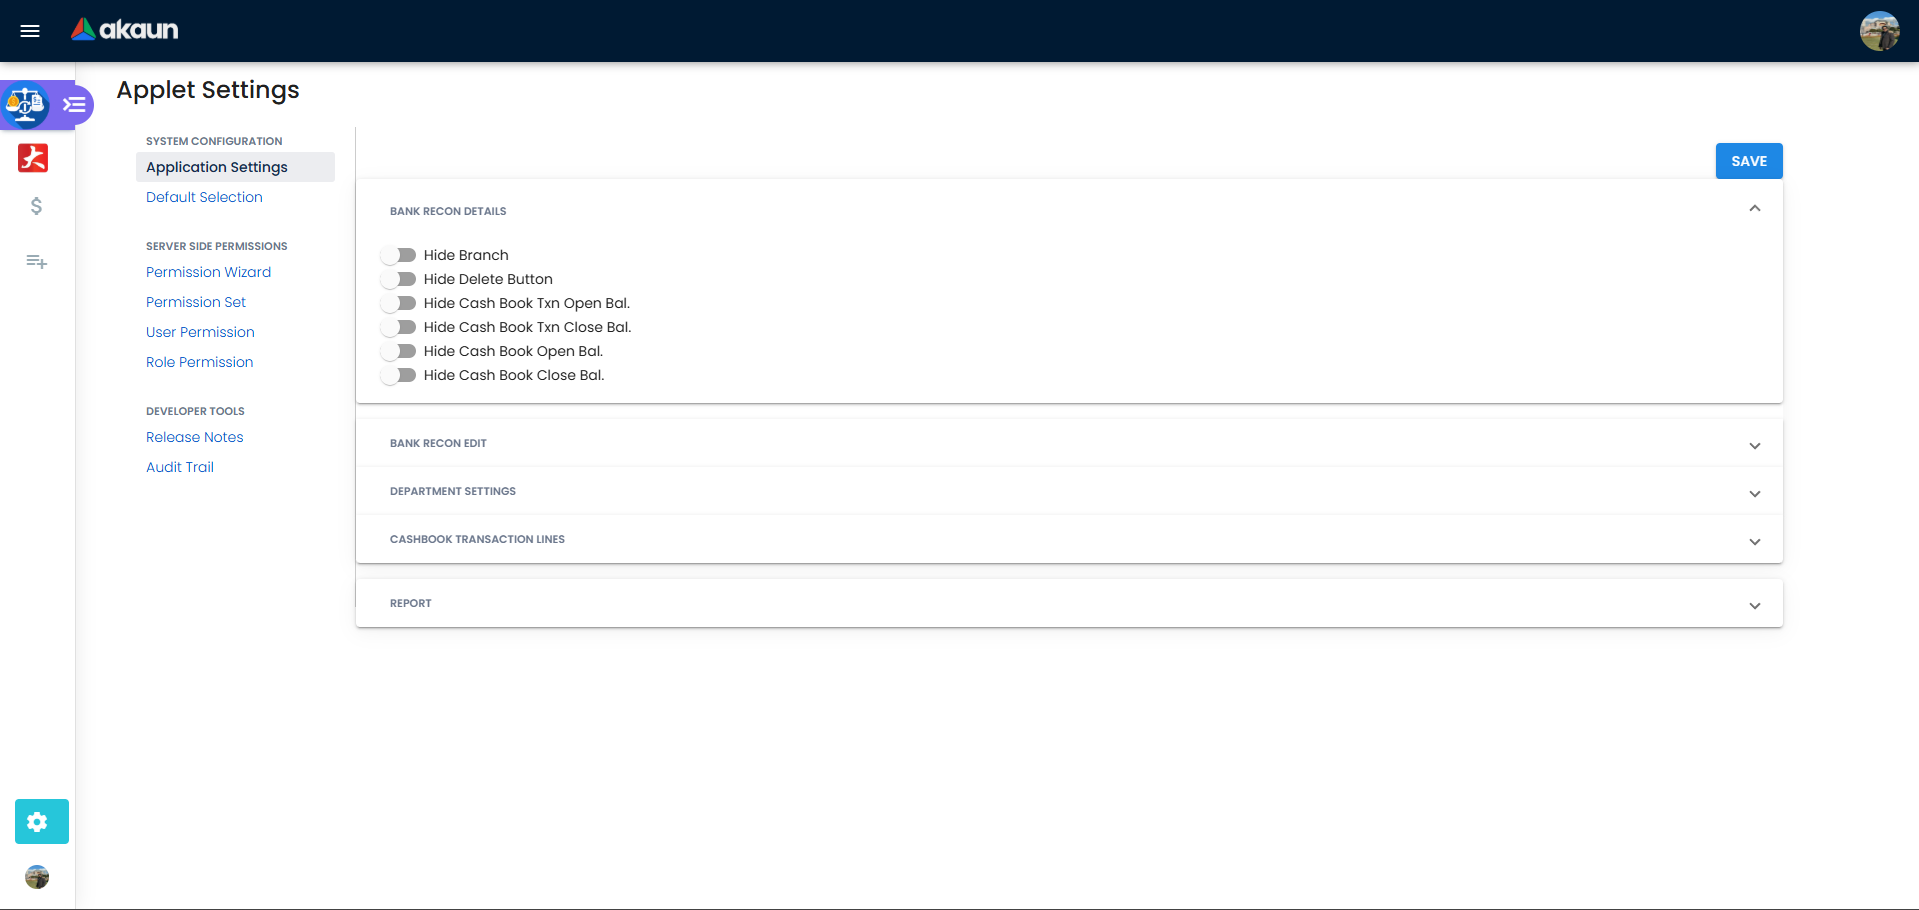
Settings that are declared in the applet’s settings model, rendered on the form, saved and read by the code:
| Section | Setting | What it controls | Default | Effect when changed |
|---|---|---|---|---|
| Bank Recon Details | HIDE_BRANCH | Branch field on the create and edit Details forms | off | Field disappears from the form. The session still records a branch: the one on the cashbook row you picked, which is where the branch always comes from |
| Bank Recon Details | HIDE_DELETE_BUTTON | The DELETE button on the session’s Details tab | off | Button removed, so nobody can delete a session from the screen. Worth switching on once a period is signed off, because deleting a session is a cascade that also deletes its imported statements and undoes every match (see Lifecycle and effects). The other Delete buttons in the applet (on an imported statement, a matched line, an imported external cashbook) have no switch |
| Bank Recon Edit | HIDE_UPLOAD_STATEMENT | The Upload Statement tab of the edit screen | off | Tab is removed from the tab strip (statements must then be imported some other way) |
| Bank Recon Edit | HIDE_AUTO_MATCHING | The Auto Matching tab | off | Tab is removed; matching is manual only |
Settings that are on the form, saved and used, but not part of the applet’s usual settings list:
| Section | Setting | What it controls | Default | Effect when changed |
|---|---|---|---|---|
| Bank Recon Details | HIDE_CASH_BOOK_TXN_OPEN_BAL_COLUMN, HIDE_CASH_BOOK_TXN_CLOSE_BAL_COLUMN | The two Cash Book Txn balance columns on the listing | off | Column hidden and removed from the column chooser |
| Bank Recon Details | HIDE_CASH_BOOK_OPEN_BAL_COLUMN, HIDE_CASH_BOOK_CLOSE_BAL_COLUMN | The two Cash Statement balance columns on the listing (the labels say “Cash Book”) | off | As above |
| Cashbook Transaction Lines | HIDE_REFERENCE1_COLUMN … HIDE_REFERENCE6_COLUMN | Ref 1–6 on the Reconcile, Unreconcile and matching grids | off | Column hidden for every user. No permission brings it back for one role (see Feature visibility / permissions) |
| Report → Report 3 | REPORT3_HIDE_CASHBOOK_OPENING_BALANCE, REPORT3_HIDE_CASHBOOK_CLOSING_BALANCE, REPORT3_HIDE_BANK_OPENING_BALANCE, REPORT3_HIDE_BANK_CLOSING_BALANCE | The four balance rows of Report 3 | off | Row omitted from the generated report |
| Report → Report 3 | REPORT3_HIDE_CURRENT_UNMATCHED_CASHBOOK, REPORT3_HIDE_MATCHED_CASHBOOK | The two cashbook sections of Report 3 | off | Section omitted |
| Report → Report 3 | REPORT3_HIDE_BANK_UNMATCHED, REPORT3_HIDE_BANK_MATCHED | The two bank sections of Report 3 | off | Section omitted |
| Report → Report 3 | REPORT3_HIDE_CB_MATCHED_PREV_BANK, REPORT3_HIDE_BANK_MATCHED_PREV_CB, REPORT3_HIDE_CB_MATCHED_FUTURE_BANK, REPORT3_HIDE_BANK_MATCHED_FUTURE_CB | The four cross-period sections of Report 3 | off | Section omitted |
| Report → Report 3 | REPORT3_HIDE_VARIANCE_OPENING_DIFF | The difference in opening balance row of Report 3 | off | Row omitted |
On the form but doing nothing — switching them has no effect: the four Department Settings toggles labelled Segment, G/L Dimension, Profit Center and Project — the applet has no dimension fields. The applet also carries dimension, tax, custom-status and PRINTABLE settings with no control and no effect; they are not documented here.
Settings → Default Selection holds a branch and a location drop-down (DEFAULT_BRANCH, DEFAULT_LOCATION). They are saved, but no screen in this applet reads them: a new session takes its branch from the cashbook you pick, and no screen here has a location field. The same holds for Personalization → Default Selection. The one setting on this screen that changes something is Details Tab Ordering (BANK_RECON_DETAILS_TAB_ORDER): drag the five tabs — Details, Upload Statement, Manual Matching, Auto Matching, Report — into the order your team prefers; the edit screen rebuilds its tab strip from the saved order.
Document behaviour settings
A reconciliation session is not a posted document: no numbering set, no printable, no approval workflow, no e-Invoice flag. No exposed control found beyond the tab switches and tab order above.
Feature visibility / permissions
Three client-side permission codes are seeded for this applet in the registry: DELETE_BUTTON_FOR_BANK_RECON, DELETE_BUTTON_FOR_BANK_STATEMENT_TXN, DELETE_BUTTON_FOR_MATCHING. The applet’s code does not read any of them, so granting or withholding them changes nothing. To take away the session’s DELETE button, use the HIDE_DELETE_BUTTON switch in Application Settings; it applies to every user of the tenant, and the applet’s other Delete buttons have no switch.
You may come across SHOW_REFERENCE1_COLUMN … SHOW_REFERENCE6_COLUMN in the applet’s code, which looks as if a role could be allowed to see a Ref column the tenant has hidden. Do not create or grant them: they change nothing. The screen compares them against a list of the user’s permissions that it never loads, so the answer is always no, and the Bank Statement Lines grid does not look at permissions at all. A hidden Ref column is hidden for everyone; if one team needs it, leave the column on and let others hide it from their own grid’s column chooser.
Server-side, every call is gated by the tenant permissions on the Bank Reconciliation, Cash Statement, Bank Statement Line, Cashbook Transaction Line, Cashbook Txn Bank Statement Link and Cashbook Txn Statement Recon Possible Link targets (OWNER / ADMIN / READ / WRITE), assigned through the Permission Wizard. Report 1 and Report 3 need one more: read access to cashbook headers, as well as to bank reconciliation. A reviewer who can open the session but gets nothing back from Generate Report on those two is usually missing that one.
Fields
Details (create and edit)
| Field | Meaning | Required | Notes / validation |
|---|---|---|---|
| Company | Legal entity that owns the cashbook | Yes | Read-only: filled from the cashbook you pick, so you never choose it separately |
| Branch | Branch for the session | No | Filled from the cashbook you pick, not from Default Selection. Hidden by HIDE_BRANCH, but still saved |
| Cashbook | The cashbook being reconciled | Yes | Chosen from the cashbooks the user is a member of. Immutable after create |
| Name | Session name | Yes | Auto-filled with the month of the Opening Date (e.g. March 2026); editable. Max 255 |
| Opening Date | First day of the period | Yes | Client-side check on the create form: must be later than the Closing Date of the cashbook’s most recent ACTIVE session, otherwise Opening date should be later than … based on the cashbook selected and Create stays disabled. The backend does not re-check overlap |
| Closing Date | Last day of the period | Yes | Client-side check: later than Opening Date (Closing date should be later than opening date). Matching grids and the auto-matcher only consider lines dated on or before it |
| Cash Book Transaction Opening Balance | Cashbook balance brought forward | — | Read-only. The create form shows the previous session’s stored cashbook closing balance; at Create the server replaces it with the sum of every ACTIVE, non-VOID cashbook line dated before the Opening Date (company timezone) |
| Cash Book Transaction Closing Balance | Cashbook balance at Closing Date | — | Read-only. Calculated: opening + sum of ACTIVE, non-VOID cashbook lines dated within the period (company timezone), worked out at Create and stored. A document posted, voided or re-dated in the period afterwards moves the greyed Calculated line at once; the stored figure follows only when the bank-reconciliation balance job runs (every 30 minutes where it is scheduled on the tenant, otherwise never). Reports 1–3 start from the stored figure |
| Cash Statement Opening Balance | Bank’s opening balance | Yes | A Prev Cash Stmt Closing Bal hint button copies the previous session’s bank closing balance |
| Cash Statement Closing Balance | Bank’s closing balance | Yes | Typed from the statement, and it is the figure the report’s variance is measured against — the imported statement lines are not added up to check it. A mistyped figure shows as a discrepancy even when every line is matched, so check this number first when a finished reconciliation will not reach zero |
| Status | Where the reconciliation stands in your sign-off | Yes | One of Processing, Ready for review, Pending amendment, Approved by HOD, Reviewed and Approved. Stored as the session’s BANK_RECON_STATUS extension value. A new session is created with Processing, read-only on Create. Nothing acts on the value: it locks nothing, gates nothing, and any user who can save the session can pick any label |
Upload Statement
| Field | Meaning | Required | Notes / validation |
|---|---|---|---|
| Bank (Import Format) | Parser to use | Yes | See the format list below. Form hint Please choose type of bank import format |
| Bank Statement Name | Name of the Cash Statement record | No | Defaults from the file name |
| File | The statement file | Yes | CSV for the CSV formats, PDF for the Pdf formats |
| Start Date / End Date | Period covered | Only for Default Format | End Date defaults to today |
Import formats offered on the screen: Standard Chartered Bank, HSBC Bank, AMBANK-01, AMBANK-02, ABMB-Pdf, Hong Leong Bank-01, -02, -03, Hong Leong Bank Pdf, Maybank, Maybank Pdf, Public Bank-01, -02, Public Bank Pdf, RHB Bank, Citi Bank, CIMB-01, CIMB-02, CIMB Pdf, OCBC Pdf, Bank Islam, Default Format. The numbered variants are different export layouts of the same bank’s internet banking; each maps to its own backend parser that checks the column headers and rejects the file if they differ (The Headers Order Does Not Match The Expected Order, … Headers Are Not As Excepted). PDF formats are parsed by text extraction and fail with No transactions found in … PDF when the layout is not recognised.
Default Format is a generic CSV. Download the template (MasterData_Default_Bank_Statement_Template.csv) from the upload form; its columns are PAYEE_OR_PAYOR_NAME, RECIPIENT_REFERENCE, TRANSACTION_DATE, AMOUNT, DESCRIPTION, REMARKS, BIC_OR_SWIFT_CODE, IBAN, BANK_ACCOUNT_NUMBER, BANK_REFERENCE_NUMBER, REFERENCE_NUMBER, REFERENCE_NUMBER2, REFERENCE_NUMBER3, REFERENCE_NUMBER4. Rows are loaded into a helper table and validated row by row; the Checking tab shows Transaction Date / Amount / Payee-Payor Name validation errors, a short error message, and whether each row was Validated and Processed. Rows with errors are not promoted into the Cash Statement.
Cash Statement (one per imported file)
| Field | Meaning | Required | Notes |
|---|---|---|---|
| Company, Branch, Cashbook | Inherited from the session | Cashbook yes | |
| Opening Date, Closing Date, Opening Balance, Closing Balance | Header values of the statement | No | Set by the parser where the format carries them |
| Status | — | — | Not on the screen: the Cash Statement form’s status selector is switched off in the applet, so there is nothing to set here |
The statement’s Name (required) is the Bank Statement Name you gave at upload, or the file name.
Imported External Cashbook
| Field | Meaning | Required | Notes |
|---|---|---|---|
| Cashbook | Target cashbook | Yes | Each row of the file becomes a cashbook transaction line in this cashbook, the same kind of line BigLedger’s own receipts and payments create there. If BigLedger also posts to this cashbook, the imported lines sit alongside those, not instead of them |
| File | One fixed CSV layout | Yes | Not a general CSV import. The file must be comma-separated with double-quoted text, have seven lines of report heading, and then a header row naming exactly these columns in this order: Dept, Trx Date, Description, CC, Reference No, Cheques No, Debit, Credit, Balance, then the batch/entry number, flag, entered-by, entry date, entry time and register reference columns. Any other header row is refused with The Headers Order Does Not Match The Expected Order. There is no delimiter or text-qualifier choice on the screen. Generated lines carry Document, Payee, Reference, Description, amount (Dt/Ct(-)), Date Txn and Entry Date |
Lifecycle and effects
The session
- Create — the header is written with status ACTIVE and the
BANK_RECON_STATUSvalue Processing. Opening balances are suggested from the cashbook’s most recent ACTIVE session (its cashbook closing balance and bank closing balance). Once the header is written, the server works out both cashbook balances from the cashbook lines and stores them over what the form sent. Afterwards, any cashbook line written, voided or re-dated on that cashbook queues a refresh, which a job scheduled every 30 minutes applies to every ACTIVE session of the cashbook — on tenants where that job is scheduled. - Work — statements are imported, links are made. The header’s processing mark (
processing_auto_matching) is set when you click Run Automatching, just before the job is queued, and cleared by the job when it finishes or fails. - Sign off. Move Status through the review labels on the Details tab: Ready for review, then Approved by HOD or Reviewed and Approved, or back to Pending amendment. Nothing is locked by this: links can still be undone, and the next session’s Opening Date is validated against this session’s Closing Date whichever status it has.
- Delete — deleting a session is a cascade, not a soft delete: every reconciliation link and possible link of the session is removed and the open amount of each affected cashbook line and statement line is restored; every Cash Statement (header, lines, attachment record) imported into the session is deleted; then the session header, its extensions and its events are deleted.
What a reconciliation link does
A link joins one cashbook transaction line to one bank statement line for an amount, and is tagged DBLSIDED (matched on both sides), BANK-STMT (an adjustment booked against a bank line) or CASH-BOOK (an adjustment against a cashbook line). On create the backend:
- aligns the sign of the amount with the line’s open amount and rounds away tiny differences so a full match leaves exactly 0;
- throws — the link is not written — if the open amount is already 0 (
…_OPEN_AMOUNT_ALREADY_ZERO_CANNOT_OVERFILL), if the amount exceeds the remaining open amount (…_AMOUNT_CONTRA_EXCEEDS_REMAINING_OPEN_AMOUNT), if the signs differ (…_OPEN_AMOUNT_AND_AMOUNT_CONTRA_SIGN_MISMATCH) or if the amount is zero (AMOUNT_CONTRA_MUST_BE_NON_ZERO), the prefix beingCASHBOOK_TXN_LINEorCASH_STMT_LINE; - takes the amount off the open amount of both the cashbook line and the statement line.
Undo Reconcile deletes the link and adds the amount back to both open amounts. Partial matches are allowed: a RM 1,000 statement line can be linked to three cashbook lines, and a cashbook line can stay partly open across sessions.
Unmatched Adjustment creates a one-sided link (txn type BANK-STMT, description Adjustment) that sets the cashbook line’s open amount to zero and sets the line’s settled marker (the same marker a full match sets — see the Manual Matching tab), so an item the bank will never show (a write-off, a rounding residue) leaves the unmatched list; Undo removes the link and clears the flag. It does not post a journal — the accounting correction still has to be made with a voucher.
Effect on other documents
While a cashbook line is linked to a session, the source document is protected on the server: changing the settlement amount or transfer details of a FINAL Receipt Voucher, Payment Voucher or Cash Transfer whose lines are still reconciled is rejected with Cashbook txn lines are bank-reconciled. Unreconcile them from the bank recon (name and month) before changing amounts or transfer details. Three things are not guarded, and each takes a matched line out from under its match after the fact.
Voiding the source document. The void’s cashbook subscriber does not write a reversing line: it marks each of the document’s cashbook transaction lines DELETED, and on the way it adds the matched amount back onto every bank statement line the deleted line was linked to and marks each reconciliation link DELETED. So the cashbook line leaves the session, the bank line reappears on the unmatched list carrying its full amount again, and the session’s calculated cashbook balance moves. Nothing on the reconciliation screen says why.
Adjusting the settlement method on a document that is still FINAL. The Settlement Adjustment screen (offered by POS General, the sales invoice, the receipt and payment vouchers and the sales return) changes the payment lines of a finalised document by deleting its cashbook lines the same way and writing new ones for the new method. It never calls the guard above, so the amount change it performs is exactly the one the ordinary edit path refuses. See Payment Aggregators and Branch Settlement Methods.
Saving a finalised document again after its settlement method or date changed. Each save of a FINAL document already posted to the cashbook rebuilds its cashbook lines from the document as it stands: the cashbook comes from whatever cashbook the settlement method names now, and the date from the document header. Only the amount is checked against the match. So if someone re-points a settlement method from one cashbook to another and then edits the remarks on an old receipt, its matched line moves to the other cashbook (or to the new date) and its match stays in place. The bank line in the first cashbook’s session still reads as matched, to a cashbook line that now belongs to another cashbook. Nothing on either screen says so.
In all three cases unreconcile first if the period matters: undo the match on the Unreconcile tab, make the change, match the new line. And when you re-point a settlement method, expect any later save of an older document that uses it to move that document’s line too.
What this applet writes and reads. It writes reconciliation sessions, imported bank statements and their lines, and the matches (and suggested matches) between them, and it updates the open amount and the settled marker on cashbook lines and the open amount on statement lines. It only reads cashbooks, companies and documents. It is not a document, and has no journal and no stock movement: nothing here reaches the General Ledger, and nothing here is reversed by a VOID — voiding a source document voids its cashbook lines through the document’s own posting service.
Auto matching
Run Automatching marks the session as processing and then queues the auto-matcher for it, to run straight away. The marking happens first. If queuing the job fails, the screen is still told that all went well and the session stays marked as processing. The job itself:
- Deletes all possible links of the session (a rerun starts from scratch; confirmed links are kept).
- Loads the outstanding lines: statement lines of the cashbook with
open_amount ≠ 0and txn typeTXN; cashbook lines withopen_amount ≠ 0, txn typeTXN, not DELETED, dated from 90 days before the Opening Date to 90 days after the Closing Date (company timezone). - Loads the cashbook’s ACTIVE Weightage Configuration, or the defaults (amount 0.25, date 0.25, reference 0.25, payee 0.25).
- Scores every cashbook × statement pair: amount (1.0 when equal to the cent, linear decay, 0 when signs differ), date (1 − days apart ÷ 90, 0 beyond 90 days), reference (best Levenshtein similarity across the reference fields) and payee (Levenshtein). Pairs whose amount score is below 0.1 or whose weighted net score is below 0.40 are dropped. Weights of dimensions with no data on either side are redistributed.
- Picks the best one-to-one pairs greedily. Net score ≥ the threshold creates a confirmed link immediately; with no configuration the rule is stricter — amount must be exact and payee similarity ≥ 0.85. Net score ≥ 0.55 but below the threshold creates a possible link for review.
- Unless
match_one_to_oneis set, looks for groups of up to five still-open cashbook lines whose total comes within RM 1 or 2 % of one open statement line, whichever is larger. A group that scores ≥ 0.98 and totals the bank amount to the cent is linked automatically. Any other group above the threshold becomes possible links for you to review. - Clears the processing mark — also when the run fails part-way.
Watch the automatic group links. The matcher divides the bank amount equally across the lines of the group, whatever each line’s own amount. With lines of equal value that is exact. With unequal lines it is not: on a RM 1,000 deposit made up of RM 300 and RM 700, each line is offered RM 500. The RM 700 line is matched for RM 500 and left with RM 200 open, and the RM 300 line is refused because RM 500 is more than it holds. Its suggestion is deleted too, and nothing on the screen says so. The bank line is left with RM 500 open. After a run, check Unmatched Txn Lines and Unmatched Cash Stmt Lines for part-matched amounts like these. Undo the group’s links from each line’s matching screen (Matched Bank Statement Lines), then match the lines by hand for their own amounts. If your deposits are usually batches of different amounts, tick one-to-one on the cashbook’s Weightage Configuration to switch the group pass off.
The screen disables its buttons the moment you click Run, re-checks the flag after one minute and every 30 seconds while the tab is open. Confirming a possible link (Reconcile / Add on the Auto Matching result screens) creates the real link and deletes the possible one.
For an integration or a test. The screen’s button only queues the job. The same matcher can also be run inline: a POST to cashbook-txn-stmt-recon-possible-links/sync with the session’s guid runs it in the request and returns the possible links in the response, so there is nothing to poll.
Keeping a line out of the auto-matcher. The matcher only considers lines whose Txn Type is TXN. On the matching screens you can change a cashbook or bank statement line’s Txn Type to BANK-CHARGES or BANK-INTEREST, and the matcher then leaves it alone. This is useful for the monthly fee and interest lines it keeps pairing wrongly. The reports do not filter on Txn Type, so such a line still counts as unmatched in all three reports until you match or adjust it by hand.
The reports
| Report | What it shows |
|---|---|
| Report 1 | Cashbook closing balance stored on the session → takes off the cashbook lines still unmatched, adds the bank lines still unmatched, and allows for lines matched with a previous or future period → Expected closing balance of the cashbook → Variance / discrepancy against the bank statement closing balance. The variance is what the listed items do not explain, not the gap between the two closings. Lines carry Document Type, Document No, Ref No, Ref 1–6, Doc Remarks, Forex Amount / Balance / Rate |
| Report 2 | Balance as per Cash Book and Balance as per Bank Statement, the reconciling items between them, Expected Closing Bank Statement and Discrepancy, with Date, Payee, Cheque No and the same reference columns |
| Report 3 | Sectioned overview: cashbook opening/closing and bank opening/closing balances; Cashbook transactions unmatched balance, matched balance, matched with previous / future period of bank statement; Bank transactions unmatched / matched balance, matched with previous / future cashbook transactions; Difference in opening of cashbook opening balance vs bank statement opening balance. Each section can be hidden from Application Settings |
All three read the links as they stand when you click Generate Report. Report 3 is the one to keep as the period’s evidence; Report 1 is the one that tells you which side the variance sits on.
Where each figure on these screens comes from
Two kinds of figure sit side by side in this applet. Some are stored, on the session or on a line, and change only when something writes them; others are worked out again each time you open the screen or click Generate Report. When a number looks wrong, find out first which kind it is: a stored figure can be older than the documents, a worked-out one cannot. The same split runs through the whole product — see Where did this figure come from?.
| Figure | Stored or worked out | Where it comes from, and what moves it |
|---|---|---|
| Cash Book Txn Open / Close Bal. on the listing, and the two cashbook balances on Details | Stored on the session | Worked out at Create from the cashbook’s ACTIVE lines whose document is not voided, in the company’s time zone: the opening is every line dated before the Opening Date, the closing is the opening plus the period’s lines. Afterwards, a cashbook line written, voided or re-dated on that cashbook queues a refresh, and the BANK_RECON_BALANCE_QUEUE_PROCESSOR clock applies it every 30 minutes to every ACTIVE session of the cashbook. That happens only where the clock is scheduled on your tenant; where it is not, the figures stay as they were at Create. Whether yours has it is on the Scheduler |
| The greyed Calculated Cash Book Transaction Closing Balance | Worked out each time you open the session or go back to Details | The stored opening plus the period’s ACTIVE, non-voided lines as they stand now. It moves the moment a document in the period changes; the stored closing catches up when the refresh runs. A line back-dated to before the Opening Date moves neither, because both start from the stored opening. The line is not shown when it works out to zero, and its refresh icon is disabled |
| The two balances you type on Details from the bank’s figures | Stored, as you typed them | Only what you typed; the Prev Cash Stmt Closing Bal hint copies the previous session’s figure. Each imported file carries opening and closing balances of its own, set by the parser, and no report reads those: the reports use the two on Details |
| Debit, Credit and Balance (RM) on Reconcile and Unreconcile | Stored on the cashbook line | Debit or Credit is the line’s amount, written when the document’s payment line was posted to the cashbook: the payment less any charge set on the settlement method (see where a cashbook line comes from). Balance is the part not yet matched: it starts at the amount, each match or Unmatched Adjustment takes its amount off, and Undo puts it back. Forex Balance is worked out on the screen, as Balance divided by the line’s exchange rate |
| Dr(-)/Cr and Balance on Bank Statement Lines | Stored on the statement line | Dr(-)/Cr is the amount the parser read from the file, with debits negative. Balance is not the running balance printed in the file. It is the part of this line not yet matched, set equal to the amount at import and moved by matches exactly as on the cashbook side |
| Reports 1, 2 and 3 | Worked out when you click Generate Report | From the stored cashbook closing on Details (Reports 1 and 3 start there) and the two balances you typed, plus the open amounts and matches as they stand at that moment. On Reports 1 and 3, three bounds catch readers out. The bank side counts only lines in files imported into this session. The unmatched cashbook list takes every still-open line of the cashbook dated up to the Closing Date, with no start date, so an item left open in an earlier month appears again every month until it is matched. And a part-matched line counts at what is still open on it |
Verify the session before you sign it off
Report 1’s Variance / discrepancy at zero is the usual finish line, and the guide walks through it. The three checks below take a minute more, need nothing outside this applet, and each catches something the variance alone does not.
- The stored closing agrees with the greyed Calculated line on Details. If the two differ, a document in the period changed after the stored figure was last worked out, and every report is starting from the older one. Where the refresh clock runs they come back together within about half an hour. What to do when they do not is in the guide, under If the stored closing is older than your fix.
- The bank side adds up. On Report 3, add the bank’s opening balance, its matched balance and its unmatched balance. When the whole period was imported into this session exactly once, and no line on that side is part-matched, the total equals the closing balance you typed. For GadgetSphere’s March on GS-KV-01: RM 41,830.00 + RM 5,820.00 + (−RM 450.00) = RM 47,200.00. The applet shows the three parts but never their total. If the total is off, a day’s file is missing or was imported twice, the closing balance was mistyped, or a line is part-matched: the matched sections count fully matched lines only, so the matched part of a part-matched line is in neither section.
- Nothing is left half-matched by accident. On the Unreconcile tab every line’s Balance (RM) reads 0.00. A line showing a balance there was undone and not matched again, because Undo leaves it on that tab. After an Auto Matching run, also look for the equal-split group links described under Auto matching.
Related applets
- Cashbook — defines the cashbook, its members and the Weightage Configuration the auto-matcher reads.
- Receipt Voucher (Internal) and Payment Voucher (Internal) — the FINAL settlement lines that become the cashbook side of the reconciliation; both are locked against amount changes while reconciled.
- POS General — POS settlements reach the same cashbooks through their settlement methods.
- Ledger and Journal — for the GL side of a bank charge or interest entry; the cashbook line itself must come from a voucher or cash transfer.
- Organisation — the company timezone that every date window in this applet uses.
Troubleshooting
| Symptom | Cause | Fix |
|---|---|---|
| Opening date should be later than YYYY-MM-DD based on the cashbook selected when creating a session | The cashbook already has an ACTIVE session ending on or after that date | Start the new period the day after the last session’s Closing Date, or delete the overlapping session |
| A voucher is missing from the Reconcile tab | The document is not FINAL, its settlement method points to another cashbook, or its date is after the session’s Closing Date | Check posting status and the settlement method’s cashbook; the Reconcile grid is capped at the Closing Date |
| Cannot change the amount on a Receipt / Payment Voucher: Cashbook txn lines are bank-reconciled… | The line is linked in a session | Undo the link on the Unreconcile tab (or the matching screen) of the session named in the message, then edit |
| Upload fails with The Headers Order Does Not Match The Expected Order or … Headers Are Not As Excepted | The file was exported in a different layout from the format chosen | Try the other numbered variant of the same bank (e.g. -01 / -02), or convert the file to the Default Format template |
| No transactions found in … PDF | The PDF layout differs from the one the parser expects (scanned image, different statement type) | Export a CSV from internet banking instead, or use Default Format |
| Default Format rows stay unprocessed | Validation errors on Transaction Date, Amount or Payee/Payor Name | Open Default Statement Helper → the file → Checking; fix the rows in the CSV and upload again |
| Auto Matching buttons stay greyed out | The session is still marked as processing. Either the job is queued or still running, or it was never queued: the mark is set before the job is queued, and a failure to queue it is not reported. A job that runs and fails clears the mark itself | Wait; the screen re-checks every 30 seconds. If the mark never clears, the job never ran, so there is nothing in the job’s own log to find. Ask the administrator to check the queue, and have support clear the mark |
| Auto Matching creates almost only possible links | No ACTIVE Weightage Configuration on the cashbook, so the strict default (exact amount + payee ≥ 0.85) applies; or the threshold is set to 100 | Create a configuration with the dimensions that your bank statement actually carries (reference and payee are often blank on card-acquirer statements) and a threshold around 85 |
| Auto Matching pairs the wrong lines with identical amounts | Amount is the only dimension with data (no reference / payee on the statement) | Lower the amount weightage and raise date; review the possible links instead of relying on auto-links |
| Reconcile fails with …_AMOUNT_CONTRA_EXCEEDS_REMAINING_OPEN_AMOUNT or …_OPEN_AMOUNT_ALREADY_ZERO_CANNOT_OVERFILL | The line was matched in another session, or partly matched already | Look at Matched Bank Statement Lines / Matched GL Transactions for the line — the Matched Recon column names the session |
| Duplicate rows on Matched Bank Statement Lines | A line linked from more than one session (older data) | Undo the links in the wrong session; the listing now groups by link |
| A matched line vanished and the greyed Calculated cashbook closing moved | The source voucher was voided after matching, or its settlement method was adjusted on a document still at FINAL | Both delete the cashbook line, hand its matched amount back to the bank statement line and mark the link DELETED. Re-run the reports, then match the replacement line (an adjustment) or account for the removal (a void) |
| A bank statement line you had matched is back on the unmatched list, at its full amount | The cashbook line it was matched to was deleted by a void or a settlement adjustment; the deletion restores open_amount on the statement line | Find the source document and read its posting statuses; the statement line is correct, the cashbook side is what changed |
| A FINAL receipt, payment voucher, cash bill or cash transfer never appears on the Reconcile tab at all | Its cashbook posting never ran: posting_cashbook is null and no cashbook transaction line exists | Financial Report › Error Checking › Trace Document: trace the document and read the Missing Cashbook check; Resolve posts the lines without voiding or re-keying. The check only covers those four document types — a settled sales invoice reads Not applicable |
| Report figures differ from the screen | Reports were generated while Auto Matching was still running, or after links changed | Regenerate the report once Processing Auto Matching is false |
| Bank charges / interest you journalled do not appear as cashbook lines | Manual journals do not create cashbook transaction lines | Enter them as a Payment Voucher / Receipt Voucher or a Cash Transfer on the cashbook |
| Deleting a session removed the uploaded statements | Delete cascades to every statement imported into the session and restores all open amounts | Expected; re-upload into the new session |
| Application Settings hide/show switches “do not work” | The four Department Settings switches are rendered but read by nothing | Nothing to configure — they are inert (see Applet settings). Hide Delete Button does work, but only on the session’s Details tab |
| A cashbook line you unmatched is not back on the Reconcile tab | Undo Reconcile restores the open amount but leaves the line’s settled marker, and the tabs split on that marker | Open it from the Unreconcile tab, where it now shows a balance, and match it from there |
| After Auto Matching, a deposit and its cashbook lines are each left partly open | An automatic group link split the bank amount equally across lines of different amounts | Undo the group’s links from the line’s matching screen and match each line for its own amount; tick one-to-one on the Weightage Configuration if this keeps happening |
Related documentation
- Bank reconciliation guide — the month-end procedure, step by step.
- Financial Accounting module — where reconciliation sits in the close.
- Cashbook applet — reference for the cashbook and its Weightage Configuration.
Video walkthrough
The video covers creating a session and entering opening balances, uploading a statement, manual matching (Reconcile, Unreconcile, Bank Statement Lines), running Auto Matching and reading its status, and generating Report 1, 2 and 3.