Internal Outbound Delivery Order Applet
Purpose and Overview
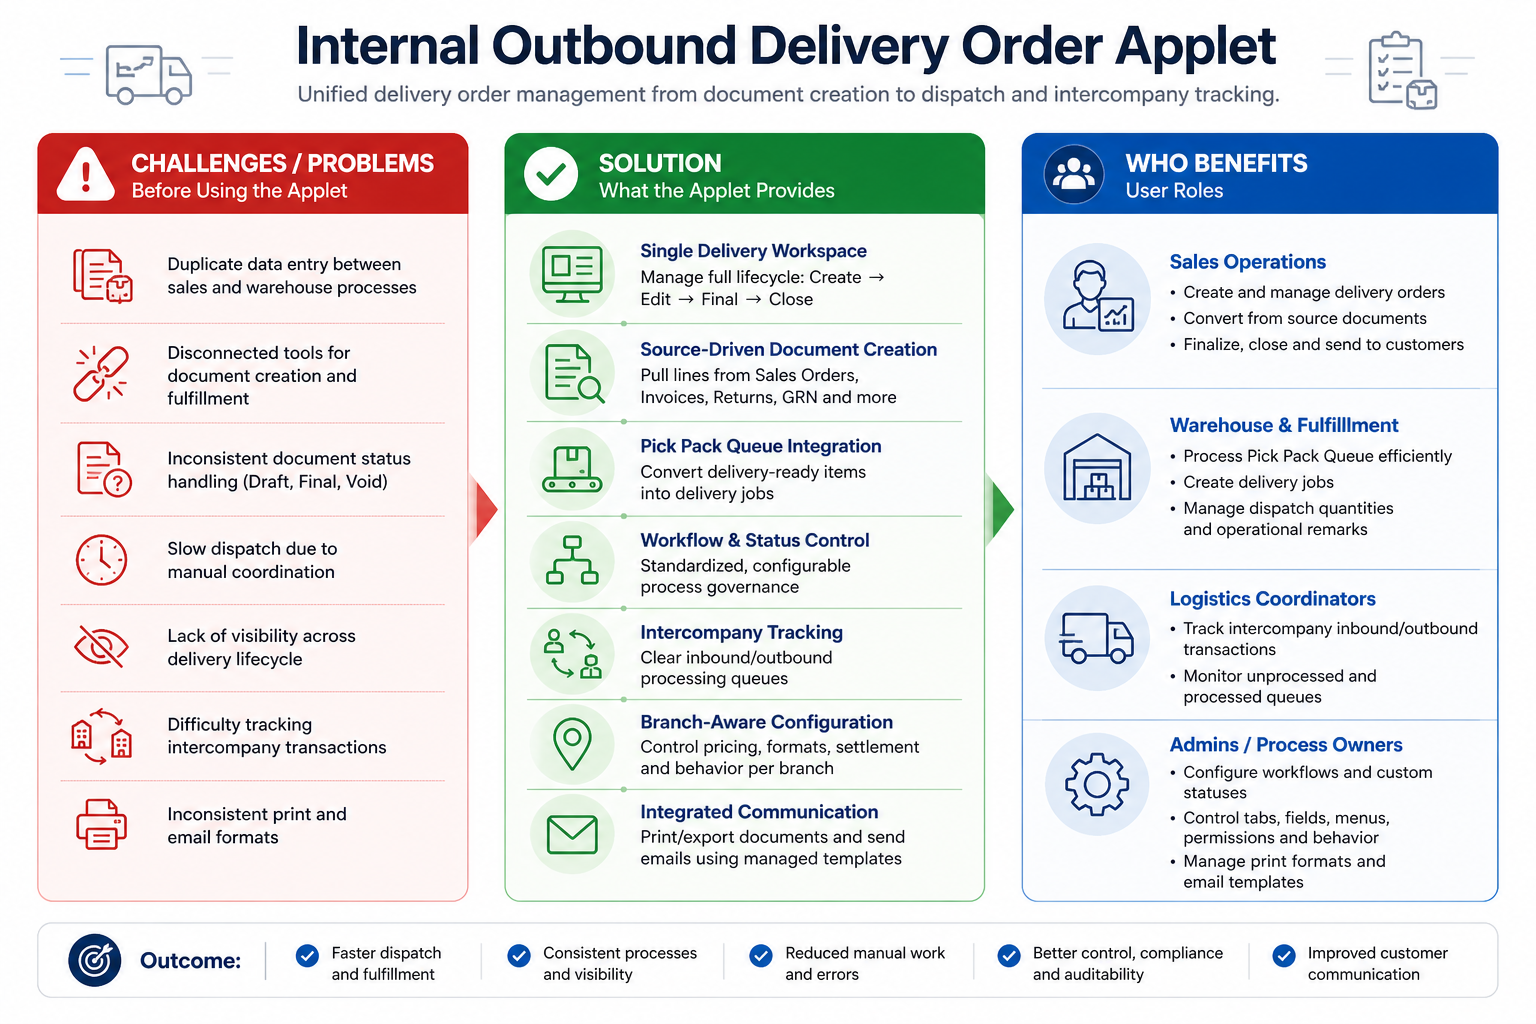
The Internal Outbound Delivery Order Applet is built to control the full internal dispatch process, from document creation and source-document knock-off to fulfillment handoff and final posting. It gives teams one operational workspace for delivery execution while keeping governance (statuses, workflow, printing, and email) consistent.
About the Applet
- Purpose: Create, manage, finalize, and operationalize internal outbound delivery orders across sales operations and warehouse teams.
- Target Users: Sales Operations, Warehouse & Fulfillment teams, Logistics Coordinators, Finance/Operations Controllers, and System Administrators.
- Key Features: Delivery Order workspace, source document search + KO, line item management, Pick Pack Queue job creation, Intercompany inbound/outbound tracking, and settings-driven workflow/print/email controls.
Key Features Overview
Who Benefits from This Applet?
Sales Operations Teams:
- Create and update delivery orders from a controlled listing
- Convert source documents (Sales Order, Sales Invoice, Sales Return, Purchase GRN, Delivery Order)
- Finalize, void, discard, and close documents with status visibility
- Send customer-facing copies through email templates and printable formats
Warehouse & Fulfillment Teams:
- Use Pick Pack Queue to process delivery-ready quantities
- Create delivery jobs with delivery type, branch/location, and shipment dimensions
- Track pending vs to-deliver quantities with operational remarks/content
- Improve dispatch speed while enforcing quantity and branch/location consistency
Logistics & Intercompany Coordinators:
- Monitor intercompany transactions in Inbound/Outbound lanes
- Separate UNPROCESSED and PROCESSED queues for action clarity
- Keep cross-company flows auditable and easy to reconcile
System Admins & Process Owners:
- Configure workflow templates by company and document type
- Control tab/menu visibility and orientation behavior
- Manage custom statuses, branch defaults, printable formats, and email templates
- Standardize behavior across departments with minimal manual policing
What Problems Does This Solve?
The Fragmented Dispatch Problem:
When outbound delivery is handled across disconnected tools, teams face:
- Duplicate data entry between document and warehouse steps
- Inconsistent status handling (draft/final/void done differently by each user)
- Slow fulfillment handoff due to manual coordination
- Limited control over what users can see/edit by role
- Inconsistent print/email output for delivery communication
The Internal Outbound Delivery Order Applet Solution:
- Unified document lifecycle - Manage create, edit, final, void, discard, and close in one flow
- Source-driven creation - Pull related lines from multiple document sources via search/KO
- Operational execution bridge - Convert queue items to delivery jobs from Pick Pack Queue
- Settings-driven governance - Control tabs, fields, statuses, menus, and orientation centrally
- Branch-aware behavior - Apply branch-level printable, pricing, settlement, and category filters
- Integrated communication - Export/print and send emails using managed templates
Feature Cards
Key Concepts
Main Navigation Map
Core app menus:
- Delivery Order (
internal-delivery-order) - Line Items (
line-items) - Pick Pack Queue (
pick-pack-queue) - Intercompany (
intercompany) - Settings (
settings) - Personalization (
personalization)
Settings submenus include Default Selection, Field Settings, Printable Format Settings, Custom Status, Email Template, Branch Settings, Workflow Settings, Feature Visibility, Webhook, Applet Log, and Release Notes.
Document Lifecycle
| Stage | Typical State | What It Means |
|---|---|---|
| Drafting | TEMP / DRAFT | Document is still being prepared and can be enriched from source docs |
| Active Editing | ACTIVE + DRAFT posting | Document is saved and operationally editable |
| Final Posting | ACTIVE + FINAL posting | Document is posted/finalized and controlled actions apply |
| Exception Handling | VOID / DISCARDED | Document is intentionally cancelled from operational flow |
| Closure | ACTIVE + FINAL then CLOSE action | Finalized item is explicitly closed for KO lifecycle completion |
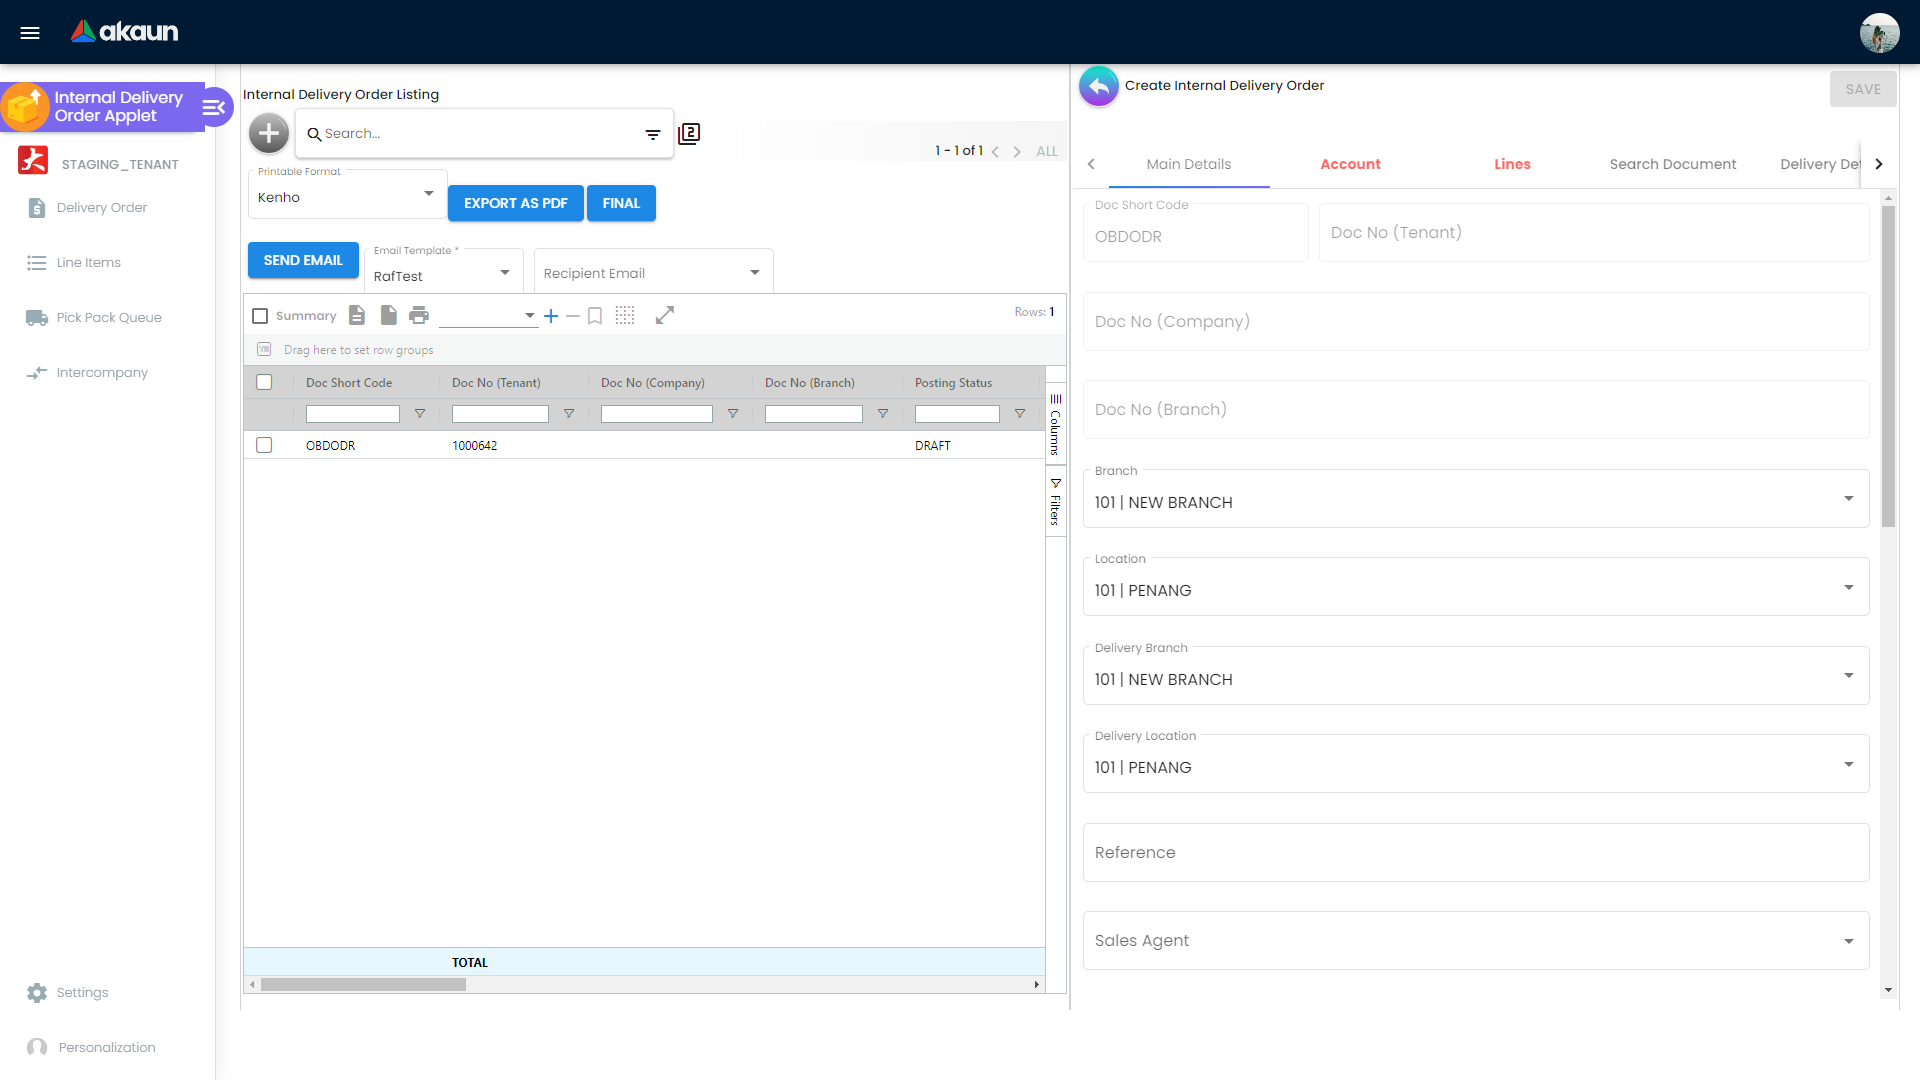
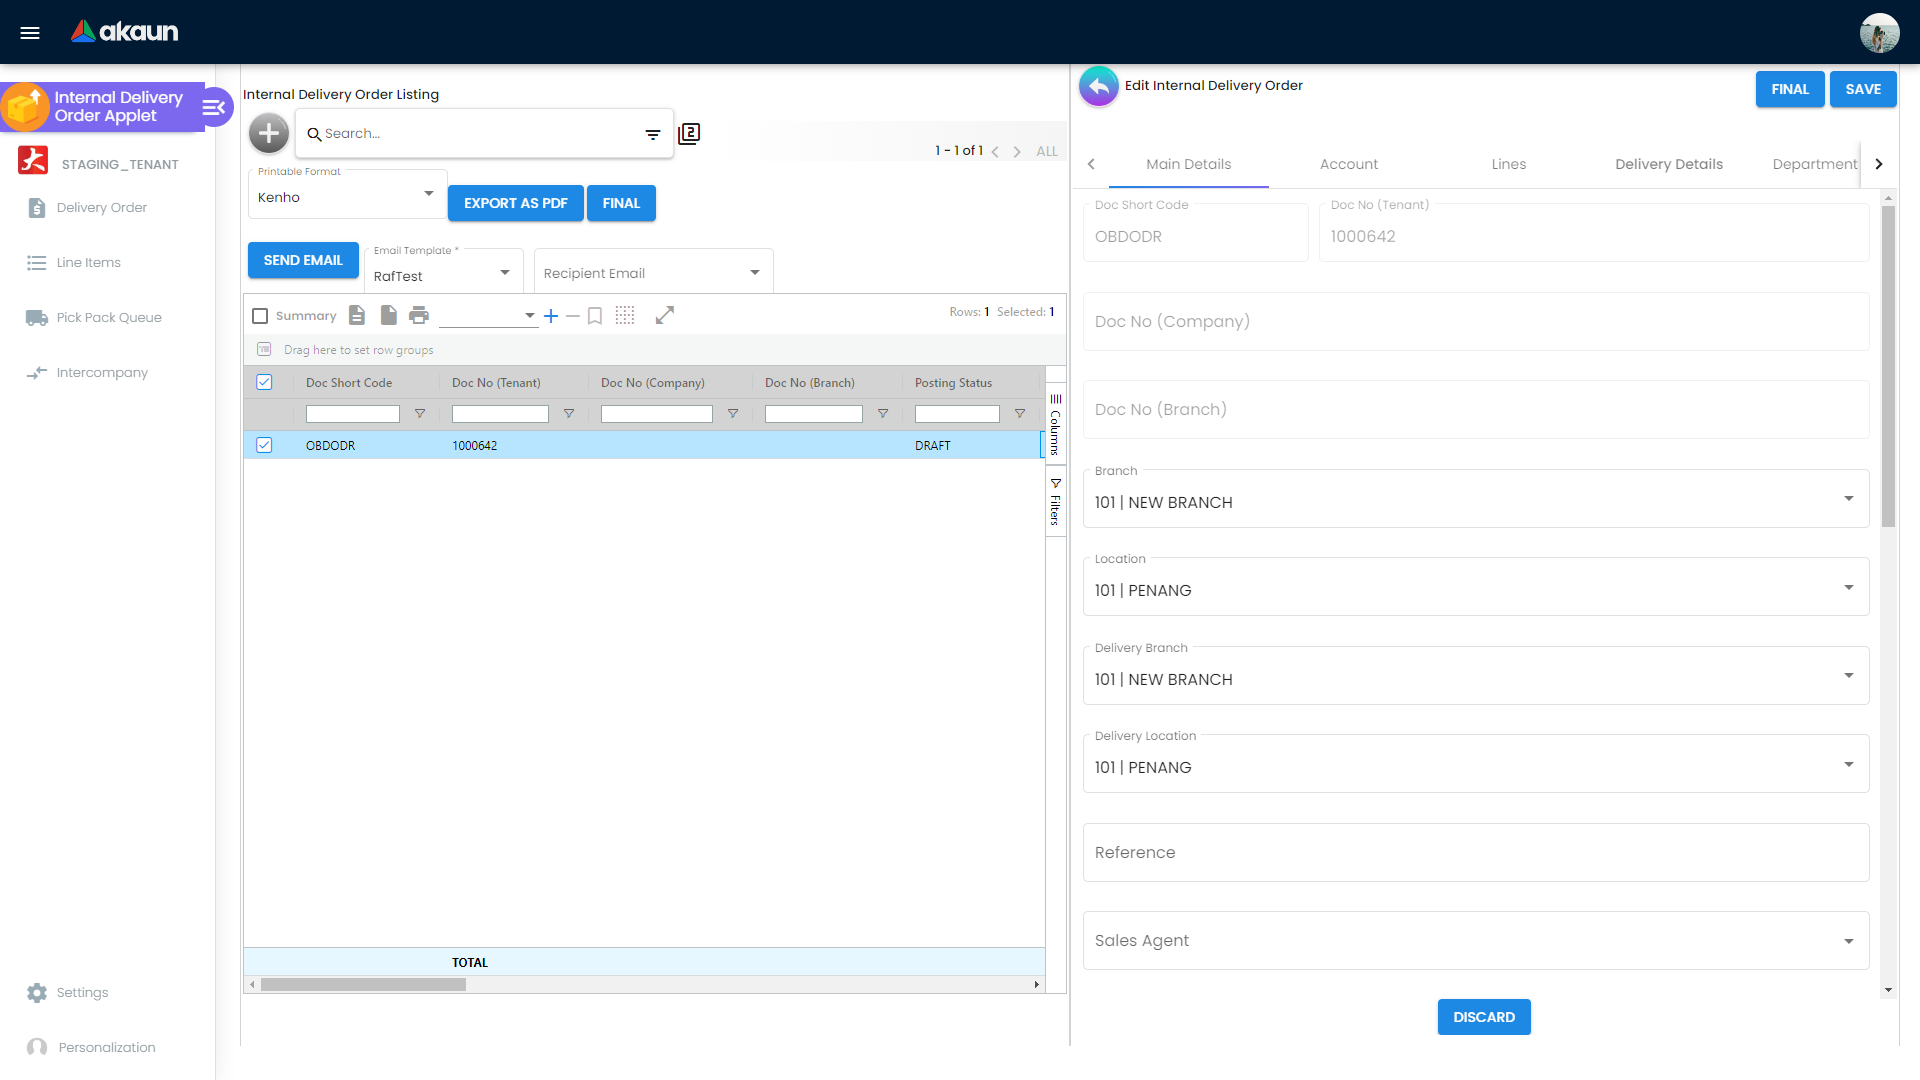
Workspace Model
The applet supports two display modes:
- Horizontal tab mode for broad desktop editing
- Vertical expansion mode for guided section-by-section processing
The detail panel order is configurable and includes these core sections:
- Search Document
- Main Details
- Account
- Lines
- Delivery Details
- KO For
- Department Hdr
- Posting
- Doc Link
- Export
- Attachments
- Status
Source-Driven Document Build
You can build outbound delivery orders from related source records through two mechanisms:
- Search Document panel with tabs for Sales Order, Sales Invoice, Sales Return, Purchase GRN, and Delivery Order
- KO For panel with company-flow driven enablement for Sales Order, Sales Invoice, Sales Return, and Purchase GRN
Quick Start Guide
Get up and running quickly with these role-based workflows.
For Sales Operations: Create and Finalize Your First Delivery Order
Goal: Create an internal outbound delivery order, add lines, and move it to final.
- Go to Delivery Order from the applet menu.
- Confirm your working Branch/Location context is correct before creating the document.
- Click Create (+) in Internal Delivery Order Listing.
- Fill Main Details and Account.
- Add lines in Lines or import lines from Search Document / KO For.
- Review Delivery Details, Posting, and Status.
- Click Save to keep changes.
- Click Final when the document is operationally ready.
- Verify the row status/posting state in listing, then run Export as PDF or Send Email if required.
Expected Outcome: A delivery order is saved/finalized successfully and appears in listing with the expected posting/status state.
For Warehouse / Fulfillment: Turn Queue Lines into Delivery Jobs
Goal: Use Pick Pack Queue to create a delivery job with dispatch data.
- Go to Pick Pack Queue.
- Filter/search and select the required rows.
- Confirm selected rows are operationally compatible (delivery type, branch/location, and pending quantities).
- Enter Delivery Type (
INTERNAL_DELIVERY,EXTERNAL_DELIVERY, orPICKUP). - Set Delivery Branch and Delivery Location (or keep source defaults).
- Update Qty To Deliver per line and ensure each value is within pending balance.
- Optionally fill shipment dimensions (
Width,Length,Height,Weight) and remarks/content. - Click Create Delivery Job.
- Verify the created job reference and confirm processed lines no longer appear as pending in queue.
Expected Outcome: A delivery job is created successfully and selected queue lines move out of pending flow.
For Admins / Process Owners: Configure Workflow, Print, and Email
Goal: Ensure posted documents follow standardized process and output.
- Go to
Settings > Workflow Settingsand map company + process forINTERNAL_OUTBOUND_DELIVERY_ORDER. - Go to
Settings > Printable Format Settingsand upload/select.jrxmlformats. - Go to
Settings > Email Templateand link template content with printable format. - Go to
Settings > Application Settingsand set default branch/location/company plus panel order. - Go to
Settings > Branch Settingsto apply branch-specific printable header/footer, settlement defaults, and filters. - Review
Settings > Custom Statusand align status labels with your operations team terminology. - Perform an end-to-end UAT flow (create, final, pick-pack, delivery job, print/email) before production rollout.
Expected Outcome: Workflow, printable, and email configurations are saved and validated through one successful end-to-end UAT cycle.
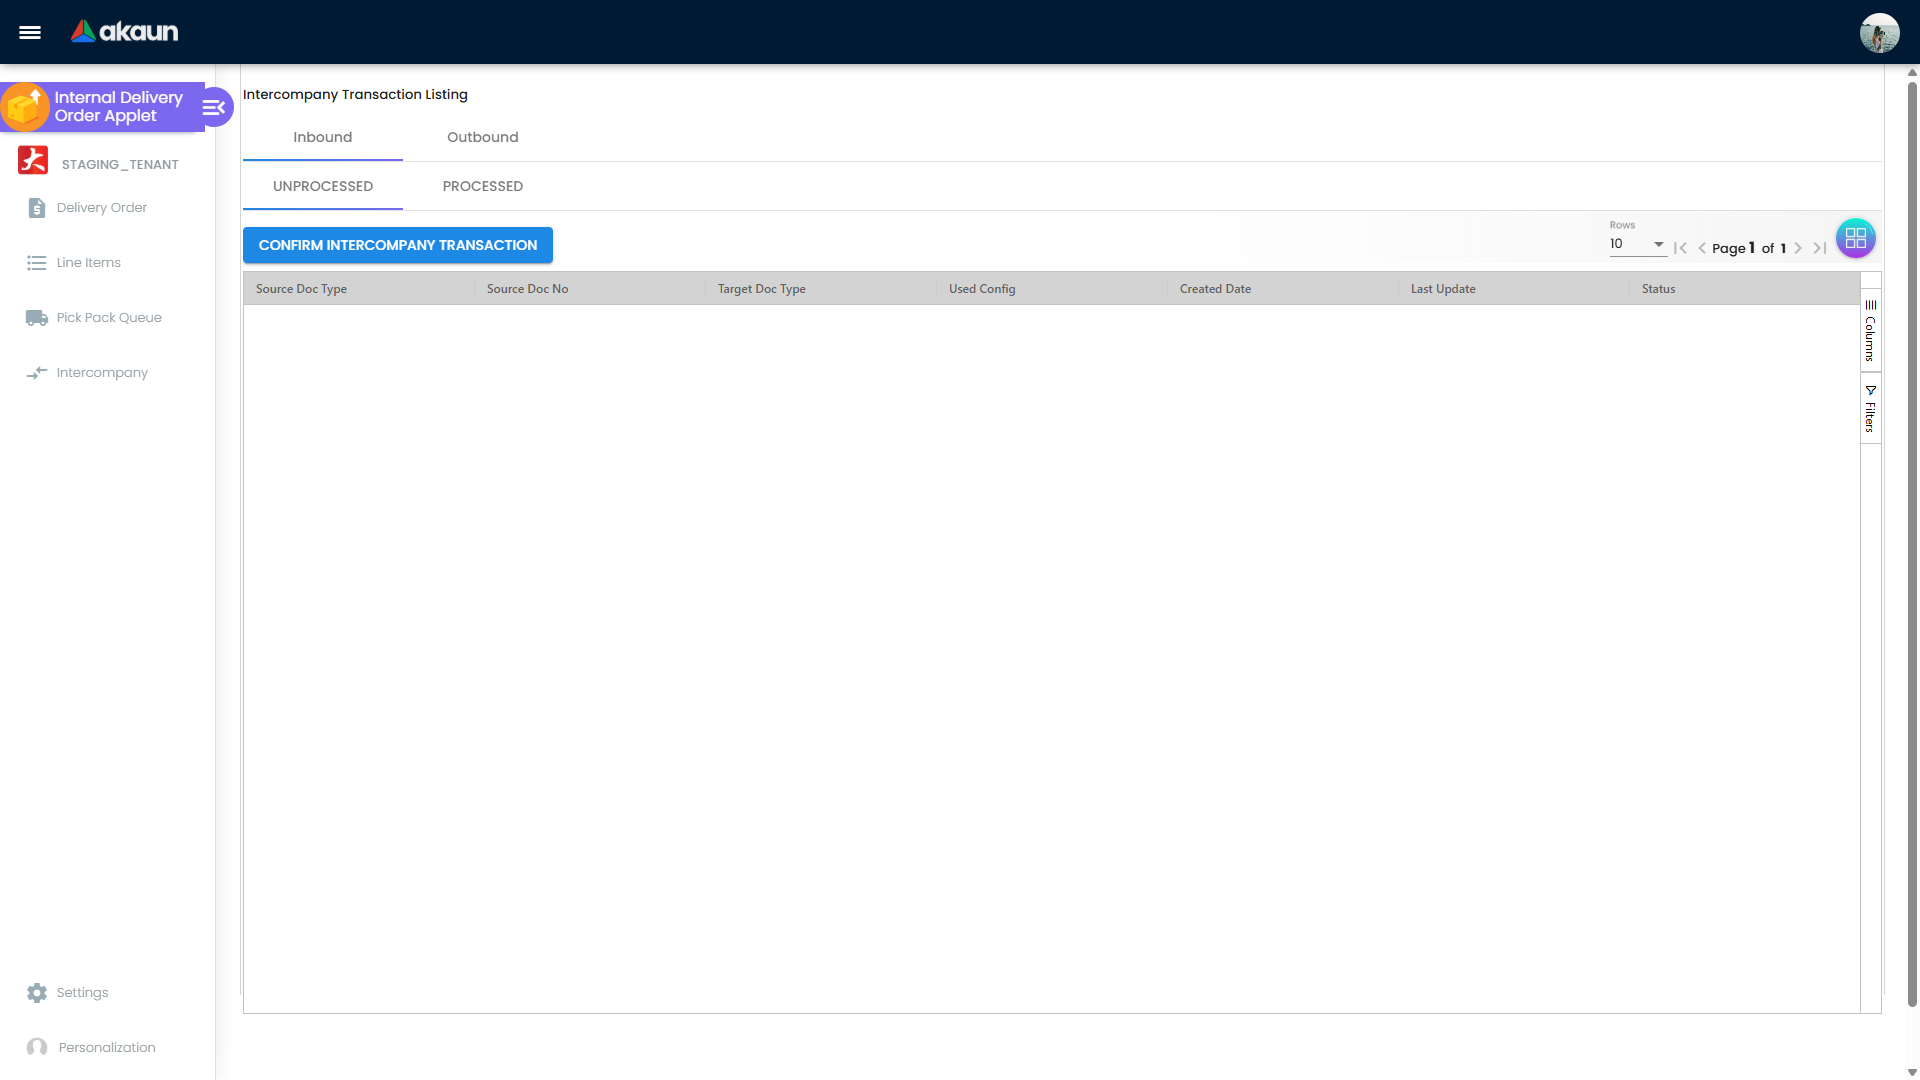
For Intercompany Coordinators: Process Inbound and Outbound Queues
Goal: Keep intercompany transaction flow clean from unprocessed to processed state.
- Go to Intercompany from the applet menu.
- Review Inbound > UNPROCESSED for documents pending confirmation.
- Select rows and use Confirm Intercompany Transaction where applicable.
- Recheck Inbound > PROCESSED to verify completion.
- Repeat the same control pattern for Outbound > UNPROCESSED and Outbound > PROCESSED.
- Investigate rows that stay unprocessed by checking source document state and branch/company mapping.
Expected Outcome: Intercompany rows are moved from unprocessed to processed states with clear action traceability.
Delivery Order Workspace
The main listing gives centralized control over outbound documents with advanced search, state-aware actions, and bulk handling.
Core listing actions:
- Create
- Final
- Draft
- Discard
- Void
- Export as PDF
- Send Email
- Single/Multiple print (tenant-dependent)
Edit workspace capabilities:
- Configurable section visibility and ordering
- Save + Final + Void + Close control flow
- Status gating (for example, certain actions only appear for specific posting states)
- Read-only lock behavior when another user is editing the same document
Document Import & KO For
Search Document
Use these source tabs (if enabled by settings):
- Search Sales Order
- Search Sales Invoice
- Search Sales Return
- Search Purchase GRN
- Search Delivery Order
KO For
KO tabs are dynamically enabled by company flow configuration for line-level conversion:
- Sales Order
- Sales Invoice
- Sales Return
- Purchase GRN
In this applet, KO refers to Knock-Off linkage, where source document quantities are linked and consumed against outbound delivery lines.
This allows your team to reuse upstream document context instead of re-entering line details.
Line Items Overview
The Line Items menu gives cross-document visibility of outbound line performance.
You can review key line-level data such as:
- Delivery Order numbers (tenant/company/branch document numbers)
- Item code and item name
- Ordered quantity, unit price, tax, and transaction amount
- Customer name/code and date traces
- Totals row for quantity and monetary fields
This view is useful for reconciliation, exception review, and operational follow-up.

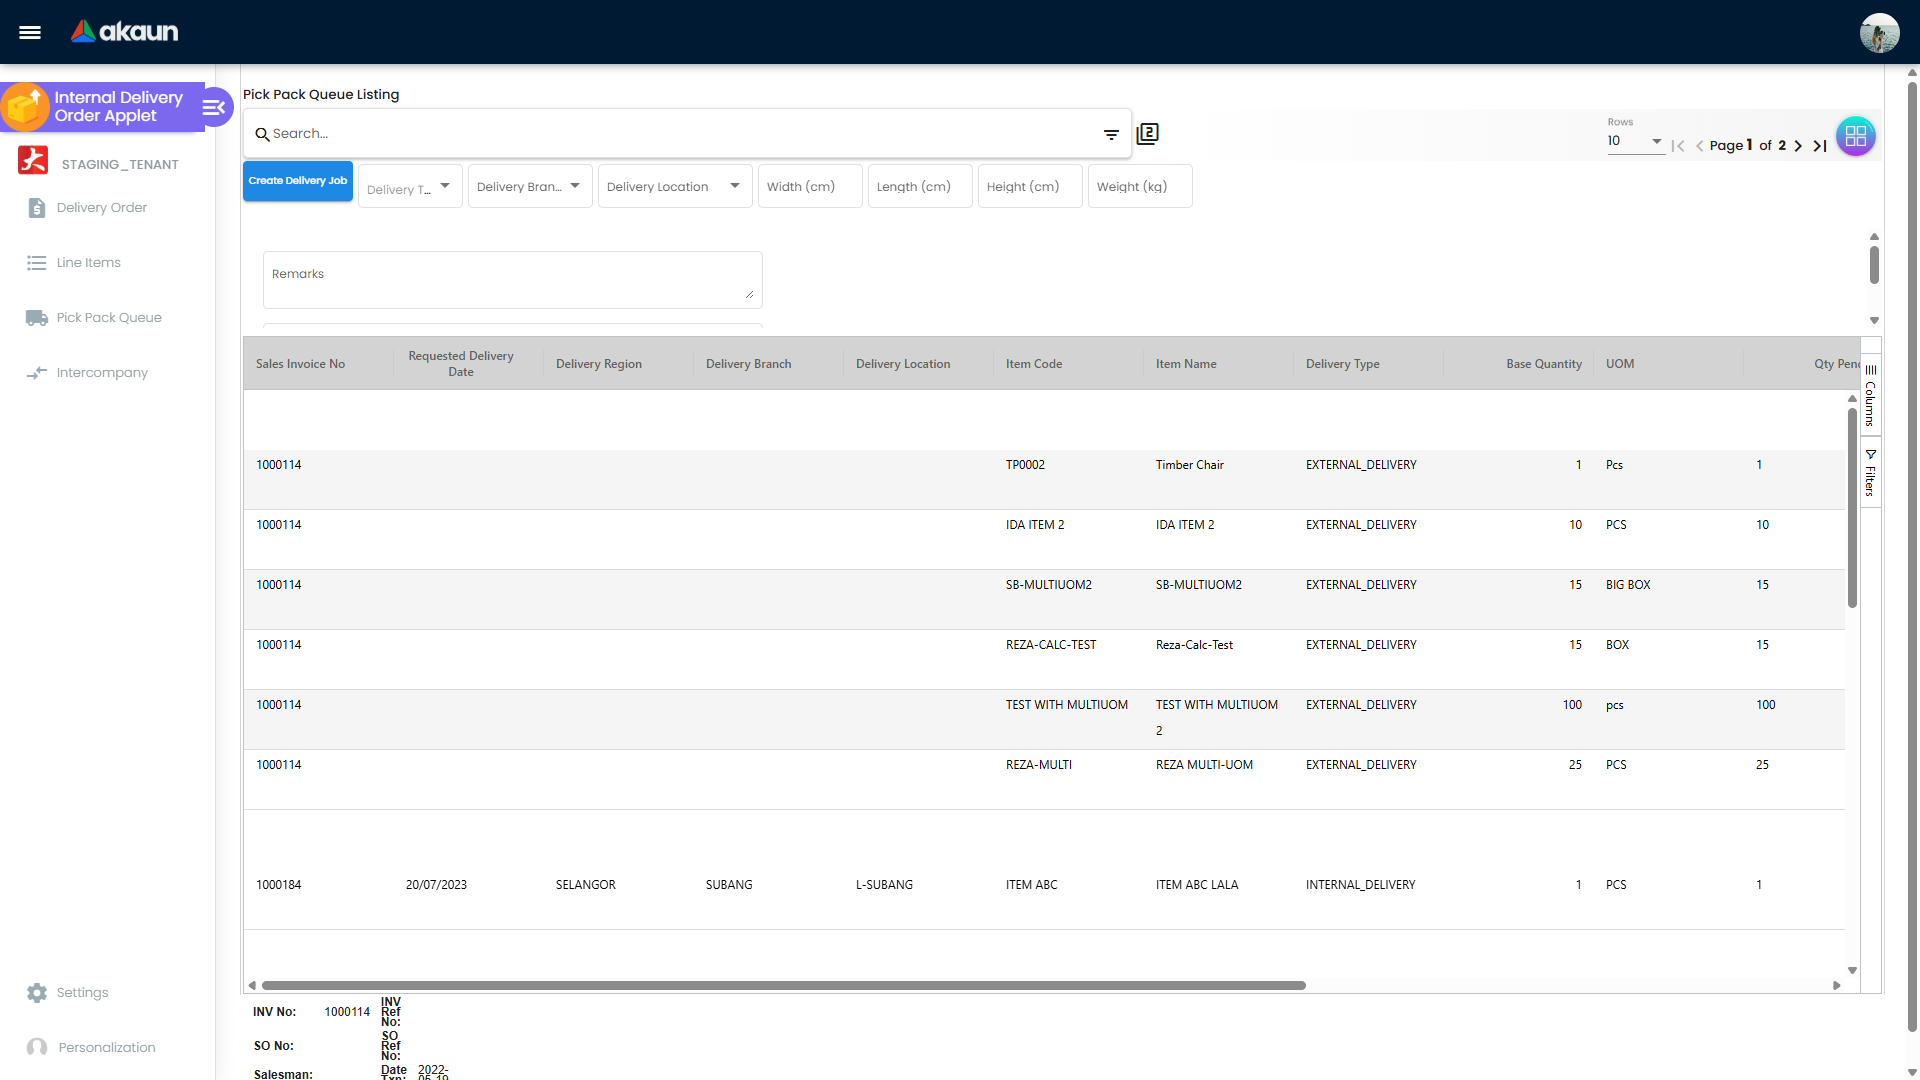
Pick Pack Queue and Delivery Jobs
The queue is purpose-built for dispatch execution.
What it supports:
- Multi-row selection grouped by document
- Quantity-to-deliver entry with balance checks
- Delivery region/branch/location visibility
- Ready-to-ship conversion into delivery jobs
- Shipment metadata capture (dimensions, remarks, content)
Validation behavior:
- Prevents invalid quantity edits beyond pending balance
- Enforces delivery type consistency
- Enforces delivery branch/location consistency before job creation
Intercompany Transaction Tracking
The Intercompany menu provides two streams:
- Inbound (
UNPROCESSED,PROCESSED) - Outbound (
UNPROCESSED,PROCESSED)
This structure helps operations separate items requiring action from completed intercompany links.
Workflow and Status Control
Workflow Settings
Under Settings > Workflow Settings, process owners can:
- Create company workflow mapping
- Assign process header and description per company
- Maintain workflow records for the internal outbound delivery doc type
Custom Status
Under Settings > Custom Status, admins can configure:
- Up to 5 custom status groups
- Header and line activation per status group
- Status lists with name, description, and default flag
Posting and action control
From edit/listing behavior, the applet supports controlled transitions such as:
- Save (Draft/Active updates)
- Final
- Void
- Discard
- Close
Visibility of actions is configurable via applet settings and client-side permissions.
Printable and Email Automation
Printable Format Settings
Under Settings > Printable Format Settings:
- Upload
.jrxmlformat files - Maintain format code and format name
- Set default selection
- Edit or delete existing formats
Email Template
Under Settings > Email Template:
- Create/edit template code and body content
- Link template to printable format GUID
- Use listing action Send Email with recipient options: Billing and Shipping Email, Billing Email Only, or Shipping Email Only
This enables controlled outbound communication directly from document listing.
Branch-Level Controls
Under Settings > Branch Settings, each branch can maintain:
- Branch Details (including rounding and default sales agent fields)
- Item Category Filter (multi-level category controls)
- Pricing Scheme with priority/level
- Branch Default Printable Format (including header/footer)
- Default Settlement Method mapping
This helps enforce localized operational rules while preserving a shared global workflow.
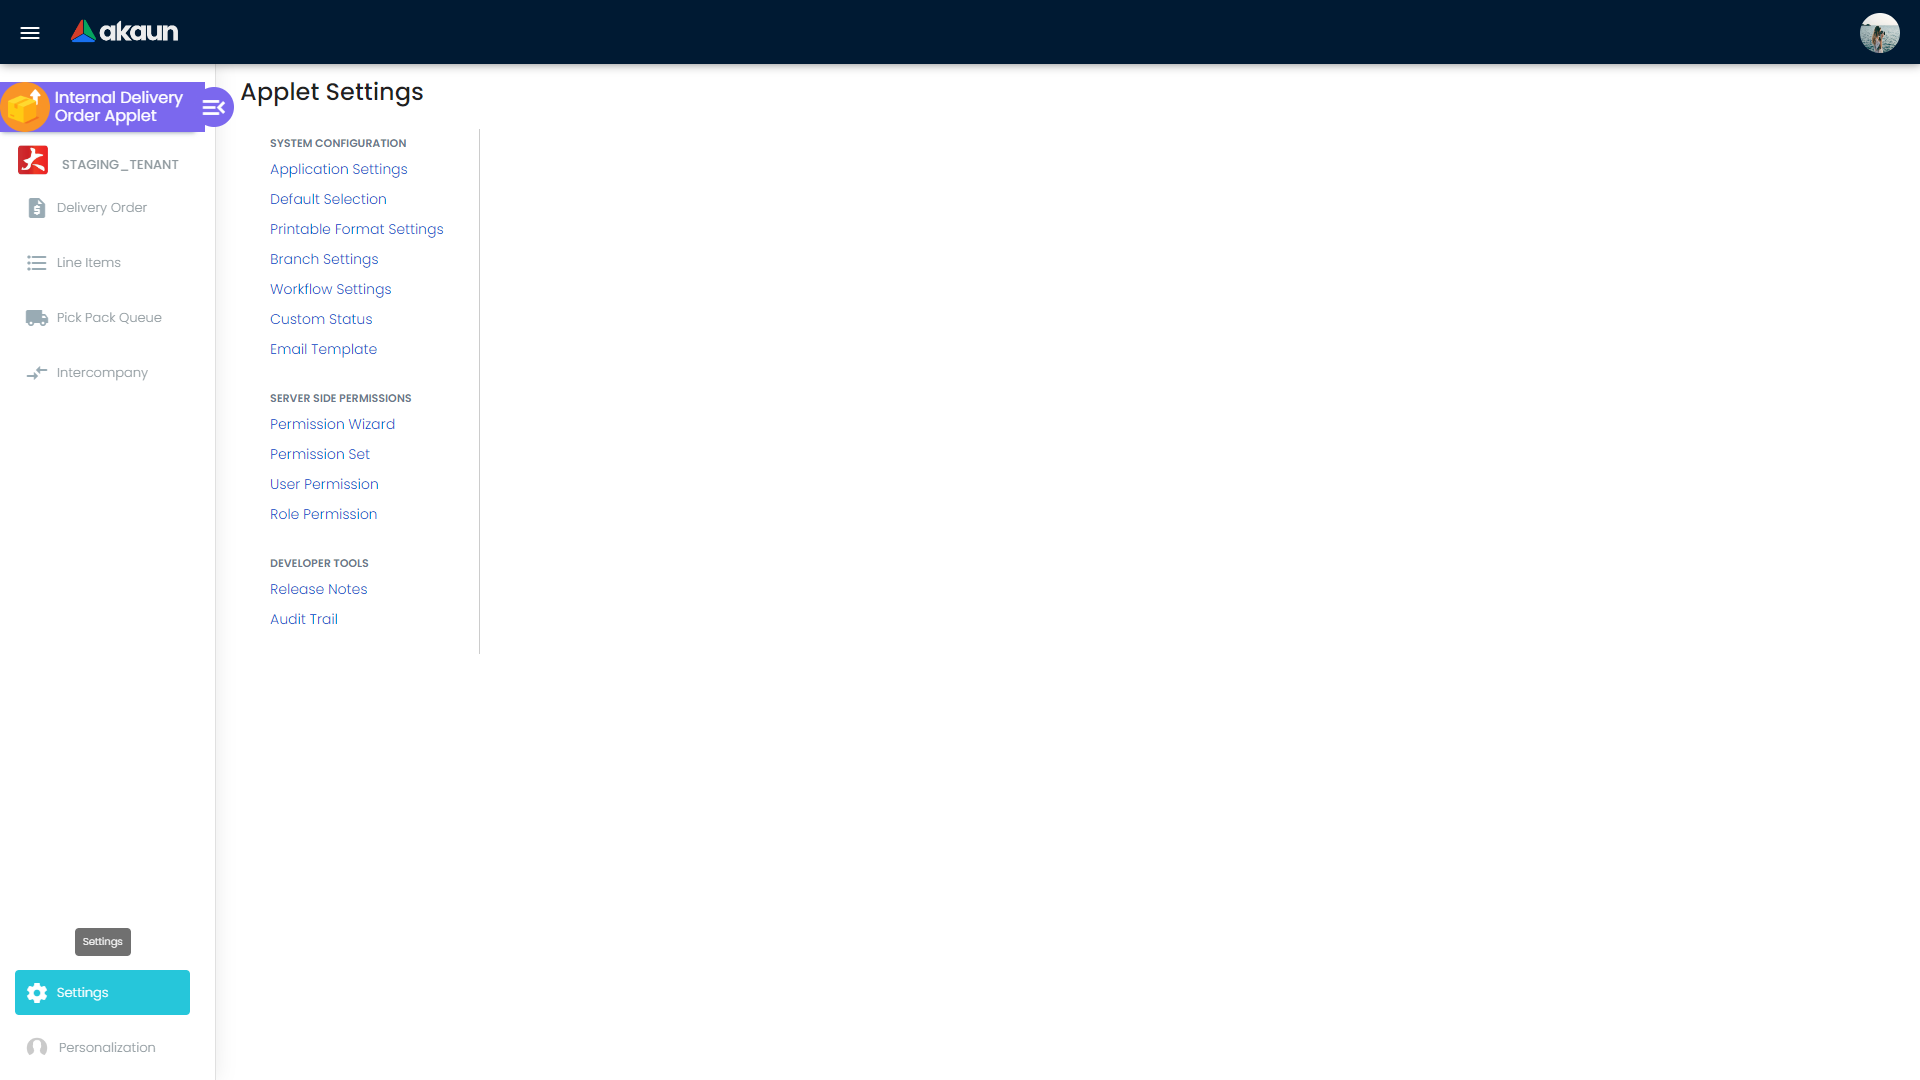
Configuration & Settings
| Path | What It Controls | Typical Outcome |
|---|---|---|
Settings > Application Settings | Default branch/location/company and detail panel order | Faster data entry and consistent user navigation |
Settings > Default Selection | Baseline app behavior per tenant | Standardized defaults across teams |
Settings > Printable Format Settings | JRXML print templates and default format | Consistent document output for operations and customers |
Settings > Branch Settings | Branch-level pricing, settlement, category filters, print defaults | Branch-appropriate rules without custom coding |
Settings > Workflow Settings | Company-to-process mapping for doc flow | Controlled approvals/state handling by process |
Settings > Custom Status | Custom header/line statuses | Better operational visibility beyond system statuses |
Settings > Email Template | Template text and print linkage | One-click, reusable delivery communication |
Settings > Applet Log | Audit trail entry point | Better traceability and compliance review |
Personalization > Default Selection | User-level default branch/location and grid toggle mode | Faster daily execution per user |
Personalization > Sidebar | Personal sidebar behavior | Cleaner per-user navigation |
Permissions and Menu Visibility
The applet combines client permission codes and setting flags to decide menu visibility:
- Permission-based allow flags:
SHOW_LINE_ITEMS_MENU,SHOW_PICK_PACK_QUEUE_MENU,SHOW_INTERCOMPANY_MENU - Setting-based hide flags:
HIDE_LINE_ITEMS_MENU,HIDE_PICK_PACK_QUEUE_MENU,HIDE_INTERCOMPANY_MENU
If a user reports missing menus, validate both role permissions and setting flags together.
High-Impact Setting Flags
Commonly used setting flags include:
HIDE_LINE_ITEMS_MENU,HIDE_PICK_PACK_QUEUE_MENU,HIDE_INTERCOMPANY_MENUVERTICAL_ORIENTATION,DEFAULT_ORIENTATIONENABLE_MULTIPLE_KO,SHOW_KO_FOR_SELECTED_BRANCHENABLE_SERIAL_NUMBER_VALIDATION_FINALDEFAULT_TRANSACTION_DATE,DEFAULT_POSTING_STATUSHIDE_*tab/field toggles for operational simplification
Use these carefully in UAT before production rollout to avoid unexpected behavior for end users.
Personalization
Personal Default Selection
Users can define:
- Default branch
- Default location
- Default company
- Column toggle preference
This reduces repeated manual selections in daily work.
Sidebar Preferences
Users can personalize sidebar behavior to keep the most-used functions accessible with less navigation overhead.
FAQ
Q: Why can’t I see some search or KO tabs?
A: These tabs are controlled by applet settings and company KO flow configuration. If disabled (HIDE_* flags or KO flow not enabled), they will not appear.
Q: Why is the Create button disabled in Delivery Order Listing?
A: This is usually permission-driven. Check your role/client action permissions and whether listing actions are hidden by applet setting flags.
Q: Why is the Final button unavailable for my document?
A: Final action visibility depends on document state, posting status, lock status, and user/client-side permissions.
Q: Why did Create Delivery Job fail in Pick Pack Queue?
A: The queue validates delivery type consistency, delivery branch/location consistency, and quantity-to-deliver limits against pending balance.
Q: Why am I unable to edit a document that appears in listing?
A: The document may be read-only due to user lock, state restrictions, or because it is already posted/closed per your workflow controls.
Q: Why did KO/Search Document return no lines for a source document?
A: Common reasons are no remaining balance for KO, source document status not eligible for conversion, or branch/company context mismatch.
Q: Can we use different print templates by branch?
A: Yes. Configure global templates in Printable Format Settings, then assign branch-level default printable format under Branch Settings.
Q: How do we send delivery documents by email without manual formatting?
A: Create Email Templates, link each template to a printable format, then use the listing’s Send Email action with the desired recipient option.
Q: Why can’t some users see Settings or Intercompany menus?
A: Menu visibility is controlled by applet flags (for example HIDE_*_MENU) and role-level access rights. Validate both when onboarding new users.
Q: Can we rearrange the detail sections in edit mode?
A: Yes. Use Settings > Application Settings to reorder the detail tab/panel sequence for the applet.