Internal Purchase GIN Applet
Purpose and Overview
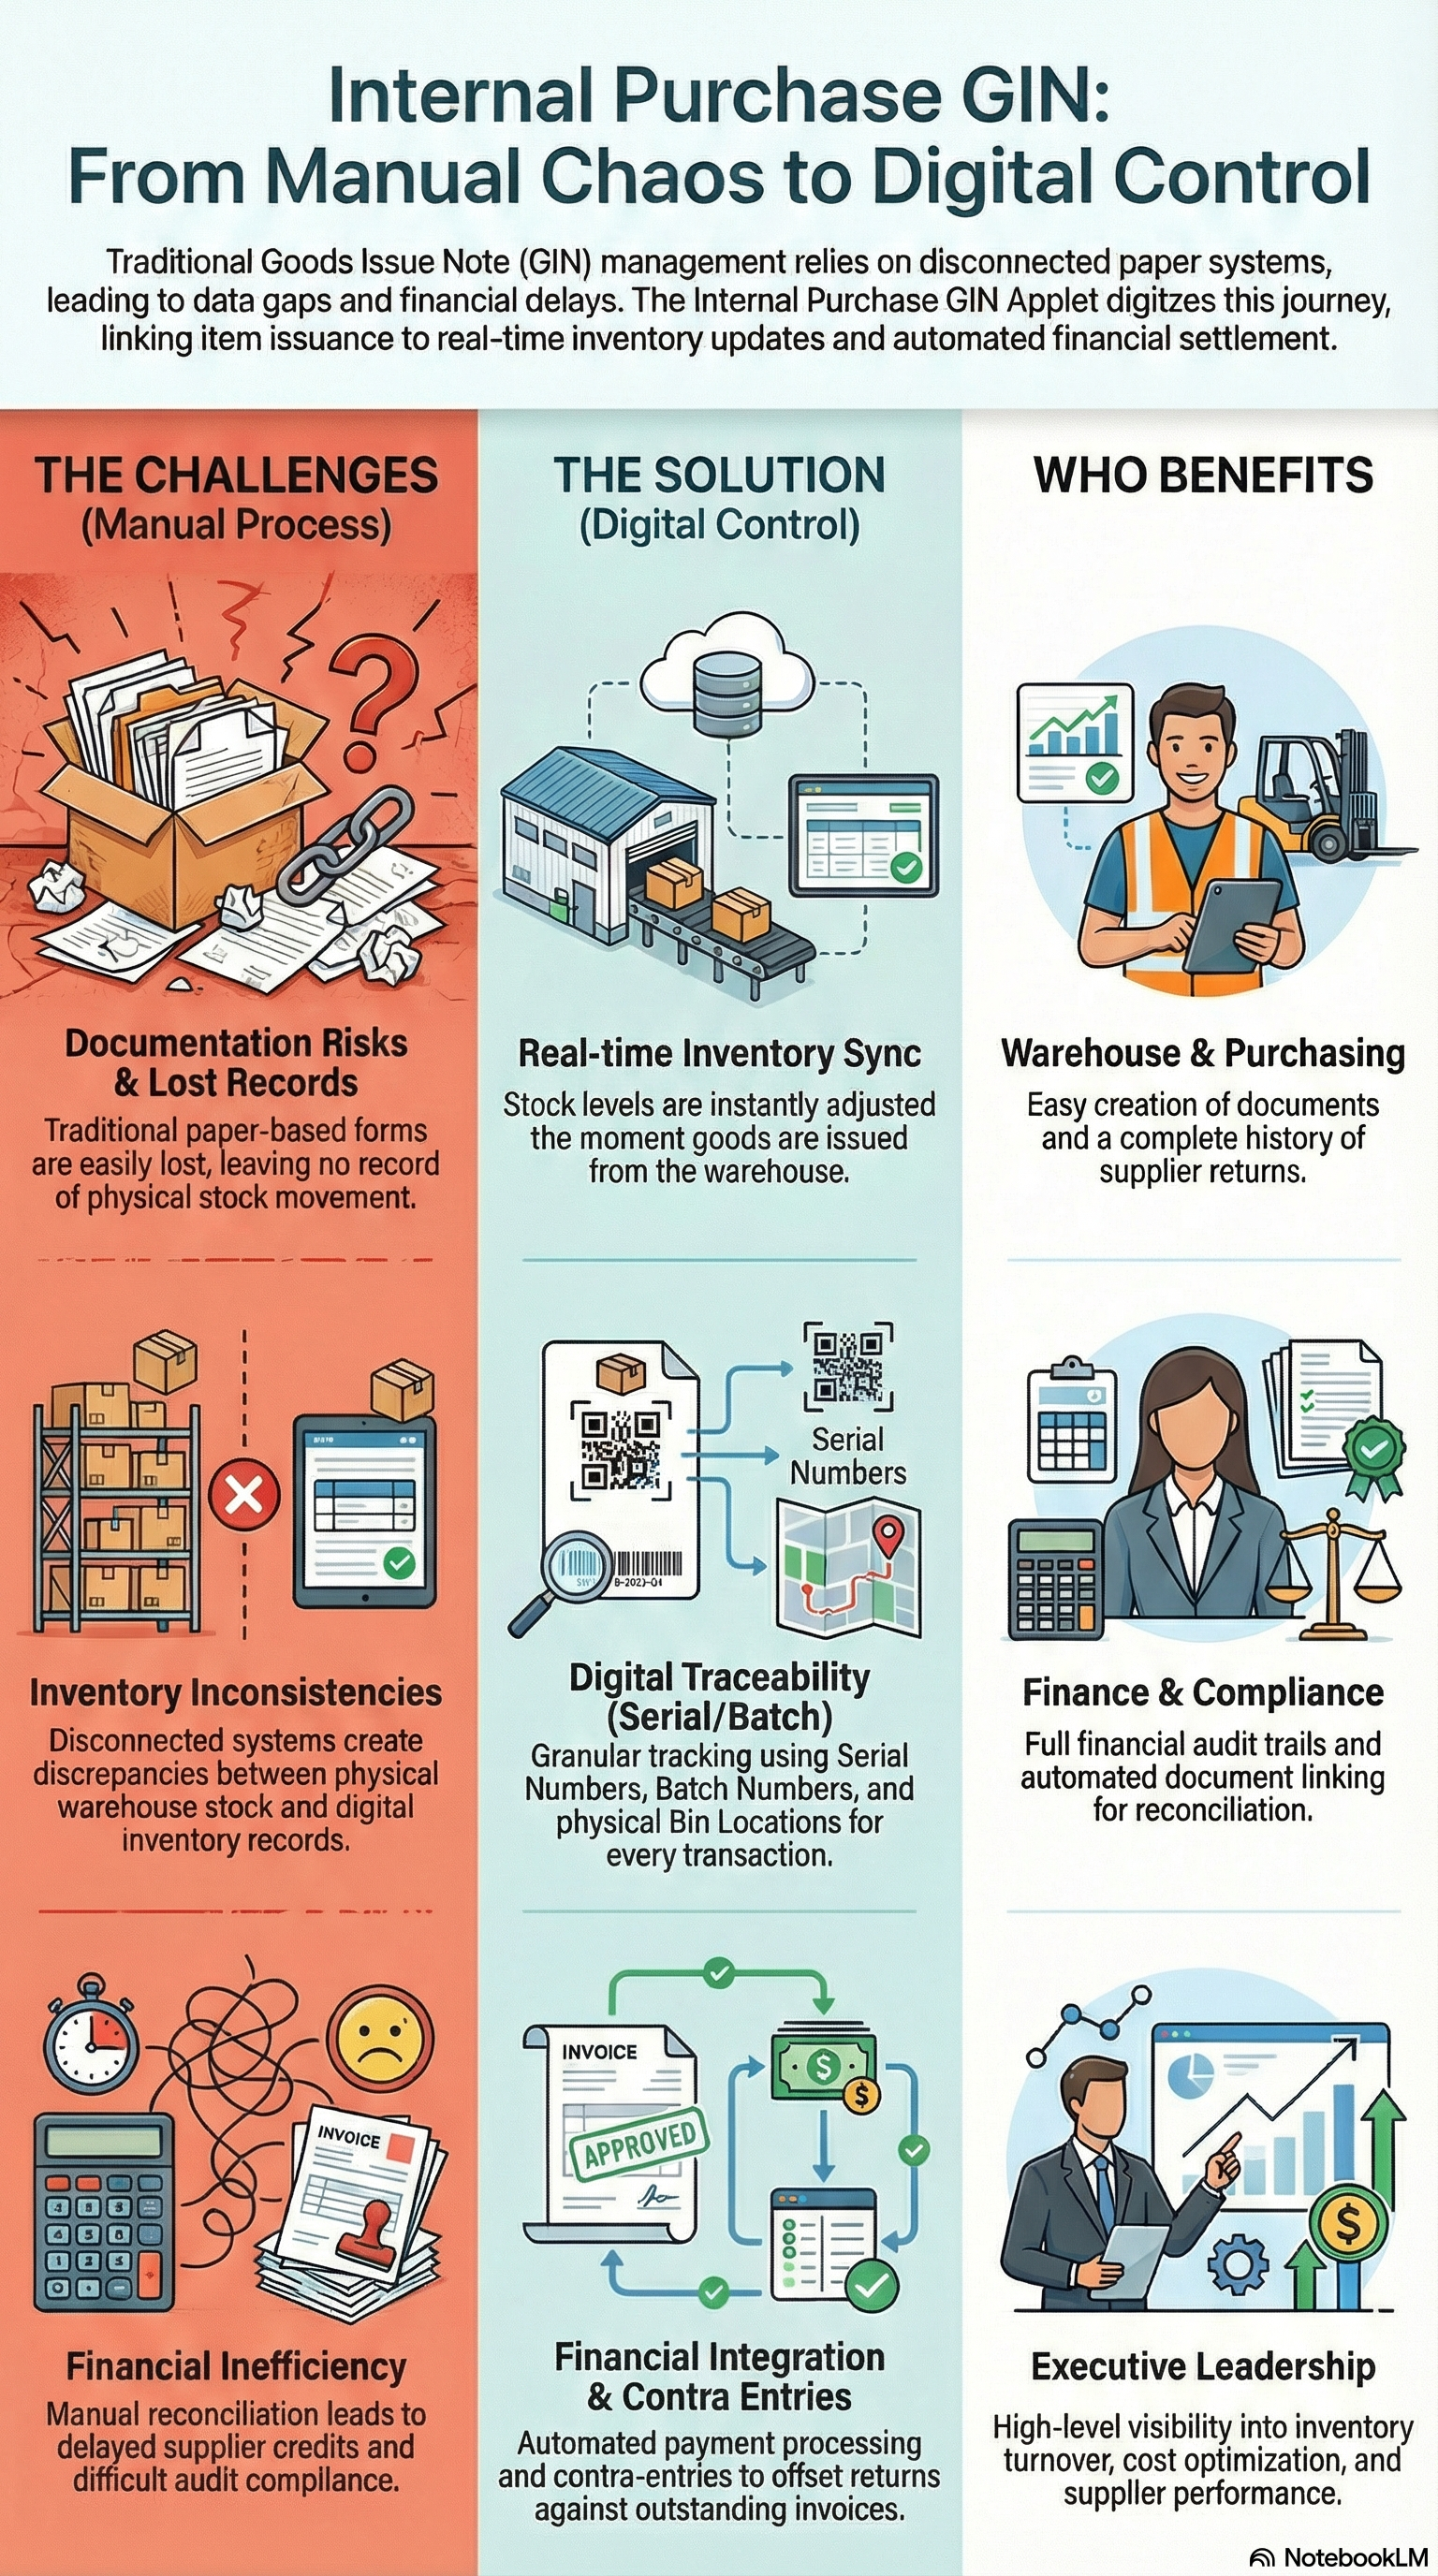
The Internal Purchase GIN Applet is a powerful tool designed to streamline the management of Goods Issue Notes (GIN) for purchase-related transactions. It enables warehouse and purchasing teams to document and track the release of goods from inventory, whether for supplier returns, transfers, or other purchase-related dispatches.
Key Features Overview
Who Benefits from This Applet?
Warehouse Staff:
- Easy creation of goods issue documents
- Real-time inventory tracking
- Serial number and batch management
- Bin location tracking
- Clear picking and dispatch workflows
Purchasing Teams:
- Complete supplier transaction history
- Efficient return-to-supplier processing
- Purchase order integration
- Document traceability
Inventory Managers:
- Real-time stock level updates
- Accurate inventory adjustments
- Batch and serial number tracking
- Warehouse location management
- Stock movement audit trail
Finance Teams:
- Automated payment processing
- Contra entry management
- Complete financial audit trail
- Supplier settlement tracking
- Document linking for reconciliation
Procurement Managers:
- Supplier performance tracking
- Return pattern analysis
- Cost control and monitoring
- Process efficiency insights
Executive Leadership:
- Inventory turnover visibility
- Supplier relationship insights
- Operational efficiency metrics
- Cost analysis and optimization
What Problems Does This Solve?
The Manual GIN Process Problem:
Traditional goods issue management relies on paper forms and disconnected systems. Common issues include:
- Lost dispatch documentation
- Inventory record inconsistencies
- Delayed supplier credits
- No visibility into stock movements
- Manual financial reconciliation
- Difficult audit compliance
The Internal Purchase GIN Applet Solution:
- Digital processing - Create and track GINs from anywhere with real-time updates
- Automated workflows - Intelligent routing and inventory updates
- Real-time inventory sync - Instant stock adjustments when goods are issued
- Financial integration - Automatic payment and contra processing
- Complete traceability - Full audit history for every transaction
- Flexible reporting - Analyze by supplier, item, or warehouse
- Multi-location support - Handle dispatches across branches and warehouses
Key Features Overview

📋 Admin Setup Checklist
Setting up the GIN system for the first time? Complete these steps in order:
- Step 1: Review Before You Begin business decisions (20 mins)
- Step 2: Configure Default Settings → Guide
- Step 3: Set Up Field Visibility → Guide
- Step 4: Configure Item Master Data (ensure batch/serial tracking enabled where needed)
- Step 5: Set Up Warehouse Bin Locations (if using bin management)
- Step 6: Design Print Templates → Guide
- Step 7: Assign User Permissions → Guide
- Step 8: Configure Webhooks (if integrating with external systems) → Guide
- Step 9: Test with Dummy GIN → Guide
- Step 10: Train warehouse and purchasing staff
- Step 11: Go Live! 🎉
Estimated time: 2-3 hours for basic setup, 5-6 hours for advanced configuration
Before You Begin
Before configuring the GIN system, make these key business decisions. These choices will shape how your entire goods issue process works:
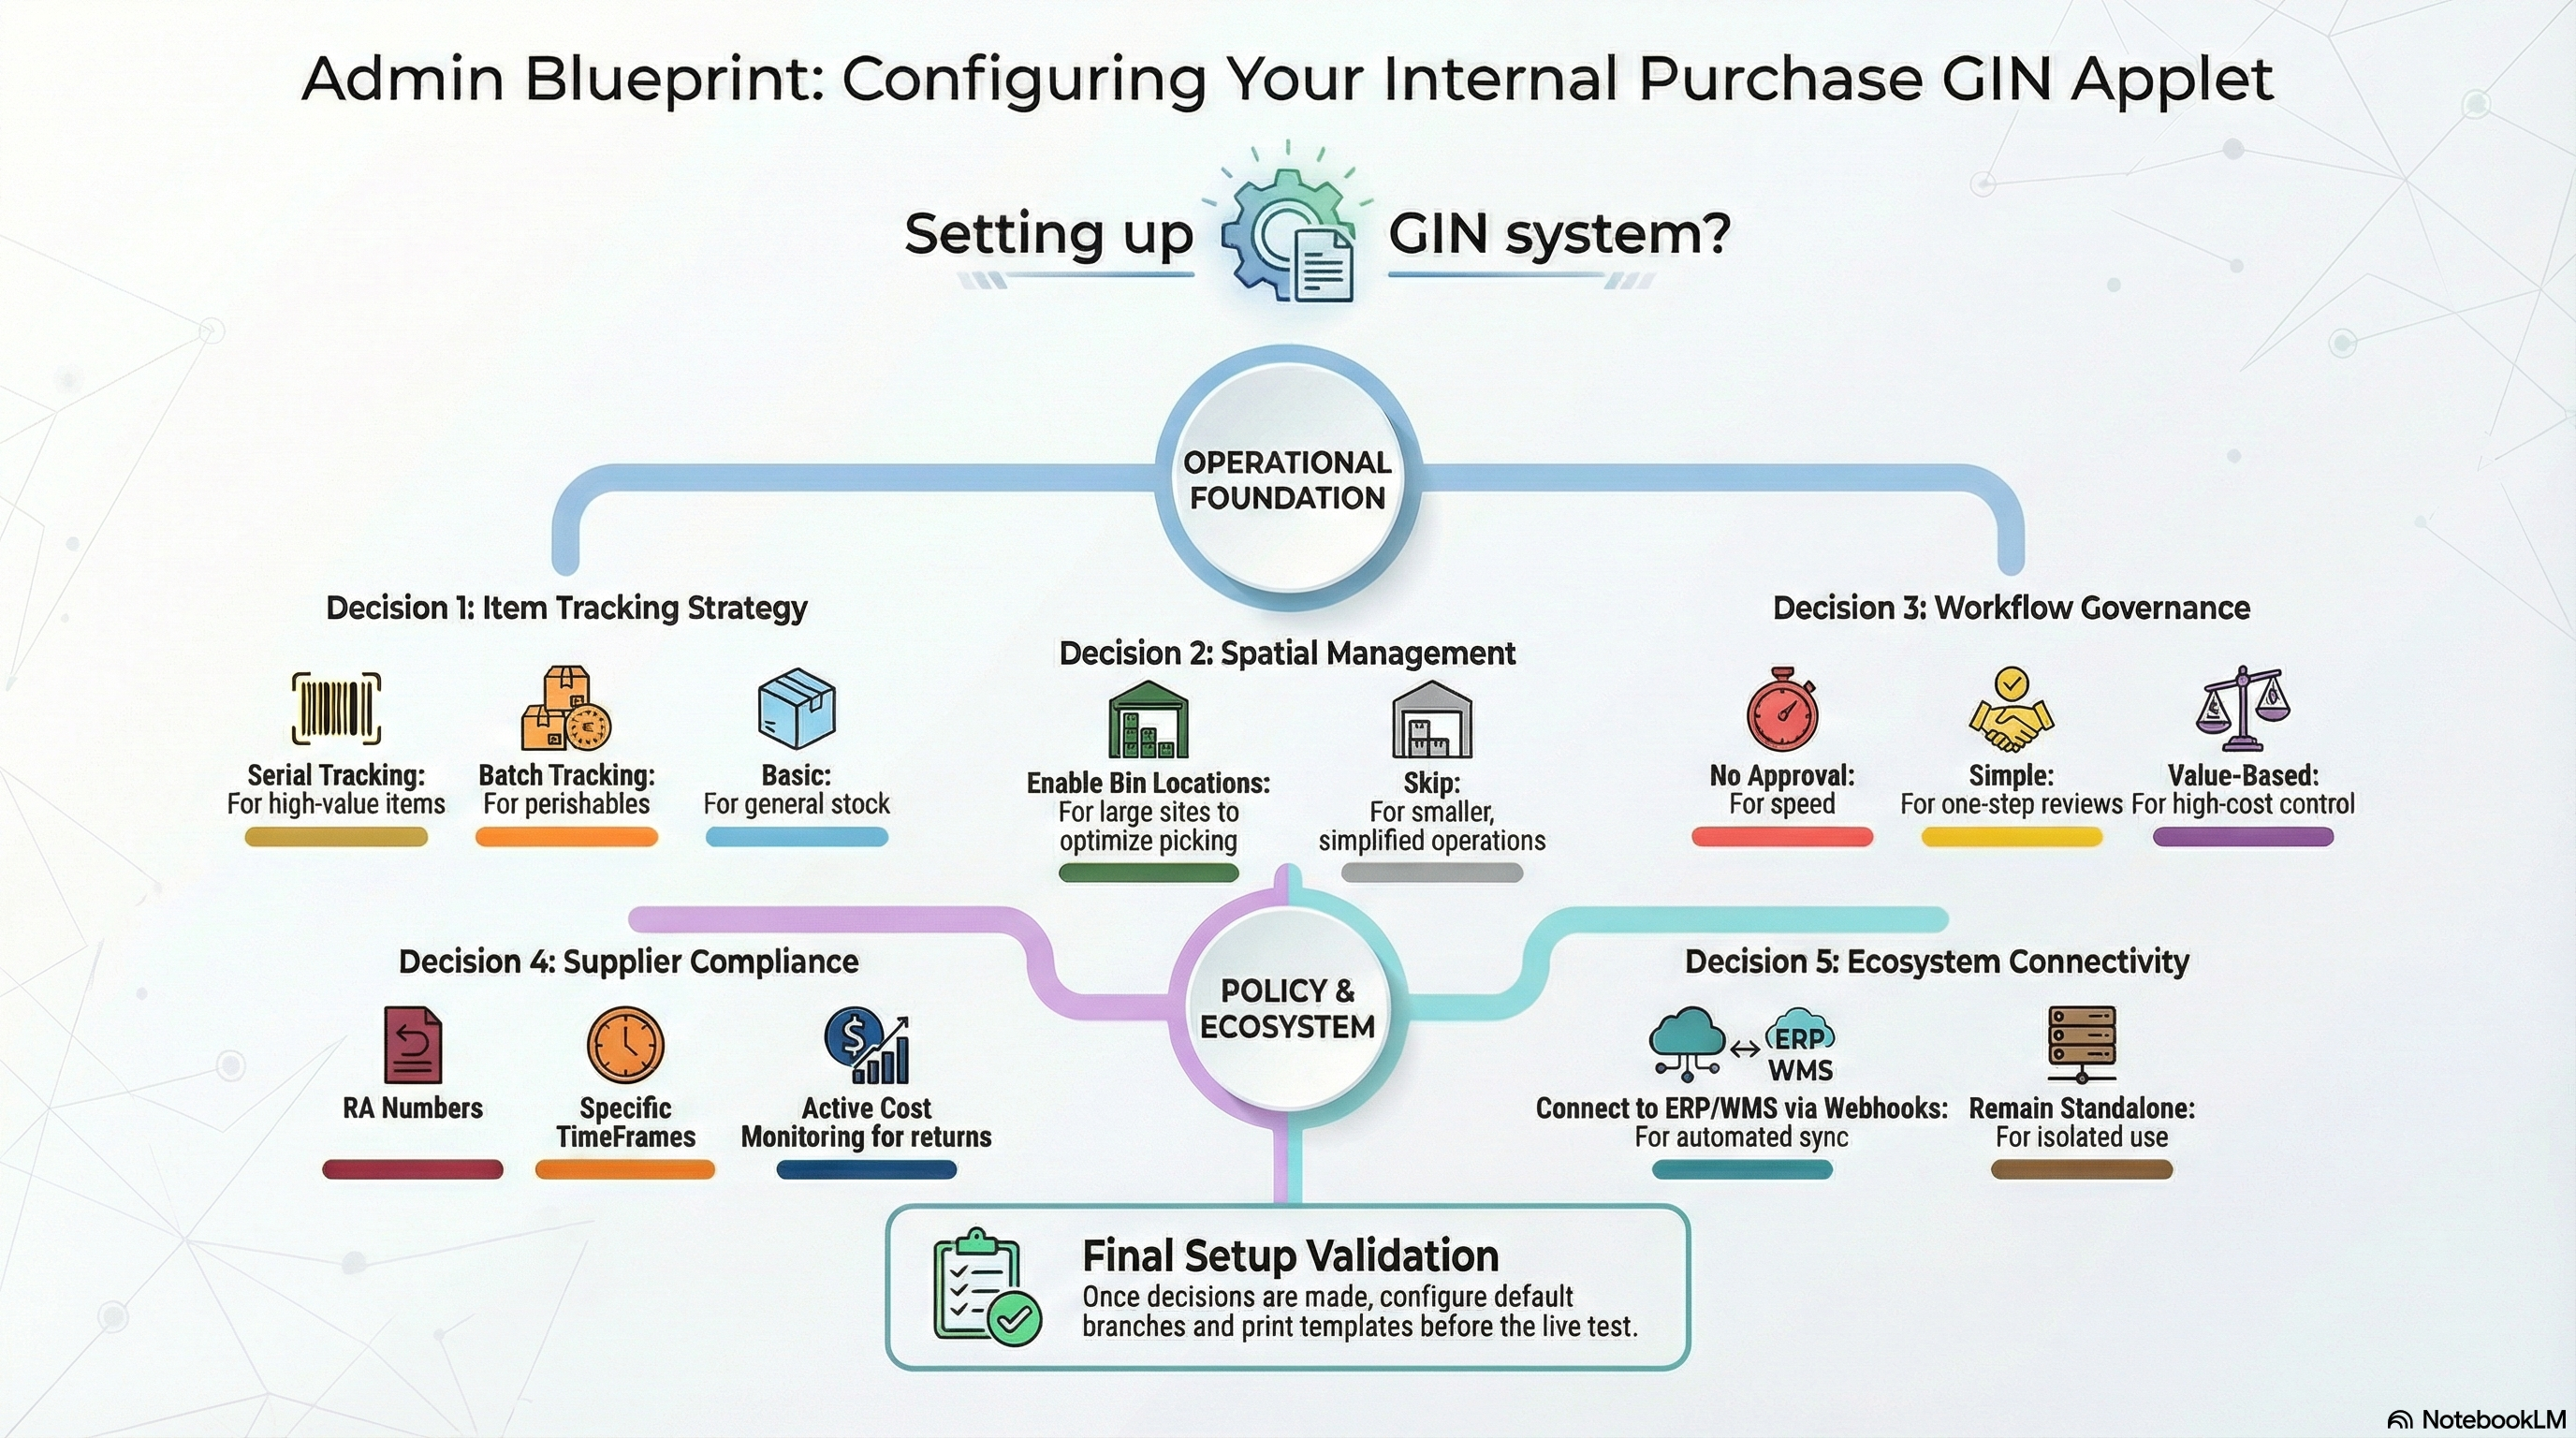
1. Define Your Inventory Tracking Requirements
Decision: What level of traceability do you need?
Common Options:
- Basic Tracking: Item code and quantity only (simple, fast)
- Batch Tracking: Group items by production batch (food, pharmaceuticals, chemicals)
- Serial Number Tracking: Individual unit tracking (electronics, machinery, high-value items)
- Full Traceability: Serial + Batch + Bin Location (regulatory compliance, complex warehouses)
Why This Matters: More tracking = better control but slower processes. Match tracking level to your business needs and compliance requirements.
Decision Framework:
| Product Type | Recommended Tracking | Reason |
|---|---|---|
| Electronics, Machinery | Serial Numbers | Individual unit warranty and support |
| Food, Pharma, Chemicals | Batch Numbers | Recall capability, expiry management |
| Bulk Commodities | Basic (Qty only) | Not cost-effective to track individually |
| High-Value Items | Serial + Bin Location | Security and precise location |
| Regulated Products | Full Traceability | Compliance requirements |
2. Decide on Bin Location Management
Decision: Will you track physical warehouse locations?
Common Options:
- No Bin Management: Single warehouse, small inventory (simple)
- Basic Bins: Aisle and shelf only (medium warehouse)
- Advanced Bins: Aisle, shelf, level, position (large warehouse, multiple zones)
- Dynamic Bins: System suggests optimal pick locations (automated warehouses)
Why This Matters: Bin management reduces picking errors and speeds fulfillment, but requires upfront setup and ongoing maintenance.
When to Use Bin Management:
✓ Warehouse > 5,000 sq ft
✓ Multiple aisles/zones
✓ High SKU count (> 500 items)
✓ Multiple warehouse staff (prevent picking conflicts)
✓ FIFO/FEFO inventory rotation needed
3. Plan Approval Requirements
Decision: Do GINs need approval before inventory adjusts?
Common Structures:
No Approval (Trusted Staff):
Warehouse Staff Creates GIN → Submits → Inventory Adjusted Immediately✓ Fast processing
✓ Less overhead
✗ Risk of errors
Simple Approval:
Staff Creates GIN → Warehouse Supervisor Approves → Inventory Adjusted✓ Basic oversight
✓ Catch obvious errors
Value-Based Approval:
< RM 5,000: Auto-approved
RM 5,000-20,000: Warehouse Supervisor
> RM 20,000: Operations Manager + Finance
✓ Focus oversight on high-value transactions
✓ Balance speed with control
Why This Matters: More approvals = better control but slower processing. Returns to suppliers may be time-sensitive.
4. Determine Supplier Return Policies
Decision: What are your standard supplier return procedures?
Key Questions:
- Do you need supplier Return Authorization (RA) numbers before creating GINs?
- How long do suppliers give you to return defective goods? (7/30/90 days)
- Who handles return shipping costs? (You vs. supplier)
- Are restocking fees charged by suppliers?
- How are credits processed? (Credit note, contra, replacement)
Document Your Policy: Create internal procedures:
- When warehouse finds defect → Contact purchasing
- Purchasing requests RA from supplier
- RA received → Create GIN (reference RA number)
- Pack goods with GIN printout
- Ship to supplier RMA center
- Follow up for credit note (typical: 30-60 days)
Pro Tip: Maintain a “Supplier Return Policy” document with specific procedures for each major supplier.
5. Choose Integration Approach
Decision: How will GIN system integrate with other systems?
Common Integrations:
| System | Purpose | Method |
|---|---|---|
| ERP | Financial posting, inventory sync | Webhook or API |
| Warehouse Management System (WMS) | Real-time stock updates | Direct integration |
| Supplier Portal | Auto-notify suppliers of returns | Webhook + email |
| Issue Tracking | Link GINs to support tickets | Issue Link feature |
| Courier System | Auto-generate shipping labels | API integration |
Why This Matters: Integrations reduce manual data entry and improve accuracy, but require IT resources to set up and maintain.
Start Simple: Begin with manual processes, add integrations as you identify bottlenecks.
Quick Start Guide
Get up and running quickly with these essential workflows.
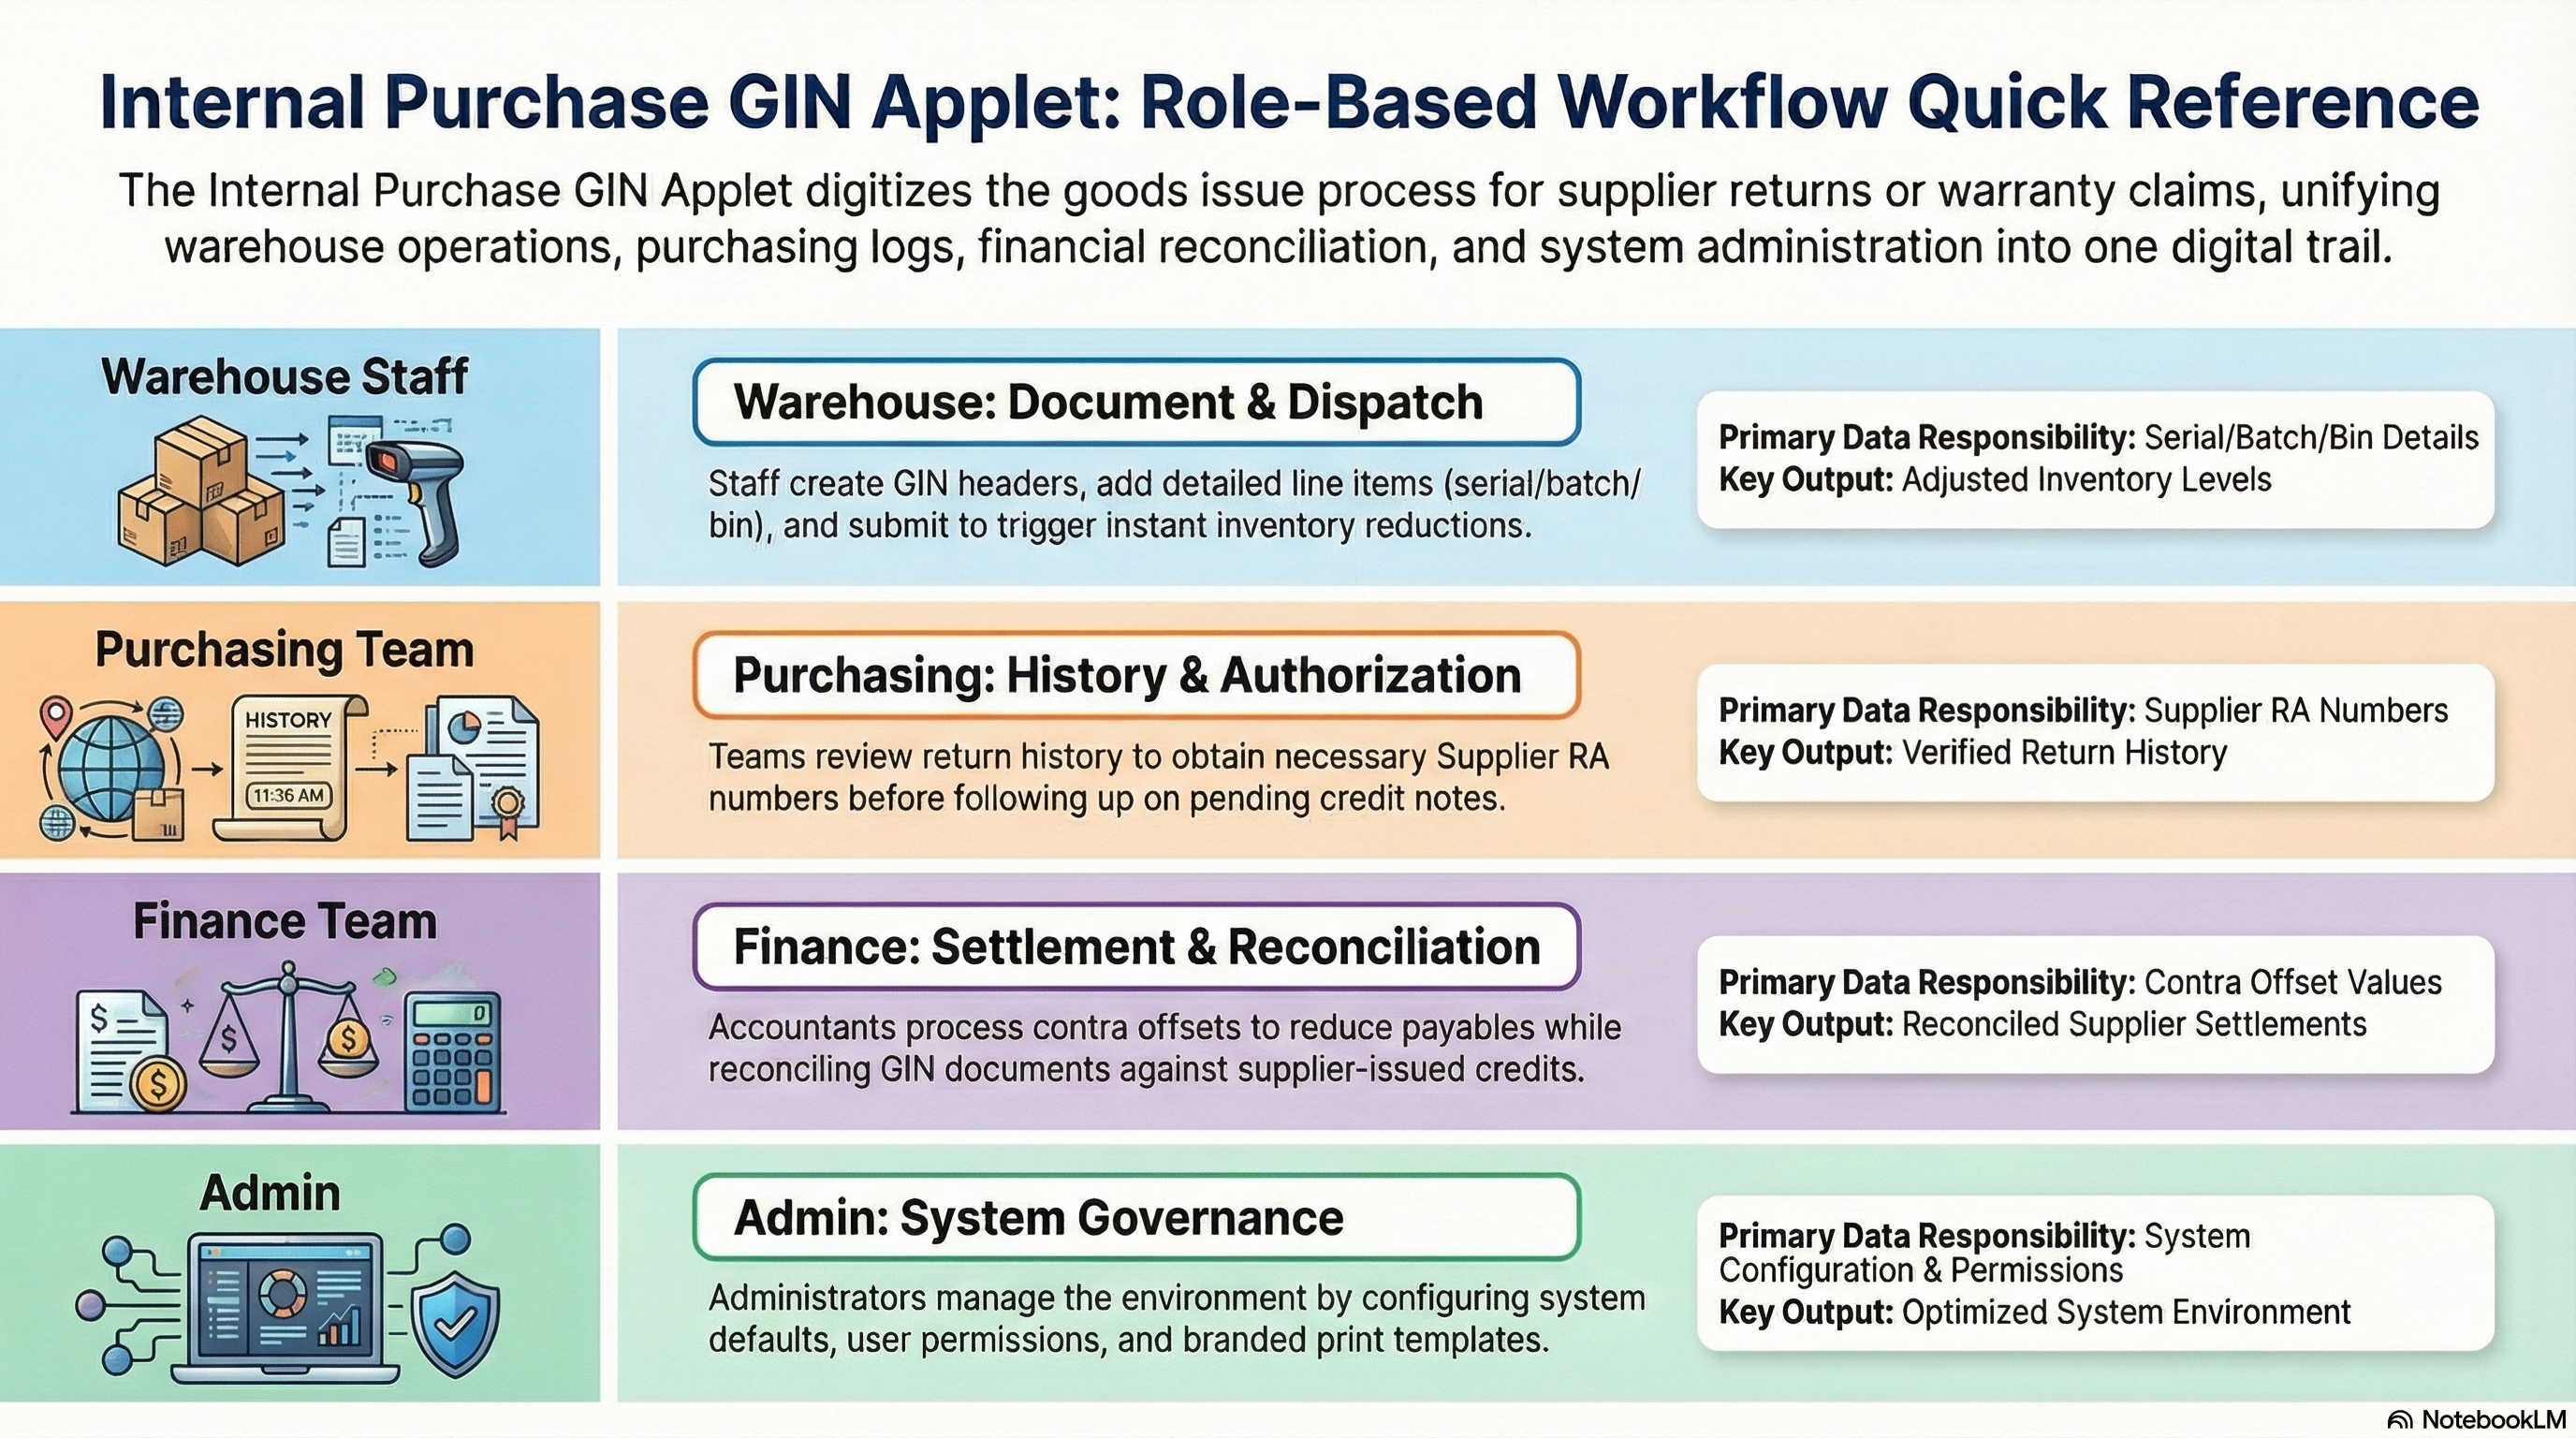
For Warehouse Staff: Create Your First GIN
Goal: Issue goods from warehouse in 5 simple steps.
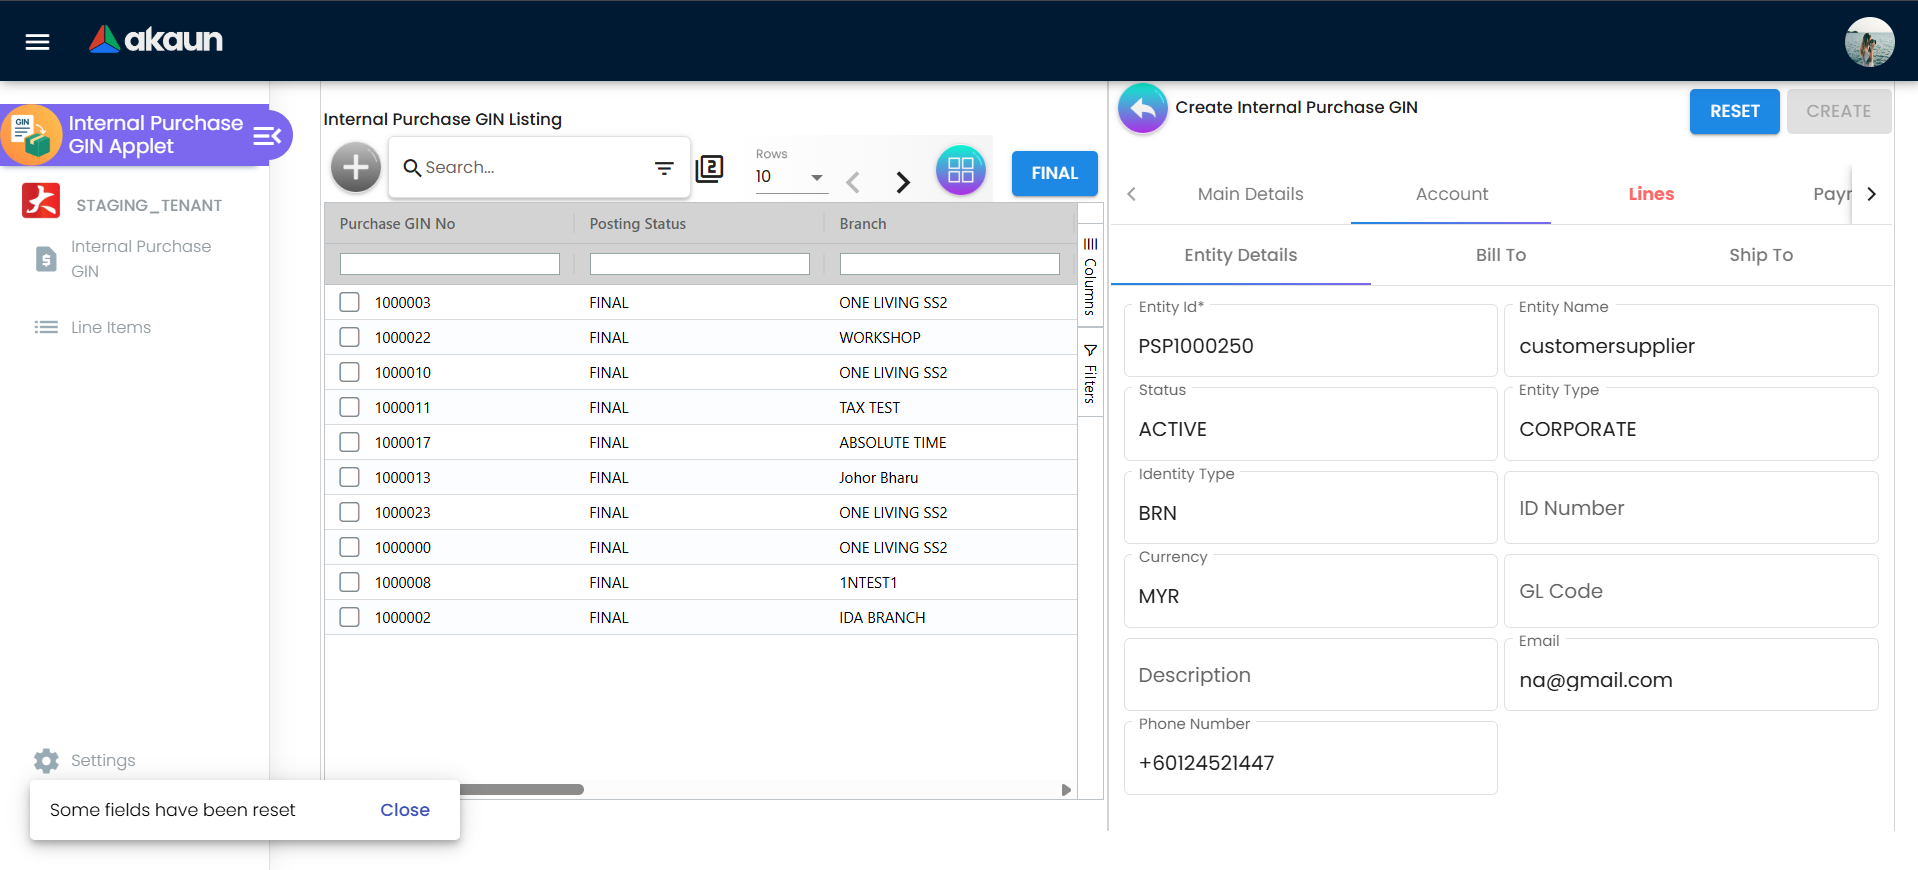
- Navigate: Go to Internal Purchase GIN from the sidebar
- Create Header: Click "+" → The create form opens
- Main Details Tab:
- Select Branch (issuing location)
- Set Transaction Date
- Select Currency
- Choose Purchaser (person responsible)
- Add Reference and Remarks (optional)
- Account Tab:
- Select Supplier (destination account)
- Choose Bill To address
- Choose Ship To address
- Lines Tab:
- Click “Add Line”
- Select Item to issue
- Enter Quantity
- Add Serial Numbers (if applicable)
- Add Batch Numbers (if applicable)
- Specify Bin Location (if using bin management)
- Add Pricing Details
- Review & Submit:
- Verify all details
- Click Submit or Save as Draft
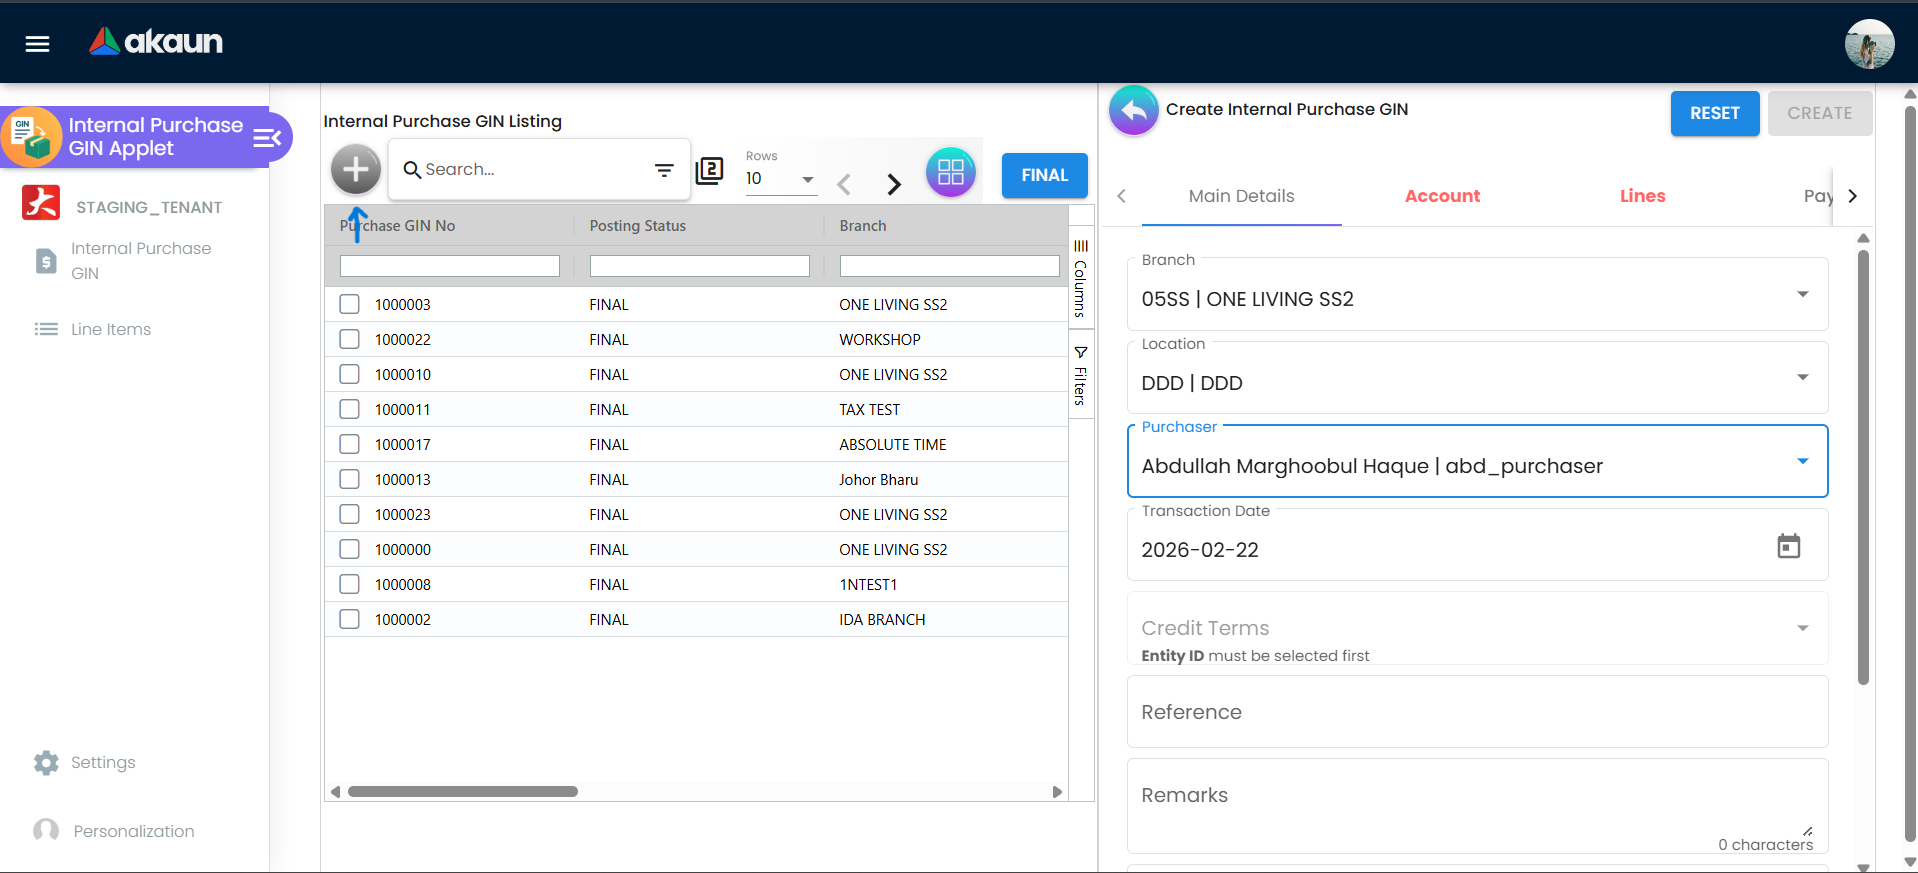
What happens next? Inventory is automatically adjusted, and the GIN document is available for printing and supplier reference.
For Purchasing Team: Track Supplier Returns
Goal: Monitor goods returned to suppliers in 3 steps.
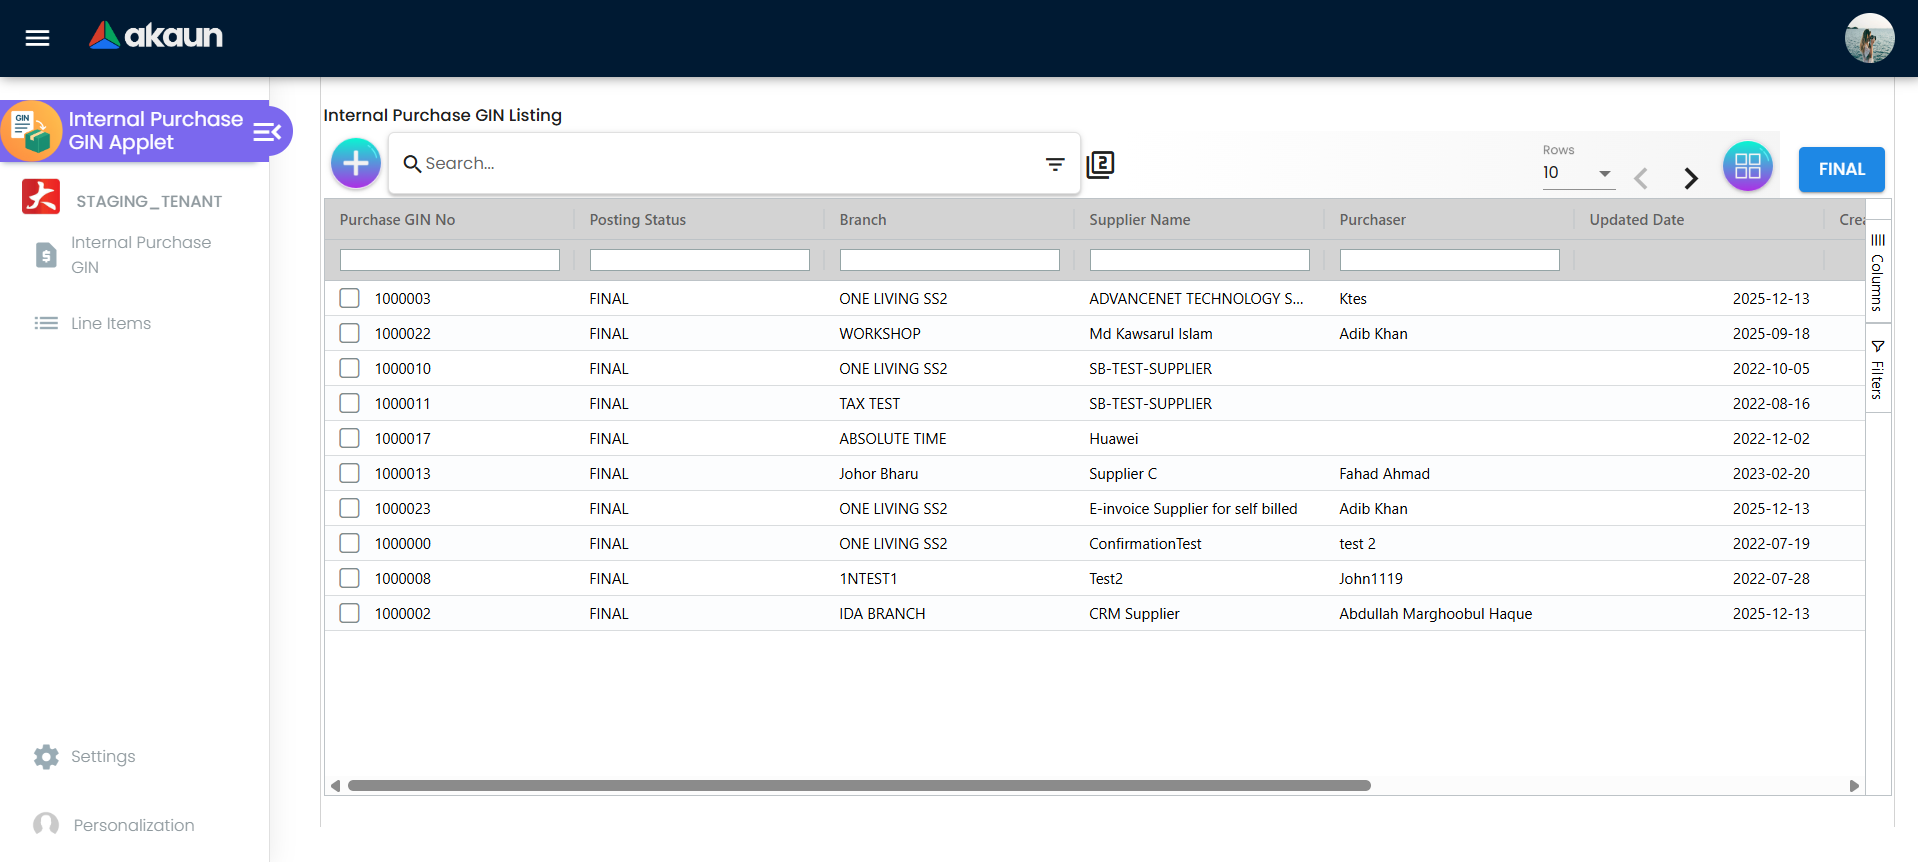
- Check Listing: Go to Internal Purchase GIN listing
- Filter by Supplier:
- Use Advanced Search
- Select specific supplier
- Filter by date range
- Review Details:
- Click on GIN to view full details
- Check line items and quantities
- Verify payment/credit status
- Print or export as needed
For Admins: Initial System Setup
Goal: Get the GIN system ready for warehouse operations in 6 steps.
Step 1: Configure Default Settings (Settings > Default Selection)
- Set default branch
- Set default currency
- Configure auto-numbering
Step 2: Configure Field Visibility (Settings > Field Settings)
- Enable/disable fields based on business needs
- Mark required fields
- Set field validations
Step 3: Design Print Templates (Settings > Printable Format Settings)
- Create GIN print layouts
- Add company logo and branding
- Configure what information appears
Step 4: Set Up Permissions (Settings > Permission Settings)
- Define who can create GINs
- Set approval requirements
- Configure access levels
Step 5: Configure Webhooks (Settings > Webhook) (Optional)
- Set up external system integrations
- Configure event triggers
- Test connectivity
Step 6: Test the Flow
- Create a test GIN
- Verify inventory update
- Check print format
- Confirm all workflows
New to the system? Start with the basics:
- Warehouse staff should explore Create GIN with test data
- Purchasing team should review GIN Listing and search capabilities
- Admins should complete Configuration & Settings before going live
Key Concepts
Understanding Purchase GIN
A Goods Issue Note (GIN) for purchases documents the release of goods from your warehouse related to purchase transactions. This typically includes returns to suppliers, warranty replacements, or goods dispatched as part of purchase agreements.
| Concept | Definition | Example |
|---|---|---|
| Purchase GIN | Document recording goods leaving warehouse for purchase-related reasons | Returning defective items to supplier |
| Line Item | Individual item and quantity on the GIN | 5 units of Product A returned |
| Supplier | The recipient account (typically the original supplier) | ABC Technologies Sdn Bhd |
| Batch Number | Production batch identifier for traceability | BATCH-2024-001 |
| Serial Number | Unique identifier for individual units | SN-12345-67890 |
| Bin Location | Physical warehouse location | Shelf A3, Row 5 |
GIN Document Structure
Understanding the document hierarchy helps you navigate the system efficiently:
Purchase GIN Header (Main Details)
│
├── GIN Number (auto-generated)
├── Branch (issuing location)
├── Transaction Date
├── Currency
├── Purchaser (responsible person)
├── Reference & Remarks
├── Permit Number & Tracking ID
│
├── Account (Supplier/Entity)
│   ├── Supplier Name
│   ├── Bill To address
│   └── Ship To address
│
├── Lines (Line Items)
│   ├── Item 1: Product, Quantity, Batch, Serial, Bin, Pricing
│   ├── Item 2: Product, Quantity, Batch, Serial, Bin, Pricing
│   └── Item 3: Product, Quantity, Issue Link
│
├── Payment
│   └── Payment records and contra entries
│
└── Department Header
    ├── Segment
    ├── Dimension
    ├── Profit Center
    └── Project
Flow Through the Hierarchy:
- Main Details: Captures who, when, where, and why
- Account: Links to supplier and addresses
- Lines: Specific products being issued with all tracking details
- Payment: Financial settlement and credits
- Department: Cost allocation for accounting
This structure enables:
- Complete traceability of every item movement
- Flexible reporting by any dimension
- Clear accountability at every level
- Seamless integration with inventory and finance systems
The “Transaction Triangle” of Purchase GIN
To effectively manage the system, understand how these three components work together:
| Component | Role | Example |
|---|---|---|
| Inventory | The “Source” - Where goods come from | Warehouse Main, Bin A3 |
| Supplier | The “Destination” - Where goods are going | ABC Supplier Sdn Bhd |
| Financial Settlement | The “Accounting” - How it’s settled | Credit note, contra, payment |
How they link:
- You select Inventory Items from specific locations in your warehouse
- You specify the Supplier receiving the goods
- The system creates Financial Records for proper accounting
- Inventory is automatically adjusted
- A traceable Audit Trail is created
Real-World Example:
- Warehouse issues 20 defective laptops (Inventory)
- Being returned to TechSupplier Co. (Supplier)
- Awaiting RM 40,000 credit note (Financial Settlement)
- System reduces warehouse stock by 20 units
- Creates complete audit trail with serial numbers
For Warehouse Staff
This section is your guide to creating and managing goods issue notes.
Create Purchase GIN - Step by Step
What is a Purchase GIN?
This is the core document you’ll create every time goods need to leave the warehouse for purchase-related reasons. Think of it as a digital dispatch note that automatically updates inventory.
Step 1: Access the Create Form
- Click “Internal Purchase GIN” from the sidebar
- You’ll see the listing of existing GINs
- Click the "+" (Add New) button in the top toolbar
- The create form opens with multiple tabs
Step 2: Fill Main Details Tab
| Field | Description | Required? | Example |
|---|---|---|---|
| Branch | Location issuing the goods | Yes | Main Warehouse |
| Transaction Date | Date of goods issue | Yes | Today’s date |
| Currency | Document currency | Yes | MYR |
| Purchaser | Person responsible for transaction | Yes | John Tan |
| Reference | External reference (PO, DO, etc.) | Optional | PO-2024-001 |
| Remarks | Additional notes | Optional | Defective items from batch 123 |
| Permit No | Import/export permit if applicable | Optional | PERMIT-2024-XYZ |
| Tracking ID | Courier tracking number | Optional | TRK-12345 |
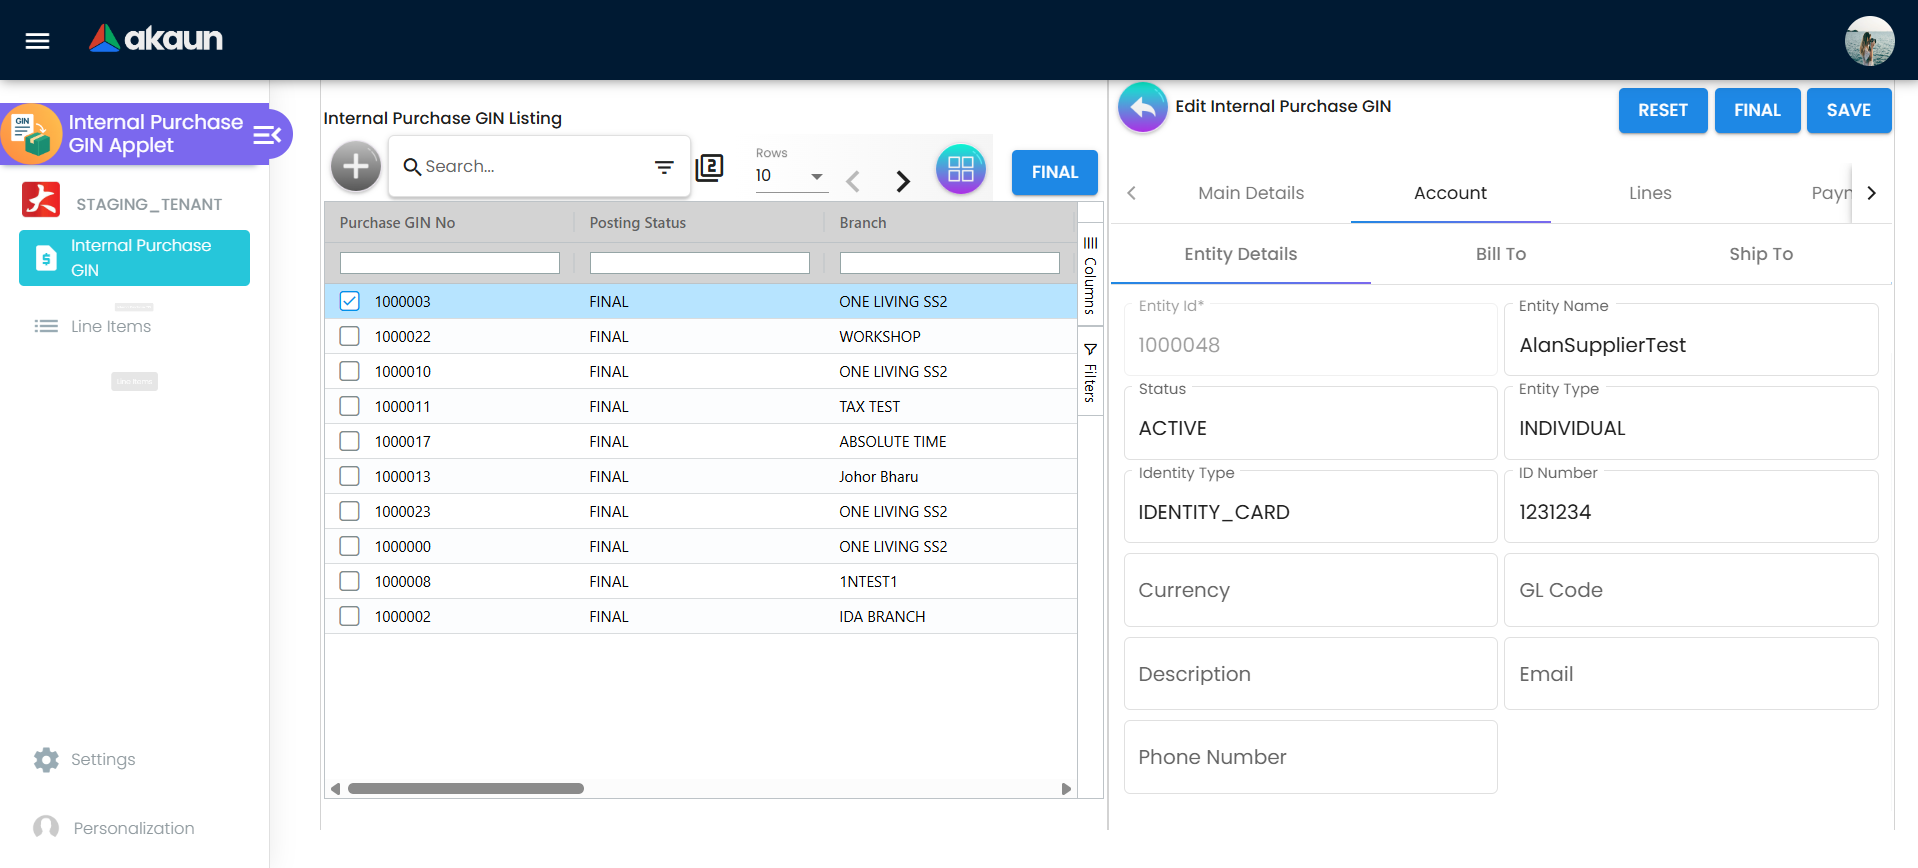
Step 3: Select Supplier (Account Tab)
Why This Tab?
Links the GIN to the supplier account for proper tracking and financial settlement.
Supplier Selection:
- Click on the “Account” tab
- Click “Select Supplier”
- Search by:
- Supplier code
- Supplier name
- Supplier category
- Click on the correct supplier to select
Address Details:
- Bill To: Where invoices/credit notes are sent
- Ship To: Where physical goods are delivered (if different)
Most of the time, Bill To and Ship To are the same. Only change if the supplier has specified different addresses.
Step 4: Add Line Items (Lines Tab)
This is where you specify exactly what items are being issued.
Add a Line Item:
- Click on the “Lines” tab
- Click “Add Line” button
- The line item form opens
Basic Item Information:
| Field | Purpose | Example |
|---|---|---|
| Item | Product being issued | Laptop - Dell Latitude 5400 |
| Description | Additional details | Defective - Screen flickering |
| Quantity | How many units | 5 |
| UOM | Unit of measure | Pieces |
Advanced Tracking (if applicable):
Serial Numbers:
- For items requiring individual tracking
- Required for electronics, machinery, etc.
- Click “Add Serial Number” and scan or type each one
- Example: SN-12345, SN-12346, SN-12347
Batch Numbers:
- For items tracked by production batch
- Common for food, pharmaceuticals, chemicals
- Click “Add Batch Number” and select from available batches
- Example: BATCH-2024-03-15
Bin Location:
- Physical warehouse location
- Helps warehouse staff locate items for picking
- Select from configured bin locations
- Example: Aisle 3, Shelf B, Bin 5
Pricing Details:
- Unit price (if applicable)
- Discounts
- Tax information
- Total line amount
Issue Link (Advanced):
- Link to issues/tickets in issue tracking systems
- Useful for returns related to support tickets
- Add work log entries for time tracking
Step 5: Add Payment/Contra (Optional)
If financial settlement happens at the same time as goods issue:
- Click on “Payment” tab
- Click “Add Payment”
- Choose payment method:
- Cash
- Bank Transfer
- Cheque
- Contra (offset against existing invoice)
- Enter amount and reference
Contra Processing:
- Select “Contra Select Document”
- Choose which purchase invoice to offset
- System will create contra entry automatically
Step 6: Department Header (Optional)
For cost allocation and management reporting:
- Click on “Department Hdr” tab
- Fill in:
- Segment: Business segment
- Dimension: Additional dimension for reporting
- Profit Center: Cost/profit center
- Project: Specific project code
This is typically used by larger organizations with complex cost allocation needs.
Step 7: Review and Submit
Before Submitting - Checklist:
- ✓ All required fields filled (red indicators gone)
- ✓ Supplier is correct
- ✓ All line items added with correct quantities
- ✓ Serial numbers added for serialized items
- ✓ Batch numbers for batch-tracked items
- ✓ No duplicate line items
Submission Options:
Save as Draft:
- Click “Save” without submitting
- GIN is saved but inventory not yet updated
- You can come back and edit later
- Use this if you need to verify details first
Submit:
- Click “Submit” button
- Inventory is immediately updated (stock reduced)
- Document number is finalized
- GIN appears in listing as completed
- Document is ready for printing
What Happens After Submission?
You Submit GIN
    ↓
System Updates Inventory (stock reduced immediately)
    ↓
Financial records created
    ↓
Document available for printing
    ↓
Audit trail recorded
    ↓
Email notifications sent (if configured)
Common Scenarios:
Scenario 1: Returning Defective Items to Supplier
Situation: 10 defective monitors need to be returned to supplier

Steps:
1. Create GIN
2. Main Details: Branch = Main Warehouse, Transaction Date = Today
3. Account: Supplier = "ABC Electronics Sdn Bhd"
4. Lines: Add line
   - Item: Monitor - 24" LED
   - Quantity: 10
   - Serial Numbers: Add all 10 serial numbers
   - Description: "Defective - Display flickering"
5. Submit

Result:
- Warehouse stock reduces by 10 units
- Supplier account shows 10 units pending credit
- Document for courier pickup
Scenario 2: Sample Goods to Supplier for Testing
Situation: Sending 3 prototype samples to supplier for evaluation

Steps:
1. Create GIN
2. Main Details: Reference = "Prototype Testing - Phase 2"
3. Account: Supplier = "XYZ Manufacturer"
4. Lines:
   - Item: Prototype Widget v2.0
   - Quantity: 3
   - Batch: PROTO-2024-001
5. Department: Project = "R&D-2024"
6. Submit

Result:
- 3 units deducted from prototype inventory
- Cost allocated to R&D project
- Tracking for sample disposition
Scenario 3: Warranty Replacement Dispatch
Situation: Customer has warranty claim, dispatching replacement to supplier for credit

Steps:
1. Create GIN
2. Main Details:
   - Reference = "Warranty Claim #WR-2024-456"
   - Remarks = "Customer complaint: Unit stopped working after 3 months"
3. Account: Supplier = "Original Supplier Ltd"
4. Lines:
   - Item: Product XYZ
   - Quantity: 1
   - Serial Number: SN-98765 (failed unit)
   - Issue Link: Link to warranty ticket #WR-2024-456
5. Payment: Create contra against original invoice
6. Submit

Result:
- Failed unit deducted from inventory
- Contra created for financial settlement
- Full traceability to warranty claim
Edit Existing GIN
Can I Edit a GIN After Creating It?
It depends on the status:
Draft GINs: ✓ Fully editable
- Open the GIN from listing
- Makes changes as needed
- Save or Submit
Submitted GINs: ✗ Usually locked (check with your admin)
- Some systems allow editing before posting
- Some require reversal and recreation
- Check your organization’s policy
To Edit a Draft:
- Go to Internal Purchase GIN listing
- Find your draft GIN (filter by Posting Status = “Draft”)
- Click on the GIN to open
- Edit form appears with all tabs
- Make your changes
- Save to keep as draft, or Submit to finalize
Print and Export GIN
Print GIN Document:
- Open the GIN from listing
- Look for Print icon/button in toolbar
- Select print format:
- Standard GIN Format
- Delivery Order Format
- Packing List Format
- Print or save as PDF
Export to Excel:
From the listing:
- Select GINs (checkbox) or export all
- Click Export button
- Choose columns to export
- Download Excel file
Use Cases:
- Attach PDF to courier package
- Email to supplier
- Print packing list for warehouse
- Export for monthly reporting
Line Items - Tracking What Was Issued
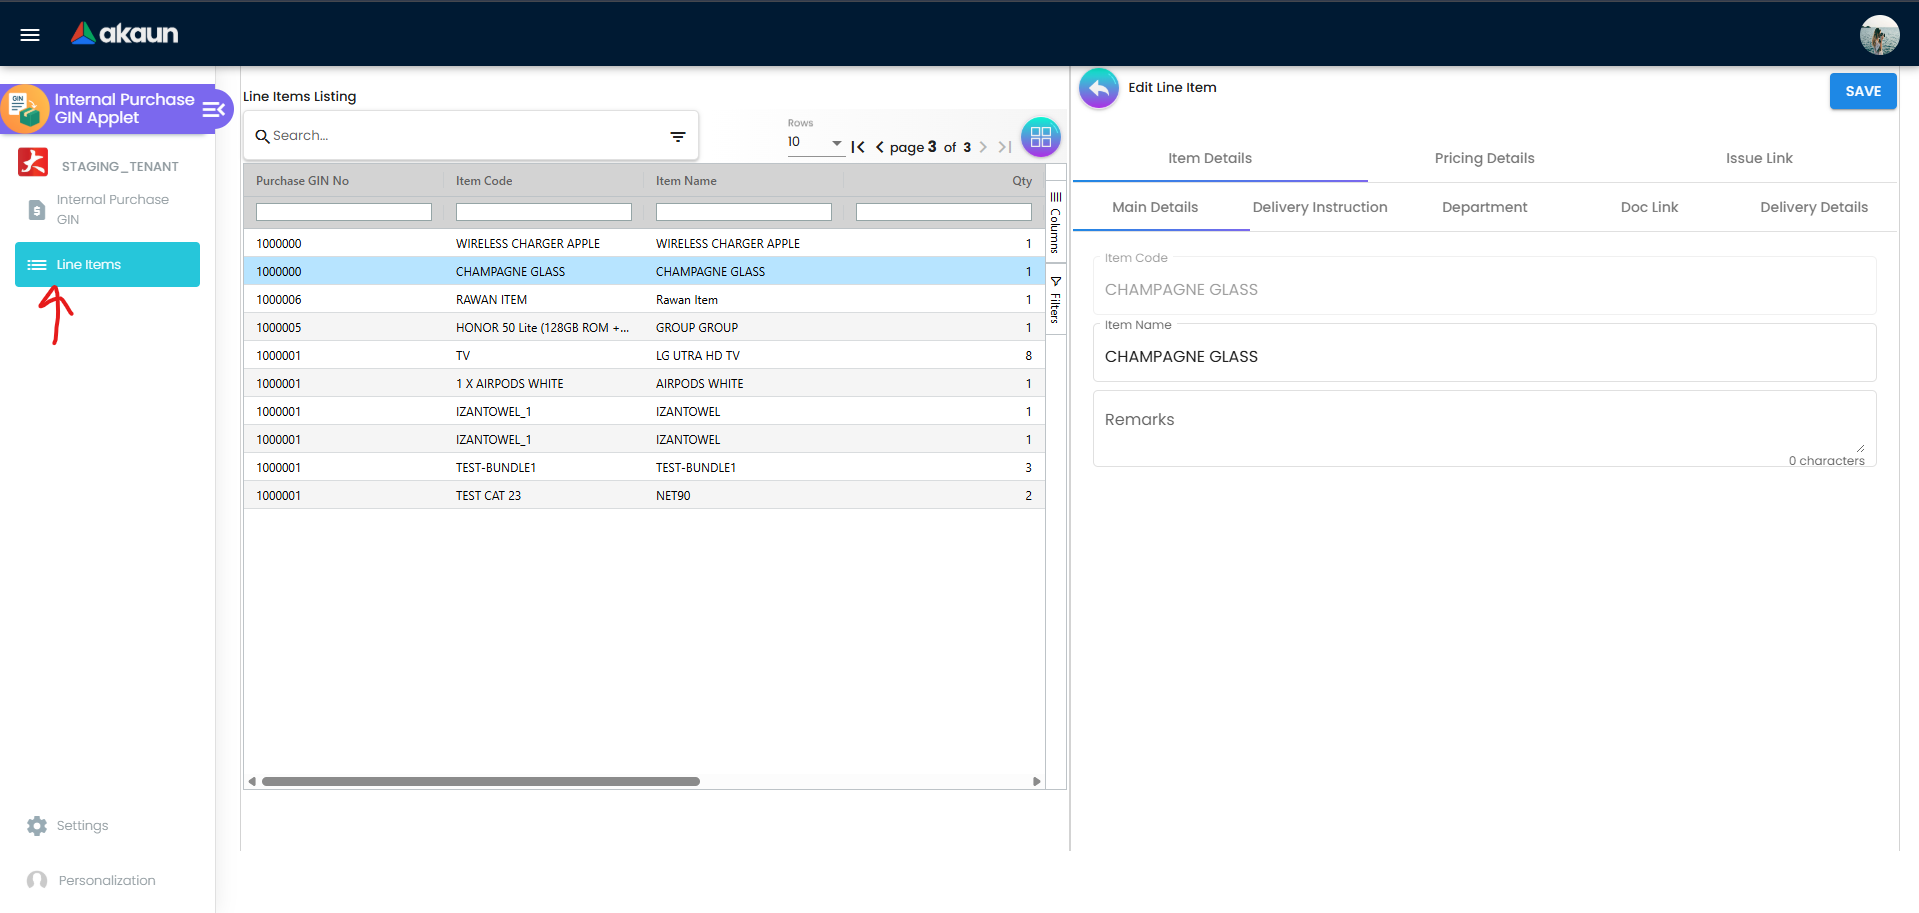
Line Items Listing View
What is the Line Items View?
While the GIN listing shows document headers, the Line Items view shows every individual item line across all GINs. It’s like having an itemized inventory dispatch history.
Why Use This View?
Track Specific Products:
- “How many units of Product X were issued to Supplier Y this month?”
- “What serial numbers were returned to suppliers?”
- “Which batches have been sent out?”
Inventory Analysis:
- Total quantities by item
- Dispatch patterns
- Supplier-wise product movements
Audit and Compliance:
- Serial number traceability
- Batch disposition tracking
- Complete line-level audit trail
How to Use Line Items View:
Access:
- From sidebar, click “Line Items” (may be under Internal Purchase GIN section)
- See complete list of all line items from all GINs
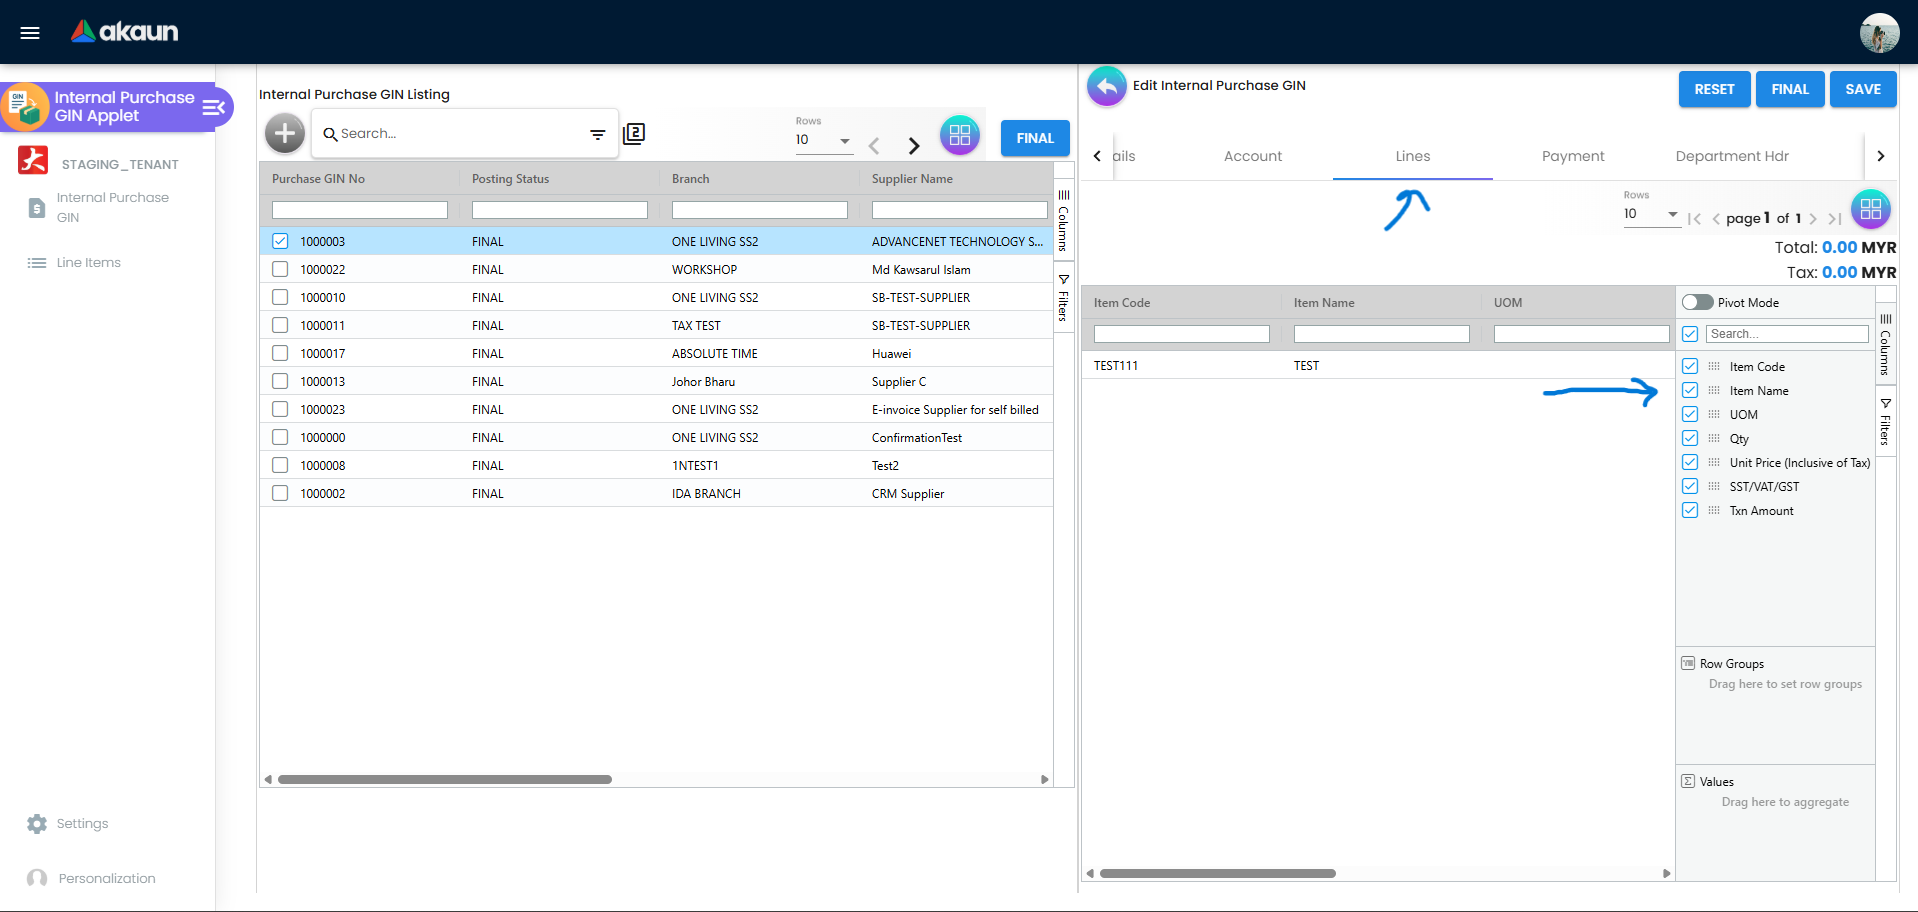
Key Information Displayed:
| Column | Shows | Use Case |
|---|---|---|
| GIN No | Document reference | Trace back to full GIN |
| Transaction Date | When issued | Time-based analysis |
| Supplier | Destination | Supplier-wise tracking |
| Item Code/Name | Product | Product-specific reports |
| Quantity | Units issued | Volume analysis |
| Serial/Batch | Tracking numbers | Traceability |
| Bin Location | Source location | Warehouse analytics |
Powerful Filtering:
Find All Returns of a Specific Product:
- Filter by: Item Code = “LAPTOP-DEL-5400”
- Date Range: Last 6 months
- Result: See all units of this laptop returned to suppliers
Track Serial Number Disposition:
- Filter by: Serial Number = “SN-12345”
- See: Which GIN it was on, which supplier, when dispatched
Supplier-Specific Analysis:
- Filter by: Supplier Name = “ABC Electronics”
- Date Range: This quarter
- Result: All products returned to this supplier
Batch Traceability:
- Filter by: Batch Number = “BATCH-2024-03”
- Result: Complete tracking of where this batch was dispatched
Export for Analysis:
- Apply filters as needed
- Click Export button
- Download Excel file
- Analyze in pivot tables or reporting tools
Common Reports Built from Line Items:
- Monthly product return volumes by supplier
- Serial number disposition report
- Batch traceability for recalls
- Warehouse location accuracy (picked from correct bins?)
Supplier & Account Management
Understanding Supplier Integration
The GIN applet integrates tightly with your supplier master data. Here’s how the relationship works:
Supplier Record Contains:
- Supplier name and code
- Contact information
- Multiple addresses (billing, shipping, warehouse)
- Payment terms
- Credit limits (if applicable)
- Supplier category and classification
When You Create a GIN:
- Supplier details auto-populate
- Credit terms carry over
- Addresses come from supplier record
- Transaction history builds up
Multiple Address Management
Bill To Address:
- Where credit notes are sent
- Head office or accounts department
- Used for financial correspondence
Ship To Address:
- Where physical goods are delivered
- May be different from billing (e.g., warehouse vs. office)
- Used for courier and logistics
Selecting Addresses:
When you select a supplier in Account tab:
- System shows all addresses on file for that supplier
- Choose appropriate Bill To address
- Choose appropriate Ship To address
- Or manually enter new address if needed
Supplier Returns Tracking
View All GINs for a Specific Supplier:
- Go to Internal Purchase GIN listing
- Use Advanced Search
- Filter: Supplier Name = [Your Supplier]
- See complete history of all goods issued to that supplier
Useful for:
- Reconciling supplier credit notes
- Reviewing return patterns
- Preparing for supplier meetings
- Analyzing product quality issues
Payment & Contra Management
Payment Processing
When to Add Payment to GIN:
Cash on Dispatch:
- Supplier requires payment when picking up goods
- COD arrangements
- Security deposits
Immediate Settlement:
- Offsetting against invoice
- Clearing supplier obligations
How to Add Payment:
- In GIN create/edit form, go to Payment tab
- Click “Add Payment”
- Fill in:
- Payment Method: Cash, Bank Transfer, Cheque, Card, etc.
- Amount: Payment value
- Reference: Receipt number, transaction ID
- Payment Date: When payment occurred
- Save payment entry
Contra Processing
What is a Contra?
A contra is an offsetting entry where you reduce what you owe the supplier (accounts payable) against the value of goods you’re returning.
Simple Example:
- You owe Supplier ABC RM 10,000 (from previous purchase invoice)
- You’re returning RM 2,000 worth of defective goods
- Instead of waiting for credit note and making payment, you “contra”
- Result: You now owe only RM 8,000
How to Create Contra:
- In GIN form, go to Payment tab
- Click “Contra”
- Click “Select Document”
- System shows all outstanding purchase invoices for this supplier
- Select the invoice(s) to offset
- System calculates contra amount
- Save
What Happens:
- GIN value reduces supplier payable
- Invoice is partially settled
- Both documents are linked
- Clear audit trail created
Inventory Integration
How GIN Affects Inventory
Automatic Stock Adjustment:
When you submit a GIN:
- Inventory quantity reduced immediately
- Stock valuation updated (if FIFO/weighted average)
- Serial numbers disposed from inventory
- Batch quantities reduced
- Bin locations cleared
Example:
Before GIN Submission:
- Product A: 100 units in Warehouse Main
- Bin A3: 50 units
- Batch-2024-01: 30 units (includes 10 being returned)

After GIN Submission (returning 10 units):
- Product A: 90 units in Warehouse Main
- Bin A3: 40 units
- Batch-2024-01: 20 units
Serial Number Tracking
For Serialized Items:
At GIN Creation:
- When you add a line item for serialized product
- System requires serial numbers
- Select from available serial numbers in that location
- Or scan serial numbers using barcode scanner
After GIN Submission:
- Serial numbers marked as “issued”
- No longer available for other transactions
- Traceable to specific GIN document
- Complete history: Receipt → Storage → Issue
Traceability Report:
- Serial Number → Received from Supplier (Date) → Stored in Bin (Location) → Issued on GIN (Date, Document) → Destination (Supplier)
Batch Number Tracking
For Batch-Tracked Items:
Why Batch Tracking?
- Product recall capability
- Expiry date management (food, pharmaceuticals)
- Quality control (manufacturing defects)
- Regulatory compliance
At GIN Creation:
- Select item with batch tracking enabled
- System shows available batches at that location
- Choose which batch(es) to issue from
- Specify quantity from each batch
Example - Issuing from Multiple Batches:
Returning 50 units of Chemical X to supplier
Available batches:
- BATCH-001: 30 units (expires March 2024)
- BATCH-002: 40 units (expires June 2024)

Decision: Issue all 30 from BATCH-001 (older batch first) + 20 from BATCH-002
Batch Disposition:
- After GIN, batch quantities reduced
- System maintains complete batch history
- Can report on where every batch quantity went
Bin Location Management
What are Bin Locations?
Physical warehouse storage locations. Examples:
- Aisle 3, Shelf B, Bin 5
- Rack A, Level 2, Position 3
- Zone 1, Row 4, Bay 2
Using Bin Locations in GIN:
Benefit for Warehouse Staff:
- Clear picking instructions
- Reduces picking errors
- Faster order fulfillment
- Accurate inventory positioning
At GIN Creation:
- Select item
- System shows available quantity per bin location
- Choose which bin to pick from
- Warehouse sees: “Pick 10 units from Aisle 3, Shelf B, Bin 5”
After GIN Submission:
- Bin quantity reduced
- If bin emptied completely, system marks it available for other items
- Bin utilization reports updated
Attachments & Documentation
Attach Documents to GIN
Why Attach Documents?
Common Attachments:
- Supplier return authorization (RA) number
- Photos of defective items
- Delivery order from courier
- Supplier email correspondence
- Inspection reports
- Warranty documents
Supported File Types:
- PDF documents
- Image files (JPEG, PNG)
- Excel spreadsheets
- Word documents
- Scanned documents
How to Attach Files:
Method 1: During GIN Creation
- After filling in main details and lines
- Look for Attachments section or tab
- Click “Add Attachment” or “Upload”
- Select file from computer
- Add description (e.g., “Photo of defective screen”)
- Upload
Method 2: After GIN is Created
- Open existing GIN
- Click “Attachments” tab or icon
- Upload files as above
View Attachments:
- Open GIN document
- Click Attachments tab
- See list of all attached files with:
- Filename
- File type
- Upload date
- Uploaded by
- Description
- Click to download or preview
Best Practices:
✓ Always Attach Photos of Defects: Visual proof for supplier claims
✓ Scan Original Documents: Delivery orders, return authorizations
✓ Clear Filenames: “RMA-12345-Product-Photos.pdf” not “IMG_001.jpg”
✓ Compress Large Files: Keep attachments under 10MB each
✓ Attach Before Submission: Easier than adding later
Advanced Search & Filtering
Search Capabilities
Basic Search:
From the GIN listing page:
- Search box at top
- Type GIN number, supplier name, or reference
- Results filter instantly
Advanced Search:
Click “Advanced Search” icon/button:
Search by Document Details:
- GIN Number: Exact or partial match
- Date Range: From date → To date
- Branch: Filter by issuing location
- Currency: MYR, USD, SGD, etc.
- Posting Status: Draft, Posted, Completed
Search by Supplier:
- Supplier Name: Dropdown or search
- Supplier Code: Exact match
- Supplier Category: Group filtering
Search by User:
- Created by: Who created the GIN
- Purchaser: Responsible person on document
- Created Date: When document was created
- Updated Date: Last modification date
Search by Items:
- Switch to Line Items view
- Filter by: Item Code, Item Name, Item Category
- See all line items matching criteria across all GINs
Saved Searches:
Create frequently-used search filters:
- Configure your search criteria
- Click “Save Search”
- Give it a name: “This Month Returns”
- Access later from saved searches dropdown
Example Saved Searches:
- “Today’s GINs”
- “Pending Draft GINs”
- “High Value Returns (>RM 10k)”
- “Supplier ABC - All Time”
Export and Reporting
Export Listing:
- Apply filters to get desired dataset
- Click “Export” button
- Choose format: Excel, CSV, PDF
- Select columns to export
- Download file
Common Export Use Cases:
Monthly Report for Management:
- Filter: Last month
- Export: All GINs with totals
- Share: With finance and management
Supplier Reconciliation:
- Filter: Specific supplier, date range
- Export: Line item details with pricing
- Use: Reconcile with supplier’s records
Audit Trail:
- Filter: Specific period
- Export: Complete details including users and timestamps
- Store: For compliance and audits
Inventory Analysis:
- Export: Line items view
- Analyze: Product return rates, quality issues
Configuration & Settings
Overview of Settings
Access settings from the sidebar: Settings menu under Internal Purchase GIN section.
Available Settings:
- Default Selection - System-wide defaults
- Field Settings - Field visibility and requirements
- Printable Format Settings - Document print layouts
- Webhook - External system integrations
- Feature Visibility - Enable/disable features
- Permission Settings - User access control
Default Settings
Purpose: Set system-wide defaults to speed up document creation.
Common Default Settings:
| Setting | Purpose | Example |
|---|---|---|
| Default Branch | Auto-select branch when creating GIN | Main Warehouse |
| Default Currency | Primary currency for transactions | MYR |
| Auto-numbering | GIN number format and sequence | PGIN-2024-0001 |
| Default Purchaser | Default responsible person | Current logged-in user |
How to Configure:
- Go to Settings > Default Selection
- Set each default value
- Save configuration
- Test by creating new GIN - defaults should auto-populate
Field Configuration
Purpose: Control which fields are visible, required, or hidden.
Why Configure Fields?
Simplify User Experience:
- Hide fields you don’t use
- Reduce clutter on forms
- Focus on essential data
Enforce Data Quality:
- Mark critical fields as required
- Prevent submission without key information
Compliance:
- Require fields needed for audit
- Ensure data completeness
Field Configuration Options:
For each field, set:
- Visible: Show on form
- Hidden: Don’t show at all
- Required: Must be filled to submit
- Optional: Can be left blank
- Read-only: Display but can’t edit
Common Field Configurations:
Strict Tracking Organization:
Serial Number: Required (for all serialized items)
Batch Number: Required (for batch-tracked items)
Bin Location: Required (for warehouse accuracy)
Reference: Required (link to external documents)
Simple Operations:
Serial Number: Optional (not tracking at that level)
Batch Number: Hidden (not using batch tracking)
Bin Location: Hidden (single warehouse, no bins)
Reference: Optional (nice to have)
How to Configure:
- Go to Settings > Field Settings
- Select section: Main Details, Account, Lines, Payment, Department
- For each field, set visibility and requirement
- Save configuration
- Refresh any open GIN forms to see changes
Printable Format Settings
Purpose: Design how GIN documents look when printed.
Why Customize Print Formats?
Professional Appearance:
- Add company logo
- Include company details
- Brand consistency
Functional Requirements:
- Include/exclude certain information
- Different formats for different purposes
- Compliance with regulations
Common Print Formats:
Standard GIN Document:
- Full details: header, supplier, all line items
- Use: Official records, supplier submission
Delivery Order Format:
- Simplified: focus on items and quantities
- Use: Courier/logistics, warehouse picking
Packing List:
- Items only, no pricing
- Use: Physical packing verification
Summary Format:
- Header and totals only, condensed line items
- Use: Quick reference, approvals
How to Configure:
- Go to Settings > Printable Format Settings
- Create new format or edit existing
- Design layout:
- Add/remove sections
- Include company logo and letterhead
- Choose which fields to display
- Set fonts and styling
- Preview format with sample data
- Save format
- Users can select format when printing
Permission Settings
Purpose: Control who can do what in the GIN system.
Permission Levels:
Create GIN:
- Who can create new GIN documents
- Typically: Warehouse staff, purchasing team
Edit GIN:
- Who can modify existing drafts
- Typically: Document creator, supervisor
Delete GIN:
- Who can delete draft documents
- Typically: Supervisor or admin only
View GIN:
- Who can see GIN listings and details
- Typically: All relevant staff
Submit GIN:
- Who can finalize and post documents
- Typically: Authorized warehouse staff
Print/Export:
- Who can print and export data
- Typically: Anyone who can view
Permission Configuration Methods:
1. Client-Side Permission:
- Browser-based access control
- Quick setup
- Per-user configuration
2. User Permission:
- Individual user permissions
- Fine-grained control
- Override team/role defaults
3. Team Permission:
- Permission by team/department
- Warehouse Team, Purchasing Team, etc.
- Apply to all team members
4. Role Permission:
- Permission by role
- Warehouse Supervisor, Clerk, Manager
- Consistent across similar roles
How to Configure:
- Go to Settings > Permission Settings
- Choose permission type: Client-Side, User, Team, or Role
- Select user/team/role to configure
- Set permissions:
- ✓ Allow: Green checkmark
- ✗ Deny: Red X
- ○ Inherit: Use default
- Save configuration
- Test with affected user accounts
Best Practice Permission Setup:
Warehouse Clerk:
Create GIN: ✓ Yes
Edit Own GIN: ✓ Yes
Edit Others' GIN: ✗ No
Delete GIN: ✗ No
Submit GIN: ✓ Yes (drafts only)
Print: ✓ Yes
Warehouse Supervisor:
Create GIN: ✓ Yes
Edit Any GIN: ✓ Yes
Delete GIN: ✓ Yes (drafts only)
Submit GIN: ✓ Yes
View All: ✓ Yes
Configure Settings: ✓ Yes
Purchasing Manager:
Create GIN: ✓ Yes
Edit Any GIN: ✓ Yes
Delete GIN: ✓ Yes
Submit GIN: ✓ Yes
View All: ✓ Yes
Export/Report: ✓ Yes
Configure Settings: ✓ Yes
Finance User:
Create GIN: ✗ No
Edit GIN: ✗ No
Delete GIN: ✗ No
View All: ✓ Yes
Export/Report: ✓ Yes
Webhook Configuration (Advanced)
What are Webhooks?
Webhooks allow the GIN system to automatically notify external systems when events occur.
Use Cases:
Inventory Management System:
- GIN submitted → Send to inventory system
- Real-time stock sync across platforms
ERP Integration:
- GIN posted → Create financial entries in ERP
- Automated journal entries
Notification Systems:
- GIN created → Send Slack/email notification
- Alert relevant teams
Supplier Portal:
- GIN issued → Notify supplier automatically
- Supplier sees return in their portal
How to Configure Webhooks:
- Go to Settings > Webhook
- Click “Add Webhook”
- Configure:
- Event: What triggers the webhook (GIN Created, GIN Submitted, etc.)
- URL: Where to send the data
- Method: POST, PUT, etc.
- Headers: Authentication tokens
- Payload: What data to send
- Test webhook
- Activate when working
Feature Visibility
Purpose: Enable or disable entire features based on your organization’s needs.
Why Control Feature Visibility?
Simplify Interface:
- Hide advanced features you don’t use
- Reduce training complexity
- Focus on core workflows
Phase Implementation:
- Start with basic features
- Enable advanced features as users become proficient
Organizational Needs:
- Different branches may need different features
- Some features only relevant to certain business models
Common Feature Toggles:
| Feature | When to Enable | When to Disable |
|---|---|---|
| Serial Number Tracking | Electronics, machinery, high-value items | Bulk commodities, consumables |
| Batch Number Tracking | Food, pharmaceuticals, chemicals | Services, unique products |
| Bin Location Management | Large warehouses, multiple locations | Small operations, single room |
| Payment Processing | Immediate settlement scenarios | All credit terms, no cash |
| Contra Processing | Frequent offsetting against payables | Rare, manual finance processing |
| Issue Link | Integration with issue tracking | No issue tracking system |
| Department Header | Complex cost allocation needs | Simple single-department operations |
How to Configure:
- Go to Settings > Feature Visibility
- See list of all toggleable features
- Enable (✓) or Disable (✗) each feature
- Save configuration
- Changes take effect for all users immediately
Personalization
Personal Default Settings
Purpose: Individual users can set their own preferences without affecting others.
What Can Be Personalized?
Default Selections:
- Preferred branch (if you work at multiple locations)
- Default currency (if you handle multiple currencies)
- Items per page in listings
- Date format preference
Display Preferences:
- Grid column order
- Which columns to show/hide in listings
- Sort order default
How to Set Personal Preferences:
- Go to Personalization > Personal Default Selection
- Set your preferences
- Save
- Your preferences apply only to your account
Example:
- User A (Warehouse Main): Sets default branch = Main Warehouse
- User B (Warehouse North): Sets default branch = North Warehouse
- Both users see their own defaults when creating GINs
Sidebar Customization
Purpose: Arrange menu items in sidebar for quick access.
Customization Options:
- Reorder menu items (drag and drop)
- Create favorites
- Collapse/expand sections
- Hide rarely-used items
How to Customize:
- Go to Personalization > Sidebar
- Drag menu items to reorder
- Click star icon to mark favorites
- Save layout
- Sidebar rearranges according to your preference
Common Use Cases & Workflows
Use Case 1: Processing Defective Product Returns
Business Scenario:
Your warehouse discovers 15 laptops from a recent shipment are defective (screen issues). They need to be returned to the supplier for credit.
Workflow:
Step 1: Inspection & Documentation
- Warehouse staff inspect all 15 units
- Note serial numbers of defective units
- Take photos of defects
- Contact supplier for Return Authorization (RA) number
Step 2: Create GIN
Main Details:
- Branch: Main Warehouse
- Transaction Date: Today
- Reference: “RA-2024-5678” (supplier’s RA number)
- Remarks: “Screen flickering - manufacturing defect”
Account:
- Supplier: “TechSupply Co. Ltd”
- Bill To: Supplier’s head office
- Ship To: Supplier’s RMA center (different address)
Lines:
- Item: “Laptop - Dell Latitude 5400”
- Quantity: 15
- Serial Numbers: Add all 15 serial numbers
- Description: “Defective - screen flickering”
- Pricing: Original purchase price per unit
Attachments:
- Upload photos of defective screens
- Upload supplier’s RA authorization email
- Upload inspection report
Step 3: Create Contra (Optional)
- If supplier invoice already posted and unpaid
- Create contra to offset RM 30,000 (15 × RM 2,000 per unit)
- Reduces amount owed to supplier
Step 4: Submit GIN
- Review all details carefully
- Submit GIN
- System reduces inventory by 15 units
- Serial numbers marked as “returned to supplier”
Step 5: Print & Dispatch
- Print GIN document
- Include in package to supplier
- Courier picks up with tracking number
- Update GIN with tracking ID
Step 6: Follow-Up
- Wait for supplier credit note
- When received, reconcile against GIN
- Finance matches credit note to GIN record
- Complete audit trail
Result:
- 15 defective units out of inventory
- Supplier credit expected for RM 30,000
- Complete traceability with serial numbers
- Documentation for quality/warranty claims
Use Case 2: Sample Dispatch for Product Testing
Business Scenario:
R&D department needs to send 5 prototype units to a manufacturing supplier for production feasibility testing. These are valuable prototypes that need tracking.
Workflow:
Step 1: Create GIN
Main Details:
- Branch: R&D Warehouse
- Transaction Date: Today
- Purchaser: R&D Manager
- Reference: “Prototype Testing - Phase 3”
- Remarks: “Production feasibility testing - return after evaluation”
Account:
- Supplier: “ABC Manufacturing Sdn Bhd”
- Ship To: Supplier’s testing laboratory
Lines:
- Item: “Prototype Widget - Version 3.2”
- Quantity: 5
- Serial Numbers: All 5 prototype serial numbers
- Batch: “PROTO-2024-Q1”
- Pricing: Cost value for inventory tracking
Department Header:
- Project: “R&D-Widget-2024”
- Segment: “Research & Development”
- (Cost allocation for project accounting)
Step 2: Submit & Track
- Submit GIN
- Print packing list (without pricing)
- Courier to supplier testing facility
- Add tracking number to GIN
Step 3: Testing Period
- Prototypes at supplier for 2-4 weeks
- No payment/contra needed (not a sale or return)
- Inventory still shows as “issued to testing”
Step 4: Return (If Applicable)
- If prototypes returned after testing:
- Create Goods Receipt (GRN) to receive back
- Reference original GIN number
- Verify serial numbers match
- Inventory back to normal
Alternative: Prototypes Not Returned
- If supplier keeps/destroys after testing:
- No GRN created
- GIN serves as final disposition record
- Inventory adjustment if needed for write-off
Result:
- Complete tracking of prototype samples
- Cost allocated to correct R&D project
- Clear audit trail for valuable items
- Easy reference for follow-up with supplier
Use Case 3: Warranty Replacement Claim
Business Scenario:
Customer has a warranty claim for a failed printer. Your policy is to provide immediate replacement to customer, then claim warranty from supplier. Need to return failed unit to supplier for credit.
Workflow:
Step 1: Customer Warranty Claim Received
- Customer reports printer failure
- Customer service verifies warranty is valid
- Immediate replacement sent to customer (separate transaction)
- Failed unit received from customer with serial number
Step 2: Create Warranty Claim GIN to Supplier
Main Details:
- Branch: Main Warehouse
- Transaction Date: Today
- Reference: “Warranty Claim #WC-2024-1523”
- Remarks: “Customer unit failed - printer error code E07”
Account:
- Supplier: “Original Printer Supplier Ltd”
- Ship To: Supplier’s warranty claims center
Lines:
- Item: “Printer - Model ABC-2000”
- Quantity: 1
- Serial Number: SN-78945 (customer’s failed unit)
- Description: “Warranty claim - error code E07, under 1-year warranty”
- Pricing: Warranty claim value
Attachments:
- Customer’s original purchase receipt (proof of warranty)
- Photo of error message
- Customer complaint details
- Supplier’s warranty claim form (if required)
Issue Link (Optional but Recommended):
- Link to customer support ticket #1523
- Link to warranty claim tracking system
- Complete cross-reference
Step 3: Payment/Contra
- If replacement unit already purchased from supplier and unpaid:
- Create contra offset
- Reduces amount owed
- If separate warranty credit:
- No payment entry
- Wait for supplier warranty credit note
Step 4: Submit & Dispatch
- Submit GIN
- Failed unit out of inventory
- Pack and ship to supplier warranty center
- Include all warranty documentation
Step 5: Supplier Processing
- Supplier receives failed unit
- Supplier inspects and verifies warranty claim
- Supplier issues credit note or replacement
- Finance receives and matches to GIN
Step 6: Customer Follow-Up
- Once supplier credit confirmed, warranty claim complete
- Update customer service records
- Close support ticket
Result:
- Failed unit properly disposed (returned to supplier)
- Warranty claim documented end-to-end
- Cost recovered from supplier
- Customer received immediate replacement (good service)
- Complete traceability for audit
Advanced: Issue Link Integration
If using issue tracking integration:
- Customer support creates ticket #1523 in issue system
- When creating GIN, link to issue #1523
- Log work time (e.g., 30 minutes handling claim)
- Add comments and status updates
- Close issue when supplier credit received
- Complete integration between support, warehouse, and finance
FAQ
Q: Where do I find the Internal Purchase GIN applet?
A: Go to Internal Purchase GIN in the sidebar (typically under Purchasing or Warehouse Management, depending on your tenant setup). If you don’t see it, your role may not have access—contact your administrator.
Q: What is a Purchase GIN?
A: A Purchase GIN (Goods Issue Note) documents goods leaving your warehouse related to purchase transactions, such as returning defective items to suppliers, warranty claims, or dispatching samples for testing.
Q: Can I edit a GIN after submitting it?
A: It depends on your system configuration. Draft GINs can usually be edited. Once submitted, inventory is automatically adjusted and changes may be restricted. Check with your administrator—you may need to create a reversal document if corrections are needed.
Q: What’s the difference between Payment and Contra?
A: Payment is when money changes hands (cash, bank transfer, etc.). Contra is offsetting the GIN value against an existing payable (invoice), reducing what you owe the supplier without actual payment.
Q: Do I need to add serial numbers for all items?
A: Only for items configured as “serialized” in your item master. High-value items like electronics and machinery typically require serial numbers. Bulk items and consumables usually don’t.
Q: How do I track where a specific serial number went?
A: Use the Line Items view and filter by serial number. You’ll see which GIN it was on, which supplier received it, and when it was dispatched.
Q: Can I create a GIN without a supplier?
A: No, a supplier/account must be selected. The GIN documents goods going TO a specific destination (supplier). If you’re moving goods internally between your own locations, you likely need a different document type (transfer order).
Q: What happens to inventory when I save a GIN as draft vs. submit?
A: Draft: No inventory impact. You can edit freely. Submit: Inventory immediately reduced. Use “Save as Draft” if you need to verify details before final submission.
Q: How do I print a GIN for the courier?
A: Open the GIN, click the Print icon, select your print format (e.g., “Delivery Order Format”), and print or save as PDF. Include the printed document with the physical shipment.
Q: Can I export GIN data to Excel?
A: Yes. From the GIN listing, apply any filters you need, click Export, choose Excel format, select columns, and download.
Q: My bin locations aren’t showing up. Why?
A: Bin locations must be configured in your warehouse/location master data first. Contact your warehouse administrator to set up bin locations if needed.
Q: What if I selected the wrong supplier?
A: If still in draft, simply edit and change the supplier. If already submitted, check with your administrator—you may need to reverse the GIN and create a new one with the correct supplier.
Q: How do batch numbers work?
A: Batch numbers track groups of items from the same production run. When adding a line item for a batch-tracked product, you select which batch(es) to issue from. System reduces quantities from those specific batches.
Q: Can I create a GIN from my mobile device?
A: It depends on your system configuration. Many systems support mobile access. Check with your administrator about mobile capabilities and responsive design.
Q: Who gets notified when I create a GIN?
A: Notification settings are configurable. Typically, the purchasing team and relevant supervisors are notified. Email/system notifications can be configured by your administrator.
Q: How long are GIN records retained?
A: This is set by your organization’s document retention policy, typically 7 years for audit compliance. Check with your finance or compliance team for specific requirements.
Q: Can I reverse a submitted GIN?
A: Reversal capability depends on system configuration. Some systems allow authorized users to reverse GINs (creates counter-entry, restores inventory). Others require manual journal entries. Contact your administrator.
Q: What’s the difference between Internal Purchase GIN and other GIN types?
A: “Internal Purchase GIN” specifically handles goods issued related to purchase transactions (returns to suppliers, warranty claims, etc.). Other GIN types might be for sales (dispatching to customers) or transfers (between your own locations).
Q: How do I handle partial returns?
A: Create a GIN for the quantity you’re returning now. If more units need to be returned later, create additional GINs. Each GIN is a separate transaction.
Q: My printer configuration isn’t working. What should I do?
A: Check Settings > Printable Format Settings to ensure a format is configured. If technical issues persist, contact your system administrator or IT support.
Q: Can I import GINs in bulk from a file?
A: Bulk import capabilities depend on system configuration. Check for an “Import” or “Upload” option in the GIN listing. If not available, reach out to your administrator about bulk data loading options.
Q: How do I link a GIN to a purchase order?
A: Use the Reference field in Main Details to enter the PO number. This creates a text reference. For system-level linking (if supported), your configuration may have specific PO linking fields—check with your administrator.
Q: What if inventory shows incorrect quantity after GIN?
A: First, verify the GIN was actually submitted (not just saved as draft). If submitted and still incorrect, contact your inventory control team immediately. There may be other transactions affecting the same item, or a system issue requiring IT support.
Q: Can Finance users void or modify GINs?
A: Typically, Finance has view-only access for audit purposes. Modifications should be done by warehouse/purchasing staff with proper authorization. Check your organization’s permission setup with your administrator.
Q: How granular can I track Issue Links?
A: If Issue Link integration is enabled, you can link GINs to specific support tickets or work orders, log time spent handling the return, add comments, and create complete cross-references. The detail level depends on your issue tracking system configuration.
Q: What happens if I create a GIN with the wrong transaction date?
A: Transaction date affects inventory valuation and financial reporting. If still a draft, edit and correct immediately. If already submitted, contact your administrator—you may need document reversal or manual adjustment. Always use correct business date, not necessarily today’s date.
Q: How do I handle rush returns where supplier doesn’t give RA number in time?
A: Create GIN with reference “RA Pending” and add remarks explaining urgency. Update the GIN with actual RA number once received. Alternatively, save as draft until RA confirmed, then submit.
Q: Can multiple users create GINs for the same items simultaneously?
A: Yes, the system handles concurrent transactions. However, if inventory is low, later submissions might fail due to insufficient stock. Best practice: communicate with team about large returns.
Q: What’s the difference between “Save” and “Submit” for a GIN?
A: Save = Draft only, no inventory impact, can edit freely. Submit = Final, inventory immediately reduced, limited or no editing. Use Save when you need verification or awaiting information (like RA number).
Q: How do I track the status of a supplier credit note?
A: The GIN system documents the outbound dispatch. Supplier credit tracking is typically done in your accounts payable system. Use the GIN number as reference when following up with suppliers and finance team.
Q: Can I copy an existing GIN to create a new one?
A: Depends on system configuration. Some systems have “Duplicate” or “Copy” function. Check for this option in the GIN listing or detail view. Otherwise, manually create new GIN using previous as reference.
Q: What if the supplier address in the system is outdated?
A: GINs pull addresses from supplier master data. To fix: Update the supplier record in master data (Suppliers > [Supplier Name] > Addresses). Future GINs will use updated address. For current GIN draft, manually override the address.
Q: How do I generate a packing list without pricing information?
A: Use print format settings. Create a “Packing List” format that excludes pricing fields. When printing, select this format instead of standard GIN format. Useful when warehouse staff or couriers don’t need to see costs.
Q: Can I delete a submitted GIN?
A: Generally no. Submitted GINs have adjusted inventory and created audit trails. Deletion would corrupt records. Instead, create a reversal GIN (opposite entry) or contact administrator for proper correction procedures.
Q: How long does it take to create a typical GIN?
A: For experienced users: 2-5 minutes for simple GINs (few line items). Complex GINs with many serial numbers or multiple batches: 10-15 minutes. Draft creation for later completion: < 1 minute.
Q: What reports can I generate from GIN data?
A: Common reports: GINs by supplier (return patterns), GINs by item (which products returned most), GINs by date (monthly volumes), Value analysis (cost of returns), Serial/batch disposition (traceability). Use Export function and analyze in Excel or BI tools.
Q: How do I handle a GIN where some items were accepted by supplier but others rejected?
A: Best practice: Create separate GINs for accepted vs. rejected items once supplier feedback received. Or use GIN notes/attachments to document supplier’s acceptance/rejection details. This maintains clear audit trail.
Q: What if warehouse discovers additional defective units after GIN already sent?
A: Create a new, separate GIN for the additional units. Reference the original GIN number in remarks for linkage. Each GIN is a distinct transaction—don’t try to modify submitted GINs.
Q: Can I use this for goods transfer between my own warehouses?
A: The Internal Purchase GIN is specifically for purchase-related dispatches (typically to suppliers). Inter-warehouse transfers usually require different document types (Transfer Orders, Stock Movements). Check with your administrator.
Best Practices
For Warehouse Staff:
✓ Always verify physical count before creating GIN—once submitted, inventory adjusts immediately
✓ Use clear descriptions in line items—future you (or colleagues) will thank you
✓ Photograph defective items before dispatch—attach photos to GIN for documentation
✓ Print packing lists before picking—reduces errors and speeds up fulfillment
✓ Add tracking IDs after courier pickup—enables status tracking
✓ Double-check serial numbers—incorrect serial number = audit nightmare
For Purchasing Team:
✓ Obtain supplier RA number before creating GIN—many suppliers require authorization first
✓ Use Reference field consistently—link to PO numbers, RMA numbers, or support tickets
✓ Create contra entries when applicable—reduces manual reconciliation work
✓ Review GIN patterns monthly—identify problem suppliers or recurring defect issues
✓ Maintain supplier address data—keep Bill To and Ship To addresses updated in supplier master
For Inventory Managers:
✓ Regular reconciliation—match GIN transactions to physical inventory counts
✓ Batch/serial audits—spot-check that tracked items match system records
✓ Monitor bin accuracy—ensure warehouse staff picking from correct locations
✓ Track disposition rates—analyze return volumes by product, supplier, reason
✓ Set up inventory alerts—get notified when stock levels drop unexpectedly
For Finance Teams:
✓ Reconcile GINs to supplier credits—ensure credits match GIN values
✓ Review contra entries—verify offsets are correct and properly applied
✓ Month-end accruals—account for GINs awaiting supplier credits
✓ Audit trail verification—ensure complete documentation for auditors
✓ Cost allocation review—verify department/project codes are correct
For System Administrators:
✓ Start with minimal features—enable only what users need, add complexity gradually
✓ Configure clear print formats—invest time in templates, saves hours later
✓ Set up sensible defaults—reduce data entry time and errors
✓ Regular permission audits—ensure users have appropriate access, no more
✓ Test integrations thoroughly—webhooks, item masters, inventory sync—test before go-live
✓ User training documentation—create quick reference guides customized to your setup
✓ Backup configurations—document all settings changes, enable rollback if needed
Security & Compliance:
✓ Segregation of duties—warehouse staff create, supervisors approve (if workflow enabled)
✓ Regular access reviews—remove permissions for terminated/transferred employees
✓ Audit trail preservation—never delete submitted GINs, use reversals instead
✓ Document retention—follow your industry’s compliance requirements (typically 7 years)
✓ Sensitive data handling—protect supplier financial information, customer warranty data
Continuous Improvement:
✓ Collect user feedback—monthly survey or feedback session with warehouse staff
✓ Monitor key metrics—average time to create GIN, error rates, inventory accuracy
✓ Quarterly process review—what’s working? what’s frustrating users?
✓ Benchmark against standards—compare to industry best practices for your sector
✓ Iterate on workflows—small improvements compound over time
Summary
The Internal Purchase GIN Applet transforms goods issue management from a paper-based, error-prone process into a streamlined digital workflow. By integrating document creation, inventory tracking, supplier management, and financial settlement into a single system, it provides complete visibility and control over purchase-related goods dispatches.
Key Takeaways:
- Digital First: Create, track, and manage GINs electronically with real-time inventory updates
- Complete Traceability: Serial numbers, batch numbers, and bin locations ensure full audit trail
- Financial Integration: Automated payment and contra processing reduces manual reconciliation
- Flexible Configuration: Adapt the system to your specific business needs through comprehensive settings
- User-Friendly: Intuitive interfaces for warehouse staff, purchasing teams, and finance users
- Scalable: Supports single locations or complex multi-warehouse, multi-currency operations
Getting Started:
- Warehouse Staff: Jump to Create Your First GIN
- Administrators: Begin with Initial System Setup
- Purchasing Team: Explore Supplier Returns Tracking
Need Help?
- Check the FAQ for quick answers
- Review Common Use Cases for real-world scenarios
- Contact your system administrator for configuration support
- Refer to Best Practices for operational excellence tips