Internal Sales GRN Applet
Purpose and Overview
The Internal Sales GRN Applet is a powerful tool designed to streamline the entire goods return process. It moves beyond simple stock reinstatement by integrating settlement management, contra document linking, and serial/batch/bin-level inventory tracking.
Key Features Overview
Who Benefits from This Applet?
Warehouse Staff:
- Record returned goods with full item-level detail
- Track serial numbers, batch numbers, and bin locations on returned units
- Generate printable GRN documents for receiving operations
- Verify item condition during the return process
Sales Operations:
- Process customer return requests with traceability back to originating sales orders
- Link every return to the original delivery order or invoice
- Monitor return status across the entire returns lifecycle
- Manage member card returns for loyalty program customers
Finance Teams:
- Process financial settlements for returned goods (cash back, vouchers, cards, cheques)
- Link GRNs to original sales documents via contra entries for accurate books
- Maintain a complete audit trail for every return transaction
- Reconcile returns against posted invoices with precision
Inventory Managers:
- Monitor real-time stock movements as goods are returned to warehouse locations
- Reconcile costing details using MAUC, FIFO, or manual cost methods
- View a cross-transaction line items listing to spot return trends
- Identify high-return items and investigate quality or process issues
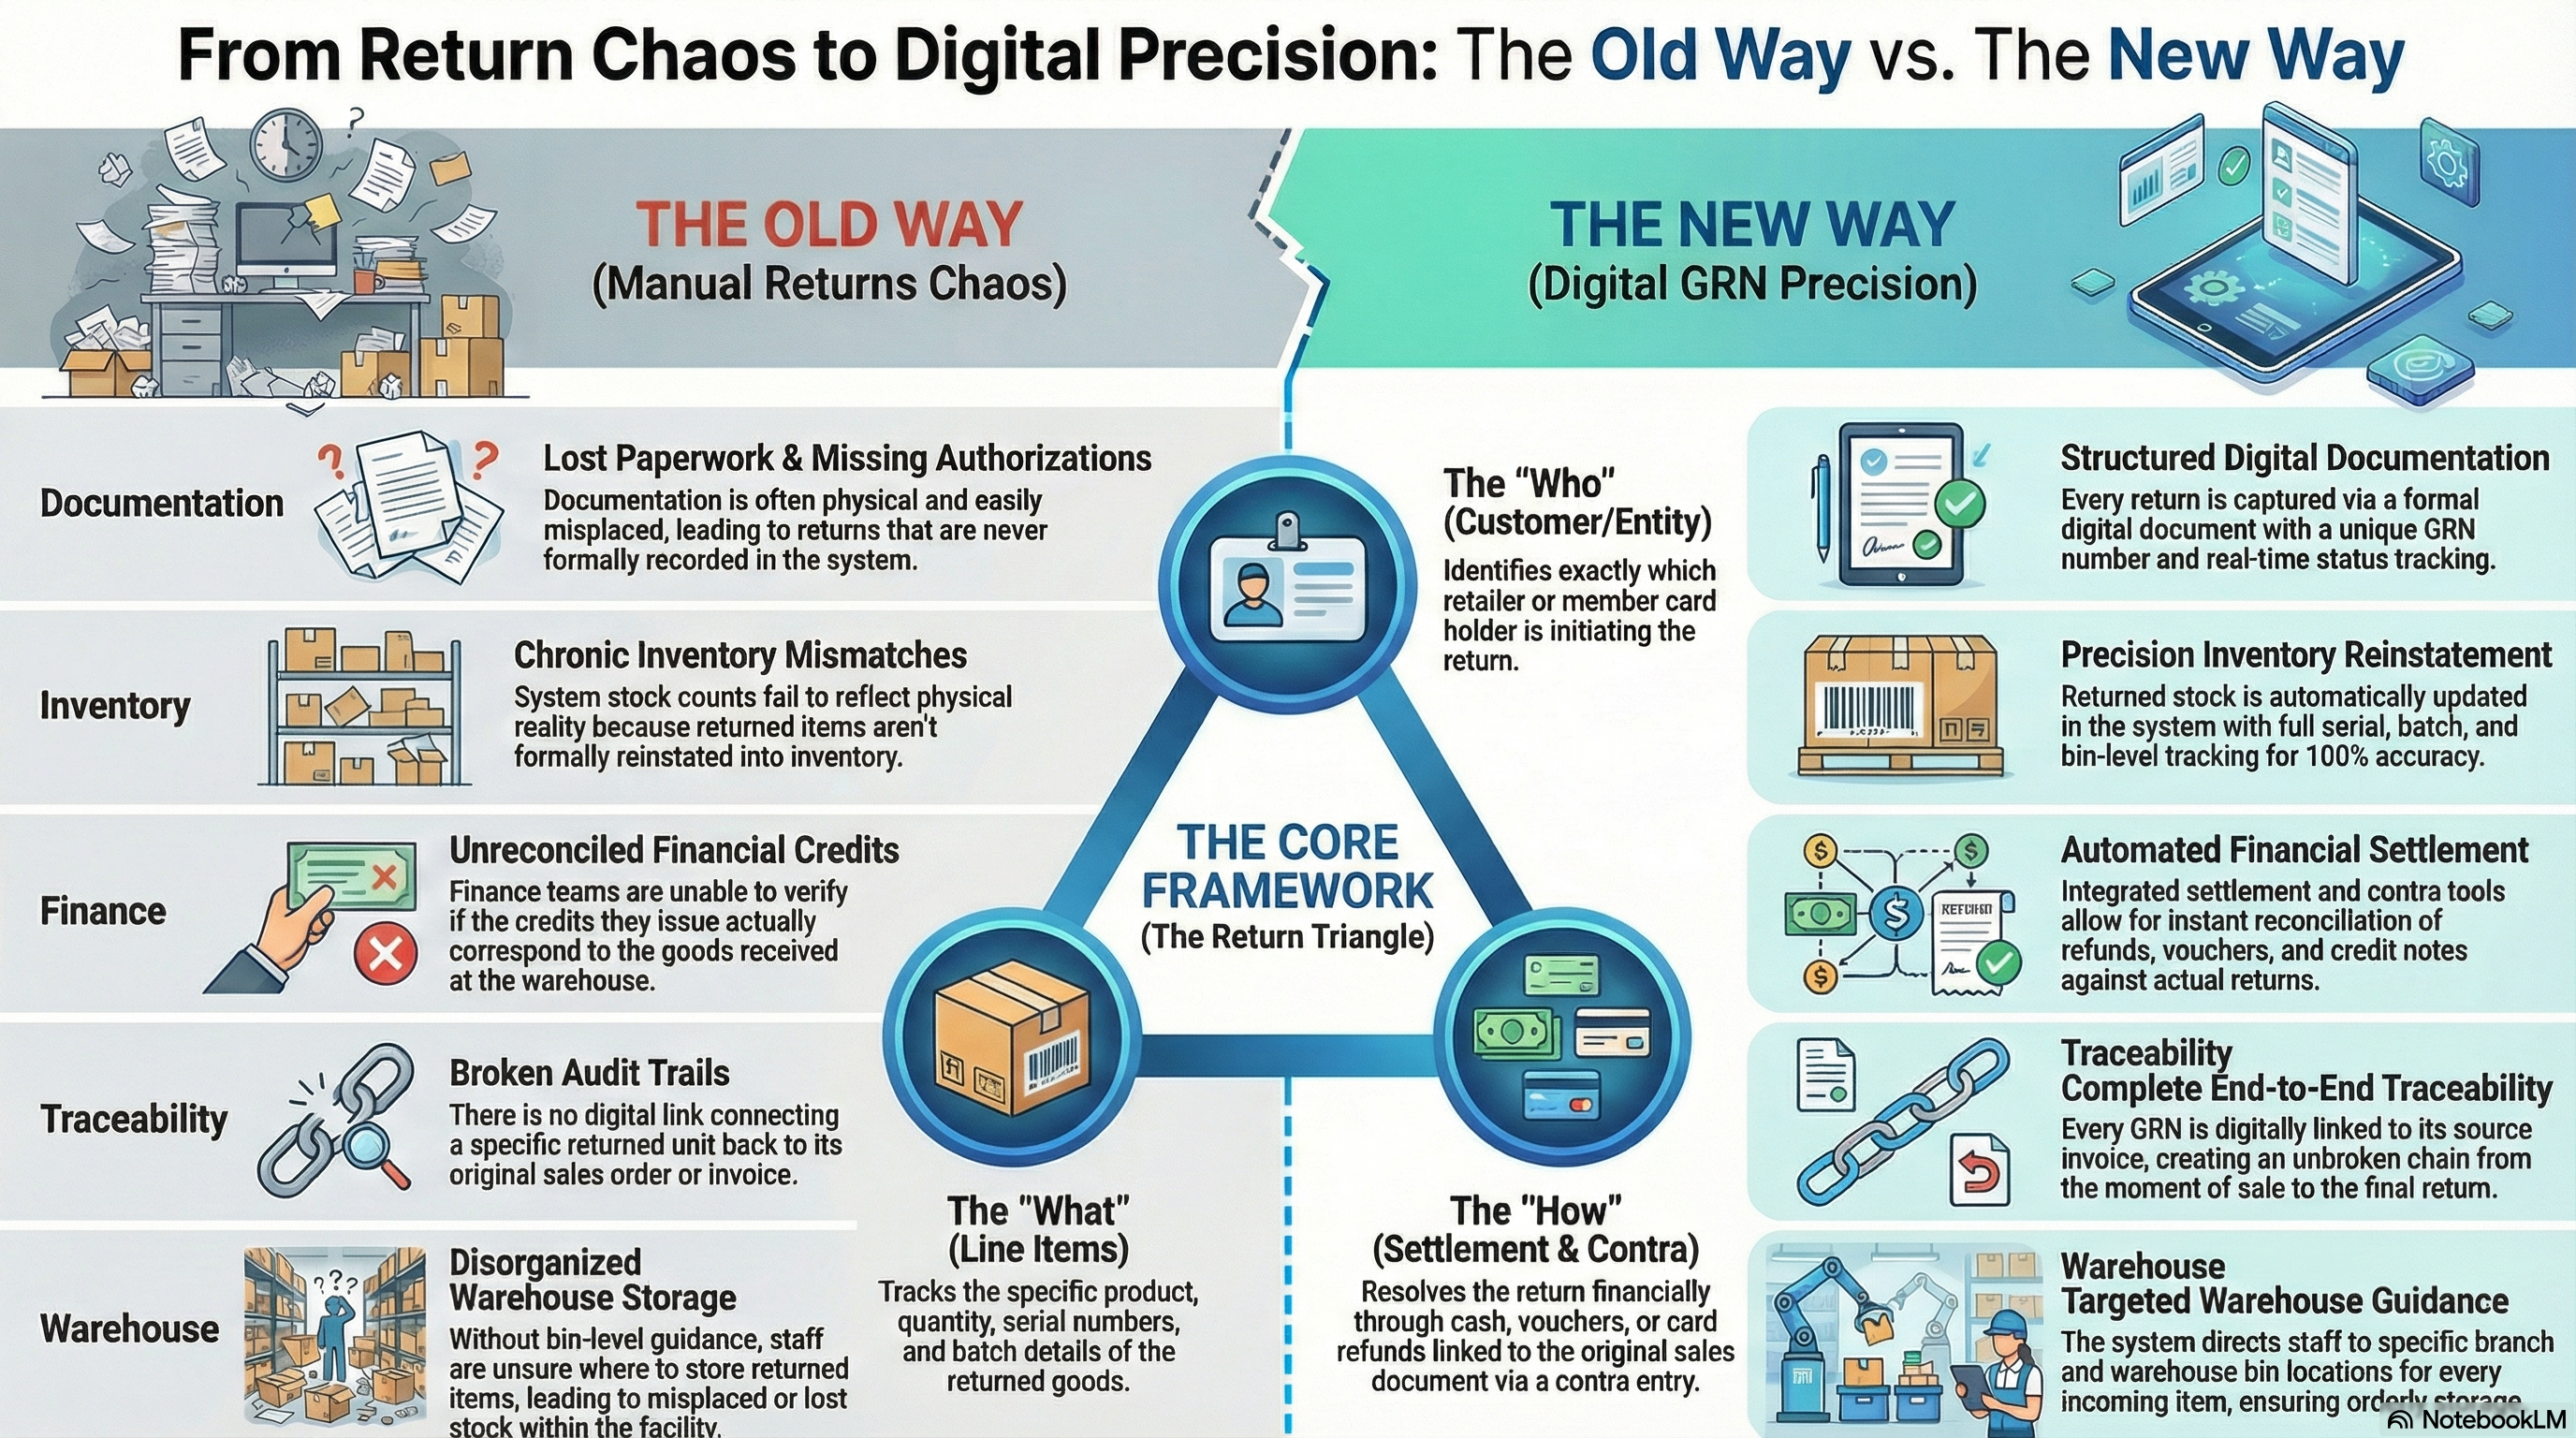
What Problems Does This Solve?
The Manual Returns Process Problem:
Traditional goods return management relies on ad hoc paperwork and fragmented communication between warehouse, sales, and finance. Common issues include:
- Lost return paperwork and missing return authorizations
- Inventory counts that never match because returned stock is not formally recorded
- Finance teams unable to reconcile credits issued against actual returned goods
- No traceability from a returned unit back to the original sale
- Warehouse staff unsure where to put returned goods without bin-level guidance
The Internal Sales GRN Solution:
- Structured return capture — Every return gets a formal document with header, line items, and status
- Inventory precision — Serial, batch, and bin tracking ensure returned stock is recorded exactly where it physically goes
- Financial resolution — Settlement and contra tools handle the money side automatically rather than manually
- Complete traceability — Every GRN links back to its source document, creating an unbroken chain from original sale to return
- Multi-location support — Returns can be directed to the correct branch and warehouse location
- Printable formats — Professional GRN documents for warehouse receiving and customer acknowledgement
Key Concepts
Understanding the GRN Framework
Every goods return process must address three fundamental aspects. The Internal Sales GRN Applet provides structured handling for all three:
| Aspect | Component | Practical Example |
|---|---|---|
| Who is returning? | Customer / Entity | Retailer ABC Sdn Bhd, Member Card holder |
| What is being returned? | Line Items with tracking | 2× Laptop, Serial SN-001, Bin B-02 |
| How is it resolved? | Settlement + Contra | Cash refund RM 2,400, linked to Invoice INV-0550 |
GRN Lifecycle
Think of the return process as a structured flow:
Customer Requests Return
│
├── GRN Created ──→ WHO is returning and WHEN?
│   │
│   └── Main Details (Branch, Location, Date, Reference)
│       │
│       └── Account (Customer entity, Billing + Shipping address)
│
├── Line Items ──→ WHAT is being returned?
│   ├── Item Details (code, qty, price)
│   ├── Serial / Batch / Bin Numbers
│   └── Costing + Pricing Details
│
└── Resolution ──→ HOW is it settled?
    ├── Settlement (Cash, Voucher, Card, Cheque, Points)
    ├── Contra (link to original invoice/delivery order)
    └── Attachments (inspection photos, authorization docs)
Flow Through the Lifecycle:
- Return Request: Customer contacts sales team to initiate return
- GRN Header: Branch, location, date, and customer captured
- Line Items: Every returned product recorded with quantity and tracking info
- Settlement: Financial resolution method agreed and recorded
- Contra: GRN linked to the originating sales document
- Finalize: GRN locked; stock reinstated and financials posted
This structure enables:
- Precise inventory control — goods go back to exactly the right location
- Complete financial reconciliation — every return ties to a source document
- Clear accountability — each return action is timestamped and attributed
- Audit-ready records — full document trail for finance and compliance teams
The “Return Triangle”
To effectively manage returns in the system, it is crucial to understand how Line Items, Settlements, and Contra Entries work together.
| Component | Analogy | Definition | Example |
|---|---|---|---|
| Line Item | The “What” | The actual returned product, quantity, and tracking details | 2× Laptop, SN-001, SN-002 |
| Settlement | The “Refund” | The method and amount used to compensate the customer | Cash back RM 2,400 |
| Contra Entry | The “Link” | The connection back to the original financial document being reversed | Invoice INV-2024-0550 |
How they link:
- You create a GRN Header (Branch, Customer, Date).
- You add Line Items (what was physically returned).
- You add a Settlement entry (how the customer is compensated).
- You add a Contra link (which original document this return offsets).
- When finalized, the system updates stock and posts the financial entries.
Quick Start Guide
Get up and running quickly with these role-specific workflows.
For Warehouse Staff: Record Your First Return
Goal: Create a GRN when goods are physically received back at the warehouse.
- Navigate: Go to Internal Sales GRN from the sidebar
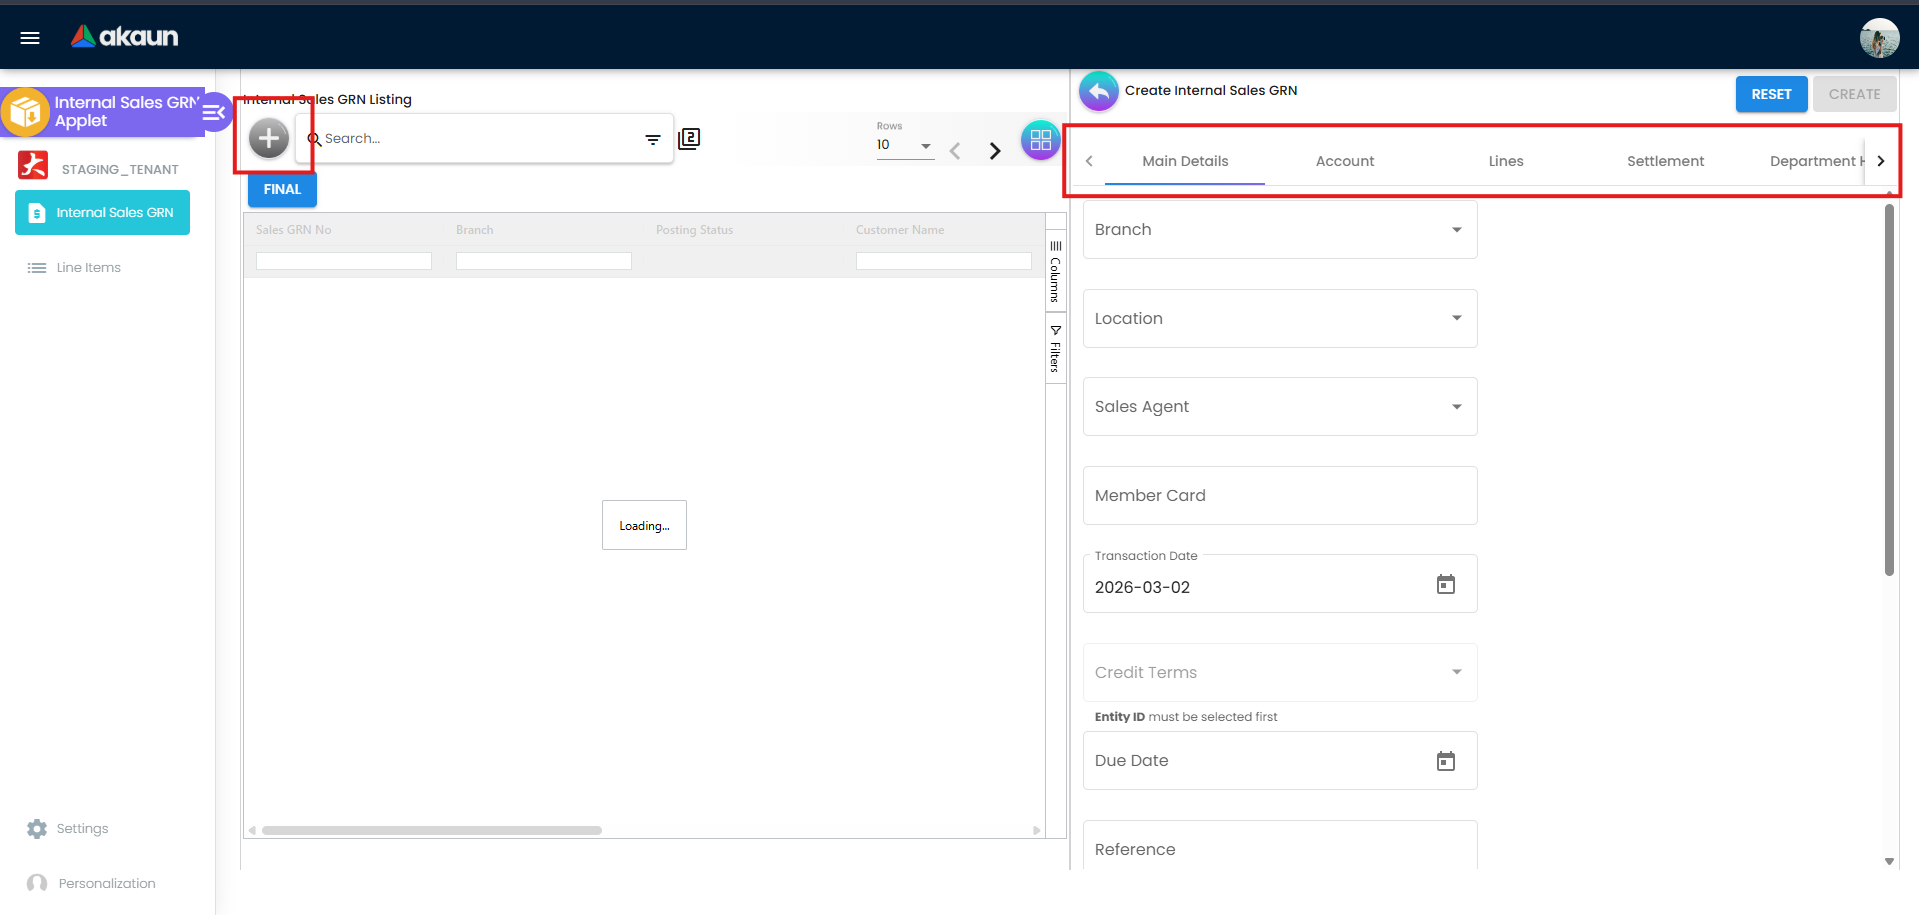
- Create New: Click "+" → A blank GRN form opens
- Fill Header:
- Select Branch and Location (where goods are being received)
- Select Sales Agent responsible for this customer’s account
- Set Transaction Date to today
- Add Reference (e.g., original invoice number or RMA code)
- Select Customer: Go to Account tab → Search and select the returning customer
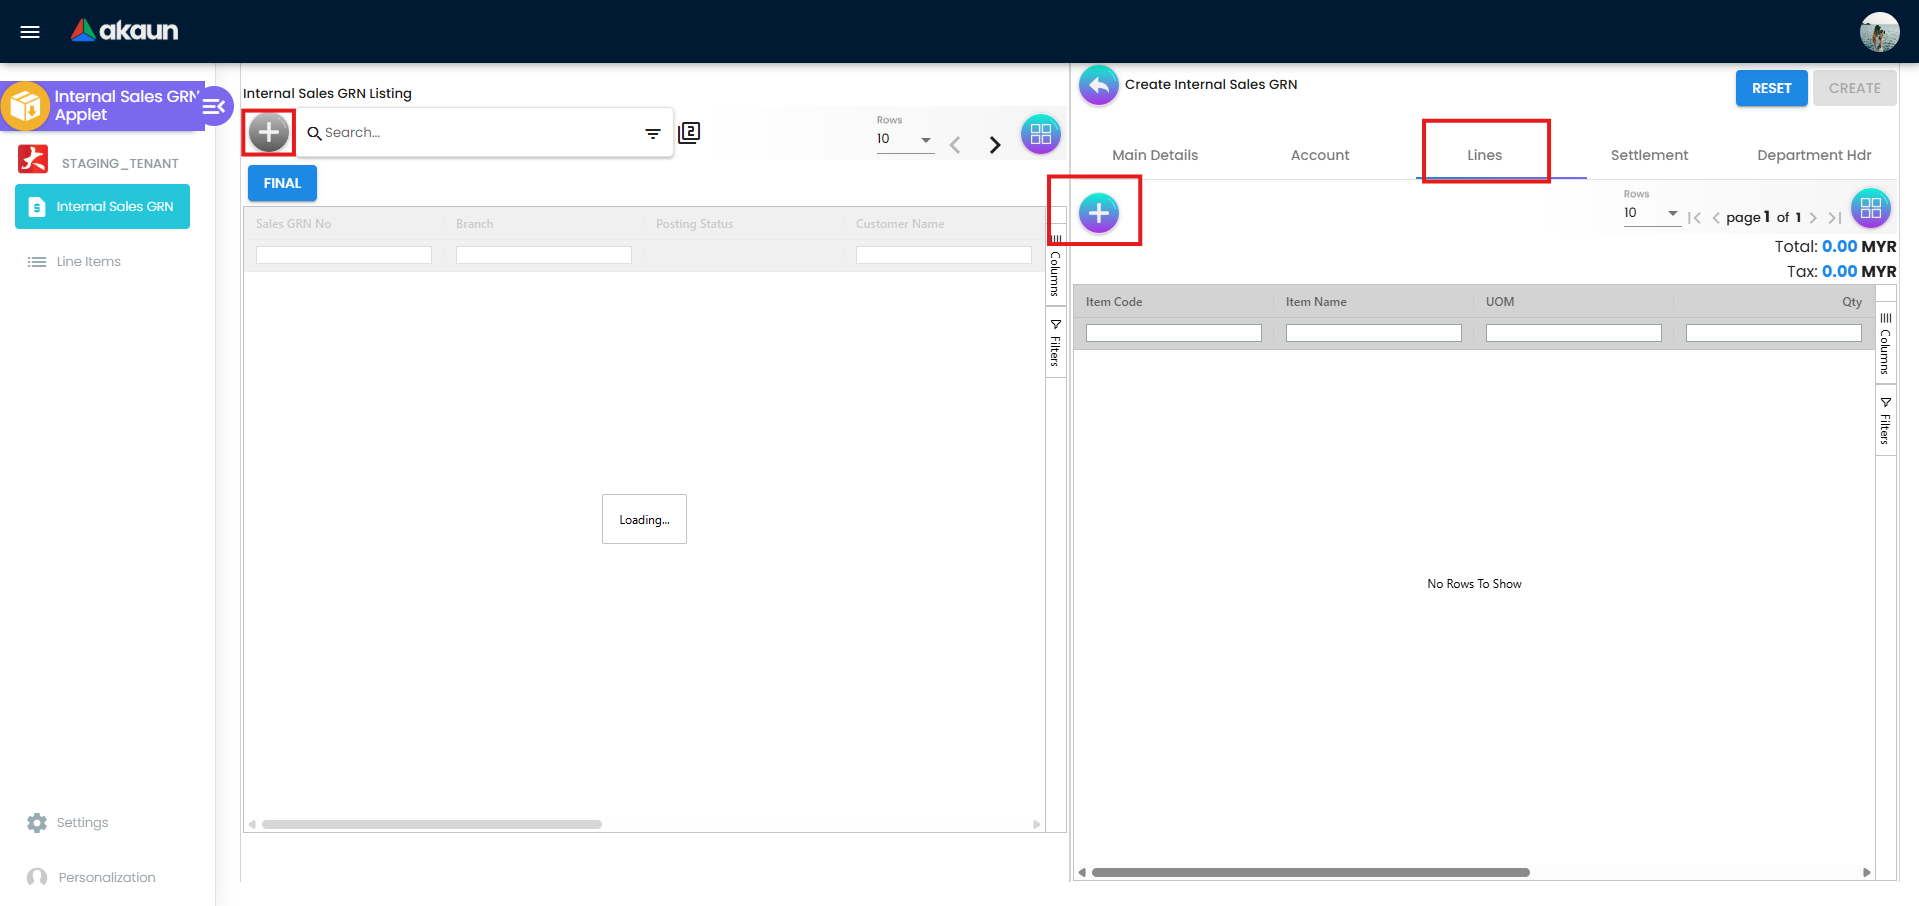
- Add Returned Items: Go to Lines tab → Click “Add Line Item”:
- Select item code
- Enter quantity returned
- Add serial/batch/bin numbers if required
- Attach Evidence: Go to Attachments tab → Upload inspection photos
- Finalize: Click Final → Stock is reinstated, document is locked
What happens next? Finance will process the settlement and post the contra entry. Stock is available again at the specified location.
Pro Tip: Always add a Reference number matching the original invoice or delivery order — it makes the Contra linking step much faster.
For Finance Teams: Process Your First Return Settlement
Goal: Verify line items and process the financial settlement in 4 steps.
- Find the GRN: Go to Internal Sales GRN → Use Advanced Search to find the return by Customer or Reference
- Review Line Items:
- Open the GRN → Go to Lines tab
- Verify quantities match the physical return receipt
- Check unit prices tie to the original invoice amount
- Add Settlement:
- Go to Settlement tab → Click “Add Settlement”
- Choose method: Cash Back / Voucher / Card / Cheque / Points
- Enter amount and transaction reference
- Link Contra:
- Go to Contra tab → Click “Add Contra”
- Search and select the original invoice or delivery order
- Enter the contra amount
Going on Leave? Make sure you hand over any open GRNs awaiting settlement to your deputy before you go — unprocessed settlements delay customer refunds.
For Admins: Initial System Setup
Goal: Get the GRN system ready for your team in 5 steps.
Step 1: Configure Default Branch and Location (Settings > Default Selection)
- Set the branch and warehouse location that pre-fill on new GRNs
- Saves warehouse staff from selecting the same values every time
Step 2: Set Up Field Configuration (Settings > Field Configuration / Application Settings)
- Toggle which fields are required vs optional vs hidden
- Tailor the GRN form to match your returns workflow
Step 3: Add Printable Formats (Settings > Printable Format Settings)
- Upload Jasper report templates for GRN documents
- Warehouse and finance staff can print professional GRN PDFs
Step 4: Configure Permissions (Settings > Permission Set)
- Define who can create, edit, finalize, and delete GRNs
- Assign permissions by user, team, or role
Step 5: Test End-to-End
- Create a test GRN as warehouse staff
- Process a test settlement as finance
- Print the GRN and verify the format
- Confirm stock is updated after finalization
Ongoing: Monitor the Line Items listing regularly to spot high-return products early.
New to the system? Start with the basics:
- Warehouse staff should create a test GRN with dummy items to practice the form
- Finance teams should open an existing GRN and explore the Settlement and Contra tabs
- Admins should review Configuration & Settings below for detailed setup guidance
Return Tracking
Monitor returned goods from receipt to resolution in real-time.
What is Return Tracking?
Return Tracking in the GRN Applet gives warehouse staff, sales teams, and finance managers full visibility into where every return stands — from the moment goods arrive back at the warehouse to final settlement and stock reinstatement. Think of it as your “return status dashboard.”
For Warehouse Staff:
- See which GRNs are drafts waiting for line items to be completed
- Confirm which returns have been finalized and stock reinstated
- Never lose track of a return that arrived but wasn’t formally recorded
For Sales Operations:
- Track return status per customer at any time
- Confirm that a customer’s return has been received and acknowledged
- Use the GRN number as the official reference when communicating with customers
For Finance/Management:
- Real-time visibility into open returns awaiting settlement
- Identify GRNs that have been finalized but not yet had a settlement processed
- Generate reports on return volumes by product, customer, or branch
How to Track a Return
From the GRN Listing:
- Go to Internal Sales GRN from the sidebar
- Use Posting Status column to filter returns by state
- Use Advanced Search to find returns by customer name, GRN number, or date range
Document States:
Customer Returns Goods → GRN Created → Lines Added → GRN Finalized
         │                   │              │               │
         │                   │              │               └── Stock reinstated, financials posted
         │                   │              └── Warehouse recording complete
         │                   └── Header created, awaiting line items
         └── Verbal/written return request received
GRN Posting Statuses
| Status | What It Means | What You Should Do |
|---|---|---|
| Draft | GRN created but not submitted | Complete line items and finalize |
| Posted | Financially posted | Verify settlement has been processed |
| Finalized | Fully locked and processed | No further action needed |
Tips for Teams
Warehouse Staff:
✓ Record Immediately: Create the GRN the moment goods arrive — don’t let returns sit on the floor unrecorded
✓ Photograph Everything: Use the Attachments tab for photographic evidence of return condition
✓ Check Serial Numbers: Scan serialized items carefully — the system validates them
✓ Use Reference Field: Always enter the original invoice or delivery order number
Finance Teams:
✓ Match Quantities: Always verify line item quantities against the physical receiving record before settling
✓ Link the Contra: Every GRN that closes out an invoice must have a contra entry — don’t skip this step
✓ Document Settlement Method: Customer requests cash? Voucher? Record it precisely so there are no disputes
✓ Review Open GRNs Daily: A quick daily check of unfinalized GRNs prevents accounts from going stale
For Warehouse Staff (Recording Returned Goods)
This section is your step-by-step guide to creating and completing a GRN when goods are returned.
Internal Sales GRN Listing — Your Returns Dashboard
What is the GRN Listing?
This is your main workspace — where you see every return record, create new GRNs, and track their progress. Think of it as the register for all goods that have come back through your warehouse door.
What You Can Do:
- ✓ Create new return records
- ✓ Open and edit draft GRNs
- ✓ Track whether a GRN has been finalized
- ✓ Search and filter by customer, date, or status
- ✓ Export records for reporting
How to Create a GRN (The Complete Journey)
Step 1: Create the GRN Header
- Click “Internal Sales GRN” from the sidebar
- Click "+" (Add New)
- Fill in:
- Branch: The branch receiving the returned goods
- Location: The warehouse location the goods are going to
- Transaction Date: Today’s date (date goods were physically received)
- Reference: Original invoice or RMA number (critical for linking!)
- Remarks: Condition of goods, reason for return, any notable damage
- Proceed to the Account tab
Step 2: Select the Customer
- Go to the Account tab
- Click Select Customer to search and pick the returning entity
- Verify billing and shipping address details are correct
- The system populates Entity ID, Name, and GL Code automatically
Step 3: Add Your Line Items
- Go to the Lines tab
- Click “Add Line Item” for each product being returned
- For each item:
- Item Code / Name: Select from inventory catalogue
- UOM: Confirm the unit of measure
- Qty: Enter the quantity physically received
- Unit Price: Verify against the original sale price
Handling Serialized Items:
- After saving the line item, open the Serial Number sub-tab
- Scan barcodes with a scanner or manually enter each serial number
- The system validates it immediately
Handling Batch Items:
- Open the Batch Number sub-tab
- Enter batch/lot number, issue date, and expiry date
- System warns if expiry date is before issue date
Handling Bin-Managed Stock:
- Open the Bin Number sub-tab
- Enter the bin code where goods are physically being placed
- System validates the bin code against warehouse configuration
Step 4: Attach Supporting Evidence
- Go to the Attachments tab
- Drag and drop photos of the returned goods, or click Upload File
- Each attachment records filename, size, upload date, and who uploaded it
Step 5: Finalize
- Click Final → GRN is locked
- Stock is reinstated at the specified branch and location
- Finance is notified to process settlement and contra
What Happens Next?
Warehouse Finalizes GRN → Finance Adds Settlement → Finance Links Contra → GRN Fully Resolved
              ↓                        ↓                       ↓
     Stock reinstated         Customer compensated      Books reconciled
Line Item Sub-Tabs Reference:
| Sub-Tab | When to Use | Key Fields |
|---|---|---|
| Item Details | Always | Code, Name, UOM, Qty, Unit Price, Tax |
| Serial Numbers | Serialized products | Serial No, validation status |
| Batch Numbers | Batch/lot controlled items | Batch No, Issue Date, Expiry Date, Qty |
| Bin Numbers | Bin-managed warehouses | Bin Code, Container Measure, Container Qty |
| Costing Details | Finance review | MAUC, FIFO, Manual Cost, Last Purchase Cost |
| Pricing Details | Pricing verification | Pricing Schema, Sales Price, Discount, Tax Amount |
| Issue Link | After-sales / quality teams | Issue No, Summary, Assignee, Resolved Date |
Common Scenarios:
Scenario 1: Single Defective Unit Return
Customer: ABC Sdn Bhd
Returns: 1x Premium Laptop (serialized)

Steps:
1. Create GRN — Branch: HQ, Location: Main Warehouse
2. Account tab — Select ABC Sdn Bhd
3. Lines tab — Add item SKU-L001, Qty: 1
4. Serial Number sub-tab — Enter SN-LAPTOP-98765
5. Attachments — Upload photo of cracked screen
6. Finalize → 1 unit back in stock at Main Warehouse
Scenario 2: Bulk Batch Return (Near-Expiry)
Retailer returns 50 units of Product X, batch B-20240315

Steps:
1. Create GRN — Reference: "Expiry Return - Retailer ABC"
2. Account tab — Select Retailer ABC
3. Lines tab — Add Product X, Qty: 50
4. Batch Number sub-tab — Batch: B-20240315, Expiry: 2024-06-30
5. Finalize → 50 units restocked (batch-tracked)
Scenario 3: Partial Return from Larger Order
Customer ordered 10 units, returning 3 as incorrect model

Steps:
1. Create GRN — Reference: SO-2024-0887
2. Add 3 Line Items (only the 3 mismatched units)
3. Scan 3 serial numbers
4. Finalize → 3 units back in stock; 7 remain with customer
Tips for Fast and Accurate GRNs:
✓ Reference Always: Enter the original invoice or SO number — Finance can’t link the contra without it
✓ Scan, Don’t Type: Use a barcode scanner for serials — typing errors cause validation failures
✓ Photo the Goods: Return disputes are resolved much faster with visual evidence
✓ Check Bin Availability: Confirm the bin can physically accept the returned goods before entering it
✓ Same Day Finalization: Finalize the GRN the same day goods are received — don’t leave it as a draft overnight
❌ Common Mistakes:
- Creating a GRN without a Reference number (Finance cannot link contra)
- Entering a serial number with a typo (system rejects it and you must re-enter)
- Forgetting to add batch expiry dates (causes batch tracking gaps)
- Not attaching photos of damaged goods (leads to disputes with customers)
- Leaving GRNs in Draft status (stock is not reinstated until Finalized)
Line Items — Cross-Transaction View
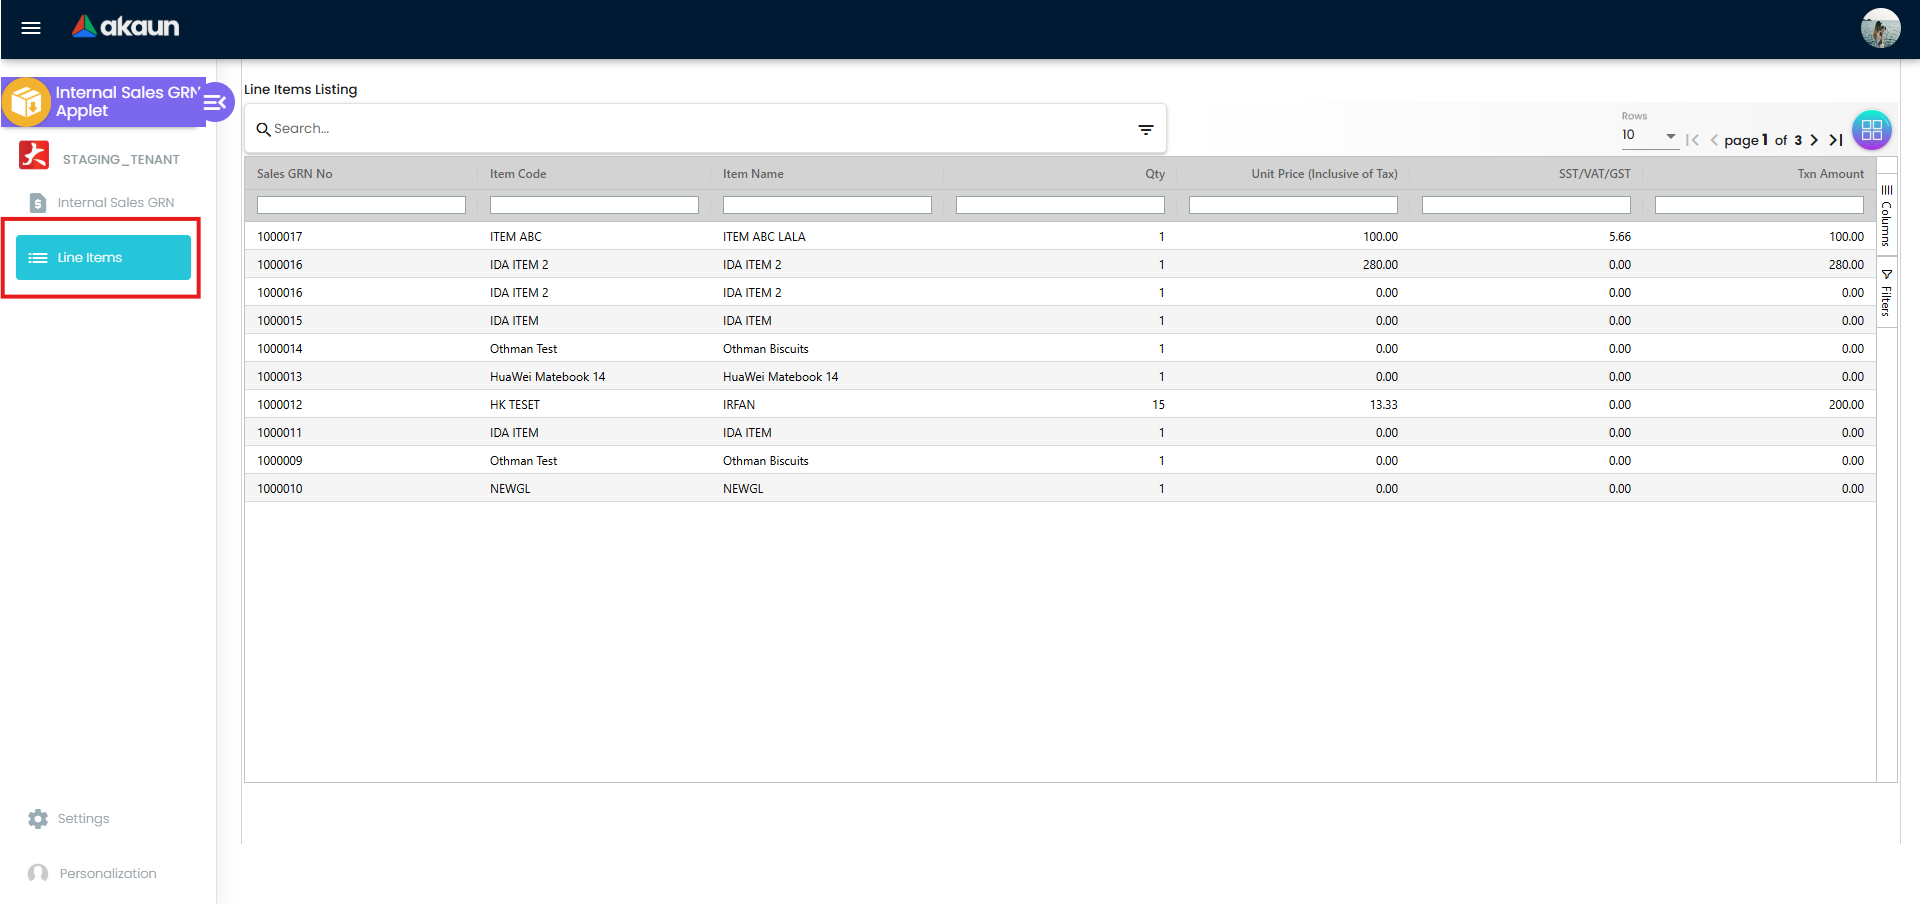
What is the Line Items Page?
While the Internal Sales GRN listing shows complete return documents, the Line Items page shows every individual returned product across all GRNs — one row per item line. It’s like having a complete itemized return history.
Why Is This Useful?
For Warehouse Teams:
- Track return volumes for a specific product (“How many Laptops have we received back this month?”)
- Spot patterns in high-return items that might indicate a quality issue
- Find a specific serial number across all return records
For Finance Teams:
- Verify all line items are accounted for before processing batch settlements
- Cross-reference return quantities with settlement amounts
How to Use It:
Find All Returns of a Specific Product:
- Go to Line Items from the sidebar
- Filter by: Item Code =
SKU-L001 - Date Range: Jan–Mar 2026
- Result: Every GRN line where that product was returned
Find a Specific Serial Number:
- Filter by: Serial Number =
SN-LAPTOP-98765 - Result: Immediately find which GRN received that unit
Monthly Return Volume Report:
- Filter by: Month = February 2026
- Export to Excel
- Use for management reporting on return volumes
For Finance Teams (Processing Return Settlements)
This section is your guide to managing the financial side of goods returns.
Settlement — Your Financial Resolution Tool
What is Settlement?
Settlement is the financial record of how a customer is compensated for returned goods. Think of it as the “refund receipt” — it records exactly how much was paid back and by what method.
Why This Matters:
For Finance:
- Ensures every return has a matching financial transaction in the books
- Prevents customers from claiming they were never compensated
- Provides a clear paper trail for auditors
For Customers:
- Fast, transparent resolution of their return
- Clear record of refund method and amount
- No ambiguity about when and how they were compensated
Settlement Methods Explained:
| Method | Description | When to Use | Additional Info Required |
|---|---|---|---|
| Cash Back | Direct cash refund | Customer requests cash | Transaction No, Amount |
| Voucher | Store voucher issued | Customer prefers store credit | Voucher code, Amount |
| Card | Credit back to card | Original payment was by card | Card No, Issuer, Expiry, CVV |
| Cheque | Payment by cheque | Large-value B2B returns | Cheque No, Date |
| Rebate Point | Loyalty points credited | Member card holder | Point CCY, Amount |
| Gold / Silver | Commodity settlement | Specialist trade scenarios | Year, Size, Amount |
How to Process a Settlement (Step-by-Step):
Step 1: Open the GRN
- Go to Internal Sales GRN from the sidebar
- Search using the GRN number or customer name
- Click to open the record
Step 2: Verify Line Items
- Go to the Lines tab
- Confirm quantities match the physical receiving report
- Check that unit prices tie to the original sale — do not overpay!
- Note the total value of returned goods
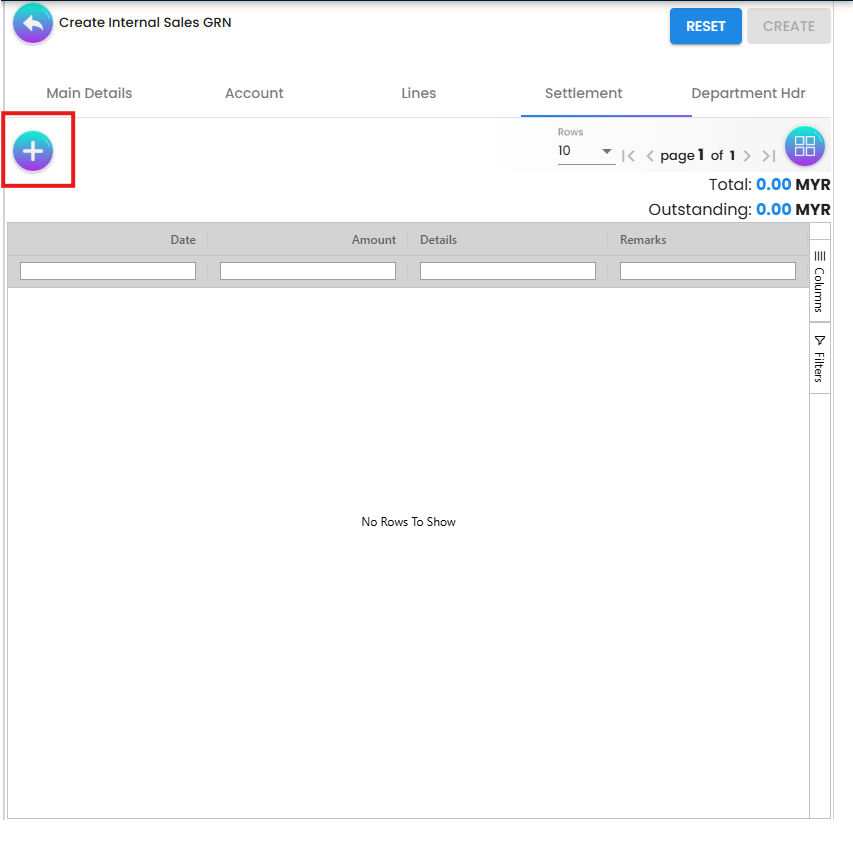
Step 3: Add a Settlement
- Go to the Settlement tab
- Click “Add Settlement”
- Select the settlement method (Cash Back, Voucher, etc.)
- Enter:
- Amount: Total settlement amount
- Transaction No: Reference number (e.g., voucher code, cheque number)
- Date: Date of settlement
- Remarks: Any notes for the record
- Save
Step 4: Edit or Remove a Settlement
- Click “Edit Settlement” on an existing entry if corrections are needed
- Settlements can only be modified before the GRN is finalized
What Happens Next?
Settlement Saved → GRN Finalized → Financial Posting → Customer Compensated
      ↓                 ↓                ↓
  Amount locked     Stock updated    Contra posted
Contra Linking — Your Reconciliation Tool
What is a Contra Entry?
A Contra entry links the GRN to the original sales document it is offsetting. Without this link, your accounts will show both the original invoice and the return as independent entries — creating a reconciliation nightmare.
Contra Flow:
Original Invoice Posted:    +RM 5,000 (revenue)
GRN Created (return):       −RM 1,200 (partial return)
Contra Linked:              System offset INV-0550 by RM 1,200
Net Result:                 RM 3,800 outstanding
How to Add a Contra Entry (Step-by-Step):
Step 1: Go to the Contra Tab
- Open the relevant GRN
- Click the Contra tab
Step 2: Select Source Document
- Click “Add Contra” (or “Contra Select Document”)
- Search by document number or date
- Select the original invoice, delivery order, or other source document
Step 3: Enter Contra Amount
- Enter the Contra Amount — this is the portion of the original document being offset
- Verify Doc Date matches the originating document date
- Save
Step 4: Verify
- The Contra tab now shows the linked document
- Click “Edit Contra” if adjustments are needed before finalization
Common Settlement & Contra Scenarios:
Scenario 1: Full Refund on Faulty Goods
GRN: 1× Laptop returned, value RM 2,400
Settlement: Cash Back RM 2,400 (Txn No: CASH-001)
Contra: Link to Invoice INV-2024-0550 for RM 2,400
Result: Invoice fully offset, customer refunded RM 2,400
Scenario 2: Partial Return — Customer Keeps Rest
GRN: 3 of 10 units returned, value RM 720
Settlement: Voucher RM 720 (Voucher: VCH-0088)
Contra: Link to SO-2024-0887 for RM 720 (partial offset)
Result: Invoice reduced by RM 720; customer has a RM 720 voucher
Scenario 3: B2B Return with Cheque Payment
GRN: Retailer returns 50 units, value RM 4,250
Settlement: Cheque No CHQ-20240315 for RM 4,250
Contra: Link to Invoice INV-2024-1120 for RM 4,250
Result: Invoice fully cleared; cheque payment logged
Best Practices for Finance Teams:
✓ Same-Day Settlement: Process settlements the same day a GRN is received from warehouse
✓ Always Link Contra: Never finalize a settlement-carrying GRN without a contra entry
✓ Match Amounts: Settlement amount + Contra amount should equal the GRN line items total
✓ Record Transaction No: Always capture the voucher code, cheque number, or card reference
✓ Audit Attachments: Before settling, check the Attachments tab for inspection evidence
❌ Common Mistakes:
- Processing a settlement without verifying warehouse has actually received the goods (check Finalize status first)
- Entering the wrong contra amount (creates unreconciled differences)
- Forgetting to add a contra entry (leaves the original invoice as fully outstanding)
- Not recording the settlement transaction number (creates untraceable refunds)
Configuration & Settings
The Settings page provides access to system-wide configuration for the Internal Sales GRN Applet. Navigate via the Settings option in the sidebar.
Application Settings
Feature Visibility:
Toggle which features and menu items are visible within the applet. Useful for hiding functionality that is not part of your current business workflow (e.g., hide the Issue Link sub-tab if you don’t use issue tracking).
Field Configuration:
Control field-level behaviour on GRN create and edit forms:
- Set fields as Required — users cannot save without completing them
- Set fields as Optional — shown but not mandatory
- Set fields as Hidden — removed from view entirely
Tailoring the form to your process reduces errors and speeds up data entry.
Default Selection
Set defaults that will pre-populate when creating new GRN records, reducing repetitive data entry.
| Setting | Purpose | Example |
|---|---|---|
| Default Branch | Pre-fills Branch on new GRNs | Headquarters |
| Default Location | Pre-fills warehouse location | Main Warehouse |
| Default Language | Sets display language | English, Bahasa Malaysia, 中文 |
How to Configure Defaults:
- Go to Settings from the sidebar
- Click Default Selection
- Select your Default Branch from the dropdown
- Select your Default Location (auto-filters by selected branch)
- Select your Default Language
- Click Save
Personal Override: Individual users can set their own personal defaults under Personalization > Personal Default Selection, which will override the system-wide defaults just for their account.
Printable Format Settings
Manage GRN print templates used to generate professional PDF documents for warehouse receiving and customer acknowledgement.
| Field | Description |
|---|---|
| Format Code | Short identifier for the template (e.g., GRN-STD) |
| Format Name | Descriptive name (e.g., Standard GRN, Customer Copy GRN) |
| File Name | The Jasper report filename on the server |
How to Add a Printable Format:
- Go to Settings > Printable Format Settings
- Click “Add Printable Format”
- Enter Format Code, Format Name, and File Name
- Save
Once configured, warehouse staff can go to a GRN’s Export tab and select the correct format to generate a PDF.
Webhook
Configure webhook notifications to push GRN lifecycle events (create, update, finalize) to external systems.
Common Use Cases:
- Trigger a 3PL (third-party logistics) notification when a GRN is finalized
- Push return data to an ERP or accounting system
- Send alerts to a Slack or Teams channel when a high-value return is recorded
Permissions
Control who can access and perform actions within the Internal Sales GRN Applet. The system supports granular permission management:
| Permission Type | Description |
|---|---|
| Permission Set | Define named groups of permissions (e.g., “Warehouse Operator”, “Finance Manager”) |
| User Permission | Assign or restrict access for individual named users |
| Client-Side Permission | Control which UI buttons and fields are visible to each permission level |
| Team Permission | Assign a permission set to an entire team |
| Role Permission | Assign permissions across all users holding a specific role |
Recommended Permission Levels:
| Role | Recommended Permissions |
|---|---|
| Warehouse Staff | Create GRN, Add Line Items, Add Attachments, View |
| Finance Officer | Add Settlement, Add Contra, Finalize GRN, View |
| Sales Manager | View All GRNs, Export, Run Line Items listing |
| System Admin | Full Access including Settings and Permission Management |
Personalization
The Personalization section lets individual users set their own preferences that override system-wide defaults.
Personal Default Selection
Set your personal default Branch and Location. When you create a new GRN, these values will be pre-filled instead of the system defaults.
How to Set Personal Defaults:
- Go to Personalization from the sidebar
- Click Personal Default Selection
- Select your preferred Branch
- Select your preferred Location
- Click Save
Who Should Use This?
- Warehouse staff who always work from one specific location
- Finance officers who handle returns for one specific branch
- Anyone who finds themselves changing the default fields on every GRN
Sidebar
Customize your sidebar navigation layout to put your most-used features front and centre.
Common Scenarios
Scenario 1: Customer Returns a Faulty Product
Situation: Customer reports a cracked screen on a premium laptop.
Action: Warehouse receives unit, Finance processes refund.

1. Create GRN → Branch: HQ, Location: Main Warehouse
2. Account → Select Customer: ABC Sdn Bhd
3. Lines → Add Item: SKU-L001 (Laptop), Qty: 1, Unit Price: RM 2,400
4. Serial Numbers → Enter: SN-LAPTOP-98765
5. Attachments → Upload: Photo of cracked screen
6. Finalize → Stock reinstated
7. Settlement → Cash Back RM 2,400, Txn: CASH-20260302
8. Contra → Link Invoice INV-2024-0550, Amount RM 2,400

Result: Customer refunded, 1 unit back in stock, invoice fully offset.
Scenario 2: Batch Return Due to Near-Expiry
Situation: Retailer returns 50 units of Product X, expiry approaching.

1. Create GRN → Reference: "Expiry Return - Retailer ABC"
2. Account → Select: Retailer ABC Distribution
3. Lines → Add: Product X, Qty: 50, Batch: B-20240315, Expiry: 2024-06-30
4. Costing Details → MAUC: RM 8.50/unit
5. Finalize → 50 units returned to stock (batch-tracked)
6. Settlement → Voucher RM 425 (50 × RM 8.50), Voucher: VCH-0099
7. Contra → Link Delivery Order DON-2024-0120, Amount RM 425

Result: 50 units restocked, retailer receives RM 425 voucher.
Scenario 3: Partial Return — Customer Keeps Remainder
Situation: Customer ordered 10 units, 3 were wrong model.

1. Create GRN → Reference: Original SO-2024-0887
2. Add 3 Line Items (only the 3 mismatched units)
3. Scan 3 serial numbers (not the 7 retained units)
4. Settlement → Voucher RM 900 (3 × RM 300)
5. Contra → Link Invoice INV-2024-0887 for RM 900 (partial offset)
6. Finalize → 3 units restocked; 7 remain with customer

Result: Partial return resolved; original invoice reduced by RM 900.
Scenario 4: B2B Return with GL Dimension Allocation
Situation: Enterprise client returns goods to be charged to specific cost centre.

1. Create GRN → Standard header fields
2. Lines → Add returned items
3. Department Hdr tab → Set:
   - Segment: Retail Division
   - Profit Centre: PC-KL-001
   - Project: Q1-Returns-2026
4. Settlement → Cheque CHQ-20260315 for full value
5. Contra → Link posted invoice
6. Finalize → Return costs allocated to the correct GL dimension

Result: Finance can track return costs against the correct profit centre.
FAQ
Q: What is the difference between a Sales GRN and a Sales Return Note (Credit Note)? A: A Sales GRN (Goods Return Note) records the physical receipt of returned goods and triggers inventory reinstatement. A Sales Return / Credit Note is the financial document that adjusts the customer’s account balance. In this applet, the GRN handles both the stock movement (via line items) and the financial resolution (via settlements and contra entries) — making it the single source of truth for the entire return.
Q: Does finalizing a GRN automatically update stock levels? A: Yes. Once a GRN is finalized, the system automatically restocks the returned quantities at the specified Branch and Location. Draft GRNs do not affect inventory.
Q: Can I link a GRN to multiple original invoices at once? A: Yes. The Contra tab supports multiple contra entries. You can link a single GRN to several source documents by clicking “Add Contra” multiple times, once for each originating document.
Q: What happens if I enter the wrong serial number? A: The system validates serial numbers in real time. An invalid serial number will trigger a “The serial number is invalid” error immediately. Correct the entry before saving the line item.
Q: Can I create a GRN for a customer without a Member Card? A: Yes. The Member Card field is optional. It is only required when the return involves a loyalty program member whose points or balance may be affected.
Q: How do I print a GRN document to give to the customer as a return acknowledgement? A: Open the GRN, go to the Export tab, and select the appropriate Printable Format. Click Export as PDF to generate the document. Ensure that at least one Printable Format has been configured under Settings first.
Q: Can I edit a GRN after it has been finalized? A: Finalized GRNs are locked and cannot be directly edited to protect the integrity of posted inventory and financial records. If a correction is needed after finalization, contact your system administrator — a reversal or adjustment entry may be required.
Q: What does the “Posting Status” mean in the GRN listing? A: Posting Status reflects the financial processing state of the return:
- Draft — Created but not finalized; no stock or financial impact yet
- Posted — Financially processed; stock has been updated and accounts posted
- Finalized — Fully locked; all actions completed
Q: How do I handle a return where the customer’s original currency was USD but we operate in MYR? A: Select the appropriate Currency in the GRN header when creating the document. The applet supports multi-currency transactions. Ensure your system’s currency settings and exchange rates are configured before processing foreign-currency returns.
Q: Can I prevent specific users from finalizing GRNs? A: Yes. Use the Permission settings under Configuration & Settings to assign restrictive permissions to specific users or roles. You can grant Create and Edit access without granting Finalize access, ensuring a second person (e.g., a finance supervisor) must finalize after warehouse staff completes the data entry.
Q: What’s the difference between a GRN and a regular stock adjustment? A: A GRN specifically tracks returns from customers with full traceability back to the original sale, including financial settlement and contra entries. A stock adjustment is a general inventory correction that doesn’t link to customer transactions or require financial reconciliation.
Q: Can I bulk import GRNs from Excel? A: This depends on your system configuration. Contact your administrator to check if bulk import functionality is enabled. Generally, GRNs are created individually to ensure proper receipt verification and documentation.
Q: How long should we keep GRN records? A: Follow your company’s document retention policy, typically 7 years for financial and tax compliance. Finalized GRNs are locked and cannot be deleted, ensuring a complete audit trail.
Q: What happens if a customer returns goods after the cut-off period? A: The system typically allows GRN creation but may flag it for manager approval if the return date is beyond policy limits. Check your company’s returns policy — most allow 30-90 days from original purchase.
Q: Can I create a GRN for goods that were never sold (e.g., free samples being returned)? A: The system is designed for returns against sales transactions. For sample returns or other non-sales scenarios, consult your finance team about the correct accounting process — this may require a different document type.