Consignee Stock Transfer
Overview
The Consignee Stock Transfer applet moves stock that you still own between your own locations and consignee locations — a partner showroom, a customer site or a dealer’s shelf where your goods sit until they are sold or returned. Consignee locations are ordinary locations flagged with location class CCSG; a Consignment Goods Issued Note sends stock to one and a Consignment Goods Received Note brings it back.
Unlike the two-step Stock Transfer, each note is a single document: finalising it takes the quantity out of Location From and puts it into Location To in the same posting, so there is no in-transit queue. Both notes carry quantity only and post nothing to the General Ledger — the stock stays on your balance sheet at cost wherever it physically is.
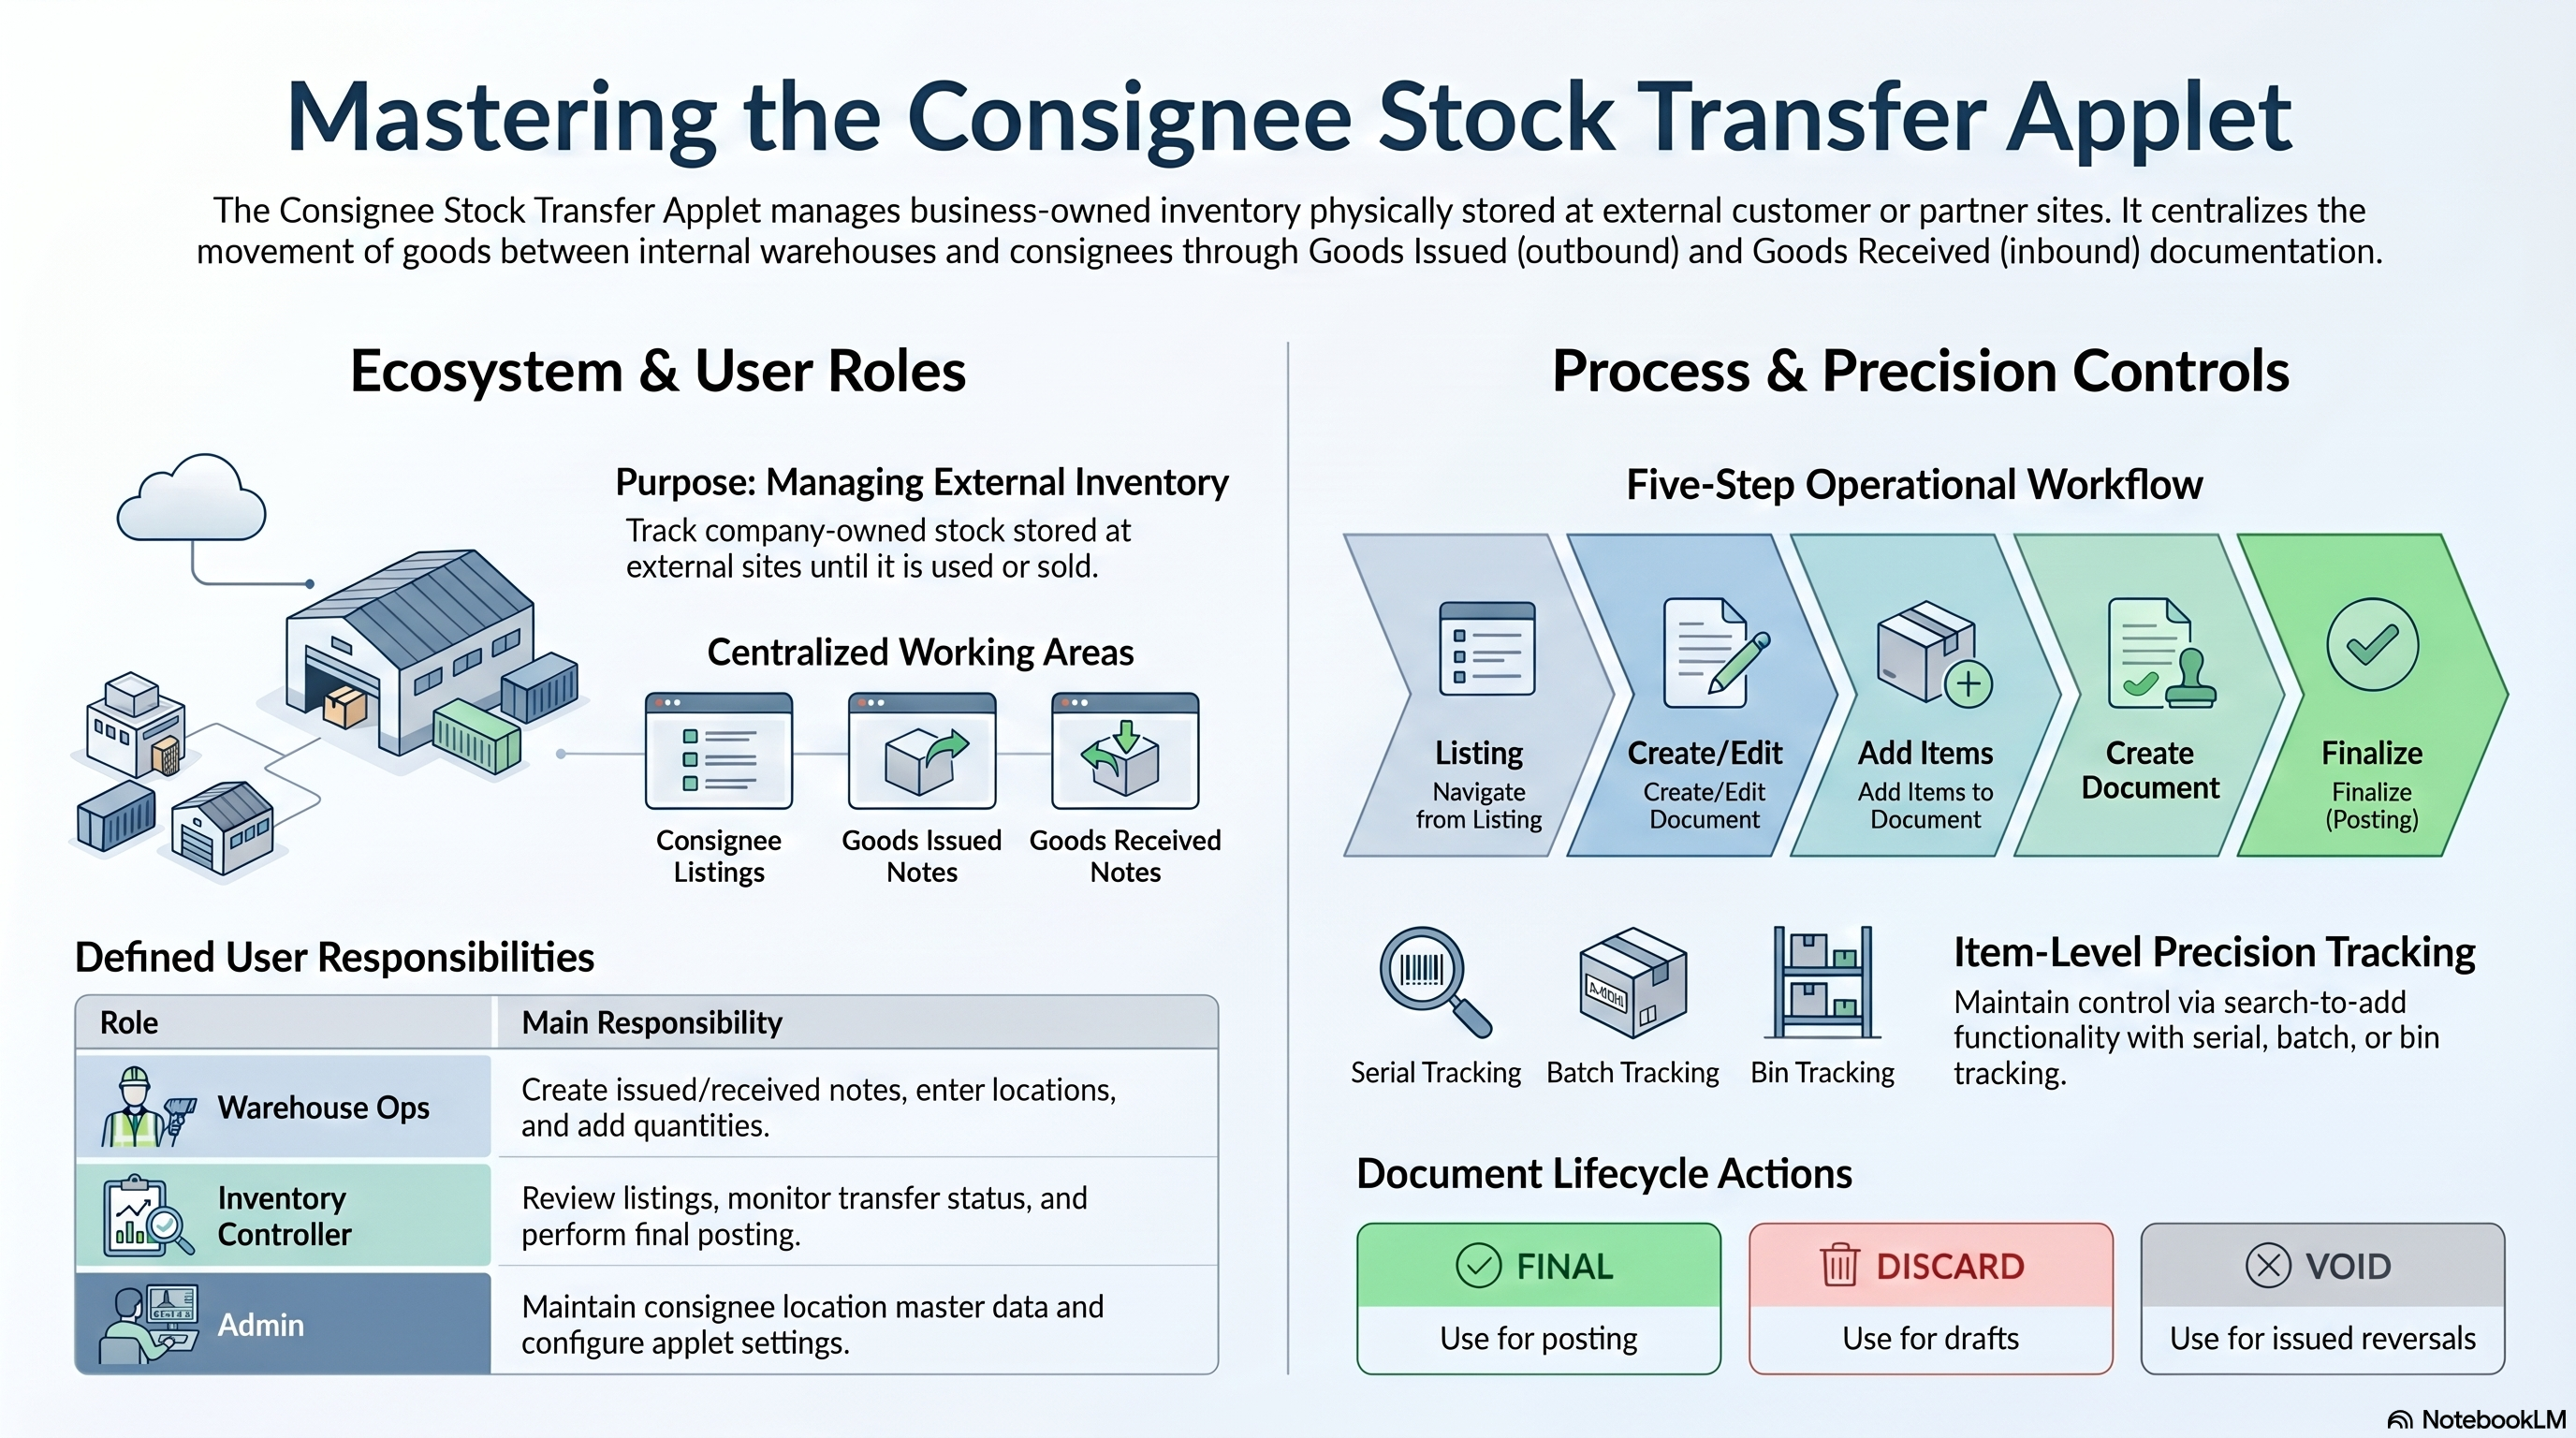
Where it fits
| Direction | Applet / document | Why |
|---|---|---|
| Upstream | Organisation | Companies and branches that a consignee location belongs to; the location itself is created in this applet’s Consignee Listing |
| Upstream | Inventory Item Maintenance / Doc Item Maintenance | Items and their tracking type (serial, batch, bin) |
| Downstream | Stock Balance, Stock Availability, Stock Report | Balance per location; the consignee location shows what is out on consignment |
| Sibling | Stock Transfer | Two-step transfer with a queue, for movements between your own locations |
| Sibling | Customer Consignment | Consignment sales and billing to the consignee, once goods are sold |
Modules: Inventory.
Screens and menus
| Menu | Purpose |
|---|---|
| Consignee Listing | Create and maintain locations (including consignee locations of class CCSG) |
| Consignment Goods Issued Note | Listing and create / edit of notes that send stock to a consignee location |
| Consignment Goods Received Note | Listing and create / edit of notes that bring stock back from a consignee location |
Gear (Settings) menu: Field Settings (Application Settings), Default Selection, Printable Format Settings, plus Webhook and the permission listings. Personalisation: per-user Field Settings and Default Selection.
Consignee Listing
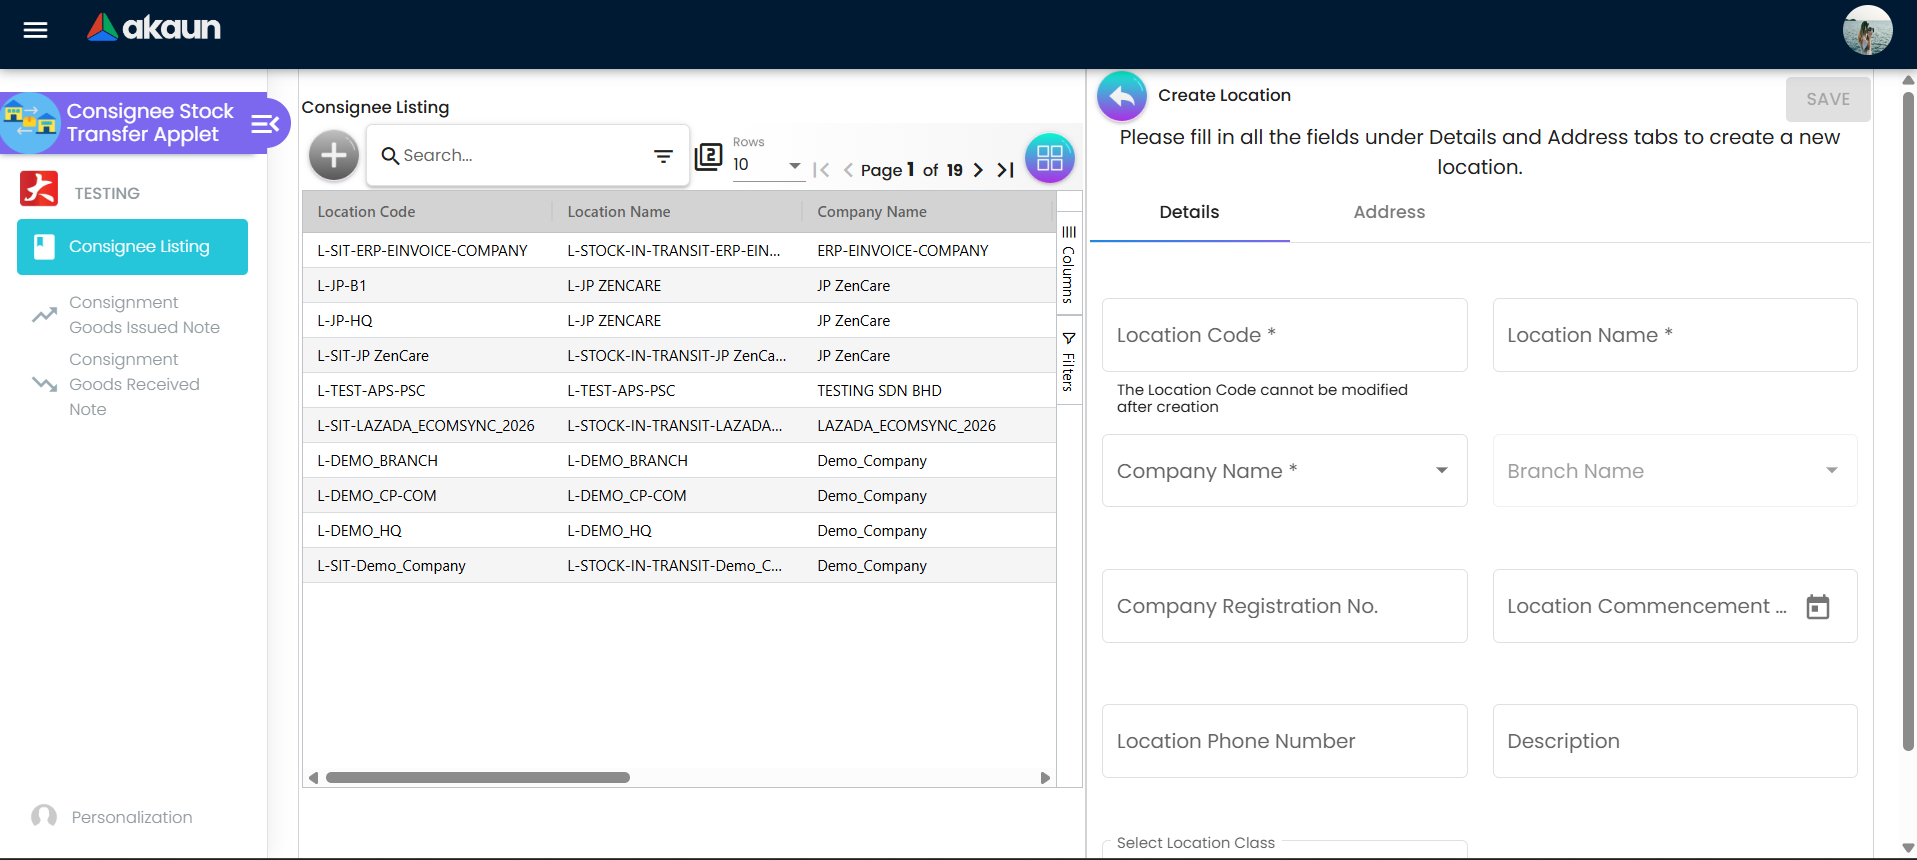
A grid of locations with Location Class and Status columns. + opens Create Location with Details (Company Name, Branch Name, Location Code, Location Name, Description, Location Class — CCSG for a consignee, blank / BASIC otherwise — commencement and closed dates, phone, mobile, fax, email, outlet type and size, currency, status) and Address (address lines 1–5, city, postal code, state, country). Editing adds Branch, Extension and Labels tabs. These are the same bl_inv_mst_location records the rest of the system uses; only the CCSG class makes a location selectable as the consignee side of a note.
Consignment Goods Issued Note
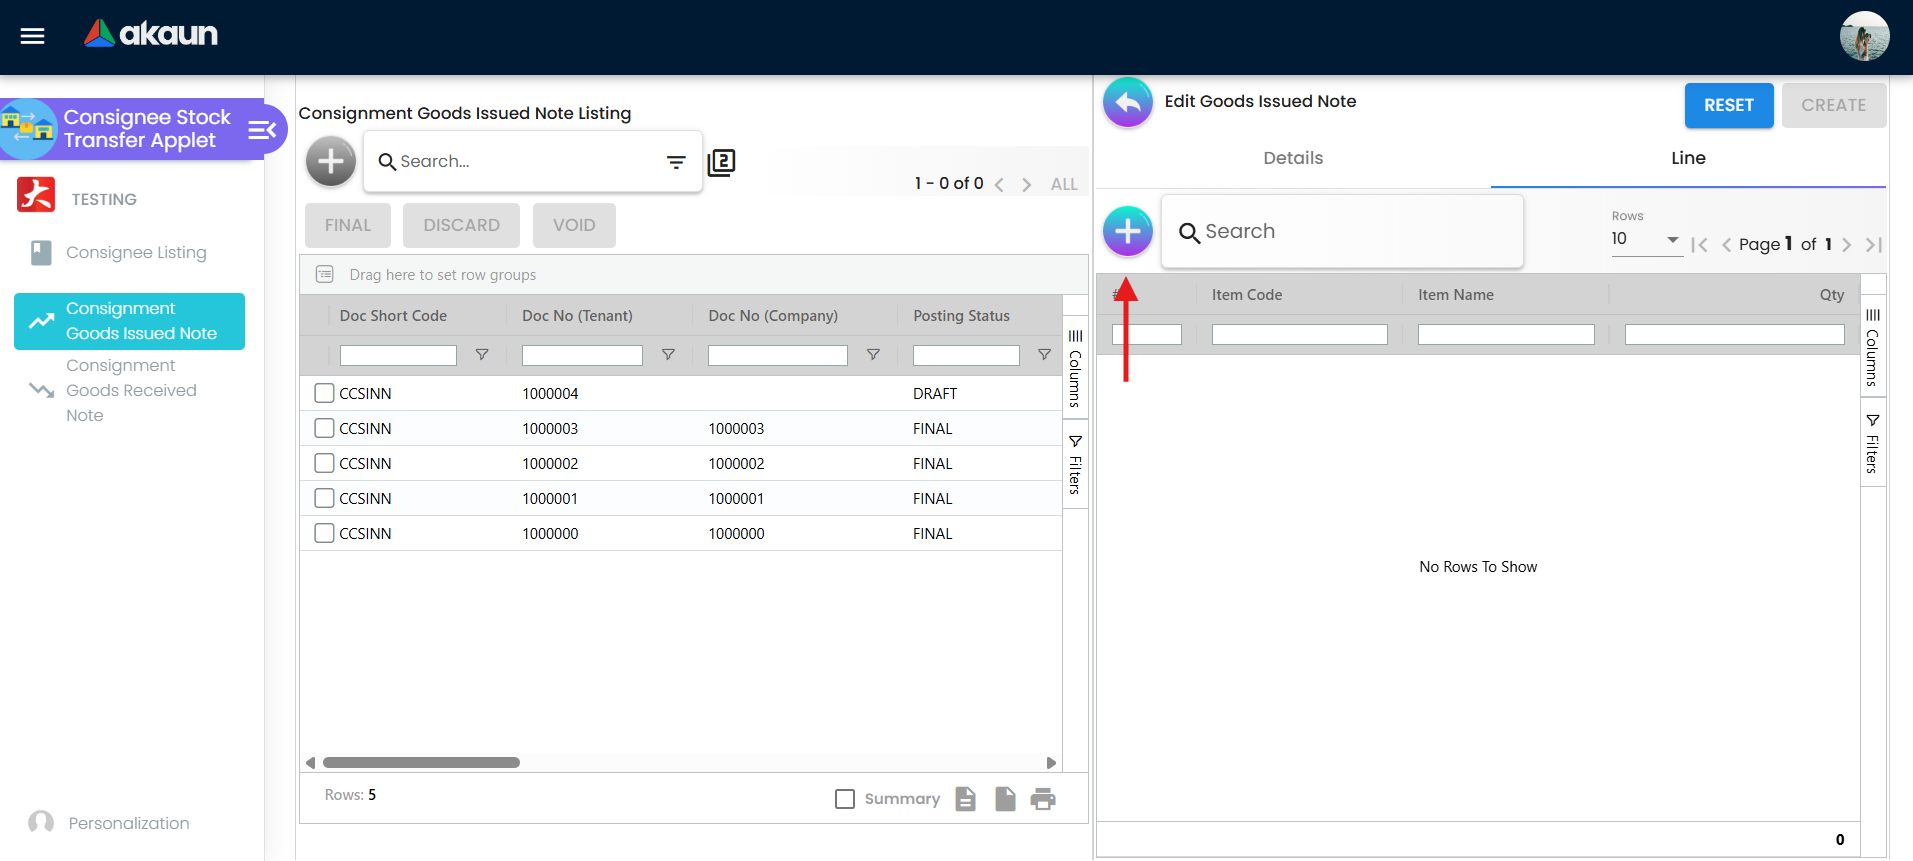
Listing columns: Doc No (Tenant / Company / Branch), Doc Short Code, Doc Description, Transaction Date, Location From, Location To, Ref #, Tracking ID, Status, Posting Status, created / updated by and date. Listing buttons act on the selected rows: FINAL (drafts), DISCARD (drafts), VOID (finals), PRINT (printable format).
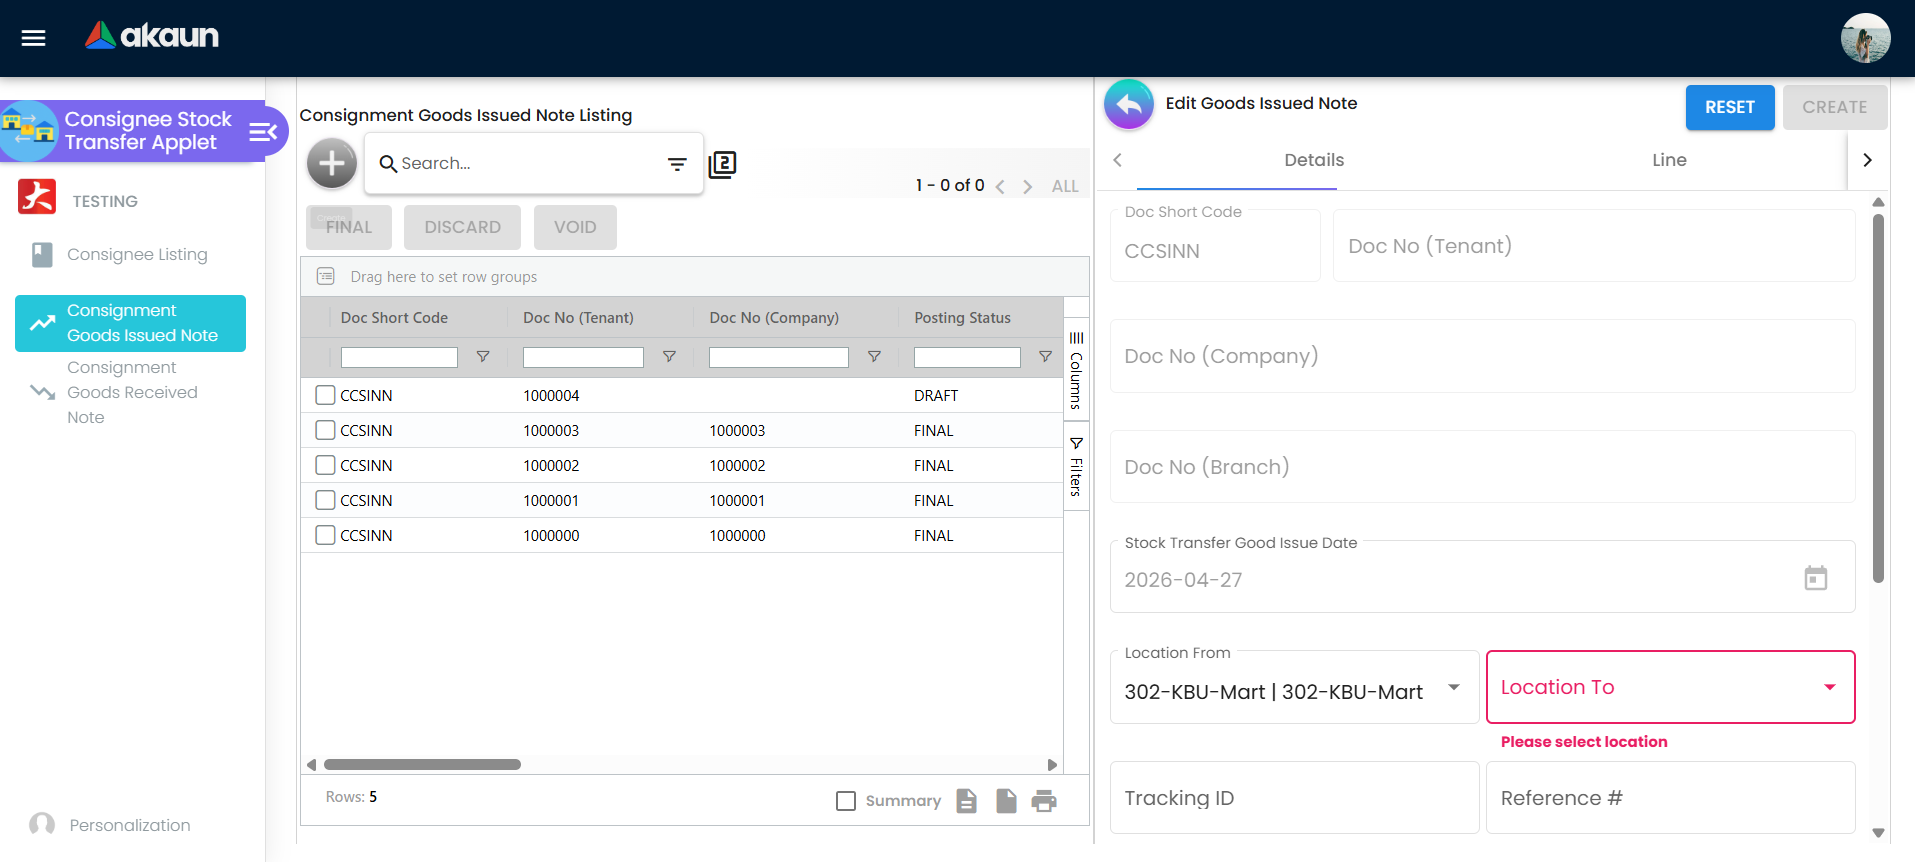
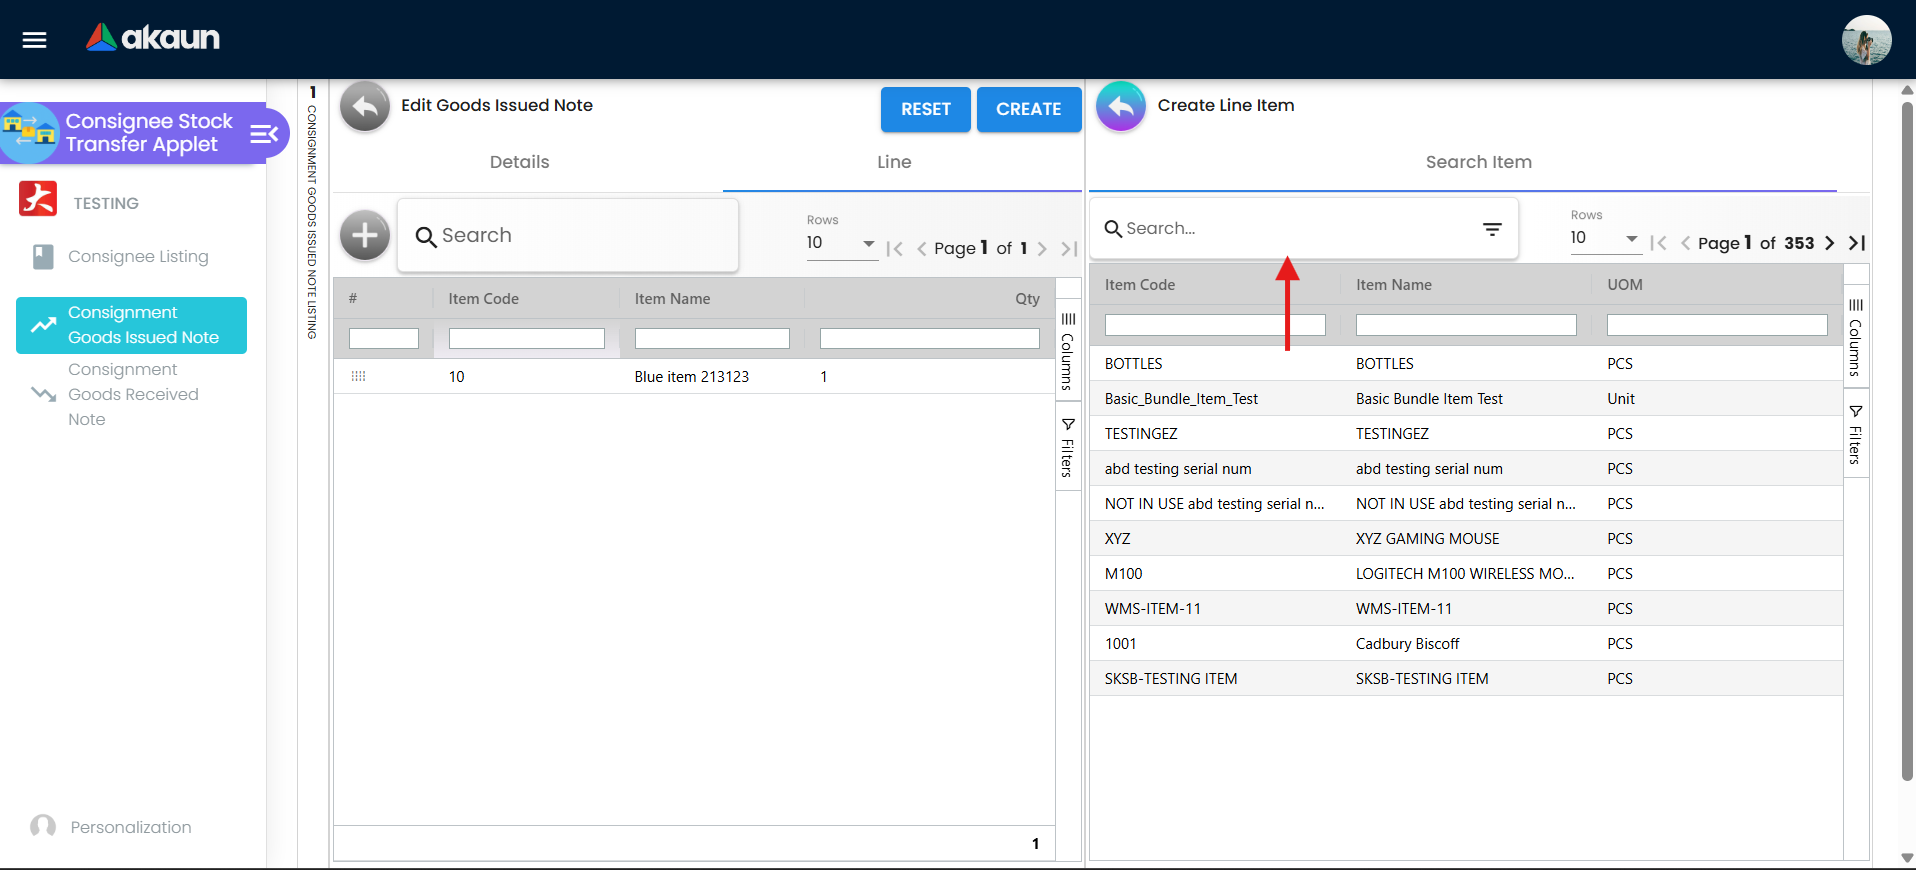
Details tab: Location From (any of your locations, defaulted from Default Selection), Location To (consignee locations only — class CCSG), Stock Transfer Good Issue Date, Doc No fields, Doc Description, Remarks, Reference #, Tracking ID. Line tab: + opens Create Line Item with Search Item, Item Details (Item Code, Item Name, Quantity) and, depending on the item’s sub-type, Serial Number, Batch Number or Bin Number. CREATE saves a new note as a draft; SAVE updates it.
Consignment Goods Received Note
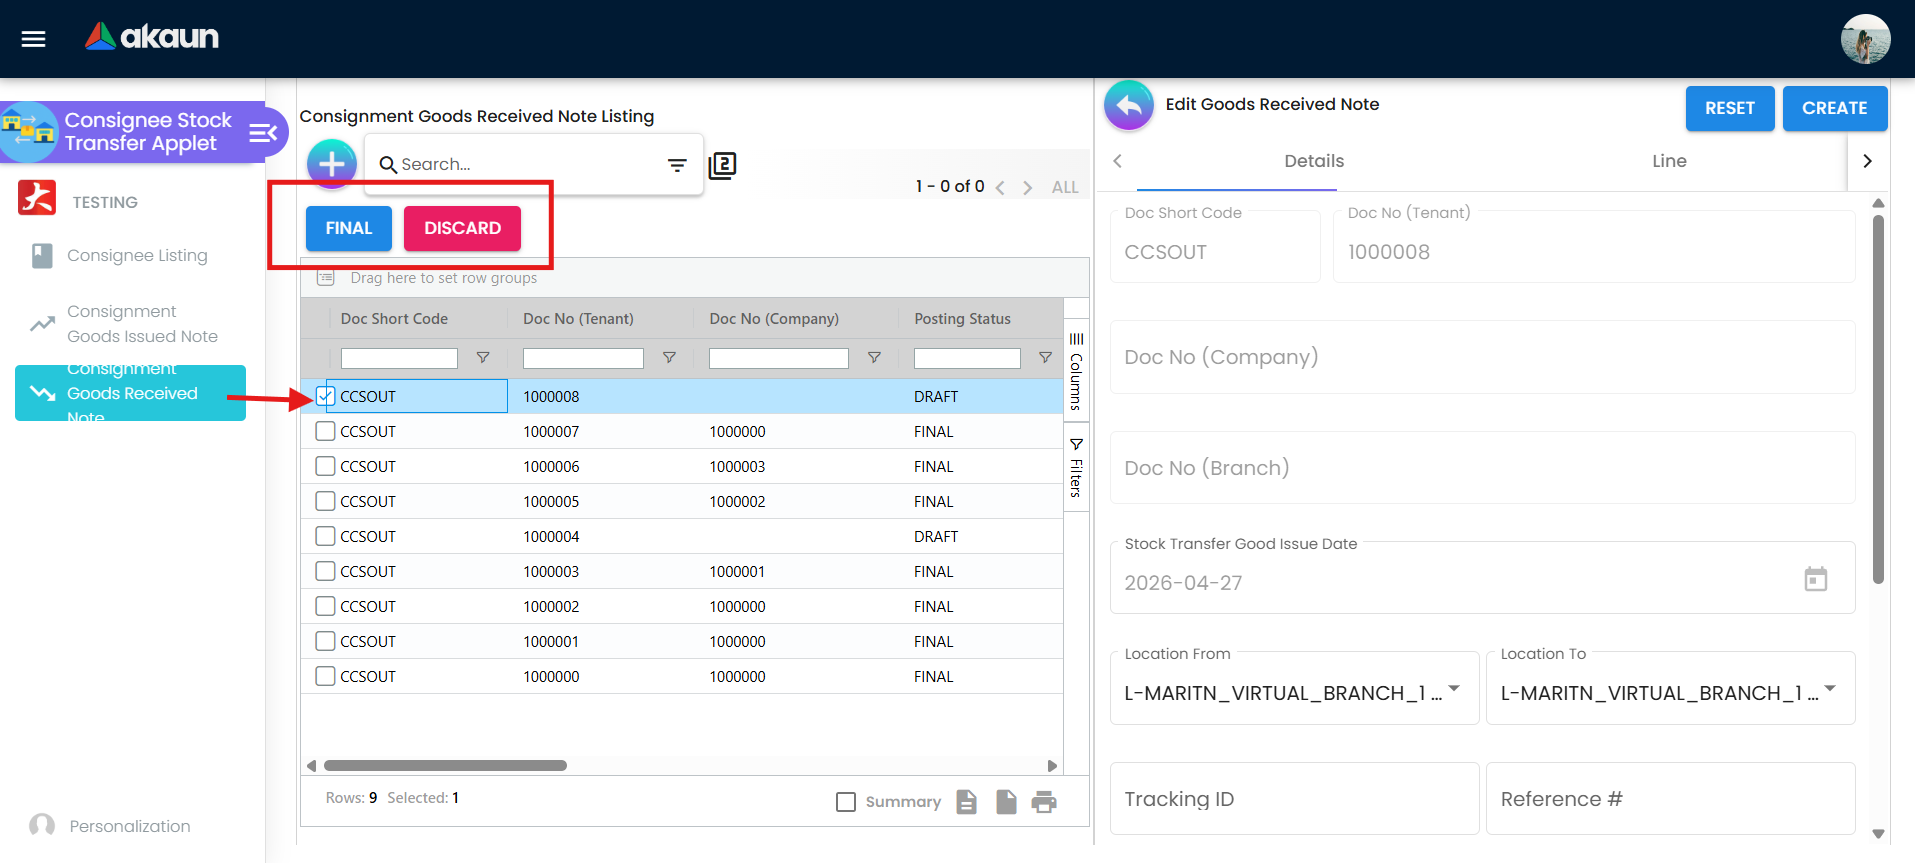
The mirror image: Location From is restricted to consignee locations (class CCSG), Location To is one of your locations. Same tabs, line editor and listing buttons (FINAL, DISCARD, VOID, PRINT).
Configuration
Before you can use it
| Prerequisite | Where | Why |
|---|---|---|
| Company and branch | Organisation | A location must belong to a company and branch |
At least one location with class CCSG | Consignee Listing (this applet) | Without one, the consignee dropdown is empty and no note can be created |
| Items with the right tracking type | Inventory Item Maintenance | Serial / batch / bin tabs |
| Stock at Location From | — | Serial-tracked items must exist at the sending location |
| Printable format (optional) | Settings > Printable Format Settings | For PRINT and ENABLE_AUTO_POPUP |
API permissions TNT_API_DOC_INTERNAL_CUSTOMER_CONSIGNMENT_OUT_* | Applet permission assignment | Both notes are posted through the customer-consignment-out endpoint |
No GL codes, tax codes or cashbooks are needed.
Applet settings
Settings > Field Settings opens the shared field-configuration screen, which exposes only three keys for this applet:
| Setting | What it controls | Default | Effect when changed |
|---|---|---|---|
ENABLE_AUTO_POPUP | Open the print dialog automatically after FINAL | off | Needs PRINTABLE (set under Printable Format Settings) |
DISABLE_EXPORT_PRINT_ON_DRAFT | Disable the PRINT button while any selected row is still DRAFT | off | Only finalised notes can be printed |
VERTICAL_ORIENTATION | Accordion (vertical) layout of the document tabs | off | Presentation only |
Settings > Default Selection — DEFAULT_BRANCH, DEFAULT_LOCATION pre-fill Location From; personal Default Selection overrides. Settings > Printable Format Settings — the printable format stored as PRINTABLE (also readable from the branch default printable format).
The listing buttons read HIDE_GENDOC_FINAL_BUTTON, HIDE_GENDOC_DISCARD_BUTTON and HIDE_GENDOC_VOID_BUTTON from the same settings record, but these keys are not on this applet’s settings screen; they can only be set through the platform settings editor. INCLUDE_* / ENABLE_* dimension, tax and custom-status keys are declared in the settings model and unused.
Document behaviour settings
| Setting | Effect |
|---|---|
HIDE_GENDOC_FINAL_BUTTON / HIDE_GENDOC_DISCARD_BUTTON / HIDE_GENDOC_VOID_BUTTON | Remove the listing action for everyone (no SHOW_* permissions are registered for this applet) |
DISABLE_EXPORT_PRINT_ON_DRAFT, ENABLE_AUTO_POPUP, PRINTABLE | Printing |
No approval workflow, no custom statuses in use, no e-Invoice.
Feature visibility / permissions
No client-side permissions are registered for consignee-stock-transfer in the applet registry; the listing code checks SHOW_GENDOC_FINAL_BUTTON, SHOW_GENDOC_DISCARD_BUTTON and SHOW_GENDOC_VOID_BUTTON but they are not seeded, so a HIDE_* setting hides the button for every role. Access is governed by the server-side document permissions (TNT_API_DOC_INTERNAL_CUSTOMER_CONSIGNMENT_OUT_CREATE / READ / UPDATE / DELETE) and location permissions.
Fields
Details
| Field | Meaning | Required | Notes |
|---|---|---|---|
Location From (locationSending, guid_store) | Where stock leaves | Yes | Issued note: your location; Received note: consignee (CCSG) location |
Location To (locationReceiving, guid_store_2) | Where stock arrives | Yes | Issued note: consignee (CCSG) location; Received note: your location |
Stock Transfer Good Issue Date (stockTransferServiceDate) | Transaction date | Yes | — |
| Doc No (Tenant / Company / Branch), Doc Short Code | Running numbers | generated | — |
| Doc Description, Remarks, Reference #, Tracking ID | Free text | No | — |
| Created / modified by and date | Audit | — | — |
Line item
| Field | Meaning | Required | Notes |
|---|---|---|---|
| Item Code / Item Name | The item | Yes | From Search Item |
| Quantity | Units moved | Yes | At least 1 |
| Serial Number tab | Serials moved | For serial items | Must exist at Location From |
| Batch Number tab | batch_no, issue_date, expiry_date, quantity | For batch items | — |
| Bin Number tab | bin_code, container_measure, container_qty | For bin items | — |
Location (Consignee Listing)
Required: Company, Branch, Location Code, Location Name, Location Commencement Date, Address Line 1, City, Postal Code, State, Country. Set Location Class to CCSG for a consignee location.
Lifecycle and posting
Status (posting_status) | Meaning | Allowed next |
|---|---|---|
DRAFT (record status TEMP until first CREATE, then ACTIVE) | Editable | FINAL, DISCARDED |
FINAL | Posted to stock; header and lines read-only | VOID |
VOID | Reversed | — |
DISCARDED | Abandoned draft | — |
Both notes are posted as document type INTERNAL_CUSTOMER_CONSIGNMENT_OUT (quantity_signum −1, amount_signum 0). On FINAL the backend writes, for every line, one stock ledger line of −quantity at Location From and a cloned line (txn_code_02 = CSG) of +quantity at Location To, 0.1 s later, so the two locations always move together in one document. No journal is posted (the type is not in the journal-posting handler) and no cost changes: the receiving location takes the company’s moving-average / FIFO / LIFO cost.
| Note | Location From | Location To |
|---|---|---|
| Goods Issued (your location → consignee) | − quantity | + quantity at the CCSG location |
| Goods Received (consignee → your location) | − quantity at the CCSG location | + quantity |
VOID reverses both ledger lines. There is no knock-off between an issued and a received note; a partial return is simply a received note for the returned quantity, and the balance at the consignee location is the running difference.
Related applets
- Stock Transfer — use it instead for movements between your own locations; it has the in-transit queue this applet deliberately lacks.
- Customer Consignment — records the consignee’s sales and the billing that follows.
- Stock Balance, Stock Availability, Stock Report — the consignee location’s balance is what is out on consignment; the Stock Summary by Location report counts these notes under Others.
- Organisation — company and branch that own the consignee location.
- Inventory Item Maintenance, Doc Item Maintenance — item tracking type.
Troubleshooting
| Symptom | Cause | Fix |
|---|---|---|
| Location To (issued) or Location From (received) dropdown is empty | No location has class CCSG, or the user lacks read permission on it | Set Location Class = CCSG in Consignee Listing; grant the location permission |
| Location dropdown was empty after an update | Fixed in 2025 — the dropdown now filters on ACTIVE status | Update the applet |
| CREATE is disabled | Location From, Location To or the date is missing, or there is no line | Complete Details and add a line |
| FINAL is disabled on the listing | A selected row is not DRAFT + ACTIVE | Select drafts only |
| VOID is disabled | A selected row is not FINAL + ACTIVE | Select finalised notes only |
| PRINT is disabled | DISABLE_EXPORT_PRINT_ON_DRAFT on and a selected row is a draft | Finalise first, or clear the setting |
| Serial rejected on an issued note | The serial is not at Location From | Trace it in Stock Availability; transfer it there first |
| Consignee balance looks wrong | A received note was created without a matching issue, or a note was voided | Compare FINAL issued and received quantities per item and consignee location in Stock Report > Stock Movement |
| Buttons missing for all users | HIDE_GENDOC_*_BUTTON set — no SHOW_* permission exists to reopen them | Clear the setting |