Consignment GRN Applet (Internal)
Purpose and overview
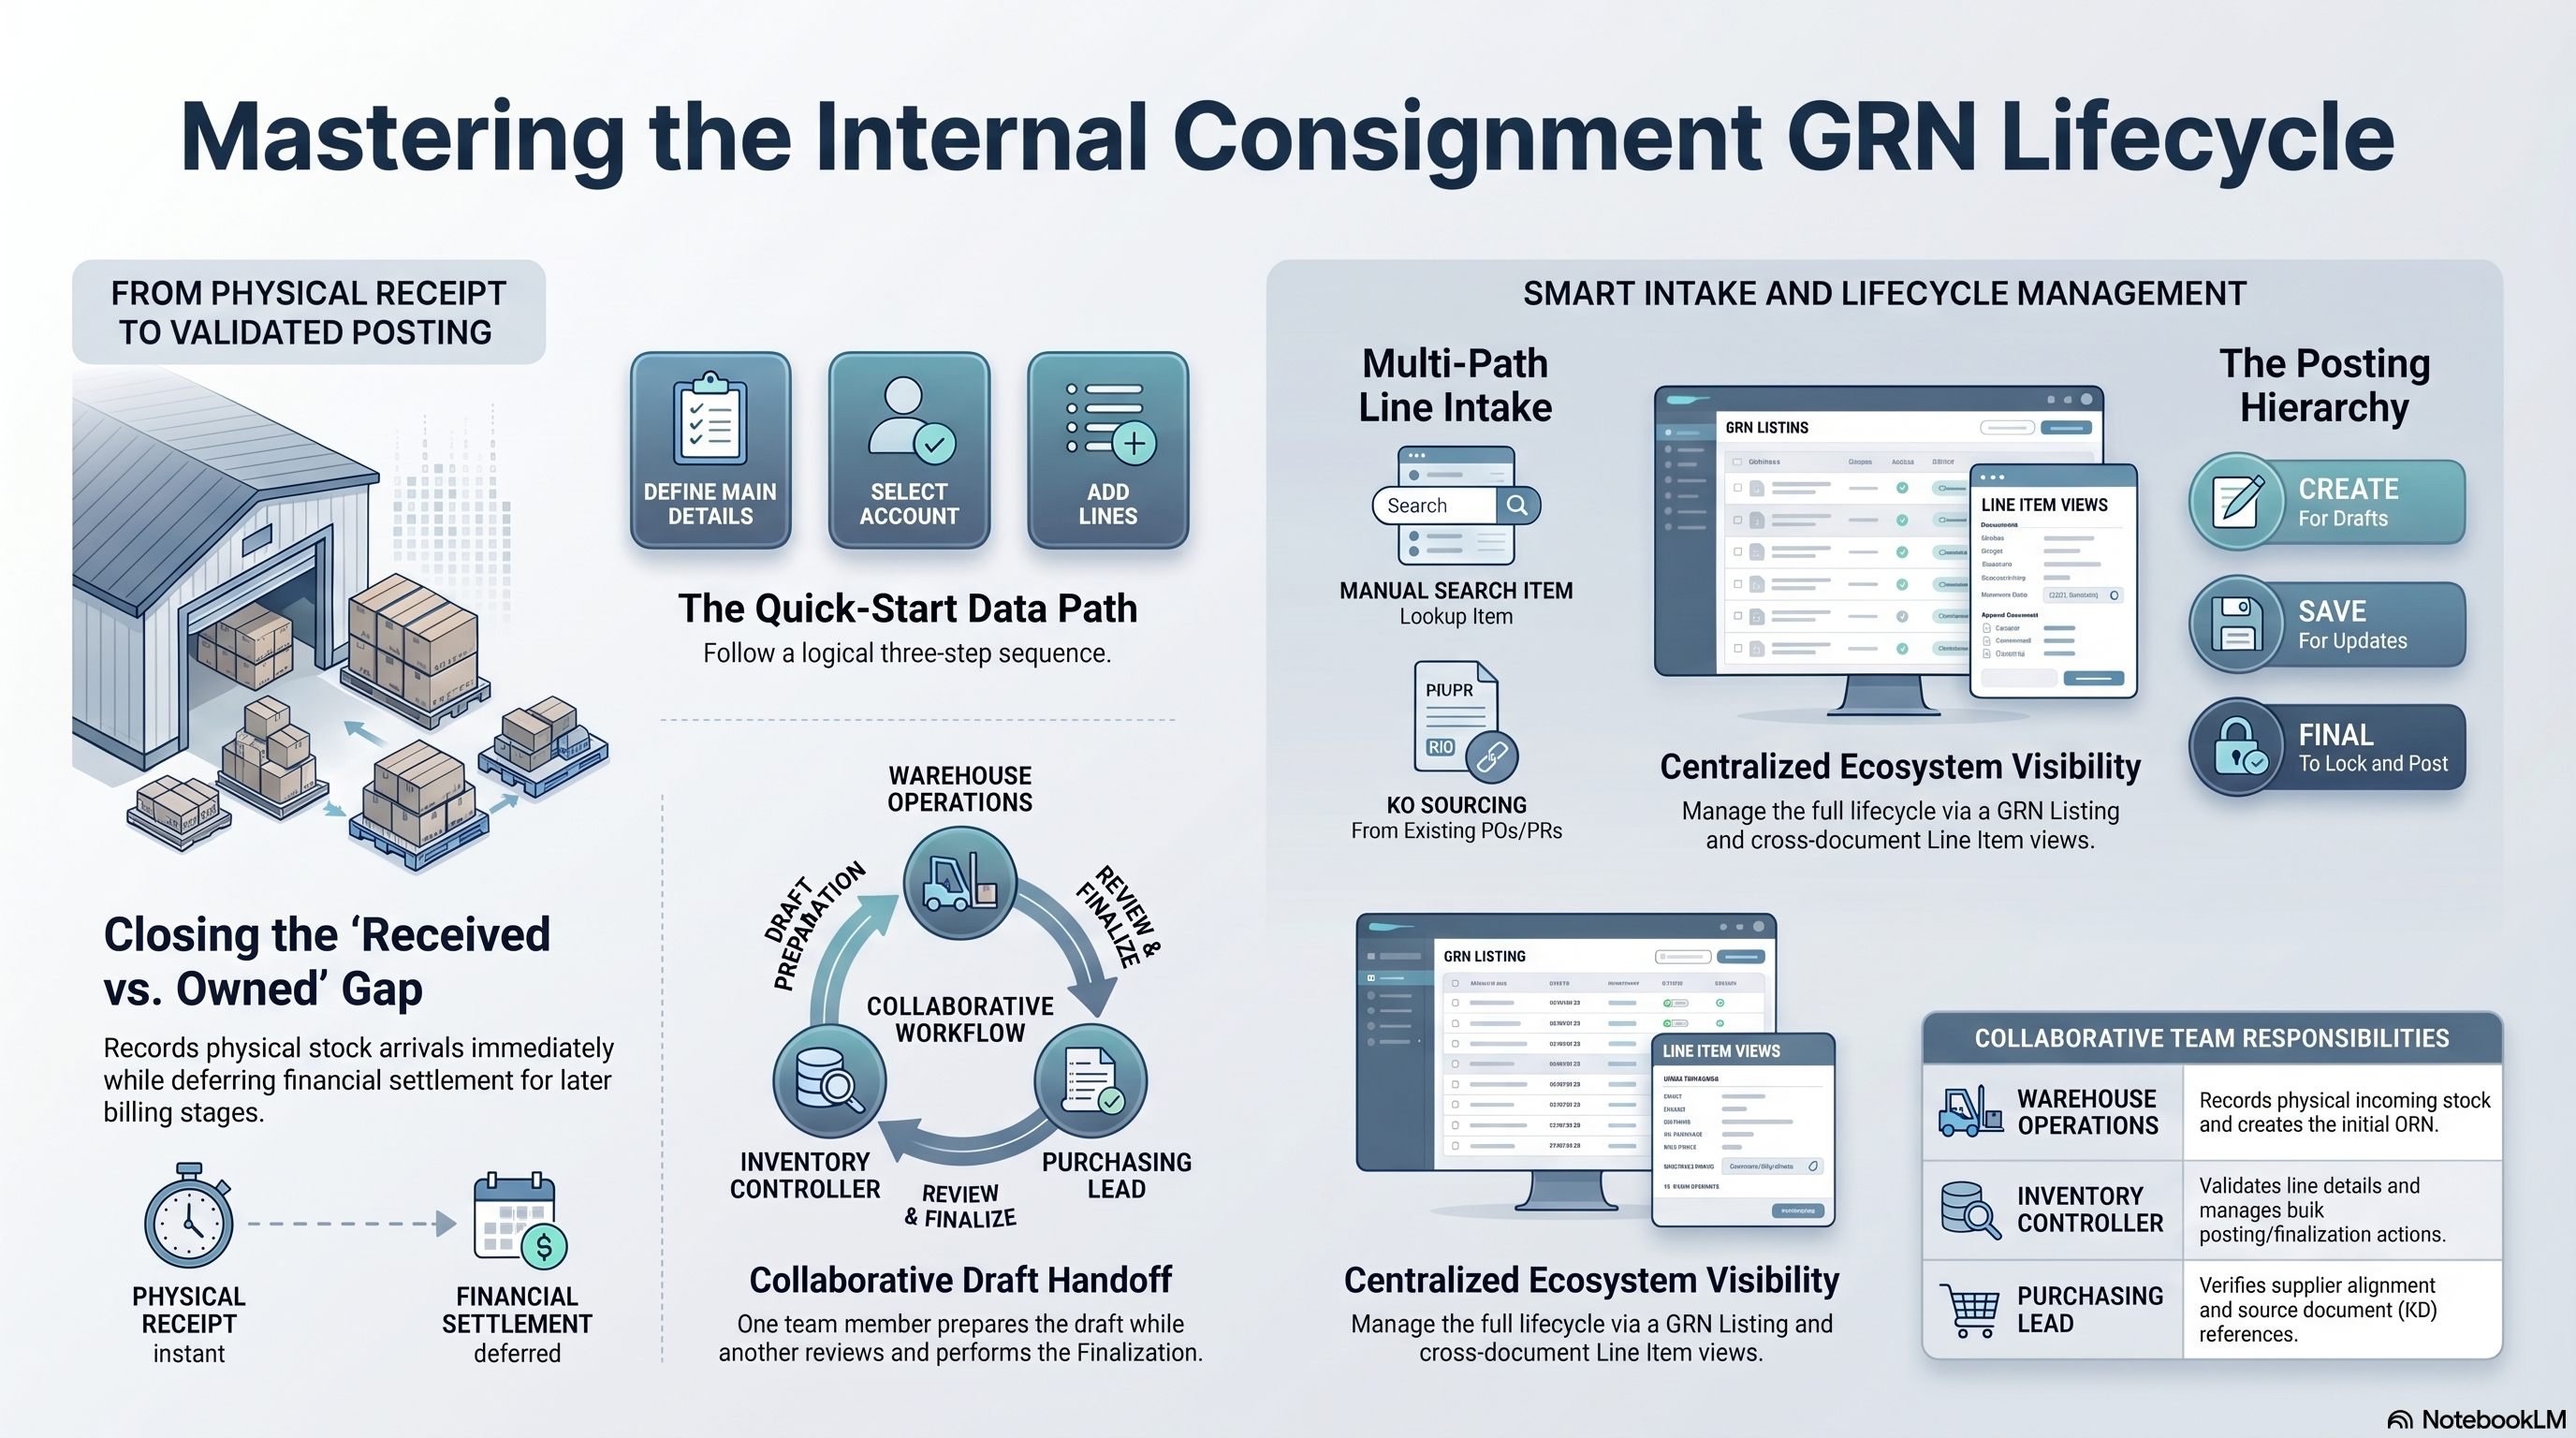
What is a GRN?
A GRN (Goods Received Note) is a structured record that answers: goods were received, which items and quantities, for which supplier or party, and on what date. It is the standard receiving document your teams use so the system matches what physically arrived.
What is consignment?
Consignment is a commercial arrangement where stock may arrive at your site or move between parties before ownership or customer billing is finalized in a separate step. You still need a proper receiving record so inventory counts, audits, and later billing or settlement stay accurate and traceable.
What this applet is for
Use the Consignment GRN Applet (Internal) to prepare, review, and post consignment GRN documents: capture header and account details, add or link line items, save drafts, then finalize when receipt is confirmed. Posting (FINAL) is the step that locks the document as the official received record for your configured process.
Problems it helps solve
- Informal receiving (email, spreadsheets, or paper only) that does not match inventory or finance records.
- Uncertainty about whether received stock is reflected in the system before billing or consumption reporting.
- Slow reconciliation when auditors or finance ask for proof of what was received, when, and against which party.
- Rework when lines are wrong or incomplete because there was no clear draft-and-review step before posting.
Where to work in the menu
- Consignment GRN: listing, create, edit, FINAL, VOID, and print for full documents.
- Line Items: search and open individual lines across documents when you need line-level review or correction.
Before you begin
- You need access permission to Consignment GRN (read/create/update based on your role).
- You need valid Company, Branch, and Location master data (these are required).
- You need an active Account Entity (supplier/entity) because create/save requires a valid account entity selection.
- You need active Item Master records so users can select items in Search Item.
- If your process uses KO sourcing, your linked source documents (for example purchase order/requisition/invoice) must exist and be available.
- Your team should align when to use CREATE, SAVE, FINAL, and VOID.
Who uses this applet
| Role | Main responsibility |
|---|---|
| Warehouse / receiving operations | Create and complete consignment GRN documents for physical incoming stock. |
| Inventory controller | Review listings, validate line details, and control posting actions. |
| Purchasing / operations lead | Verify supplier/entity details, references, and KO-linked line intake. |
| Admin | Configure visibility settings, default values, and role permissions. |
Key features
Quick start
Role: Warehouse / receiving operations
Goal: create your first completed consignment GRN in this applet.
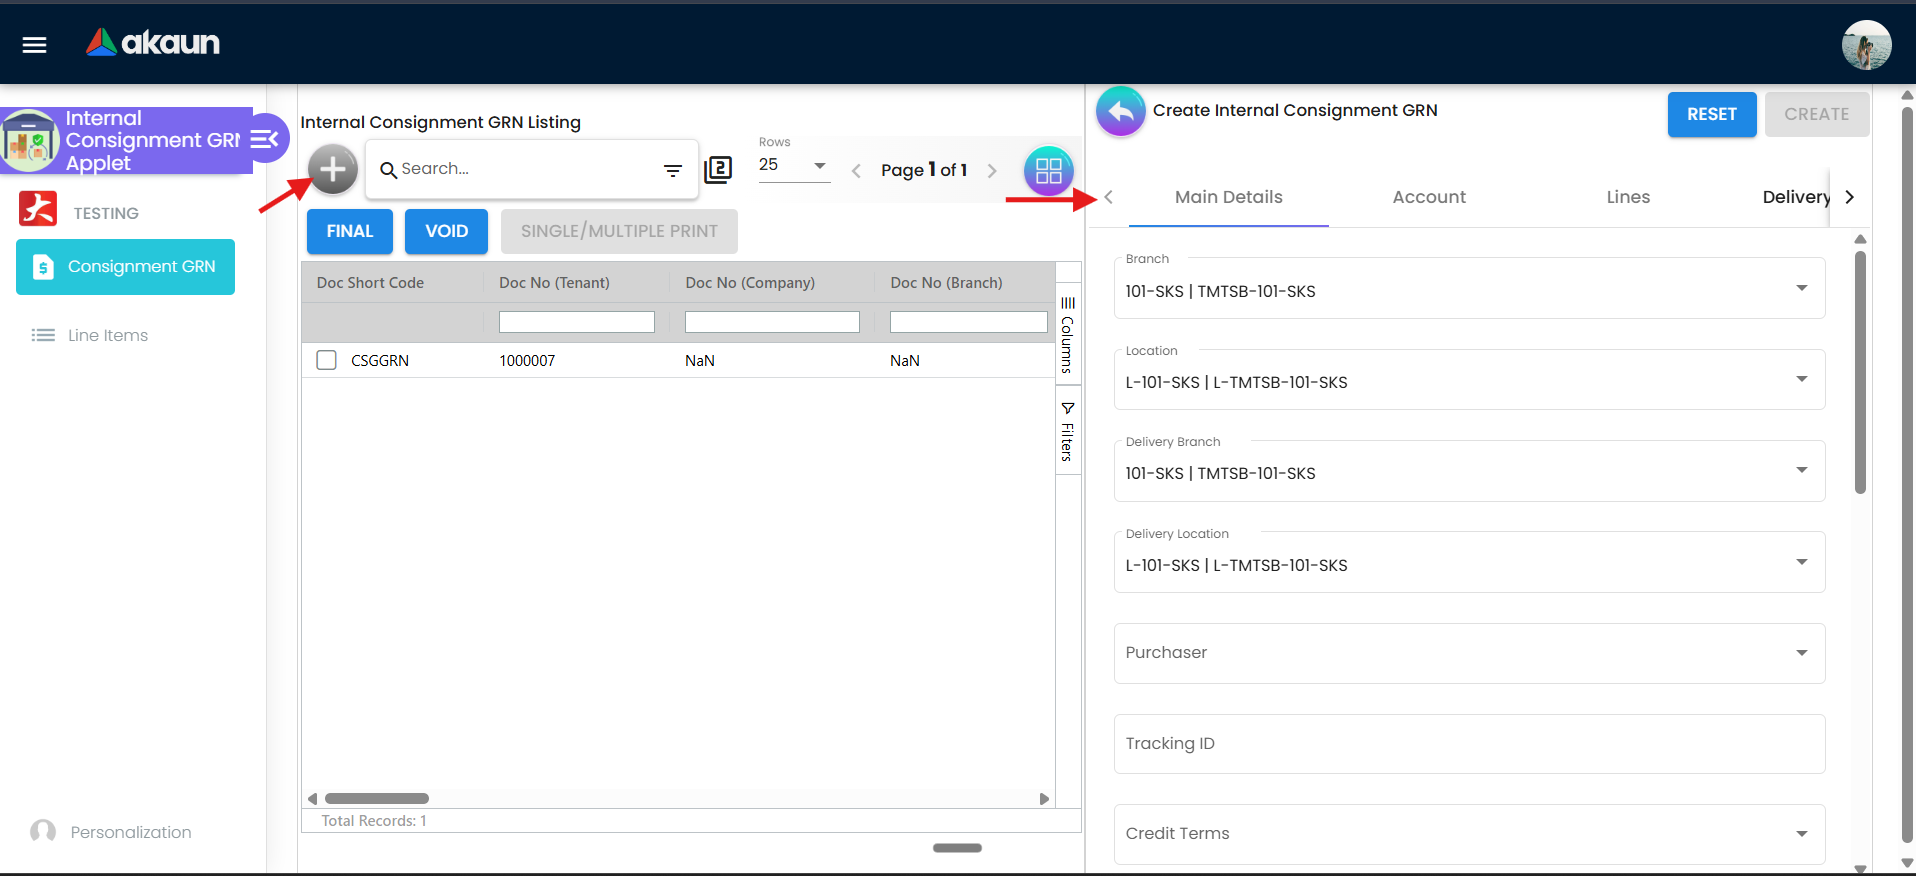
- Open Consignment GRN and click Create (
+) from Internal Consignment GRN Listing. - In Main Details, complete required fields:
- Company
- Branch
- Location
- Fill supporting fields as needed:
- Tracking ID for internal traceability.
- Reference for your internal reference number (for example receiving memo or request number).
- Permit No when your process requires permit tracking.
- Transaction Date, Description, and Remarks.
- Open Account and select Entity ID (required).
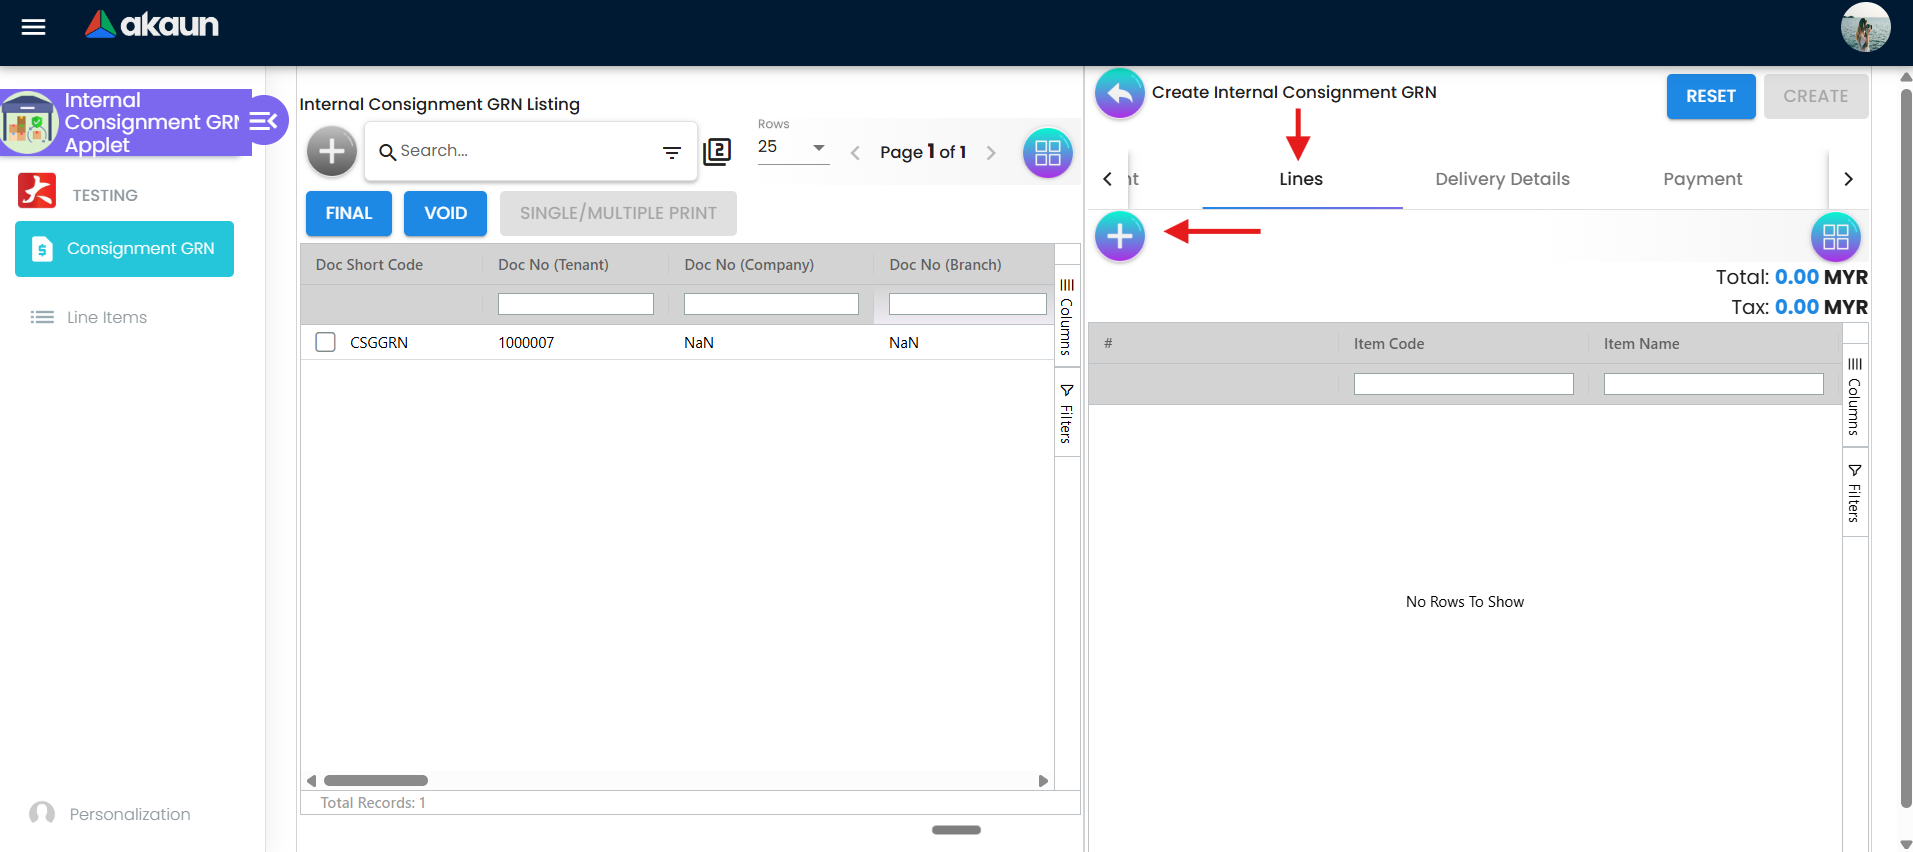
- Open Lines and click add to enter Select Item.
- In Search Item, type item code or item name, then choose the correct item from results.
- If nothing appears, confirm with your administrator that the item is active and visible to your role.
- In line Item Details, enter quantity and required line details, then click ADD.
- Back on the GRN document, click CREATE.
- Reopen the saved document from listing when needed, adjust details, then click SAVE.
- Click FINAL only after confirming all received quantities and details are correct.
What happens next:
- After CREATE, the GRN is saved and appears in listing for further edits.
- After SAVE, your changes are stored but the document is still not posted until finalization.
- After FINAL, posting status becomes FINAL and key edit actions are restricted.
- On listing, VOID can be used on eligible FINAL + ACTIVE rows when reversal is required.
Detailed workflows
Internal Consignment GRN Listing
Role: Warehouse / inventory controller
Use listing to manage the full document lifecycle.
Main actions from listing:
- Create (
+) opens new GRN draft. - FINAL posts selected rows that are DRAFT and ACTIVE.
- VOID applies to selected rows that are FINAL and ACTIVE.
- SINGLE/MULTIPLE PRINT prints selected rows (if printable setting is enabled).
Bulk finalization behavior:
- Listing supports selecting multiple rows and clicking FINAL once.
- Only eligible rows are posted; ineligible rows are skipped.
Create and edit flow
Role: Warehouse / purchasing operations
Create screen title: Create Internal Consignment GRN
Edit screen title: Edit Internal Consignment GRN
Main tab sequence for core work:
- Main Details: company/branch/location, transaction header fields.
- Account: entity, billing, and shipping account details.
- Lines: add and maintain item rows.
Button usage and decision guide:
- CREATE: first save of a new GRN.
- SAVE: update an existing GRN draft.
- FINAL: post the document when receipt is confirmed and ready to lock as posted.
- RESET: discard unsaved current-screen form changes and reload draft data.
Practical decision flow:
- Use CREATE as soon as minimum valid data is complete.
- Use SAVE during review/collaboration cycles before posting.
- Use FINAL only when physical receipt and line details are confirmed.
Line item intake paths
Role: Warehouse / receiving operations
From Lines, click add and choose the appropriate source path in Select Item:
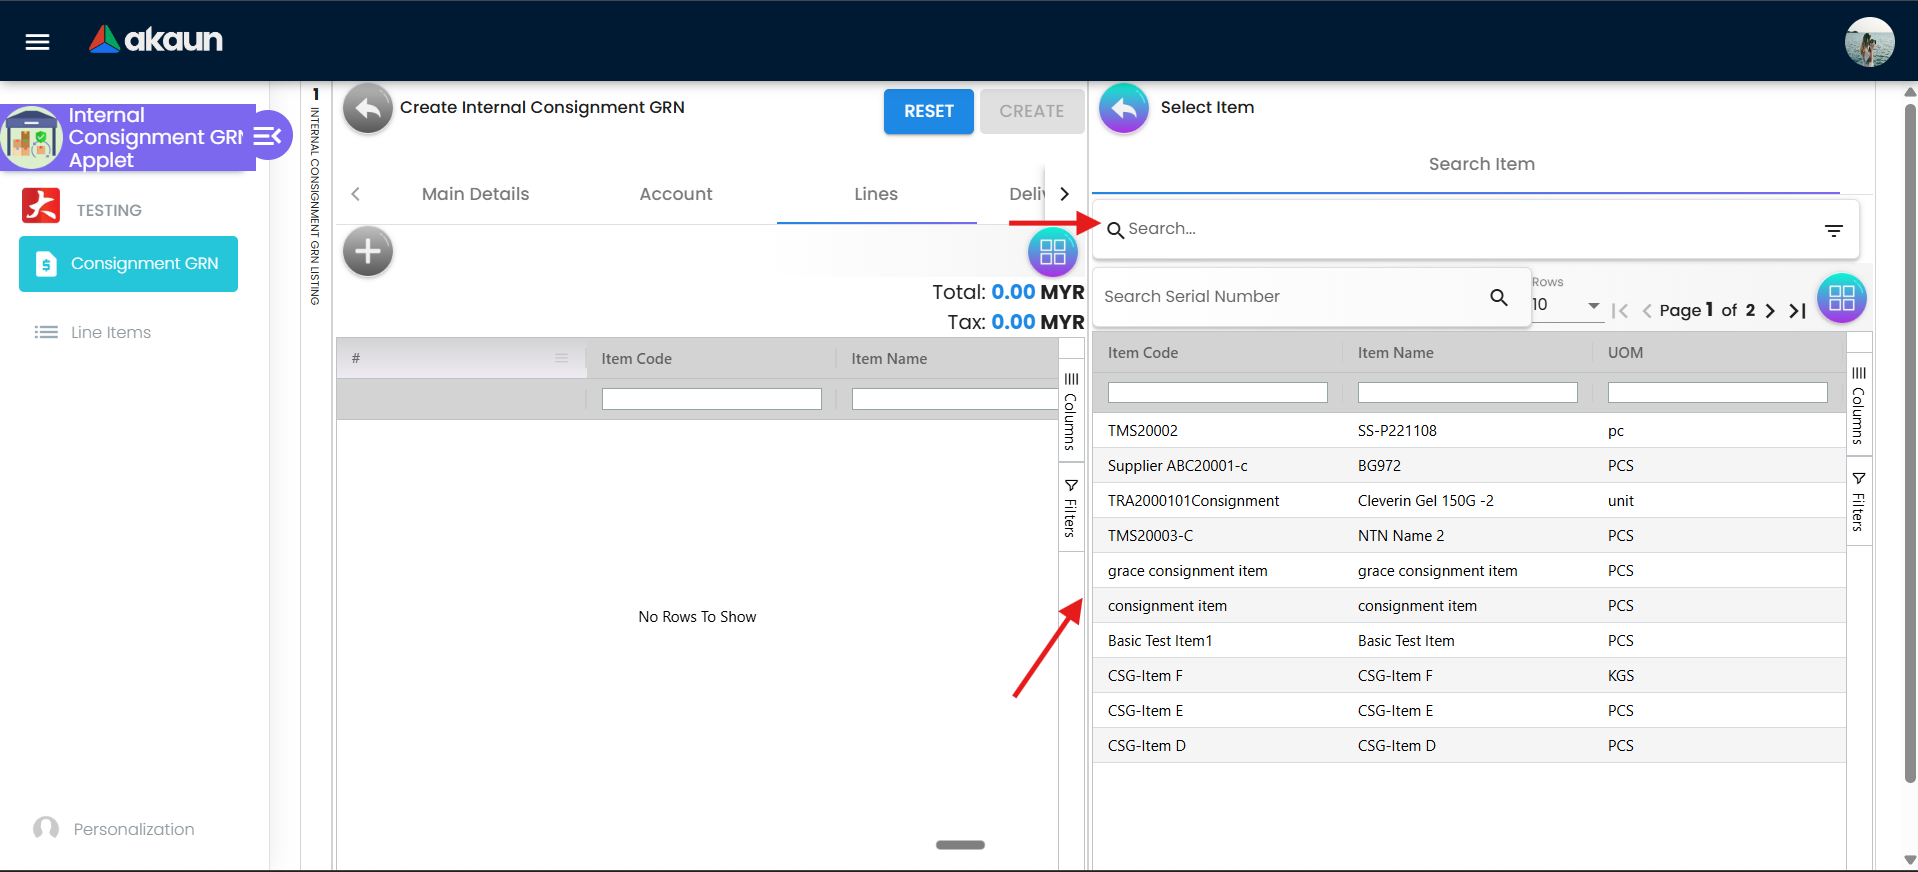
- Search Item: manual item lookup (most common path).
- KO For Purchase Order: source lines from linked PO flow (if enabled).
- KO For Purchase Requisition: source lines from linked PR flow (if enabled).
- KO For Purchase Invoice: source lines from linked PI flow (if enabled).
Line completion steps:
- Select item from one of the paths.
- Fill Item Details with valid quantity (minimum 1) and pricing/tax fields as required by your visibility settings.
- If item tracking applies, complete Serial Number, Batch Number, or Bin Number tabs.
- Click ADD for new line; use SAVE inside line edit when updating an existing line.
Tracking tab visibility rule:
- Serial/Batch/Bin tabs appear based on item subtype and applet settings.
- If you expect a tracking tab but do not see it, verify item master subtype and applet visibility settings with your administrator.
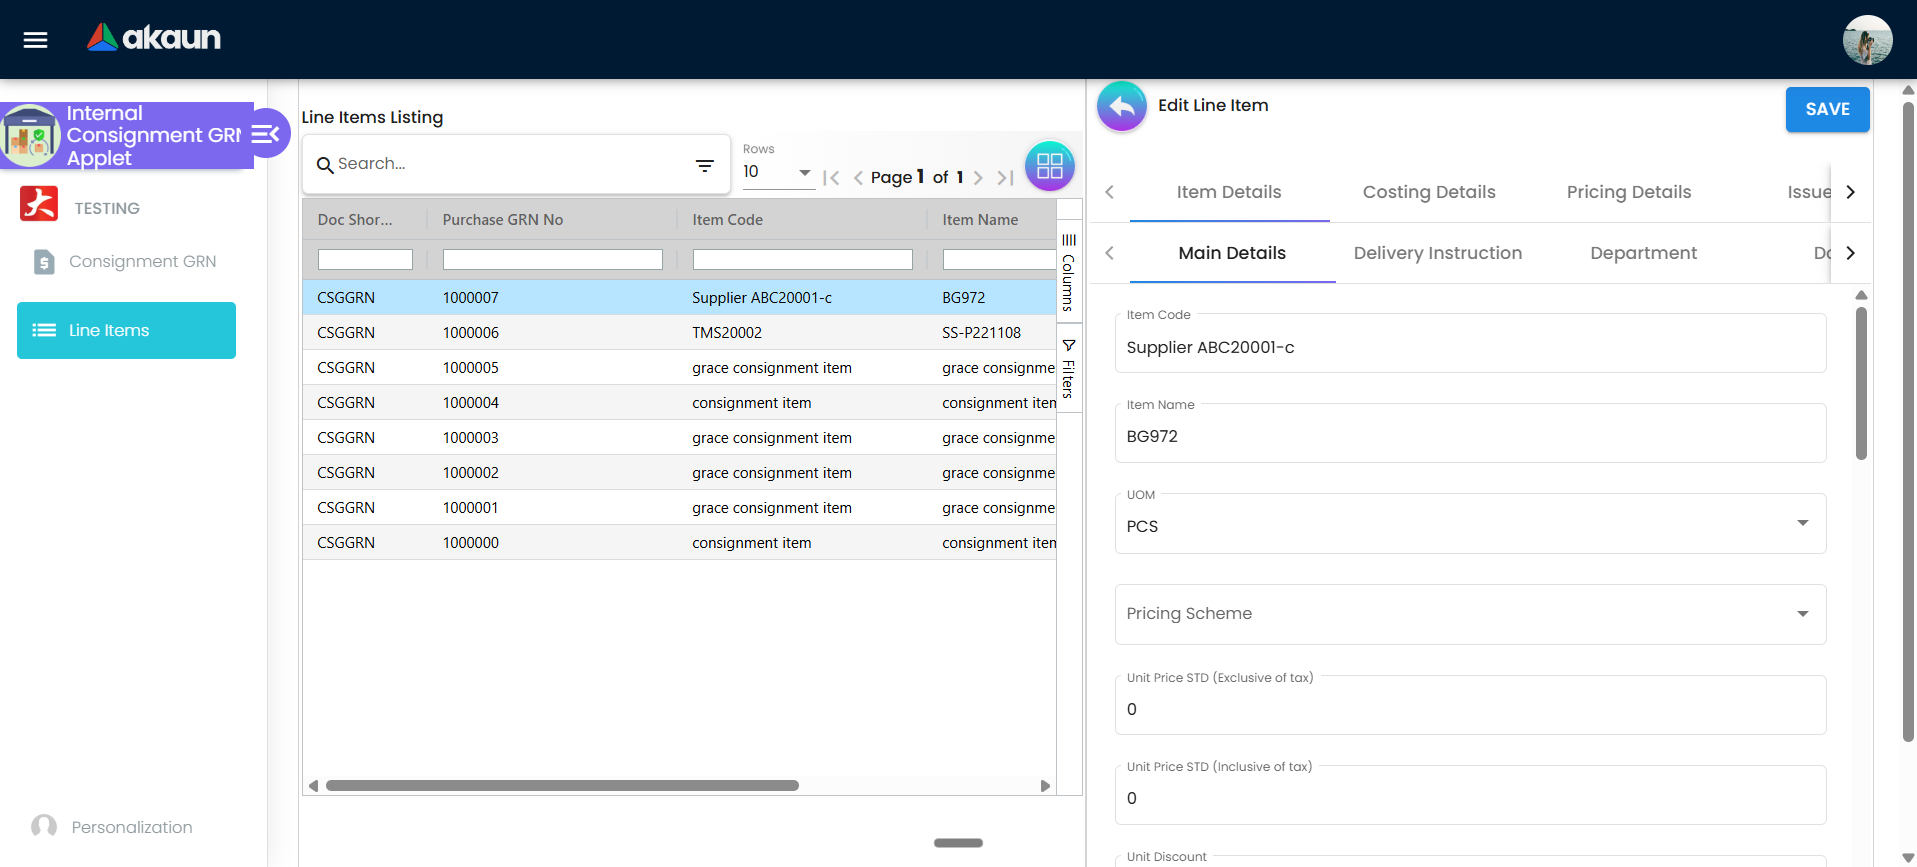
Edit a line from the Line Items listing
Role: Warehouse / inventory operations
From Line Items in the sidebar, open the line listing and click a row to edit that line in the line editor.
Conditional tabs and fields
Role: Admin / advanced users
Some tabs are shown or hidden by applet settings. Depending on your setup, users may see:
- Delivery Details
- Payment
- KO For
- Department Hdr
- Trace Document
- Contra
- Doc Link
- Attachments
- Export
- Status
Main Details field visibility is also setting/permission-dependent (for example tracking ID, permit no, currency, client doc fields, and transaction date controls).
Status reference
This applet uses two status dimensions:
- Record status (for example ACTIVE) for record condition.
- Posting status (for example DRAFT, FINAL, VOID) for posting stage.
Common user interpretation:
- Editable draft: ACTIVE + DRAFT
- Posted document: ACTIVE + FINAL
- Reversed posted document: ACTIVE + VOID
| Status / action | Meaning | User impact |
|---|---|---|
| ACTIVE | Normal working record state. | Document can be processed based on posting status. |
| DRAFT (posting status) | Not posted yet. | Can be updated and finalized when complete. |
| FINAL (posting status) | Posted transaction. | Key edit operations are restricted; use reversal process for mistakes. |
| VOID (posting status) | Finalized document is reversed. | Indicates the posted GRN has been voided through allowed action. |
| CREATE | First save of a new document. | Creates document record for further updates. |
| SAVE | Save updates to existing document. | Keeps document in working state until finalized. |
| FINAL (action) | Post selected or open document. | Commits posting status to FINAL for eligible record. |
| VOID (action) | Reverse eligible finalized document. | Applies to FINAL + ACTIVE records only. |
If something is wrong
| Symptom | Likely reason | What to do |
|---|---|---|
| CREATE is disabled | Missing required header/account/line requirements. | Complete Company, Branch, Location, select Entity ID, and add at least one active line. |
| SAVE is disabled | Invalid line data (commonly invalid serial entries) or incomplete required form state. | Correct line validations and required fields, then save again. |
| FINAL from listing does not apply to all selected rows | Some selected rows are not in DRAFT + ACTIVE state. | Filter listing by posting/status first, then select only eligible rows. |
| VOID is unavailable or does not apply | Row is not FINAL + ACTIVE or void visibility is restricted. | Select eligible finalized row and confirm your role/settings allow void action. |
| Expected tabs (Payment/Department/Delivery/etc.) are missing | Tab is hidden by applet settings. | Ask your administrator to review applet visibility settings. |
| Item price columns are not shown in line listing | Your role lacks pricing display permission. | Ask your administrator to verify pricing display permission for your role. |
Related documentation
- Consignment GIN (Internal) Applet - related issue-side consignment movement in the same process family.
- Consignment Billing (Internal) Applet - downstream financial billing after consignment movement/consumption.
- Customer Consignment Applet - broader consignment stock operations context.
- Internal Purchase Order Applet - upstream KO source for line intake when PO linkage is enabled.
- Internal Purchase Requisition Applet - upstream KO source for line intake when PR linkage is enabled.
FAQ
What is the main purpose of this applet?
It records incoming consignment stock receipt as a controlled GRN document so teams can validate details first, then post with FINAL.
What is the difference between CREATE, SAVE, and FINAL?
- CREATE makes the first document record.
- SAVE updates an existing document without posting.
- FINAL posts the document and moves it into posted state with tighter edit restrictions.
Can one user CREATE/SAVE and another user FINAL later?
Yes. The flow supports draft handoff: one user can prepare and save, then an authorized user can finalize after review.
Why is FINAL not working on some selected rows in listing?
Only rows with posting status DRAFT and status ACTIVE are eligible for listing-level finalization.
Can I void any document?
No. VOID applies only to eligible finalized records (typically FINAL + ACTIVE) and must also be available in your settings/permissions.
Why can’t I see some tabs like Payment, Department Hdr, or Delivery Details?
Those tabs are configuration-dependent and may be hidden by applet settings in your environment.
Why can’t I see line prices or tax amount columns?
Pricing columns are permission-controlled. If your role lacks the pricing display permission, those columns are hidden.
Which fields are mandatory before I can create?
At minimum: Company, Branch, Location, valid Entity ID in Account, and at least one valid active line.
When should I use Search Item vs KO tabs?
Use Search Item for direct/manual selection. Use KO tabs when your process requires pulling lines from upstream documents (PO/PR/PI) and KO settings are enabled.
What does Permit No mean here?
Permit No is a reference field used by teams that track permit-based receiving/compliance records. If your process does not use permits, leave it blank unless policy requires it.
Glossary
- Consignment: an arrangement where goods can be received or held while ownership or customer billing may be finalized later; receiving still needs a clear system record.
- GRN (Goods Received Note): the receiving document that records what arrived, quantities, party, and date so inventory and audits match physical goods.
- Consignment GRN (Internal): GRN document type used for the internal consignment receipt workflow in this applet.
- Line Item: one item row with quantity and related pricing/tracking details.
- KO (Knock Off): linking or pulling line items from an upstream source document (for example PO/PR/PI).
- Posting Status: transaction stage such as DRAFT, FINAL, or VOID.
- Record Status: business record condition such as ACTIVE.
- Entity ID: selected supplier/entity account used in the document account section.
- Tracking ID: free-text trace reference for operations follow-up.
- Permit No: optional permit reference used in regulated or permit-tracked receiving scenarios.