Ledger and Journal Applet
Purpose and Overview
The Ledger and Journal Applet is a comprehensive financial management tool designed to streamline the recording and tracking of financial transactions. It serves as the backbone of financial record-keeping by organizing transactions in two complementary ways: chronologically in journals and categorically in ledgers. This dual approach provides businesses with both a timeline of financial activities and a structured view of account balances.
This applet is essential for managing all aspects of financial activity.
Key Accounting Tools
The applet integrates two fundamental accounting tools that work together to create a complete financial picture:
Journal: A chronological log that captures every financial transaction as it occurs. Think of it as a diary of your business’s financial activities, recording each transaction with its date, description, and financial impact. This provides a clear audit trail and helps track when transactions occurred.
Ledger: A categorized record that organizes transactions by account type (assets, liabilities, income, expenses). This allows businesses to see the cumulative effect of transactions on each account, making it easy to understand account balances and analyze financial trends over time.
By combining these tools, the applet ensures that every transaction is both recorded in time order and properly classified by account category, enabling smooth financial reporting, analysis, and better strategic decision-making.
Benefits
The Ledger and Journal Applet delivers significant value to organizations through:
Financial Performance Tracking: Monitor your business’s financial health in real-time. Track revenue streams, expense patterns, and profitability trends across different time periods. Identify which areas of your business are performing well and which need attention.
Systematic Organization: Eliminate the chaos of scattered financial records. Every transaction is systematically recorded with complete details including dates, descriptions, amounts, and supporting documentation references. This organization makes it easy to find and review any transaction quickly.
Detailed Insights: Gain deep visibility into your financial operations. Understand exactly where money is coming from (income sources) and where it’s going (expense categories). Analyze patterns, identify cost-saving opportunities, and make data-driven decisions about resource allocation.
Accurate Reporting: Generate reliable financial reports with confidence. Because every transaction is properly recorded and categorized, your financial statements (Trial Balance, Profit & Loss, Balance Sheet) accurately reflect your true financial position. This accuracy is crucial for stakeholder trust and regulatory compliance.
Planning Support: Use historical transaction data to create realistic budgets and accurate forecasts. Understand seasonal patterns, predict cash flow needs, and plan for future investments based on solid financial evidence rather than guesswork.
Regulatory Compliance: Meet accounting standards and tax regulations with ease. The applet maintains complete audit trails, proper documentation, and standardized accounting practices that satisfy auditors, tax authorities, and regulatory bodies. This reduces compliance risk and audit preparation time.
Usage
Where
The Ledger and Journal Applet is versatile and suitable for any organization that needs to track, record, and report on financial activities.
Who
The applet is designed to serve multiple types of users:
Accountants: Professional accountants use it to maintain complete and accurate financial records, prepare financial statements, and ensure compliance with accounting standards (GAAP, IFRS, etc.)
Bookkeepers: Day-to-day financial record keepers use it to enter transactions, reconcile accounts, and maintain the general ledger
Financial Professionals: CFOs, financial controllers, and financial analysts use it to review financial data, analyze trends, and generate reports for decision-making
Business Owners & Managers: Entrepreneurs and managers use it to understand their business’s financial position, monitor cash flow, and make informed business decisions
Personal Finance Managers: Individuals can even use it to manage complex personal finances, track multiple income sources, and categorize personal expenses
How It Works
The applet follows standard double-entry bookkeeping principles:
Transaction Recording: Every financial event (sale, purchase, payment, receipt) is first recorded in the journal with complete details including date, description, and amounts. Each transaction must balance—every debit must equal corresponding credits.
Account Categorization: Each journal entry specifies which accounts are affected (e.g., Cash, Accounts Receivable, Sales Revenue, Rent Expense). This categorization ensures transactions are properly classified.
Ledger Posting: Information from journal entries is automatically organized into ledger accounts. Each account accumulates all its related transactions, showing a running balance and complete transaction history.
Analysis and Reporting: The organized ledger data is then used to generate financial reports (Trial Balance, Income Statement, Balance Sheet) that provide insights into financial performance and position.
This systematic flow ensures data integrity, maintains audit trails, and supports both detailed analysis and high-level reporting.
Modules and Functionality
The Ledger and Journal Applet consists of several interconnected modules accessible from the sidebar navigation:
Journal Transaction: The primary data entry module where all financial transactions are recorded chronologically. This captures the “what happened and when” of your financial activities. Every entry includes transaction details, supporting document references, and the accounting impact (debits and credits).
Sub Ledger: Provides granular detail within broader ledger categories. For example, while your main ledger might have “Accounts Receivable,” the sub-ledger breaks this down by individual customers. This allows you to track not just total amounts owed, but exactly which customers owe what amounts.
Ledger: The master account registry that organizes all financial data by account type. This is where you view cumulative account balances, review transaction histories for specific accounts, and manage your chart of accounts structure.
Import Journal: A time-saving feature that allows bulk import of transactions from external sources. Instead of manually entering hundreds of transactions, you can import them in batches using a template.
Error Checking: A diagnostic toolset for maintaining data integrity. It helps identify and resolve issues like unbalanced journals, missing sequences, and other anomalies that could affect financial reporting.
Settings: Customization hub where you configure the applet to match your organization’s specific needs, including currency settings, account structures, user permissions, document numbering schemes, and workflow rules.
1.0 Journal Transaction
The Journal Transaction module is the heart of the applet—it’s where all financial activities are initially recorded. This module maintains a complete, chronological history of every financial event in your business, creating an audit trail that can be reviewed, searched, and analyzed.
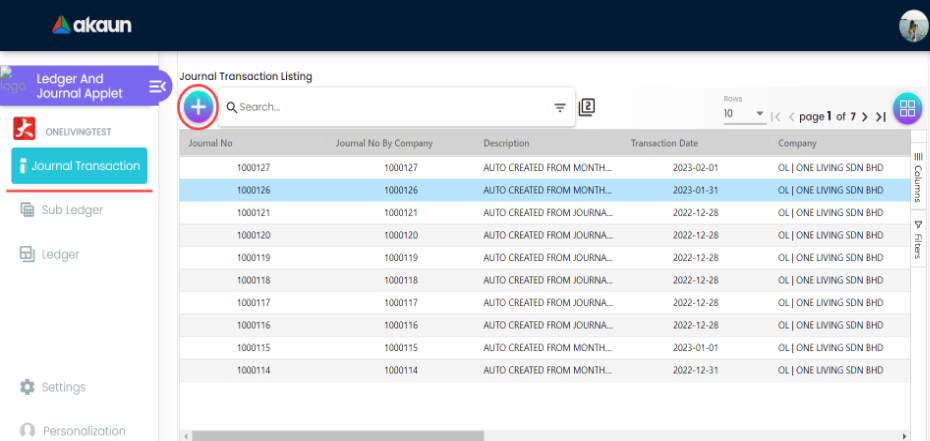
1.1 Journal Transaction Listing
The listing page serves as your transaction dashboard, displaying all journal entries in a comprehensive table format. This view allows you to quickly scan through transactions, identify patterns, and locate specific entries.
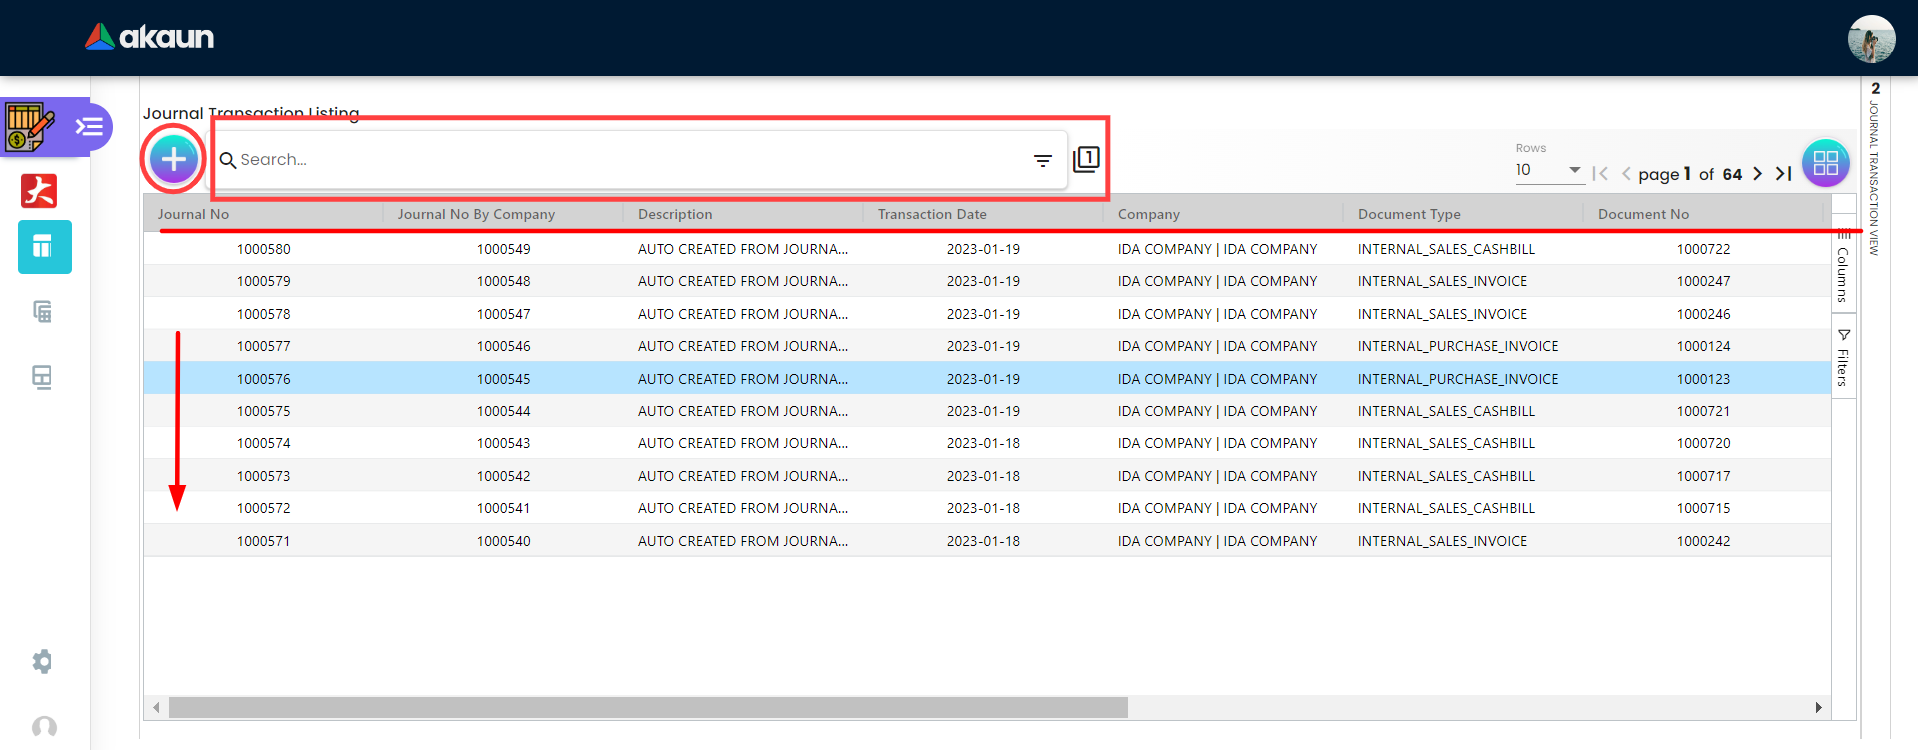
Table Columns Explained:
Journal No: System-generated unique identifier for each transaction. This number is used throughout the system to reference specific transactions.
Journal No By Company: Custom numbering scheme specific to each company if you’re managing multiple entities. This allows each company to maintain its own numbering sequence.
Document Type: Classification of the supporting document (e.g., Invoice, Receipt, Purchase Order, Credit Note). This helps categorize transactions by their nature.
Document No: Reference number of the supporting document, creating a link between the accounting entry and physical/digital documentation.
Status: Indicates the transaction’s current state in the workflow (e.g., Active, Inactive) enables review and approval processes.
Posting Status: Shows whether the transaction has been finalized in the ledger (Posted/Unposted). Unposted transactions can still be edited; posted transactions are locked to maintain data integrity.
Tip
Auto vs. Manual Journals:
- AUTO: System-generated entries from other applets (e.g., Sales, Purchases). These usually cannot be edited directly to preserve the audit trail.
- MANUAL: Entries created directly in this applet (e.g., Adjustments, Depreciation).
Functionality: Clicking on any row opens the detailed “View Journal Transaction” page where you can see complete transaction information including all line items.
1.2 Create Journal Transaction
Creating a journal transaction is a two-step process: first entering the main transaction details (header information), then adding individual line items that show the specific account impacts.
1.2.1 Main Tab
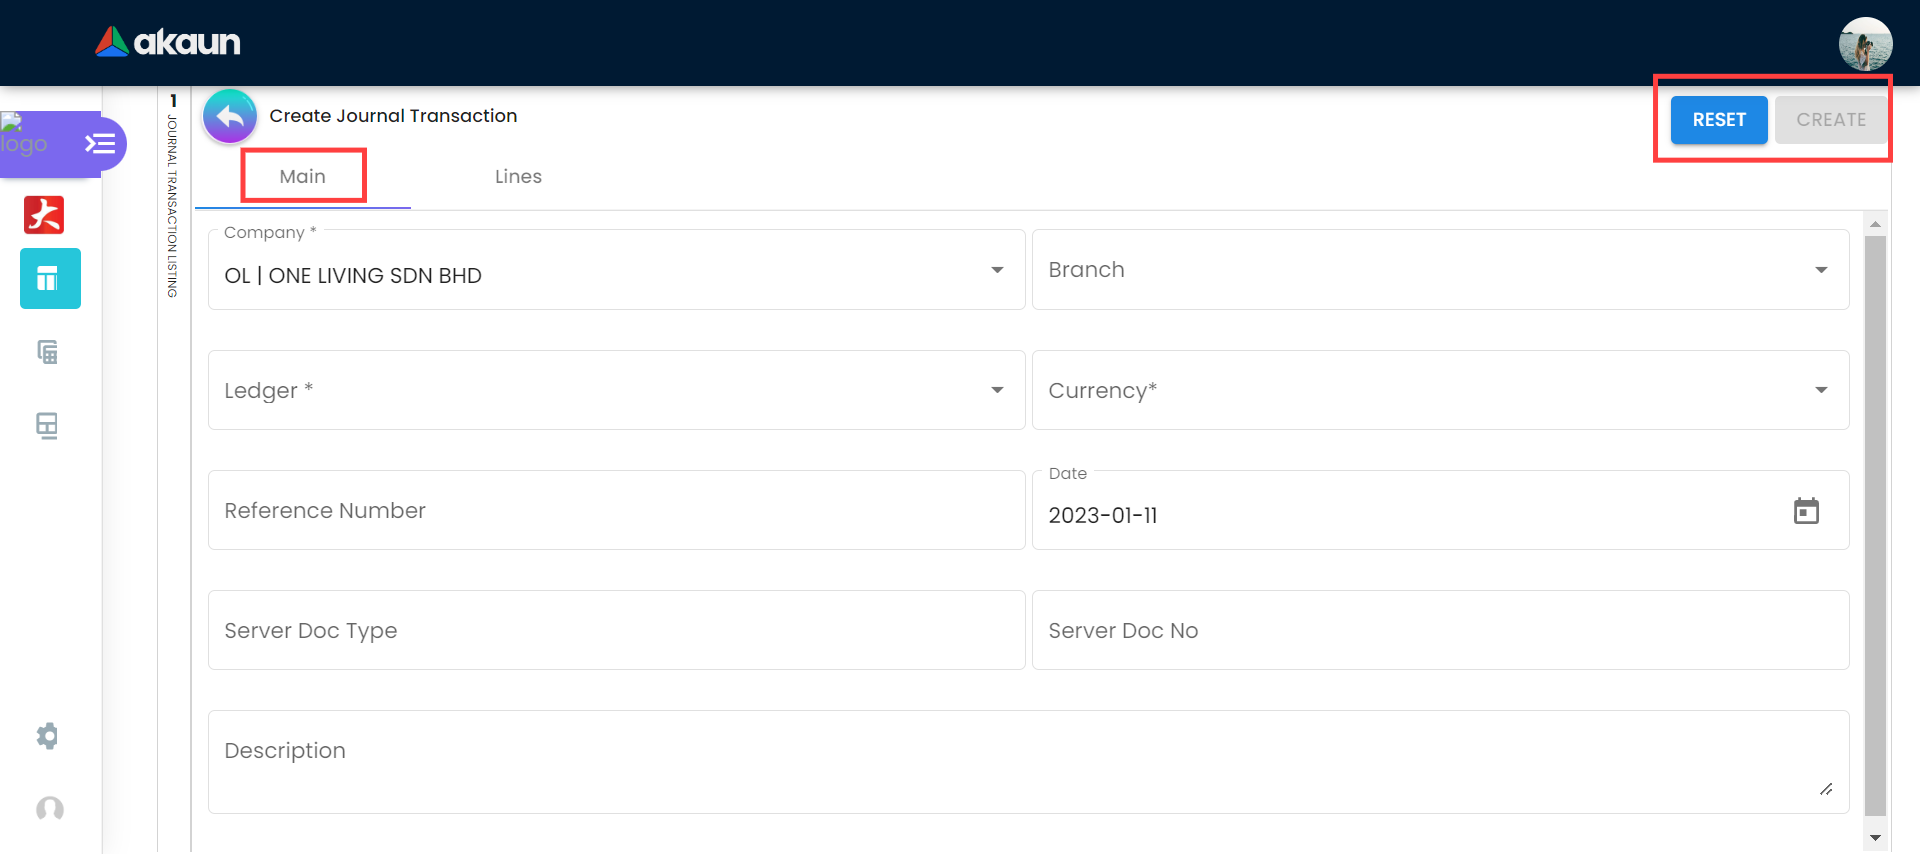
The Main tab captures the overall transaction information—the “who, what, when, and where” of the financial event.
Fields:
- Ledger: The book of accounts (e.g., PRIMARY).
- Reference Number: Your internal reference (e.g., Invoice #).
- Server Doc Type: The source document type (e.g., INTERNAL_SALES_CASHBILL). This tells you which applet generated this journal.
- Server Doc No: The unique ID of the source document. Clicking this often links back to the original transaction (e.g., the specific Invoice or Receipt).
Tip
Why are fields auto-filled? You can configure default values for Company, Ledger, and Currency in Settings > Default Selection. This speeds up data entry by pre-populating these fields for every new journal.
1.2.2 Lines Tab
The Lines tab is where you specify the actual accounting impact of the transaction. This is where double-entry bookkeeping comes into play—you’ll enter the specific accounts affected and the debit and credit amounts.
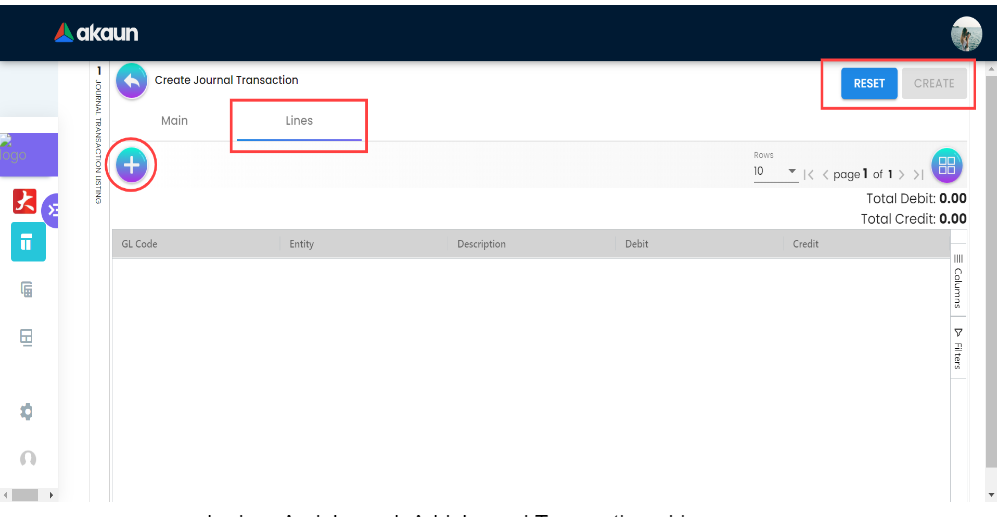
Understanding Line Items: Every journal transaction consists of at least two line items (one debit, one credit) because of double-entry bookkeeping principles. For example:
- When you receive cash from a customer: Debit Cash, Credit Accounts Receivable
- When you pay rent: Debit Rent Expense, Credit Cash
- Complex transactions may have multiple line items affecting several accounts
Interface Elements:
- Lines Table: Displays all line items you’ve added, showing:
- GL Code: The account code from your chart of accounts (e.g., 1000 for Cash, 4000 for Sales)
- Entity: The specific customer, supplier, or other entity involved
- Debit: Expenses (Expenditure) & Assets.
- Credit: Income & Liabilities.
1.2.2.1 Add Line Item Main
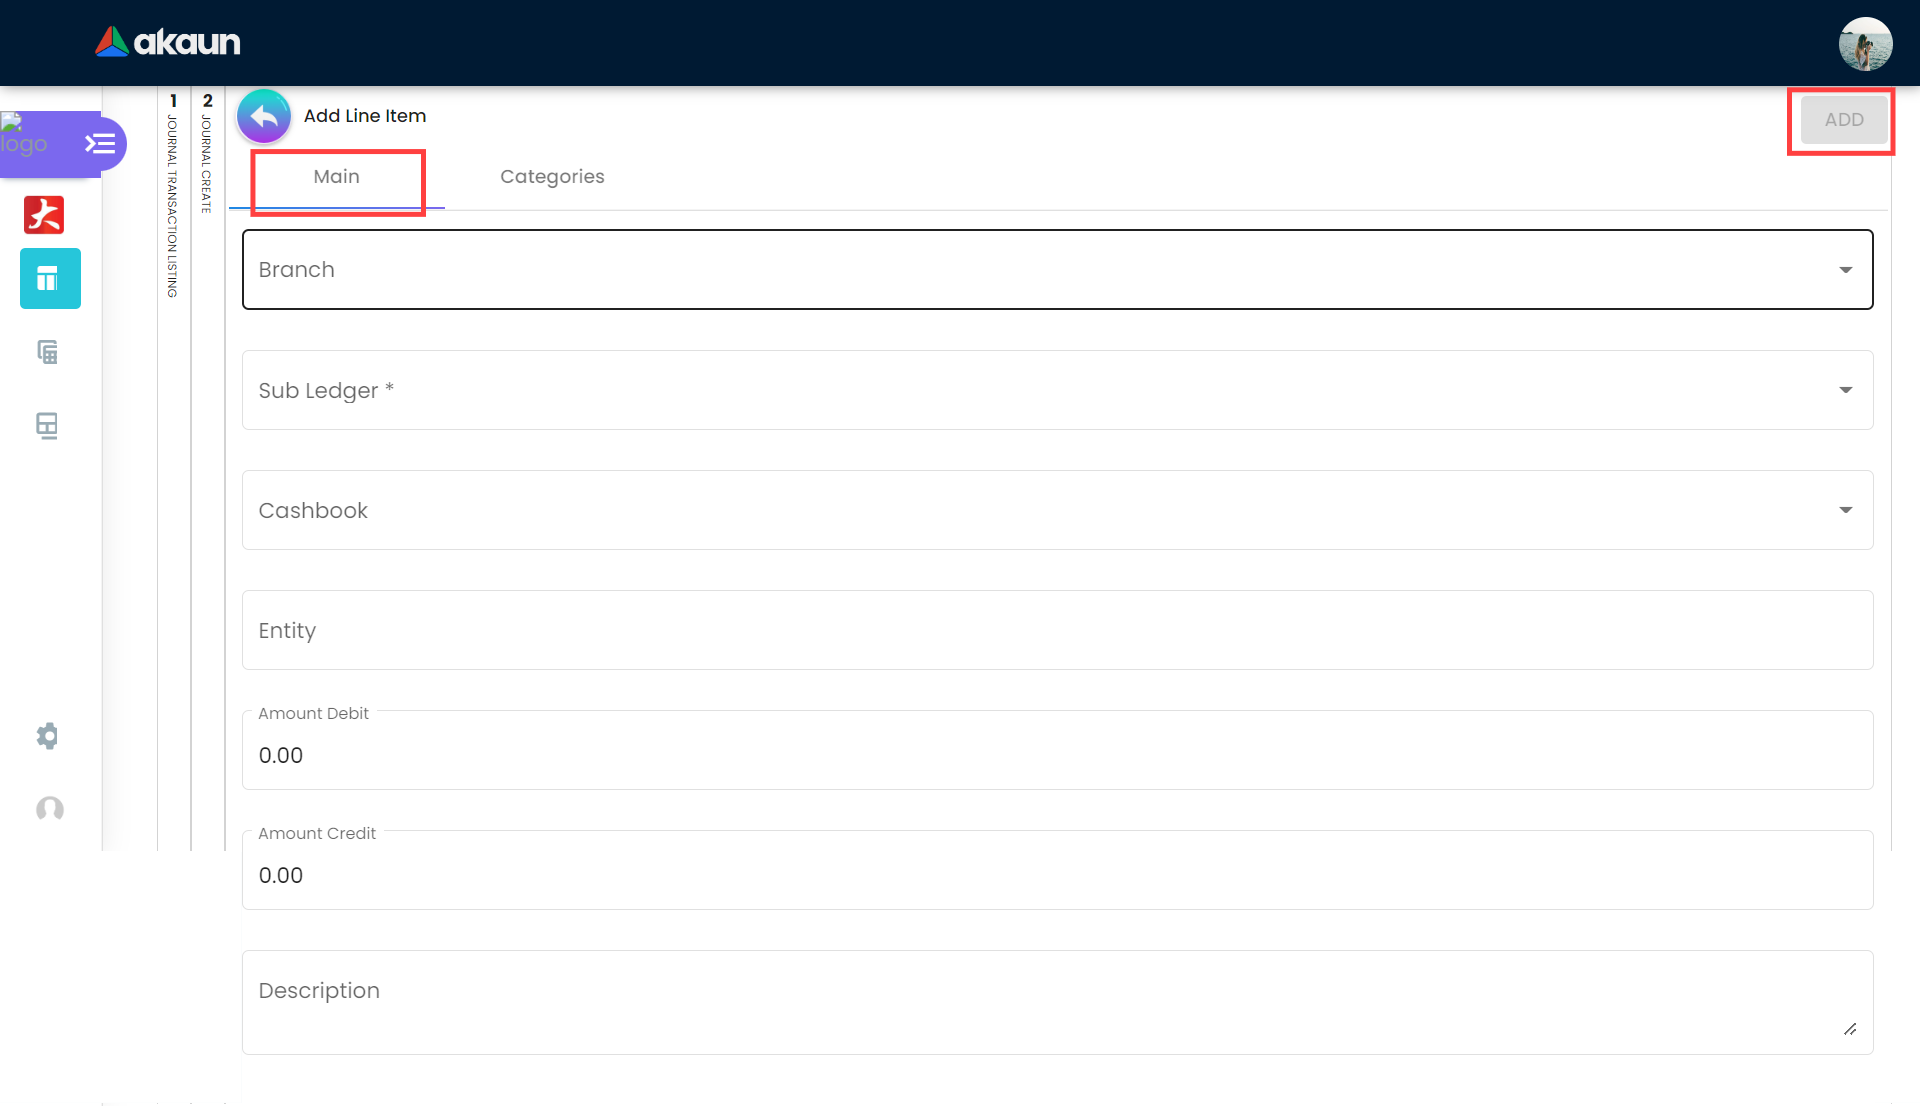
Each line item specifies one account affected by the transaction and the monetary impact on that account.
Line Item Fields:
- Branch: The specific branch for this line item (useful for multi-branch accounting).
- GL Code: The General Ledger account to be debited or credited (e.g., Travel Expenses, Cash at Bank).
- Cashbook: (Optional) Select if this line item affects a specific cash book.
- Entity: The related party (Customer, Supplier, Employee) if applicable.
Important: For each line item, enter the amount in EITHER the debit OR credit field, not both. The total of all debit line items must equal the total of all credit line items for the transaction to balance.
1.2.2.2 Add Line Item Categories
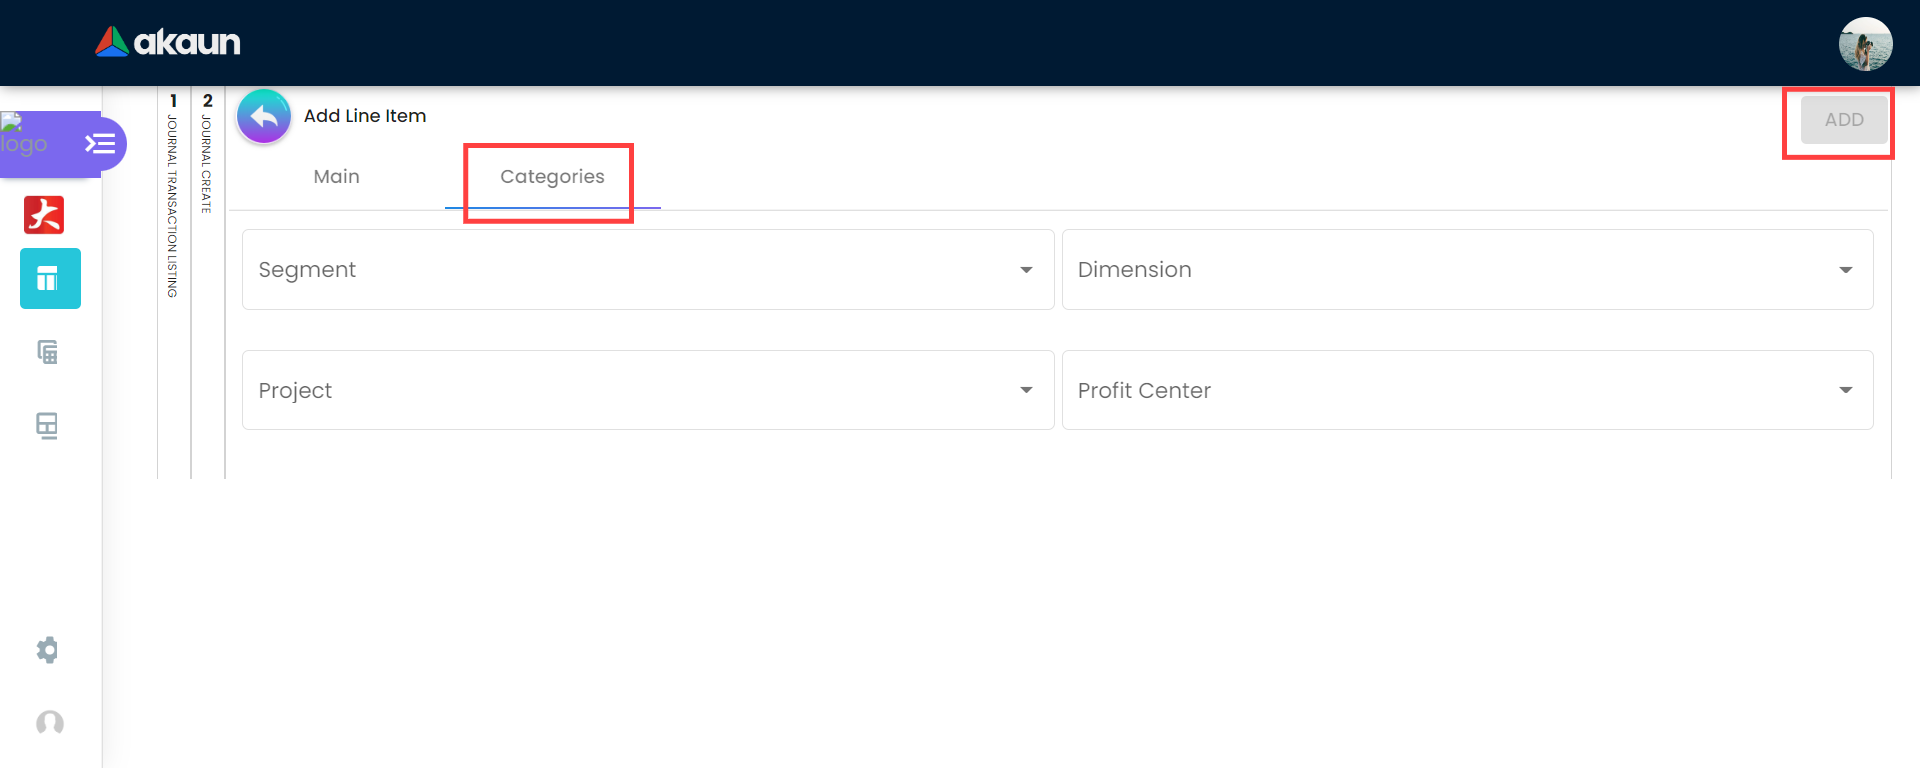
Categories provide additional dimensions for analyzing your financial data beyond basic account classification. They enable multi-dimensional reporting and analysis.
Category Fields:
Segment: Business segments or divisions (e.g., “Retail Division,” “Wholesale Division,” “Online Sales”). This allows you to analyze profitability and performance by business segment.
Dimension: Custom classification dimensions relevant to your business (e.g., “Product Line A,” “Product Line B,” “Service Category 1”). This could represent products, services, or any other meaningful grouping.
Project: Specific projects or initiatives. Essential for project-based businesses to track income and expenses by project, enabling project profitability analysis and helping ensure projects stay within budget.
Profit Center: The part of the organization responsible for generating profit (e.g., “North Region,” “Enterprise Sales Team”). This helps attribute financial results to specific organizational units for performance evaluation.
Usage: Navigate to the Categories tab after entering the main line item details, fill in the relevant category fields, and click Add (top left). Not all categories need to be filled—only use those relevant to your organization’s reporting needs.
1.3 Workflow Actions
Common actions you can perform on existing journals:
- Void (Reverse): Found in the listing page (Red button). Use this to reverse a posted transaction that was incorrect. It creates a contra-entry to nullify the financial impact while keeping the original record for audit purposes.
- Clone: Found in the View page. Use this to duplicate a previous journal. This is perfect for recurring monthly entries (e.g., Rent, Subscription fees) where the accounts remain the same and only the date/amount changes.
2.0 Sub Ledger
The Sub Ledger module provides detailed breakdowns of ledger accounts, offering granular visibility into account components. While the main ledger shows total balances (e.g., “Accounts Receivable: $50,000”), the sub-ledger breaks this down into individual components (e.g., “Customer A owes $10,000, Customer B owes $15,000,” etc.).
Purpose: The Sub Ledger acts as the detailed registry for all operational accounts. While the main Ledger (General Ledger) maintains high-level control accounts or categories (e.g., “Current Assets”, “General Expenses”), the Sub Ledger defines the specific accounts used in daily transactions.
Think of the General Ledger (GL) as the “Hanging Folders” in a filing cabinet (broad categories), and the Sub-Ledger as the specific “Papers” inside them (specific items). You cannot record a transaction just to a folder; you must specify the paper.
It is used to manage:
- Operational Accounts: Specific expense accounts (e.g., “Accounting Fees”, “Travel”), cash accounts (e.g., “Cash Drawers”), and revenue accounts.
- Individual Entities: Specific customer and supplier accounts for tracking receivables and payables.
- Asset & Inventory Records: Specific fixed asset items and inventory categories.
Note on Inventory: The Inventory Applet tracks the quantity and logistics of stock, while the Sub-Ledger tracks the financial value. When you buy stock, the Inventory Applet increases quantity, and the Journal automatically updates the Sub-Ledger value.
This granular level allows for detailed tracking and reporting while maintaining a clean, summarized General Ledger.
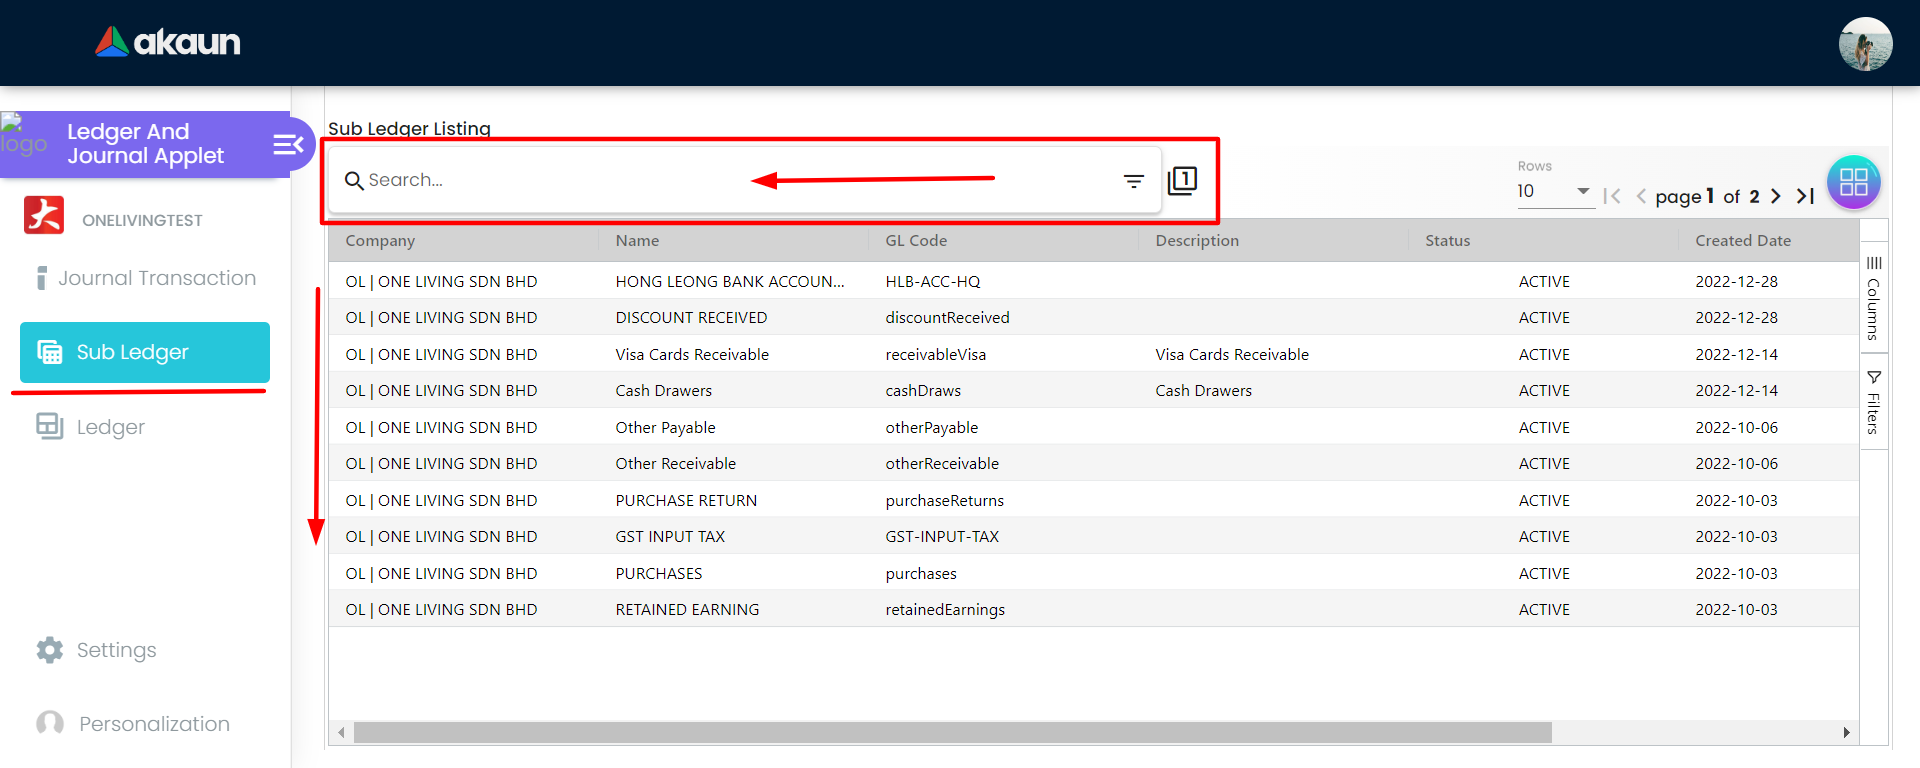
2.1 Sub Ledger Listing
The listing page provides an overview of all sub-ledger accounts in your system, organized in an easy-to-navigate table.
Display Columns:
Name: The descriptive name of the sub-ledger (e.g., “ABC Corporation - Customer Account,” “Office Equipment - Asset #123”).
GL Code: The general ledger account code this sub-ledger belongs to. This links the sub-ledger back to the main chart of accounts (e.g., sub-ledger “Customer ABC” might have GL Code 1200 for Accounts Receivable).
GL Section: The section of the General Ledger this account belongs to.
GL Category: The category within the General Ledger.
Account No: The specific account number assigned to this sub-ledger.
Tip
Understanding GL Hierarchy: These three columns work together to categorize the account:
- GL Section (Broadest): The main financial statement section (e.g., Current Assets, Operating Expenses).
- GL Category (Specific): The group within that section (e.g., Inventory, Travel Expenses).
- GL Code (Exact): The specific account identifier linked to the Chart of Accounts (e.g., 1200-001).
Mapping Impact: This hierarchy determines exactly where the Sub-Ledger’s balance appears on your financial reports.
Tip
GL Mapping & Reports: The GL Code, Section, and Category you select determine where this sub-ledger appears on your Balance Sheet or P&L. Always verify mapping during creation. If a Sub-Ledger is missing from reports, check if it’s mapped to a hidden or inactive GL account.
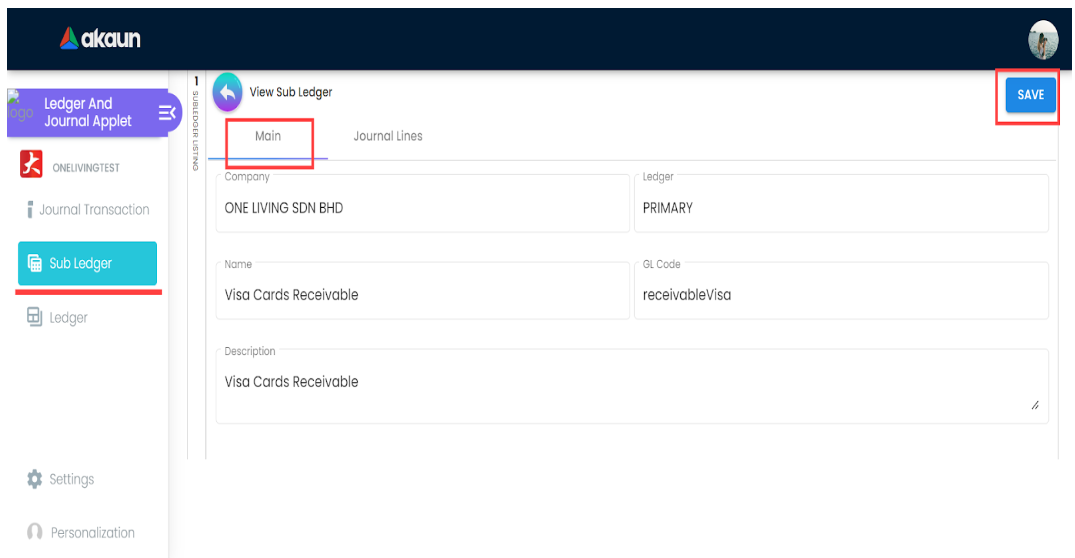
2.2 Edit Sub Ledger (Main Tab)
The View/Edit Sub Ledger page allows you to review and update sub-ledger account details.
Functionality:
Auto-Population: When you open a sub-ledger, all its current information automatically appears in the form fields.
Editable Fields: Only the Description field can be modified. This allows you to update notes, add clarifying information, or correct typos without changing the fundamental account structure.
Protected Fields: Company, Ledger, Name, and GL Code are not editable to maintain data integrity. These are set when the sub-ledger is created and shouldn’t change.
Important
Fixing Incorrect Mapping: If a Sub-Ledger is linked to the wrong GL Code (e.g., “Sales” instead of “Expenses”), you generally cannot change it if transactions exist. Instead, create a new Sub-Ledger with the correct mapping, transfer the balance via Journal Entry, and deactivate the old one.
Note
Opening Balances: You cannot “edit” the balance field directly. To set an opening balance, you must create a Journal Transaction (Debit the Sub-Ledger, Credit Opening Balance Equity).
Use Cases: You might edit descriptions to:
- Add customer contact information to customer sub-ledgers
- Update asset descriptions with serial numbers or locations
- Add notes about payment terms or special arrangements
- Clarify the purpose of miscellaneous sub-ledgers
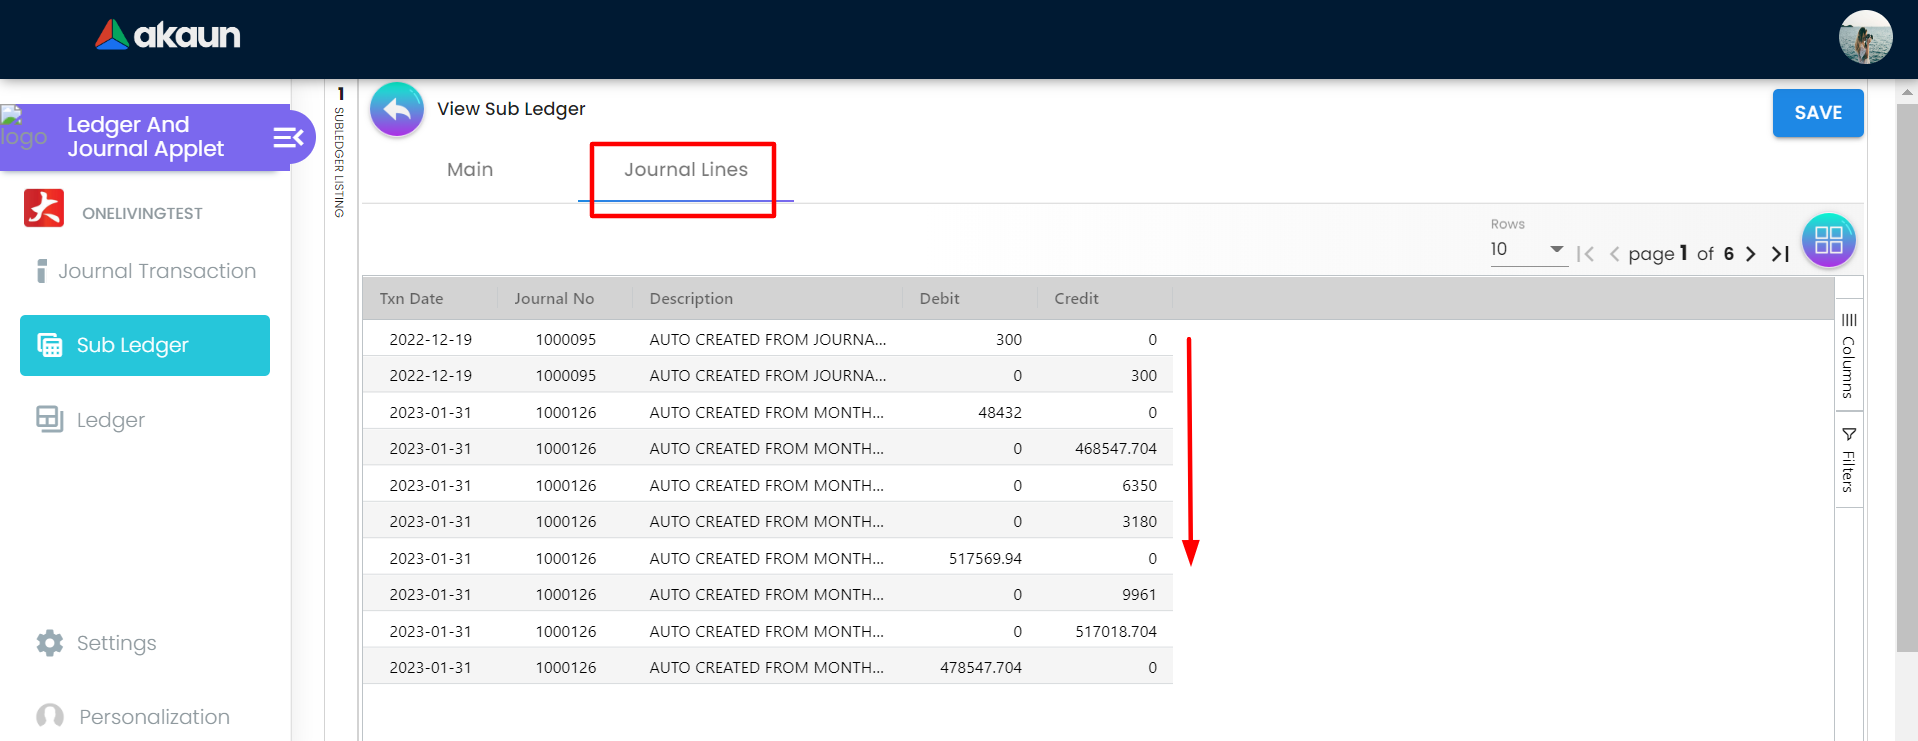
2.3 Journal Lines Tab
This tab shows the complete transaction history for the selected sub-ledger, providing a detailed audit trail of all financial activity affecting this account.
Display Columns:
- Journal No: The journal entry number for each transaction. Click this to navigate to the full journal entry and see all its line items, not just the one affecting this sub-ledger.
Use Cases:
- Review a customer’s payment history to resolve disputes
- Verify all transactions affecting a specific asset
- Analyze the transaction pattern for a particular account
- Reconcile sub-ledger details against external statements
- Track the complete history of any sub-ledger account
Running Balance: While not explicitly mentioned, many systems show a running balance after each transaction, making it easy to see how the account balance evolved over time.
Tip
Drill Down: This tab is your primary tool for “drilling down” into details. It shows every single transaction (invoice, payment, adjustment) that makes up the current balance.
Warning
Reconciliation: If your Sub-Ledger balance differs from the Trial Balance, check for Direct GL Entries (journals posted directly to the GL control account without a Sub-Ledger). Always transact at the Sub-Ledger level.
If you see “Zero Journal Lines”, it means no posted transactions have hit this account yet. Check for Draft or Pending transactions.
3.0 Ledger
Purpose: The Ledger module is your master account registry. It organizes all financial data by account type and provides summary views of account balances.
It serves to:
- Maintain your Chart of Accounts.
- Show current balances for all accounts.
- Provide the foundation for financial statements (Trial Balance, P&L, Balance Sheet).
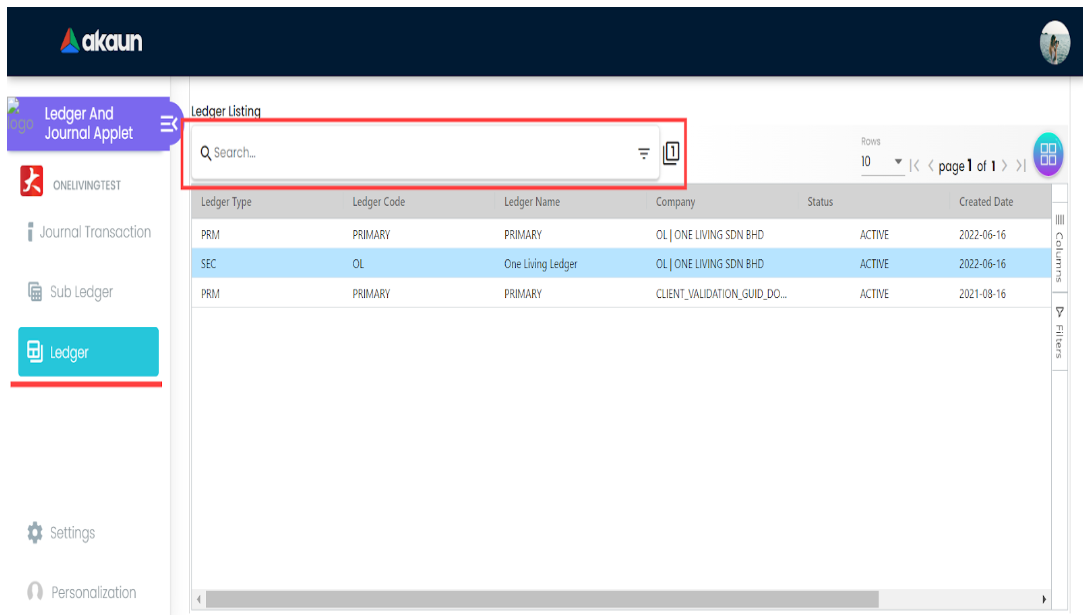
3.1 Ledger Listing
The main ledger listing page displays all ledger accounts in your chart of accounts, giving you a bird’s-eye view of your entire account structure.
Display Columns:
- Ledger Type: The classification of the account (e.g., PRM for Primary, SEC for Secondary).
- Ledger Code: The unique identifier for this account (e.g., 1000, 1100).
- Ledger Name: The descriptive name of the account (e.g., “Cash at Bank”, “Sales Revenue”).
Tip
FAQ: Ledger Code vs. GL Code
- Ledger Code = The Book (e.g., “PRIMARY”). It represents the set of books you are writing in.
- GL Code = The Account (e.g., “1000-Cash”). It represents the specific category of money inside that book.
Analogy: You write a transaction for “Cash” (GL Code) inside your “Primary” notebook (Ledger Code).
Tip
Primary vs. Secondary Ledgers:
- Primary (PRM): Your main book of accounts used for statutory reporting in your base currency.
- Secondary (SEC): Used for alternative reporting requirements, such as reporting in a different currency or under a different accounting standard.
Warning
Only Secondary (SEC) ledgers can be deleted. Primary (PRM) ledgers are protected as they form the core of your financial system.
Tip
When to use Secondary Ledgers? Secondary ledgers are useful for specific reporting needs that differ from your primary financial statements. Common uses include:
- Foreign Currency Reporting: To maintain financial records and generate reports in a currency different from your primary operating currency.
- Tax Reporting: To adjust financial data to meet specific tax regulations or reporting standards (e.g., IFRS vs. local GAAP adjustments for tax purposes).
3.2 View Ledger Details Tab
The ledger detail page allows you to review complete account information and make necessary updates to account properties. When you click on a ledger row, the system displays all current account information:
- Ledger Code: The account’s unique identifier (read-only for data integrity)
- Ledger Type: The account classification
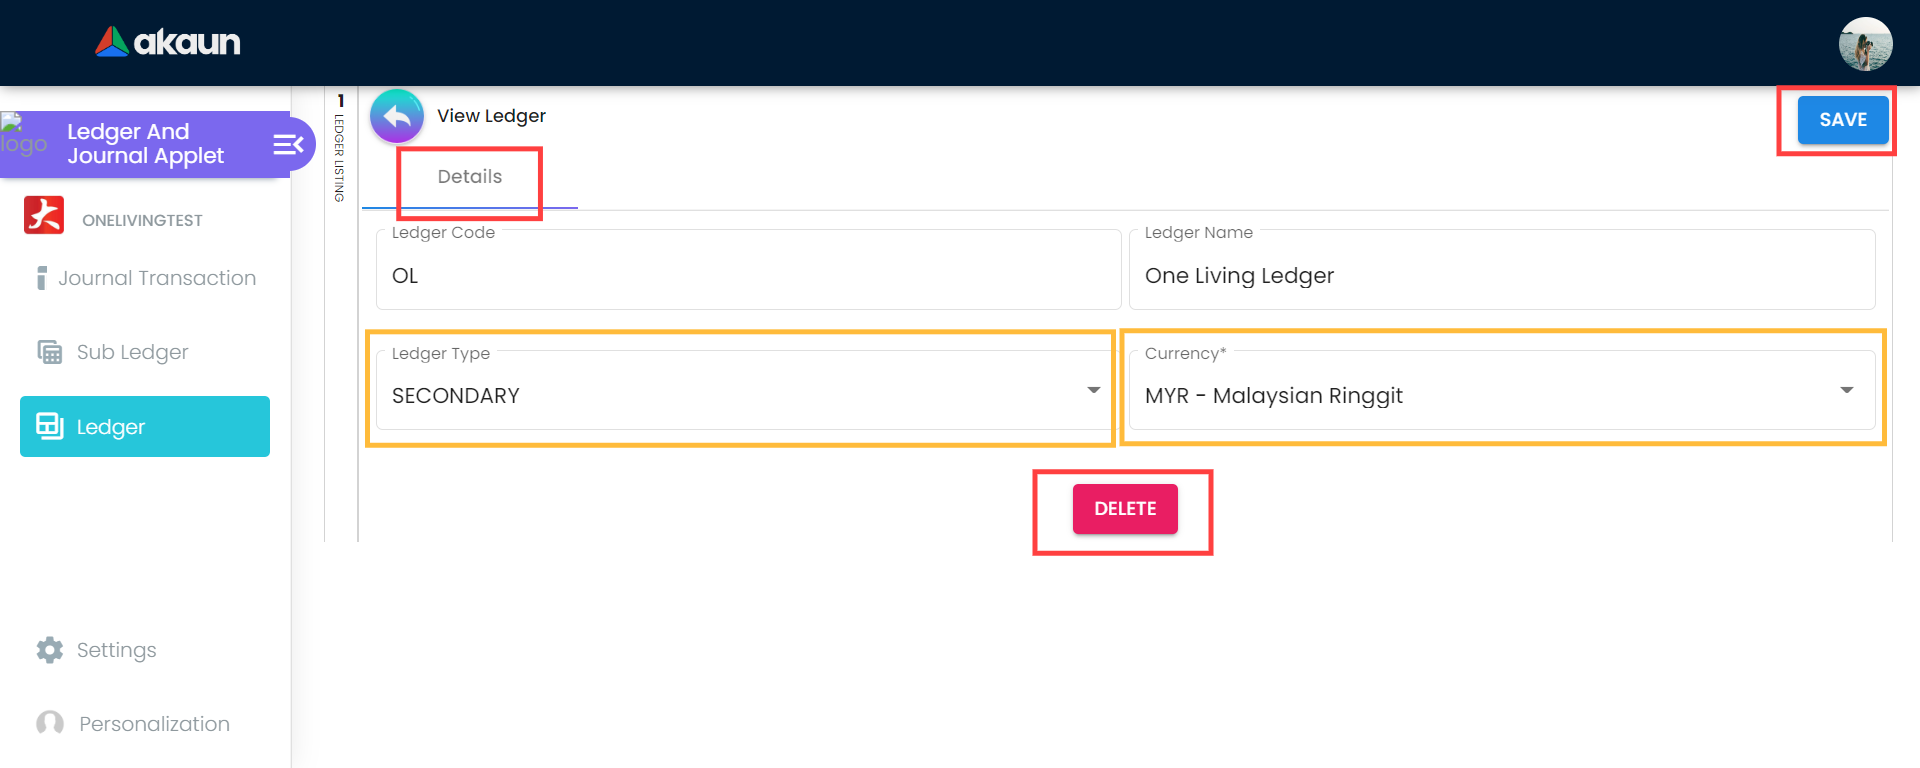
Editable Fields:
- Ledger Type: You can change the account classification if needed. For example, you might reclassify an account if you initially set it up incorrectly or if accounting standards change. However, be cautious with this—changing the type affects how the account appears on financial statements and how transactions are interpreted.
4.0 Import Journal
The Import Journal module allows for bulk uploading of journal transactions using a standardized template.
4.1 Import Journal Listing
The listing page displays a history of imported files and their processing status.
Table Columns:
- Process Status: Status of the import (e.g., DONE, FAILED, VALIDATING_DATA).
4.2 Template Columns
The CSV template contains the following columns for data entry:
- COMPANY_CODE: Code of the company for the transaction.
- HDR_BRANCH_CODE: Branch code for the transaction header.
- LEDGER_CODE: Code of the ledger book.
- REFERENCE_NUMBER: External reference number.
- CURRENCY_CODE: Transaction currency.
- HDR_DESCRIPTION: Overall description of the transaction.
- DATE_TXN: Date of the transaction.
- LINE_BRANCH_CODE: Branch code for the specific line item.
- LINE_GL_CODE: General Ledger account code.
- LINE_CASHBOOK_CODE: Cashbook code (if applicable).
- LINE_ENTITY_CODE: Entity code (Customer/Supplier/Employee).
- LINE_AMOUNT_DEBIT: Debit amount.
- LINE_AMOUNT_CREDIT: Credit amount.
- LINE_DESCRIPTION: Description for the specific line item.
4.3 Uploading a Journal
To import transactions:
- Download Template: Click the Sample Format link to download the template file (e.g.,
MasterData_Upload_Ledger_&_Journal.csv). The necessary information can be refered in 4.2 Template Columns. - Upload: Drag and drop your file into the “Upload Master Data” area or click Upload File.
- Monitor Status: Check the listing page to see if your import was successful or if there were errors.
5.0 Error Checking
The Error Checking module is a diagnostic tool designed to maintain data integrity within your financial records. It helps identify anomalies such as unbalanced journals, missing sequences, or incomplete transactions that could affect financial reporting.
5.1 Journal Not Balance
This tab identifies transactions where the total Debit amount does not equal the total Credit amount. In double-entry bookkeeping, every transaction must balance. Unbalanced journals can lead to an inaccurate Trial Balance and Balance Sheet.
Common Causes:
- System interruptions during posting.
- Data migration errors.
- Complex multi-currency rounding differences.
Action: Review these entries and correct them to ensure your accounts balance.
5.2 Other Diagnostic Tabs
- Missing Journal: Identifies gaps in the sequential numbering of journals, which is important for audit completeness.
- Missing Journal Forex Gain Loss: Checks for missing foreign exchange gain/loss entries on multi-currency transactions.
- Update Journal Remarks: A utility to review and update narrative remarks for transactions.
- Missing Credit Card Charge: Identifies potential discrepancies in credit card transaction recording.
Source Document Integrations
The Ledger and Journal applet automatically creates journal entries from transactions finalized in various operational applets. This ensures that financial records are always in sync with business activities. Key source documents include:
Downstream Applets
The data recorded in the Ledger and Journal applet is used by financial report applet for analysis and reporting.
Relationship: Ledger & Journal ↔ Financial Report Applet
1. Ledger & Journal applet
- Holds GL master data and journal entries:
- GL Section
- GL Category
- GL Code
- Sub-ledger mappings
- Transactional applets (Sales Invoice, POS/Cashbill, Sales Return, Credit/Debit Notes, Purchase Invoice, Purchase Return, etc.) create Journal Header + Journal Lines here when a document reaches FINAL/POSTED status.
2. Month-end processing (accounting engine)
Month-end is not just a “close period” button; it is a full accounting engine.
It performs multiple calculations and adjustments, including but not limited to:
- Depreciation
- Stock valuation and cost adjustments
- Retained earnings processing
- Reversal journals
- Period-end accruals and adjustments
- Any company-specific accounting routines The result of month-end is a set of processed GL balances, which are the numbers the Financial Report applet uses.
Tip
Important distinction:
The Financial Report does NOT simply summarize journal entries directly.
Journal entries → Month-end processing (with complex calculations) → Processed GL balances → Financial Report.
This means the numbers in Financial Reports reflect accounting adjustments made during month-end, not just raw transaction totals.
3. Financial Report applet
Important terminology:
A single company can have multiple ledgers.
Example: local ledger, IFRS ledger, tax ledger.A Set of Book can include multiple ledgers, and those ledgers do not need to belong to the same company.
(This supports consolidated reporting.)The Financial Report applet reads processed GL balances (post month-end) for the selected Set of Book and generates:
- Trial Balance
- Profit & Loss
- Balance Sheet
Reports show aggregated totals grouped by:
- GL Section
- GL Category
- GL Code
To inspect source postings, use the drill-down from a GL Code row (this shows the underlying posted journal lines from the Ledger & Journal applet filtered by posting date/status).
Summary
The Ledger and Journal Applet is a comprehensive, mission-critical tool for financial management that ensures:
Accuracy: Through double-entry bookkeeping, validation rules, and systematic controls, the applet maintains accurate financial records that can be trusted for decision-making and compliance.
Efficiency: By integrating with other applets, supporting bulk imports, and automating calculations, the applet significantly reduces manual effort and speeds up financial processes.
Compliance: With complete audit trails, period locking, user permissions, and standardized processes, the applet helps organizations meet accounting standards and regulatory requirements.
Insight: Through detailed categorization, multi-dimensional analysis, and integration with financial reporting, the applet transforms raw transaction data into actionable business intelligence.
Scalability: The applet’s modular design, multi-company support, and flexible configuration options allow it to grow with your organization, from small startups to large enterprises.
Whether you’re an accountant ensuring accurate financial records, a bookkeeper recording daily transactions, a financial analyst generating reports, or a business owner monitoring performance, the Ledger and Journal Applet provides the tools and structure needed to manage financial data effectively.
By maintaining a clear chronological record in journals, organizing data categorically in ledgers, and connecting seamlessly with related applets, this tool forms the backbone of sound financial management and informed decision-making.