Packing Order (Internal) Applet
Purpose and Overview
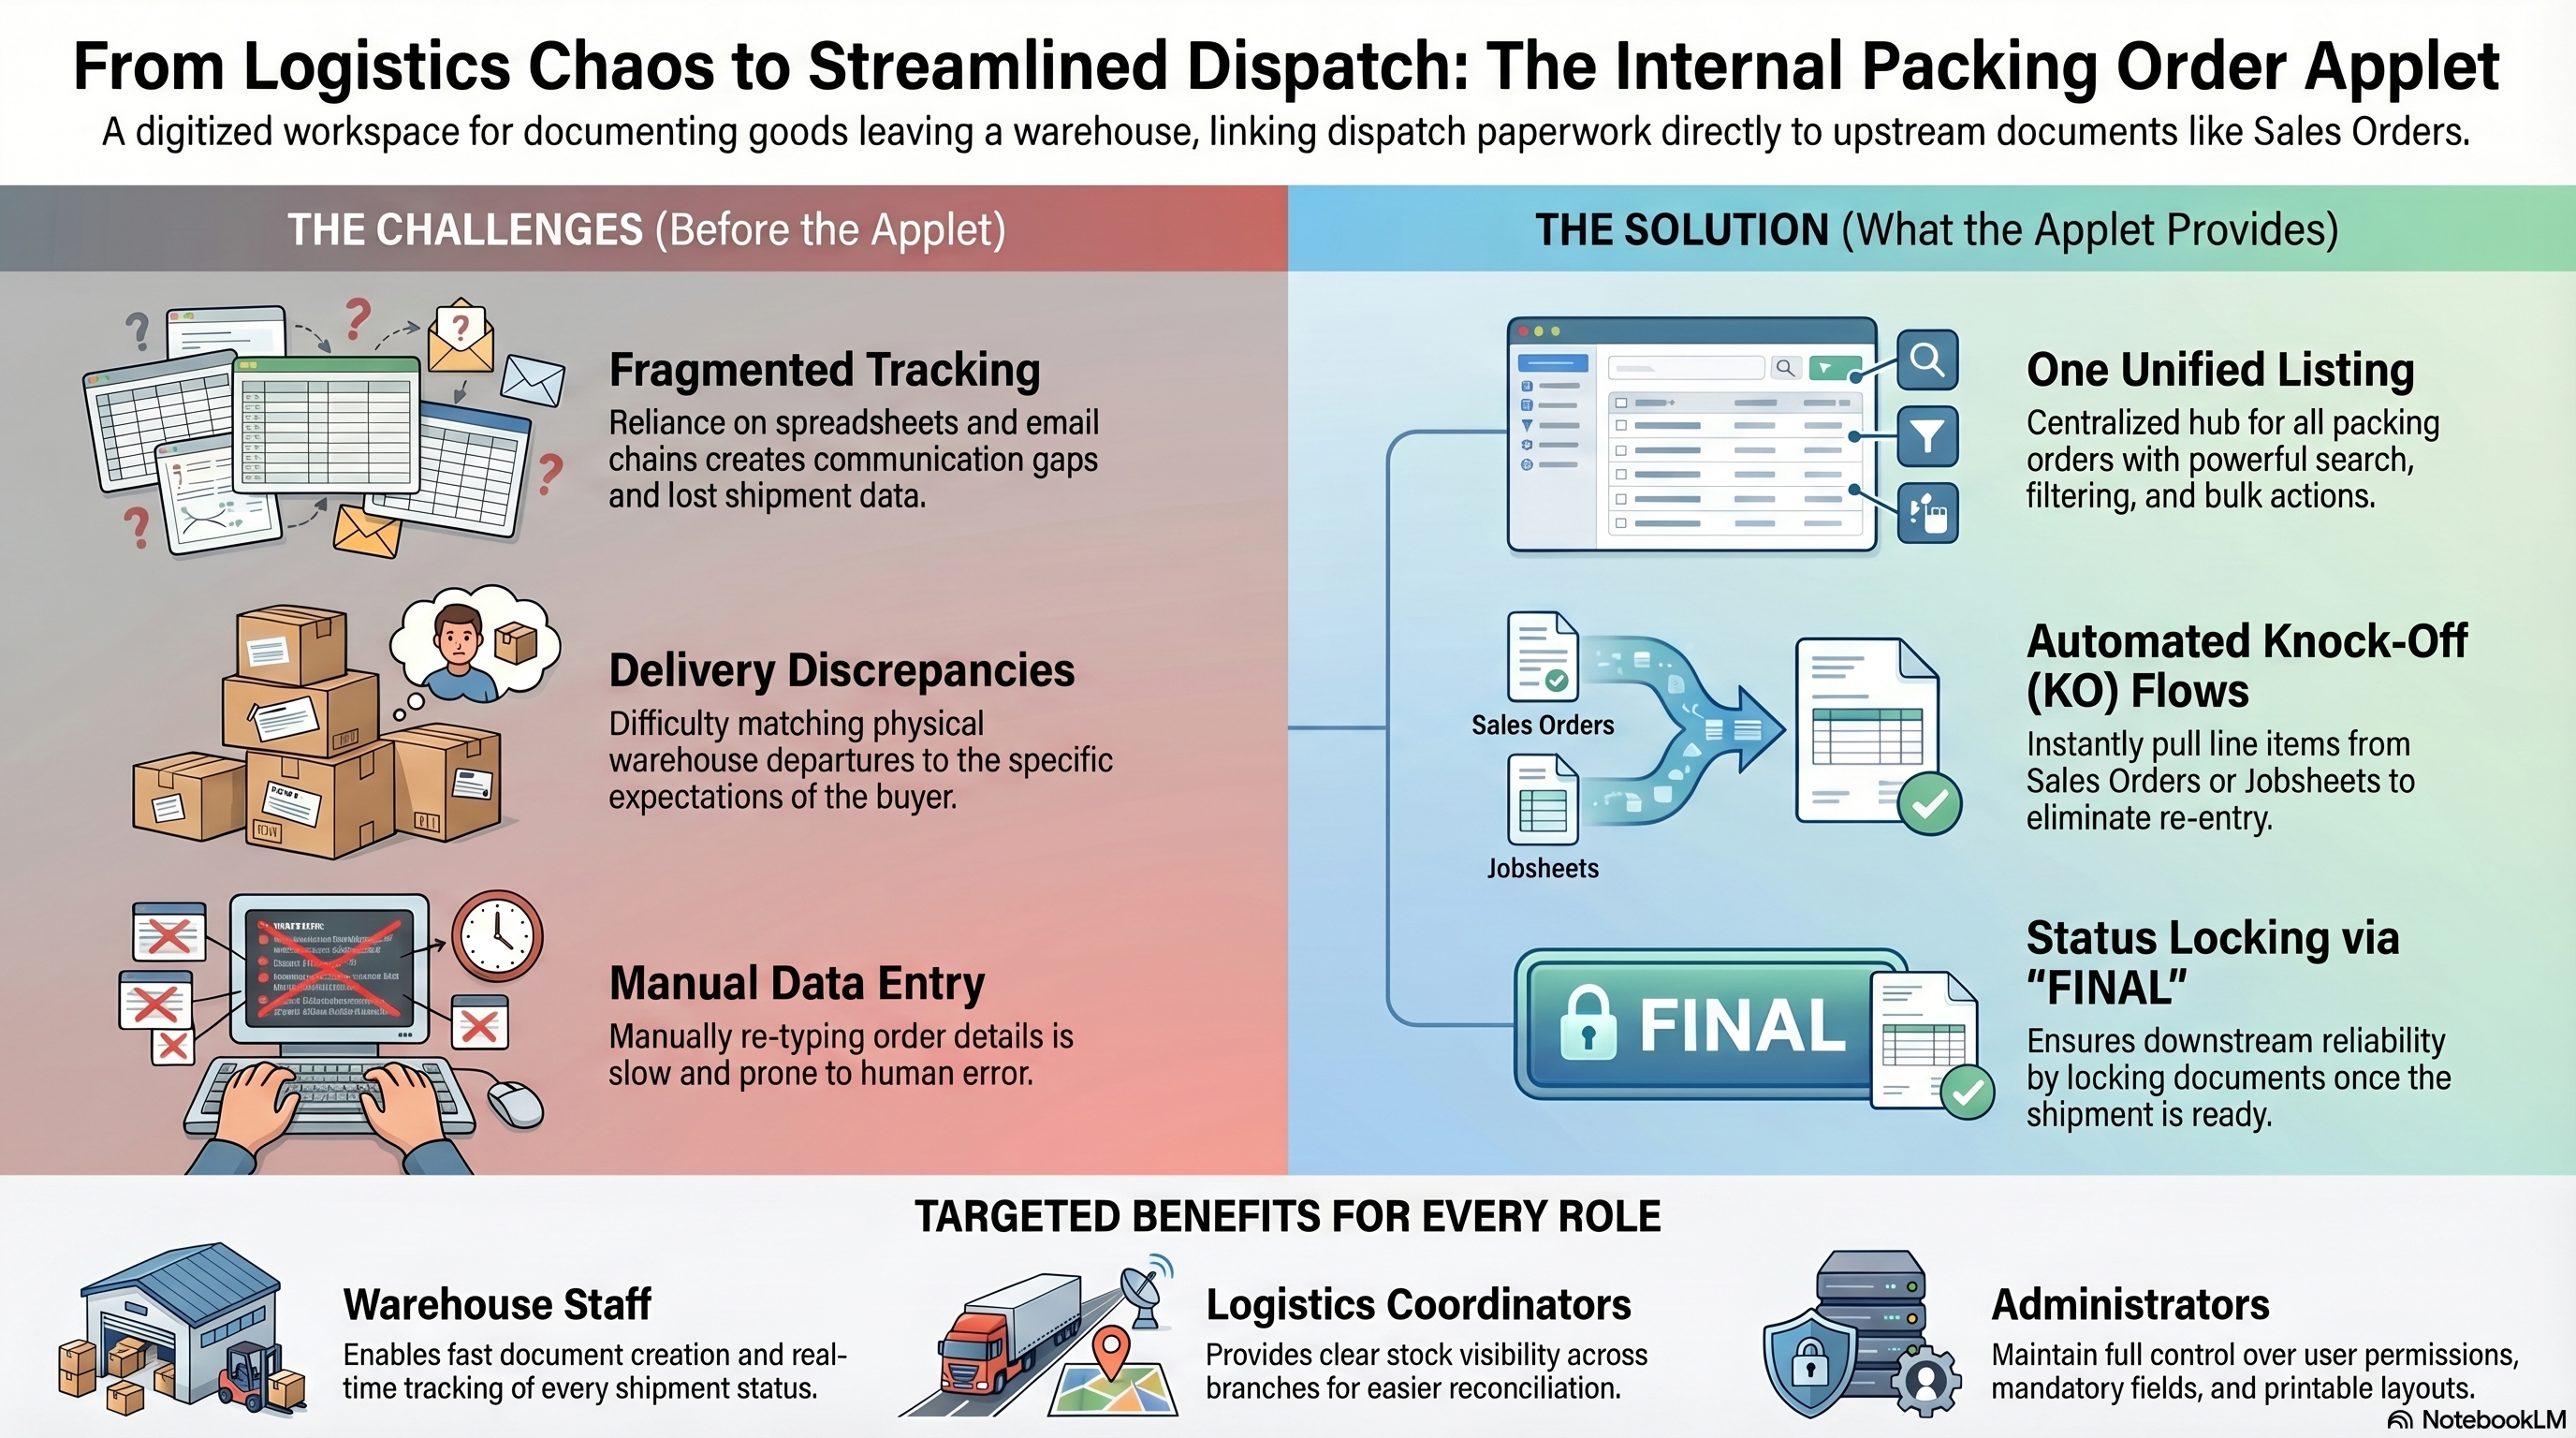
The Internal Packing Order Applet is your workspace for documenting goods leaving your warehouse toward the buyer. Each packing order records the dispatching branch and location, the items being shipped, and how the movement links to upstream documents such as Sales Orders, Jobsheets, Quotations, and Delivery Orders.
In Simple Terms: Think of it as your dispatch paperwork, digitised in one place—you record what is going out, pull line detail from existing orders when your process allows, and finalise the document so receiving can reconcile against what you shipped.
Key Features Overview
Who Benefits from This Applet?
Supplier Operations & Warehouse Staff:
- Centralised view of all outbound packing orders
- Fast line creation via Search Item or Knock-Off (KO)
- Real-time tracking of shipment statuses
- Print-ready delivery documentation for drivers
Logistics Coordinators:
- Clear visibility into which branch and location stock is dispatched from
- Ability to reconcile outbound movements with upstream orders
Administrators:
- Full control over field requirements, KO availability, permission sets, and printable layouts
What Problems Does This Solve?
Without a central record, outbound shipments are tracked in spreadsheets or email chains, making it difficult to match what left the warehouse to what the buyer expects. This applet solves that by providing:
- One unified listing for all packing orders with search, filtering, and bulk actions
- Structured details capturing the exact branch, location, and movement classification
- Automated knock-off flows to pull items directly from Sales Orders, Jobsheets, Quotations, or Delivery Orders—eliminating manual re-entry
- Financial summaries on each order: Total Transaction Amount, SST/VAT/GST, and Rounding
Key Concepts
Document Flow
Open Listing → Create (+) → Fill Main Details → Save → Add Lines (Manual or Knock-Off) → Matchings (optional) → Finalise (when ready to dispatch)
Technical Terms Explained
| Term | What It Means |
|---|---|
| Branch | Your organisational site or division. The order records which branch the goods leave from. |
| Location | A specific warehouse or dispatch point under your branch. |
| Conversion Code / Name | The system’s classification for this outbound stock movement type. Your admin defines the allowed values. |
| KO (Knock-Off) | Automatically importing line items from an existing document (Sales Order, Jobsheet, Quotation, or Delivery Order) instead of typing them in manually. |
| Matchings | A tab used to link this packing order to other related documents in the system. May be empty if your workflow does not require it. |
| Posting Status | Indicates whether the order is still editable or has been finalised. |
| Jobsheet | An internal tracking document detailing materials and labour for a production job. Used here as a source document for knock-off. |
Quick Start Guide
1. Manual Packing Workflow
Goal: Create an ad-hoc packing order and manually select items to dispatch.
- Navigate: Under the applet sidebar, click Manual Packing.
- Create: Click the + button (Create) at the top of the listing.
- Fill Main Details:
- Select the dispatching Branch and Location.
- Select the required Conversion Code and Conversion Name.
- Save: Click SAVE. The document is generated and you can now add lines.
- Add Lines: Go to the Lines tab.
- Click the + (Add) button.
- Use the Search Item tab to browse your catalogue and enter the dispatched quantities.
- Click Back to return to the Lines grid.
- Finalise: Once all items are added, click FINAL to lock the document for dispatch.
2. Operator Queue Workflow
Goal: Process a pre-assigned packing job from the warehouse queue.
- Navigate: Under the applet sidebar, click Operator Queue.
- Select Task: Find a pending task assigned to you or your station, and click the row to open it.
- Process Lines: Navigate to the Lines tab to review the items that must be packed.
- Update Status/Finalise: Pack the items physically, ensure quantities match, and click FINAL (or trigger the relevant workflow status) to complete your queue task.
3. Knock-Off (KO) Workflow
Goal: Pull items automatically from an upstream document (like a Sales Order).
- Navigate: Open or create a packing order (e.g., via Manual Packing → +).
- Save Details: Ensure your Main Details are filled and click SAVE.
- Import Lines: Go to the Lines tab and click the + button.
- Switch to the required KO tab (e.g., KO For Sales Order or KO For Jobsheet).
- Search for the specific Sales Order or Jobsheet number.
- Select the source document to automatically import all pending line items.
- Adjust & Finalise: Adjust quantities if delivering a partial shipment, then click FINAL.
Understanding Your Sidebar Modules
This applet handles several operational flows. Depending on your company’s configuration, you will interact with the following modules in your sidebar:
Core Packing Operations
| Module | What It Is | How To Use It |
|---|---|---|
| Manual Packing | For ad-hoc or complex orders where operators must define the packing structure manually. | Click Manual Packing → List displays all manual orders. Click + to create a new one, fill details, and add lines. |
| Operator Queue | The digital task list for warehouse floor staff. Tasks are pushed here automatically. | Click Operator Queue → Find your assigned task → Click row to open → Pack the indicated items → Finalise. |
| Packing Request | Formal requests routed from sales or logistics to the packing team, initiating the outbound process. | Click Packing Request → Review incoming requests → Convert requests into actable packing orders. |
Specialized Manufacturing (Coil)
| Module | What It Is | How To Use It |
|---|---|---|
| Auto Coil Operator | An interface for machine operators handling coiled goods (steel, wire) via automated winding integration. | Click Auto Coil Operator → Select machine line → Review automated output lengths → Confirm packing. |
| Auto Coil Supervisor | The management console for automated coil lines. | Click Auto Coil Supervisor → Monitor output rates, approve operator overrides, and track performance metrics. |
Production & Exception Handling
| Module | What It Is | How To Use It |
|---|---|---|
| Job Order | Links outbound packing directly to specific manufacturing work orders. | Click Job Order → Select the manufacturing job → Pack the finished goods produced from that job. |
| Packing Containers | Manages reusable physical containers (pallets, crates, drums) and their tare weights. | Click Packing Containers → Create or update container records to track what items are packed into. |
| Scrap & Short | The exception-handling hub for damaged materials (Scrap) or missing stock (Short). | Click Scrap & Short → Log any items damaged during packing or document why an order is short. |
System & Testing
| Module | What It Is | How To Use It |
|---|---|---|
| TESTING | A diagnostic sandbox for administrators and developers. | Click TESTING → Test barcode scanner integrations or weight scale hardware without affecting live data. |
Manual Packing
The Manual Packing module is the master control document and primary workspace for supervisors managing the entire packing process.
(Requires SHOW_SUPERVISOR_VIEW permission)
Core Functionality
| Action | Description | Impact |
|---|---|---|
| Create Order | Define required output items and map raw material inputs. | Establishes the production blueprint. |
| Finalize Order | Confirm the order details and commit them. | Generates tasks in the Operator Queue. |
| Track Contra | View related downstream documents. | Ensures traceability to Delivery Orders. |
How It Works
- Initiate: Supervisor creates a new Packing Order.
- Configure: Define expected outputs and map corresponding raw materials (Inputs).
- Commit: Save and click FINAL.
- Dispatch: Tasks are automatically routed to the Operator Queue for shop floor execution.
Real-World Scenario
Scenario: Large Assembly Assignment
The Problem: A supervisor needs to assign a large assembly job to three different operators and ensure inventory is properly deducted for the consumed raw materials.

The Solution: The supervisor creates a single Manual Packing document, specifies the total output, and finalizes it. The system automatically handles the inventory math and pushes the specific tasks to the operators' queues.
Operator Queue
The Operator Queue is a simplified, touch-friendly task list specifically designed for machine operators on the shop floor.
(No special permissions required - default landing page)
Core Functionality
| Feature | Description | Benefit |
|---|---|---|
| Task Visibility | View only tasks currently assigned to the operator’s specific workstation or machine block. | Reduces clutter and confusion. |
| Direct Execution | Click a task to immediately launch the execution interface. | Speeds up the workflow. |
| Real-Time Sync | Tasks assigned by supervisors appear instantly. | Eliminates paper-based delays. |
How It Works
- Log In: Operator accesses the terminal.
- Review: Operator checks the queue for pending assignments.
- Select: Operator clicks a task to begin.
- Execute: The system redirects them to the appropriate logging screen (e.g., Auto Coil Operator).
Real-World Scenario
Scenario: Streamlined Shop Floor Execution
The Problem: A floor worker needs to know exactly what to work on next without navigating complex ERP screens.

The Solution: They open the Operator Queue, see the top-priority task assigned by their supervisor, tap it, and immediately start logging their production.
Auto Coil Operator
The Auto Coil Operator module is a specialized production logging interface tailored for industries dealing with continuous lengths of material (e.g., wire, cable, pipes).
(No special permissions required)
Core Functionality
| Input Metric | Description | Example |
|---|---|---|
| Spool Length | The total continuous length produced. | 500 meters |
| Cut-Loss | The amount of material lost during machine cutting. | 2 meters |
| Weight | The final weight of the completed spool. | 150 kg |
How It Works
- Receive Task: Operator opens a coiling task from the Operator Queue.
- Execute: Operator runs the physical coiling machine.
- Log Metrics: Operator inputs the specific spool length, cut-loss, and weight generated by the machine.
- Submit: The raw data is sent directly to the Auto Coil Supervisor module for review.
Real-World Scenario
Scenario: Logging Copper Wire Production
The Problem: An operator needs to log exact spooling metrics that standard unit-based inventory systems cannot handle.

The Solution: The operator uses the dedicated calculators in the Auto Coil Operator interface to log exactly how much copper wire was successfully spooled versus how much was cut as scrap.
Auto Coil Supervisor
The Auto Coil Supervisor provides managers with review and override capabilities, acting as the advanced counterpart to the Auto Coil Operator module.
(Requires SHOW_SUPERVISOR_VIEW permission)
Core Functionality
| Action | Description | Impact |
|---|---|---|
| Review Logs | Check raw coiling data submitted by operators. | Ensures data accuracy. |
| Analyze Variance | Compare expected consumption against actual yield. | Highlights efficiency issues. |
| Override Data | Correct data entry errors made by operators. | Prevents skewed inventory valuation. |
How It Works
- Review: Supervisor monitors incoming logs from the shop floor.
- Validate: Supervisor compares the logged metrics against machine reports or expectations.
- Adjust: If an error is spotted, the supervisor overrides the value.
- Approve: Supervisor formally approves the run, triggering final inventory ledger updates.
Real-World Scenario
Scenario: Correcting a Data Entry Error
The Problem: A supervisor notices an operator accidentally logged 5,000 meters instead of 500 meters.

The Solution: The supervisor intercepts the log in the Auto Coil Supervisor module, corrects the typo to 500 meters, and approves it, preventing a massive inventory error.
Packing Request
The Packing Request module generates and manages the initial demand signal requesting the packing of specific finished goods.
(Requires SHOW_SUPERVISOR_VIEW permission)
Core Functionality
| Field | Purpose | Example |
|---|---|---|
| Requested Items | What needs to be packed. | 50 Pallets of Bottled Water |
| Target Quantity | How much is required. | 50 units |
| Required Date | When it must be completed. | Friday, 5:00 PM |
How It Works
- Identify Need: Planners or warehouse staff identify a requirement for packed goods.
- Create Request: A Packing Request is generated specifying the items, quantities, and deadlines.
- Submit: The request is submitted for review.
- Convert: Approved requests are converted into Job Orders or directly linked to Manual Packing documents.
Real-World Scenario
Scenario: Fulfilling a Bulk Shipment
The Problem: The fulfillment team needs a large quantity of loose items packed and shrink-wrapped by a specific deadline to meet a shipping schedule.

The Solution: They create a Packing Request. This signals the manufacturing floor to schedule the work without giving them direct access to edit the underlying sales orders.
Job Order
The Job Order serves as the formal, binding production request document sent to the manufacturing floor.
(Requires SHOW_SUPERVISOR_VIEW permission)
Core Functionality
| Component | Description | Benefit |
|---|---|---|
| Bill of Materials (BOM) | The specific list of raw materials required. | Ensures correct parts are used. |
| Production Timeline | Scheduled start and end dates. | Keeps production on track. |
| Task Allocation | Initial high-level assignment. | Organizes shop floor resources. |
How It Works
- Receive Signal: A planner reviews approved Packing Requests or inventory shortages.
- Draft Order: The planner drafts a Job Order, detailing the exact BOM and timeline.
- Issue: The Job Order is formally issued to the floor.
- Execute: It serves as the direct input source for creating a Manual Packing order.
Real-World Scenario
Scenario: Custom Electronic Assembly
The Problem: A specific, customized product needs to be built with exact component tracking.

The Solution: A planner issues a detailed Job Order for 1,000 customized electronic assemblies, ensuring the floor uses the correct specialized components rather than standard stock.
Urgent Sales Order
The Urgent Sales Order module is a fast-track queue exclusively for processing high-priority customer orders requiring immediate assembly or packing.
(Requires SHOW_SUPERVISOR_VIEW permission)
Core Functionality
| Feature | Description | Impact |
|---|---|---|
| Priority Queueing | Highlights orders bottlenecking live sales. | Accelerates fulfillment. |
| Direct Sales Link | Pulls urgent orders directly from the Sales module. | Reduces communication delays. |
| Bypass Workflow | Skips standard Job Order queues. | Saves time on critical tasks. |
How It Works
- Flag Order: A sales order is flagged as urgent by the sales team.
- Monitor: The manufacturing team monitors the Urgent Sales Order dashboard.
- Action: Urgent orders are pushed immediately into the Manual Packing workflow for execution.
Real-World Scenario
Scenario: VIP Customer Fulfillment
The Problem: A VIP customer orders a custom-built server rack that absolutely must be packed and shipped same-day.

The Solution: The order bypasses the standard queue, appears in the Urgent Sales Order module, and is immediately assigned to an operator, ensuring the deadline is met.
Packing Containers
The Packing Containers module tracks and manages the physical containers, pallets, or cages used during the packing process.
(Requires SHOW_SUPERVISOR_VIEW permission)
Core Functionality
| Container Property | Description | Example |
|---|---|---|
| Type | The classification of the container. | Heavy-Duty Crate, Wooden Pallet |
| Capacity | Maximum volume or weight allowed. | 500 kg |
| Current Contents | The specific items currently packed inside. | 50 Laptops |
How It Works
- Define Containers: Users set up the available physical containers in the system.
- Assign Items: During the Manual Packing process, output items are assigned to specific containers.
- Track Routing: The system tracks the physical location of the container as it moves through the warehouse.
Real-World Scenario
Scenario: Protecting Fragile Goods
The Problem: Fragile electronics must be packed exclusively into specific heavy-duty crates, and those crates must be tracked.

The Solution: Supervisors use the Packing Containers module to enforce that the specific items are mapped to the correct crate type, ensuring safe transit and accurate location tracking.
Scrap & Short
The Scrap & Short module is a centralized listing view for tracking all accumulated production waste, material shortages, and yield loss.
(Requires SHOW_SUPERVISOR_VIEW permission)
Core Functionality
| Tracking Metric | Description | Value |
|---|---|---|
| Waste Logs | Consolidated scrap data from all operators. | Full visibility of material loss. |
| Return Reasons | Standardized categorization of why scrap occurred. | Enables root cause analysis. |
| Yield Efficiency | Comparison of input vs. viable output. | Highlights machine or operator issues. |
How It Works
- Log Generation: Operators report losses during task completion (via Operator Queue or Auto Coil Operator).
- Consolidation: The system automatically aggregates these logs into the Scrap & Short module.
- Categorization: Waste is classified using standard Return Reasons (e.g., “Machine Jam”).
- Analysis: Management reviews the data to identify trends and inefficiencies.
Real-World Scenario
Scenario: End-of-Month Yield Analysis
The Problem: Management notices an overall drop in production yield but doesn't know why.

The Solution: A production manager opens the Scrap & Short module, filters by the current month, and immediately sees that "Machine Jam" on Line 3 is responsible for 80% of the material waste.
Shared Features: Delivery Details & Contra Tracking
While navigating the individual modules, two critical shared features provide traceability:
| Feature | Description | Use Case |
|---|---|---|
| Delivery Details | Handles warehouse routing by defining the specific branch and physical bin where output items will be stocked after production. | Found within the Manual Packing editor to assign final goods storage. |
| Contra Tracking | Provides end-to-end traceability for downstream operations. | View any related documents generated as a direct result of production (e.g., Delivery Orders shipping the goods to a customer). |
Create and Edit Details
When you open a document from any of the sidebar modules (e.g., creating a new Manual Packing order), you will enter the detailed document view.
Available Actions (Top Right):
- Back: Return to the listing.
- RESET: Discard unsaved changes and reload the last saved state. (Warning: Cannot undo a SAVE).
- SAVE: Commits your current data. Disabled if required fields are missing.
- FINAL: Locks the document. (Conditional: Only appears when the document is active and you have permission).
Document Tabs Explained
Transactions utilise a generic tab structure to organise data. Depending on your admin’s setup, you will see some or all of these tabs:
1. Main Details
This tab captures the core operational scope of the movement:
- Branch / Location: Exactly where the goods are leaving from (Mandatory).
- Transaction Date: The operational date of dispatch.
- Conversion Code & Name: The internal category of this movement (Mandatory).
- Description / Remarks: Notes for internal reference.
- Reference / Document No: External tracking numbers for logistics.
2. Account
This tab houses the financial and logistical entity data associated with the receiver:
- Entity Details: Links to the specific Customer or Intercompany Branch receiving the goods.
- Credit Terms / Limit: Read-only financial constraints associated with the selected entity.
- Ship To: The physical delivery address where the items are being dispatched.
- Bill To: The invoicing address for the selected entity.
3. Matchings & Contra
Used for linking documents and reconciling values:
- Matchings: Links this internal packing order to other associated documents (e.g., grouping a packing order with a specific delivery manifest).
- Contra: Displays associated contra entries if the shipment involves offsetting balances between debtor and creditor accounts.
4. Lines (Adding Items & Knock-Off)
The Lines tab defines precisely what is leaving the warehouse.
- Click + (Add) inside the Lines tab.
- The Select Item screen opens, presenting multiple sourcing methods:
| Source Tab | When To Use It | Workflow |
|---|---|---|
| Search Item | Standalone manual packing | Browse or scan item codes from the catalogue, enter quantities. |
| KO For Sales Order | Fulfilling a sales order | Search Sales Order No → Automatically import pending lines. |
| KO For Jobsheet | Dispatching produced goods | Search Jobsheet No → Automatically import produced lines. |
| KO For Quotation | Packing quoted items | Search Quotation No → Automatically import quoted lines. |
| KO For Delivery Order | Fulfilling a DO | Search Delivery Order No → Automatically import pending deliveries. |
Note: The Line grid also automatically calculates the Total Txn Amount and any associated SST/VAT/GST for the dispatched items.
For Administrators
Configuration & Settings
The Packing Order (Internal) applet is highly configurable. Administrators can tailor the workspace to hide unnecessary complexity from warehouse staff while enabling deep production tracking for supervisors.
1. Application Settings (System-Wide)
Accessed via Settings > Application Settings, these toggles change how the applet looks and functions for all users.
A. Tailoring the Form (Field/Tab Visibility) To prevent mistakes and keep the UI clean, administrators can hide sections that their layout doesn’t use.
| Setting | What It Does |
|---|---|
Hide Export Tab | Removes the Export tab. |
Hide Attachment Tab | Removes the Attachments tab. |
Hide Doc Link Tab | Removes the Doc Link tab. |
Hide Main Contra Tab | Removes the Contra tab. |
Hide Delivery Details Tab | Removes the Delivery Details tab. |
B. Tailoring the Layout & Workflow
| Setting | What It Does |
|---|---|
Hide Gendoc Void Button | Hides the Void button on the document interface. |
Hide Gendoc Save Button | Forces users to finalize/discard without saving drafts. |
2. Default Selection
Configure fallback behaviors:
- Default Branch: The warehouse assigned if the user doesn’t pick one.
- Default Location: The default physical location assigned within the branch.
- Default Company: The default corporate entity for the order.
- Default Process GUID & Type Code: Sets the default manufacturing process applied to new documents.
3. Permissions Governance
Because production tasks affect inventory immediately upon execution, controlling who can perform them is critical. Access is managed through a layered permission system in the Settings menu:
- Permission Wizard: A guided tool to set up basic access levels.
- Role Permission: Grant access by job title (e.g., “Assign the
SHOW_SUPERVISOR_VIEWpermission flag to management roles”). - User/Team Permission: Grant granular exceptions to specific individuals or squads.
4. Workflow & Reasons
- Workflow Settings: Configure approval workflows or state transitions for packing orders.
- Return Reasons Settings: Define standard scrap and return reasons (e.g., “Machine Jam”, “Material Defect”). Having clean categories helps with yield reporting later.
5. Print Templates & Communication
- Printable Format Settings: Customize the layout of the physical “Job Ticket” or “Production Docket” that might be printed and attached to the material cages on the floor.
- Email Template: Define standard email notifications and templates for production updates.
Personalization
Individual users can customize certain defaults to speed up their workflow by navigating to the Personalization menu.
Personal Default Selection
- Users can override the global Default Selection to define their own specific Default Branch or Location. This ensures they don’t have to manually select their specific workstation location every time they log production.
Related Applets
| Applet | How It Relates |
|---|---|
| Supplier Delivery Order Applet | Another supplier-facing logistics document; delivery planning may link to packing orders |
| Internal Purchase GRN Applet | Buyer-side goods receipt; packing orders from the supplier align with receiving on the buyer side |
| Blanket Purchase Order Applet (Supplier Access) | Supplier portal for blanket agreements; packing activity may occur within the same procurement context |
FAQ
Process Questions
Q: Can I deliver a partial quantity from a Sales Order? A: Yes. When using the Knock-Off flow, adjust the imported item quantity to match only what you are loading onto the truck. You can create additional packing orders for the remaining items later.
Q: What if I accidentally finalised the wrong quantity? A: Once finalised, the document is locked. Depending on your company policy, you may need to void it or create a manual return/adjustment.
Q: How do I print the packing order for my driver? A: Once your Main Details and Lines are saved, click the Print icon on the Edit screen to generate a PDF.
Q: Which upstream documents can I knock off from? A: Depending on your configuration, you can knock off from Sales Orders, Jobsheets, Sales Quotations, and Delivery Orders. Only the tabs enabled by your admin will appear.
Q: Can an Operator finalize (post) a Packing Order? A: Typically, no. Operators log execution data into the Operator Queue. A Supervisor reviews the variances (Input vs Output) and clicks Final on the master Packing Order (Internal) document to solidify the inventory movement.
Q: Where does Scrap go? A: Scrap is tracked against the specific Job Order. It explains the variance between the expected Input consumption and actual Output yield. It can optionally be routed to a designated “Scrap Bin” in inventory for later recycling or write-off, depending on your warehouse settings.
Q: What is “Auto Coil Operator”? A: Coiling is a specific manufacturing sub-module tailored to industries dealing in lengths (cables, wires, pipes). It has specialized calculators for length, cut-loss, and spool tracking that differ from standard unit-based assembly.
System Questions
Q: Why is SAVE disabled? A: The Main Details form must be valid. Ensure Branch, Location, Conversion Code, and Conversion Name are all filled in.
Q: A button is missing (e.g., FINAL) — why? A: Button visibility depends on the document state and your permissions. For example, FINAL only appears on active, unfinalised documents. If a button is missing, check with your administrator.
Q: What is the Matchings tab for? A: It links this packing order to other documents in the system. If the tab is empty, your workflow may not require matching for this document type.
Q: I don’t see a KO tab (e.g., KO For Sales Order) — what’s wrong? A: KO tabs are conditional and controlled by your administrator. If a tab is missing, that particular knock-off flow has not been enabled for your company.
Glossary
- Branch — Your organisational site or division. The packing order records which branch the outbound movement is from.
- Conversion Code / Name — The system’s classification for this outbound stock movement type within inventory rules.
- Feature Visibility — Company settings that control which menus and actions appear for each role.
- Final (FINAL) — Marks the document as complete and locks it from further editing.
- Jobsheet — An internal tracking document detailing materials and labour for a production job. Used here as a source for knock-off.
- Knock-Off (KO) — Automatically importing line items from an existing document instead of manual entry.
- Location — A specific warehouse or dispatch point under the selected branch.
- Matchings — Links this packing order to other related documents when your workflow requires it.
- Internal Packing Order — Supplier-originated evidence of goods dispatched toward the buyer.
- Posting Status — Whether the document is still editable or has been finalised.