Manufacturing Operations Applet
About the Applet
- Purpose: A comprehensive shop floor execution system designed to bridge the gap between production planning and physical inventory movement.
- Target Users: Machine Operators, Production Supervisors, and Floor Managers.
- Key Features: Work Queue Management, Bin-Level Traceability, Real-time Time Tracking, and Gated Quality Approvals.
Purpose and Overview
The Manufacturing Operations Applet is your shop floor execution hub where production actually happens. It takes the formal Job Orders created in the Production Planning & Monitoring (PPM) Applet and turns them into finished goods through structured work logging, material tracking, and supervisor approval.
Key Features Overview
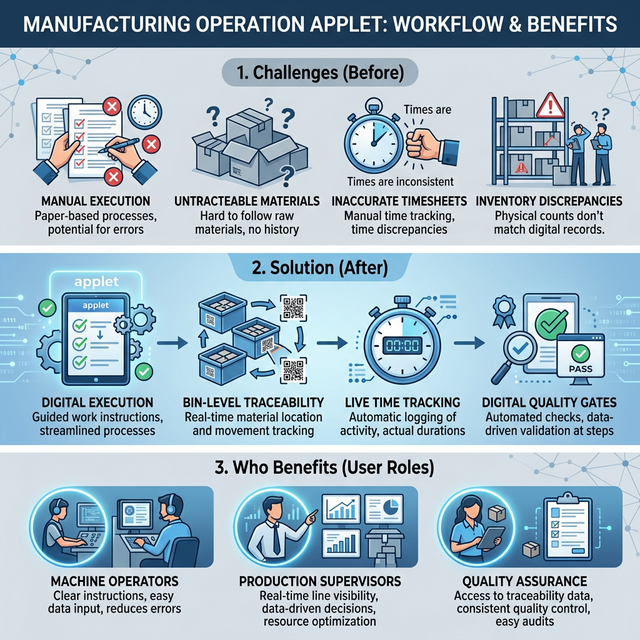
Who Benefits from This Applet?
Machine Operators:
- Claim and execute assigned jobs from a prioritized queue
- Record precise machine time, raw materials consumed, and measurements taken
- Report accurate production quantities directly from the floor
- Flag discrepancies instantly rather than at the end of the shift
Production Supervisors:
- Set dynamic job priorities to sequence operator work queues
- Review strictly formatted work logs before inventory gets permanently updated
- Intervene and place problematic jobs “On Hold”
- Ensure uncompromised quality compliance before output moves to packing
Quality Assurance / Floor Managers:
- Trace the exact origin bin of a raw material used in a finished good
- Audit completed measurements and specifications entered during production
- Identify discrepancies between planned versus actual yield
What Problems Does This Solve?
The Manual Execution Problem:
Traditional shop floors rely on paper travelers, manual stopwatches, and memory to record production. This leads to severe issues:
- Untraceable materials where operators pick whichever bin is closest
- Inaccurate labor hour calculations as timesheets are filled out hours later
- Massive inventory discrepancies found days later when paper logs are manually typed in
- Lack of immediate visibility for supervisors to intercept quality failures
The Manufacturing Operations Solution:
- Work Queue Management — Operators see exactly what to work on next, prioritized by the supervisor
- Bin-Level Traceability — Operators must digitally select the exact physical bin they are drawing raw materials from
- Live Time Tracking — Real-time start/stop buttons capture the literal minute production shifts
- Digital Quality Gates — Supervisors must digitally approve the work log before the inventory state updates
Core Capabilities
Key Concepts
| Concept | What It Means | Example |
|---|---|---|
| Process Instance | Individual manufacturing step from Job Order | “Armoring” step for JO-2024-001 |
| Work Log | Record of production activity submitted by the operator | Time spent, bins used, quantity produced |
| Priority Number | Job sequence ranking set by the supervisor | 1 = highest priority, larger = lower |
| Discrepancy | Difference between planned and actual output | Planned 1000, produced 800 = 200 discrepancy |
| Ready Status | Supervisor-approved state | Process complete, safe to transfer to inventory/packing |
Quick Start Guide
Get up and running quickly with these essential workflows based on your role on the shop floor.
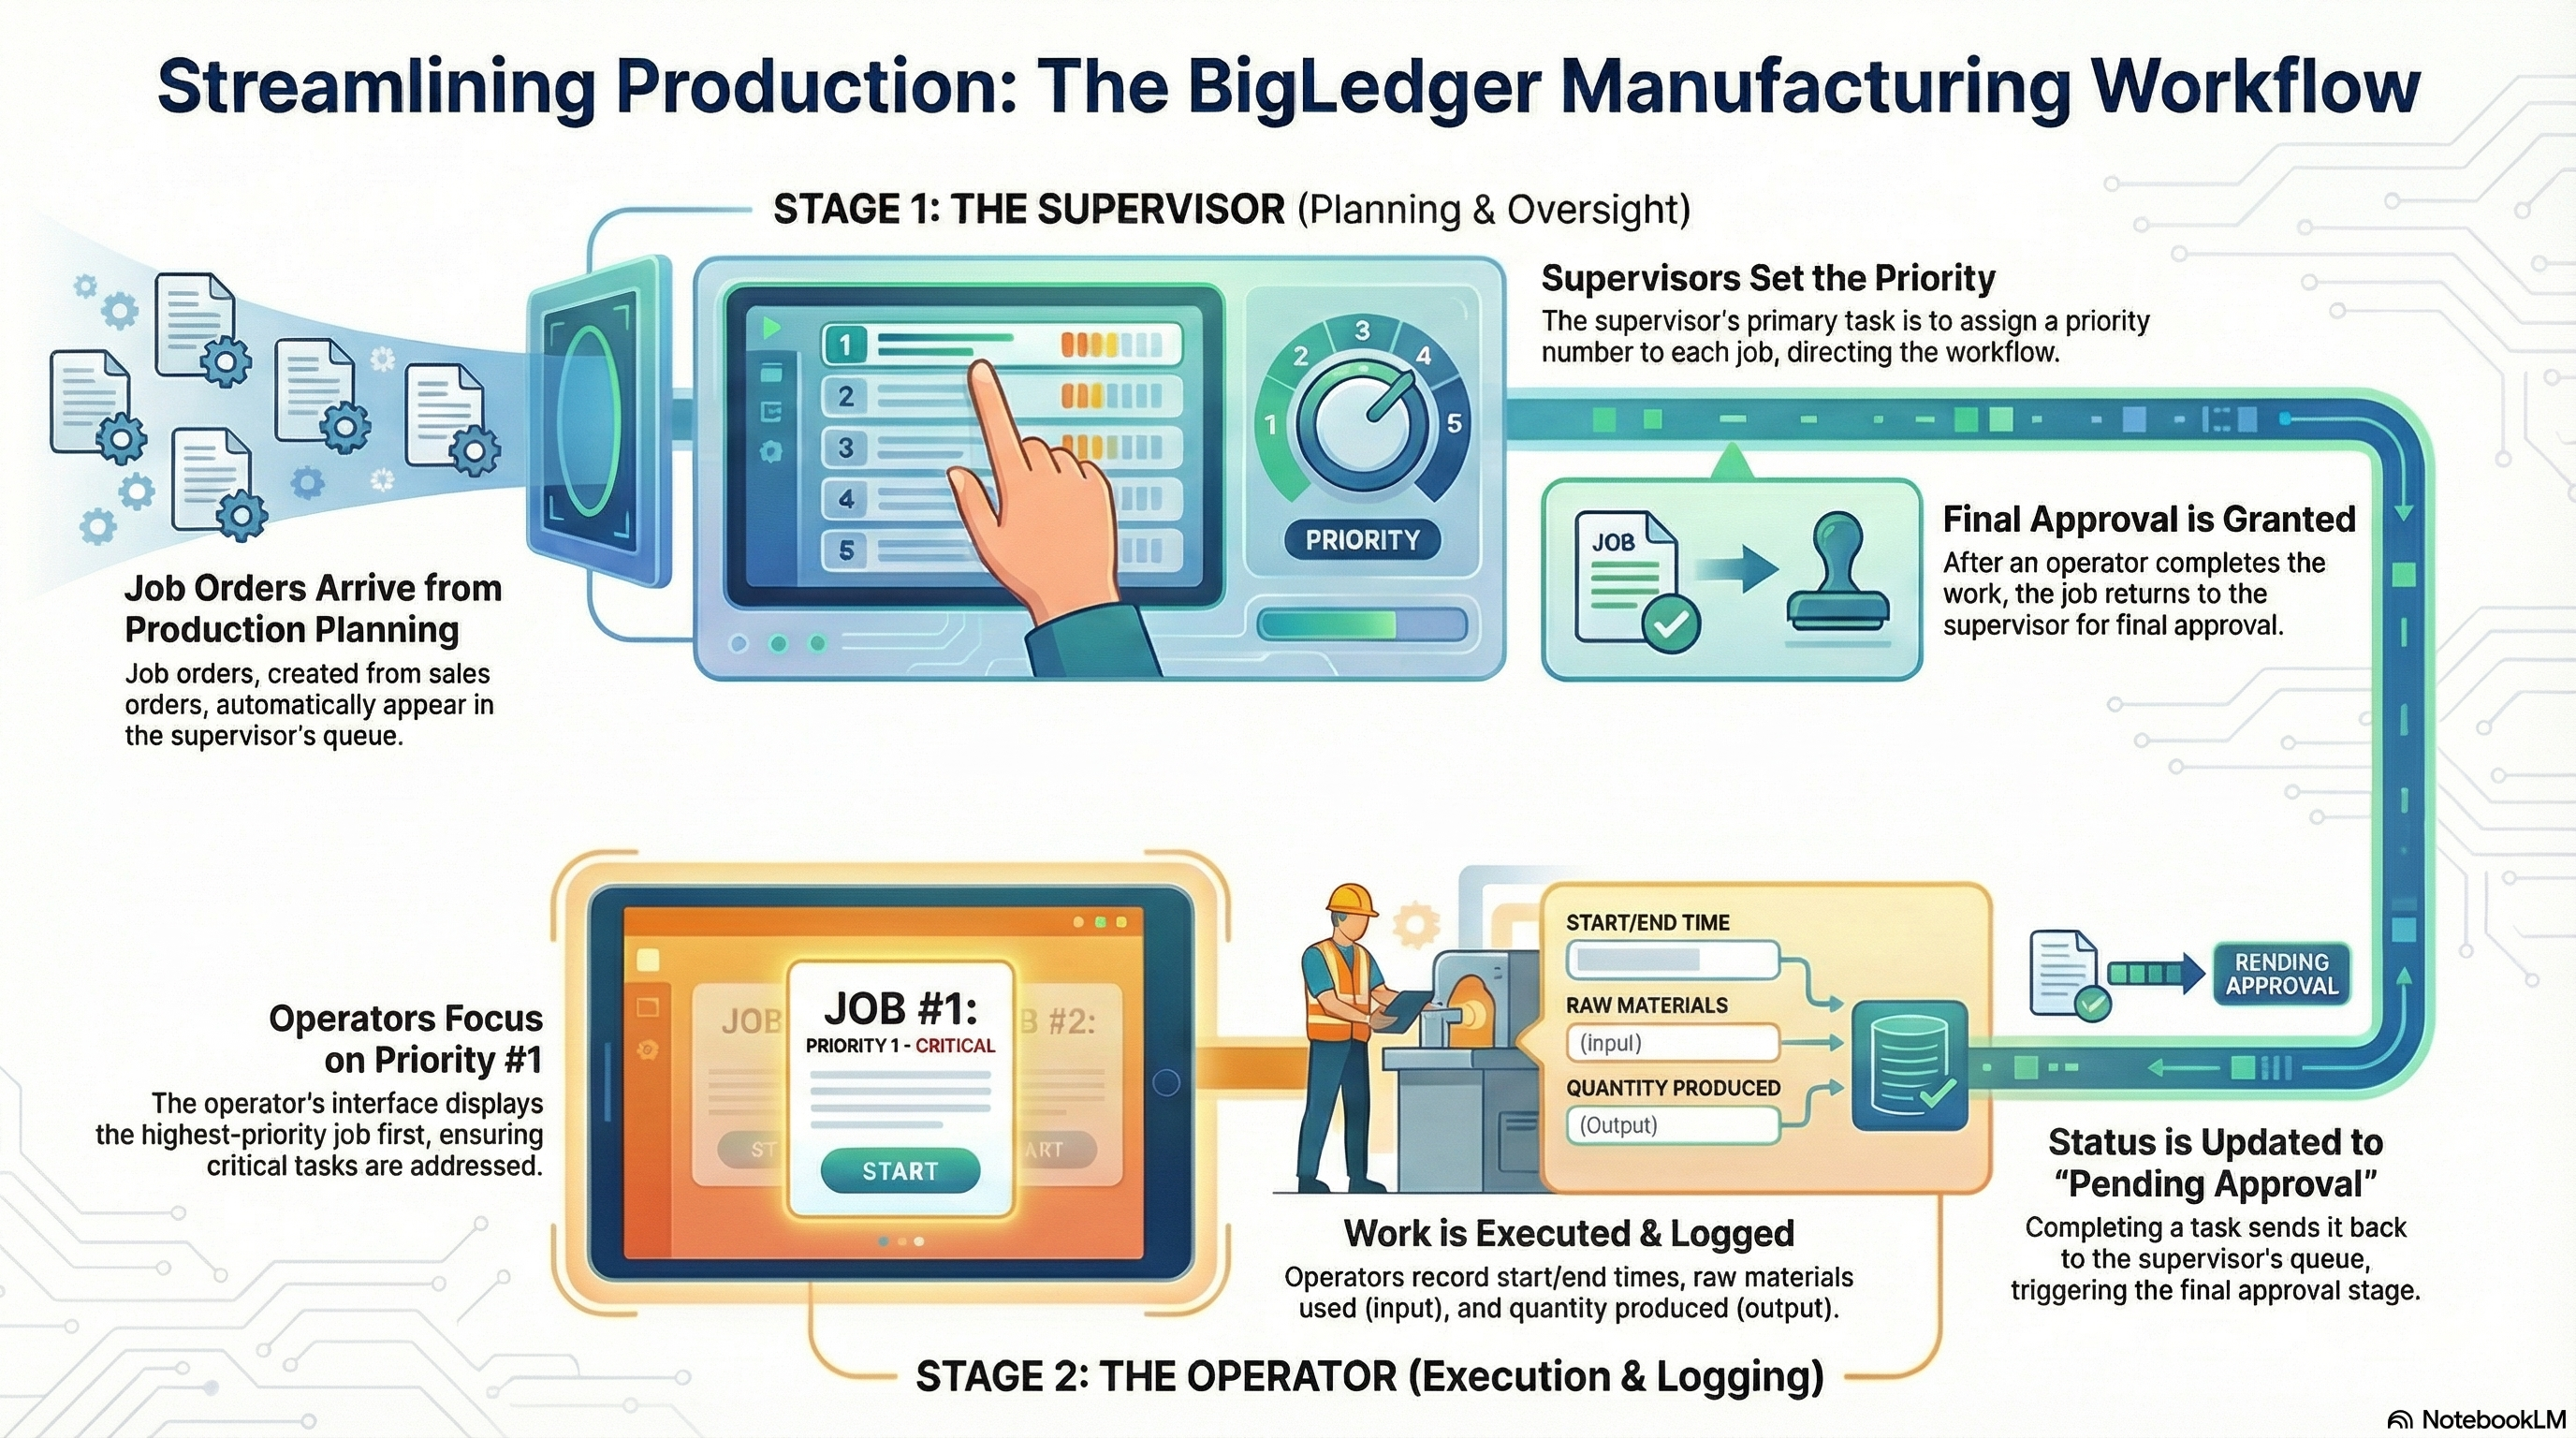
For Production Supervisors: Managing the Queue
Goal: Sequence the floor’s work and approve completed operations.
- Set Priorities: Open the Supervisor PI menu. Review incoming process instances and enter a Priority Number for each (1 is highest priority).
- Monitor the Floor: Watch processes move from “Available” to “In Progress” as operators claim them.
- Review Submissions: Click on jobs marked “Pending Approval”. Verify the logged time, the selected material bins, and the submitted measurements.
- Approve Output: If the work log is accurate and the physical inspection passes, change the status to Ready. The system will now update inventory.
For Machine Operators: Executing Work
Goal: Claim jobs, log accurate time, and record your actual consumed materials.
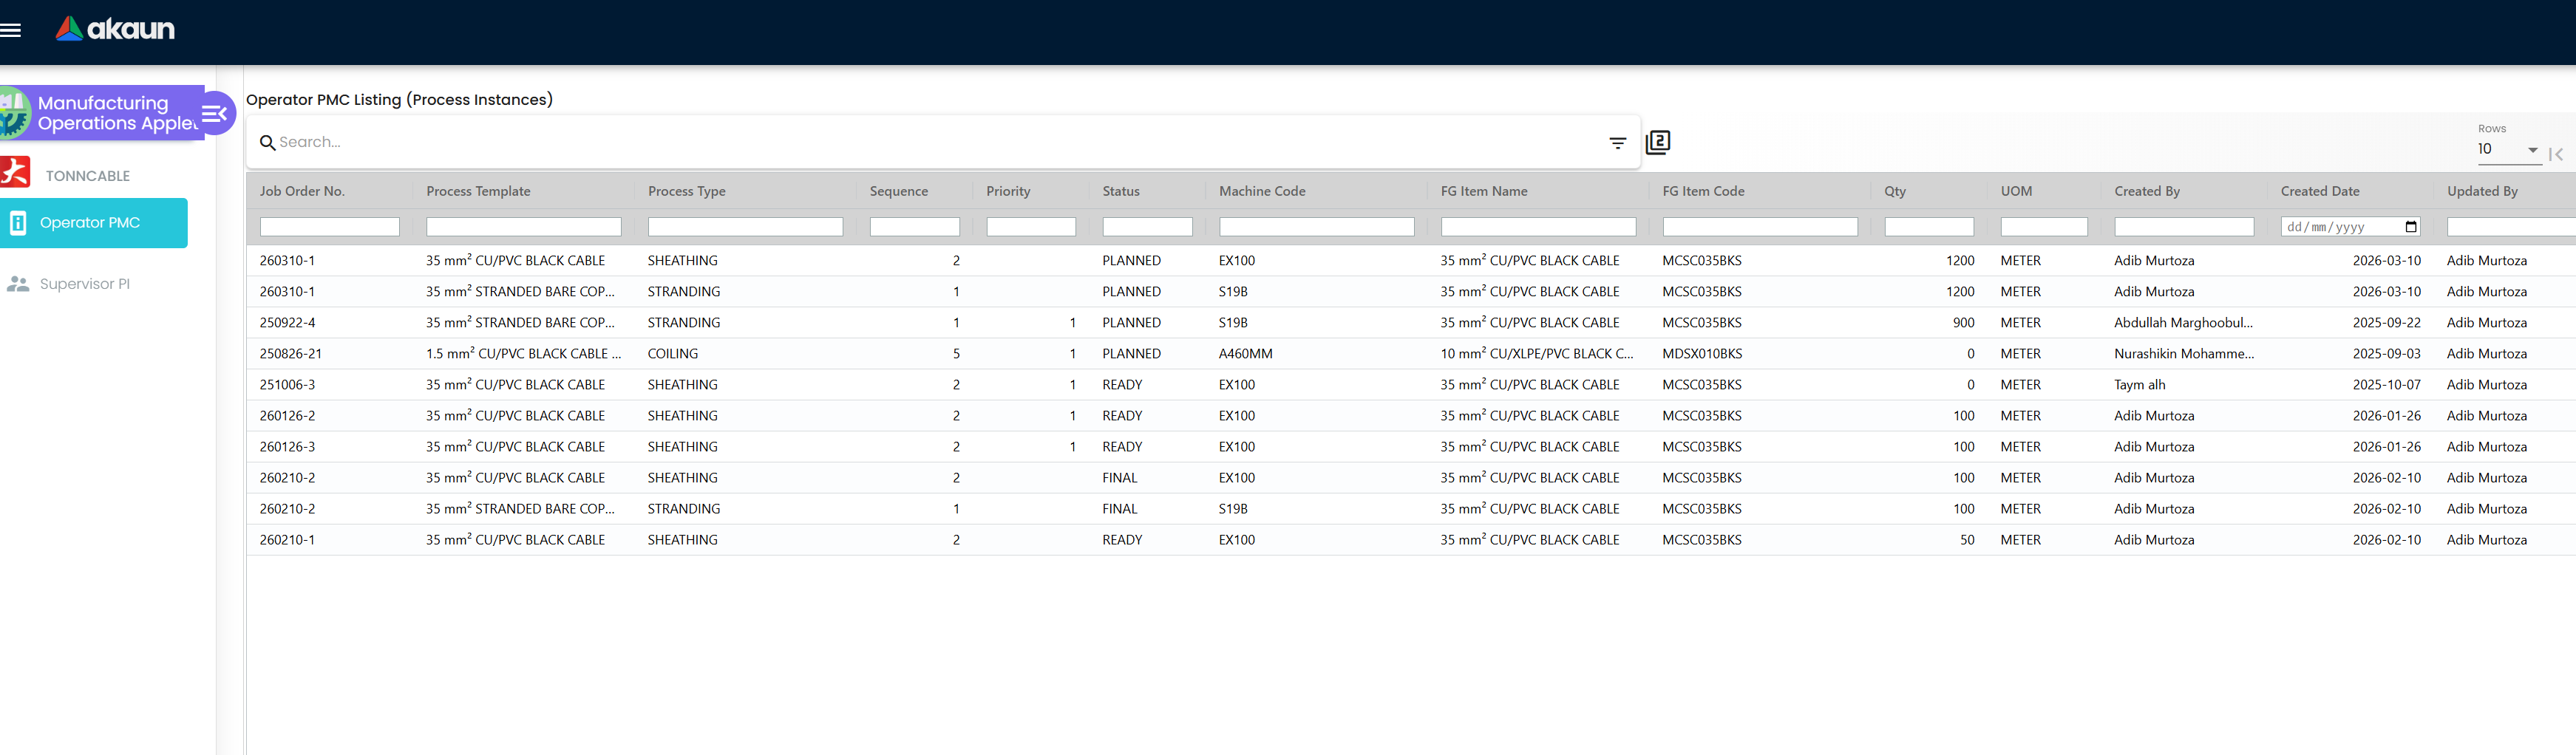
- Find Your Job: Open the Operator PMC menu. The jobs at the top of your list (lowest priority number) are what you must work on first.
- Claim It: Change the process status from “Available” to In Progress to let the supervisor know you’ve started.
- Clock In: Click the Start button inside the Work Log the moment your machine physically begins running to precisely track your labor time.
- Log Materials: Under inputs, select the exact Bin Code of the raw materials you loaded into the machine.
- Clock Out & Submit: Click End when finished, enter your Quantity Produced, and save the log to send it back to the supervisor for approval.
For Admins: Initial System Setup
Goal: Ensure users have the correct access to their respective menus.
- User Permissions: Navigate to the user profile settings within the platform.
- Supervisor Access: Find the users acting as Floor Supervisors and explicitly grant them the
MRP supervisorpermission. This unlocks the Supervisor PI view. - Operator Access: Standard operators only need default access to see the standard Operator PMC execution menus.
Core Workflows and Operations
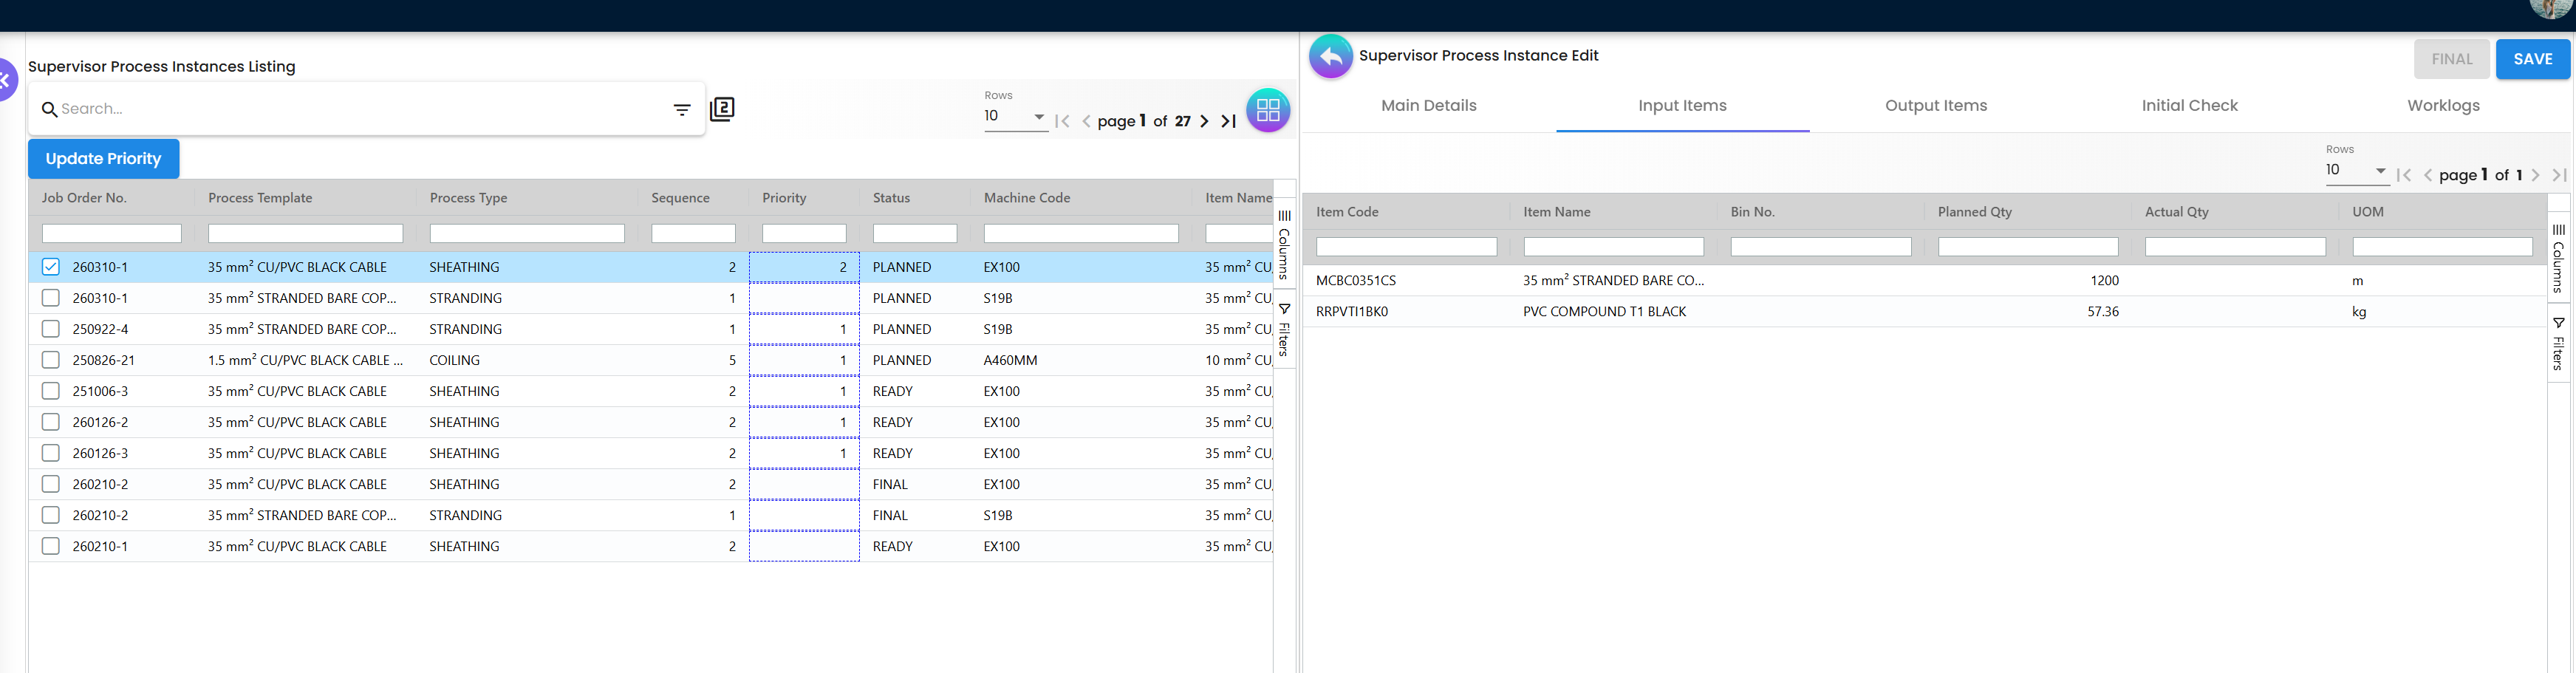
1. Supervisor PI: Managing Production
The Supervisor PI (Process Instance) menu is the command center for controlling what gets produced and when, and for ensuring quality through rigid work log approval.
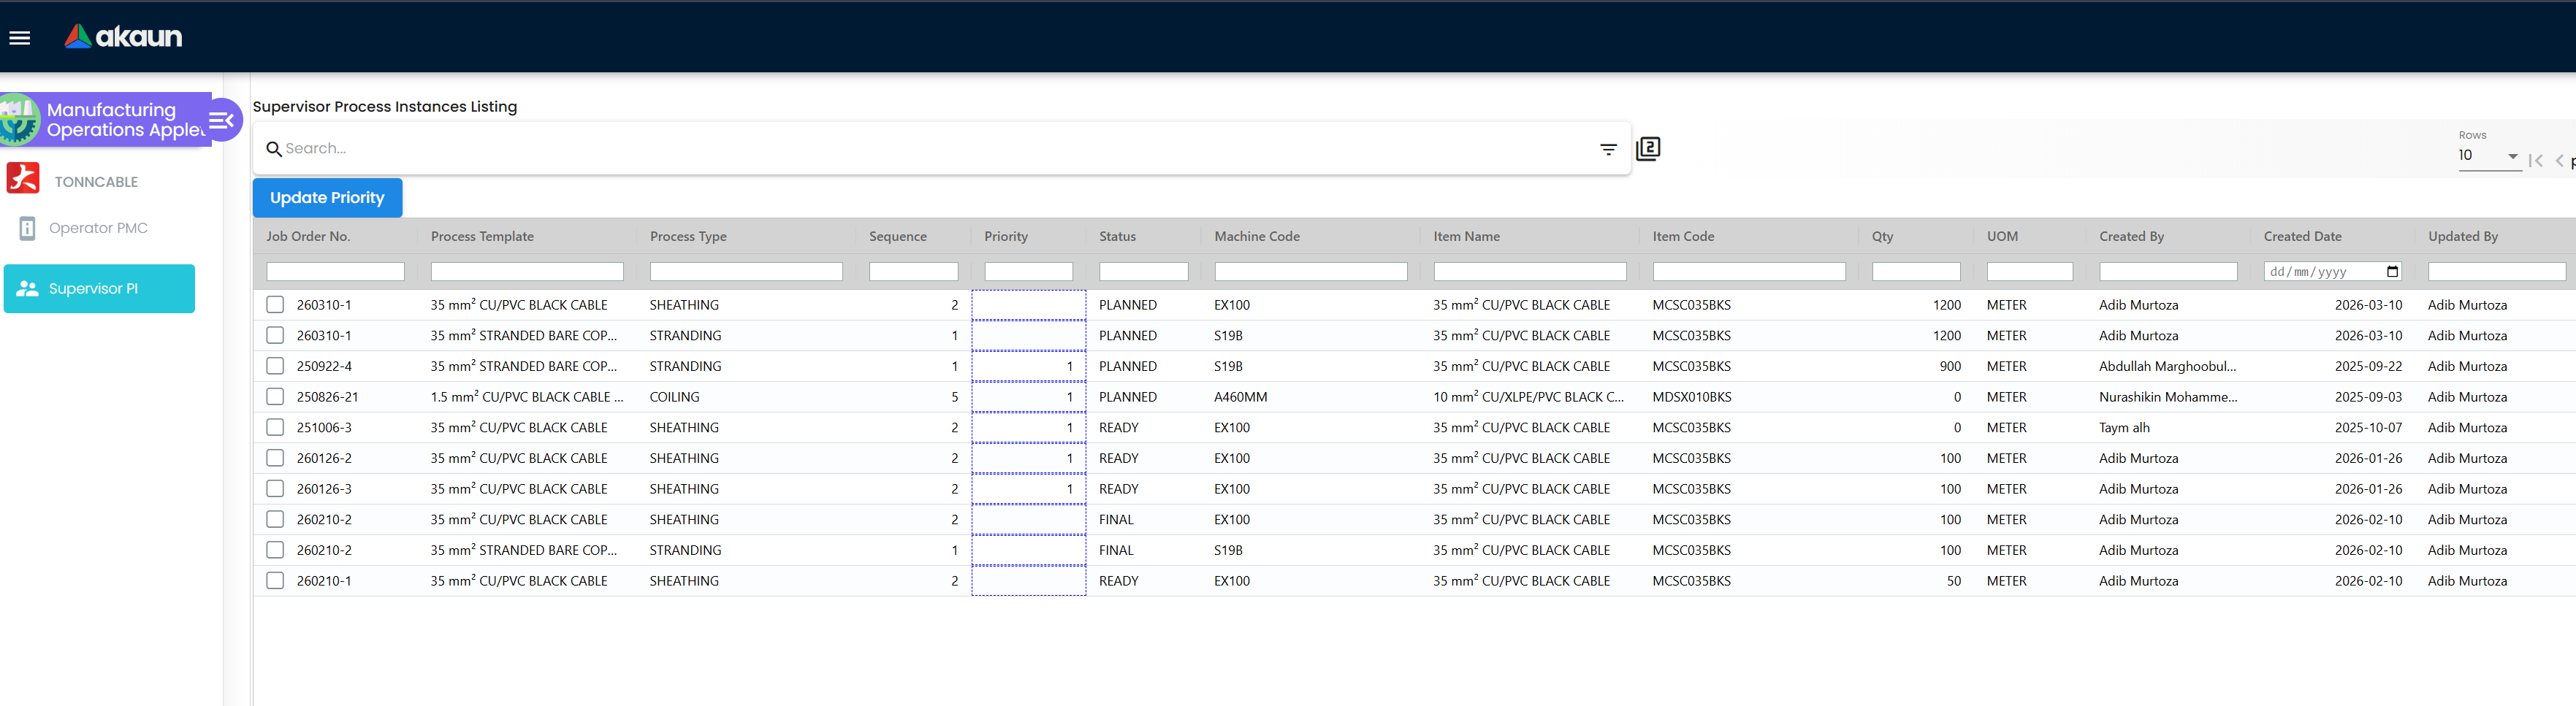
Setting Priorities
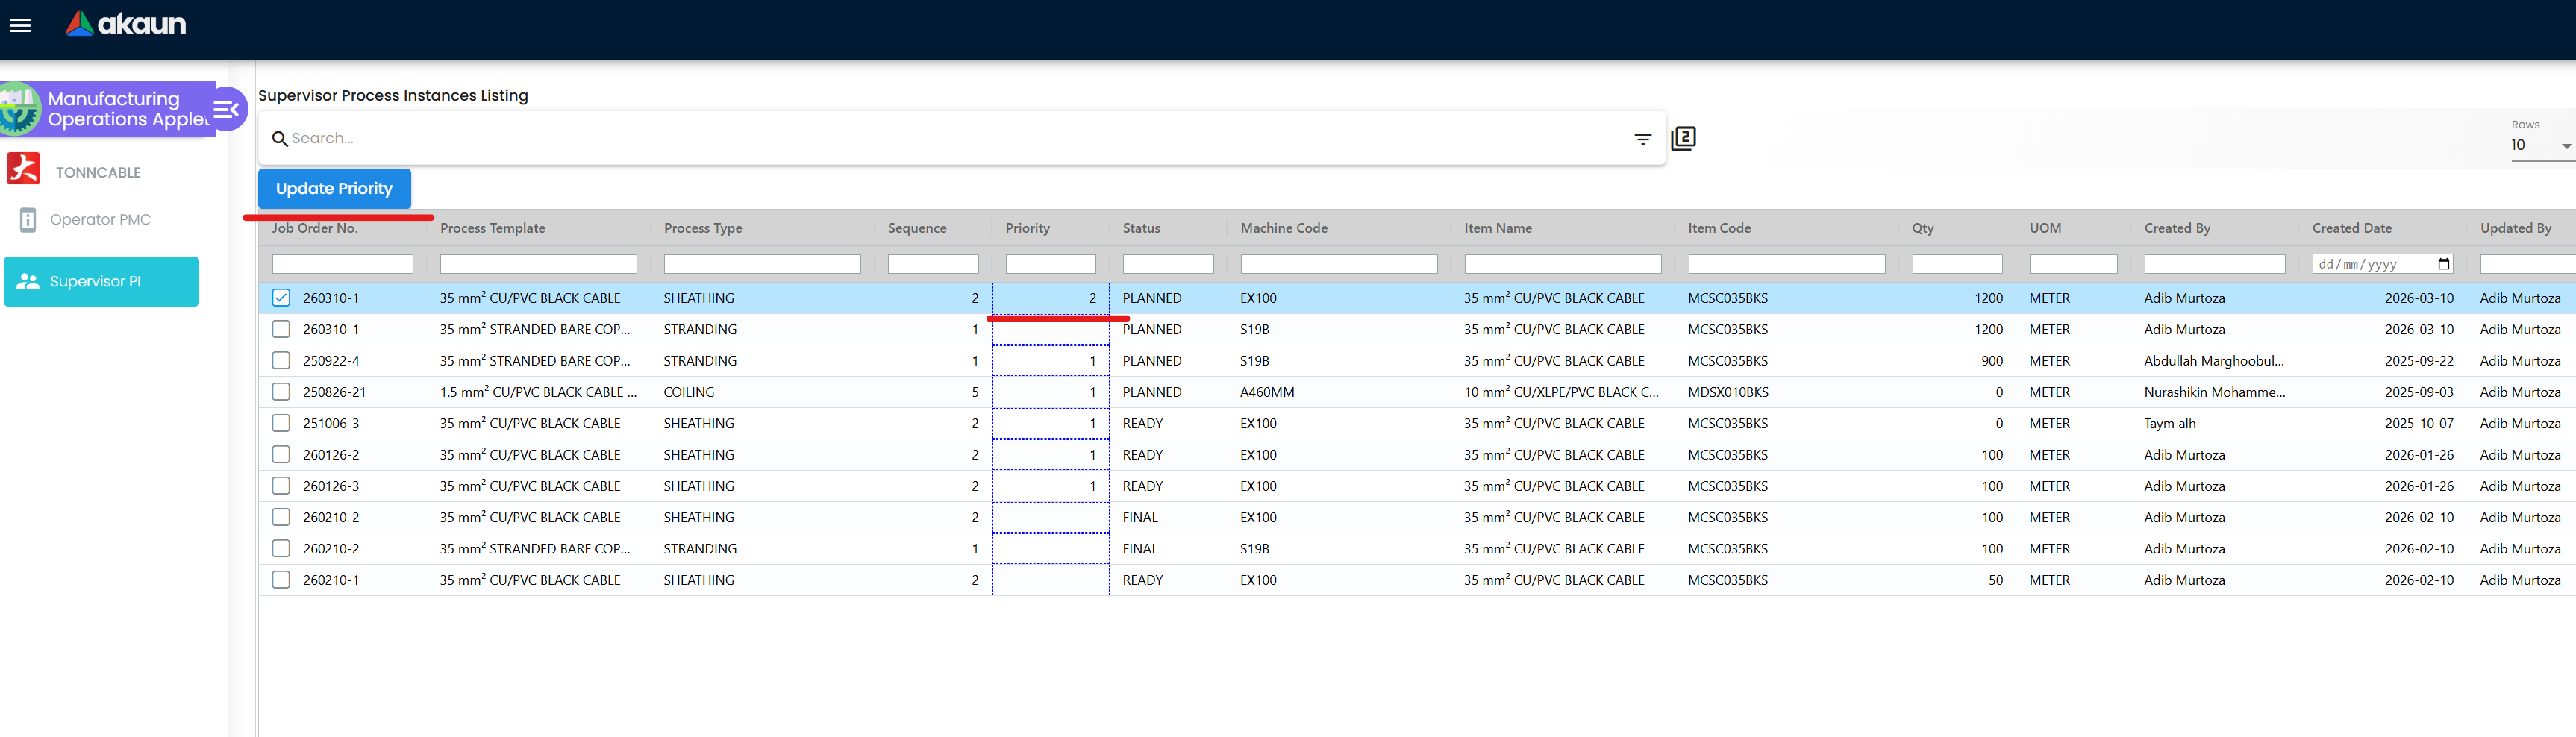
Operators see jobs ordered strictly by the priority you set here.
- Use gaps when numbering (e.g., set jobs to 10, 20, 30) so you can easily insert rush orders later (at 15) without having to renumber everything.
Quality Gate (The ‘FINAL’ Approval)
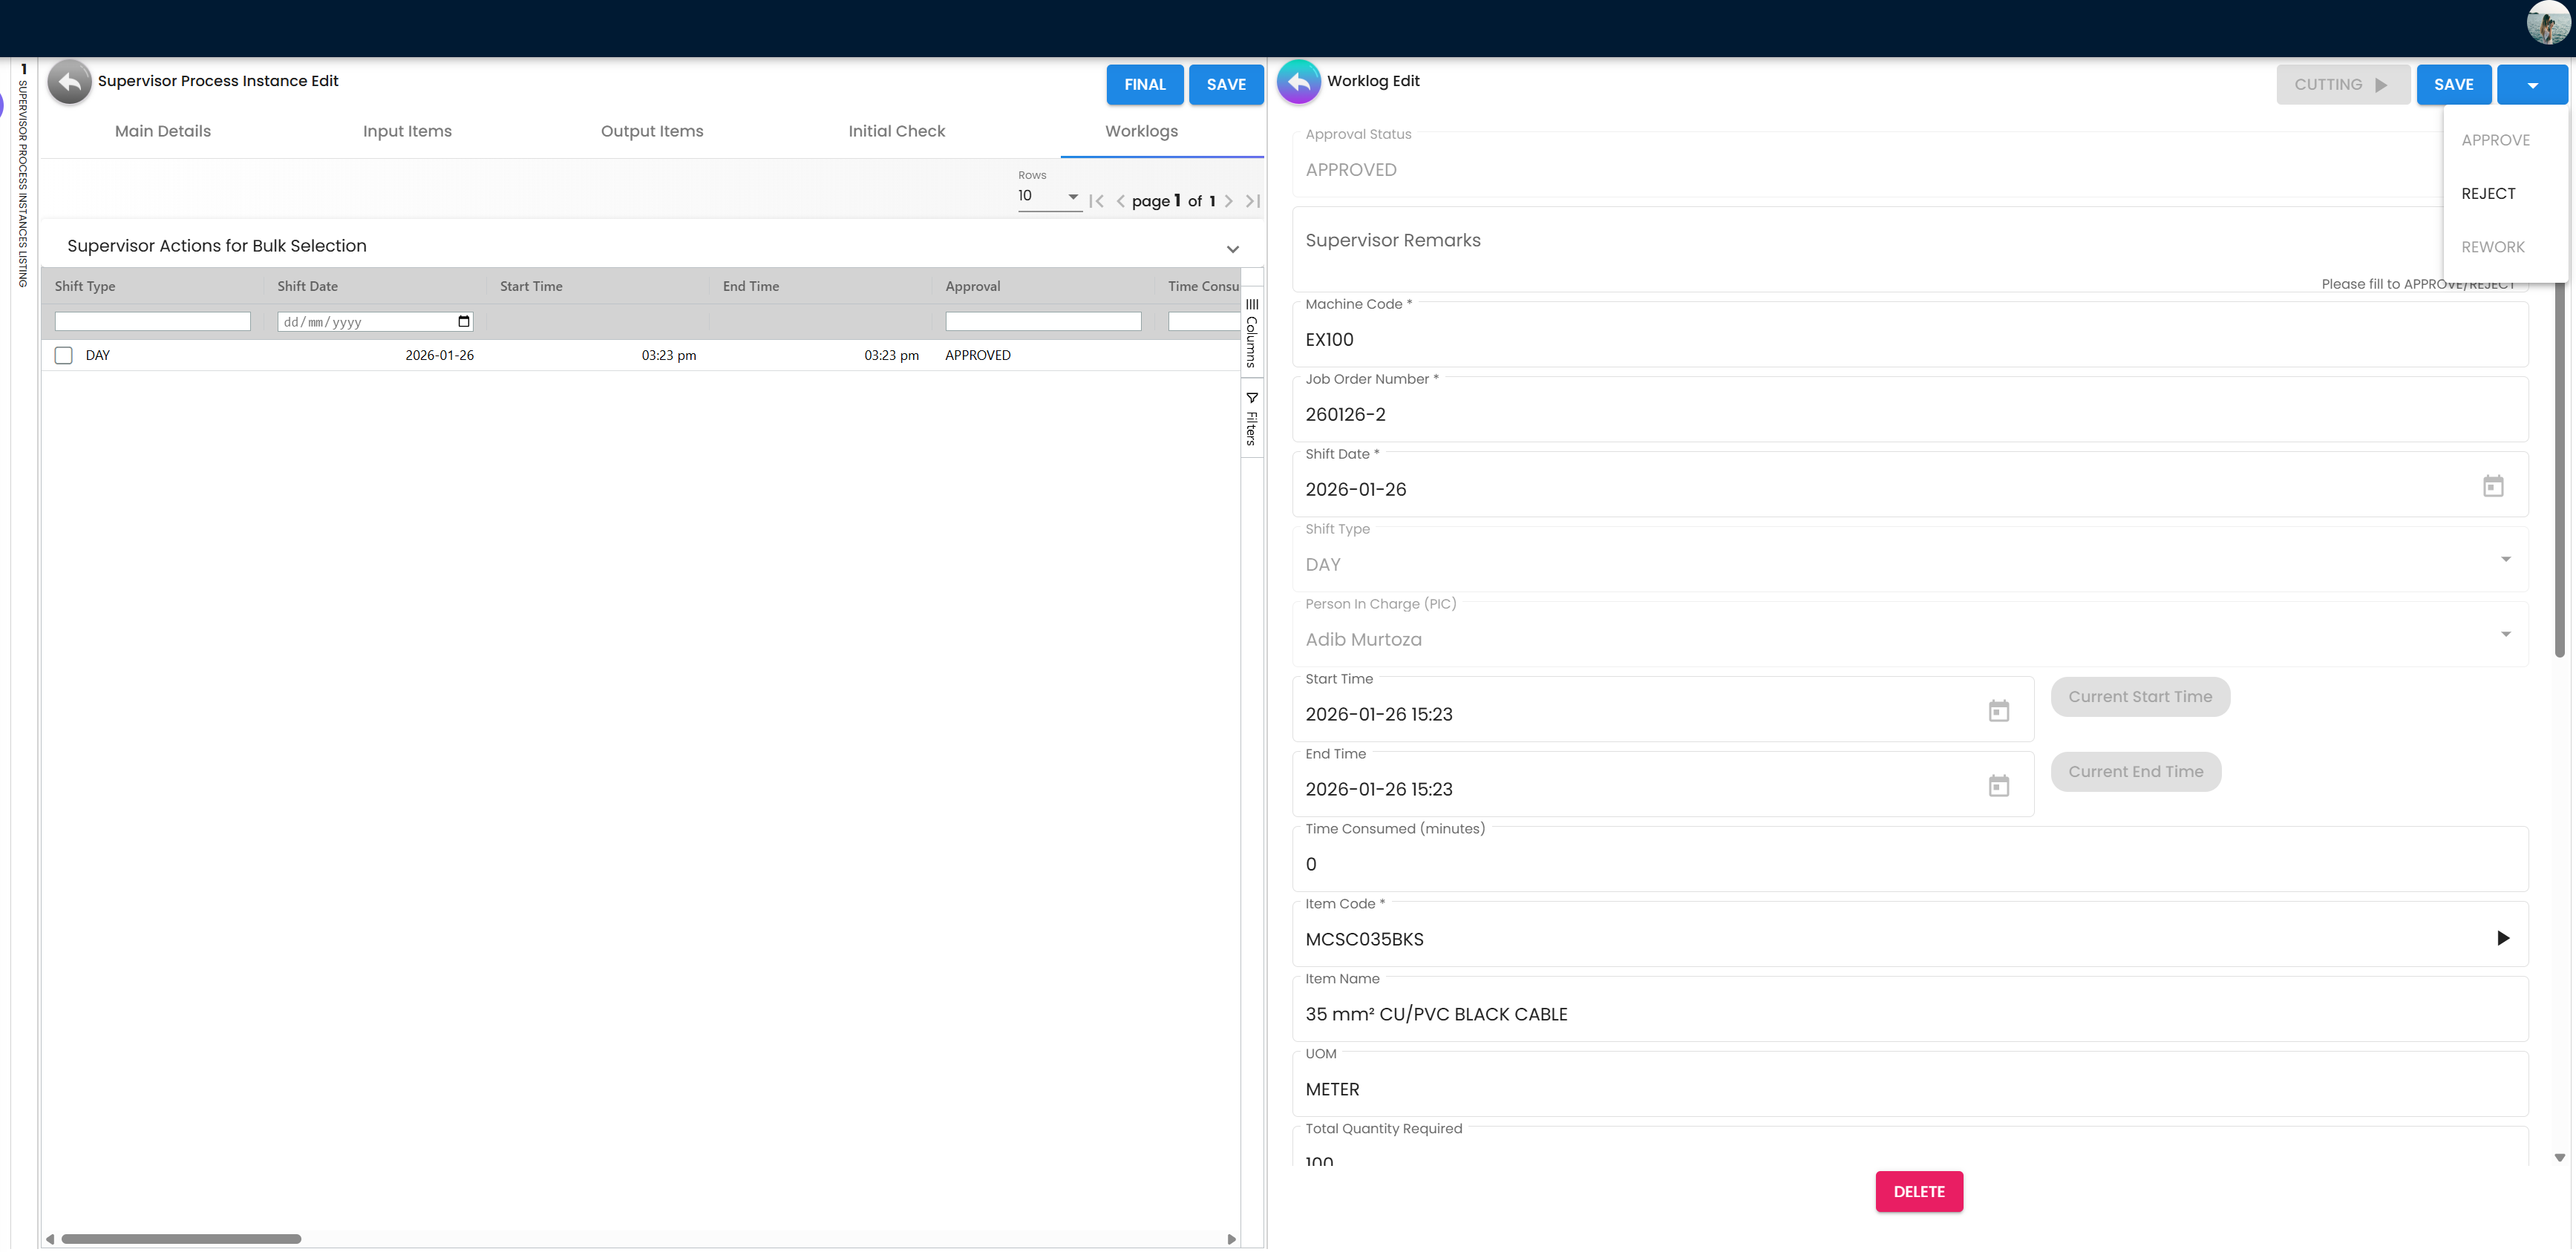
When an operator finishes, the log enters Pending Approval. The Supervisor holds the final authority via the Supervisor PI view.
- The Gated ‘FINAL’ Button: The system includes a strict safety mechanism. The FINAL button remains disabled until:
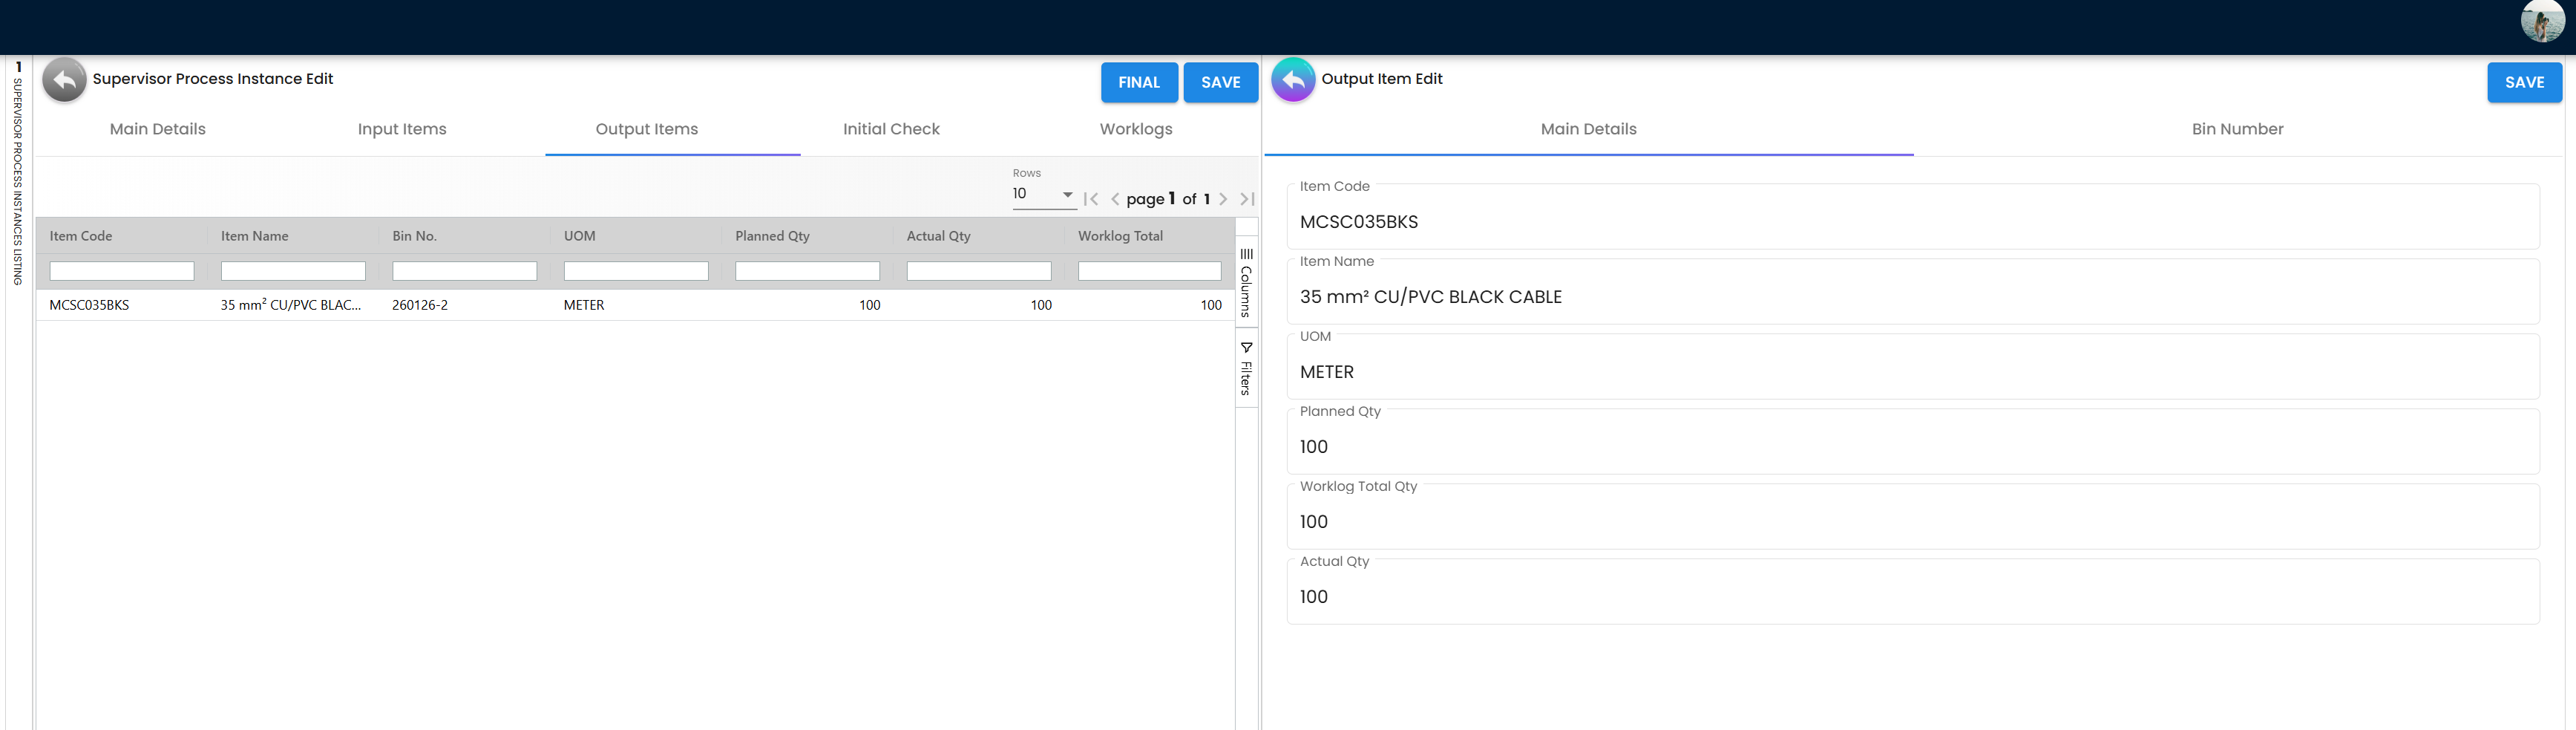
- Every Input Item has at least one associated Bin and Actual Quantity.
- Every Output Item has at least one associated Bin and Actual Quantity.
Reviewing items and verifying bins:
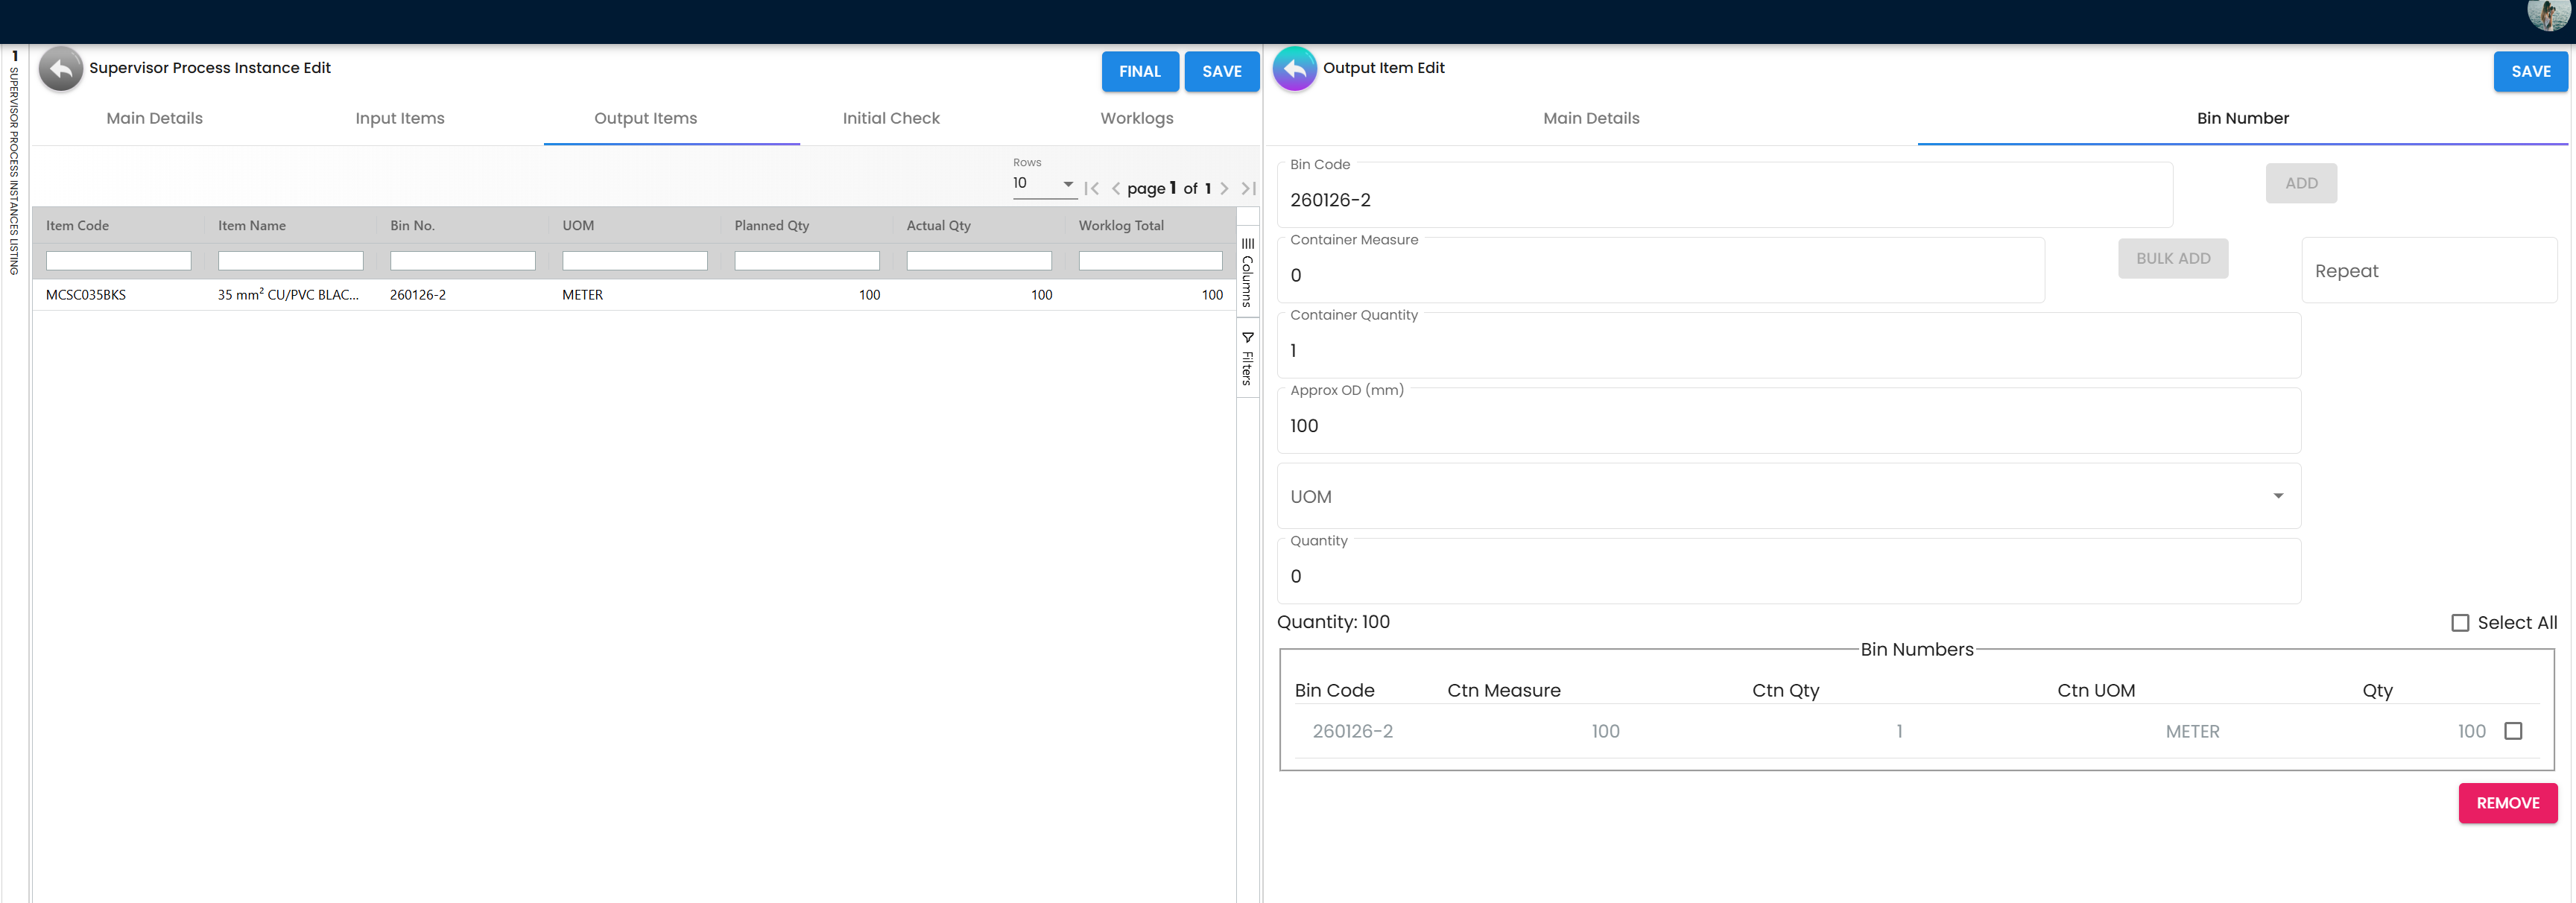
- Data Validation: Review recorded PIC (Person in Charge) and Shift Types to ensure accountability.
- Reviewing Logs: Supervisors can add Supervisor Remarks to work logs if corrections or feedback are required.
- Status Lifecycle: Once marked
ReadyorFINAL, inventory and costing engines update immediately.
2. Operator PMC: Executing Production
The Operator PMC (Production Management Console) translates physical production into digital records. Your accuracy directly drives inventory levels and company financials.
Creating a Work Log
This is the most critical interaction in the applet.
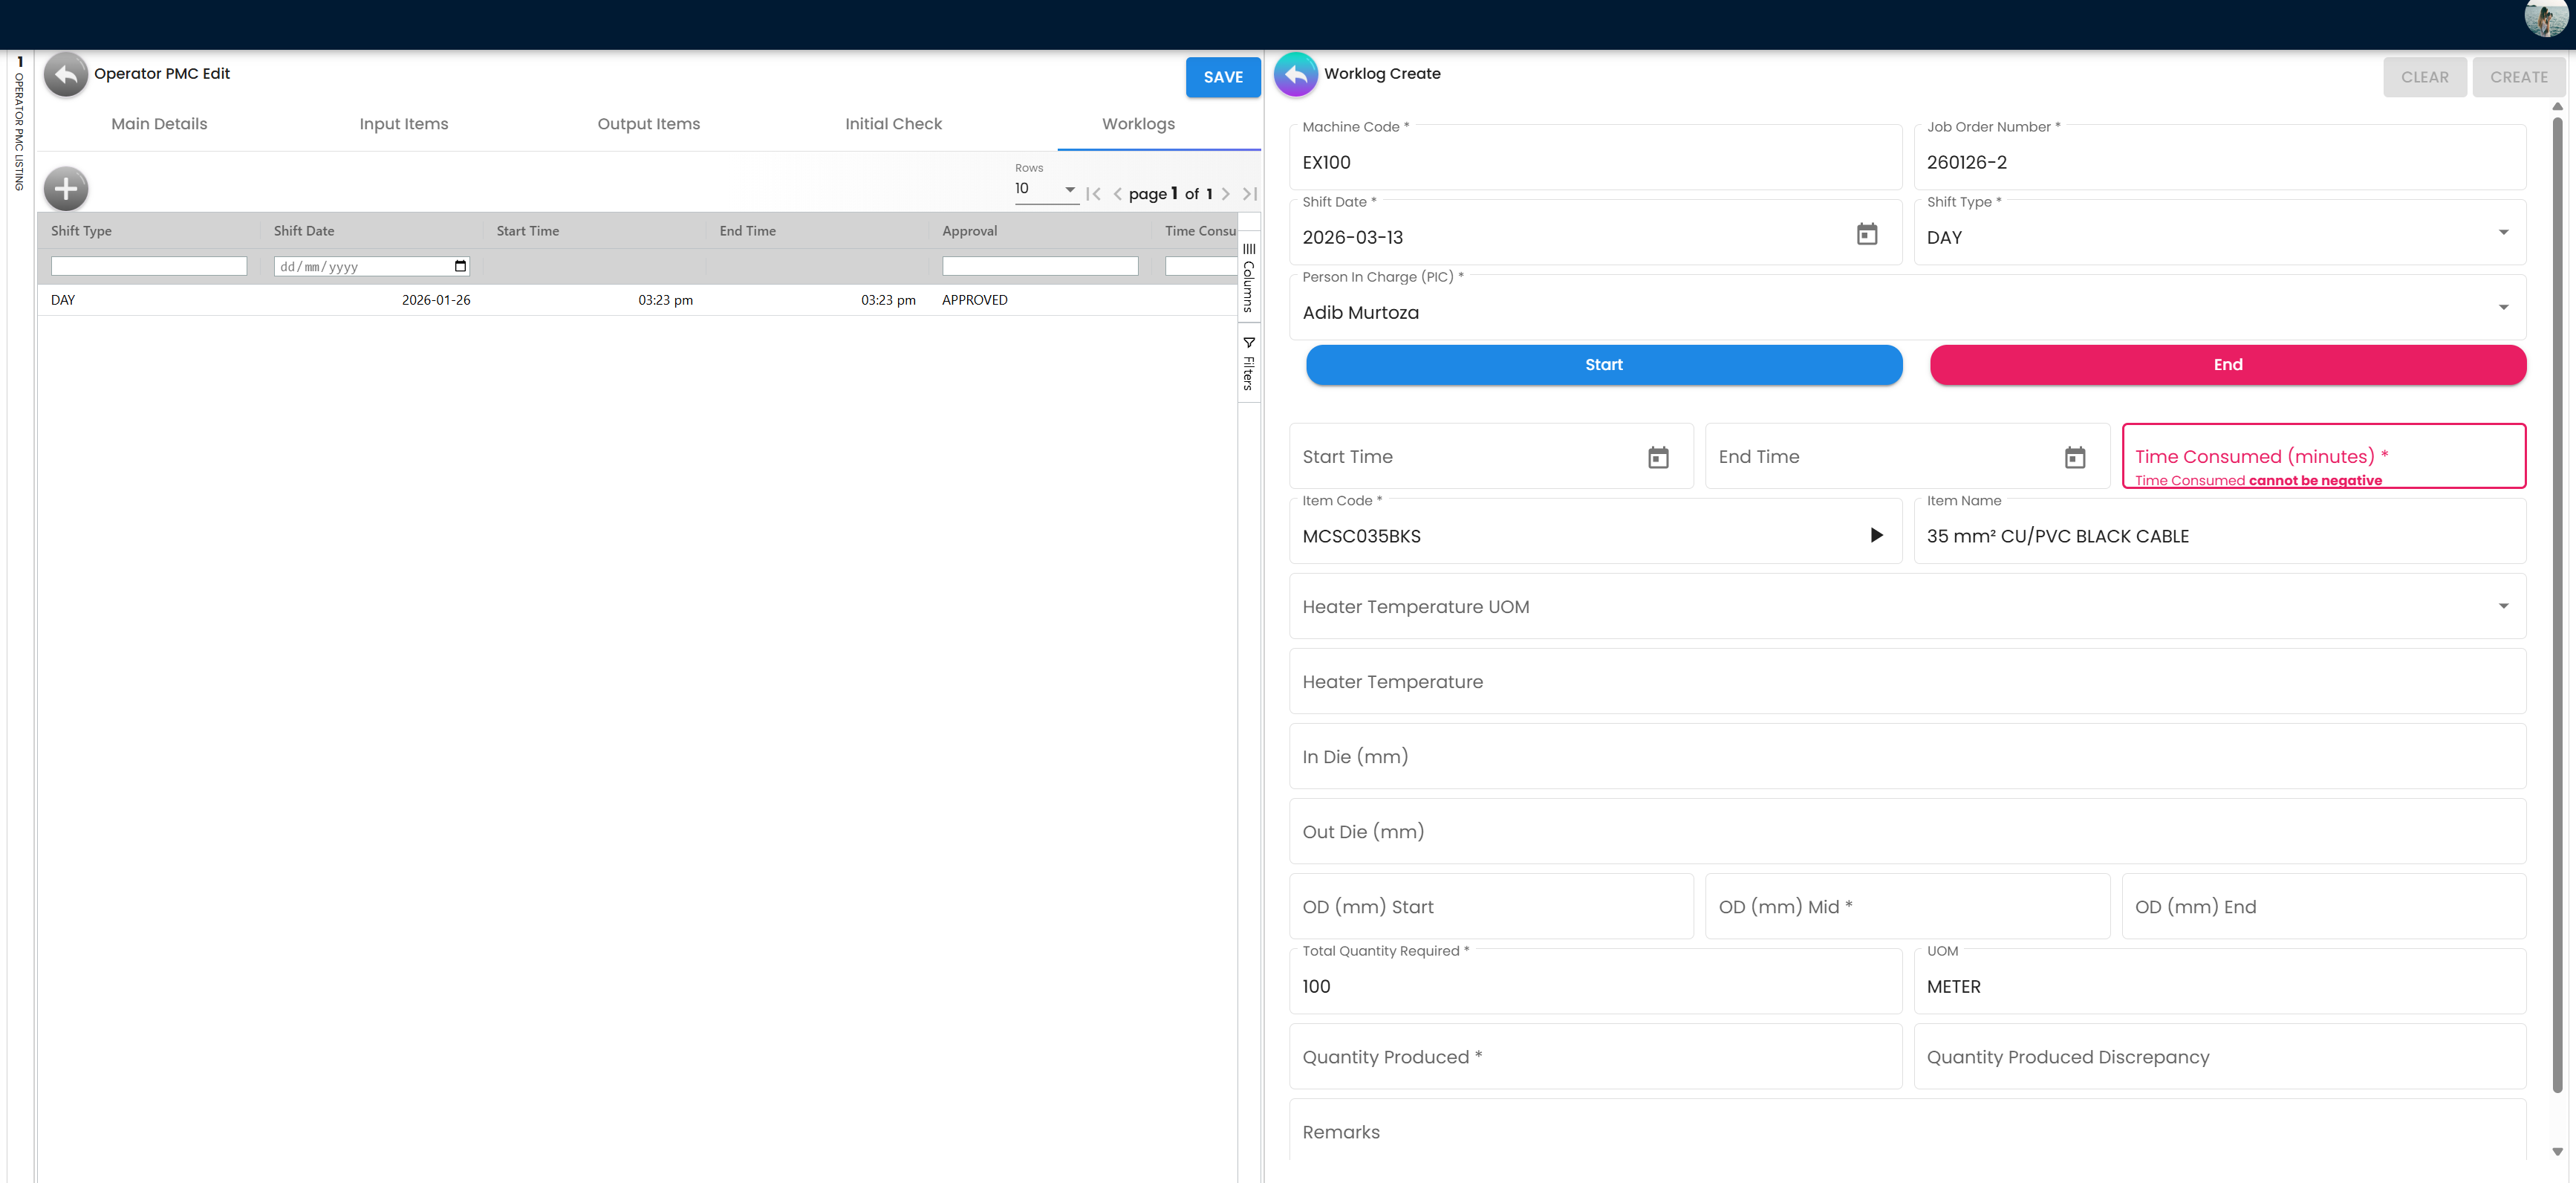
Live Time Tracking: Instead of typing times, click Start when work begins and End when the machine stops. The system automatically calculates Total Time spent. Do not hit Start when you merely claim the job; only hit Start when production begins.
Quality Measurements and Specifications
Inside the Worklogs tab, operators record critical production variables that vary by the process type:
- OD (Outside Diameter): Record measurements in millimeters for the Start, Mid, and End of the production run.
- Extrusion Specifications: For relevant processes, you can record Heater Temperature (with UOM), In Die (mm), and Out Die (mm).
- Labor Tracking: Clock in with Start and End buttons; select your Shift Type and verify the PIC (Person in Charge).
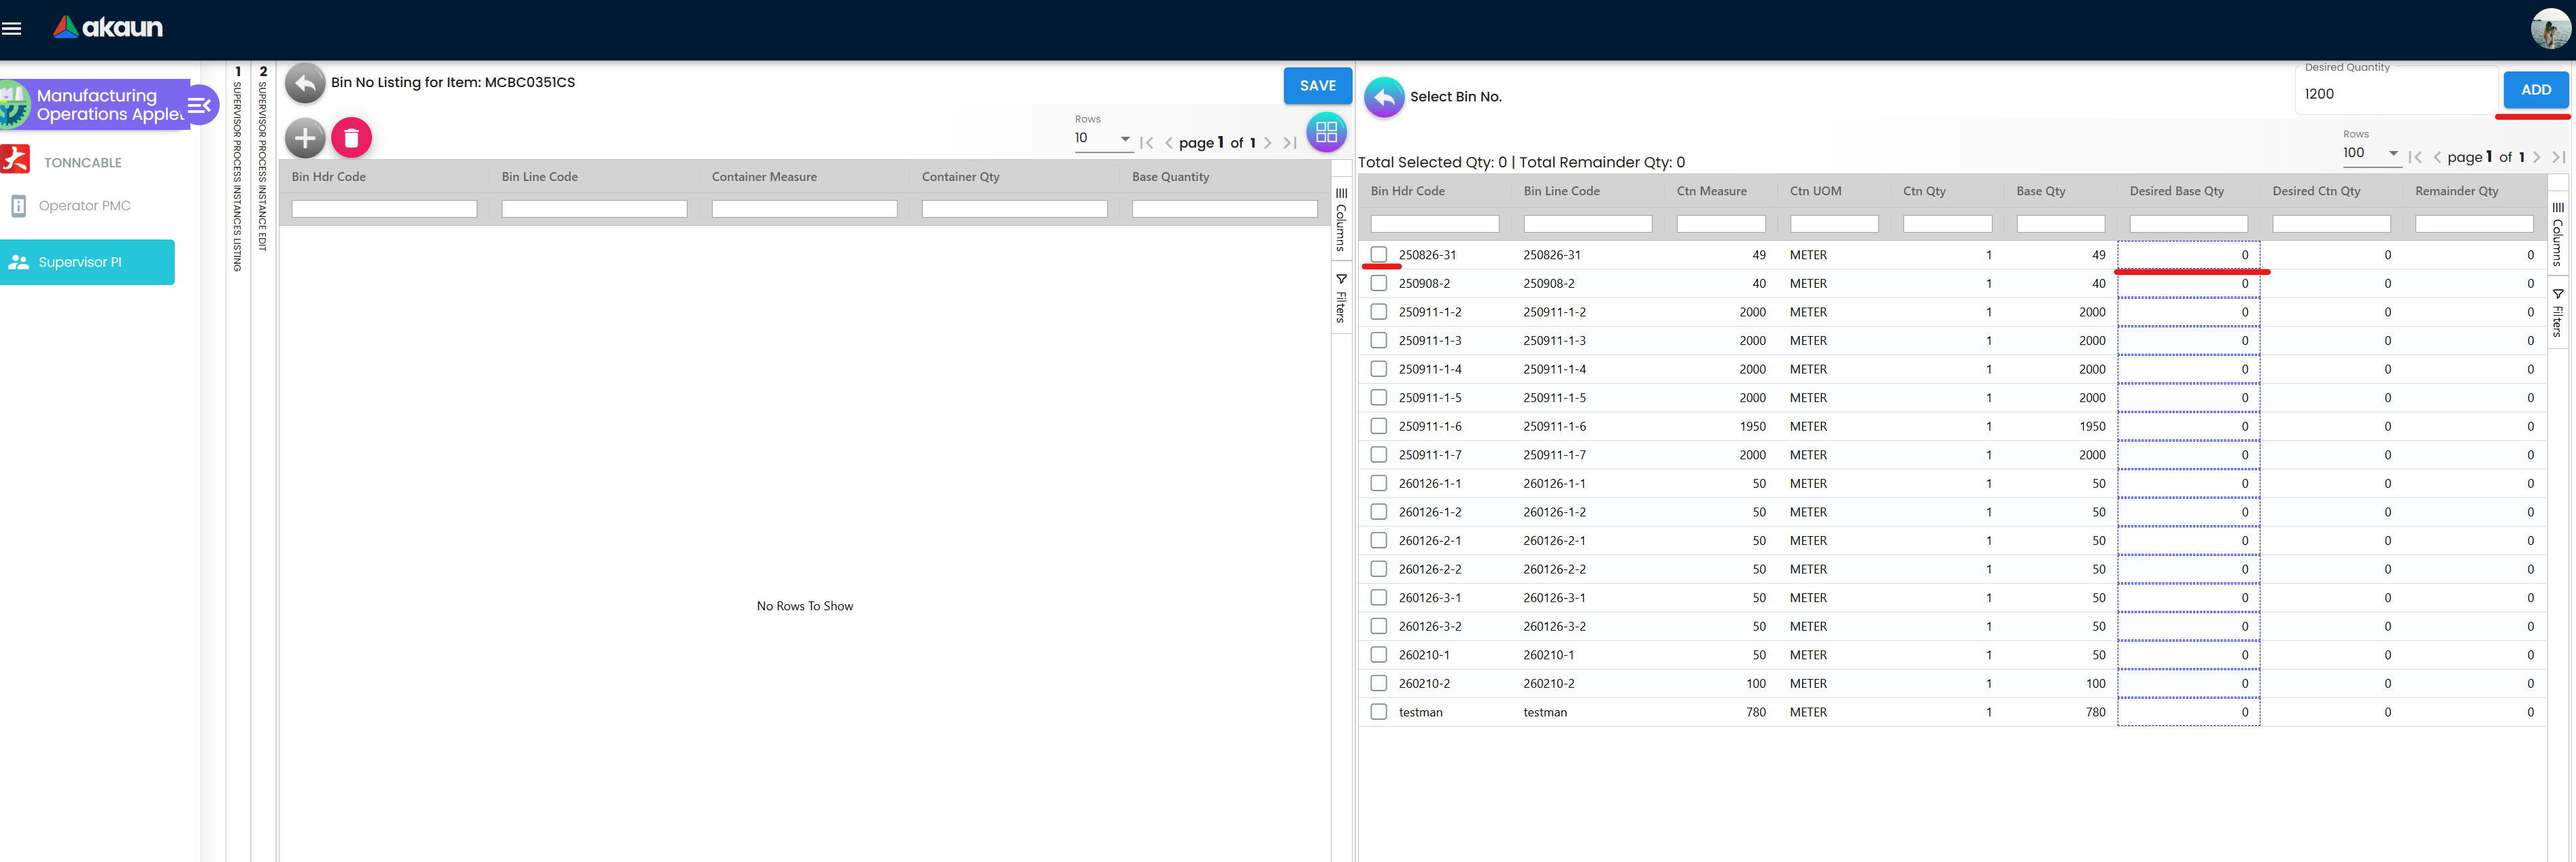
Input Materials and Bin Selection
Operators must specify the exact bin where raw materials were sourced to maintain strict inventory tracking.
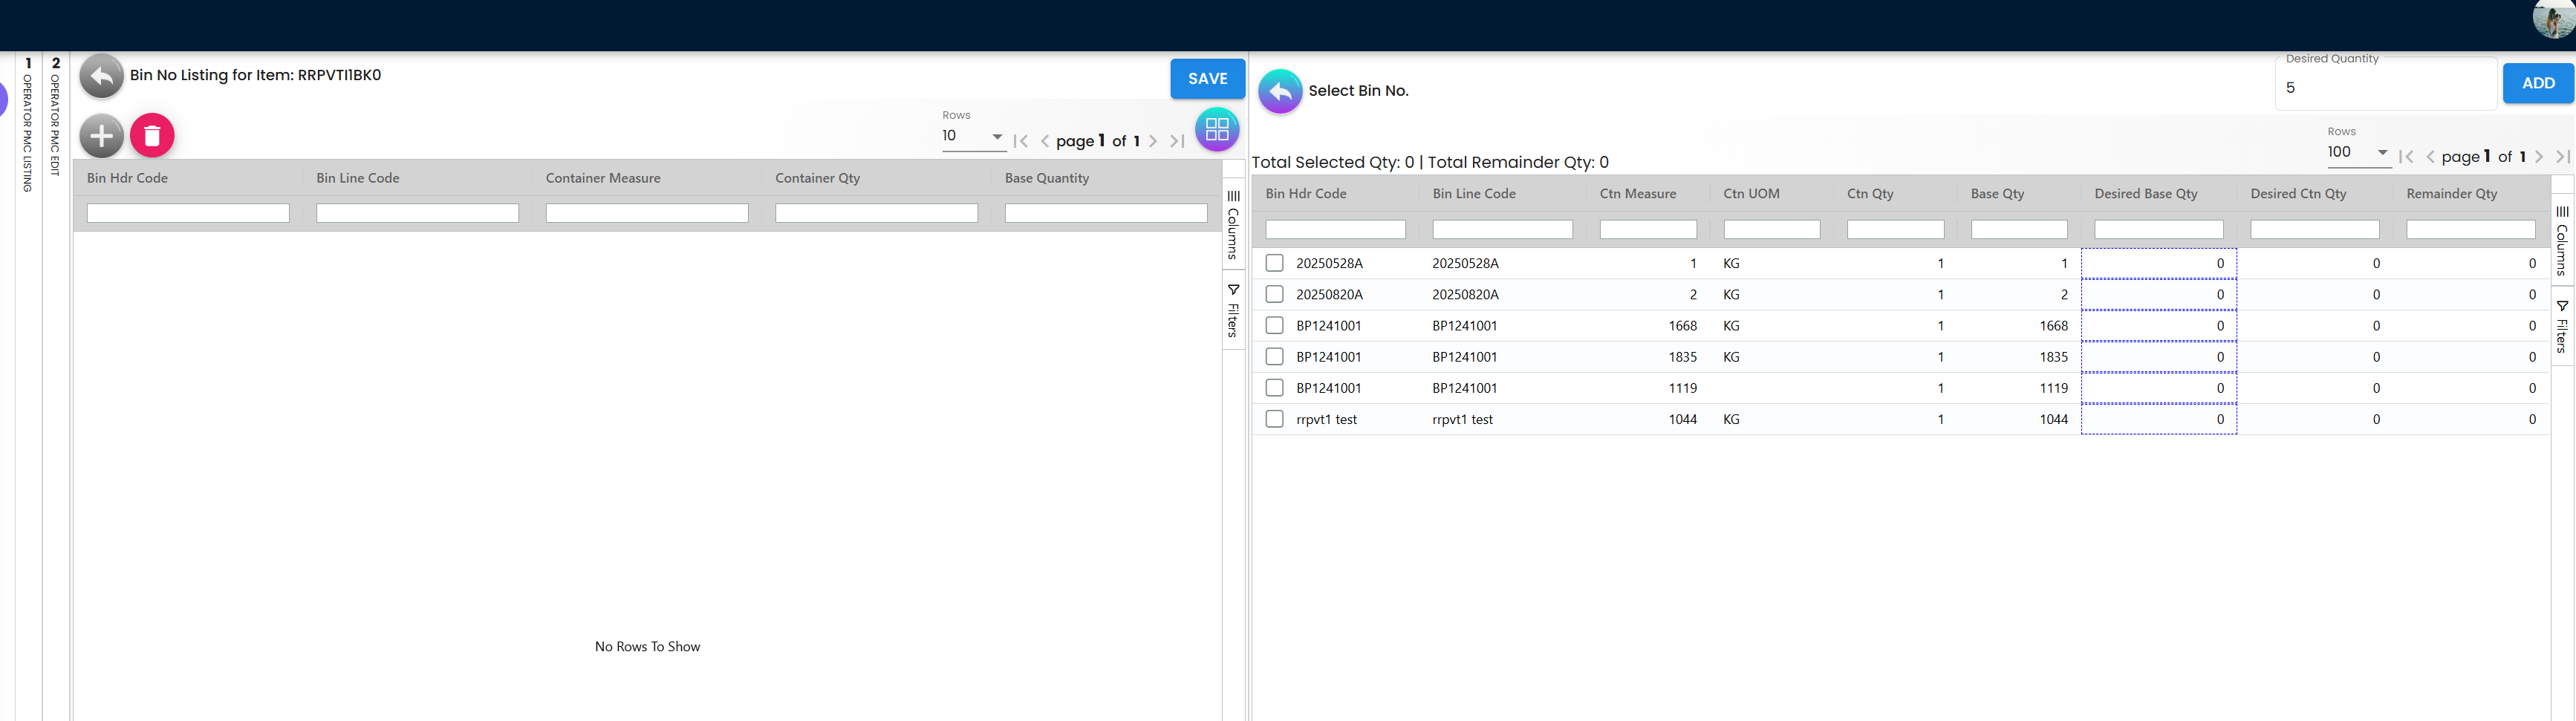
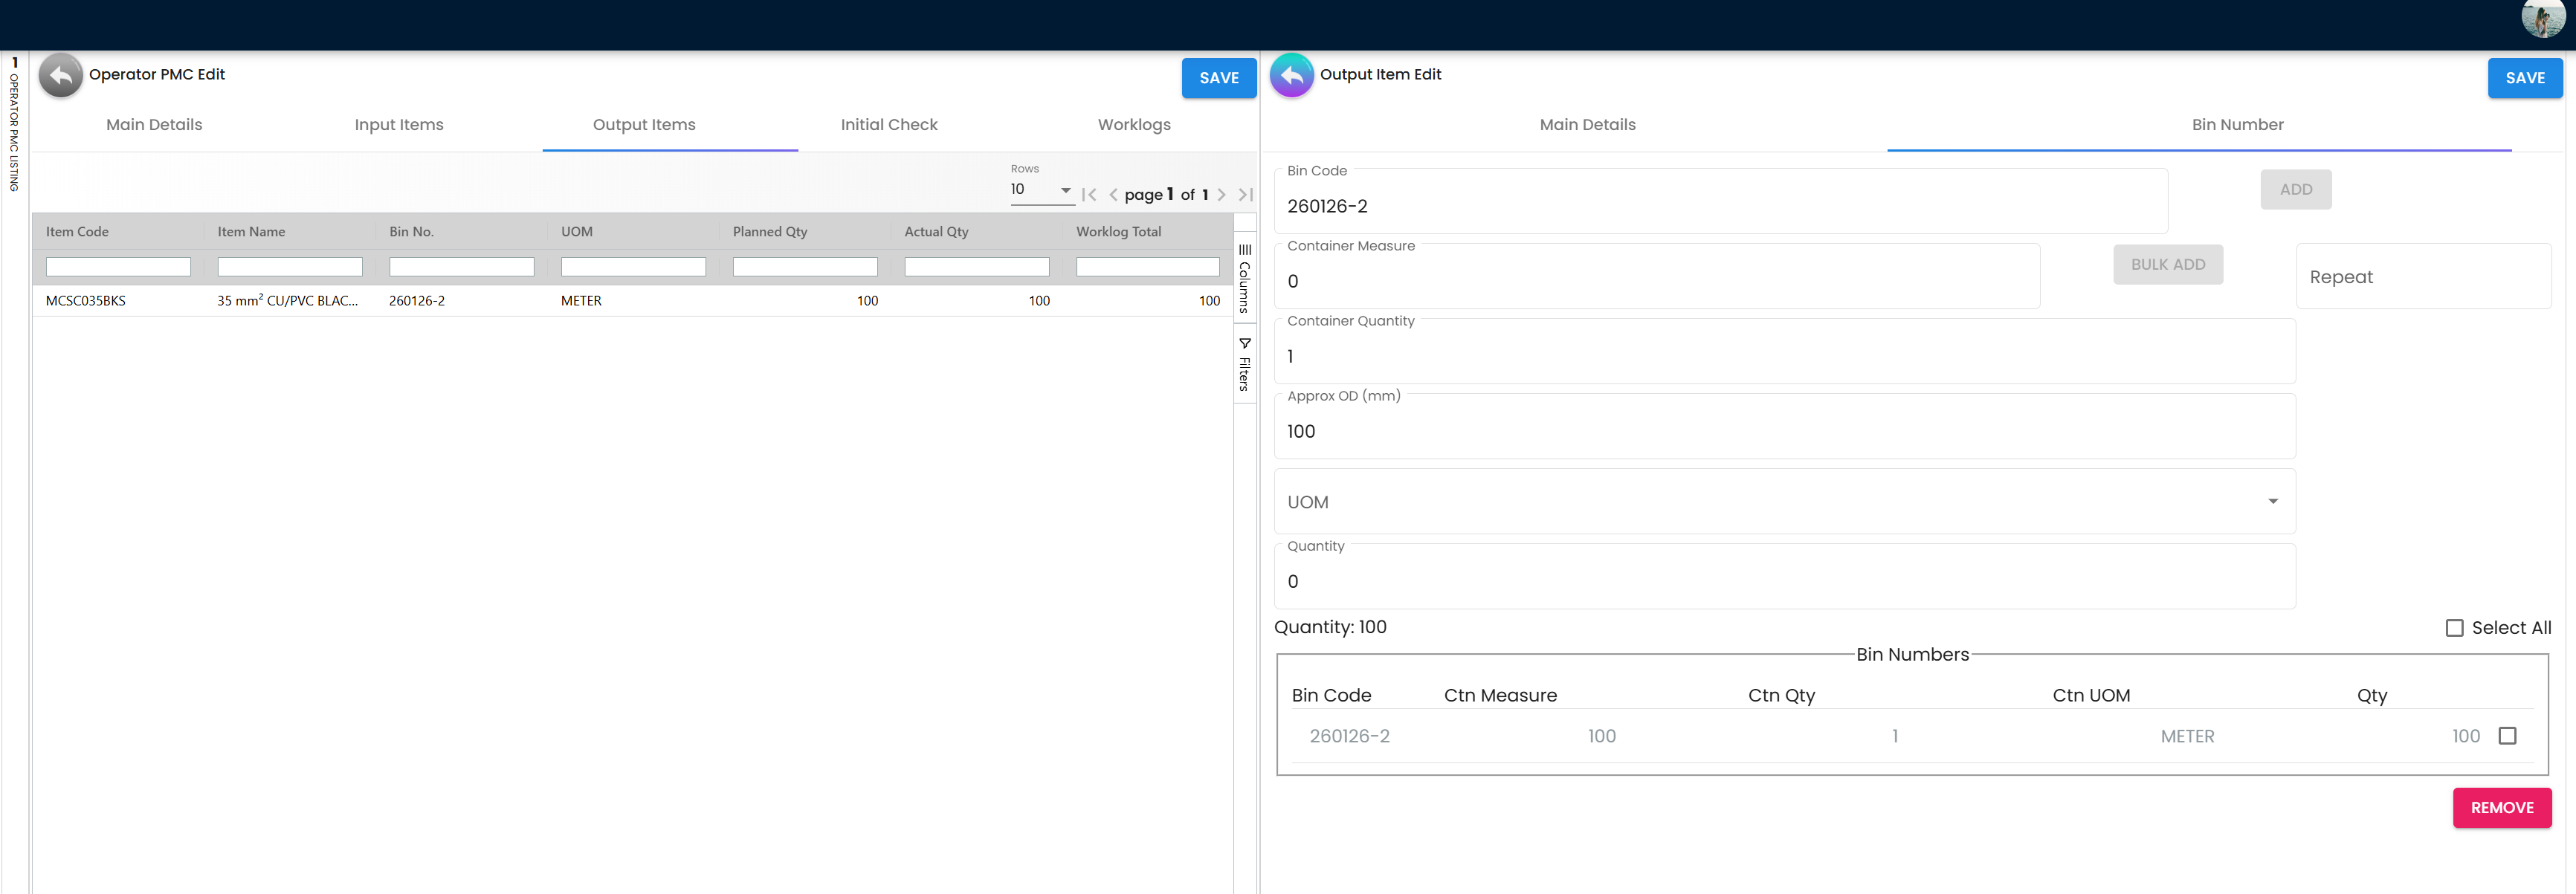
Handling Bulk Quantities and Discrepancies
When recording the final Quantity Produced, you can enter a single quantity for one container, or utilize Bulk Add if the output was scattered across multiple reels, pallets, or bins.
- Shift Discrepancy: The system auto-calculates
Planned Quantity - Actual Quantity. If you experience a surplus (Over Production), that excess will simply remain in safe stock for future orders.
The Five-Tab Interface
Both Operators and Supervisors have access to a consistent, detailed view organized into five distinct tabs:
- Main Details: High-level process overview and machine status.
- Input Items: Detailed bin-level material consumption.
- Output Items: Recording of produced semi-finished or finished goods.
- Initial Check: Verification step for attachments and SOPs prior to production.
- Worklogs: The primary data entry hub for time and measurements.
Process Status Lifecycle
Understanding the flow of a process instance is key to mastering the shop floor:
- Available: Sent from Planning; ready for an operator to claim.
- In Progress: Operator has claimed the job and is physically working.
- Pending Approval: Operator finished and submitted the Work Log.
- Ready: Supervisor reviewed and approved the log. The item is safe to move to packing.
- On Hold: Supervisor paused the job (e.g., machine broke, missing QA specs).
- Cancelled: Supervisor permanently terminated the run.
Configuration & Settings
User Access Control
The applet utilizes role-based gated views.
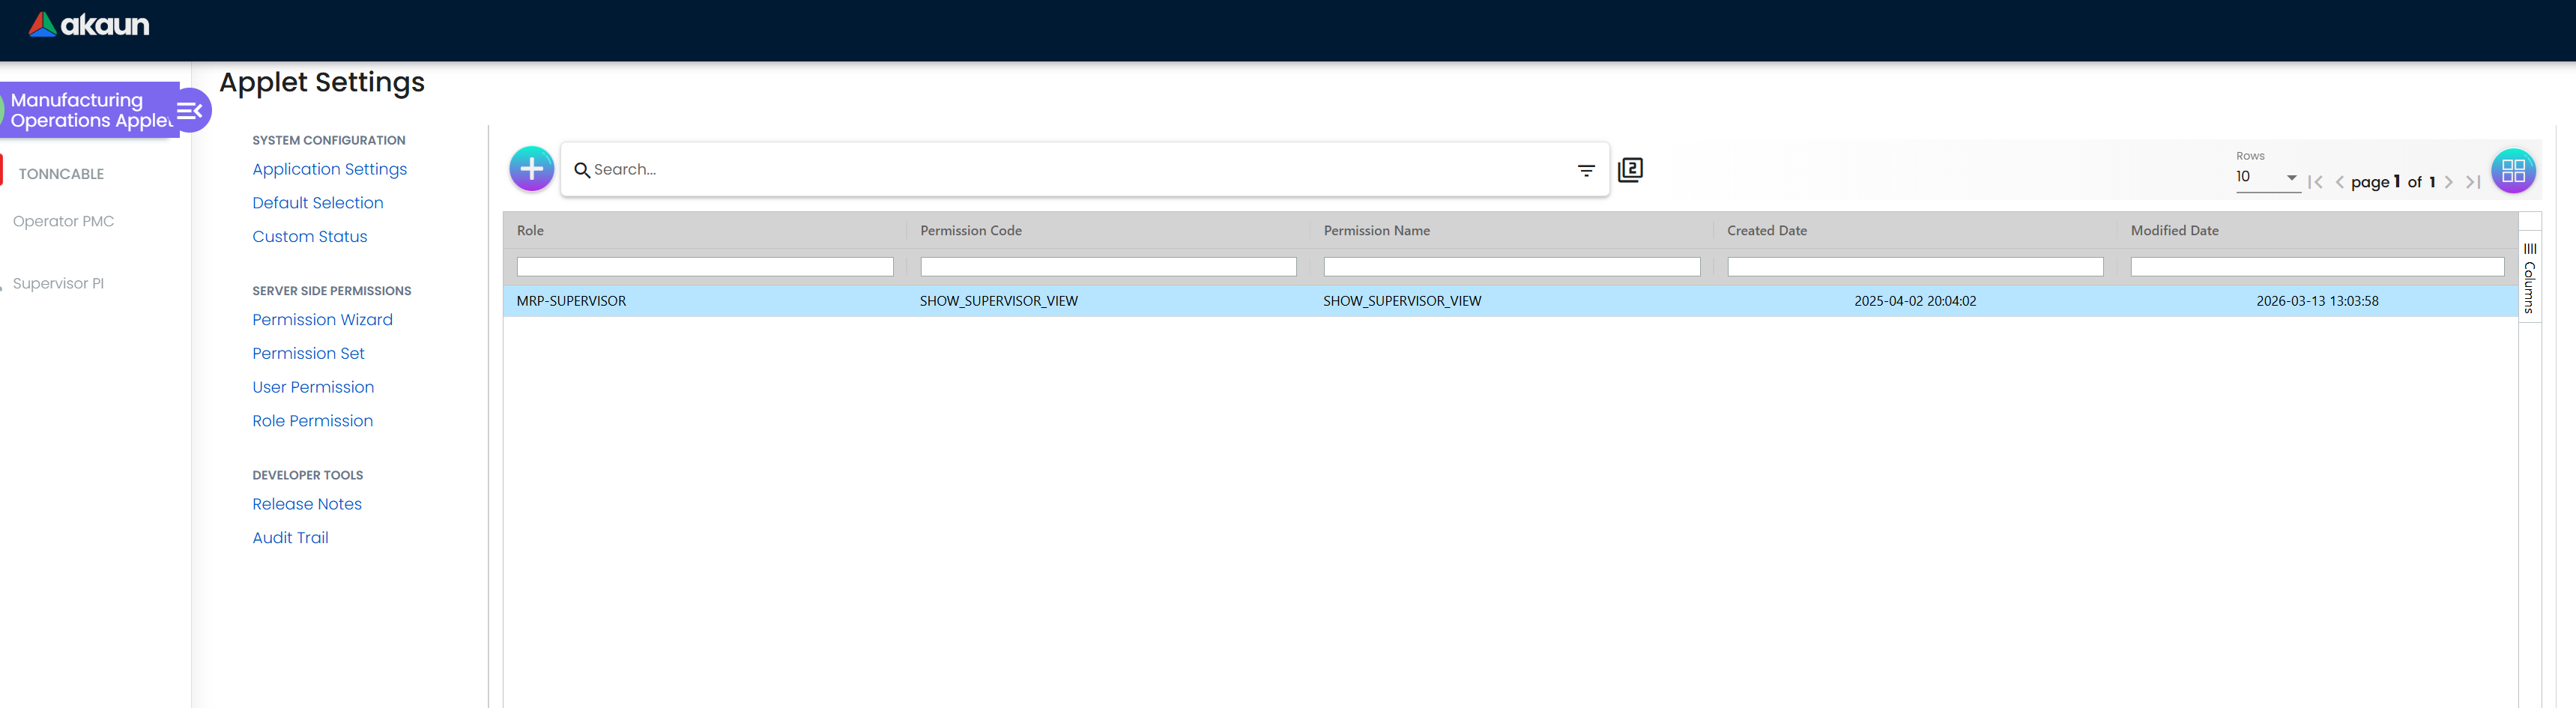
| Permission Toggle | Resulting Access | Target Role |
|---|---|---|
| (Default) | Grants access to Operator PMC | Machine Operators |
| MRP supervisor | Unlocks Supervisor PI | Floor Supervisors |
If a supervisor cannot see the approval queues, an admin must enable the MRP supervisor permission on their account profile.
Application Field Settings
Administrators can toggle the visibility and requirement of specific fields to match the company’s accounting and reporting needs:
- Financial Dimensions: Toggle visibility for Segment, G/L Dimension, and Profit Center.
- Project Tracking: Enable/Disable the Project field for job-specific cost allocation.
- Taxation Support: Enable visibility for SST (Sales and Service Tax) and WHT (Withholding Tax).
- UI Customization: Hide specific technical fields such as Tracking ID, Permit No, or detailed Costing Details if they are not required on the floor.
Custom Status Engines
The system allows for deep customization of the production lifecycle through the Custom Status setting.
- Header Statuses: Define up to 5 custom statuses for the overall Process Instance header.
- Line Statuses: Define up to 5 custom statuses for individual production lines.
- Status Parameters: For each custom status, you can define the Name, a Description, and set a Default state.
Machine Code Configuration
Each Work Log is explicitly tied to a predefined Machine Code. The system enforces a strict rule: One Work Log per Machine Code per process instance. This guarantees that machine-hour utilization reporting and maintenance tracking remain completely mathematically pure.
Printables
Administrators can configure specific Printable Templates for production documents. This allows for the generation of physical labels, job sheets, or transfer notes directly from the applet once a process reaches a specific state.
Frequently Asked Questions (FAQ)
1. Why can’t the operators see any Job Orders in their queue?
First, verify that the planners actually clicked “Generate Process Instance” inside the Job Order within the PPM Applet. Second, check if the operator has accidentally filtered their view to the wrong Machine Code. Finally, ensure the job has been properly released into the “Available” state.
2. An operator clicked ‘Start’ by mistake and let the timer run for 5 hours. How do we fix this?
As long as the supervisor has not yet marked the log as Ready, the supervisor can manually edit the Work Log’s timestamp fields inside the Supervisor PI menu to correct the actual duration before approving it.
3. What happens if an operator selects the wrong Bin for a raw material?
If the log hits Ready status, that specific bin will have its inventory depleted in the system. If this was a mistake, a manual correction via the Stock Adjustment (Internal) Applet is required to fix the physical vs system bin balances.
4. Can an operator put a job ‘On Hold’ if their machine breaks down?
No, only supervisors can place jobs On Hold or Cancelled. The operator must physically inform the supervisor, who will then update the status in the Supervisor PI menu so the delay is formally noted in management reports.
5. Why is the Supervisor PI menu completely missing from my sidebar?
You lack the necessary administrative permission. Your system administrator must go to your user profile and explicitly enable the MRP supervisor client-side permission. You will need to log out and log back in for the menu to appear.
6. I am a supervisor, but the ‘FINAL’ button is greyed out. Why?
The system enforces strict data completeness. The FINAL button will not enable until every single line in both the ‘Input Items’ and ‘Output Items’ tabs has an assigned Bin and a recorded Actual Quantity. Check those tabs for any missing or zero-quantity lines.