Process Maintenance Applet
Purpose and Overview
The Process Maintenance Applet is where you define how your factory makes things. It’s the foundation layer that the Production Planning & Monitoring Applet builds on—without proper process configuration here, you can’t create Job Orders there.
Think of it as your manufacturing knowledge base: which machines do what, what materials go into each step, what comes out, and how steps combine into complete production sequences.
Who Benefits from This Applet?
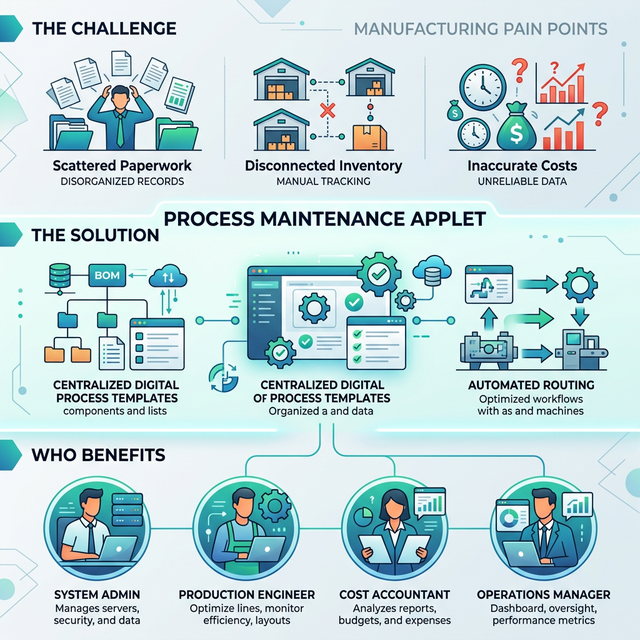
System Administrators:
- Initial setup of Machines and Process Types
- Define production capabilities and configure equipment specifications
- Manage feature visibility, permissions, and webhook integrations
Production Engineers:
- Create Process Templates (individual manufacturing steps) of type PRODUCTION or PACKING
- Build Job Templates (complete production sequences) with multiple production route Options
- Define input/output ratios and material requirements (BOM)
- Bulk import Process Templates from external files
Cost Accountants:
- Verify material consumption ratios for accurate product costing
- Review input/output relationships across Process Templates
- Validate BOM quantity ratios against actual production data
Operations Managers:
- Ensure standardized production flows with configurable Process Type sequences
- Monitor resource allocation through Machine assignment
- Gain visibility into assembled Job Templates and their Process Groups
What Problems Does This Solve?
The Manual Manufacturing Setup Problem:
Traditional production setups rely on fragmented spreadsheets, scattered operating procedures, and disconnected inventory systems. Common issues include:
- Inaccurate material consumption leading to inventory discrepancies
- Ambiguous routing instructions causing production delays
- Difficulty determining the exact cost of manufacturing a product
- Missing centralized documentation for machine capabilities
- No single source of truth for production sequences
The Process Maintenance Solution:
- Centralized knowledge base — All machine capabilities, process templates, and routing instructions in one place
- Accurate consumption tracking — Precise input/output ratios (BOM) drive precise inventory transactions
- Flexible template types — Separate PRODUCTION and PACKING templates for different workflow stages
- Modular workflows — Build, re-use, and link individual Process Templates into flexible Job Templates with multiple Options
- Bulk import — Import Process Templates from files instead of creating them one by one
- Attachment management — Upload machine specs, manuals, and SOPs directly to Process Templates
Key Features Overview
Key Concepts
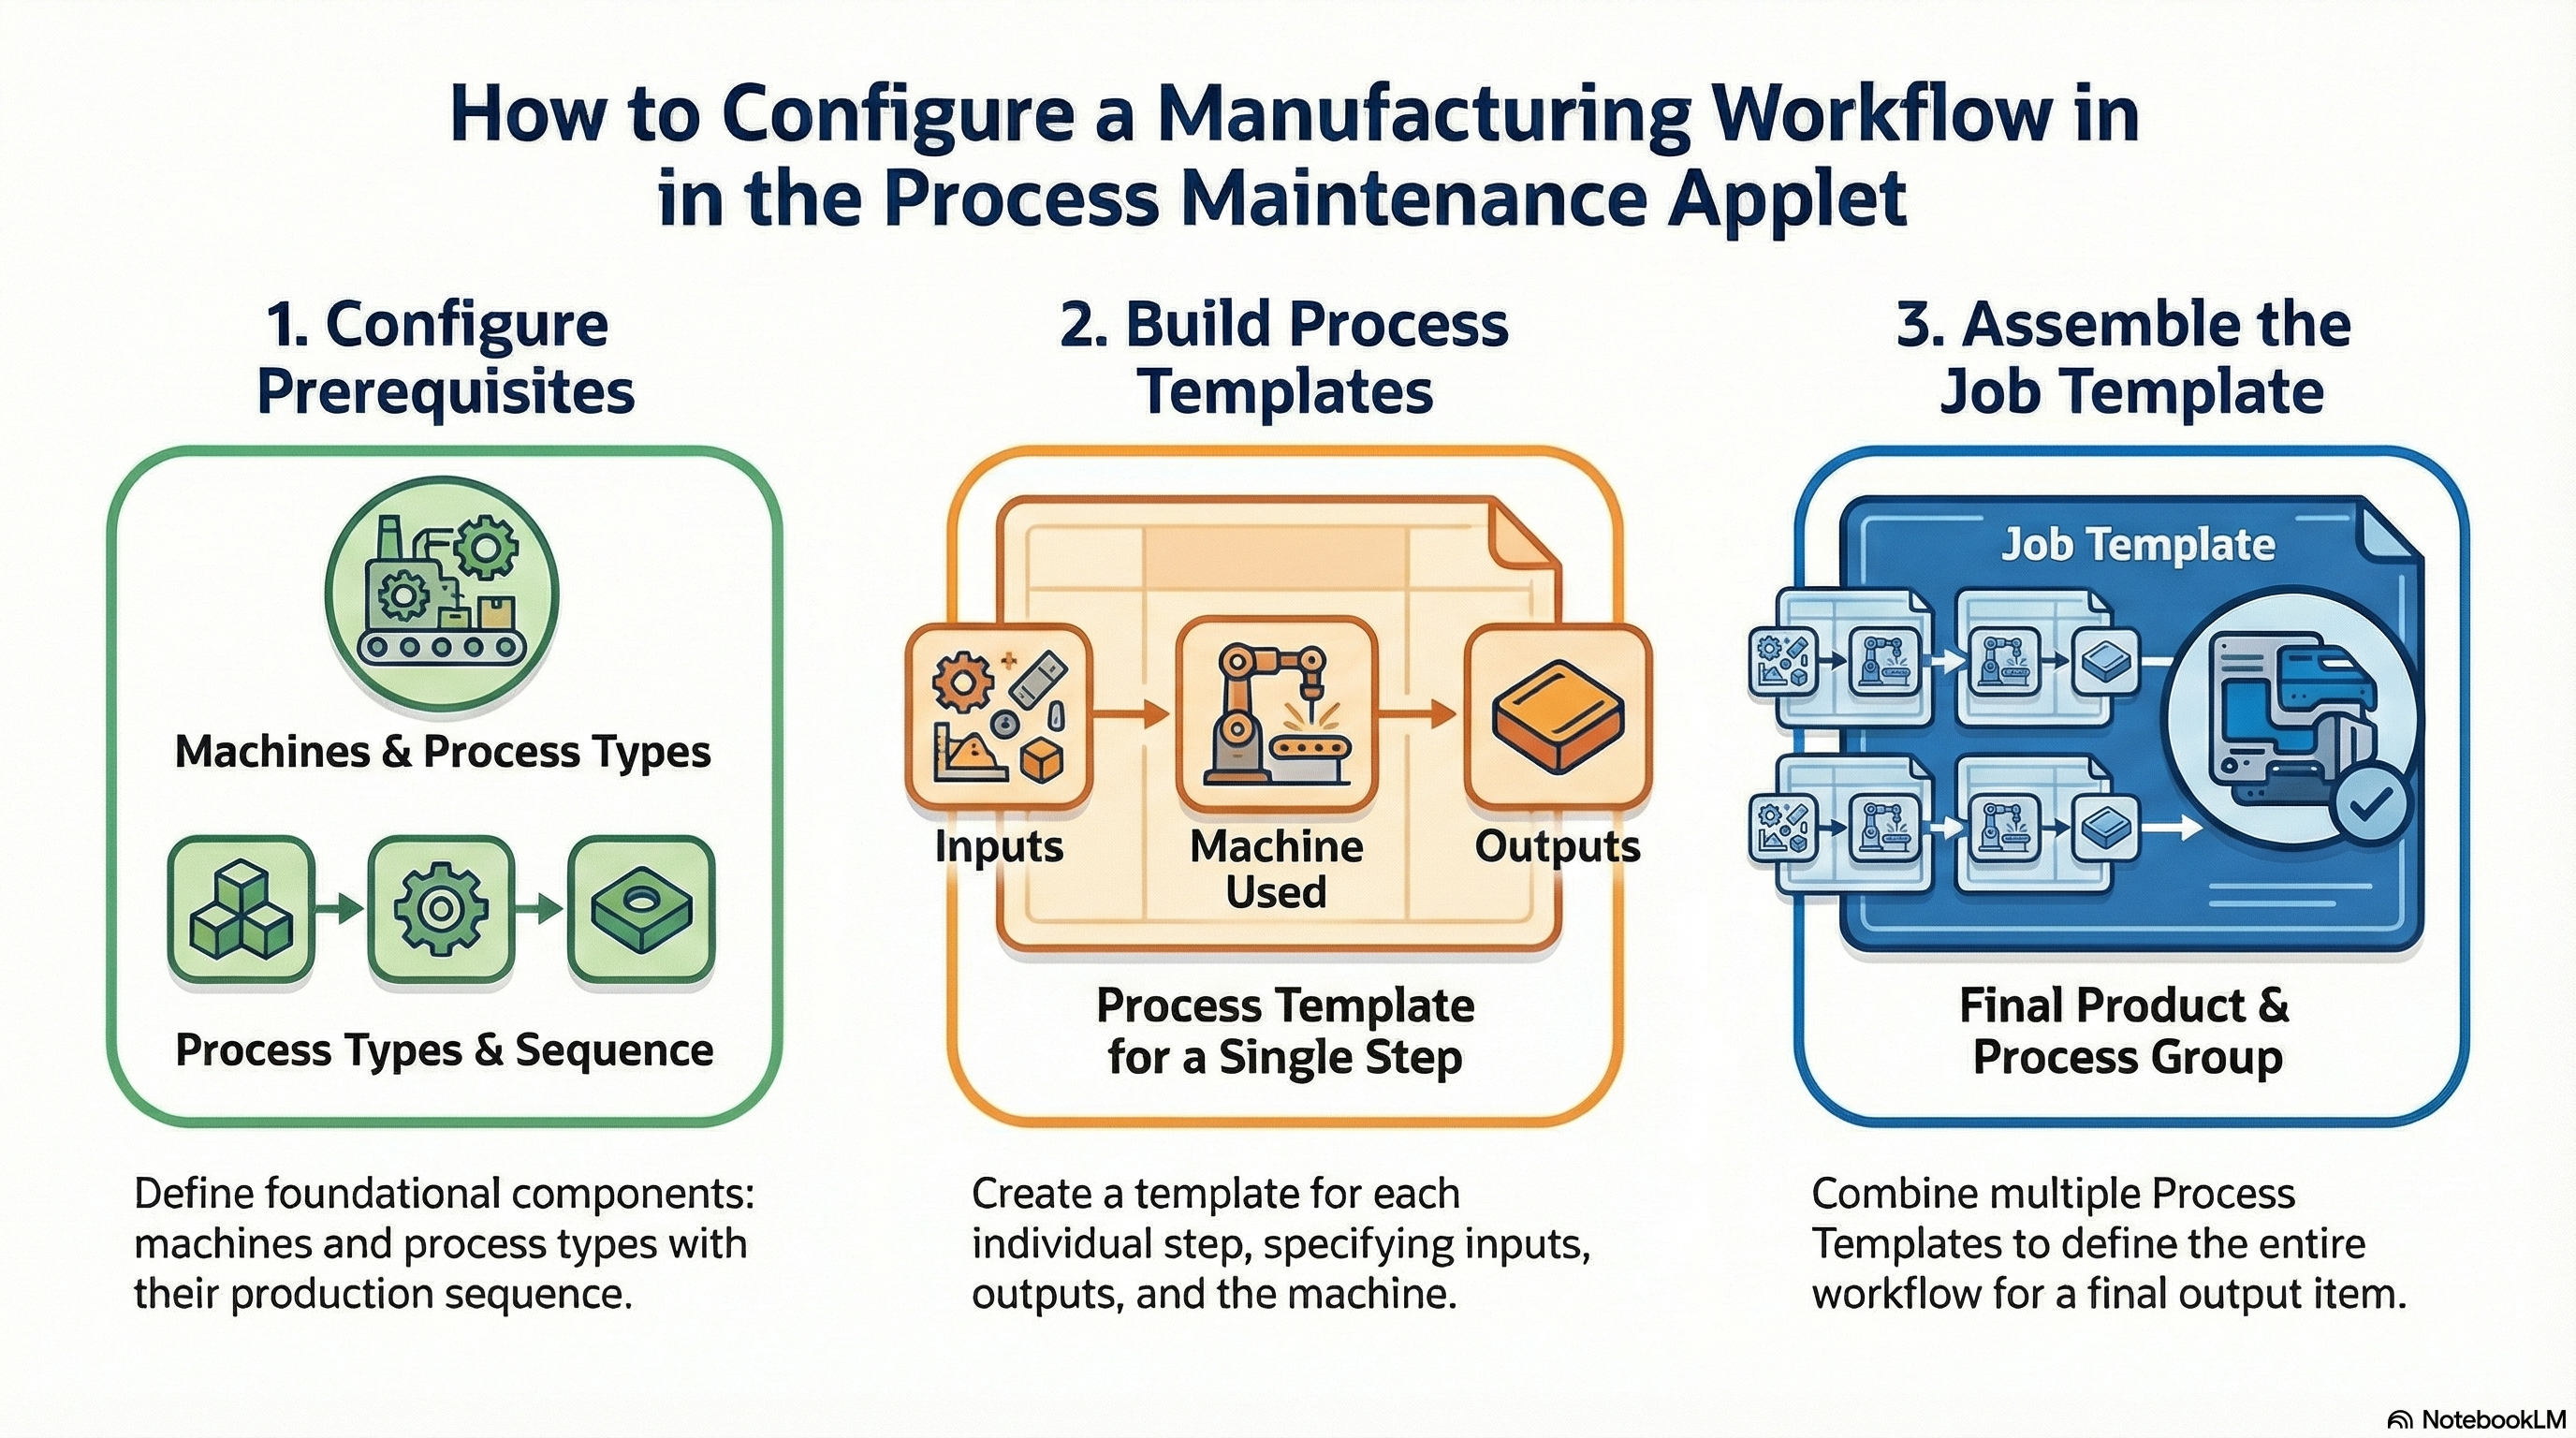
Manufacturing Hierarchy Structure
Think of the manufacturing setup as a structured flow of dependencies:
Factory Floor
│
├── Machines ──→ WHERE the work happens? (Equipment)
│   │
│   └── Process Types ──→ WHAT KIND of work is it? (Categories like Cutting, Assembly)
│       │
│       └── Process Templates ──→ HOW is a specific step done? (Inputs + Outputs + Machine)
│           │
│           └── Job Templates ──→ WHAT is the complete recipe? (Options & Groups)
Flow Through the Hierarchy:
- Machine: The physical equipment available.
- Process Type: The logical category and sequence of the work.
- Process Template: The specific recipe for a single step (ties machines, inputs, outputs, and process type together).
- Job Template: The master assembly of all linked Process Templates required to produce a final item.
Core Terminology
| Concept | What It Means | Example |
|---|---|---|
| Machine | Physical production equipment (Name, Code, Type) | Armoring Machine A1, Cutting Line B2 |
| Process Type | Category of manufacturing operation with a sequence number | Cutting (10), Assembly (20), Testing (30) |
| Process Template | Single manufacturing step with inputs, outputs, and machine links | “Armoring Process”: Steel wire (input) → Armored cable (output) |
| Template Type | Classification of a Process Template | PRODUCTION or PACKING |
| Job Template | Complete production sequence linked to an output item | “Armored Cable Job” = Armoring + Bedding + Cabling |
| Option | A production route variation within a Job Template | Standard route vs Express route |
| Process Group | A finalized, named set of Process Templates within an Option | “Standard Armored Cable” |
| Input Items | Materials consumed in a process (with ratio/quantity) | Raw materials, semi-finished goods |
| Output Items | Products created by a process (with ratio/quantity) | Semi-finished goods, finished products |
| Ratio | Quantity relationship between inputs and outputs | 4 legs (input) → 1 table (output) |
Quick Start Guide
Get up and running quickly with these essential workflows.
For System Administrators: Initial Foundation Setup
Goal: Get the core resources and settings ready for process definition.
Prerequisites Check
- Ensure all raw materials, semi-finished goods, and finished products exist in the Item Data Hub and are activated in Doc Item Maintenance.
Configure Settings (
Settings)- Set a Default Branch and Default Location under
Default Selectionto pre-fill forms. - Review Field Settings to decide whether to show or hide: External Process, Item Marking, and Multi-Output Process Templates.
- Optionally configure Feature Visibility, Webhooks, and Permissions.
- Set a Default Branch and Default Location under
Create Machines
- Navigate to the Machine sidebar menu.
- Add each machine with a unique Machine Name, Machine Code (auto-uppercased), Machine Type (dropdown), Description, and Remarks.
Define Process Types
- Navigate to the Process Type sidebar menu.
- Create each Process Type with a Process Type Name, Process Type Code, Description, Sequence number (use gaps: 10, 20, 30), and Remarks.
- Toggle Independent Process for operations that don’t follow the standard sequence.
- Optionally toggle External Process and Item Marking (controlled by Field Settings).
For Production Engineers: Defining the Recipes
Goal: Create templates that clearly direct how products are made.
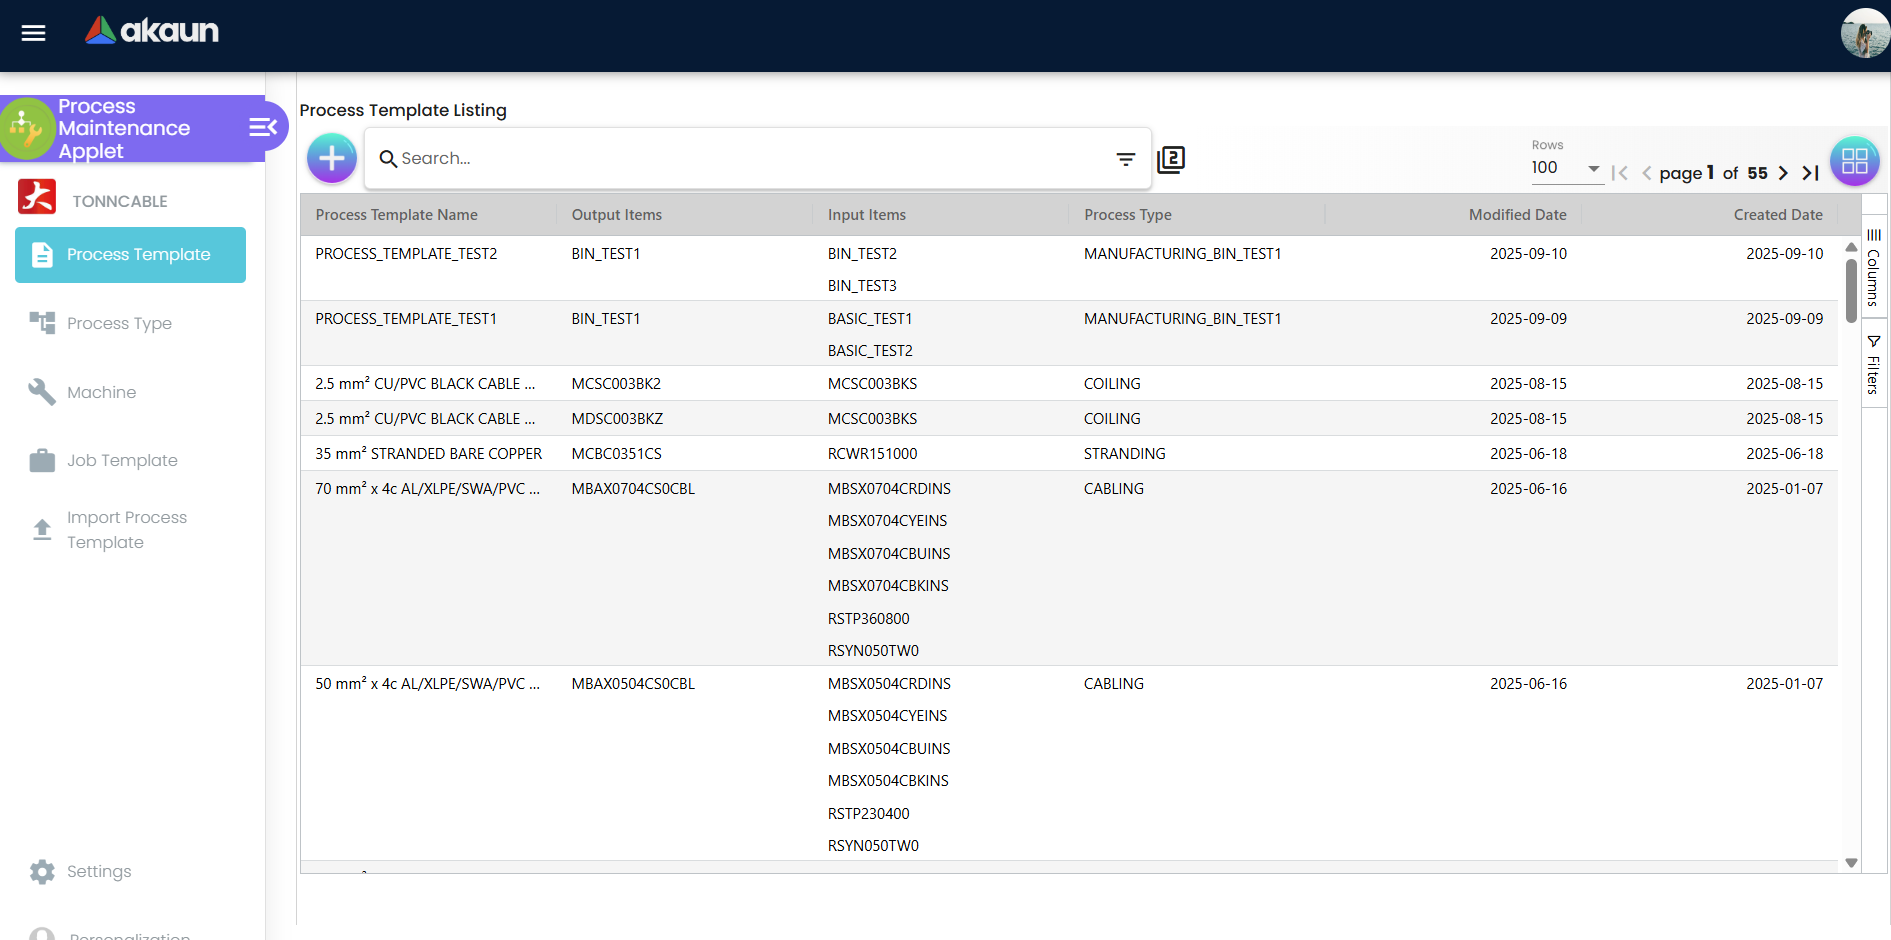
- Create Process Templates
- Navigate to the Process Template sidebar menu and click "+" to create.
- Fill in the Process Template Name, select a Process Type from the searchable dropdown, choose a Template Type (PRODUCTION or PACKING), and add a Description.
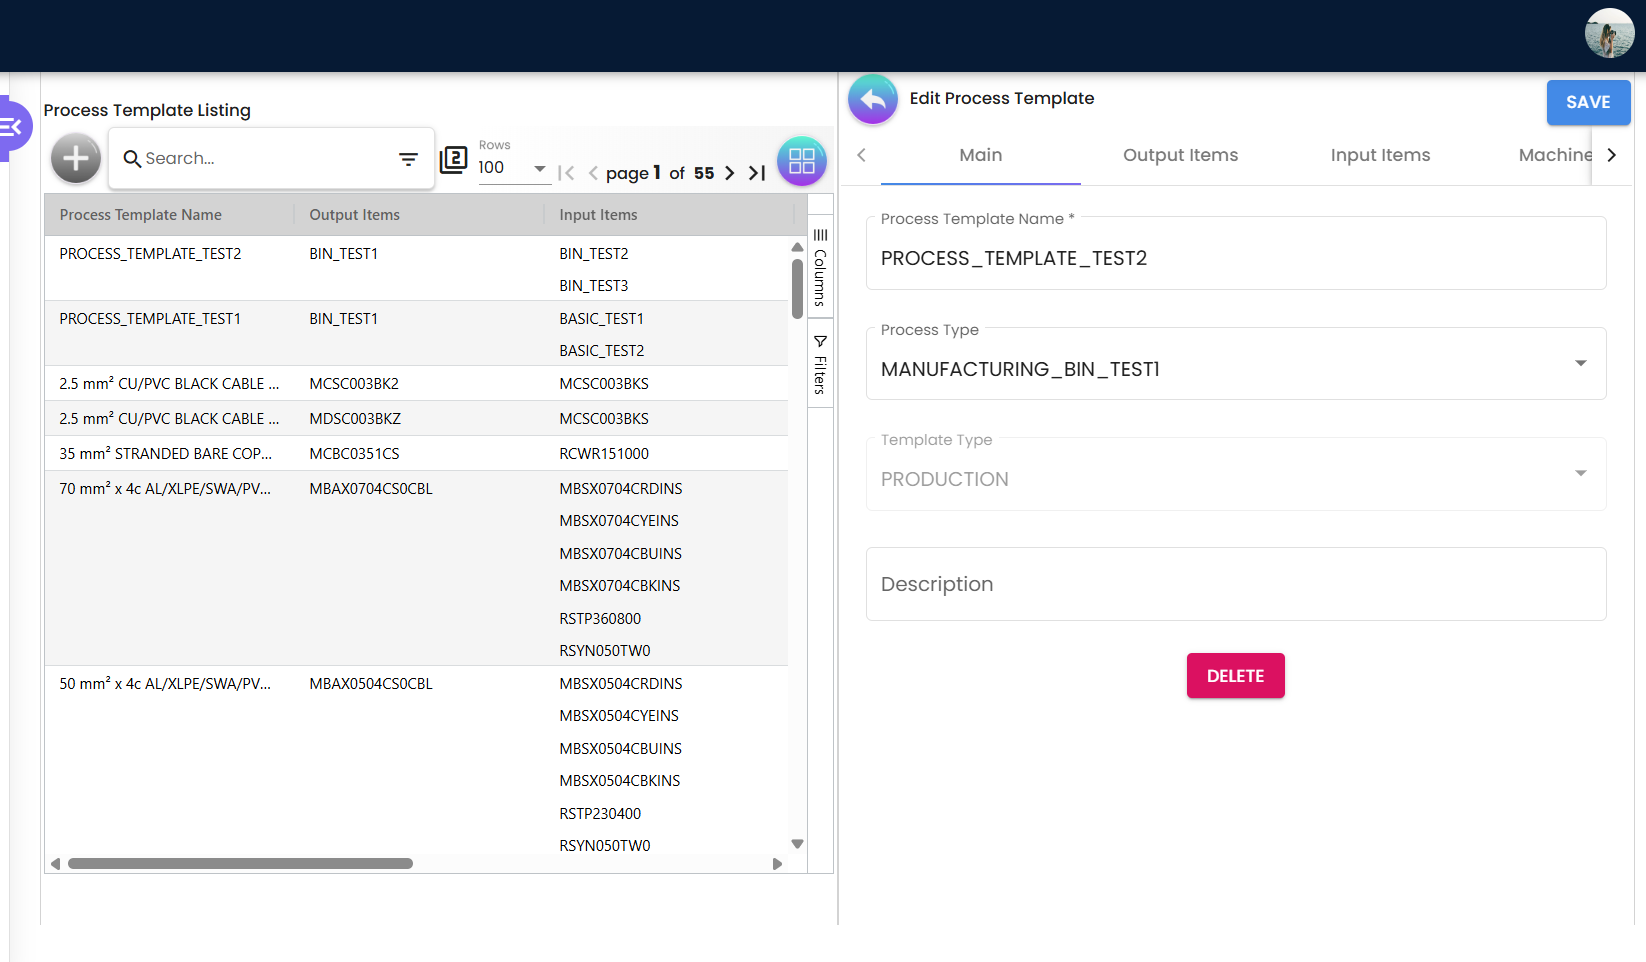
- Switch to the Output Items tab → click "+" → select an INV Item Code → set the Ratio (quantity produced per cycle) and UOM.
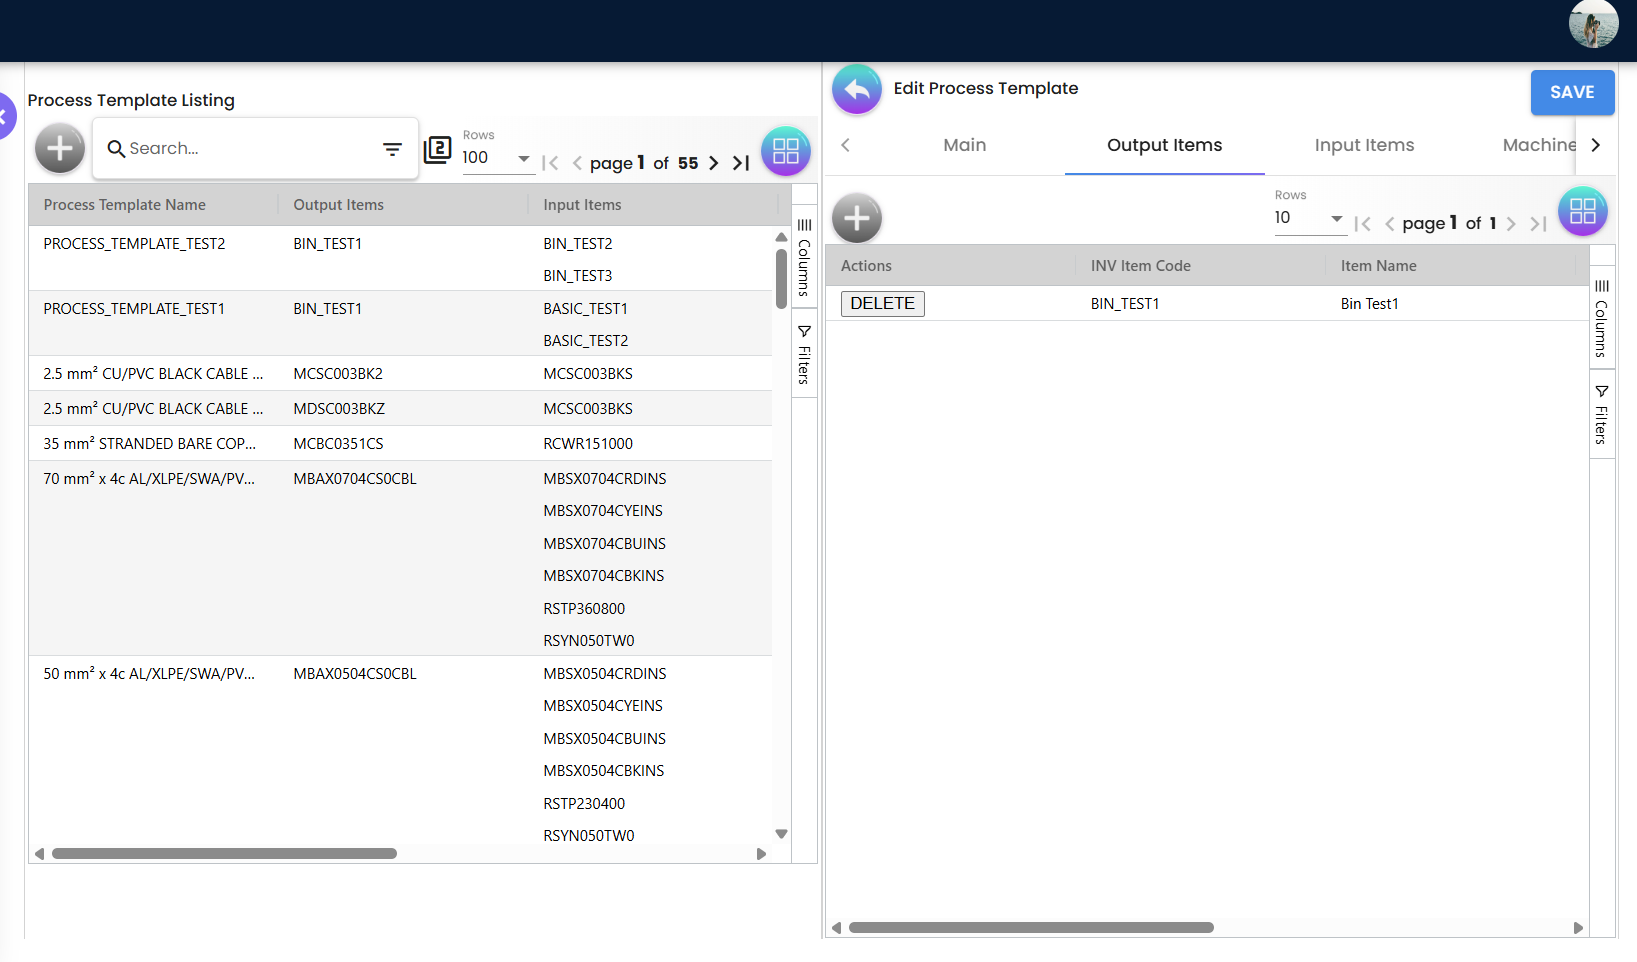
- Switch to the Input Items tab → click "+" → add consumed materials with their Ratio.
- Switch to the Machine Used tab → link one or more machines; set a default.
- Optionally switch to the Machine Spec tab → attach documentation (PDFs, images, manuals).
Pro Tip: Enable “Multi-Output Process Template” under Settings > Field Settings if a single step produces multiple outputs (like a primary product and a byproduct).
Build Job Templates
- Navigate to the Job Template sidebar menu and click "+" to create.
- Select the Item Name (finished product) from the item selector—the Item Code auto-populates.
- Save to initialize. Then navigate to the Options tab to select Process Templates for this production route.
- Enter a Group Name and click Add to generate the Process Group.
- Verify the assembled sequence under the Process Group tab.
Bulk Import (Optional)
- Navigate to Import Process Template to upload process templates from an external file via Excel/CSV.
Configuration & Settings
1. Machine Configuration
Machines are your physical production assets. Define them once, then reference them in Process Templates.
Creating Machines:
Navigate to the Machine menu and create entries for each piece of equipment.
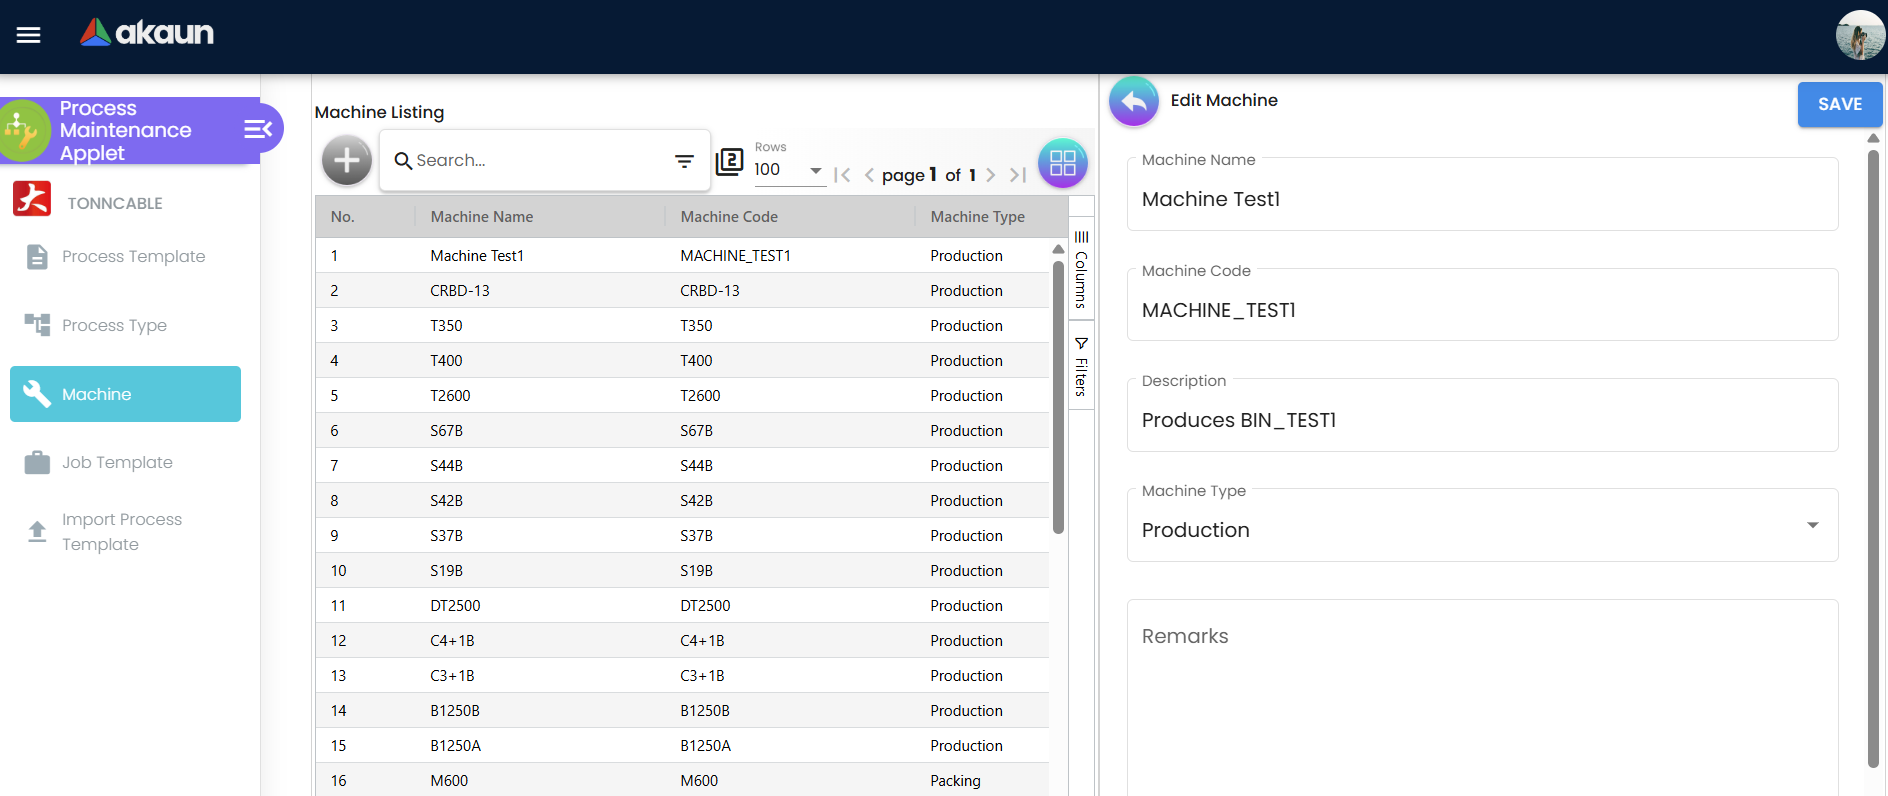
| Field | Description |
|---|---|
| Machine Name | Unique name for the machine (read-only after creation) |
| Machine Code | Unique identifier, auto-uppercased (read-only after creation) |
| Description | Free-text description of the machine |
| Machine Type | Dropdown selection for the machine category |
| Remarks | Additional notes |
2. Process Type Configuration
Process Types categorize your manufacturing operations and define their sequence in production flows. This is where you establish the order of operations.
Creating Process Types:
Navigate to the Process Type menu. Each Process Type represents a category of work.

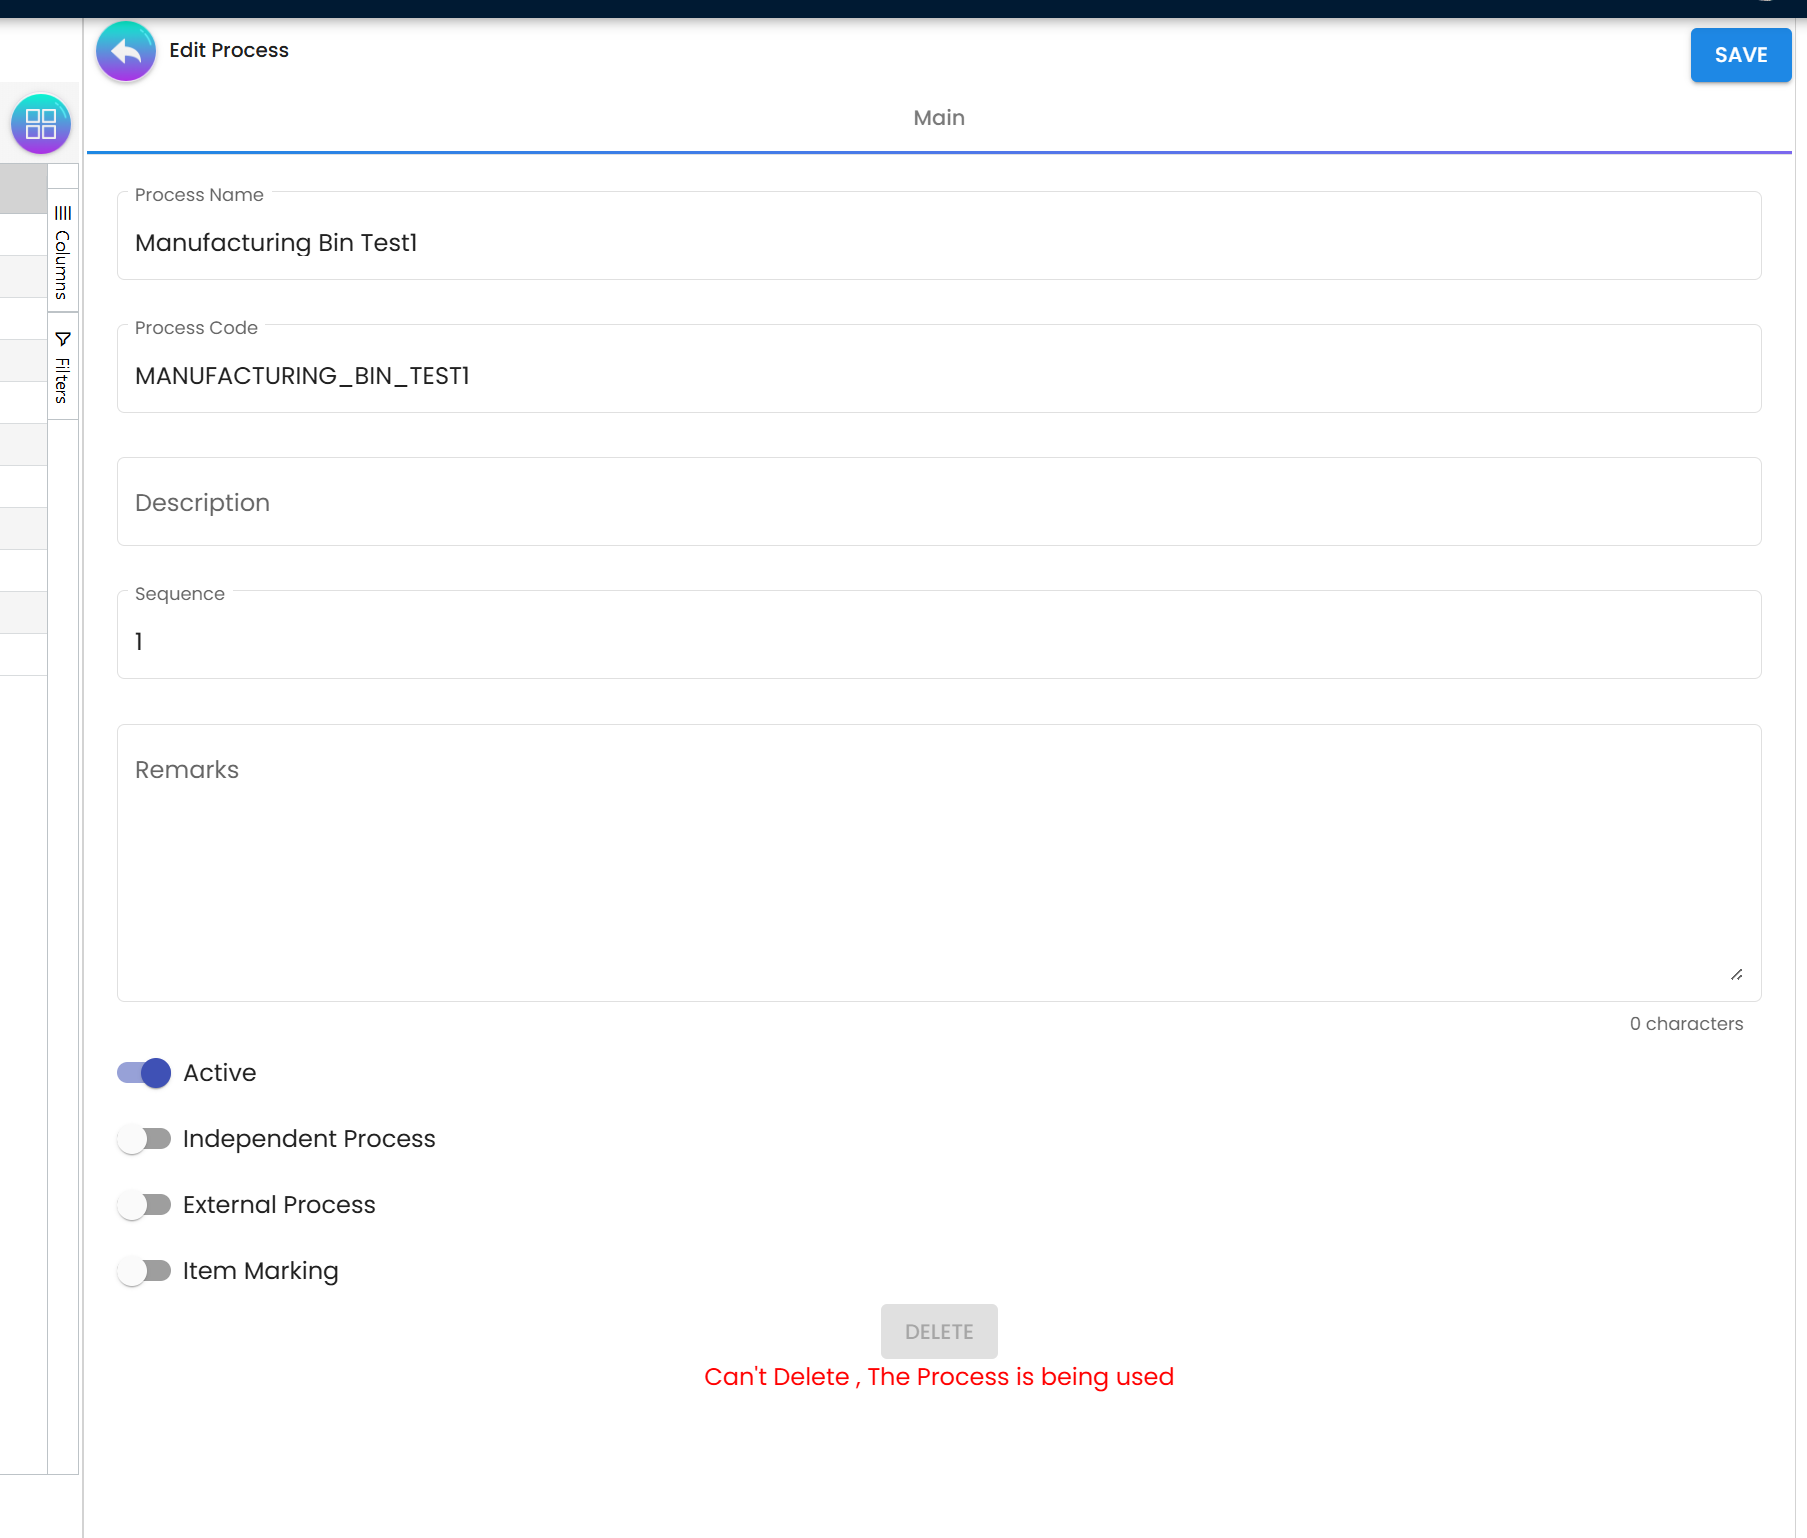
| Field | Description |
|---|---|
| Process Type Name | The operation category (Armoring, Bedding, Cabling, etc.) |
| Process Type Code | Unique identifier, auto-uppercased |
| Description | Free-text description |
| Sequence | Number determining default order in Job Templates. Lower = first. Use gaps (10, 20, 30) for flexibility. Validated for duplicates and invalid formats |
| Remarks | Additional notes |
| Active | Toggle to activate or deactivate the Process Type |
| Independent Process | Toggle for operations that don’t follow the standard sequence (e.g., maintenance, QC inspections) |
| External Process | Toggle for outsourced operations (visibility controlled by Field Settings: HIDE_EXTERNAL_PROCESS) |
| Item Marking | Toggle for item marking capability (visibility controlled by Field Settings: HIDE_ITEM_MARKING) |
3. Process Template Creation
Process Templates are individual manufacturing steps. Each one defines what goes in (inputs), what comes out (outputs), and which machines can perform the work.
Creating a Process Template:
Navigate to Process Template menu and create a new template.
Main Details Tab:
| Field | Description |
|---|---|
| Process Template Name | Descriptive name for the template (validated for uniqueness) |
| Process Type | Searchable dropdown to select from your defined Process Types |
| Template Type | PRODUCTION or PACKING — determines the type of manufacturing step |
| Item Marking | Text field (shown only when Item Marking is enabled for the selected Process Type) |
| Description | Free-text description |
Output Items Tab:
Add the item(s) this process creates. For each output:
- INV Item Code — Click to select from the item list
- UOM — Auto-populated from the item master
- Ratio — Quantity produced per cycle
- Description — Notes for this output item
ENABLE_MULTI_OUTPUT_PROCESS_TEMPLATE in Field Settings to allow multiple output items per template.Input Items Tab:
Add the materials consumed. Same fields as Output Items (INV Item Code, UOM, Ratio, Description).
Example: Table Assembly
Output: 1 Table (ratio = 1)
Inputs:
- 1 Table Top (ratio = 1)
- 4 Table Legs (ratio = 4)
- 8 Screws (ratio = 8)
- 1 Instruction Sheet (ratio = 1)Machine Used Tab:
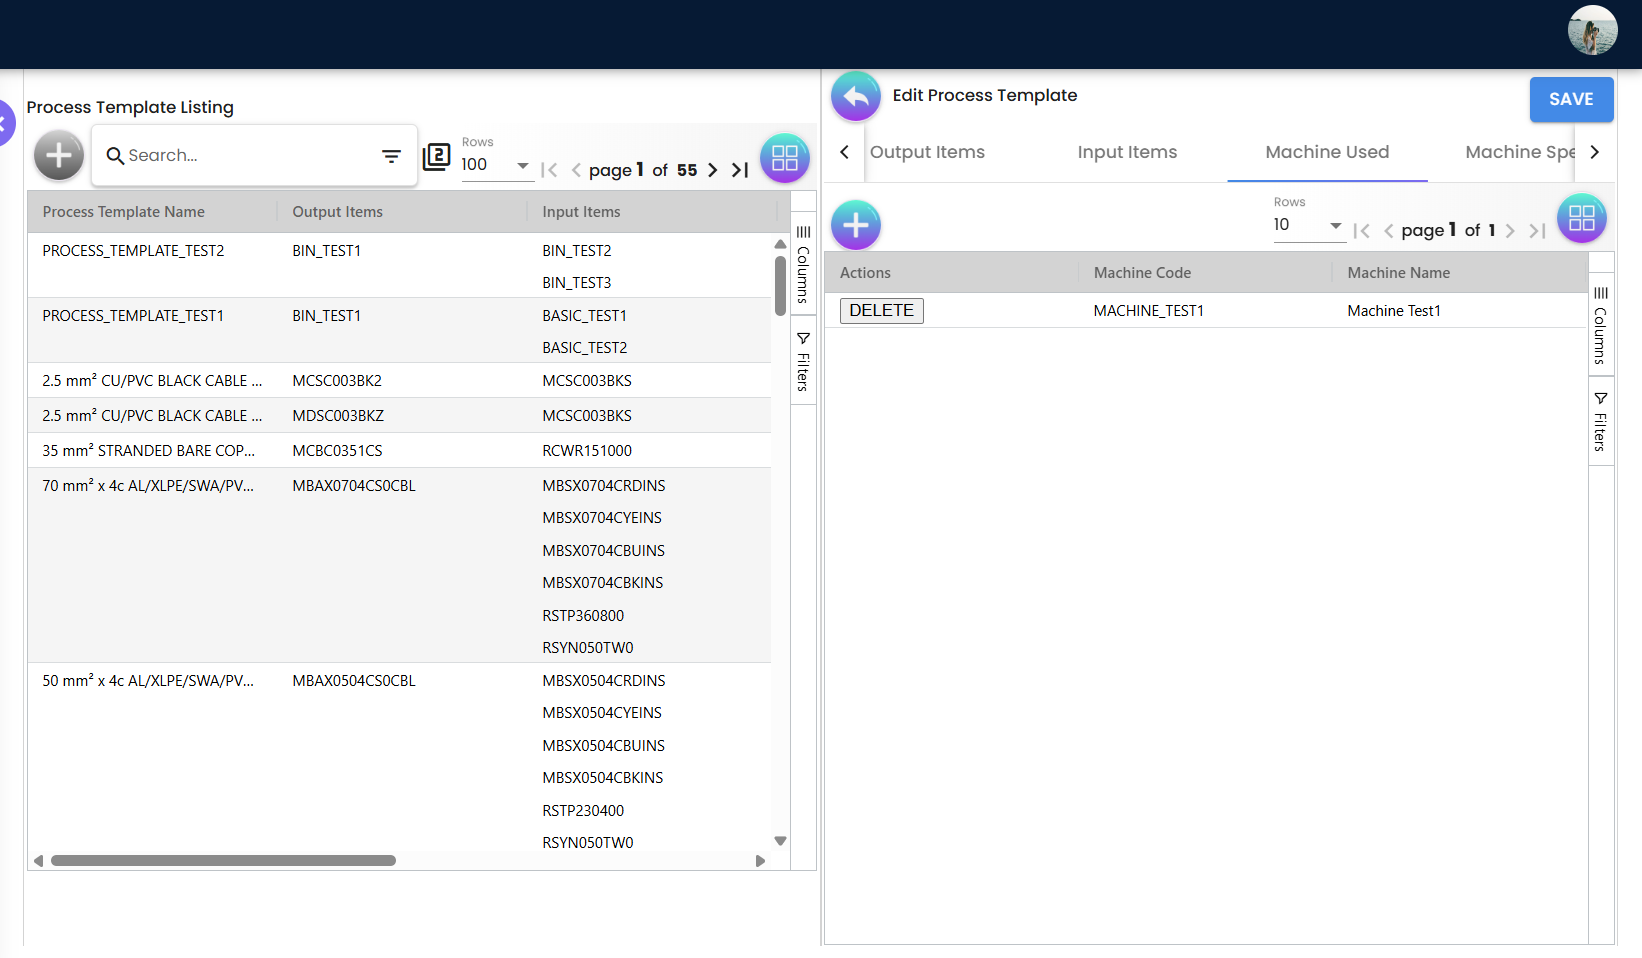
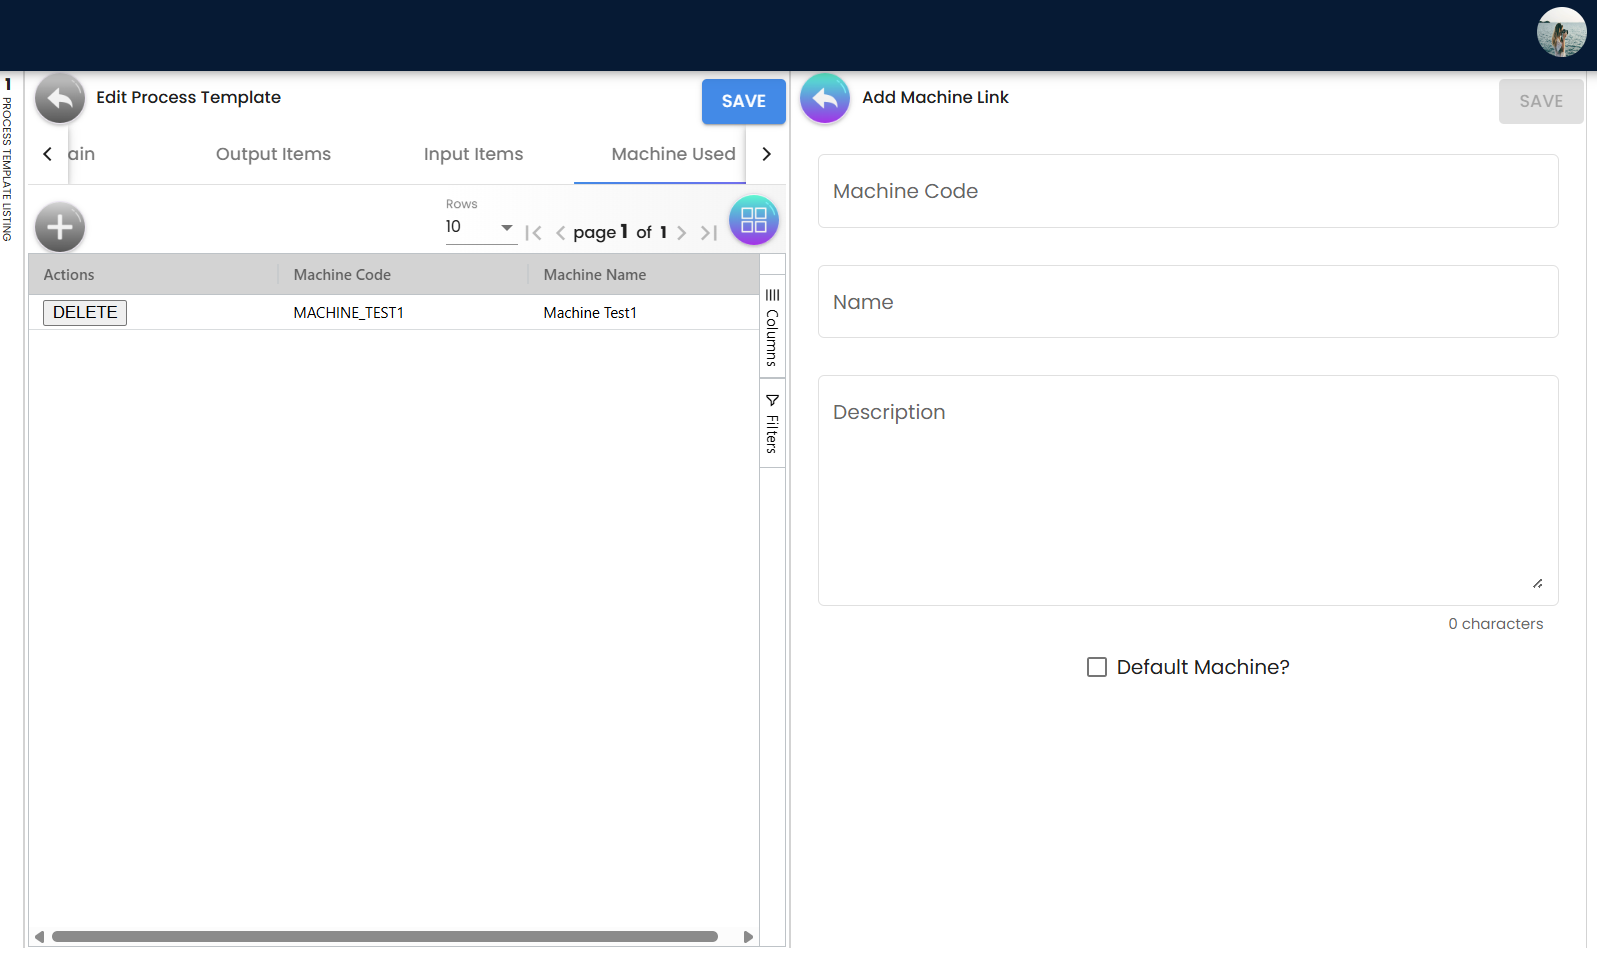
Select which equipment can perform this process. If multiple machines are capable, link all of them and set one as the default. The default machine is pre-selected when Job Orders are generated.
Machine Specifications Tab: {#machine-specifications}
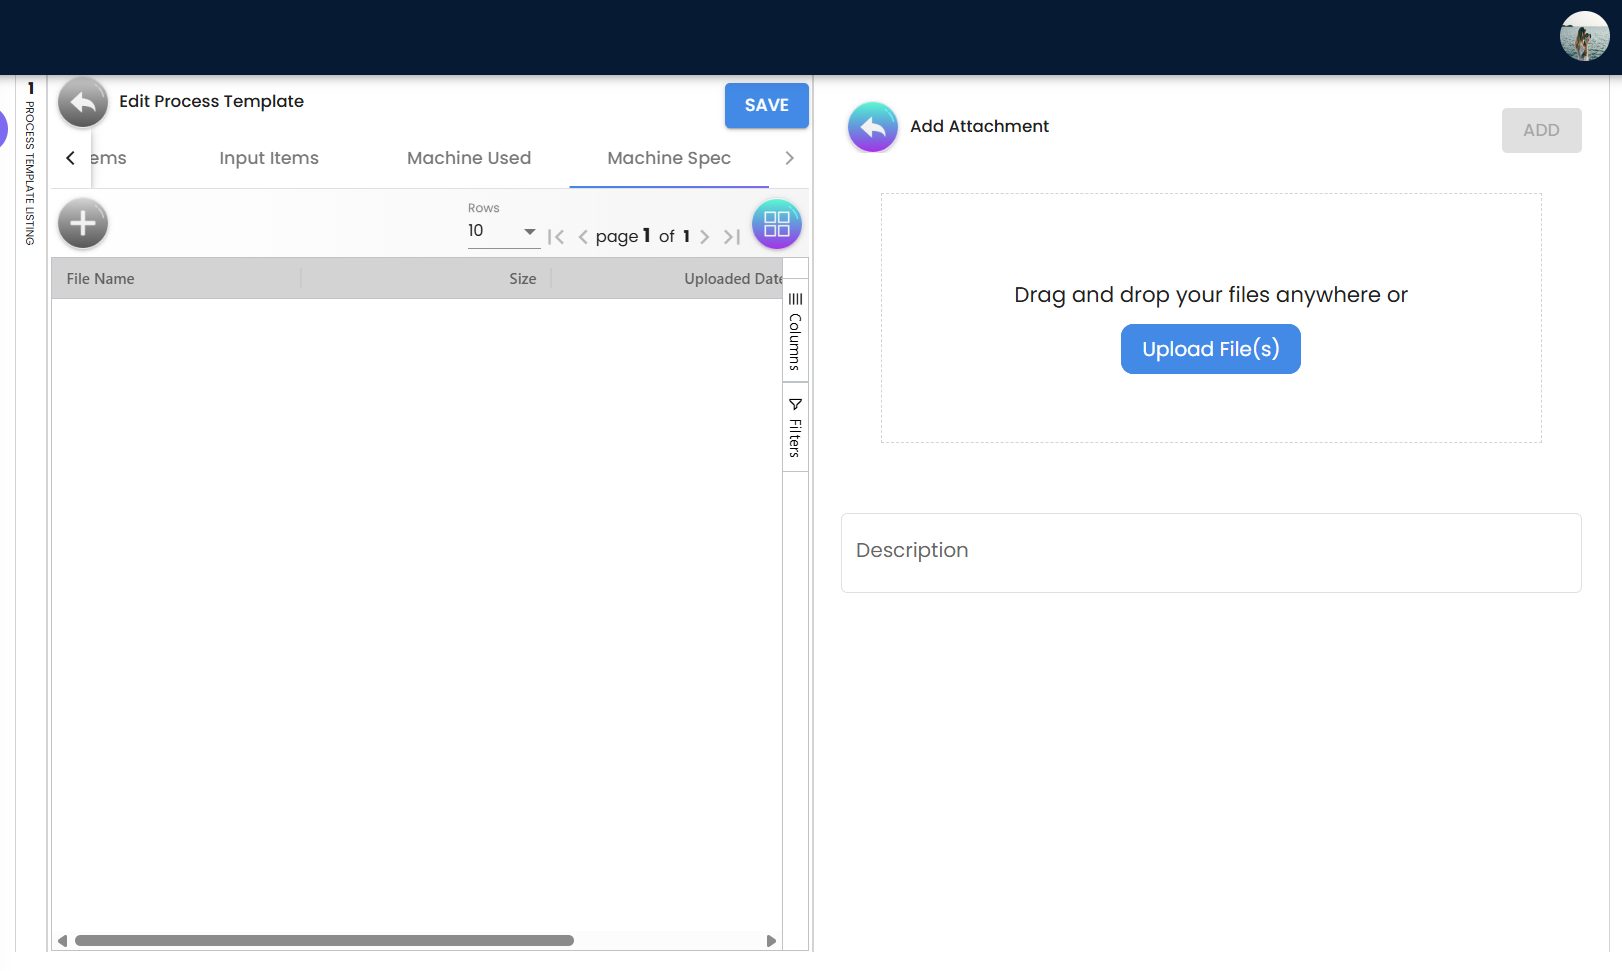
Attach documentation to the Process Template:
- Equipment manuals (PDF)
- Setup instructions
- Quality specifications
- Safety procedures
- Photos or diagrams
This keeps all process-related documentation in one place, accessible to operators and engineers.
Details Tab Ordering setting in Settings > Default Selection.4. Job Template Creation
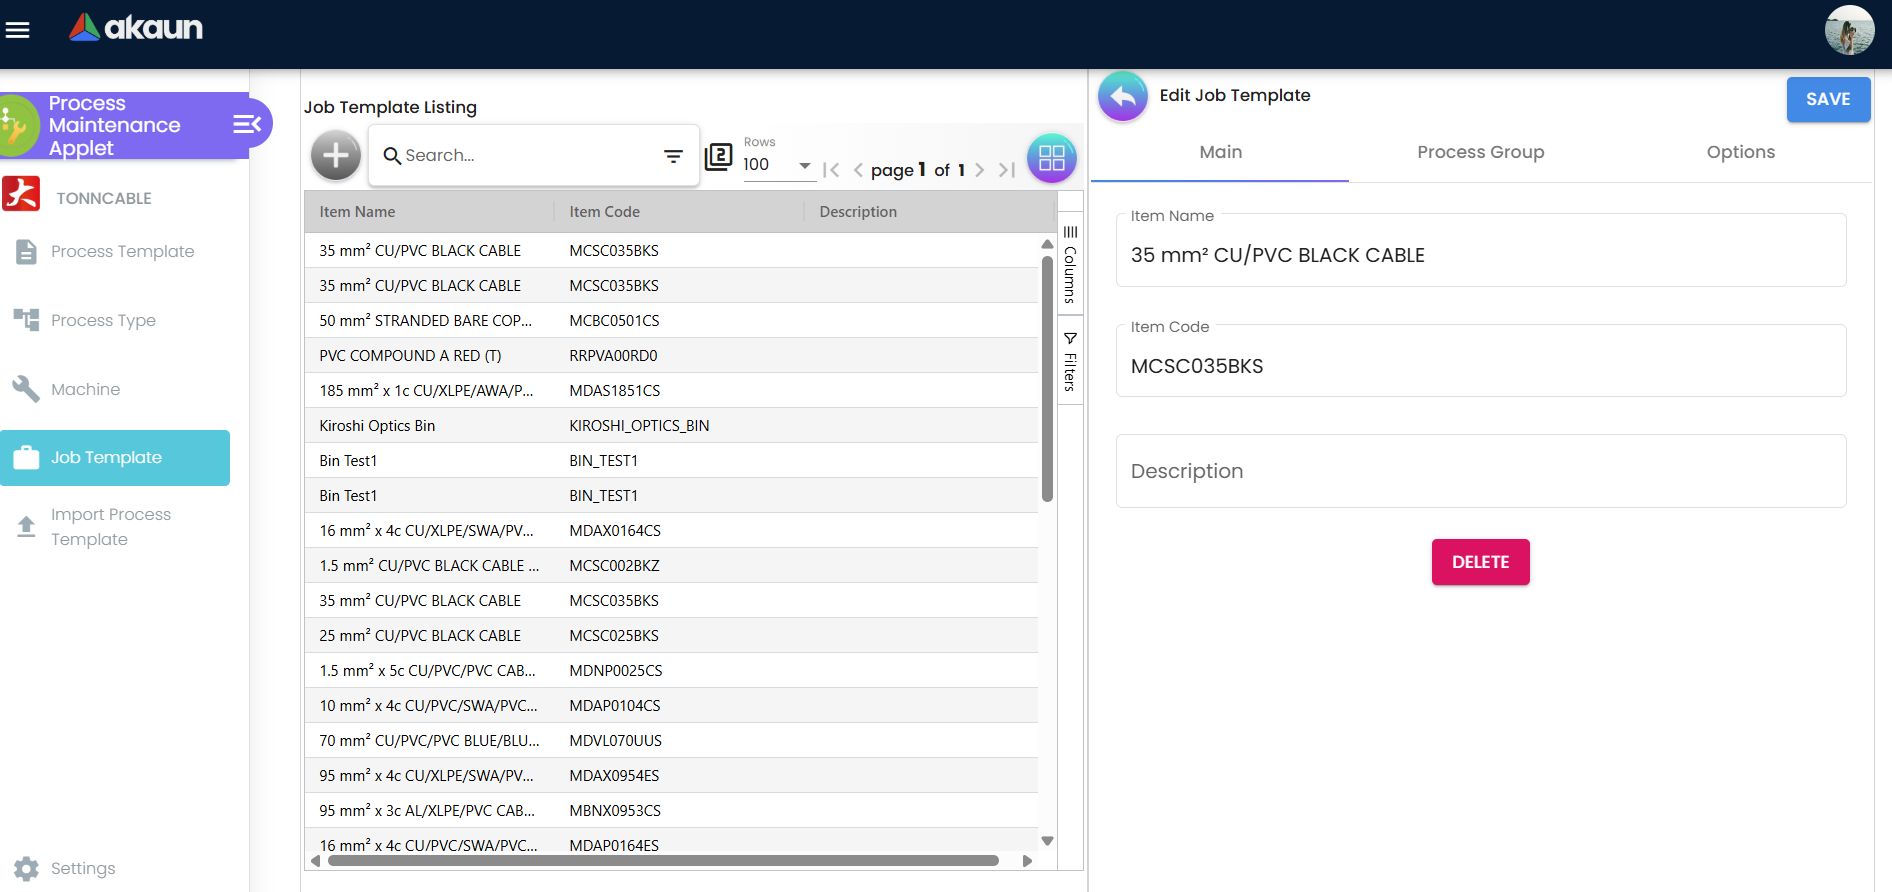
Job Templates combine multiple Process Templates into complete production sequences. This is your master recipe for making a finished product.
Creating a Job Template:
Navigate to Job Template menu and create a new template.
Main Tab:
| Field | Description |
|---|---|
| Item Name | Click to select the finished product from the item list |
| Item Code | Auto-populated from the selected item |
| Description | Free-text description |
Options Tab — Defining Production Variations:
A single product might have multiple ways to manufacture it—different process sequences, alternative materials, or quality levels. These are called “Options.”
The Options tab displays all available Process Templates. Select the ones needed for this production route.
To finalize a Process Group:
- Select the Process Templates for your Option
- Enter a Group Name (e.g., “Standard Armored Cable”, “Premium Finish Table”)
- Click Add to generate the Process Group
Process Group Tab:
View the finalized Process Groups with all their linked Process Templates in sequence. This is what appears in the Production Planning Applet when creating Job Orders.
5. Process Template File Import
For large-scale setups, you can bulk import Process Templates from external files instead of creating them one by one.
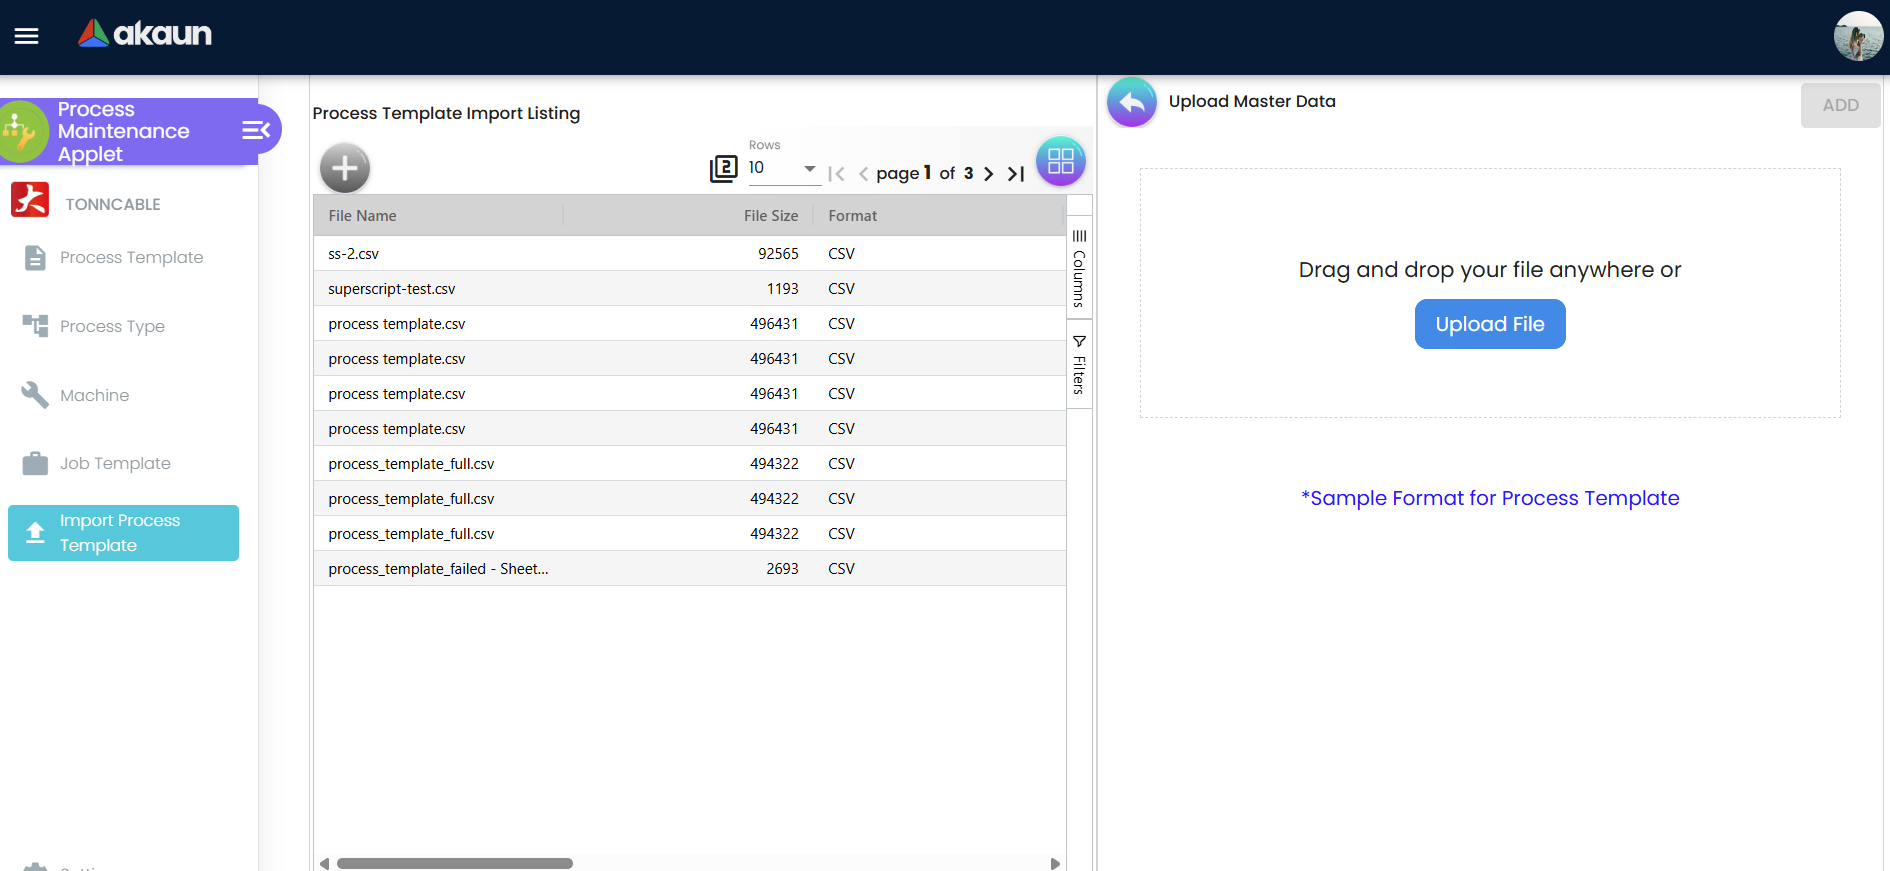
Navigate to the Import Process Template sidebar menu. The import interface follows a listing → create → edit pattern for managing import batches.
6. Settings
Access from Settings in the sidebar.
Feature Visibility (Settings > Feature Visibility)
Toggle the visibility of individual features within the applet. This is the default landing page when entering Settings.
Field Settings (Settings > Field Settings)
Configure field-level toggles organized by entity:
Process Type — Main Details:
| Toggle | Effect |
|---|---|
HIDE_EXTERNAL_PROCESS | Hides the “External Process” toggle from Process Type create/edit forms |
HIDE_ITEM_MARKING | Hides the “Item Marking” toggle from Process Type create/edit forms |
ENABLE MULTI OUTPUT PROCESS TEMPLATE | Allows multiple output items on a single Process Template |
Process Type — Item Categories:
Configure Category Group assignments with mandatory checkboxes for items.
Default Selection (Settings > Default Selection)
| Setting | Description |
|---|---|
| Default Branch | Pre-selects the branch for new records |
| Default Location | Pre-selects the location for new records |
| Details Tab Ordering | Drag-and-drop reordering of the Process Template edit view tabs |
Webhook (Settings > Webhook)
Configure webhook integrations for event-driven notifications and external system connectivity.
Permission Management
| Setting | Description |
|---|---|
| Permission Wizard | Guided setup for configuring permissions |
| Permission Sets | Define grouped permission rules |
| User Permissions | Assign permissions to individual users |
| Role Permissions | Assign permissions based on user roles |
7. Personalization
Access from Personalization in the sidebar. These are user-level overrides.
| Setting | Description |
|---|---|
| Default Selection | Set your personal default Branch and Location — overrides applet-level defaults |
| Sidebar | Customize which sidebar items are visible and their order |
Integration with Production Planning
Once your Process Maintenance configuration is complete, here’s how it flows into production:
In Production Planning Applet:
- Planner creates a Job Order
- Selects an item to produce
- System shows available Job Templates (Process Groups) for that item
- Planner selects a Job Template
- Clicks “Generate Process Instance”
- System creates individual Process Instances from your Process Templates
- Each Process Instance includes:
- Machine assignment (from your default machine)
- Input requirements (from your input ratios)
- Expected outputs (from your output ratios)
- Sequence (from your Process Type sequence)
Your configuration drives:
- Material requirements planning
- Machine capacity planning
- Production costing
- Inventory transactions
- Work instructions for operators
Frequently Asked Questions (FAQ)
1. Why can’t I find an item when adding inputs or outputs in the Process Template?
The item must exist in the Item Data Hub and be activated in Doc Item Maintenance. If you do not see it, double-check its status and spelling in those modules.
2. Why are my Process Templates appearing in the wrong order inside my Job Template?
The sequence is determined by the Process Type sequence numbers. Check your Process Types and adjust the numbers if necessary. Lower numbers are executed first.
3. I am unable to save my Job Template. What should I check?
Ensure that a default machine is selected in your referenced Process Templates, input and output items are defined, and that the Process Group name you entered does not already exist. The system validates for duplicate group names.
4. Why doesn’t the material consumption in the Job Order match our actual usage?
Your Process Template ratios may be inaccurate. Review the input/output ratios with your production team and ensure you account for natural waste and scrap before updating the ratios.
5. Why doesn’t my Job Template appear in the Production Planning Applet?
Make sure you have fully finalized the group by clicking Add in the Options tab. Also ensure that the output item matches the item configured in the Job Order, and the Job Template was saved successfully.
6. What is the difference between PRODUCTION and PACKING template types?
When creating a Process Template, you must select a Template Type. PRODUCTION is for primary manufacturing steps (cutting, assembly, processing), while PACKING is for packaging and finishing operations. This classification helps organize and filter templates.
7. I cannot delete a Machine or Process Type. Why?
The system prevents deletion of Machines and Process Types that are currently linked to Process Templates. You will see a “Can’t Delete, The Machine/Process is being used” message. Remove the references in the linked Process Templates first.
8. How do I enable multiple output items on a Process Template?
By default, each Process Template supports a single output. To allow multiple outputs, go to Settings > Field Settings and enable the ENABLE MULTI OUTPUT PROCESS TEMPLATE toggle.