Chart of Account Applet
Purpose and Overview
The Chart of Account Applet is the architectural backbone of your financial system. It provides a centralized interface to define, structure, and control the complete hierarchy of your organization’s financial ecosystem—from high-level Companies and Sets of Books down to granular General Ledger (GL) Codes and Categories.
Key Features Overview
Who Benefits from This Applet?
Finance Managers:
- Full control over the financial reporting structure
- Granular management of Fiscal Years with specific locking mechanisms (
LOCK_GL,LOCK_TXN,LOCK_ALL) - Tools to merge or restructure GL codes as the business evolves using the “Merge” workflow
- Detailed visibility into the hierarchy of accounts
Accountants & Bookkeepers:
- Quick lookup and verification of GL Codes via the Chart search
- Streamlined creation of new accounts when needed
- Clear understanding of account categorizations for accurate journal entries
- Efficient bulk updates via file imports for Categories and Codes
System Administrators:
- Centralized configuration of Company and Set of Books entities
- Role-based permission management for sensitive financial data
- Audit logging for all structural changes
- Integration configuration via webhooks
Executive Leadership:
- Standardized financial structure across all business units
- Consistent reporting and analysis
- Compliance with regulatory requirements
- Clear audit trail for financial decisions
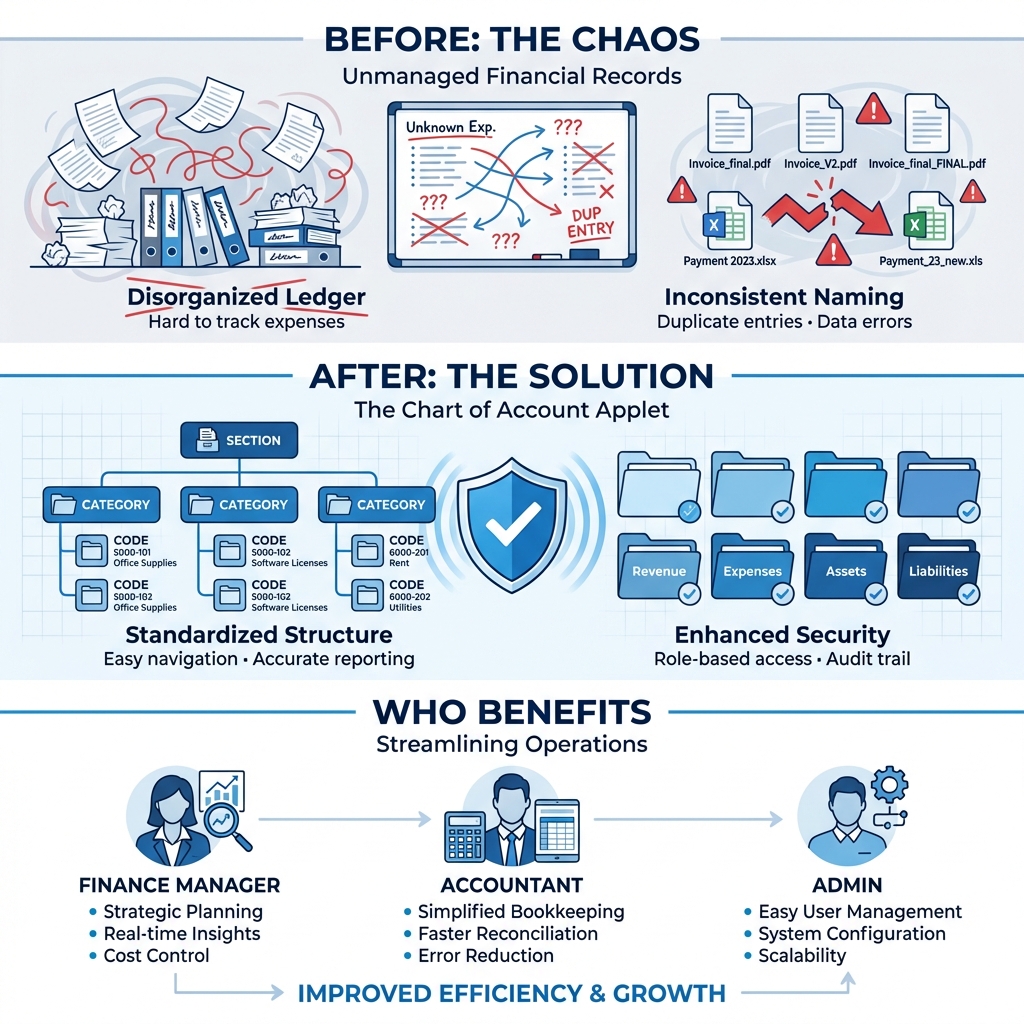
What Problems Does This Solve?
The Disorganized Ledger Problem:
Without a centralized and disciplined system, financial accounts can become fragmented, inconsistent, and duplicated. Common issues include:
- Inconsistent account naming conventions
- Duplicate GL codes for the same purpose
- Difficulty in rolling up data for financial reports
- Complexities in managing fiscal periods across different entities
- Manual errors in account classification
The Chart of Account Applet Solution:
- Structured Hierarchy - Enforces a clear
Section → Category → Coderelationship - Unified Management - Manage multiple Companies and Sets of Books in one place
- Flexible Maintenance - Easily merge duplicates with a guided “Source → Target” workflow
- Fiscal Control - Precise definition of financial periods with 4-level locking status
- Automated Imports - Bulk upload capabilities to set up or migrate accounts quickly
- Multi-Dimensional Analysis - Segments, Dimensions, Profit Centers, and Projects for granular reporting
A short introduction to Chart of Account Applet:
Key Features Overview
Sidebar Menu Reference
A quick guide to every option available in the applet’s sidebar.
| Menu Item | Description |
|---|---|
| Chart of Account | The main hierarchical tree view. Includes tabs for Details, GL Code Link, GL Code, Segment Tree, Dimension Tree, Profit Center Tree, and Project Tree. |
| GL Section | Define main reporting sections (Assets, Liabilities, etc.). |
| GL Category | Group accounts within sections. Includes tabs for Details (Name, Account No.) and GL Code (create codes directly here). |
| Import GL Category | Bulk upload categories via CSV/Excel. |
| GL Code | List view of all General Ledger codes with search and edit tools. |
| Import GL Code | Bulk upload GL codes to populate your chart quickly. |
| Companies | Manage legal entities. Includes tabs for Main (read-only info), Ledgers (create ledgers & sub-ledgers), Fiscal Year, and Default GL Codes. |
| Set Of Books | Define accounting books. Includes tabs for Details and Ledgers (link existing ledgers). |
| Fiscal Year | Configure financial years. Includes tabs for Main (name) and Fiscal Period (dates, closing status). |
| GL Code Merge | Tool to consolidate duplicate accounts by moving history. |
| GL Code Create Item | Utility to auto-generate system Items linked to specific GL Codes. |
Key Concepts
Key Terms
| Term | Description |
|---|---|
| GL Section | The top-level grouping for financial statement presentation (e.g., Assets, Liabilities, Equity, Revenue, Expenses). |
| GL Category | A sub-grouping within a section that organizes related accounts together (e.g., “Current Assets”, “Fixed Assets”). |
| GL Code | The individual account used for recording transactions (e.g., “1001 - Petty Cash”, “1102 - Cash at Bank”). |
Understanding the Financial Hierarchy
At the heart of the applet is a strict 3-level hierarchy designed to ensure accurate financial reporting.
| Level | Component | Purpose | Example |
|---|---|---|---|
| Level 1 | GL Section | The highest grouping for financial statements | Assets, Liabilities, Equity, Revenue |
| Level 2 | GL Category | Logical groupings within a section for subtotals | Current Assets, Fixed Assets, Operating Exp |
| Level 3 | GL Code | The actual transactional bucket | 1000-01 Petty Cash, 5000-01 Sales - East |
Visual Hierarchy:
Organization
│
├── GL Section (Level 1) ──→ Assets, Liabilities, Equity, Revenue, Expenses
│   │
│   └── GL Category (Level 2) ──→ Current Assets, Fixed Assets, Trade Debtors
│       │
│       └── GL Code (Level 3) ──→ 1000-01 Petty Cash, 1010-01 Bank ABC
│
├── Company ──→ Legal entity with currency and fiscal settings
│   │
│   └── Set of Books ──→ Accounting book container
│       │
│       └── Ledgers & Sub-Ledgers ──→ Detailed transaction tracking
│
└── Fiscal Year ──→ Accounting periods with locking controls
    │
└── Fiscal Periods ──→ Monthly/custom periods with status controlsThe “Core Triangle” of Chart of Accounts
To effectively manage the system, understand how GL Sections, GL Categories, and GL Codes work together:
| Component | Analogy | Definition | Example |
|---|---|---|---|
| GL Section | The “Chapter” | Top-level grouping for financial statement presentation | Assets |
| GL Category | The “Subchapter” | Logical grouping for subtotals and organization | Current Assets |
| GL Code | The “Account” | The actual bucket where transactions are recorded | 1001 - Petty Cash |
How they link:
- You create a GL Section (e.g., Assets)
- You create a GL Category under that section (e.g., Current Assets)
- You create GL Codes within the category (e.g., 1001 Petty Cash, 1002 Cash at Bank)
- When transactions are posted, they go to the GL Code, which rolls up to Category, then to Section
Fiscal Control Logic
The system uses a 4-tier locking mechanism to protect your financial data integrity:
| Status | Meaning | Who can post? | Use Case |
|---|---|---|---|
| OPEN | Period is fully active | Everyone (Auto-posting & Manual Journals) | Current active period |
| LOCK_GL | General Ledger is locked | System Only. Invoices/Bills can still post, but manual journals are blocked | Month-end soft close |
| LOCK_TXN | Transactions are locked | No operational documents (Invoices, etc.) can be created for this date | Cut-off enforcement |
| LOCK_ALL | Hard Close | The period is finalized. No changes allowed | Year-end close |
LOCK_ALL, it cannot be reopened without admin intervention. Always verify all transactions are complete before hard closing.Quick Start Guide
Get your financial structure ready with these essential workflows.
For Admins: Initial Organization Setup
Goal: Establish the legal and accounting entities for the system.
Verify Company Details (
Sidebar > Companies):- Verify the Company Code, Name, Registration No, and Currency in the Main tab.
Create Ledgers (
Companies > Ledgers):- Create the financial ledgers for the company.
- Required Fields: Ledger Code, Ledger Name, Ledger Type (Primary/Secondary/Consolidated), Currency.
- Note: A company can have multiple ledgers, but typically one Primary ledger is required.
Configure Defaults (
Companies > Default GL Codes):- Prerequisite: Ensure your Chart of Accounts has GL Codes created. If this is a new setup, you may need to import or create GL Codes first (see “Build the Hierarchy” section).
- Map critical Default GL Codes to ensure automation works. This is split into several tabs:
- General: Retained Earnings, Profit/Loss, Non-Stock & Trade-In, Fixed Asset Register, Rounding, Settlement Charges.
- Entity: Trade/Non-Trade Debtor & Creditor accounts, Merchant Receivable/Payable, Employee Payable.
- Sales/Purchase: Sales/Purchase accounts, Returns, Discounts, Tax accounts.
- Stock: Stock Adjustment, Reset MA, Stock Balance, COGS, Inventory Not Invoiced, Raw Material/WIP/Finished Goods/NSTI Stock & COGS.
- Forex: Forex Gain, Forex Loss.
- Consignment: Consignment Stock, Consignment Liability.
Create Set of Books (
Sidebar > Set Of Books):- Create a Set of Books by providing a Name.
- Navigate to the Ledgers tab to link your created Ledgers to this Set of Books.
Set Fiscal Year (
Sidebar > Fiscal Year):- Select the Company.
- Enter a Name for the fiscal year (e.g., “FY 2024”).
- Define the Date Start and Date End.
- The system will auto-generate the fiscal periods.
For Finance Managers: Build the Hierarchy
Goal: Create the account structure for daily operations.
Review Sections (
Sidebar > GL Section):- GL Sections typically come pre-populated (e.g., Current, Fixed Assets, Long Term Liabilities, Equity, Revenue, Expenses).
- You can create new sections or edit existing ones to update their Name or Account No.
- Editable Fields: Name, Account No.
Create Categories (
Sidebar > GL Category):- Create categories to group accounts (e.g., “Current Assets”, “Fixed Assets”).
- Required Fields: GL Category Code (immutable after creation), GL Category Name.
- Optional Fields: Description, Account No.
- Note: Categories are created independently. To link a Category to a Section, edit the Category and use the GL Section tab to assign it.
Link Categories to Sections (
GL Category > Edit > GL Section tab):- Open the GL Category you created.
- Navigate to the GL Section tab.
- Add the appropriate GL Section to establish the hierarchy.
- This is how the system knows that “Current Assets” belongs under “Assets”.
Add GL Codes (
Sidebar > GL CodeorChartview):- Create individual accounts (e.g., “1001 - Petty Cash”).
- Required Fields: GL Code (immutable after creation), GL Name, Chart of Account, GL Category.
- Optional Fields: Description, Account No.
Example Structure:
1000 - Assets                    (GL Section)
├── 1100 - Current Assets        (GL Category, linked to Assets via GL Section tab)
│   ├── 1101 - Petty Cash        (GL Code)
│   ├── 1102 - Cash at Bank - ABC
│   ├── 1103 - Cash at Bank - XYZ
│   └── 1110 - Trade Debtors
├── 1500 - Fixed Assets          (GL Category, linked to Assets via GL Section tab)
│   ├── 1501 - Office Equipment
│   ├── 1502 - Motor Vehicles
│ └── 1510 - Accumulated DepreciationFor Accountants: Daily Maintenance
Goal: Maintain accuracy of the accounts.
Lookup Codes: Use the Chart view to quickly find the correct GL code for a transaction
Create New Codes (
Sidebar > GL Code):- Select Chart of Account and Category
- Enter GL Code number and name
Merge Codes (
Sidebar > GL Code Merge):- If duplicates are found:
- Select the Chart of Account
- Select the GL Category
- Select Source GL Code (the duplicate)
- Select Target GL Code (the correct one)
- Click MERGE, then CLICK AGAIN TO CONFIRM
- All history moves to Target; Source is deactivated
- If duplicates are found:
Fiscal Closing (
Sidebar > Fiscal Year):- At month-end, open the Fiscal Year
- Navigate to the Fiscal Period tab
- Click on the specific period row to open Fiscal Period Details
- Change the Closing Status dropdown (
OPEN→LOCK_GL,LOCK_TXN, orLOCK_ALL) - Click SAVE
Chart of Accounts Management
Tree View - Your Financial Map
Menu: Chart of Account
The main hierarchical view showing your complete account structure.
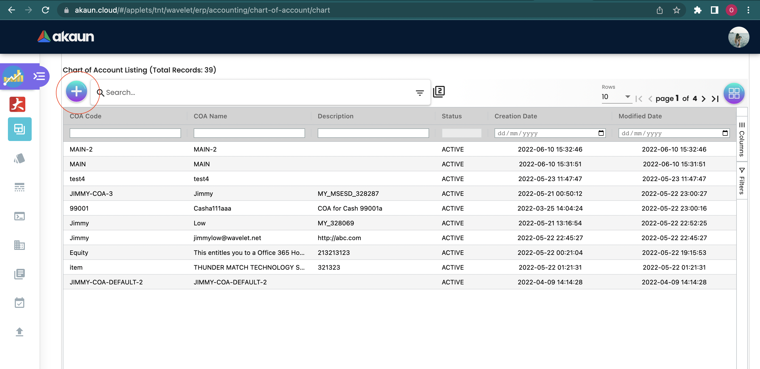
What You Can Do:
- ✓ Drill-down from Section → Category → Code
- ✓ Quick audit for misclassified accounts
- ✓ Search and filter accounts
- ✓ Create new Charts of Account
- ✓ Delete a Chart of Account (with confirmation)
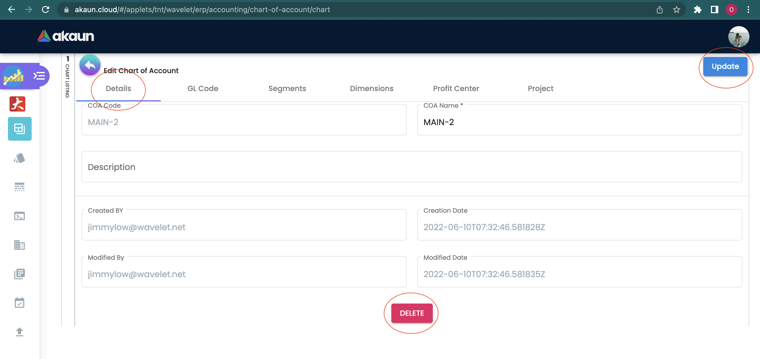
Creating a Chart of Account:
- Required Fields: COA Code (immutable after creation), COA Name
- Optional Fields: Description
Tabs Available When Editing a Chart:
| Tab | Purpose |
|---|---|
| Details | COA Code (read-only), COA Name, Description. Also shows audit trail (Created By/Date, Updated By/Date) |
| GL Code Link | Select a GL Code from the dropdown and Add or Delete the link |
| GL Code | View all GL Codes within this Chart |
| Segment Tree | Manage reporting segments — used to tag transactions by business unit (e.g., Retail, Wholesale, Online) |
| Dimension Tree | Manage custom dimensions — flexible tags for cost tracking (e.g., Department, Region, Branch) |
| Profit Center Tree | Manage profit centers — track revenue and expenses per unit for P&L analysis (e.g., KL Branch, Penang Branch) |
| Project Tree | Manage projects — track financial data by project (e.g., “Office Renovation”, “System Upgrade”) |
Note: Tab order is configurable via Applet Settings (
CHART_OF_ACCOUNT_DETAILS_TAB_ORDER).
Segments Tab
In accounting, segments classify transactions by distinct operational divisions — such as business units, regions, or product lines — allowing financial reports to be broken down by each segment independently.
Add reporting segments to your COA for multi-dimensional analysis.
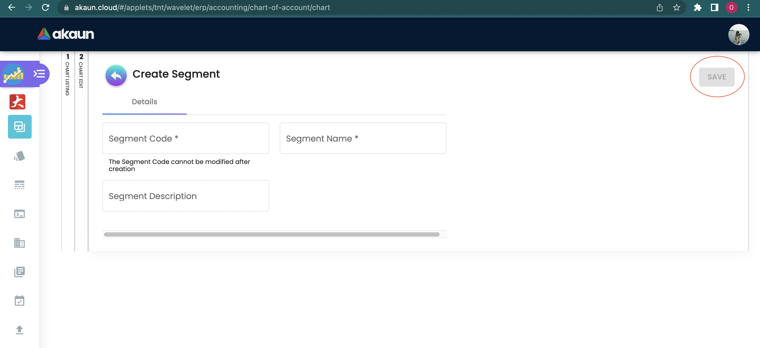
Required Fields: Segment Code (immutable after creation), Segment Name
Optional Fields: Description, Parent Segment (searchable dropdown, select “No Parent” for top-level)
Additional Fields: Ref 1 - Ref 5 (Code, Name, Description) for advanced tagging.
Editable After Creation: Segment Name, Description, Status, Parent Segment, Reference Fields
Use Cases:
- Track by Business Unit (e.g., Retail, Wholesale)
- Track by Region (e.g., North, South, East, West)
- Track by Product Line
Dimensions Tab
In accounting, dimensions (also called analysis dimensions) provide a flexible tagging system for transactions. Unlike the fixed GL Code hierarchy, dimensions let you cross-cut financial data by categories like departments, cost centers, or campaigns — without duplicating GL Codes.
Add custom dimensions for advanced reporting.
Required Fields: Dimension Code (immutable after creation), Dimension Name
Optional Fields: Description, Parent Dimension (searchable dropdown, select “No Parent” for top-level)
Additional Fields: Ref 1 - Ref 5 (Code, Name, Description) for advanced tagging.
Editable After Creation: Dimension Name, Description, Status, Parent Dimension, Reference Fields
Use Cases:
- Cost Centers (Marketing, Operations, IT)
- Product Categories
- Customer Segments
Profit Center Tab
In accounting, a profit center is any unit within an organization that generates its own revenue and bears its own costs. Assigning transactions to profit centers enables individual P&L statements per branch, department, or business line.
Define profit centers for departmental P&L tracking.
Required Fields: Profit Center Code (immutable after creation), Profit Center Name
Optional Fields: Description, Parent Profit Center (searchable dropdown, select “No Parent” for top-level)
Additional Fields: Ref 1 - Ref 5 (Code, Name, Description) for advanced tagging.
Editable After Creation: Profit Center Name, Description, Status, Parent Profit Center, Reference Fields
Use Cases:
- Department-level profitability
- Branch performance analysis
- Business unit comparison
Project Tab
In accounting, project tracking captures all revenue and expenses tied to a specific initiative — such as construction, a client engagement, or an internal upgrade — allowing organizations to monitor project-level profitability and budgets separately from day-to-day operations.
Track financial data by project.
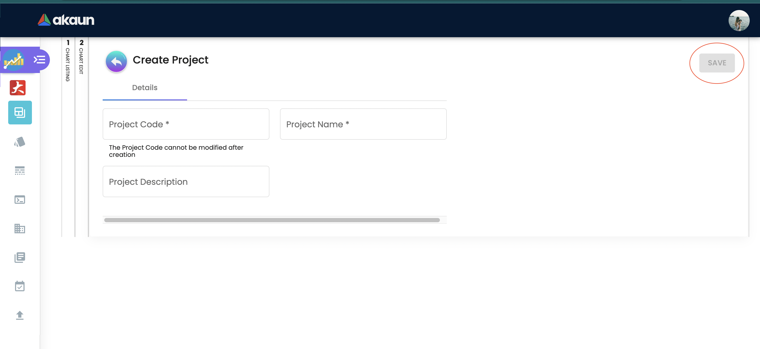
Required Fields: Project Code (immutable after creation), Project Name
Optional Fields: Description, Parent Project (searchable dropdown, select “No Parent” for top-level)
Additional Fields: Ref 1 - Ref 5 (Code, Name, Description) for advanced tagging.
Editable After Creation: Project Name, Description, Status, Parent Project, Reference Fields
Use Cases:
- Capital expenditure projects
- Client engagements
- Internal initiatives
Master Data Management
GL Section
Menu: GL Section
Define the main reporting sections that appear on financial statements.
Standard Sections:
| Section | Code Range | Purpose |
|---|---|---|
| Assets | 1000-1999 | What the company owns |
| Liabilities | 2000-2999 | What the company owes |
| Equity | 3000-3999 | Owner’s stake in the company |
| Revenue | 4000-4999 | Income from operations |
| Expenses | 5000-9999 | Costs of operations |
GL Category
Menu: GL Category
Group accounts within sections for organized reporting.
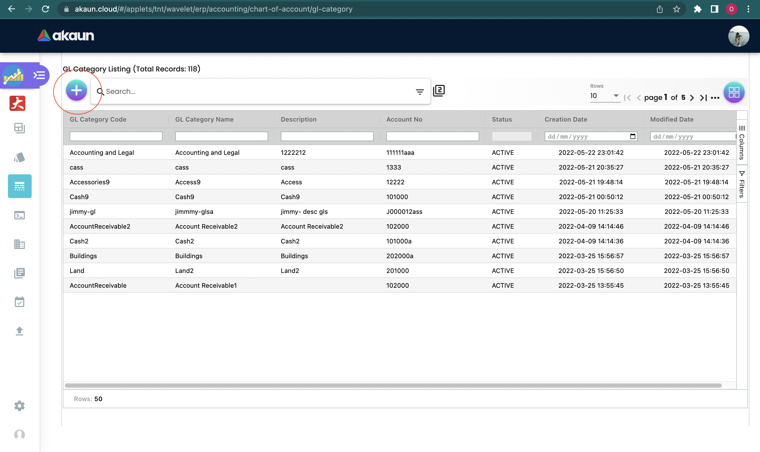
When you click on a GL Category, you access three tabs:
Details Tab:
- GL Category Code - Read-only after creation
- GL Category Name - Editable
- Chart of Account - Editable (move category to different COA)
- GL Category - Parent category (for sub-categories)
- Description - Editable
- Account No. - Editable
GL Code Tab:
- Create GL Codes directly from within a Category (Category is auto-selected)
- GL Codes created here also appear in the GL Code module
GL Section Tab:
- Link the Category to a specific GL Section
GL Code
Menu: GL Code
The primary workspace for managing individual accounts.
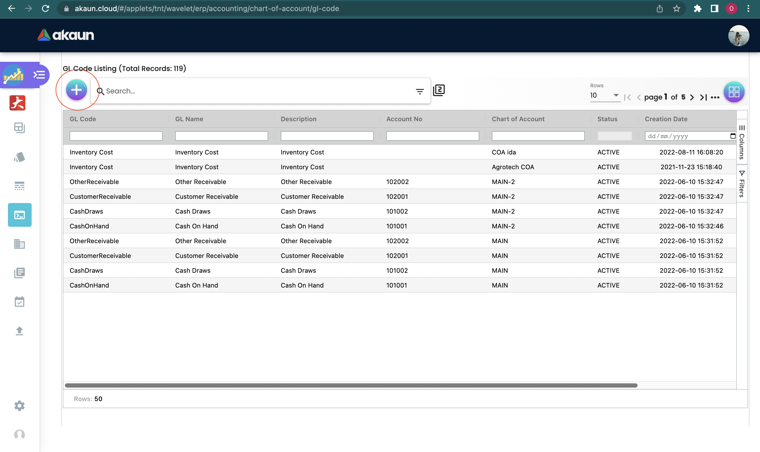
Required Fields for GL Code Creation:
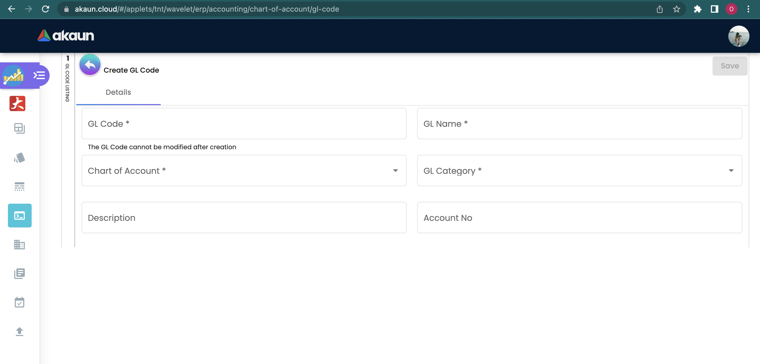
| Field | Required |
|---|---|
| GL Code | ✓ (cannot be modified after creation) |
| GL Name | ✓ |
| Chart of Account | ✓ (Select from the list of COAs) |
| GL Category | ✓ (Select from GL Categories module) |
| Description | Optional |
| Account No. | Optional |
| Status | Editable (dropdown) |
Tabs Available When Editing a GL Code:
| Tab | Purpose |
|---|---|
| Details | GL Code, GL Name, Chart of Account, GL Category, Description, Account No., Status, audit trail |
| Chart of Account Link | Link this GL Code to one or more Charts of Account |
Organization Setup
Company Management
Menu: Companies
Companies are automatically listed after the Chart of Accounts is selected in the Organization Applet.
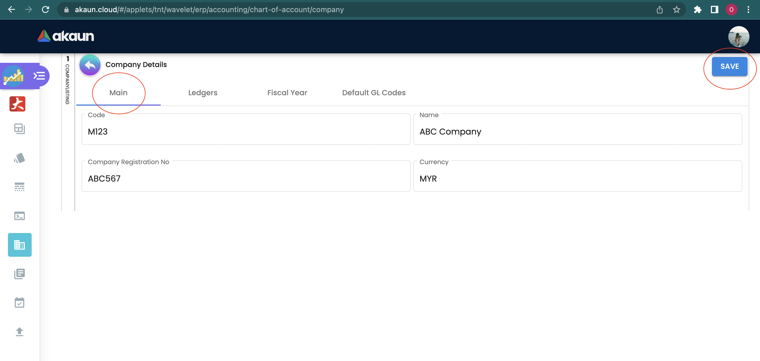
Main Tab:
- Company Code - Read-only
- Company Name - Editable
- Company Registration No. - Editable
- Currency - Editable (searchable dropdown)
- Tax ID - Editable
- SST ID - Editable
- Chart of Account - Editable (dropdown)
- Inventory Cost Base On - Editable (dropdown)
Ledgers Tab:
In accounting, a ledger is the principal book (or digital record) that contains all financial transactions for a company. Sub-ledgers break this down further by individual GL Code for detailed tracking.
Create and manage company ledgers.
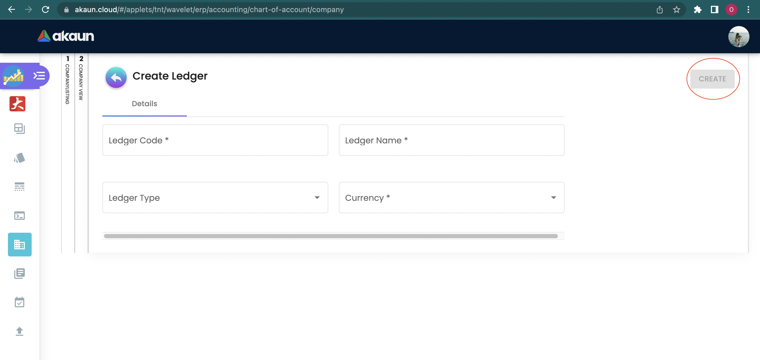
Required Fields: Ledger Code, Ledger Name, Ledger Type (Primary/Secondary/Consolidated), Currency
After creation, click on the Ledger to access:
Opening Balance Tab (Primary Ledgers only):
- Enter opening balances for GL Codes linked to this ledger
Remove Journal Tab:
- Remove journal entries associated with this ledger
Fiscal Year Tab:
- View the list of fiscal years associated with this Company
Default GL Codes Tab:
Critical configuration for system automation.
| Tab | GL Codes |
|---|---|
| General | Retained Earnings, Profit/Loss, NSTI, Fixed Asset Register, Rounding, Settlement Charges |
| Entity | Trade Debtor/Creditor, Non-Trade Debtor/Creditor, Trade Not Invoiced Debtor/Creditor, Non-Trade Not Invoiced Debtor/Creditor, Merchant Receivable/Payable, Employee Other Payable |
| Sales | Sales, Sales Return, Sales Discount, Output Tax |
| Purchase | Purchase, Purchase Return, Purchase Discount, Input Tax |
| Stock | Stock Adjustment, Reset MA, Stock Balance, COGS, Inventory Not Invoiced, Raw Material (Stock Value + COGS), WIP (Closing + COGS), Finished Goods (Closing + COGS), NSTI (Closing + COGS) |
| Forex | Forex Gain, Forex Loss |
| Consignment | Consignment Stock, Consignment Liability |
Set of Books Management
Menu: Set Of Books
In accounting, a Set of Books is a complete, self-contained accounting record — grouping one or more ledgers together for a specific reporting purpose (e.g., statutory reporting, management reporting, or multi-currency consolidation).
Details Tab:
- Name - Editable
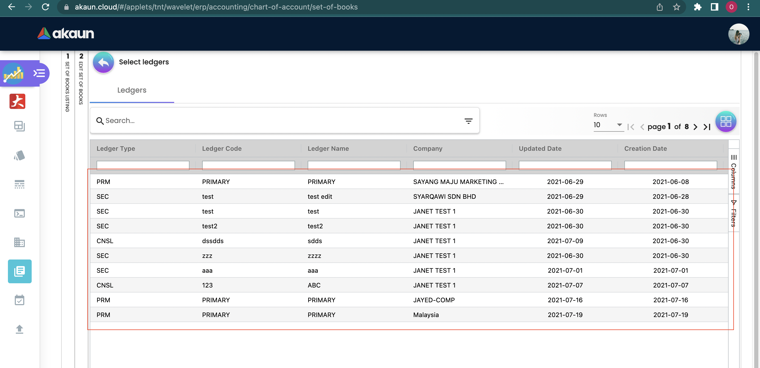
Ledgers Tab:
- Link existing Ledgers (created in Companies module) to the Set of Books
- Select from available Ledgers to add or remove from the Set of Books
Fiscal Year Management
In accounting, a fiscal year defines the 12-month period used for financial reporting and tax purposes. It may or may not align with the calendar year. Fiscal periods (usually monthly) within the year can be individually locked to prevent changes to finalized data.
Menu: Fiscal Year
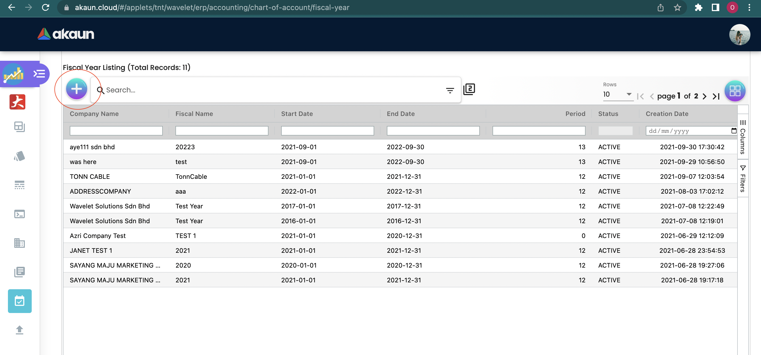
Creating a New Fiscal Year
Required Fields:
- Company
- Name
- Start Date
- End Date
The system automatically generates fiscal periods based on your date range.
Fiscal Period Management
Each fiscal year contains monthly (or custom) periods. For each period:
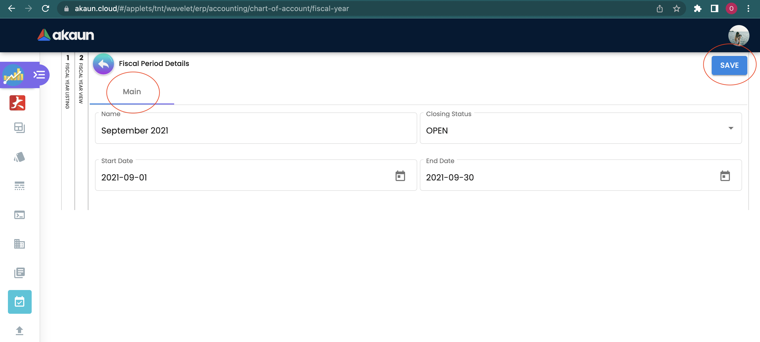
| Field | Description |
|---|---|
| Name | Period name (e.g., “January 2024”) - Editable |
| Closing Status | OPEN, LOCK_GL, LOCK_TXN, LOCK_ALL |
| Start Date | Editable |
| End Date | Editable |
How to Close a Month:
- Open Fiscal Year and select the current year
- Switch to the Fiscal Period tab
- Find the month and change status from OPEN to LOCK_ALL
Bulk Operations
Import GL Category
Menu: Import GL Category
Bulk upload categories via CSV file.
How to Import:
- Navigate to Import GL Category
- Download Sample: Click the *Sample Format link to get the CSV template
- Prepare Data: Fill in your rows following the template format
- Upload: Drag & Drop your
.csvfile (or click Upload File) - Review: Check for any validation errors
- Commit: Click ADD to finalize
Import GL Code
Menu: Import GL Code
Bulk upload GL codes to populate your chart quickly.
Template Headers:
CHART_OF_ACC | GL_CATEGORY | GL_CODE | GL_NAME | DESC
| Column | Description | Example |
|---|---|---|
| CHART_OF_ACC | Exact code of the Chart of Account | COA-001 |
| GL_CATEGORY | Category name this code belongs to | Current Assets |
| GL_CODE | New account number | 1000-01 |
| GL_NAME | Account name | Petty Cash |
| DESC | (Optional) Description | Main office petty cash |
How to Import:
- Navigate to Import GL Code
- Download Sample: Click the *Sample Format link to get the
.csvtemplate - Prepare Data: Fill in your rows. Ensure
GL_CATEGORYmatches exactly what is already in the system - Upload: Drag & Drop your
.csvfile (or click Upload File) - Review: The system will show a preview. Green ticks mean “Ready”. Red flags mean “Error” (hover to see why)
- Commit: Click ADD to finalize
.csv template directly from the Import GL Code screen via the *Sample Format link.Maintenance Tools
GL Code Merge
Menu: GL Code Merge
If two codes were created for the same purpose (e.g., “Phone Exp” and “Telephone Bill”), use this tool to fix it without losing data.
The Workflow:
- Navigate to GL Code Merge
- Select Chart of Account: Choose the COA
- Select GL Category: Choose the category (both codes must be in the same category)
- Select Source GL Code: Pick the duplicate/incorrect code (e.g., “Phone Exp”)
- Select Target GL Code: Pick the correct/final code (e.g., “Telephone Bill”)
- Execute: Click MERGE, then click again to CONFIRM
What Happens:
- All transaction history moves from Source to Target
- Source GL Code is deactivated
- Target GL Code now contains all historical data
GL Code Create Item
Menu: GL Code Create Item
Bridge the gap between Accounting and Sales/Inventory.
Scenario: You have a GL Account “4000-01 Consulting Income”. You want to issue an Invoice for “Consulting”.
How to Use:
- Navigate to GL Code Create Item
- Select the GL Category from the dropdown
- Click SEARCH to list all GL Codes in that category
- Click CREATE to generate Items for the listed GL Codes
The system will generate a saleable Item linked to each GL Code, allowing the sales team to pick it in an invoice and automatically route revenue to the correct account.
Standard Account Structure & Compliance
Recommended Numbering Convention
Adopting a standard 4-digit or 5-digit code structure ensures your reports are readable and compliant.
| Range | Section | Example Category |
|---|---|---|
| 1000 - 1999 | Assets | 1000 Current Assets, 1500 Fixed Assets |
| 2000 - 2999 | Liabilities | 2000 Current Liabilities, 2500 Long-Term Loans |
| 3000 - 3999 | Equity | 3000 Share Capital, 3100 Retained Earnings |
| 4000 - 4999 | Revenue | 4000 Sales, 4500 Other Income |
| 5000 - 9999 | Expenses | 5000 COGS, 6000 Admin Exp, 8000 Finance Cost |
Malaysian SST Compliance
For Malaysian entities, ensure your Default GL Codes are mapped to the following standard codes (or your equivalents) to ensure tax return generation works correctly:
- Input Tax Account (Purchase): e.g.,
1410 - SST Input Tax - Output Tax Account (Sales): e.g.,
2310 - SST Output Tax - SST Payable:
2311 - SST Suspense:
2312
Note: These must be configured in
Companies > Default GL Codes.
Common User Scenarios
Scenario 1: Retail Business
Goal: Simple tracking of cash and inventory.
Structure: Uses a flat list of expenses with focus on point-of-sale tracking.
Key Needs:
- Separate GL Codes for “Cash at Shop” vs “Cash at Bank”
- Detailed “Cost of Goods Sold” to track product margins
- Multiple cash register accounts for reconciliation
Recommended Setup:
1100 - Cash at Shop Counter 1
1101 - Cash at Shop Counter 2
1110 - Cash at Bank - Daily Deposits
5000 - Cost of Goods Sold - Retail
Scenario 2: Manufacturing Company
Goal: Tracking production costs and work-in-progress.
Structure: Deep hierarchy for “Cost of Sales” with WIP tracking.
Key Needs:
- WIP Accounts:
Raw Materials→Work In Progress→Finished Goods - Overhead Allocation: Specific expense codes for Factory Rent vs Office Rent
- Settings: Enable
SHOW_WIP_STOCK_VALUEin Admin Settings
Recommended Setup:
1300 - Raw Materials Inventory
1310 - Work In Progress
1320 - Finished Goods Inventory
5100 - Direct Labor Costs
5200 - Manufacturing Overhead
6000 - Factory Rent
7000 - Office Rent
Scenario 3: Multi-Branch Corporation
Goal: Consolidated reporting by location.
Structure: Unified Chart of Accounts used by all branches.
Key Needs:
- Use GL Segments or Profit Centers rather than duplicating GL codes
- Don’t create
6000-KLand6000-JB; use6000and tag the Branch - Configure each branch as a separate profit center
Recommended Approach:
Single GL Code: 6000 - Rent Expense
Tag with Profit Center:
├── PC-KL (Kuala Lumpur)
├── PC-JB (Johor Bahru)
└── PC-PG (Penang)
Settings & Configuration
General Settings
Found in: Settings > General Settings
Two collapsible panels:
Default GL Code A JSON textarea where you define fallback GL Code mappings. The system reads this configuration when automatically assigning GL Codes to transactions that do not have an explicit mapping elsewhere.
Closing Stock Balance Settings Slide toggles that control which inventory stock values appear in your financial reports (e.g., Balance Sheet, Profit & Loss). Each toggle corresponds to a stock category:
| Toggle | What It Controls |
|---|---|
SHOW_INVENTORY_STOCK_VALUE | General inventory (finished goods for trading companies) |
SHOW_RAW_MATERIAL_STOCK_VALUE | Raw material stock (manufacturing) |
SHOW_WIP_STOCK_VALUE | Work-In-Progress stock (manufacturing) |
SHOW_FINISHED_GOODS_STOCK_VALUE | Finished goods stock (manufacturing) |
SHOW_NSTI_STOCK_VALUE | Non-Stock & Trade-In items |
Click SAVE after changing any setting.
Personalization
Found in: Personalization icon in sidebar
Personal Default Settings
Set your preferred working context to avoid repeated selections:
- Default Branch: The system will auto-select this branch for new transactions
- Default Location: Your primary inventory location
Troubleshooting & FAQ
Common Issues
Issue: “Cannot delete GL Code”
- Cause: The code has been used in a transaction (even a voided one)
- Fix: You cannot delete it. Change its status to INACTIVE or use the GL Code Merge tool to move its history to another account
Issue: “Balance Sheet doesn’t balance”
- Cause: Opening Balances were entered incorrectly or Retained Earnings is not mapped
- Fix: Check
Companies > Default GL Codes > General > Retained Earning. Ensure it points to a valid Equity account (e.g., 3100)
Issue: “Inventory value missing in Profit & Loss”
- Cause: The stock display settings are disabled
- Fix: Go to
Settings > General Settingsand enableSHOW_INVENTORY_STOCK_VALUE
Issue: “Cannot create transactions - Period locked”
- Cause: The fiscal period has been closed
- Fix: Check
Fiscal Year > Fiscal Periodand ensure the period status is OPEN or request admin to unlock
Issue: “GL Code not appearing in dropdown”
- Cause: The GL Code is inactive or not linked to the correct Chart of Account
- Fix: Check the GL Code status and ensure it’s linked to the active COA
FAQ
Q: What is the difference between a GL Section and a GL Category?
A: A GL Section is the highest level (e.g., Assets). A GL Category is a subdivision (e.g., Current Assets). GL Codes sit inside Categories.
Q: How do I lock a specific month?
A: Go to Fiscal Year → select the year → open the Fiscal Period tab → click on the specific period row to open Fiscal Period Details → change the Closing Status dropdown to LOCK_ALL → click SAVE.
Q: Can I manage multiple companies in this applet?
A: Yes. You can define multiple Companies and Sets of Books. When working, you can switch between contexts.
Q: What happens if I import a GL Code that already exists?
A: The system validates against duplicates. If a match is found, the row may be skipped or updated depending on the specific import logic, but generally, unique GL codes are enforced.
Q: Can I delete a GL Code after it has been used?
A: No. To maintain audit integrity, used codes cannot be deleted. Use GL Code Merge to consolidate it into another account, or simply Deactivate it.
Q: Where do I set the “Retained Earnings” account?
A: This is configured under Companies → Default GL Codes → General tab. This setting is strictly required for year-end closing processes.
Q: How do I handle a change in Fiscal Year dates?
A: Create a new Fiscal Year record. Ensure there is no gap between the old year end and the new year start. Short “stub” years are supported for transition periods.
Q: Can I have different GL Codes for different Sets of Books?
A: Yes, you can define specific mappings or use different Sets of Books to manage distinct reporting requirements for the same Company.
Related Applets
The Chart of Account applet is a foundational module. Its data is used by many other applets:
| Category | Applets |
|---|---|
| Financial Reports | Trial Balance, Profit and Loss, Balance Sheet, Financial Reports Applet |
| Core Modules | Organization Applet, Ledger and Journal Applet, CashBook Applet |
| Customer/Entity | Customer Maintenance Applet |
| Sales Cycle | Sales Order, Sales Invoice, Sales Return, Receipt Voucher, Debit Note, Credit Note |
| Purchase Cycle | Internal Purchase Order, Internal Purchase Invoice, Internal Purchase Return, Payment Voucher |
Technical Integration (Developer)
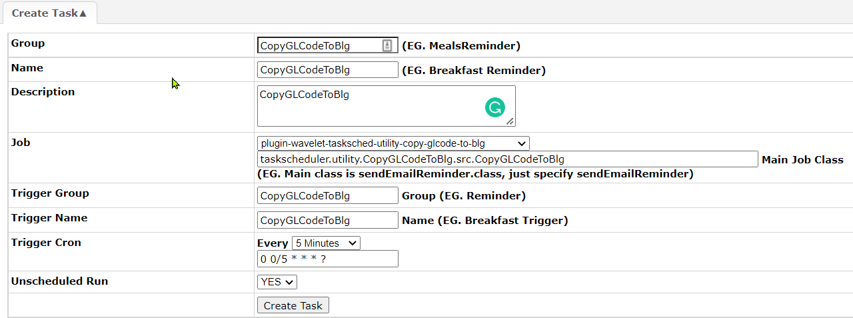
COA Sync from EMP
For syncing GL Codes from an external EMP system, use the following task scheduler configuration:
Jar File: plugin-wavelet-tasksched-copy-glcode-to-blg.jar
Main Class: taskscheduler.utility.CopyGLCodeToBlg.src.CopyGLCodeToBlg
Parameters:
| Parameter | Description |
|---|---|
email_error | Email for error notifications |
tenant_code | Tenant code |
token | API authentication token |
api_url | API endpoint URL |
ledger_guid | Company primary ledger GUID |
chart_of_account_guid | COA GUID |
chart_of_account_code | COA code |
company_guid | Company GUID |
Steps:
- Upload Jar file via:
Control Panel > System Admin > File Cabinet > File Manager - Create Task via:
Control Panel > Developer > Plugins > Task Scheduler > Create Task - Run Task:
List Task > Click "Run Now" for "CopyGLCodeBlg" - Verify in Akaun: Check GL Section, GL Category, GL Code in Chart of Account applet