Supplier Applet
Purpose and Overview
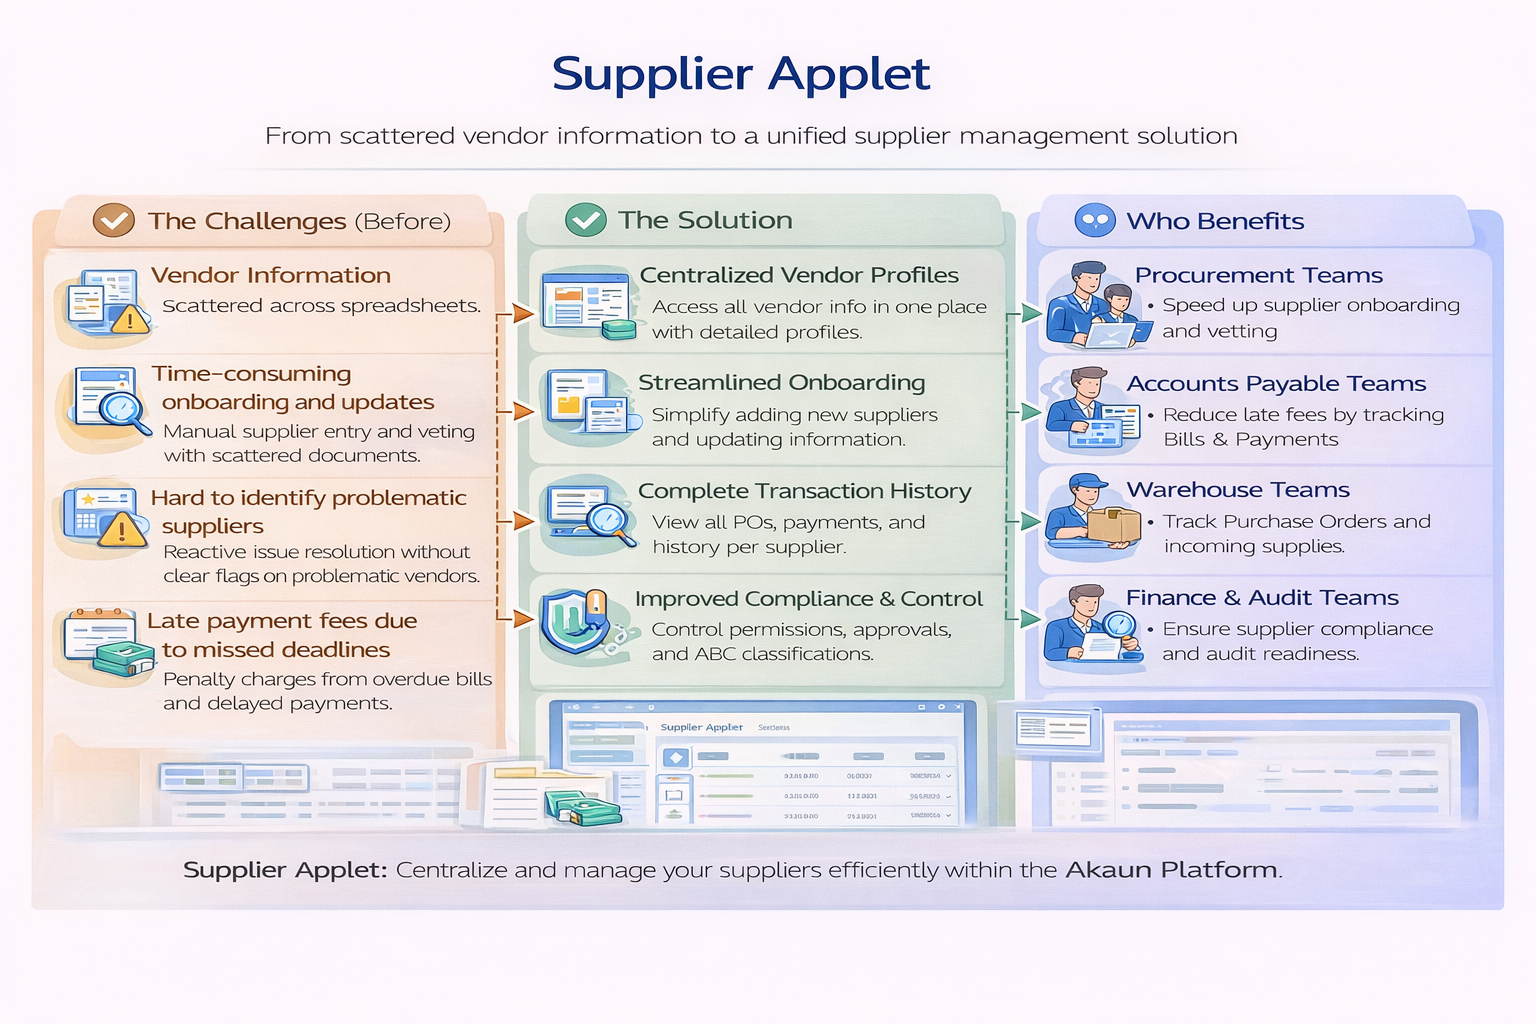
The Supplier Applet is a centralized workspace for supplier master data across procurement and finance. It supports supplier onboarding, profile maintenance, payment and tax setup, credit controls, bulk upload/download workflows, and duplicate cleanup.
Key Features Overview
Who Benefits from This Applet?
Procurement Teams:
- Create and maintain supplier records quickly
- Use categories and branch linking for operational accuracy
- Reduce sourcing delays caused by incomplete supplier setup
Finance & Accounts Payable:
- Maintain payment configuration and tax data in one place
- Control credit terms and credit limits consistently
- Use file export and consolidated views for reconciliation
Data Admins / Master Data Teams:
- Run bulk import workflows for supplier and credit data
- Clean up duplicate entities with merge tools
- Monitor processing outcomes and error messages
System Administrators:
- Configure field visibility and tab behavior
- Set applet defaults and branch grouping rules
- Manage feature visibility and permission screens
What Problems Does This Solve?
Common Supplier Data Issues:
- Duplicate supplier records across teams
- Inconsistent payment and tax information
- Manual, slow onboarding and update cycles
- Lack of visibility into import/export and merge status
Supplier Applet Outcomes:
- Single supplier master source for operational and finance use
- Structured create/edit tabs for complete supplier profiles
- Bulk data workflows for scalable maintenance
- Entity merging workflow to deduplicate suppliers safely
- Configurable governance through settings and permissions
Key Features Overview
Key Concepts
Understanding the Supplier Framework
| Aspect | Component | Practical Example |
|---|---|---|
| Who you buy from | Supplier Profile | Supplier code, name, type, status |
| How you transact | Payment/Tax/Credit setup | Payment config, tax details, credit term and limit |
| How you control data | Settings + Merge tools | Field visibility, defaults, entity merging |
Supplier Data Hierarchy
Supplier Applet
|
|-- Supplier Listing
|   |-- Supplier Create/Edit Tabs
|   |   |-- Main
|   |   |-- E-Invoice / Peppol Config
|   |   |-- Login / Driver Login
|   |   |-- Payment Config / Tax
|   |   |-- Address / Contact
|   |   |-- Credit Term and Limit
|   |   |-- Branch / Company / Item Pricing
|   |   `-- Documents
|
|-- Supporting Menus
|   |-- Category
|   |-- Credit Term Listing
|   |-- Credit Limit Listing
|   |-- File Import / File Export
|   |-- Upload Credit Terms / Upload Credit Limits
|   |-- Consolidated ARAP
|   `-- Entity Merging / Entity Merge Processing
|
`-- Settings & Personalization
The Supplier Control Triangle
| Component | Role | Example |
|---|---|---|
| Profile | Supplier identity and status | Supplier Code, Supplier Name, Type |
| Transaction Setup | Payment and taxation configuration | Bank account, tax type, tax code |
| Control Layer | Policies and cleanup operations | Credit rules, field settings, merge criteria |
Quick Start Guide
For Procurement: Create Your First Supplier
Goal: Create a usable supplier profile.
- Open Supplier Listing.
- Click + to create a supplier.
- Complete Main details (code/name/type/status).
- Add Address and Contact records.
- Add Category and required operational links.
- Review Payment Config and Tax requirements with finance.
- Set status to Active once required data is complete.
- Save and verify the supplier appears in the listing.
For Finance: Configure Payment and Tax
Goal: Make supplier records payment-ready.
- Open supplier record from listing.
- Go to Payment Config tab and add a payment row.
- Fill
Payee Residential Status,Country,Bank, account fields, and optional expiry. - Confirm
Swift Codeis auto-populated after bank selection. - Go to Tax tab and define supplier tax information.
- Verify credit setup in Credit Term and Limit.
- Save and review updates.
For Data Admins: Run Bulk Operations
Goal: Maintain supplier data at scale.
- Use File Import to upload supplier CSV files.
- Select the correct delimiter (
PIPE,COMMA,SEMICOLON,TAB) before upload. - Use Sample Format to validate file structure before submit.
- Use Upload Credit Terms and Upload Credit Limits for bulk credit updates.
- Review listing statuses and error messages.
- Use File Export to generate supplier CSV output.
For Admins: Configure the Applet
Goal: Apply governance and default behavior.
- Open Settings > Application Settings.
- Configure menu and tab visibility rules.
- Set defaults in Settings > Default Selection.
- Configure Entity Branch Group if needed.
- Review role and user permissions under settings routes.
- Run an end-to-end test (create supplier, add payment config, verify listing visibility).
Sidebar Menu Reference
Main Menus
| Menu | What It Does | Typical Use |
|---|---|---|
| Supplier | Main supplier directory and edit entry point | Create and maintain supplier master records |
| Category | Supplier category master | Group suppliers for filtering/reporting |
| Credit Term Listing | Credit term master records | Maintain available payment term rules |
| Credit Limit Listing | Credit limit master records | Maintain available credit limit rules |
| File Import | Supplier CSV upload | Bulk create/update suppliers |
| Upload Credit Terms | Credit terms file upload | Bulk assign/update supplier credit terms |
| Upload Credit Limits | Credit limits file upload | Bulk assign/update supplier credit limits |
| File Export | Supplier export job listing | Generate and download CSV snapshots |
| Consolidated ARAP | Consolidated account listing | Review consolidated AR/AP records |
| Entity Merging | Duplicate grouping and merge action | Deduplicate supplier entities |
| Entity Merge Processing | Merge queue result listing | Check merge progress and outcomes |
| Settings | Applet settings, feature visibility, permissions | |
| Personalization | Personal default selection and sidebar settings |
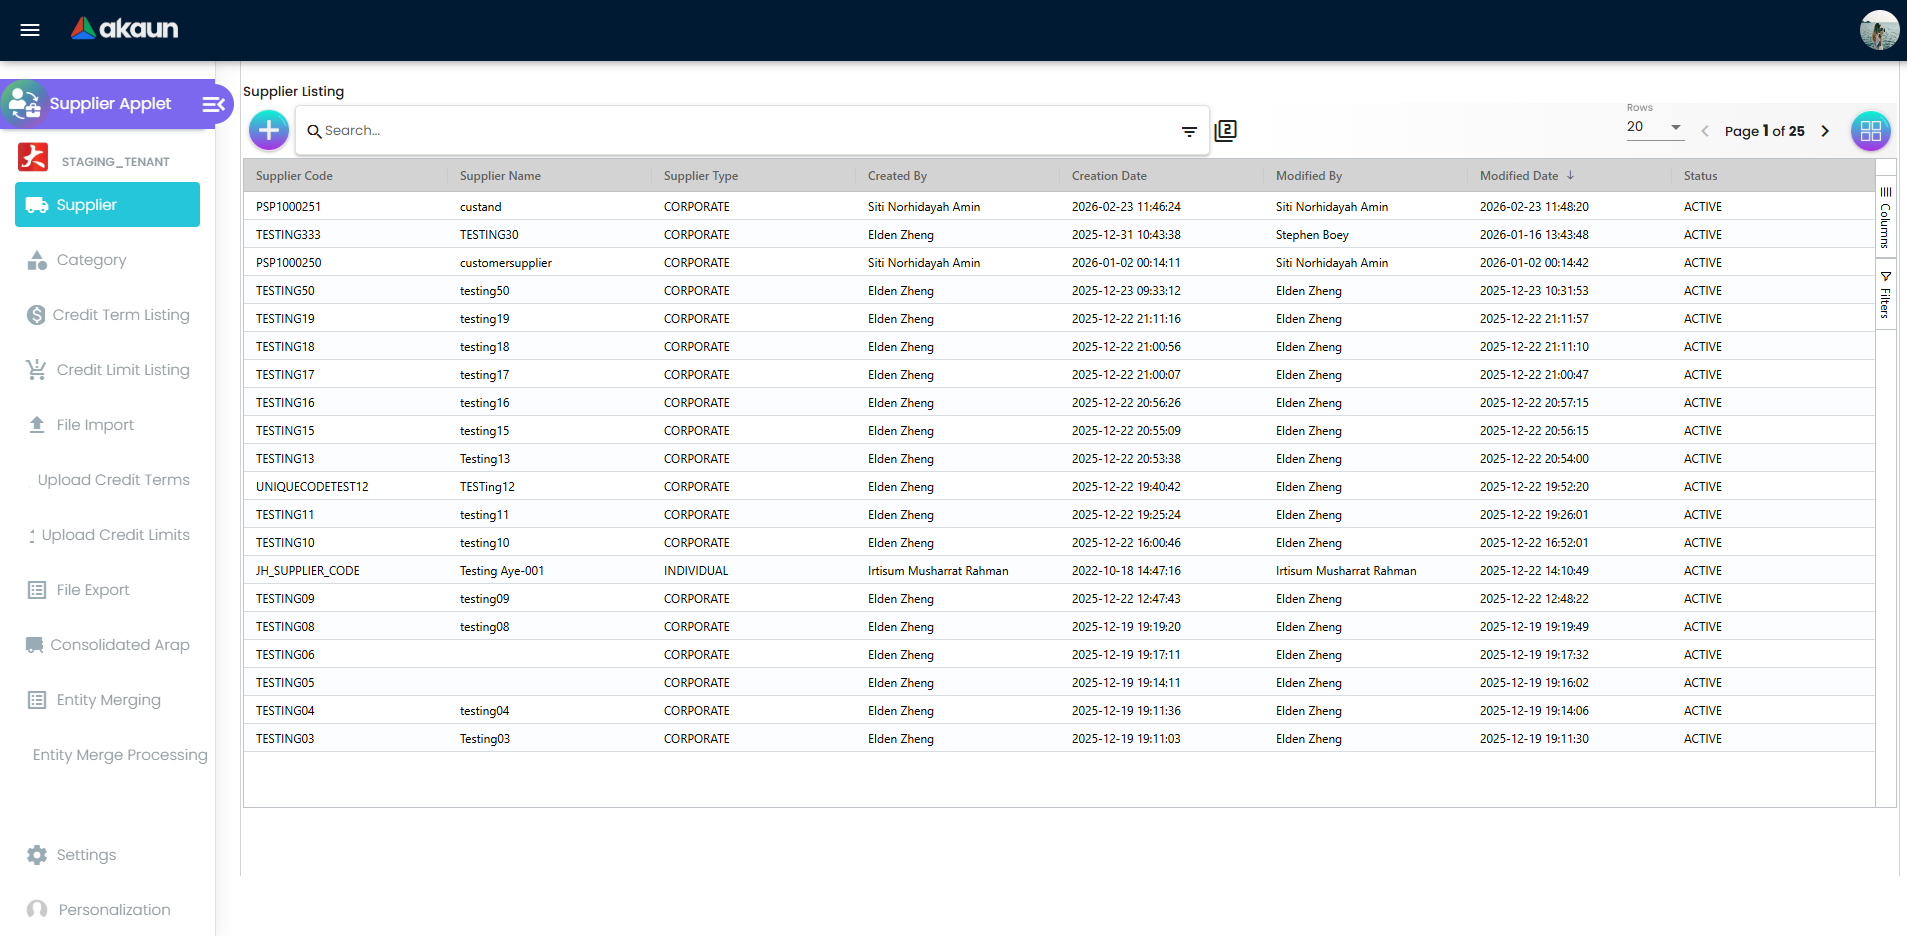
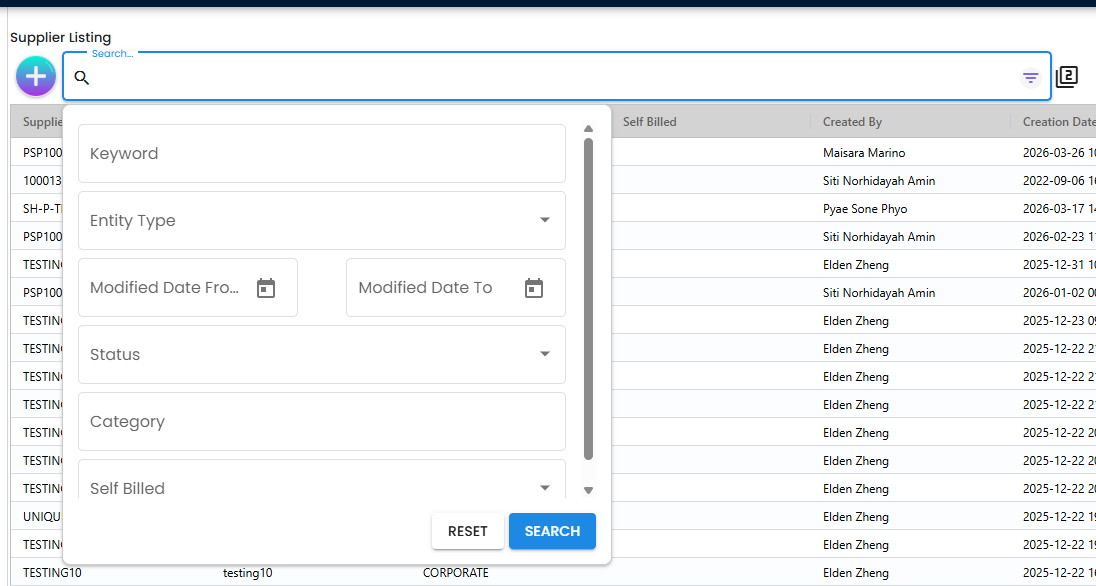
Supplier Listing
Supplier listing includes key columns such as:
- Supplier Code
- Supplier Name
- Supplier Type
- Created/Modified By and Date
- Status
Use listing filters/search to find and open supplier records quickly.
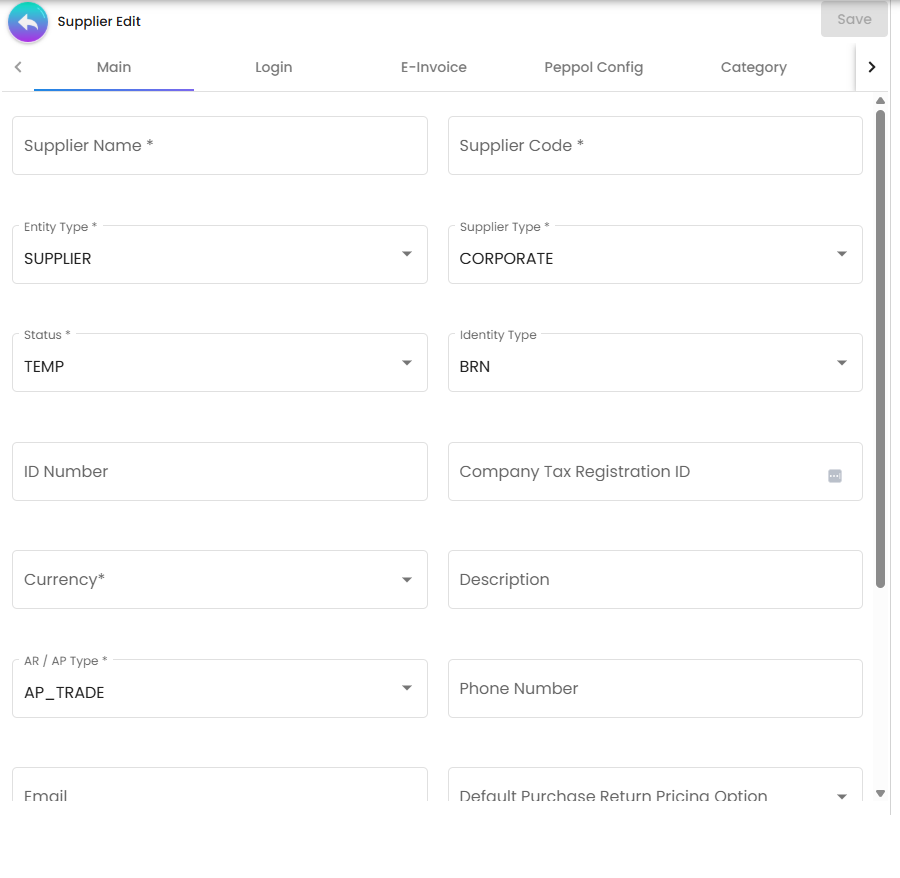
Supplier Create/Edit Form
The supplier edit screen is tab-based and supports configurable tab ordering/visibility.
Tab Reference
| Tab | Main Function |
|---|---|
| Main | Core supplier profile details |
| E-Invoice | E-invoice identity and related configuration fields |
| Peppol Config | Peppol participant link management + notification options |
| Category | Category linking to supplier |
| Login | Supplier login subject linkage |
| Applet Catalog | Link supplier to applet catalog entries |
| Driver Login | Driver login linkage records |
| Payment Config | Supplier payment methods |
| Tax | Tax details per supplier |
| Address | Address maintenance (main/billing/shipping and types) |
| Contact | Contact person maintenance |
| Credit Term and Limit | Credit term and credit limit setup |
| Branch Linking | Branch linkage entries |
| Supplier Branch | Intercompany supplier branch records |
| Company Linking | Supplier-company linkage and related controls |
| Item Pricing | Supplier-item pricing records |
| Remark | Free-text remarks |
| Employee | Employee-linked context |
| Documents | Linked purchasing and payment document history |
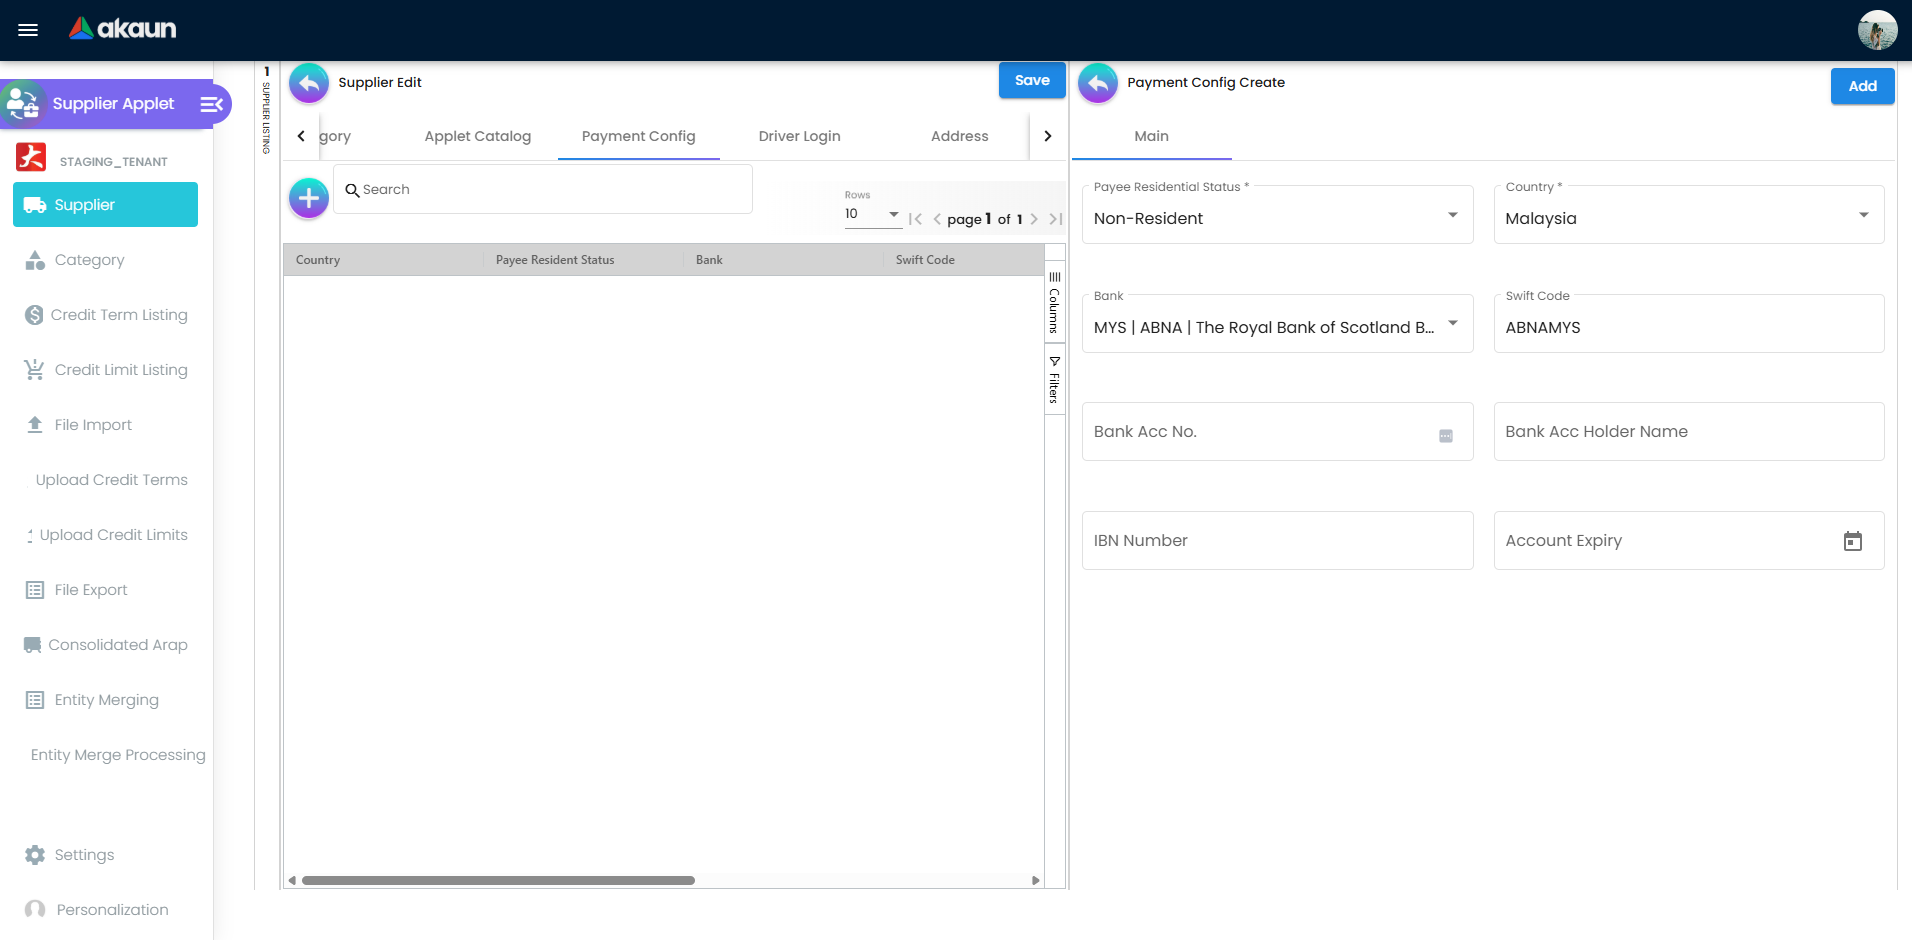
Payment Config Fields
Based on payment config create/edit components, the main fields are:
| Field | Function |
|---|---|
| Payee Residential Status | Resident / Non-Resident classification |
| Country | Country context for payment details |
| Bank | Bank selection |
| Swift Code | Auto-populated from selected bank |
| Bank Acc No. | Bank account number |
| Bank Acc Holder Name | Account holder name |
| IBN Number | Additional account identifier |
| Account Expiry | Optional account expiry date |
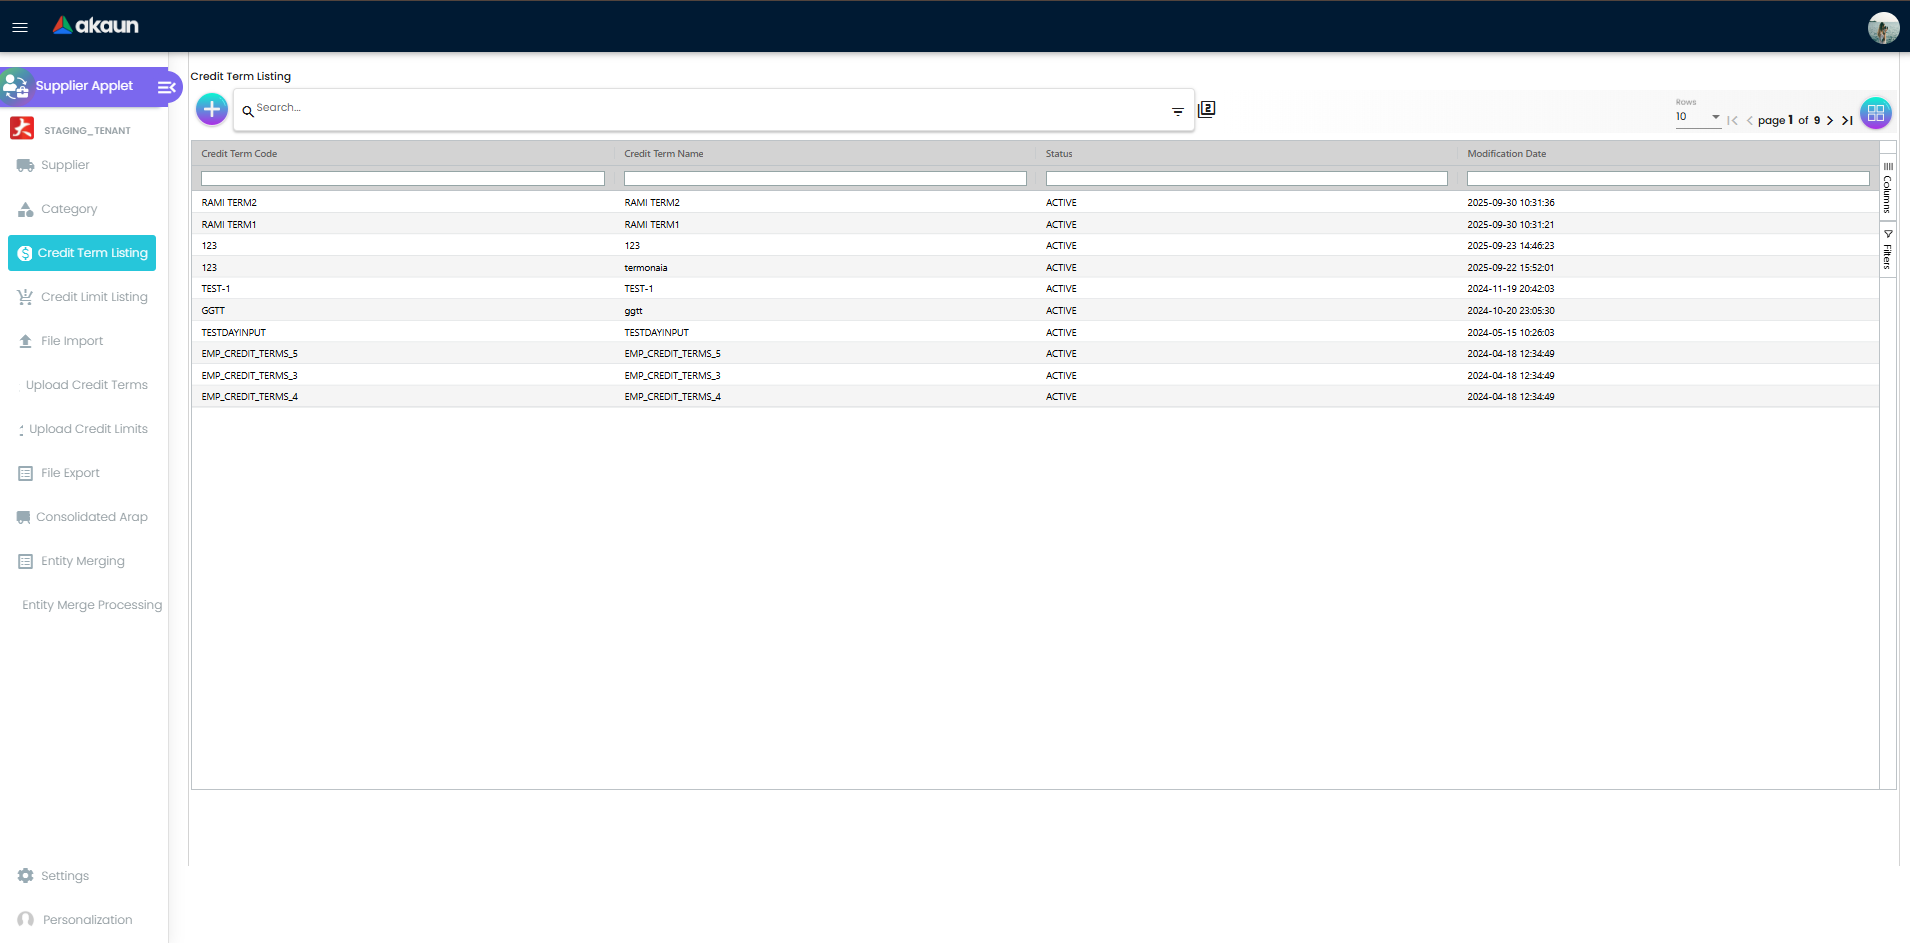
Credit Controls
Credit Term Listing
Use Credit Term Listing to define and maintain standard credit term rules used by suppliers.
What you can do in this menu:
- View all credit terms in one grid (Credit Term Code, Credit Term Name, Status, Modification Date)
- Search and filter terms to find the exact rule quickly
- Create a new credit term record
- Open and edit existing credit terms
- Activate or deactivate terms through status control
What can be configured in create/edit:
- Credit Term Code and Credit Term Name
- Status
- Set Year / Set Month / Set Day
- Add Year / Add Month / Add Day
- Audit information in edit mode (Created By, Creation Date, Modified By, Modified Date)
Client-facing value:
- Keeps payment term logic standardized so procurement and finance apply the same due-date rules across suppliers.
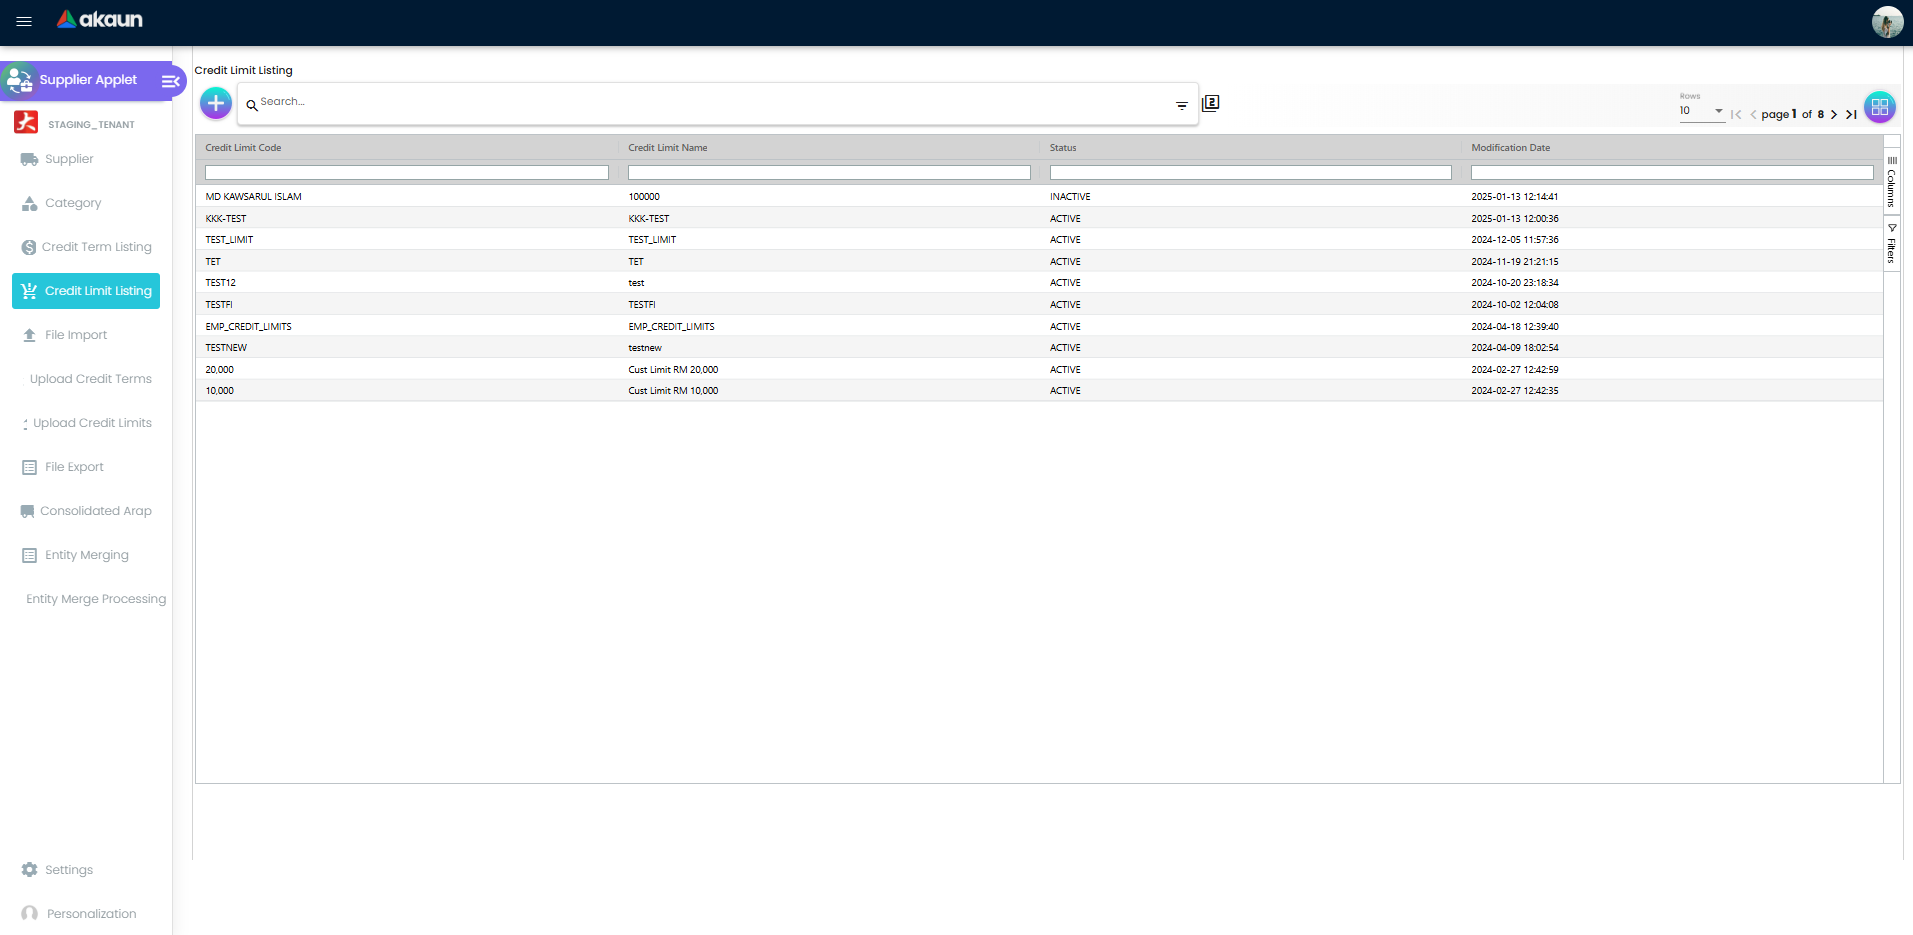
Credit Limit Listing
Use Credit Limit Listing to define and maintain limit rules for supplier credit control.
What you can do in this menu:
- View all credit limits in one grid (Credit Limit Code, Credit Limit Name, Status, Modification Date)
- Search and filter limit records
- Create new credit limit records
- Open and edit existing limits
- Activate or deactivate limits through status control
What can be configured in create/edit:
- Credit Limit Code and Credit Limit Name
- Status
- Currency
- Credit Limit Amount
- Audit information in edit mode (Created By, Creation Date, Modified By, Modified Date)
Client-facing value:
- Ensures your team enforces consistent financial boundaries before supplier transactions proceed.
Upload Menus
- Upload Credit Terms: bulk import supplier credit term assignments.
- Upload Credit Limits: bulk import supplier credit limit assignments.
Both import listings include processing fields such as file name, format, process status, and error message.
File Import & Export
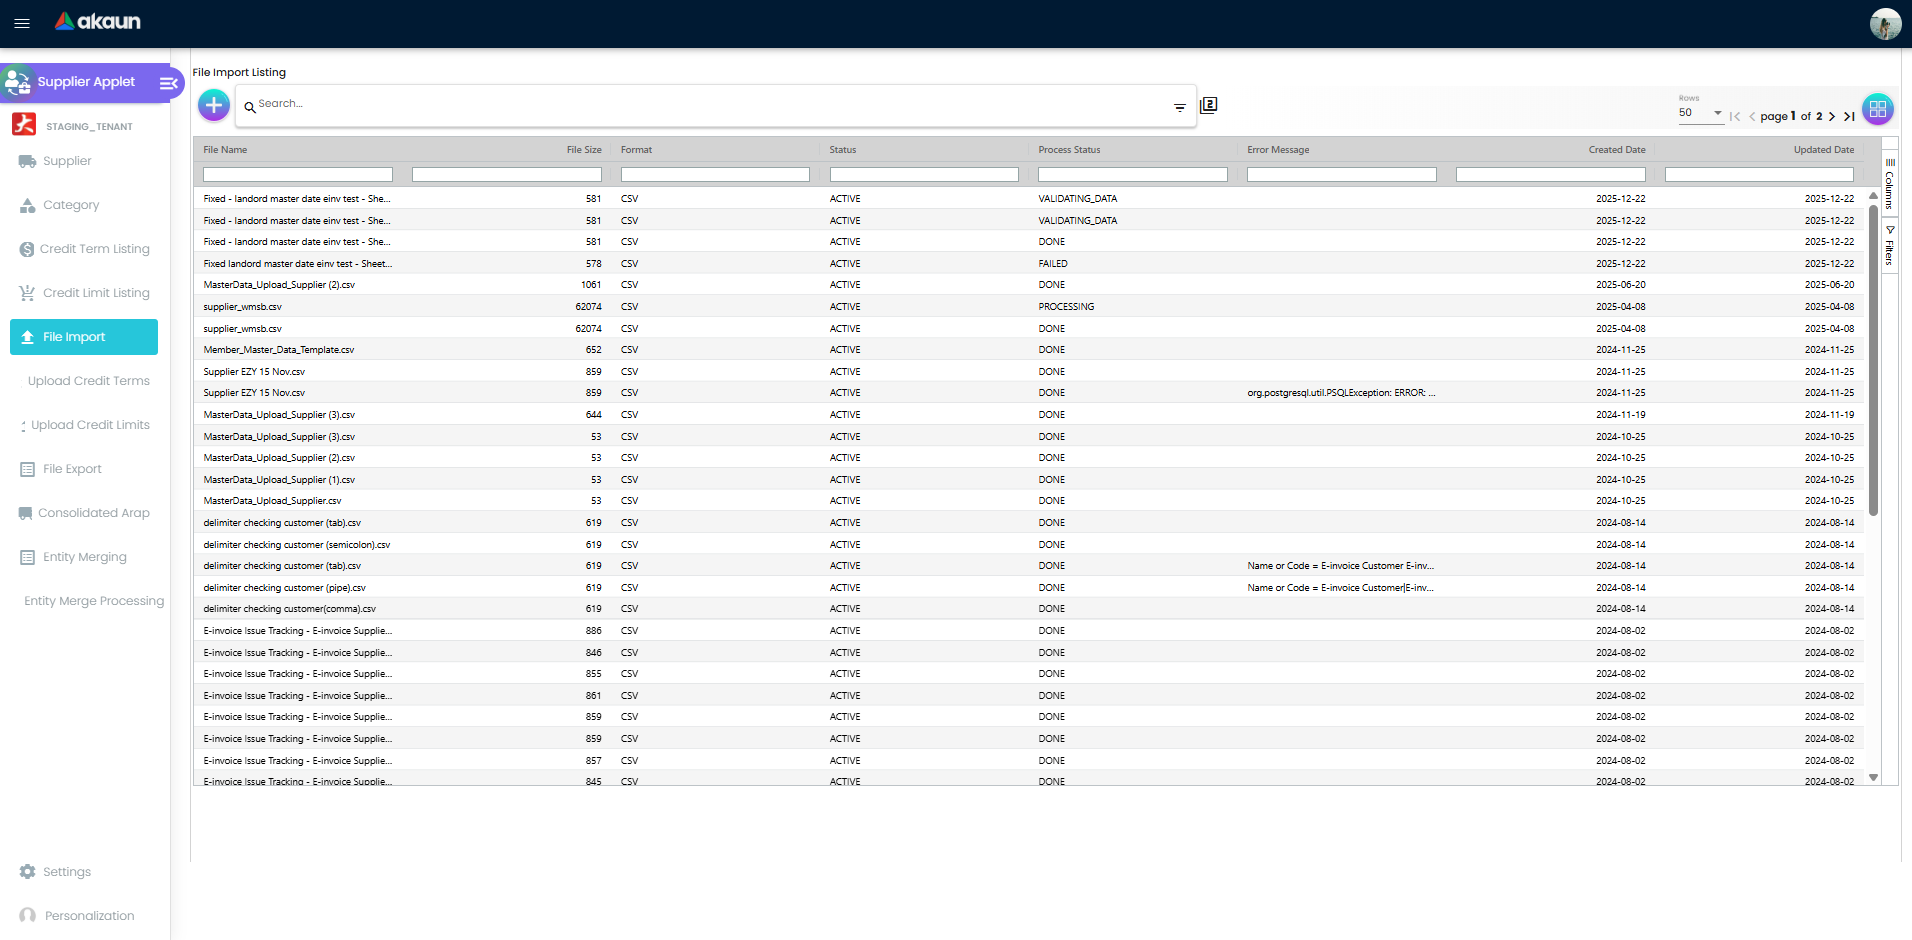
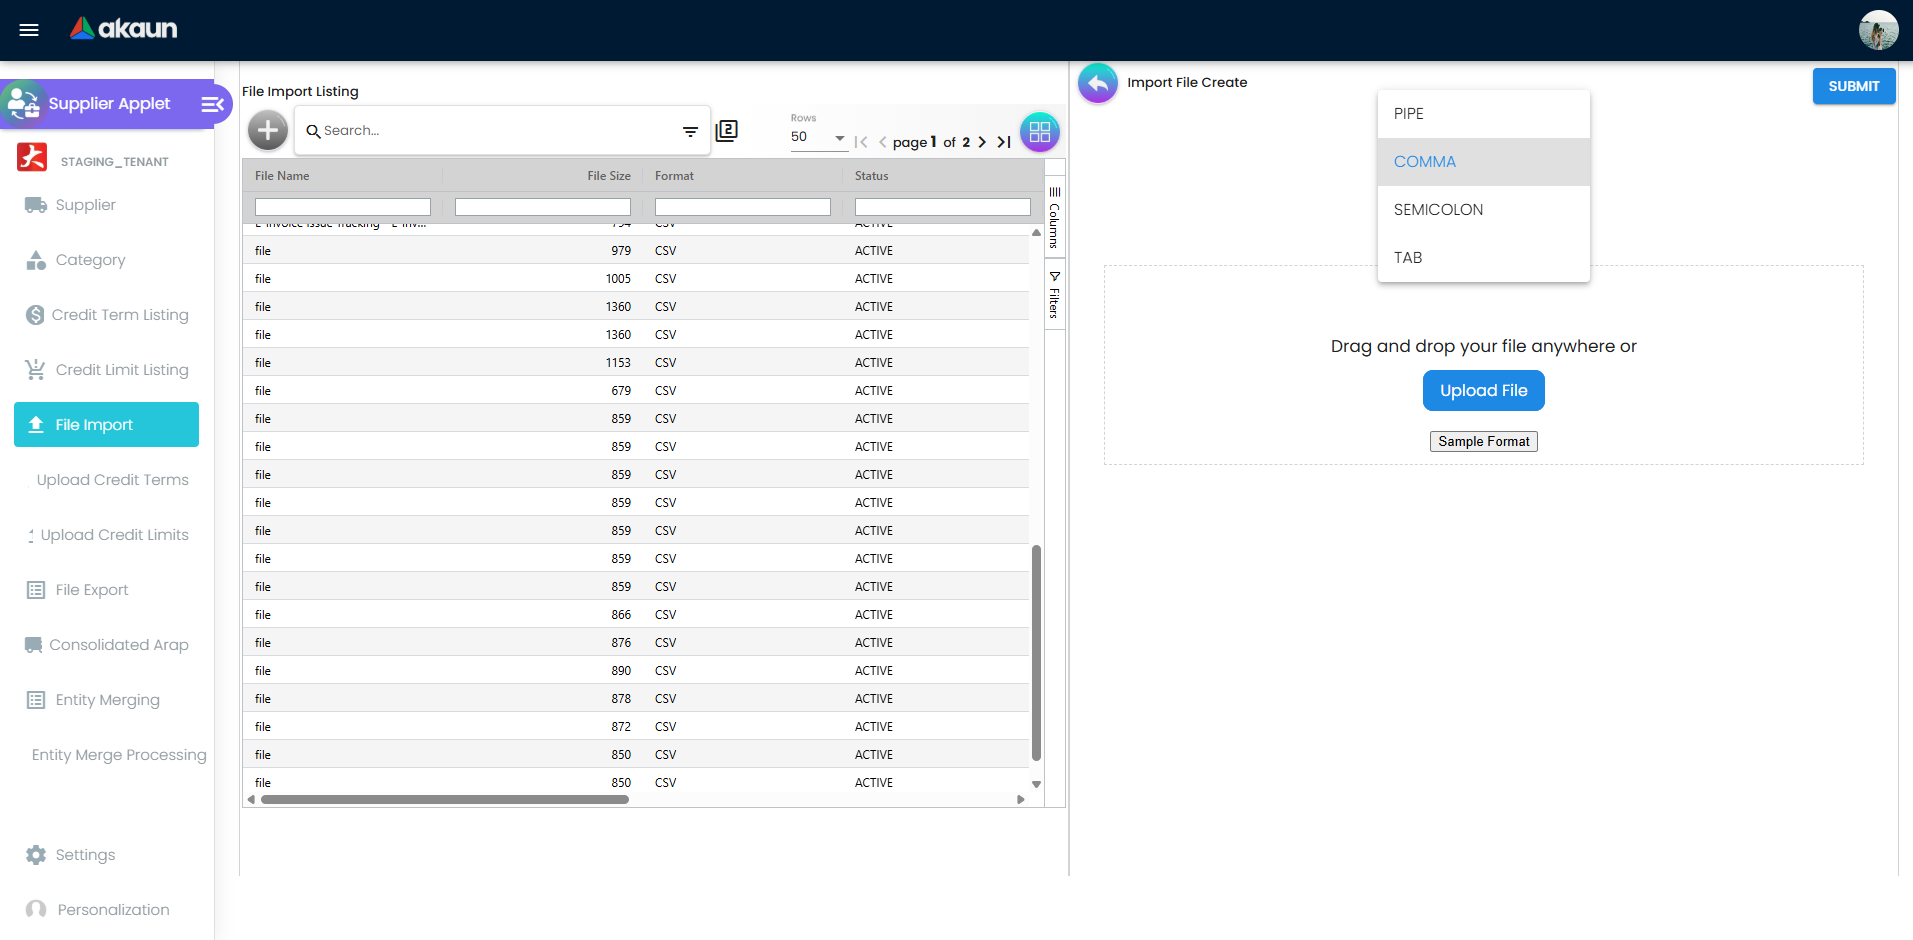
File Import
Supplier file import supports:
- Delimiter selection:
PIPE,COMMA,SEMICOLON,TAB - CSV upload via drag-drop or file picker
- Sample format download
- Process monitoring from import listing (
Process Status,Error Message)

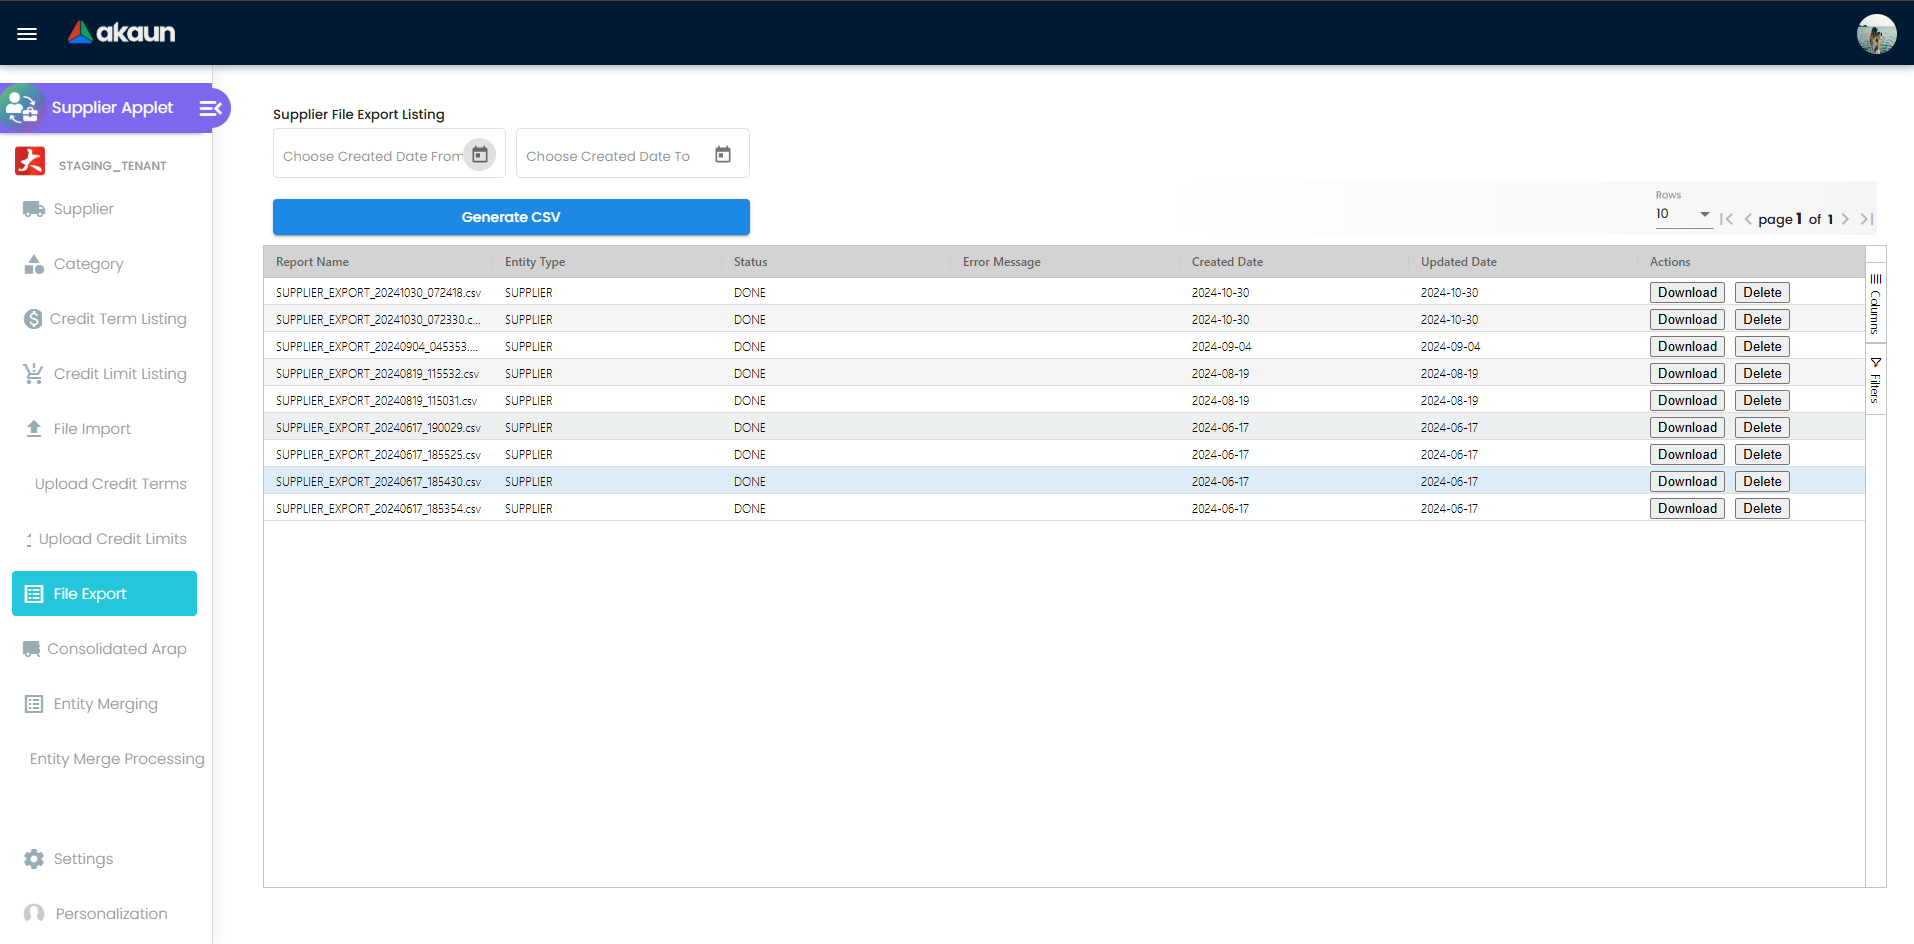
File Export
Supplier file export supports:
- Date filters (
created_date_from,created_date_to) - CSV generation (
Generate CSV) - Export listing with status tracking and download/delete actions
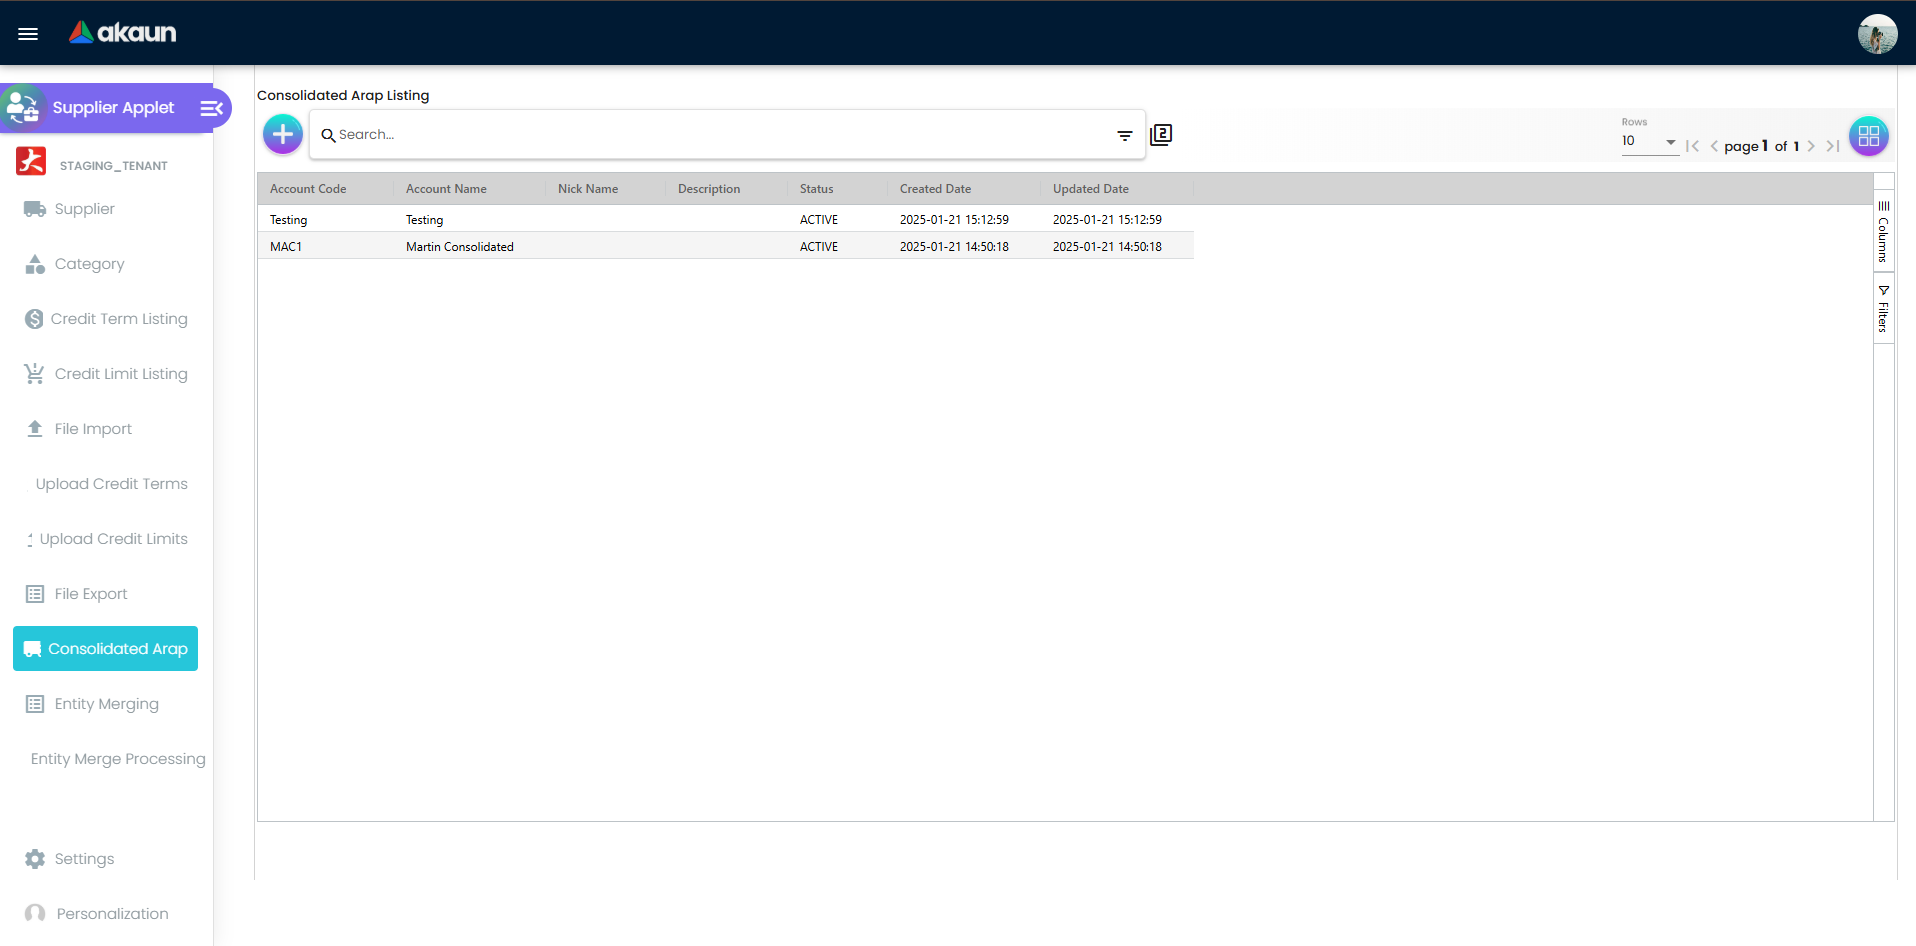
Consolidated ARAP
Use Consolidated ARAP to maintain consolidated account records and related links used in AR/AP workflows.
Main listing functions:
- View consolidated account records with:
- Account Code
- Account Name
- Nick Name
- Description
- Status
- Created Date / Updated Date
- Search by keyword and use advanced filters
- Open records for edit
- Create new consolidated ARAP records
Create/Edit (Main tab) functions:
- Maintain Acc Code, Acc Name, Acc Nickname, Description, and Status
- Save updates to account setup
- Remove records when required (edit mode)
- Review audit fields (created/modified by and date)
Additional tabs in edit mode:
- Entity: link supplier entities to the selected consolidated ARAP account
- Login: manage login subject links (User Email, Rank, Status, Modified Date)
- Applet Catalog: manage applet catalog links (Catalogue Code/Name/Type, Description, No. of Applets)
Client-facing value:
- Gives finance one structured place to manage consolidated account setup and its linked entities.
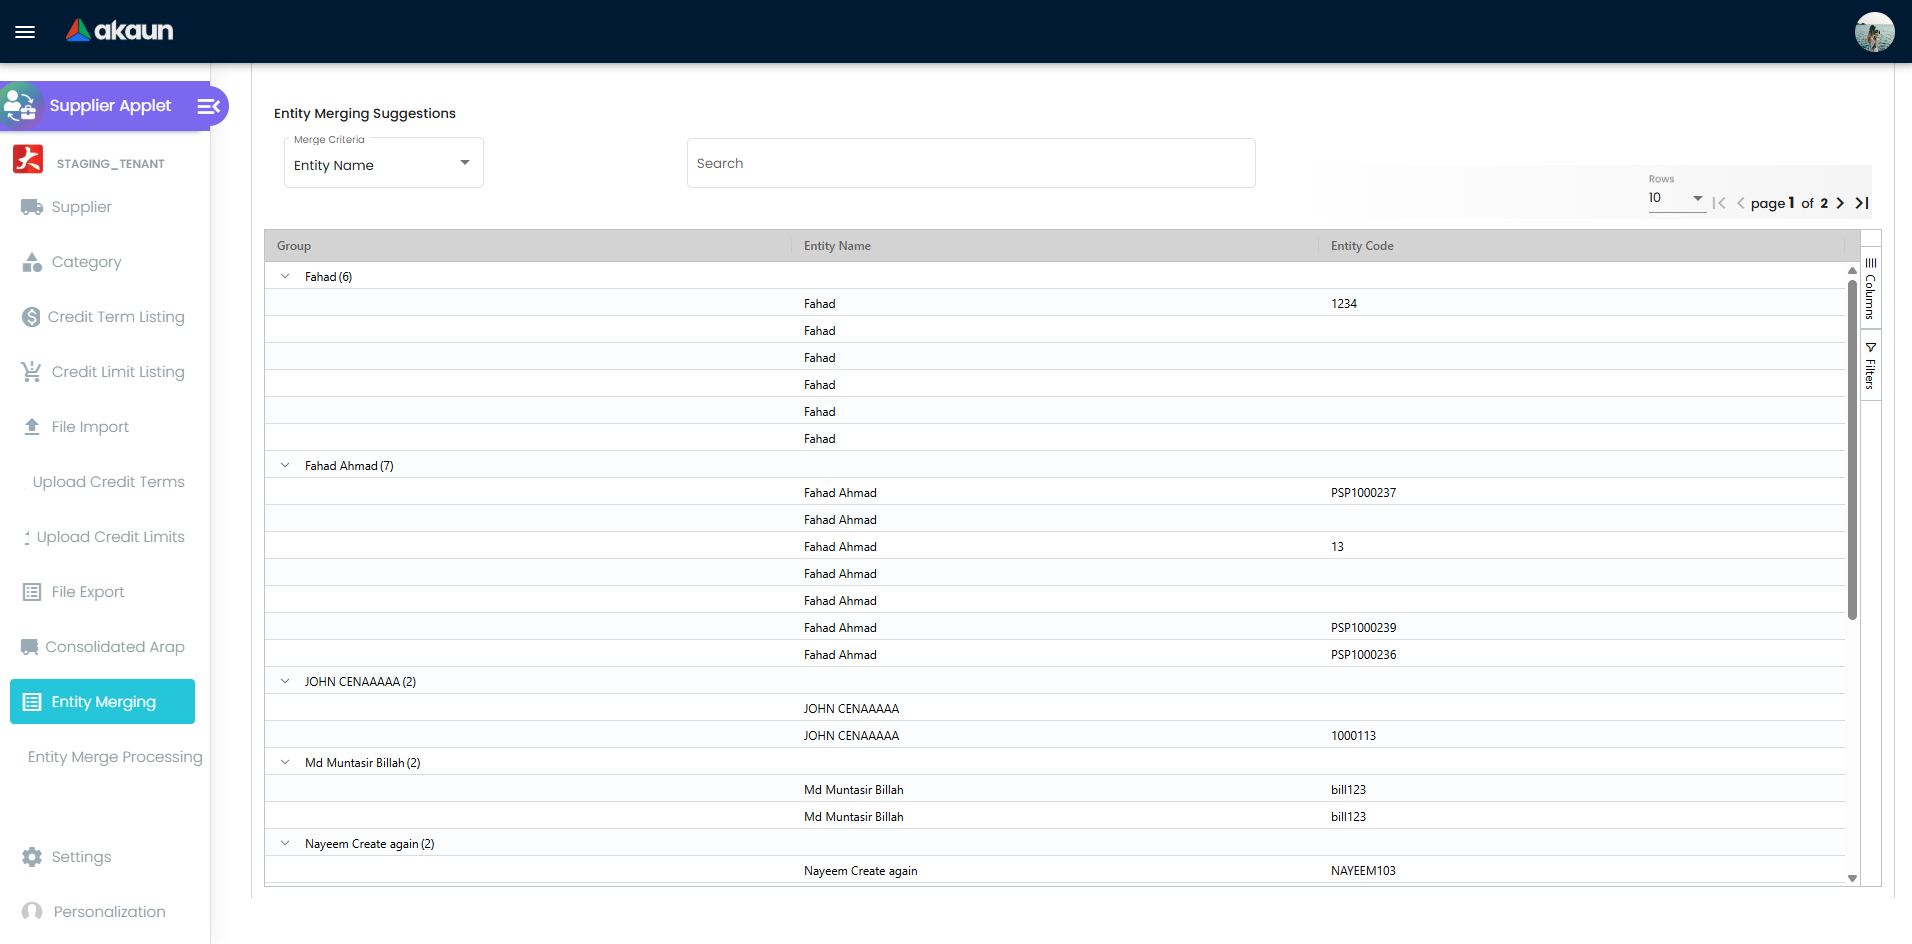
Entity Merging
Entity merging is criteria-driven and supports duplicate cleanup by:
- Entity Name
- Entity ID No
- Entity Phone
- Entity Email
Important behavior from component logic:
- The merge grid starts empty.
- Records load only after selecting Merge Criteria.
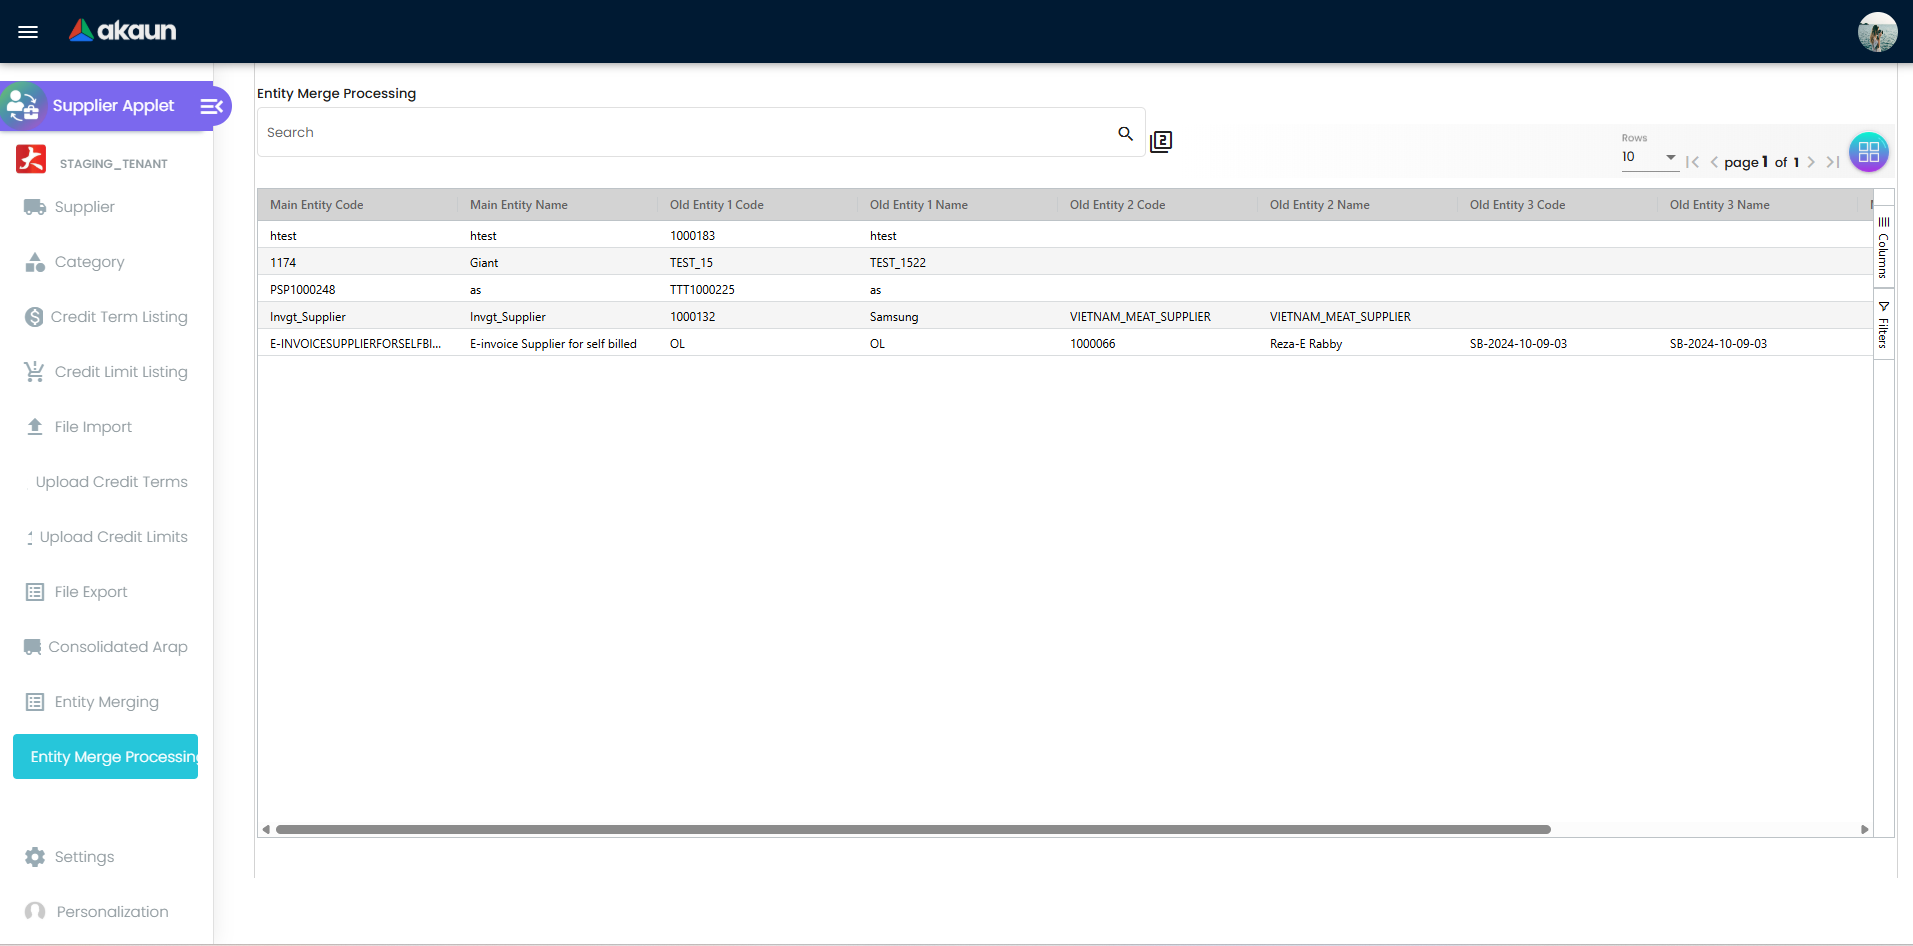
After merge execution, use Entity Merge Processing to monitor merge status and merged/total progress.
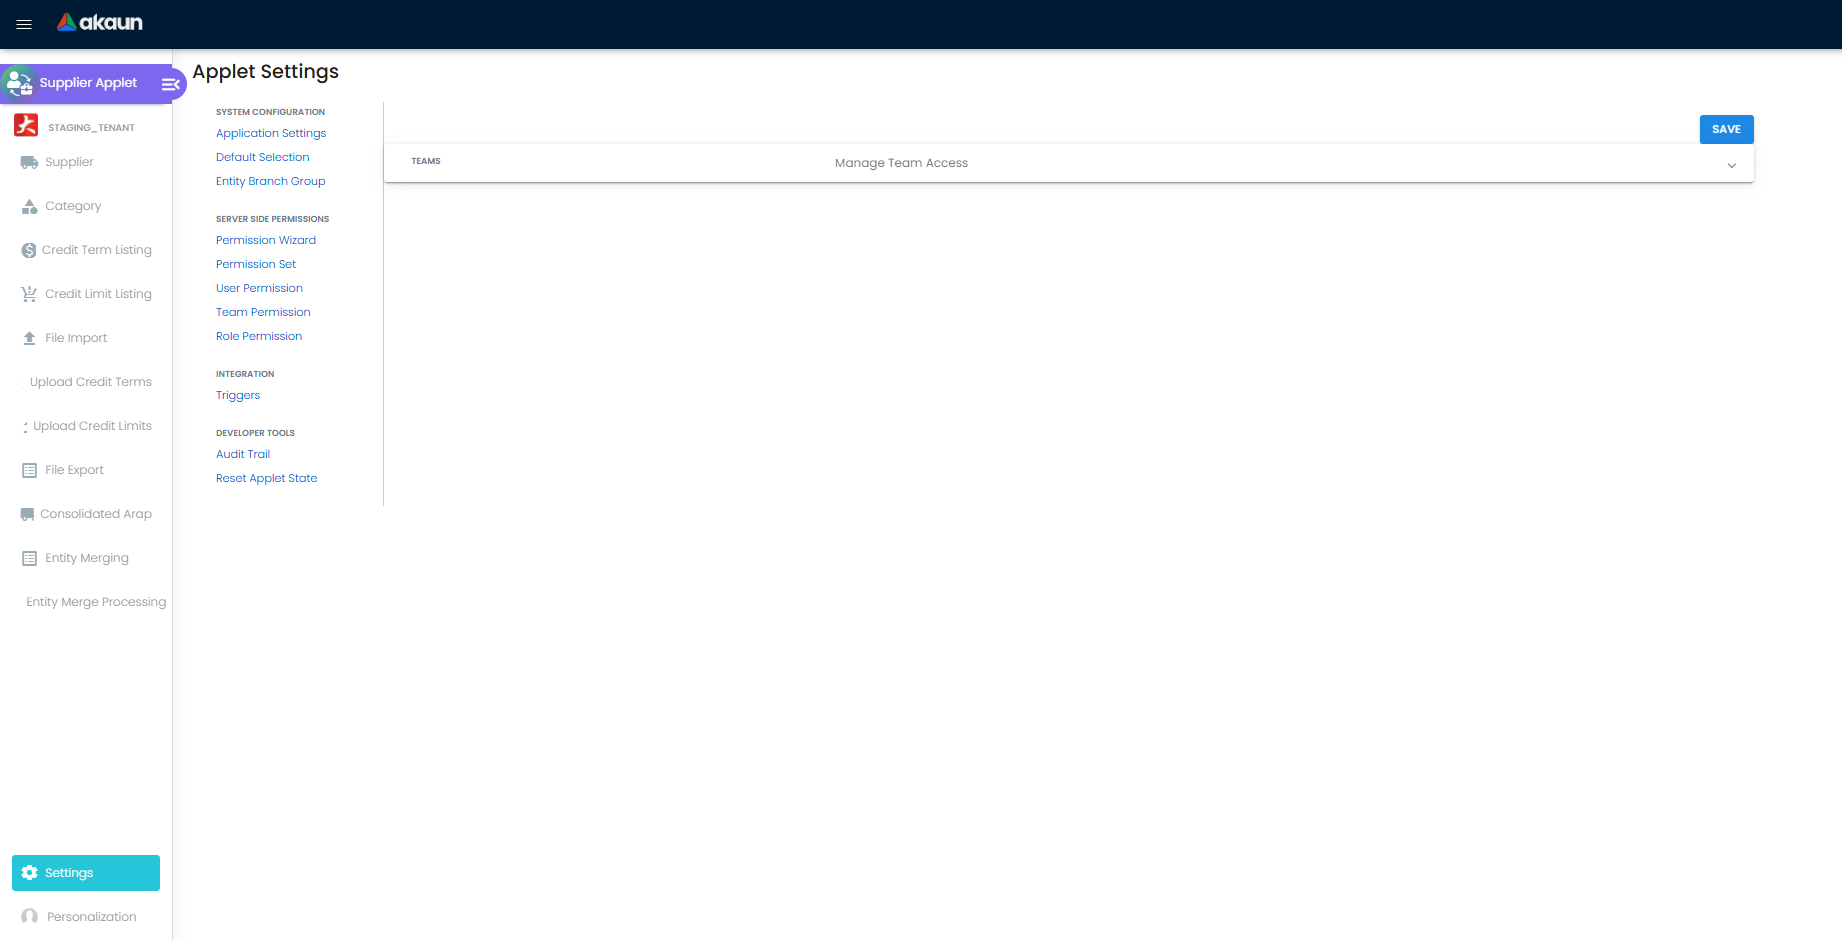
Configuration & Settings
Settings routes include:
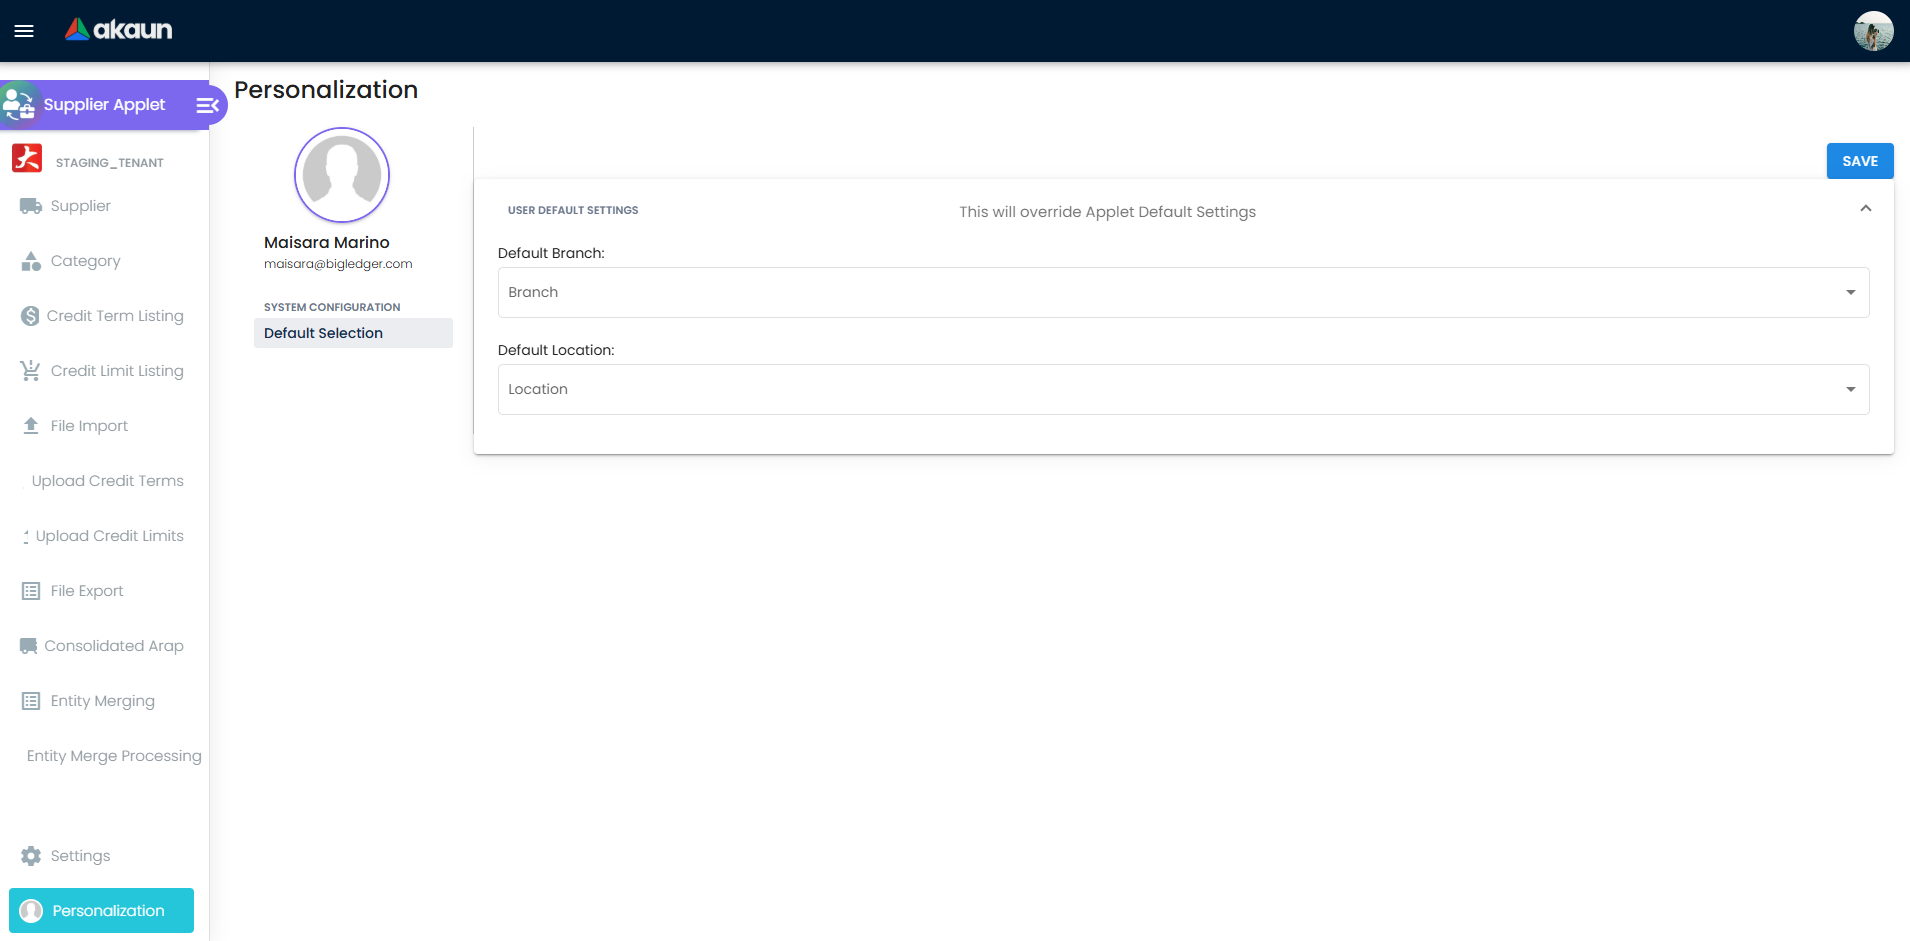
- Default Selection (
settings/default-selection) - Field Settings (
settings/field-settings) - Feature Visibility (
settings/feature-visibility) - Permission screens (
permission-set,user-permission,team-permission,role-permission,permission-wizard) - Entity Branch Group (
settings/entity-branch-group) - Webhook (
settings/webhook)
Application Settings Highlights
Field settings include toggles for:
- Menu visibility (Category, Credit Term/Limit listings, File Import/Export, Consolidated ARAP, Entity Merging)
- Supplier main-form fields (email, phone, supplier code, status, currency, tax id, etc.)
- Supplier detail tabs (Payment Config, Tax, Address, Contact, Credit Term and Limit, Peppol, E-Invoice, Documents, etc.)
Personalization
Personalization routes include:
personalization/personal-default-selectionpersonalization/sidebar
Integration Points
| Module | Integration Purpose |
|---|---|
| Purchasing | Supplier references in purchasing documents and supplier-related transactions |
| Accounts Payable | Payment processing and payable-side supplier data usage |
| E-Invoice / Peppol | E-invoice identity data and Peppol participant configuration |
| Master Data Services | Bulk supplier import/export and cross-entity maintenance |
| Reporting | Supplier filtering and consolidation using listing/export outputs |
Troubleshooting
Entity Merging Shows No Data
Problem: Entity Merging grid is empty.
Likely Cause: Merge criteria is not selected.
What to do: Select Merge Criteria first (Entity Name, ID No, Phone, or Email), then review loaded groups.
Payment Config Swift Code Is Blank
Problem: Swift Code is not populated.
Likely Cause: Bank not selected or selection changed.
What to do: Select Country, then select Bank; the form auto-fills Swift Code.
Import File Process Status Fails
Problem: Import completes with error status.
Likely Cause: Delimiter/template mismatch or invalid row values.
What to do: Download Sample Format, verify delimiter selection, then re-upload and review Error Message.
Missing Tabs or Menus
Problem: User cannot see expected tabs/menus.
Likely Cause: Hidden by field settings or role/menu permissions.
What to do: Review Settings > Field Settings and permission visibility for the affected role.
Related Applets
Core Module Applets
- Customer Maintenance Applet - Customer master data
- Inventory Item Maintenance Applet - Supplier product relationships
- Tax Configuration Applet - Supplier tax settings
Procurement Applets
- Purchase Order Applet - Supplier order processing
- Purchase Requisition Applet - Procurement requests
- Supplier Portal Applet - Supplier self-service
Financial Applets
- Accounts Payable Applet - Supplier payments
- Payment Processing Applet - Vendor payments
- Expense Management Applet - Supplier expenses
Best Practices
- Define naming and coding standards before large supplier imports.
- Use Category, Credit Term Listing, and Credit Limit Listing as controlled masters; avoid ad-hoc values.
- Test file imports with a small sample before bulk uploads.
- Schedule duplicate cleanup using Entity Merging as a regular data governance activity.
- Keep tab visibility lean in Field Settings so users only see relevant fields.
- Validate key payment fields before moving suppliers to active operational usage.
FAQ
Q: Why is Entity Merging listing empty?
A: The listing is intentionally empty until Merge Criteria is selected.
Q: Which payment fields are available in Payment Config?
A: Payee Residential Status, Country, Bank, Swift Code, Bank Acc No., Bank Acc Holder Name, IBN Number, and Account Expiry.
Q: What file format is supported for supplier import?
A: CSV upload is supported, with configurable delimiter (PIPE, COMMA, SEMICOLON, TAB).
Q: Where do I bulk upload credit terms and credit limits?
A: Use Upload Credit Terms and Upload Credit Limits menus.
Q: Where can I track export generation status?
A: In File Export listing, which shows status/error and provides download actions.
Q: Why are some tabs not visible in Supplier Edit?
A: Tab visibility is controlled in Settings > Field Settings and tenant permission/visibility configuration.
Q: Where can I view supplier-linked transaction documents?
A: In the Documents tab inside Supplier Edit.
Q: Why is my import file stuck in failed process status?
A: Check Error Message, confirm your CSV delimiter matches the selected delimiter, and validate the file against Sample Format.
Q: Why can’t I download an export file yet?
A: The export must finish generation first. Wait until the export Status indicates completion, then use the download action.