Membership Admin Applet
Purpose and Overview
The Membership Admin Applet is the central control hub for your organization’s membership and loyalty programs. It empowers you to manage member data, define point systems, configure currency conversions, and orchestrate member privileges from a single interface.
In Simple Terms: Think of this applet as your loyalty program’s control panel — like the dashboard of your car. Just as your car dashboard lets you control speed, music, and temperature from one place, this applet lets you control who your members are, what rewards they can earn, and how those rewards work.
Before You Begin
Before diving into the system, take time to make these key business decisions. These choices will shape how your entire loyalty program works:
1. Define Your Point Types (Currencies)
Decision: How many different types of points will you use?
Common Options:
- Single Currency (simplest): One type of point for everything (e.g., “Rewards Points”)
- Dual Currency: Spending points (for rewards) + Status points (for tier upgrades)
- Multiple Currencies: Campaign-specific points, partner points, etc.
Why This Matters: You can’t easily change this later without confusing members. Most businesses start with 1-2 types.
2. Plan Your Member Tiers (Classes)
Decision: What membership levels will you offer?
Examples:
- 3 Tiers: Bronze → Silver → Gold
- 4 Tiers: Standard → Premium → VIP → Elite
- No Tiers: Everyone is equal (all members get the same benefits)
Why This Matters: Tiers create aspiration and reward loyalty. But more tiers = more complexity to manage.
3. Decide on Point Expiry Rules
Decision: Do points expire? If so, when?
Common Options:
- No Expiry: Points last forever (easiest for customers, but creates accounting liability)
- Calendar Year: Points expire December 31st each year
- Rolling Expiry: Points expire 12 months after earning
- Mixed: Status points don’t expire, but spending points do
Why This Matters: Expiry drives urgency to redeem, but frustrates customers if poorly communicated.
4. Set Point-to-Money Conversion Rates
Decision: What are your points worth in real money?
Examples:
- 100 Points = $1.00 (common in retail)
- 1,000 Miles = $10.00 (common in travel)
- 50 Points = 1 item (non-monetary rewards)
Why This Matters: This determines your program’s cost. Be realistic about what you can afford.
5. Choose Your Segmentation Strategy (Labels)
Decision: How will you tag members for targeted campaigns?
Examples:
- Demographics: Age Groups, Gender, Location
- Behavior: High Spenders, Frequent Visitors, Dormant
- Preferences: Vegetarian, Pet Owners, Sports Fans
Why This Matters: Labels let you send personalized offers. Plan these before member registration begins.
Who Benefits and Problems Solved
Who Benefits from This Applet?
Marketing Managers:
- Create and manage member labels for targeted campaigns
- Define membership classes and privileges
- Configure point earning and redemption rules
Customer Support & Operations:
- Quick access to member profiles and history
- Ability to perform manual point adjustments
- Manage member suspensions and status
System Administrators:
- Configure system-wide settings and field visibility
- Manage webhooks for integration with external systems
- specific permission controls for teams and users
Finance Teams:
- Oversee points-to-money conversion rates
- Audit point transactions and liability
- Generate membership financial reports
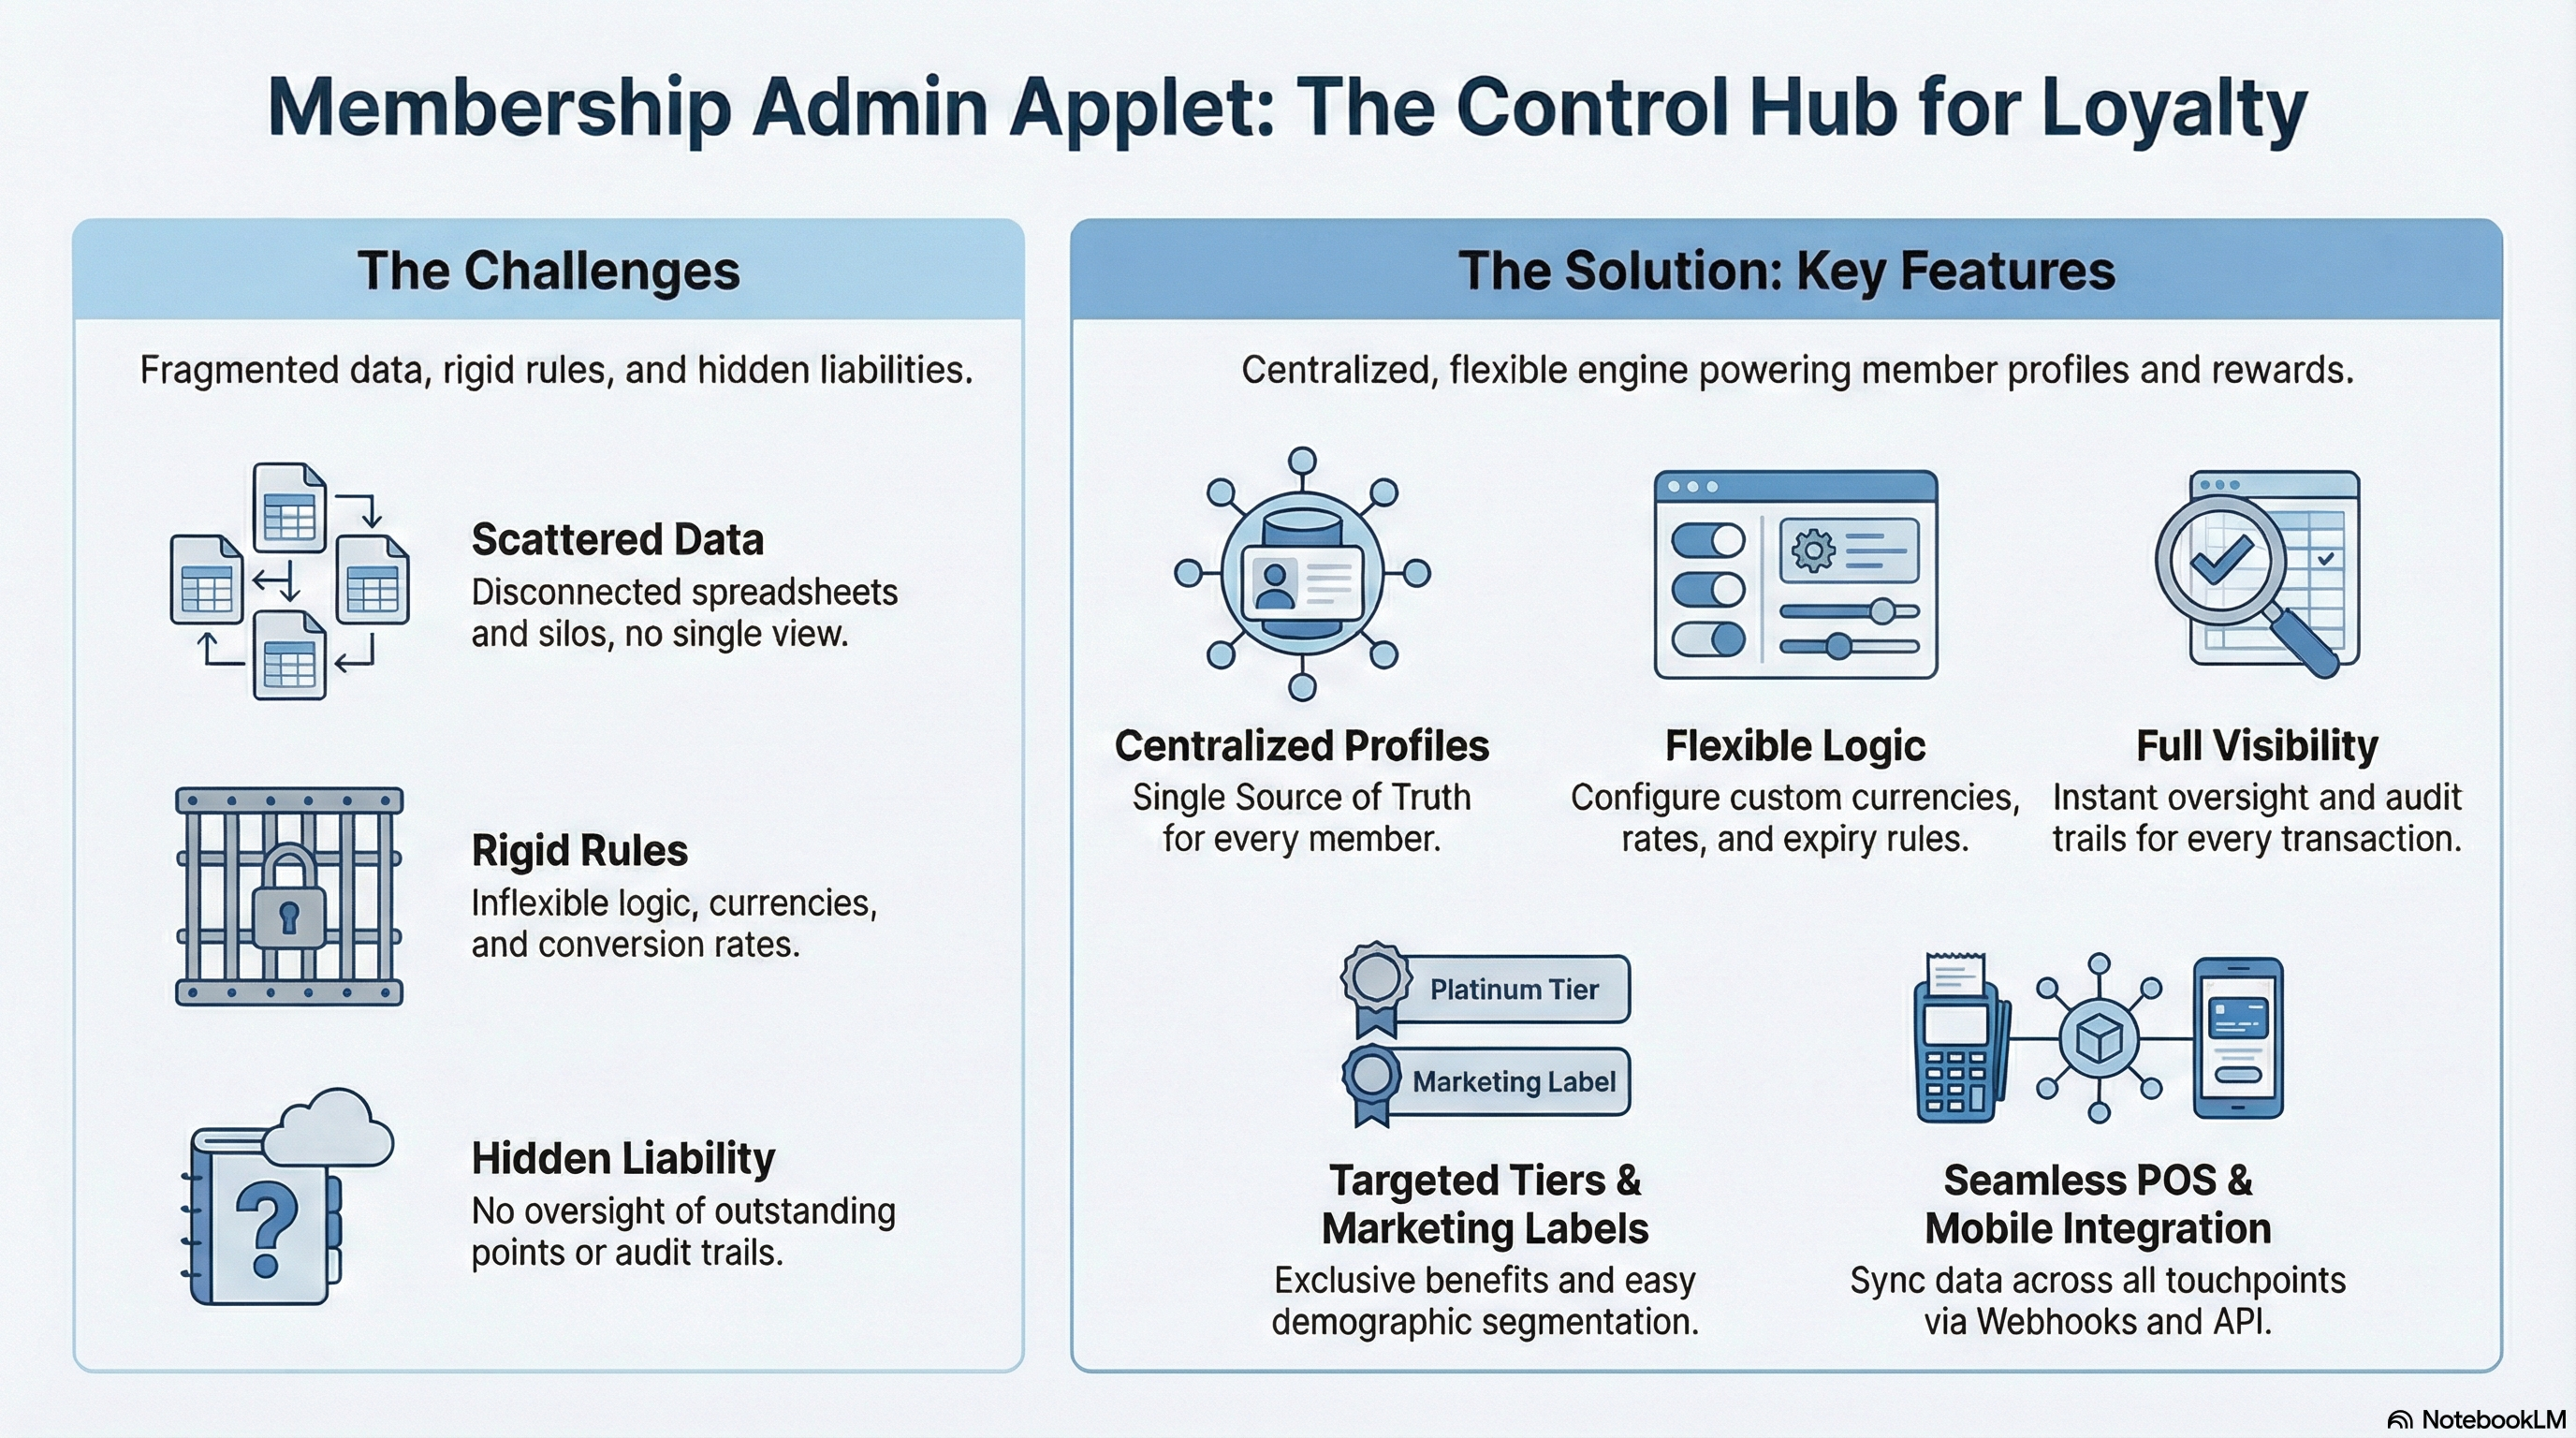
What Problems Does This Solve?
The Fragmented Loyalty Data Problem:
Managing a membership program often involves scattered spreadsheets, disconnected systems for points and profiles, and manual calculations.
- Disconnected member data leading to poor customer service
- Inflexible point systems that are hard to change
- Lack of visibility into liability (outstanding points)
- Difficulty in segmenting members for tiers
The Membership Admin Solution:
- Centralized Profile Management - A single source of truth for all member data, accessible via mobile and web.
- Flexible Currency Logic - Support for multiple point currencies and conversion rates.
- Dynamic Tiering - Automated or manual management of Member Classes and Privileges.
- Integration Ready - Webhooks and API support for connecting to POS and eCommerce.
- Audit capabilities - Full visibility into point adjustments and member changes.
Key Features Overview
Quick Start in 5 Minutes
New to this system? Here’s the absolute minimum to get started:
For Admins (First-Time Setup)
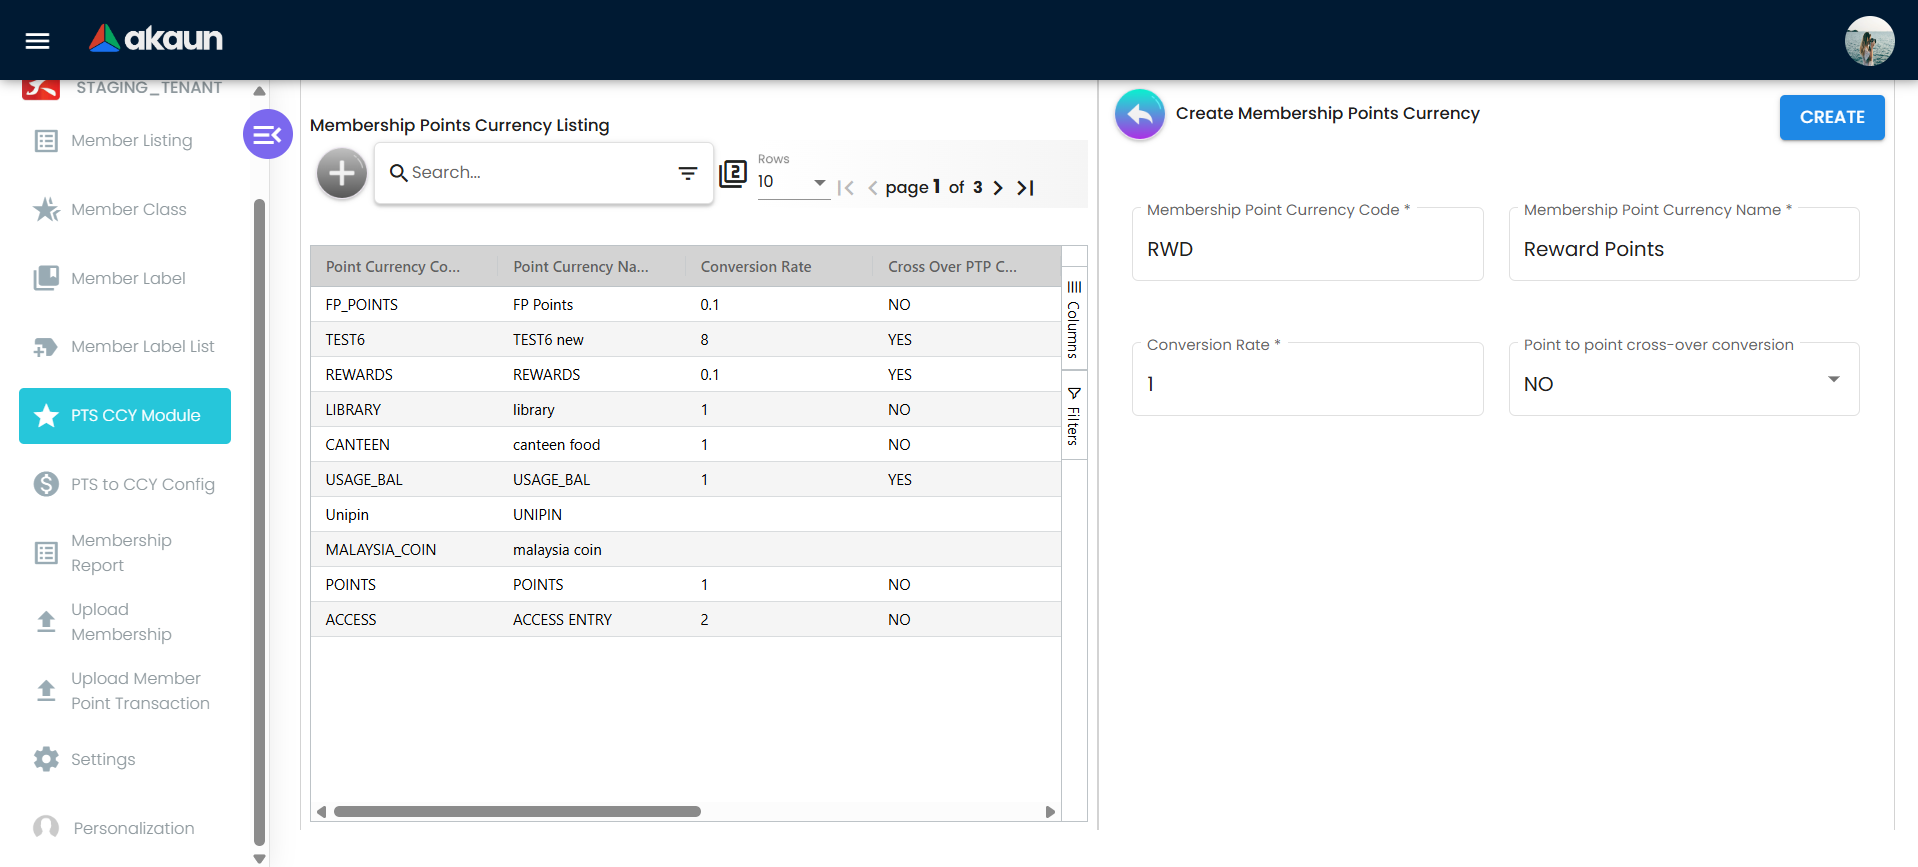
- Create one point type: Click
PTS CCY Modulein the left sidebar → Click the Create button (add icon, top-left) → Fill in the form:- Membership Point Currency Code: Short code in ALL-CAPS (e.g.,
LPT) - Membership Point Currency Name: Display name (e.g.,
Loyalty Points) - Conversion Rate: Enter
1→ Click CREATE
- Membership Point Currency Code: Short code in ALL-CAPS (e.g.,
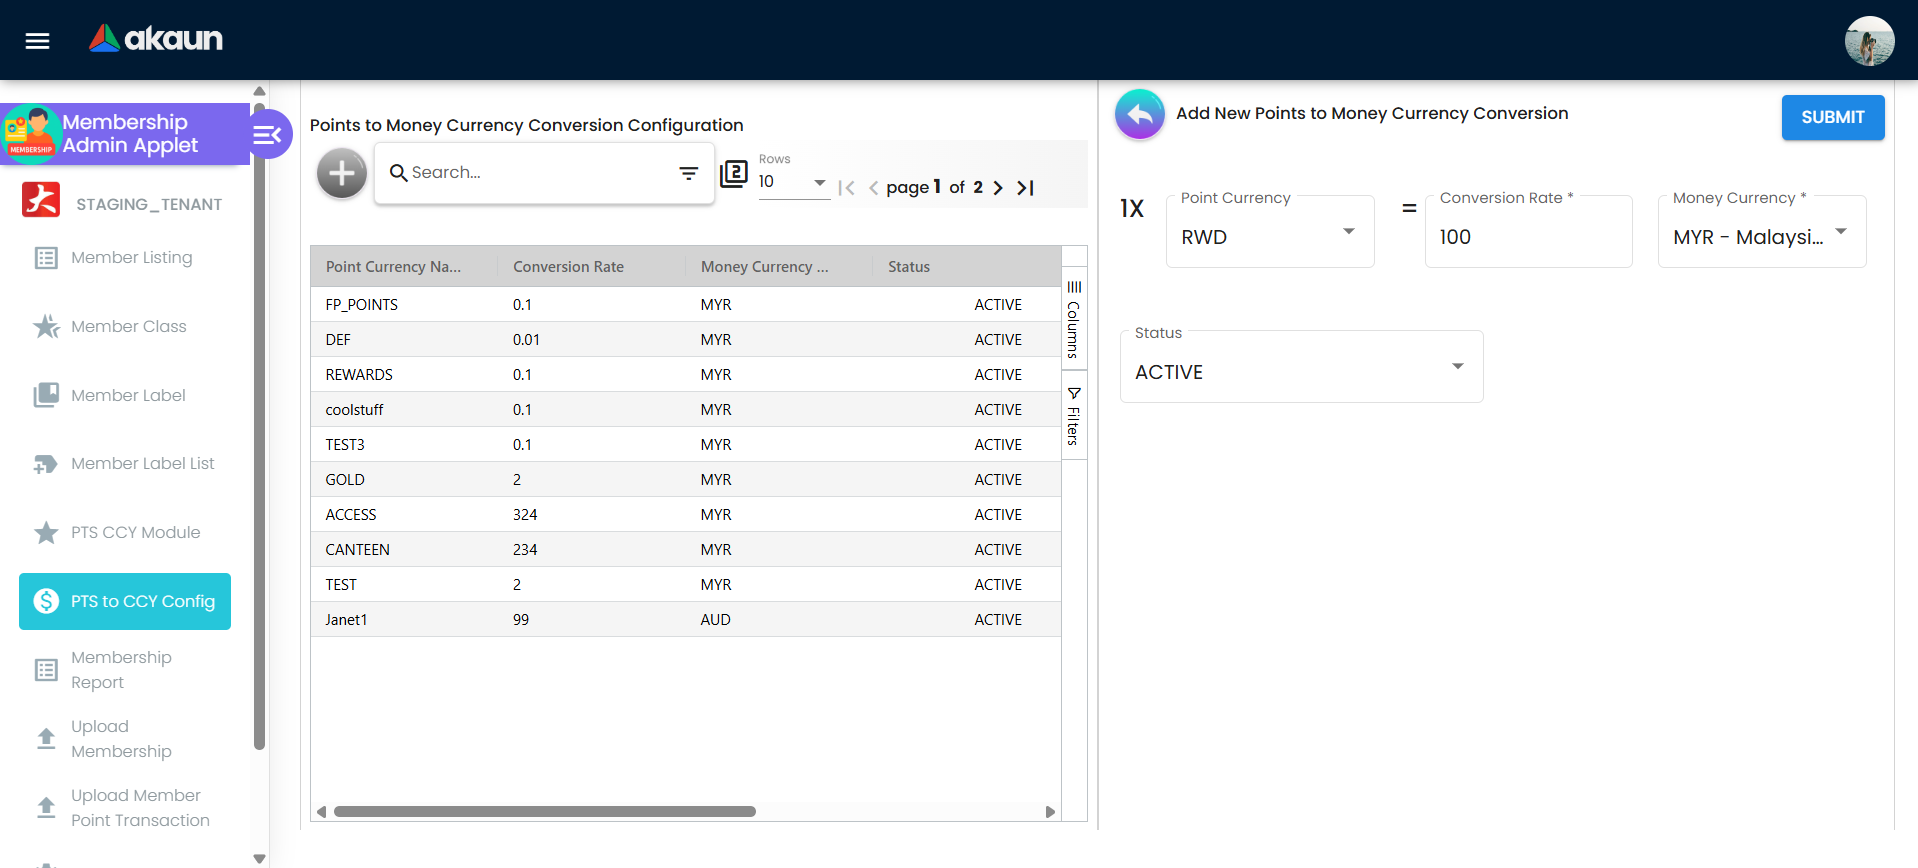
- Set the points-to-money rate: Click
PTS to CCY Configin the left sidebar → Click Create → Fill in the form:- Point Currency: Select the currency you just created (e.g.,
LPT - Loyalty Points) - Conversion Rate: How many points = 1 unit of money (e.g.,
100means 100 points = 1 MYR) - Money Currency: Select
MYR(or your local currency) - Status: Select
ACTIVE→ Click SUBMIT
- Point Currency: Select the currency you just created (e.g.,
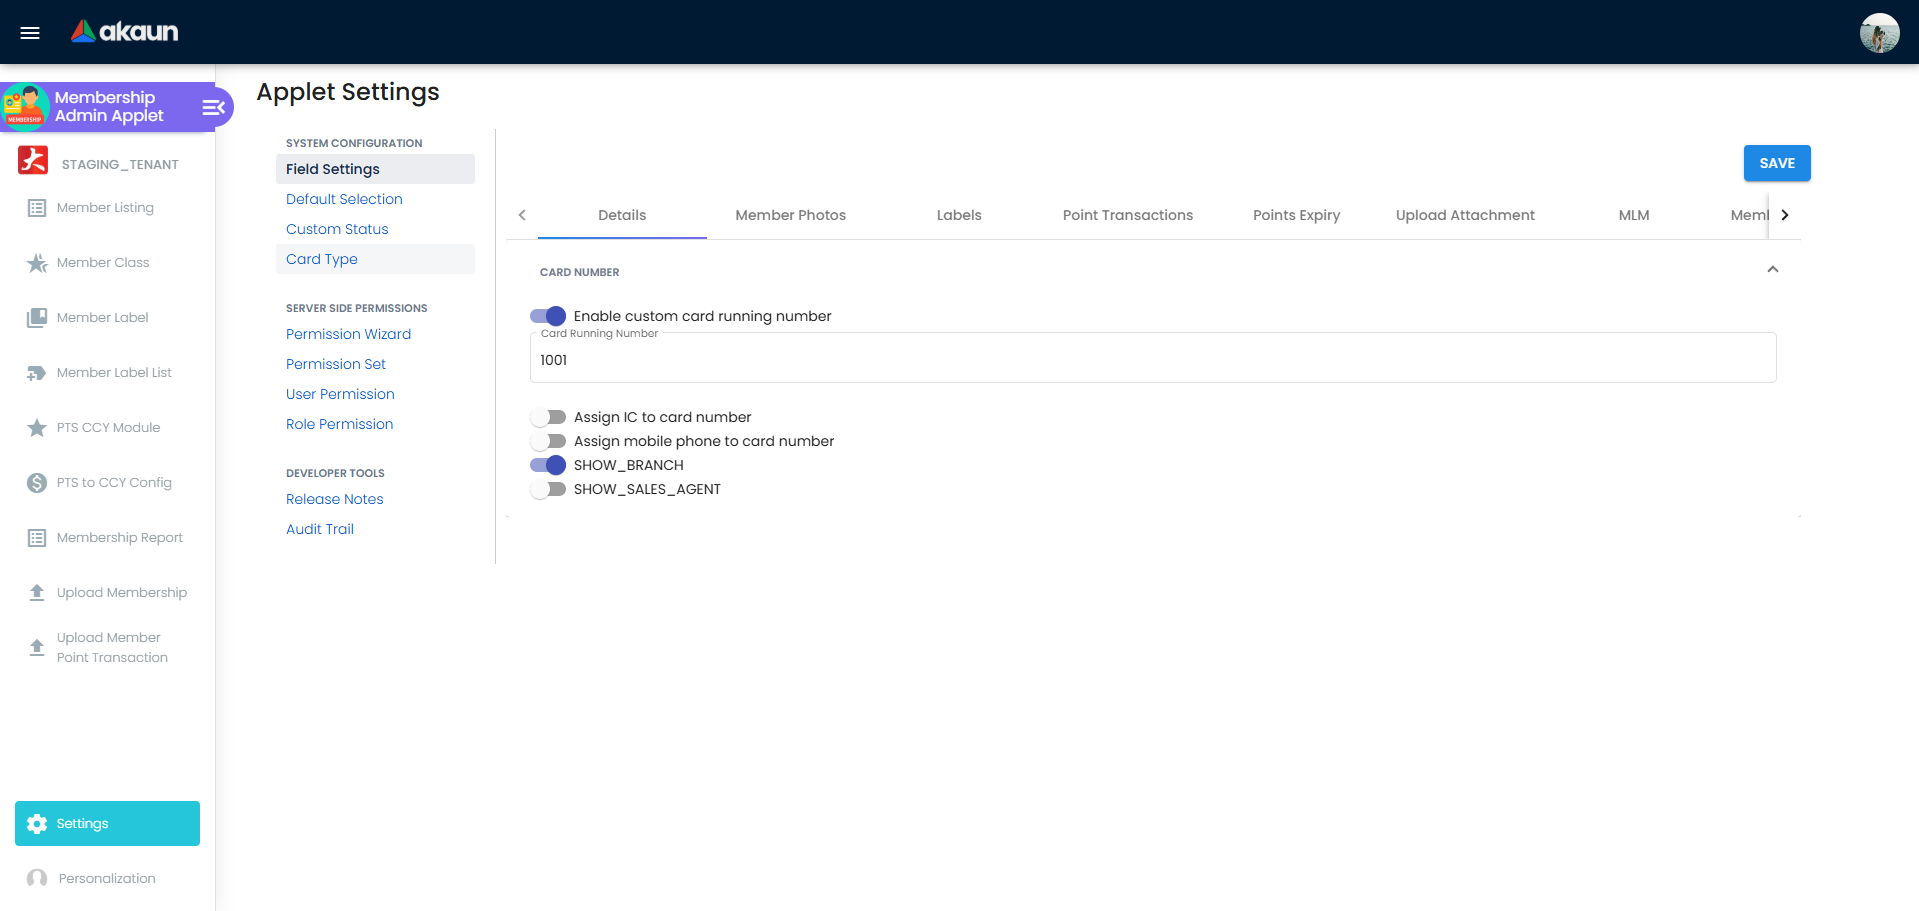
- Review field settings: Click the Settings icon in the sidebar → Select
Field Settingsfrom the sub-menu → Review the Details tab with toggle switches for card number configuration → Click SAVE
- Done! You can now register members and they can earn/redeem points.
For Support Staff (Daily Use)
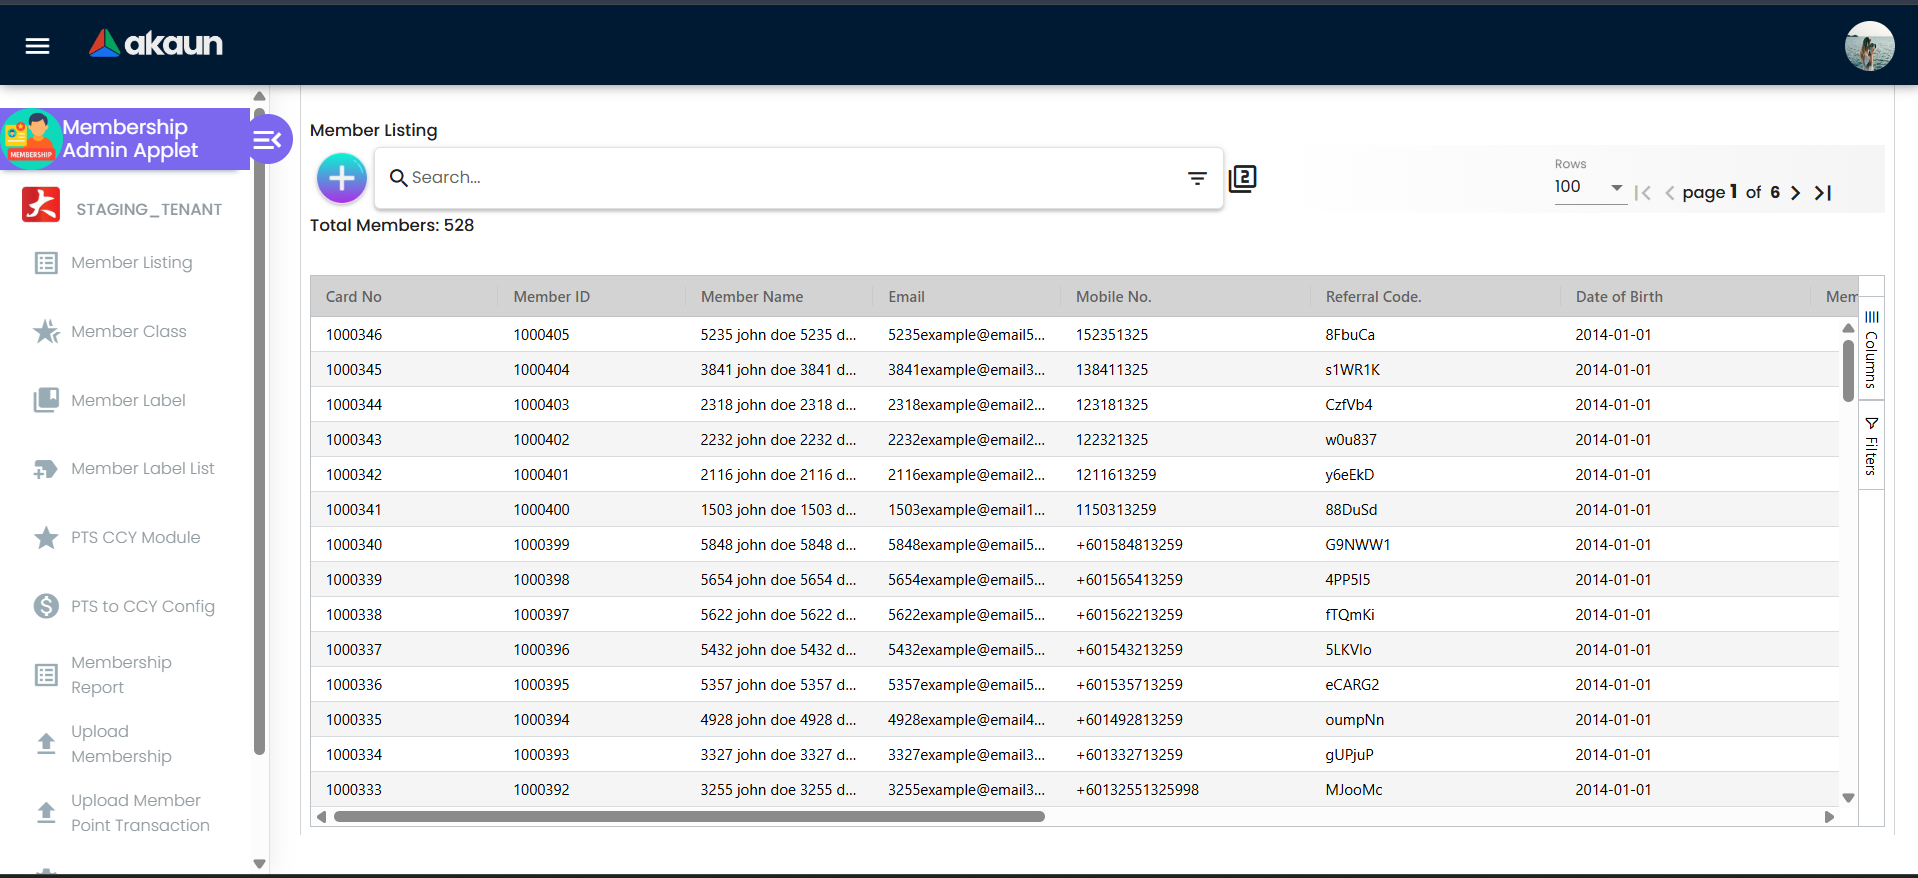
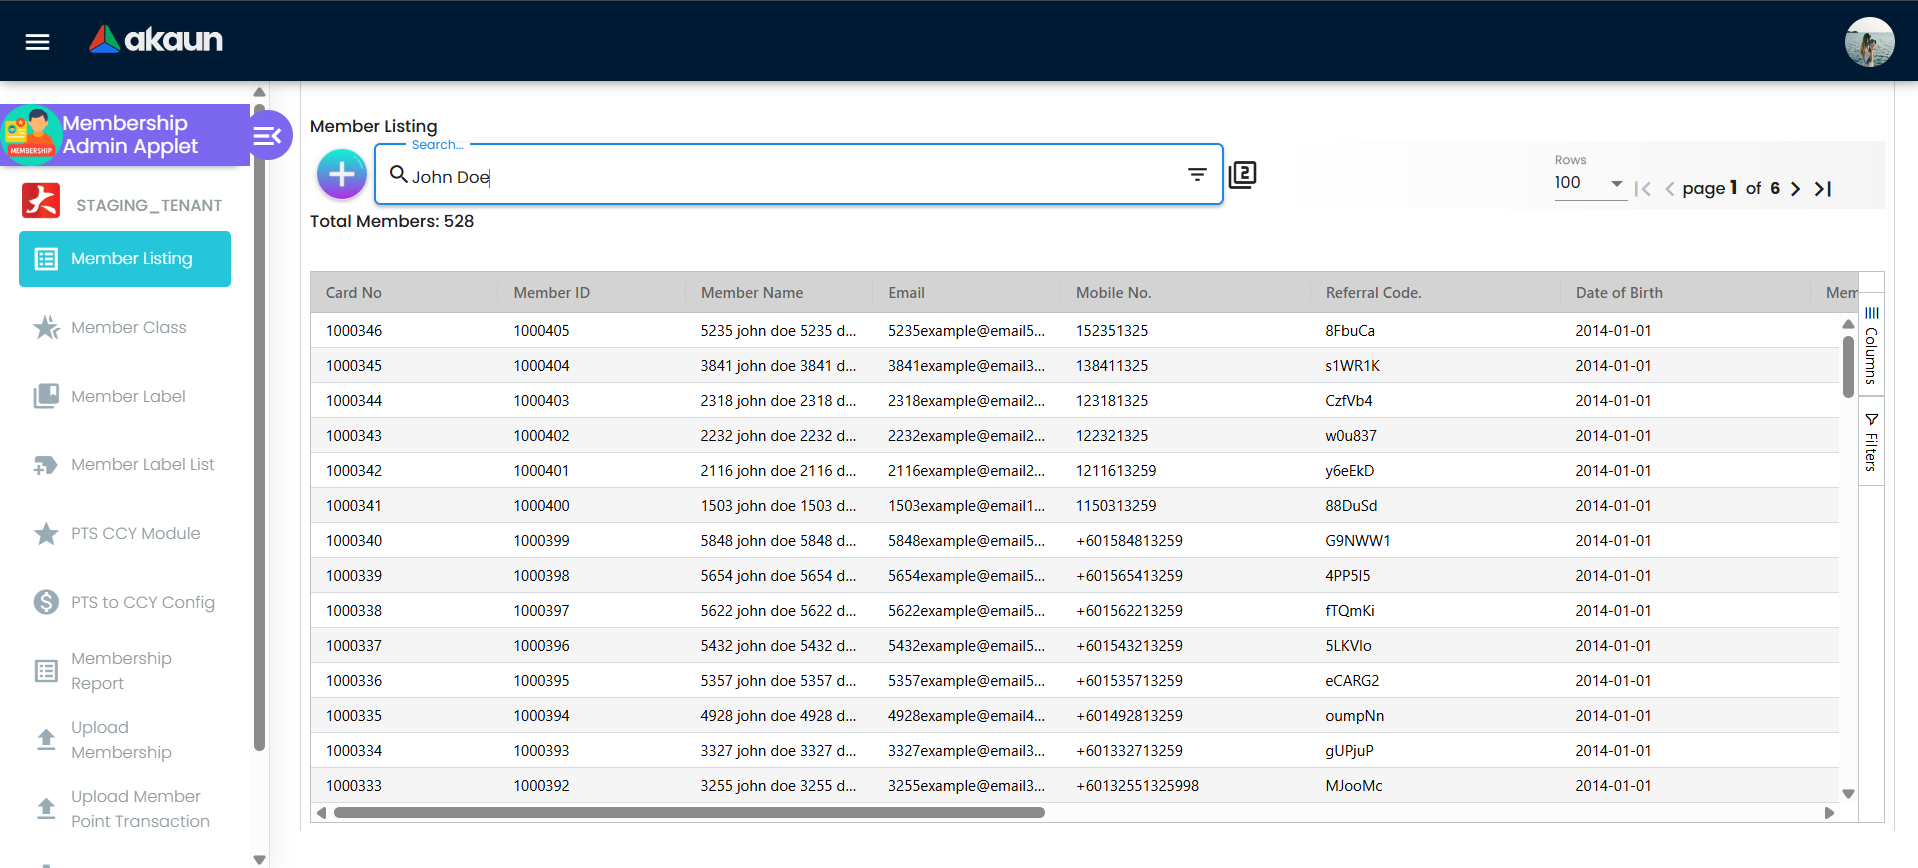
- Find a member: Click
Member Listingin the left sidebar → Use the search bar at the top to search by name, phone, or email → Click on the member’s row to open their profile
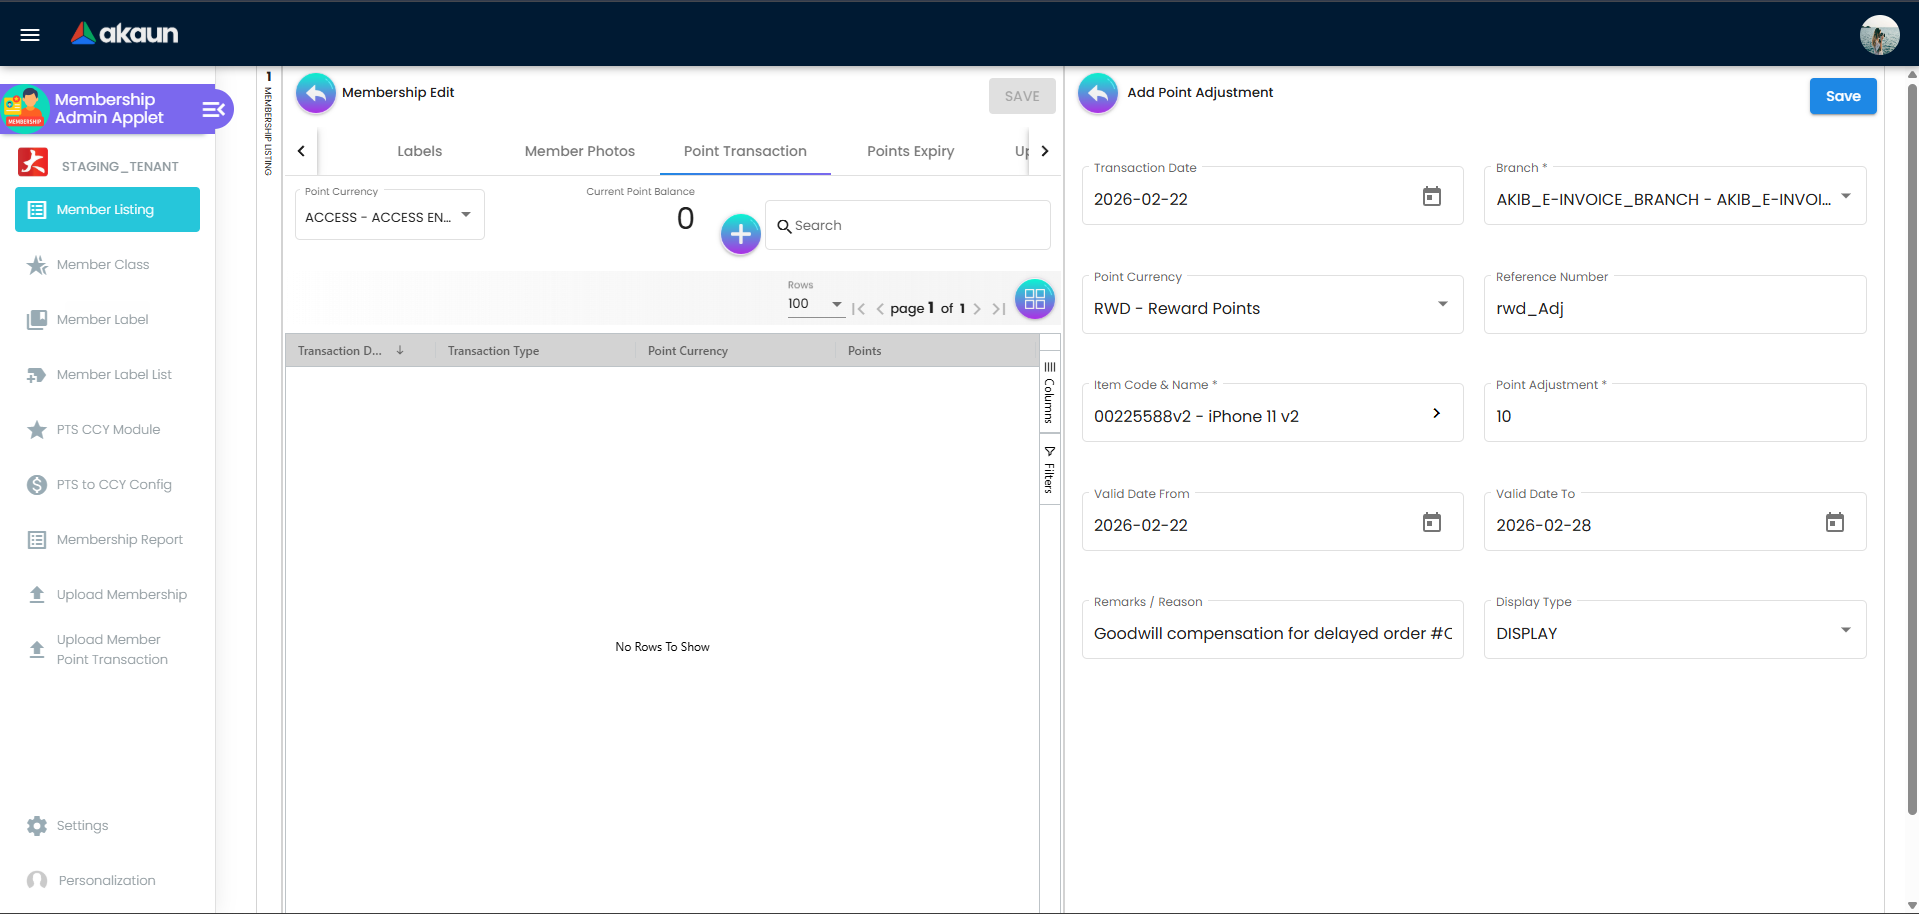
- Adjust points (if needed): From inside the member’s profile, click the Add Point Adjustment button → Fill in the form:
- Transaction Date: Select today’s date using the date picker
- Branch: Select your branch from the dropdown
- Point Currency: Select the point type (e.g.,
LPT - Loyalty Points) - Item Code & Name: Click the arrow icon to select an item/reason, or type it directly
- Point Adjustment: Enter positive to add (e.g.,
500) or negative to deduct (e.g.,-500) - Remarks / Reason: Type a clear explanation (e.g.,
Goodwill for delayed order #ORD-123) → Click Save
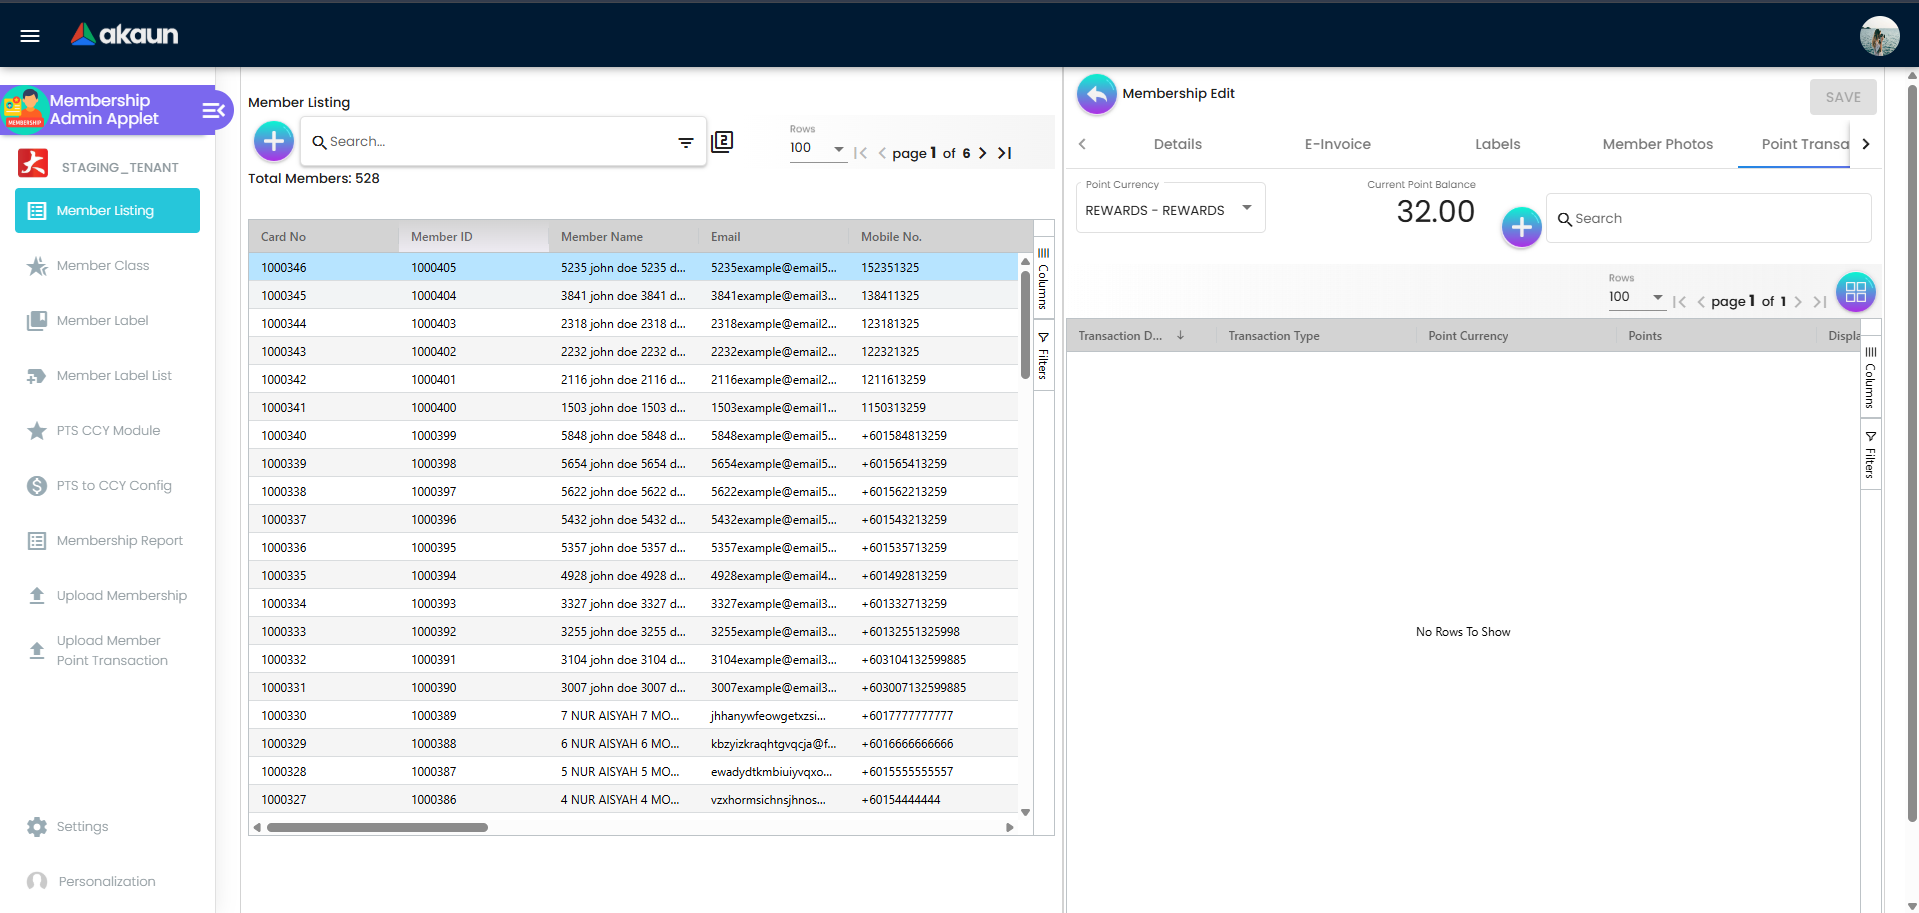
- Check transaction history: Scroll down inside the member’s profile to find the Transaction History section
For Marketing Teams
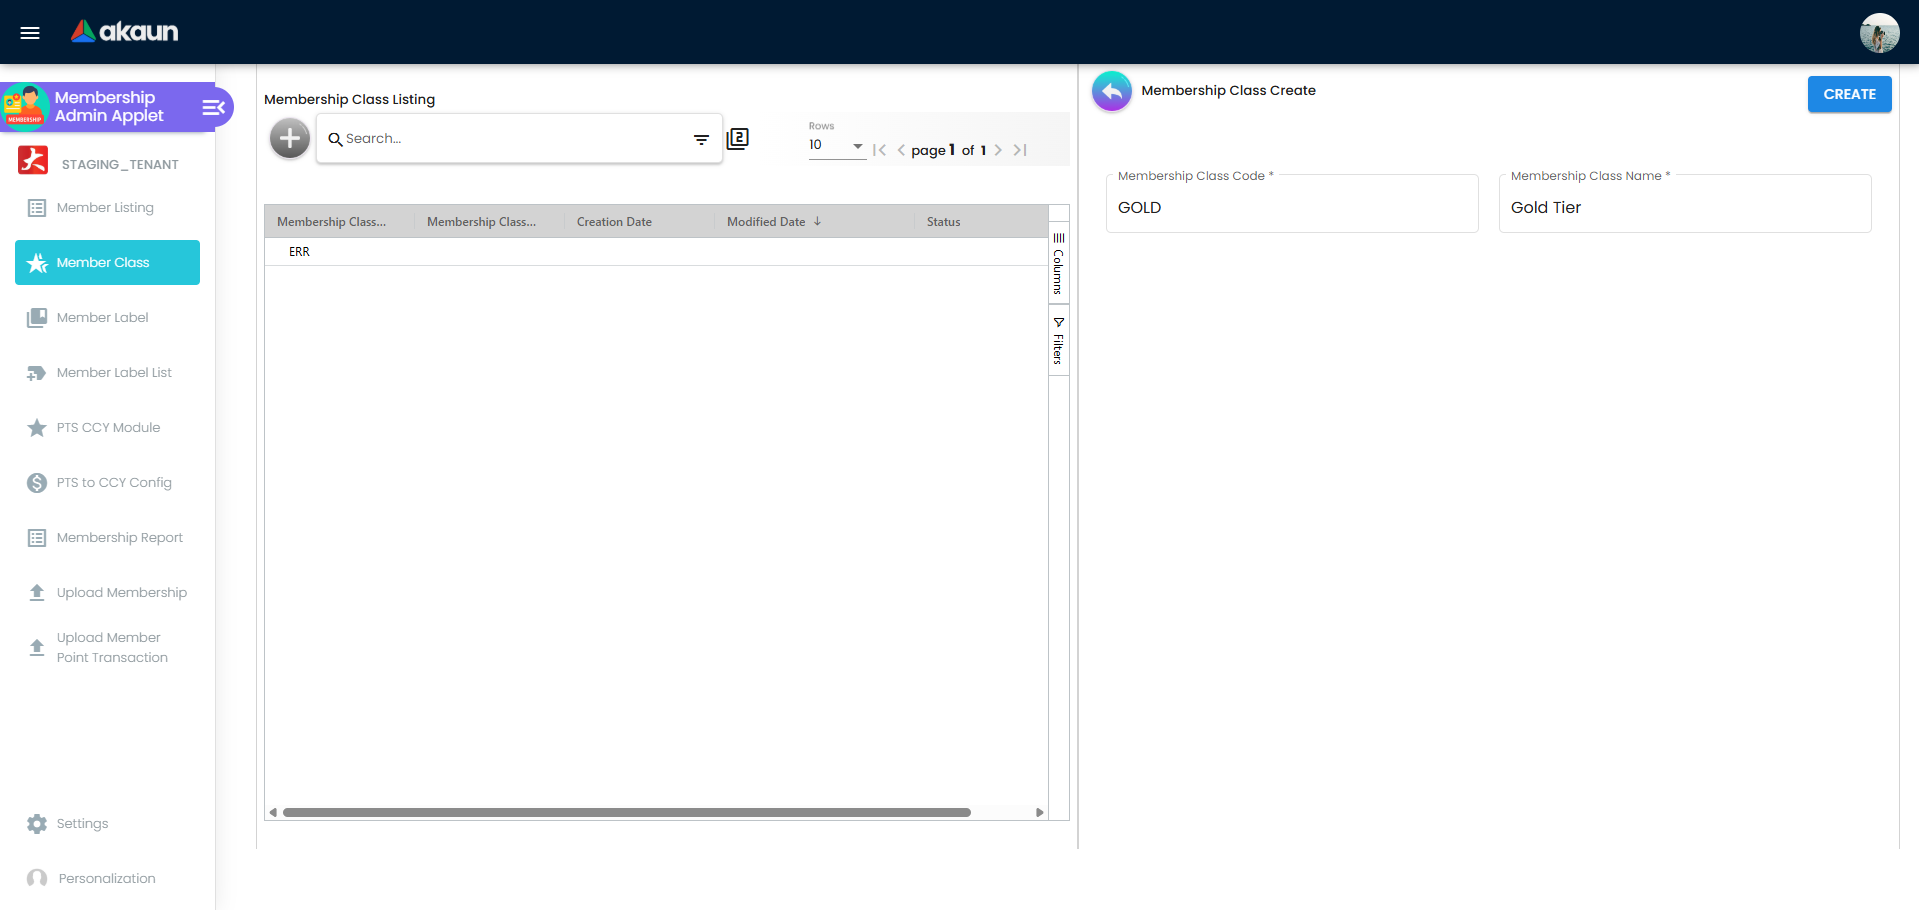
- Create a tier: Click
Member Classin the left sidebar → Click the Create button → Enter the class name (e.g.,Gold) and configure benefits → Click SAVE
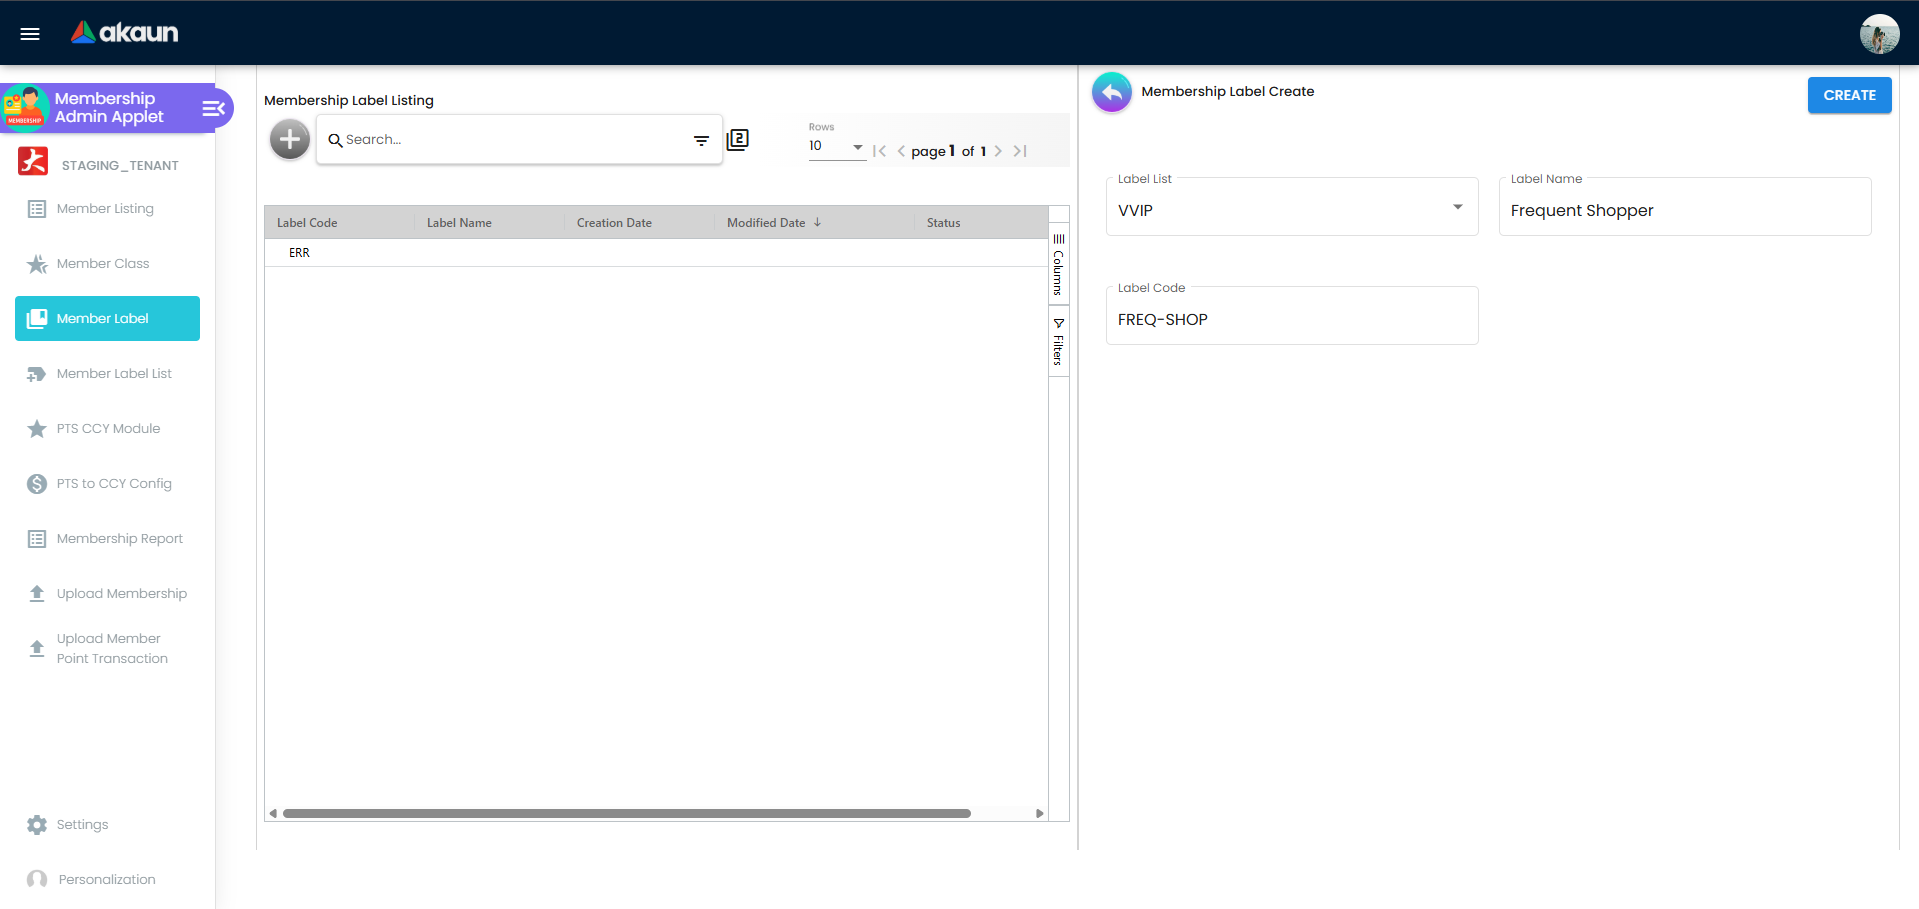
Member Label in the left sidebar → Click Create → Enter a label name (e.g., Frequent Shopper) → Click SAVE
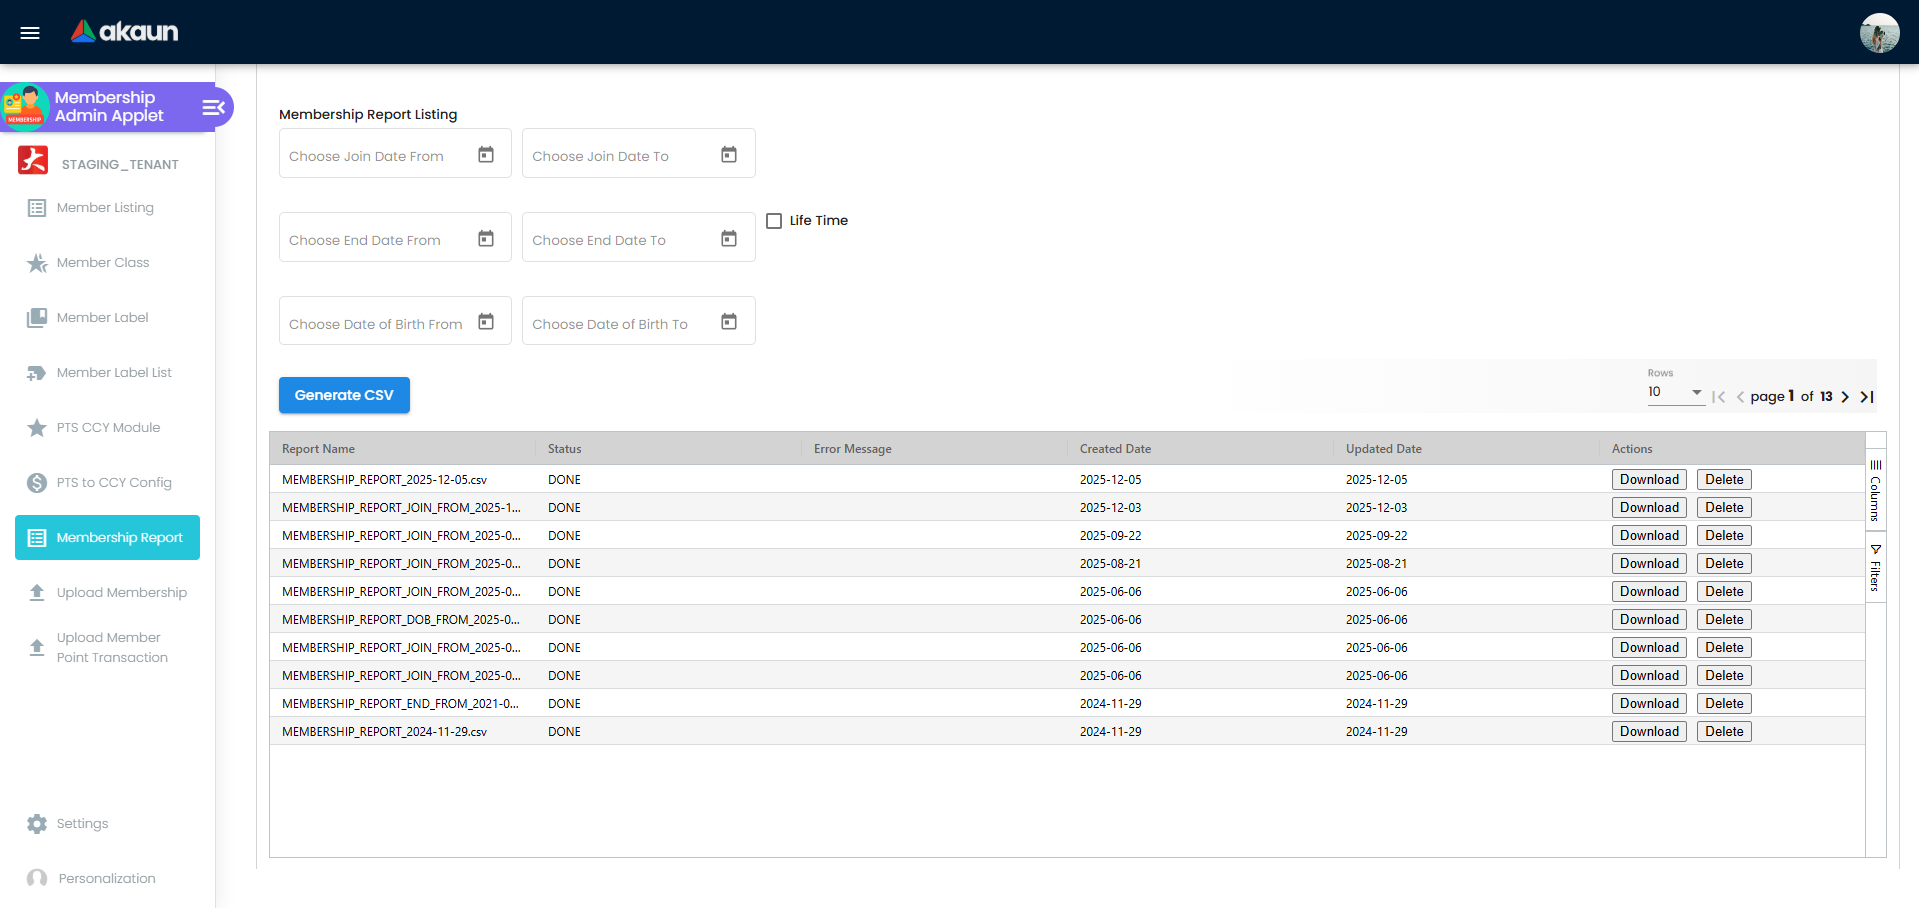
Membership Report in the sidebar → Select your filters (e.g. Join Date or DOB) → Click Generate CSV → Download the completed report from the list below.
Admin Setup Checklist
Setting up a new loyalty program? Complete these steps in order:
- Step 1: Review Before You Begin business decisions (30 mins)
- Step 2: Create point currencies → Guide
- Step 3: Set up conversion rates → Guide
- Step 4: Configure registration fields → Guide
- Step 5: Create member tiers (optional) → Guide
- Step 6: Create member labels (optional) → Guide
- Step 7: Set up permissions → Guide
- Step 8: Test with fake member account → Guide
- Step 9: Train staff on daily operations
- Step 10: Launch to real customers!
Estimated time: 2-4 hours for basic setup
Key Concepts
Understanding the Membership Framework
To effectively manage the system, you need to understand four core building blocks and how they work together.
The Four Building Blocks Explained
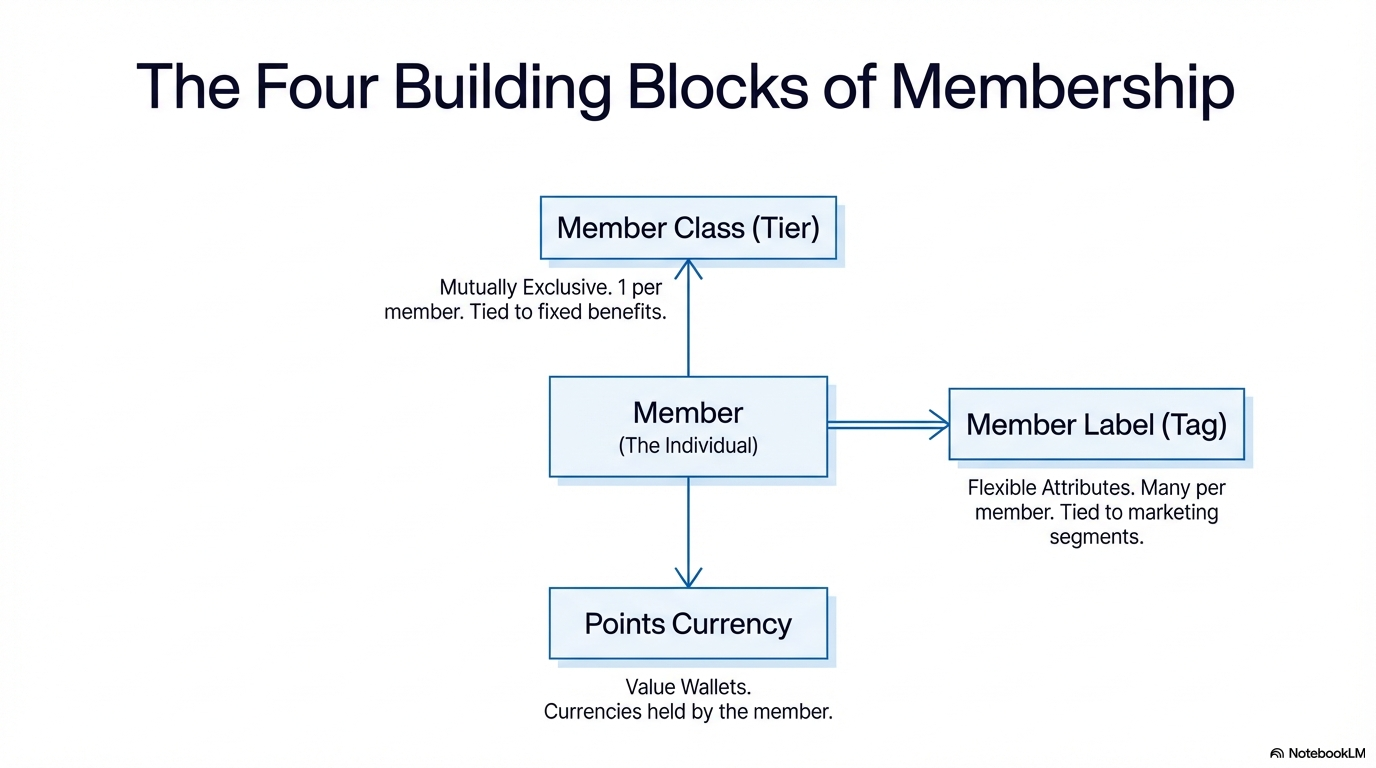
| Building Block | What It Is (Plain English) | Example |
|---|---|---|
| Member | An individual customer enrolled in your program | Sarah Chen, Customer #12345 |
| Member Class (Tier) | A membership level that grants specific benefits. Each member belongs to ONE class at a time. | Bronze, Silver, Gold, Platinum |
| Member Label (Tag) | A flexible category for grouping members. Each member can have MANY labels at once. | VIP Customer, Vegetarian, Golfer, Birthday This Month |
| Points Currency | A specific type of value a member can collect and spend | Reward Points, Status Miles, Gift Certificates |
Member Class vs Member Label: When to Use Which?
This is the #1 concept to master — it determines your entire program structure.
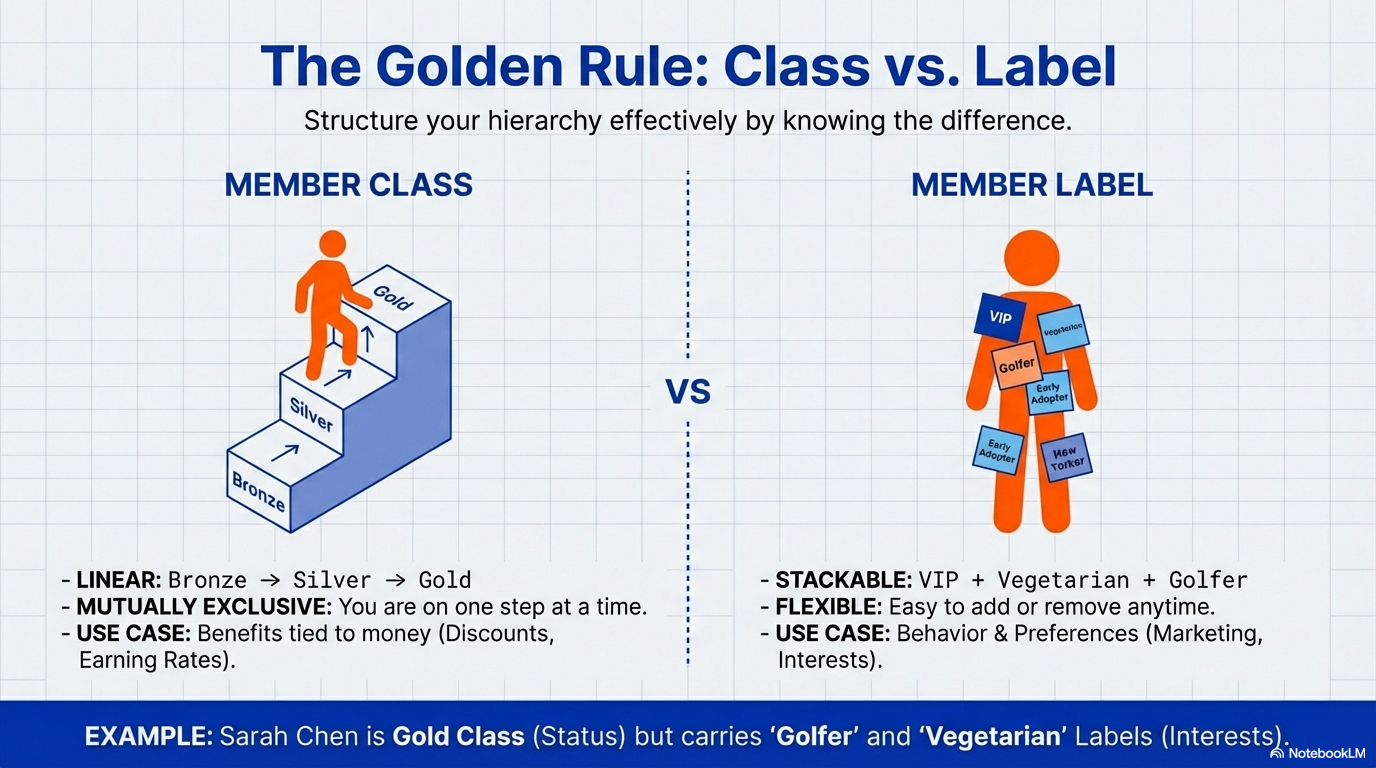
Quick Definition:
- Member Class = Membership tier (Bronze/Silver/Gold) — ONE per member, tied to benefits
- Member Label = Flexible tag (VIP/Vegetarian/Golfer) — MANY per member, for marketing
Member Classes (Tiers) — Use for long-term status
- Mutually exclusive: A member is Gold OR Silver, never both
- Usually tied to benefits: Gold members get 10% discount, Silver get 5%
- Hard to change: Moving tiers usually requires hitting spending thresholds
- Think: “What VIP level is this customer?”
Member Labels (Tags) — Use for flexible segmentation
- Stackable: A member can be “VIP” AND “Vegetarian” AND “Golfer” simultaneously
- Usually for marketing: Send golf promotions to all “Golfer” label holders
- Easy to add/remove: Apply or remove labels anytime
- Think: “What categories does this customer belong to?”
Real-World Example:
Sarah Chen is a:
- Member Class: GOLD (she's a high-value customer)
- Labels: Vegetarian, Birthday-March, Frequent-Online-Shopper

This means:
→ She gets Gold-tier discount (10% off) on all purchases [from her Class]
→ She receives vegetarian menu promotions [from Vegetarian label]
→ She gets a birthday gift in March [from Birthday-March label]
→ She sees online-exclusive deals [from Frequent-Online-Shopper label]How Members, Classes, Labels, and Currencies Connect
Here’s a visual map showing how these four pieces fit together:
                        MEMBER (Sarah Chen)
                              |
                              |
            +-----------------+-----------------+
            |                                   |
            |                                   |
      MEMBER CLASS                      MEMBER LABELS
   (One per member)                  (Many per member)
            |                                   |
      [Gold Tier] ──────────────────────> [VIP, Vegetarian, Golfer]
            |                                   |
            |                                   |
            v                                   v
    Benefits Granted:                  Marketing Segments:
    • 10% Discount                     • Golf promotions
    • Earn 2x Points                   • Veggie menu offers
    • Priority Support                 • VIP event invites
            |
            |
            v
      POINTS WALLET
            |
    +-------+-------+
    |               |
Reward Points   Status Miles
  (1,540)          (8,200)
    |               |
    v               v
Spending       Tier Progress
(Redeem)       (Qualification)
Flow Explanation:
- Sarah (Member) is assigned to the Gold tier (Member Class)
- She is also tagged with three Labels: VIP, Vegetarian, Golfer
- Her Gold Class gives her specific benefits (discounts, bonus earning rates)
- Her Labels determine what promotions she receives
- She earns two types of Points: Reward Points (for spending) and Status Miles (for tier qualification)
The “Points Ecosystem”
The system allows for complex point interactions:
- Earning: Members earn Points through actions (e.g., 1 Point per $1 spent, bonus points for birthdays, etc.)
- Conversion (optional):
- Points-to-Points: Convert 1,000 Reward Points → 500 Partner Miles
- Points-to-Money: Redeem 100 Points → $1.00 off next purchase
- Expiry: Points can be set to expire based on rules you define (e.g., “Expires December 31” or “Expires 12 months after earning”)
- Balance Tracking: Members see their current balance in real-time via mobile app or website
Quick Reference Cards
Point Adjustment Quick Reference
When to Use:
- Service failure compensation
- Fixing errors
- Goodwill gestures
- Birthday bonuses
How:
- Find member in Member Listing
- Click “Add Point Adjustment”
- Enter amount (+positive or -negative)
- Write clear reason
- Submit
Best Practices:
- Always explain WHY
- Include reference numbers (order #, ticket #)
- Double-check amount
- Never use vague reasons like “adjustment”
Bulk Import Checklist
Before Upload:
- Download CSV template first
- Test with 10 members before full upload
- Set Excel columns to “Text” format
- Verify dates are YYYY-MM-DD format
- Check phone numbers have country codes
- Remove duplicate Member IDs
- Save as UTF-8 encoded CSV
Common Errors:
- Duplicate Member ID → Use unique IDs
- Invalid email → Check for @ and .com
- Wrong date format → Use YYYY-MM-DD
- Missing required field → Fill all asterisk columns
Permission Matrix Quick Guide
| Role | View Members | Adjust Points | Delete Members | Configure System |
|---|---|---|---|---|
| Cashier | Yes | No | No | No |
| Support Agent | Yes | Yes (up to 500) | No | No |
| Supervisor | Yes | Yes (up to 5,000) | No | No |
| Marketing Manager | Yes | No | No | Limited (labels only) |
| System Admin | Yes | Yes (unlimited) | Yes | Yes |
Most Common Daily Tasks
Task: Find a member’s point balance
→ Member Listing → Search → View profile → See Wallet Balance
Task: Add compensation points
→ Member Listing → Find member → Add Point Adjustment → Enter amount & reason
Task: Check why points were deducted
→ Member profile → Scroll to Transaction History → Find transaction → View details
Task: Export members for campaign
→ Member Listing → Apply filters (tier/label) → Click Export
Task: Create a new promotion label
→ Member Label → Create → Name it → Save → Assign to members
Task: Upload new members in bulk
→ Member Master Data Listing → Download template → Fill data → Upload
Member Management
The central directory of your customers and their loyalty data.
Member Profile 360
What it is: A complete view of everything about one member — like opening their full customer file.
How to access it:
- Go to Member Listing
- Find the member (search by name, phone, or email)
- Click on their name or the Eye Icon
What you’ll see:
Profile Details Section:
- Full name, contact info (email, phone, address)
- Join date (when they enrolled)
- Current tier (Bronze, Silver, Gold, etc.)
- Member ID or card number
- Assigned labels (Vegetarian, VIP, Golfer, etc.)
Wallet Balance Section:
- Current balance for each type of point currency (if you have multiple)
- Example: “Reward Points: 1,540” and “Status Miles: 8,200”
- Click on a currency to see detailed breakdown
Transaction History Section:
- Every point movement ever recorded for this member:
- Earned: Points from purchases (shows date, amount, order number)
- Redeemed: Points used for rewards (shows what they got)
- Adjusted: Manual changes by staff (shows who made the change and why)
- Expired: Points removed by expiry rules
- Date range filters: Show only recent transactions or specific months
- Export button: Download their full history to Excel if needed
Privileges/Benefits Section:
- Shows which Member Class they belong to (their tier)
- Lists what benefits they get (e.g., “10% discount”, “Double point earning”)
- Shows qualification criteria (e.g., “Must spend $5,000/year to maintain Gold status”)
Manual Adjustments
What it is: The ability to add or remove points from a member’s account directly (bypassing the normal earning process).
When to use it:
- Compensating for service failures (“Sorry your order was late — here’s 500 points”)
- Fixing errors (“We accidentally gave you 5,000 points instead of 500 — correction needed”)
- Goodwill gestures (“Welcome back after being away — bonus 200 points”)
- Promotional bonuses (“Happy birthday — 100 bonus points!”)
When NOT to use it:
- Regular purchase earning (should come from POS automatically)
- Promotional campaigns (use bulk operations instead)
- Favoring specific customers without business justification (creates unfairness)
How to Make an Adjustment:
- Open the member’s profile (see Member Profile 360 above)
- Click Add Point Adjustment button
- Fill in the form:
- Select Currency: Choose which type of points (e.g., “Loyalty Points”)
- Amount:
- Enter a positive number to add points (e.g.,
500) - Enter a negative number to remove points (e.g.,
-500)
- Enter a positive number to add points (e.g.,
- Reason/Notes: Type a clear explanation (this is recorded forever for auditing)
- Reference Number (optional): Link to an order number, ticket ID, or case number if relevant
- Review your entry carefully (mistakes can upset members!)
- Click Submit
What happens immediately:
- Member’s balance updates in real-time
- They see the change in their app/account within seconds
- Transaction appears in their history with type “Adjusted”
- Your username and timestamp are recorded
- Email notification can be sent (if enabled in settings)
Best Practices for Adjustments:
Always explain why: Write reasons like “Compensation for delayed order #12345” instead of just “Adjustment”
Be specific: “Goodwill for 30-min wait time on 12/15/2025” is better than “Goodwill”
Get approval for large amounts: If your company policy requires manager approval for adjustments over 1,000 points, follow it
Document everything: If a member calls asking “Why did I lose points?”, the reason field will have the answer
Use reference numbers: Link adjustments to support tickets or order numbers for easy tracking
Double-check amounts: Adding 50,000 instead of 5,000 is a costly mistake
Common Mistakes to Avoid:
- Adjusting the wrong member (always verify name before submitting)
- Forgetting the negative sign when deducting points
- Vague reasons like “error” (what kind of error?)
- Adjusting without checking current balance first
Audit Trail:
Every adjustment creates a permanent record showing:
- Who made the change (your username)
- When it happened (date and time)
- How much changed (amount and currency)
- Why it happened (your reason text)
- What the balance was before and after
Why this matters: If auditors or management ask “Why does this member have so many bonus points?”, you can show the complete trail proving each adjustment was legitimate.
Points Currency Management
The engine that powers how members earn and spend rewards.
This section is detailed (380+ lines). For most businesses:
- Use single currency strategy (simplest)
- Set 100 points = $1 conversion rate (easy math)
- Choose calendar year expiry (clean accounting)
Skip to Configuration if you just need basic setup.
Understanding Point Currencies (Multiple “Wallets”)
What it is: A Point Currency is a type of value members can collect, like different types of money in a wallet. Just like you might have dollars and euros in your wallet, members can have different types of points.
Why use multiple currencies?
- Separation of purpose: “Reward Points” for shopping discounts vs. “Status Points” for tier qualification
- Different rules: Shopping points expire annually, but status points never expire
- Partner programs: Your points + airline miles + hotel points all coexist
- Campaign flexibility: Launch temporary “Holiday Bonus Coins” without affecting main program
Common Currency Strategies:
Strategy 1: Single Currency (Simplest)
One type: "Loyalty Points"
- Earned: 1 point per $1 spent
- Redeemed: 100 points = $1 off
- Expiry: December 31st each year
- Best for: Small businesses, straightforward programs
Strategy 2: Dual Currency (Most Common)
Currency 1: "Reward Points" (for spending)
- Earned: 1 point per $1 spent
- Redeemed: 100 points = $1 off
- Expiry: Expires after 12 months

Currency 2: "Status Miles" (for tier upgrades)
- Earned: 1 mile per $10 spent
- Not redeemable: Only counts toward tier status
- Expiry: Never expires
- Example: 10,000 miles = Gold tier, 50,000 miles = Platinum

Best for: Businesses wanting to separate spending rewards from tier progression
Strategy 3: Multiple Currencies (Advanced)
Currency 1: "Shop Coins" (main currency)
Currency 2: "Referral Tokens" (earned by inviting friends)
Currency 3: "Birthday Bonus" (special annual gift)
Currency 4: "Partner Miles" (earned at partner locations)

Best for: Large enterprises, complex ecosystems
Conversion Rules (How Points Become Value)
What it is: The exchange rate that determines what points are worth. Without conversion rules, points are just numbers with no value.
Type 1: Points-to-Money Conversion (Most Common)
What it does: Converts points into real money off purchases.
Example Setup:
Conversion Rule: "Loyalty Points → MYR"
Rate: 100 points = 1.00 MYR
Valid: January 1 - December 31, 2025

What members see:
"You have 2,500 points = $25.00 in rewards!"

At checkout:
- Purchase total: $50.00
- Redeem 2,000 points: -$20.00
- Final payment: $30.00
Advanced: Tiered Conversion Rates
Regular Members: 100 points = $1.00 (1% value)
Gold Members:    100 points = $1.25 (1.25% value — better deal!)
Platinum:        100 points = $1.50 (1.5% value — best deal!)

This rewards high-tier members with better redemption value.
Time-Limited Promotions:
Normal rate (Always):  100 points = $1.00
Holiday rate (Dec only): 80 points = $1.00   ← Better value!

Use this to drive redemptions during slow periods.
Type 2: Points-to-Points Conversion (For Partner Programs)
What it does: Converts your points into a partner’s points (like converting store points to airline miles).
Example Setup:
Conversion Rule: "Loyalty Points → Airline Miles"
Rate: 1,000 Loyalty Points = 500 Airline Miles
Valid: All year

Member's choice:
Option A: Redeem 1,000 points for $10 off next purchase
Option B: Convert 1,000 points to 500 airline miles

This gives members flexibility to choose their preferred reward type.
When to use this:
- Partnership agreements with other brands
- Multi-brand loyalty programs
- Giving members more redemption options
How to Set Up Conversions:
For Points-to-Money:
- Go to Membership Points to Money Currency Conversion
- Click Create New Conversion
- Fill in:
- From Currency: Select your point type (e.g., “Loyalty Points”)
- To Currency: Select money (e.g., “MYR”, “USD”)
- Conversion Rate: Enter the ratio (e.g., “100” points = “1.00” money)
- Valid From/To Dates: Set when this rate applies
- Member Class Filter (optional): Apply different rates to different tiers
- Click Save
For Points-to-Points:
- Go to Membership Points to Points Currency Conversion
- Click Create New Conversion
- Fill in:
- From Currency: Your store points
- To Currency: Partner points
- Conversion Rate: Enter the ratio
- Click Save
Testing Conversions:
Before launching, verify your rates make financial sense:
Example Calculation:
If you give 1 point per $1 spent, and 100 points = $1 off...
→ 1% reward rate (customer gets back 1% of spending)
→ For every $10,000 in sales, you give $100 in rewards
→ Is this sustainable for your margins?

If your margin is 30% ($3 profit per $10 sale):
→ $100 reward cost = 33 sales @ $3 profit each
→ You need the member to make 33+ purchases to break even
Pro Tip: Most retail programs use 1-2% reward rates. Airlines use 5-10% because they have high margins on loyalty redemptions (empty seats cost them almost nothing).
Expiry Management (Preventing Liability Buildup)
What it is: Rules that automatically remove old points to prevent members from hoarding forever.
Why expiry matters:
For Business (Accounting):
- Outstanding points = Financial liability (debt on your books)
- If every member redeemed at once, could you afford it?
- Expiry reduces liability by removing unused points
For Members (Psychology):
- Expiry creates urgency: “Use it or lose it!”
- Drives redemption and store visits
- But can frustrate members if poorly communicated
Expiry Strategies:
Option 1: No Expiry (Simplest, Highest Risk)
Points never expire
Pros: Members love it, no confusion
Cons: Liability keeps growing, no urgency to redeem
Best for: New programs, luxury brands (where loyalty matters more than liability)
Option 2: Calendar Year Expiry (Common)
All points expire December 31st each year
Pros: Clean accounting, predictable liability
Cons: Members lose points on fixed date regardless of when earned
Best for: Annual-budget businesses, B2B programs
Option 3: Rolling Expiry (Fairest)
Points expire 12 months after earning date
Example: Points earned Jan 15, 2025 expire Jan 15, 2026
Pros: Fair to members, encourages regular engagement
Cons: Complex to communicate
Best for: Retail, restaurants, recurring-purchase businesses
Option 4: Hybrid (Advanced)
Reward Points: Expire after 12 months (rolling)
Status Points: Never expire
Campaign Points: Expire with campaign end date
Best for: Multi-currency programs
Setting Up Expiry:
- When creating/editing a Points Currency, find the Expiry Policy section
- Choose expiry type:
- “Never expires”
- “Fixed date” (enter a specific calendar date)
- “Relative” (enter number of days/months from earning: e.g., “365 days” = 12 months)
- Set Warning Period (optional): “Notify members 30 days before expiry”
- Save
What happens automatically:
- System checks expiry daily
- Expired points are removed from member balances
- Members receive advance warnings (if enabled)
- Transactions show “Expired” in history
Currency Settings Reference
When creating a Points Currency, here’s what each setting means:
| Setting | What It Controls | Example |
|---|---|---|
| Currency Name | Display name shown to members | “Loyalty Points”, “Reward Coins” |
| Currency Code | Internal system identifier (like a nickname for the database) | “LP”, “RC” |
| Symbol | Icon shown next to balance | Leave blank for just numbers or use simple text symbols |
| Decimals | Can members have fractional points? | 0 decimals = whole numbers only (1, 2, 3). 2 decimals = allows cents (1.25, 3.50) |
| Expiry Policy | When points expire (see Expiry Management above) | “12 months from earning” |
| Transferability | Can members gift points to others? | Usually “Disabled” to prevent fraud |
| Visibility | Show balance to members in app? | Usually “Visible” unless it’s an internal currency |
| Redemption Enabled | Can members spend this currency? | “Yes” for Reward Points, “No” for Status Points (tracking only) |
Configuration & Settings
Fine-tune how the system behaves to match your business rules.
Where to find settings: Click Settings in the sidebar to access all configuration options.
General Settings
What it is: Basic system-wide preferences that apply to everyone.
Key Settings Explained:
Default Selections:
- Purpose: Pre-fill forms to speed up data entry
- Example: If 90% of registrations happen at your Main Street branch, set “Default Branch: Main Street” so staff don’t have to select it every time
- What you can set as default:
- Default Branch
- Default Member Class (tier for new sign-ups)
- Default Currency (if you have multiple)
- Default Status (Active vs. Pending Review)
Card Type Configuration:
- Purpose: Define if members get physical cards or just digital IDs
- Options:
- Physical Cards: Members get plastic cards with magnetic strips or barcodes (requires card printer)
- Virtual Cards: Members get a digital ID card shown in mobile app (no equipment needed)
- Both: Members can choose physical or digital
- Why it matters: Physical cards cost money to produce; virtual cards are free but require members to have smartphones
Date & Time Format:
- Purpose: Match how your region displays dates
- Examples:
- US format: 12/31/2025 (MM/DD/YYYY)
- European format: 31/12/2025 (DD/MM/YYYY)
- ISO format: 2025-12-31 (YYYY-MM-DD)
- Impact: Affects date displays throughout the system
Field Configuration (Customizing Registration Forms)
What it is: Control which information you collect from members during sign-up.
Why customize this:
- Simplify registration (fewer fields = faster sign-ups)
- Comply with privacy laws (only collect what you legally need)
- Match your business needs (B2B might need company name, B2C doesn’t)
How Field Configuration Works:
Access: Settings > Field Configuration
For each field, you control three things:
Visibility (Show or Hide?)
- Show: Field appears on forms
- Hide: Field doesn’t exist for users
- Example: If you don’t need IC Number, hide it
Requirement Level (Can it be skipped?)
- Mandatory: Must be filled before submission (red asterisk appears)
- Optional: Can be left blank
- Example: Email usually mandatory (for receipts), gender usually optional
Editability (Who can change it?)
- Member Can Edit: Members can update this themselves
- Staff Only: Only support staff can change it
- Read-Only: Nobody can edit after creation (like Member ID)
Standard Fields You Can Configure:
| Field Name | What It Stores | Recommendation |
|---|---|---|
| Full Name | Member’s name | Mandatory, Member can edit (for corrections) |
| Email address | Mandatory (needed for receipts and notifications) | |
| Phone Number | Mobile or landline | Mandatory (for account recovery and OTP) |
| Date of Birth | Birthday | Optional (nice for birthday rewards, but sensitive) |
| Gender | Male/Female/Other | Optional (useful for demographic analysis, but can be sensitive) |
| IC Number / National ID | Government ID | Only if legally required (very sensitive — hide if not needed) |
| Address (Line 1, 2, City, State, Postal Code) | Mailing address | Optional (unless you ship physical rewards) |
| Company Name | Employer (for B2B) | Hide for B2C, Mandatory for B2B |
| Member Since | Join date | Read-only (auto-filled by system) |
| Member ID | Unique identifier | Read-only (auto-generated by system) |
Decision Framework:
Before configuring, ask yourself:
- Do we legally need this? (Example: Age verification for alcohol sales → Yes, collect Date of Birth)
- Will we use this data? (Example: If you never send mail → No, hide Address fields)
- Does this speed up or slow down sign-ups? (Each extra field = more friction = fewer sign-ups)
- Is this sensitive information? (IC Numbers, Date of Birth → Only collect if necessary; consider privacy laws)
Common Configurations by Business Type:
Retail Store (B2C):
Mandatory: Name, Email, Phone
Optional: Date of Birth, Gender
Hidden: IC Number, Company Name, Address
Online Business (eCommerce):
Mandatory: Name, Email, Phone, Shipping Address
Optional: Date of Birth
Hidden: IC Number, Company Name
B2B Membership Program:
Mandatory: Name, Email, Phone, Company Name, Position/Title
Optional: Address
Hidden: IC Number, Date of Birth, Gender
Loyalty Program Requiring Age Verification:
Mandatory: Name, Email, Phone, Date of Birth, IC Number
Optional: Gender, Address
Custom Status (Beyond Active/Inactive)
What it is: Create additional member statuses beyond the standard “Active” and “Inactive.”
Default Statuses:
- Active: Member can earn and redeem points normally
- Inactive: Member account is suspended (no earning or redeeming)
Why create custom statuses:
- Temporarily suspend members without fully deactivating (e.g., “Under Review” for fraud investigation)
- Track special conditions (e.g., “VIP Review Pending” for potential upgrades)
- Manage probationary periods (e.g., “Trial Member” for first 30 days)
Examples:
- “Pending Verification”: New members awaiting ID verification
- “Payment Overdue”: B2B members with unpaid invoices
- “Cooling Off Period”: Members who requested temporary pause
- “Closed - Voluntary”: Member requested account closure (different from “Closed - Fraud”)
How to create:
- Go to
Settings > Custom Status - Click Create New Status
- Enter Status Name (e.g., “Pending Verification”)
- Choose behavior:
- Can Earn Points?: Yes/No
- Can Redeem Points?: Yes/No
- Show in App?: Yes (visible to member) / No (internal only)
- Save
Webhooks (For Technical Integrations)
What it is (Simple Explanation): An automatic notification your system sends to other systems when something important happens.
Real-World Analogy: Like setting up your door to automatically send a text message to your phone every time someone rings the bell. You don’t have to constantly check — you get notified when it happens.
Common Use Cases:
Example 1: Notify POS When Member Upgrades
Trigger: Member upgraded from Silver to Gold
Webhook sends message to POS: "Update member #12345 to Gold discount"
POS automatically applies new discount rate at checkout
Example 2: Update Mobile App When Points Change
Trigger: Member earned/redeemed points
Webhook sends message to app backend
App shows updated balance without member needing to refresh
Example 3: Sync with Email Marketing System
Trigger: Member assigned "VIP" label
Webhook notifies email system: "Add to VIP campaign list"
Member automatically gets VIP newsletters
How to Set Up a Webhook (For Admins with IT Support):
- Go to
Settings > Webhooks - Click Create New Webhook
- Fill in:
- Webhook Name: Internal label (e.g., “POS Tier Sync”)
- Trigger Event: What activates this (e.g., “On Member Tier Change”)
- Endpoint URL: The web address to send data to (provided by receiving system’s IT team)
- Authentication: Security credentials (if required)
- Payload Format: What data to send (usually JSON — your IT team will define this)
- Test: Click “Send Test” to verify it works
- Save & Enable
Available Trigger Events:
- On Member Registration
- On Points Earned
- On Points Redeemed
- On Points Expired
- On Member Tier Change
- On Label Assigned/Removed
- On Profile Update
What the receiving system gets:
{
  "event": "tier_upgrade",
  "member_id": "12345",
  "member_name": "Sarah Chen",
  "old_tier": "Silver",
  "new_tier": "Gold",
  "timestamp": "2025-12-15T10:30:00Z"
}
Permission Management (Controlling Who Can Do What)
What it is: Security settings that control which staff members can access which features.
Why this matters: You don’t want every cashier to have the power to delete members or manually add 1,000,000 points. Permissions prevent accidental or malicious actions.
Permission Levels Explained:
1. User Permissions (Individual Access)
- Assign permissions to specific people
- Example: “Jane from Support can view members but cannot adjust points”
- Use for: Unique roles or temporary access
2. Team Permissions (Group Access)
- Assign permissions to a whole team
- Example: “All Customer Support team members can adjust points up to 1,000”
- Use for: Standard roles (Support, Sales, Finance)
3. Role Permissions (Job Title Access)
- Assign permissions based on job role
- Example: “All Store Managers can approve point adjustments over 1,000”
- Use for: Org-wide consistent roles
Common Permission Configurations:
Cashier / Frontline Staff:
- View member profiles
- Earn points for members (via POS integration)
- Cannot manually adjust points
- Cannot delete members
- Cannot view financial reports
Customer Support Agents:
- View member profiles
- Edit member contact info
- Adjust points (up to 500 points, requires reason)
- View transaction history
- Cannot delete members
- Cannot change tier manually
- Cannot configure system settings
Supervisors / Team Leads:
- All of Customer Support +
- Adjust points (up to 5,000, requires reason)
- Manually change member tier
- View team reports
- Cannot delete members
- Cannot configure system settings
Marketing Team:
- View member profiles
- Create and assign labels
- Export member lists for campaigns
- View analytics reports
- Cannot adjust points
- Cannot edit member details
- Cannot configure system settings
System Administrators:
- Full access to everything
- Configure all settings
- Manage users and permissions
- Delete members (with audit trail)
- Access all reports
How to Set Permissions:
Option A: Use Permission Wizard (Easiest for Beginners)
- Go to
Settings > Permission Wizard - System guides you step-by-step:
- “What job role is this?” → Select (e.g., “Customer Support”)
- “Can they view member data?” → Yes/No
- “Can they adjust points?” → Yes (up to limit) / No
- Wizard suggests appropriate settings
- Review summary
- Apply to user/team
Option B: Manual Configuration (For Advanced Users)
- Go to
Settings > User/Team/Role Permissions - Select the user, team, or role
- Check/uncheck permission boxes for each feature
- Set limits where applicable (e.g., “Max point adjustment: 1,000”)
- Save
Permission Best Practices:
Follow “Least Privilege” Principle: Only give access people need for their job (don’t give everyone admin rights)
Use Teams, Not Individuals: Assign permissions to “Customer Support Team” rather than 20 individual agents (easier to manage)
Review Quarterly: As people change roles, update permissions
Enable Audit Logging: Track who does what (especially important for point adjustments)
Test Before Rolling Out: Create a test user, apply permissions, verify they work as expected
Common Mistakes:
- Giving too many people admin access
- Not documenting who has what permissions
- Forgetting to revoke access when someone leaves
- Making permission changes without testing
Feature Visibility (Showing/Hiding Menu Options)
What it is: Control which menu items appear in the sidebar for different users.
Why use this: Simplify the interface by hiding features users don’t need.
Example:
- Frontline staff don’t need to see “Reports” or “Settings” in their menu (less clutter, fewer mistakes)
- Marketing team only sees Member Listing, Labels, and Reports
- Only admins see the full menu
How to configure:
- Go to
Settings > Feature Visibility - See list of all menu items
- For each item, choose:
- Visible to Everyone
- Visible to Admin Only
- Hidden from Everyone (if you don’t use that feature)
- Optionally assign visibility by Team or Role
- Save
What affected users see: The menu automatically hides items they shouldn’t access.
Bulk Operations
Efficiently handle large volumes of data using import/export tools.
Member Master Data Upload (Bulk Import Members)
What it is: Import hundreds or thousands of members at once using a spreadsheet file instead of typing them one-by-one.
When to use:
- Migrating from an old system to this new membership system
- Loading existing customer database into loyalty program
- Annual membership renewals (uploading updated data)
- Corporate batch registration (B2B programs with company-wide enrollment)
How it works:
Step 1: Download Template
- Go to Member Master Data Listing
- Click Download Template button
- System gives you a CSV file with the correct column headers
Step 2: Fill in Your Data
- Open the template in Excel or Google Sheets
- Each row = one member
- Fill in columns:
- Required columns (marked with asterisk): Member ID, Name, Email, Phone
- Optional columns: Date of Birth, Gender, Address, etc.
- Follow formatting rules (shown in template):
- Dates: YYYY-MM-DD format (e.g., 1990-05-15)
- Phone: Include country code without spaces (e.g., +60123456789)
- Email: Valid email format only
- Save the file as CSV
Step 3: Upload
- Back in Member Master Data Listing, click Upload
- Select your CSV file
- System validates the data:
- Green = All good, ready to import
- Yellow = Warnings (can still import)
- Red = Errors (must fix before importing)
- Review the validation report
- Click Confirm Import
What happens: System creates all member profiles in one batch. You’ll see a success count (e.g., “1,450 members imported successfully, 5 failed”).
Validation Rules (Why Imports Fail):
| Error Type | What It Means | How to Fix |
|---|---|---|
| Duplicate Member ID | This ID already exists in system | Use a different ID or update existing member instead |
| Invalid Email Format | Email doesn’t look right | Check for typos (must have @ and domain like .com) |
| Missing Required Field | A mandatory column is blank | Fill in all fields marked with asterisk |
| Invalid Date Format | Date not in YYYY-MM-DD format | Change to 1990-05-15 (not 05/15/1990) |
| Member Class Not Found | Tier name doesn’t exist | Check spelling or create the tier first in Member Privilege |
Best Practices:
Test with 10 members first: Before uploading 10,000 members, test with a small sample to catch formatting errors
Clean your data: Remove duplicate rows, fix typos, standardize formats before uploading
Back up first: Export existing members before bulk import (in case something goes wrong)
Upload during off-hours: Large imports can slow the system — do it when fewer users are online
Use unique IDs: Member IDs must be unique (no two members can have same ID)
Common Mistakes:
- Excel auto-formats dates wrong (changes 2025-01-15 to 1/15/2025) → Set column to “Text” format first
- Phone numbers lose leading zeros (0123456789 becomes 123456789) → Prefix with apostrophe ‘0123456789
- Mixing encodings (special characters become gibberish) → Save as UTF-8 encoding
Member Point Transaction Upload (Bulk Add Points)
What it is: Add points to multiple members at once (like running a promotion where 500 members each get 100 bonus points).
When to use:
- Promotional campaigns (“Everyone gets 100 points for our anniversary!”)
- Compensating multiple affected members (system downtime, service failure)
- Migrating historical point balances from old system
- Awarding contest winners
How it works:
Step 1: Download Template
- Go to Member Point Transaction Data Listing
- Click Download Template
- System gives you a CSV file
Step 2: Fill in Transaction Data
- Each row = one transaction
- Required columns:
- Member ID: Who gets the points
- Currency: Which point type (e.g., “Loyalty Points”)
- Amount: How many points (positive = add, negative = deduct)
- Transaction Date: When this happened
- Reason: Why (for audit trail)
- Example rows:
Member ID, Currency, Amount, Date, Reason
12345, Loyalty Points, 100, 2025-12-15, Anniversary Bonus
12346, Loyalty Points, 100, 2025-12-15, Anniversary Bonus
12347, Loyalty Points, 50, 2025-12-15, Contest Runner-Up
Step 3: Upload
- Back in Member Point Transaction Data Listing, click Upload
- Select your CSV
- System validates:
- Does each Member ID exist?
- Is the currency valid?
- Are amounts reasonable? (flags if someone gets 1,000,000 points)
- Review validation report
- Click Confirm Import
What happens: All points are added instantly. Each member’s balance updates and they see the transaction in their history.
Safety Features:
- Duplicate Detection: System flags if you’re uploading the same transaction twice
- Amount Limits: Warns if a single transaction exceeds your configured threshold (e.g., > 10,000 points)
- Negative Balance Prevention: Won’t let you deduct more points than a member has (unless you override)
(See Member Class vs Label for full explanation)
Reporting and Data Export
Member List Export:
- Go to Member Listing
- Apply filters (e.g., “Gold tier only”, “Joined last 30 days”)
- Click Export
- Choose format: CSV or Excel
- File downloads with all filtered member data
Transaction History Export:
- Go to any member’s profile or Membership Report
- Select date range (e.g., “Last month”)
- Click Export Transactions
- Get detailed report of all point movements
Analytics Reports:
- Go to Membership Reports
- Choose report type:
- Member Demographics (age, gender distribution)
- Point Liability Report (total outstanding points)
- Tier Distribution (how many in each class)
- Redemption Rate (% of members actively redeeming)
- Inactive Members (haven’t transacted in 90 days)
- Set date range and filters
- Click Generate & Export
Data Privacy Note: Exported files contain personal information. Always:
- Store exports securely (don’t leave on unencrypted USB drives)
- Delete exports after use (don’t let old reports accumulate on desktops)
- Follow your company’s data protection policies
- Never share exports via unsecured email
FAQ
Q: Can I support multiple types of points?
A: Yes! You can create multiple “Currencies” (e.g., Loyalty Points, Store Credit, Status Miles) and manage them independently. Each currency can have different expiry rules and conversion rates. For example, your “Spending Points” might expire annually, while your “Status Miles” never expire.
Q: How do I bulk import members from an old system?
A: Use the Member Master Data Listing feature:
- Click on Member Master Data Listing in the sidebar
- Download the CSV template (this shows you exactly which columns are needed)
- Fill in your existing member data in the CSV file
- Upload the completed file back to the system
- The system will create all member profiles in one go
Tip: Test with a small batch first (e.g., 10 members) to make sure your data format is correct before uploading thousands.
Q: Can I set points to expire automatically?
A: Yes. When configuring a Points Currency, you define expiry rules:
- “Never expires” — Points last forever
- “Calendar year” — All points expire on December 31st
- “Rolling expiry” — Points expire 12 months from the date earned
- “Custom date” — You choose a specific deadline
The system automatically removes expired points, and members receive advance warning (if you enable expiry notifications).
Q: What’s the difference between ‘Member Privilege’ in the menu and ‘Member Class’ in this guide?
A: They’re the same thing! The system menu uses “Member Privilege” as the label, but it manages Member Classes (your tiers like Bronze/Silver/Gold). We use “Member Class” in this guide because it’s clearer. Both terms refer to your membership tiers.
Where you’ll see this:
- Menu label: “Member Privilege”
- What it does: Manages Member Classes/Tiers
- What you create: Gold, Silver, Bronze (your tier names)
Q: How does this integrate with my point-of-sale system (store registers)?
A: The applet acts as the central brain that stores all member data. Your POS system connects to it through an API (a connection that lets software talk to each other):
Flow when a customer shops:
- Cashier scans member card or enters phone number at POS
- POS sends request to Membership Applet: “Who is this member?”
- Applet responds with: Member name, current balance, tier, applicable discounts
- Transaction completes at POS
- POS sends back to Applet: “Add 50 points to this member”
- Applet updates member balance immediately
Webhooks can push real-time notifications back to your POS (e.g., “Member just upgraded to Gold — update their discount”).
Technical Note: Your IT team or software vendor handles the integration setup. Once connected, it runs automatically.
Q: Can I test changes without affecting real members?
A: Yes! Best practice is to:
- Create test member accounts (use fake emails like
test@yourcompany.com) - Make your configuration changes
- Test earning and redeeming with the test accounts
- Once verified, apply changes to production
Warning: Always test conversions and expiry rules with fake accounts first. Mistakes can frustrate real members.
Q: What happens if I change a conversion rate (e.g., from 100 points = $1 to 200 points = $1)?
A: The system uses the conversion rate active at the time of redemption:
- Old rate: 100 points = $1 (valid until June 30)
- New rate: 200 points = $1 (valid from July 1)
Example:
- Member redeems points on June 25 → Uses 100:1 rate
- Member redeems points on July 5 → Uses 200:1 rate
You can set date ranges for each rate, so the system automatically switches on the right date.
Q: Do members see the changes I make immediately?
A: Most changes are immediate:
- Point adjustments → Instant
- Label assignments → Instant
- Tier upgrades → Instant
Some changes need a refresh:
- Conversion rate changes → Members see new rate after closing and reopening app
- Field configuration changes → Affects new registrations going forward, not existing profiles
Q: Can members transfer points to each other?
A: Only if you enable Transferability when creating the Points Currency:
- Disabled (default): Members can only use their own points
- Enabled: Members can gift points to other members (you can set limits to prevent abuse)
Most businesses keep this disabled to avoid fraud (e.g., people selling points).
Q: How do I know if someone manually adjusted points vs. points earned naturally?
A: Every point movement has a transaction type in the history:
- Earned: From purchases or campaigns
- Redeemed: Used for discounts or rewards
- Adjusted: Manual change by staff (with reason recorded)
- Expired: Removed by system due to expiry rules
Click on any transaction to see full details including who made the change and why.
Glossary
Simple definitions for technical terms used in this system
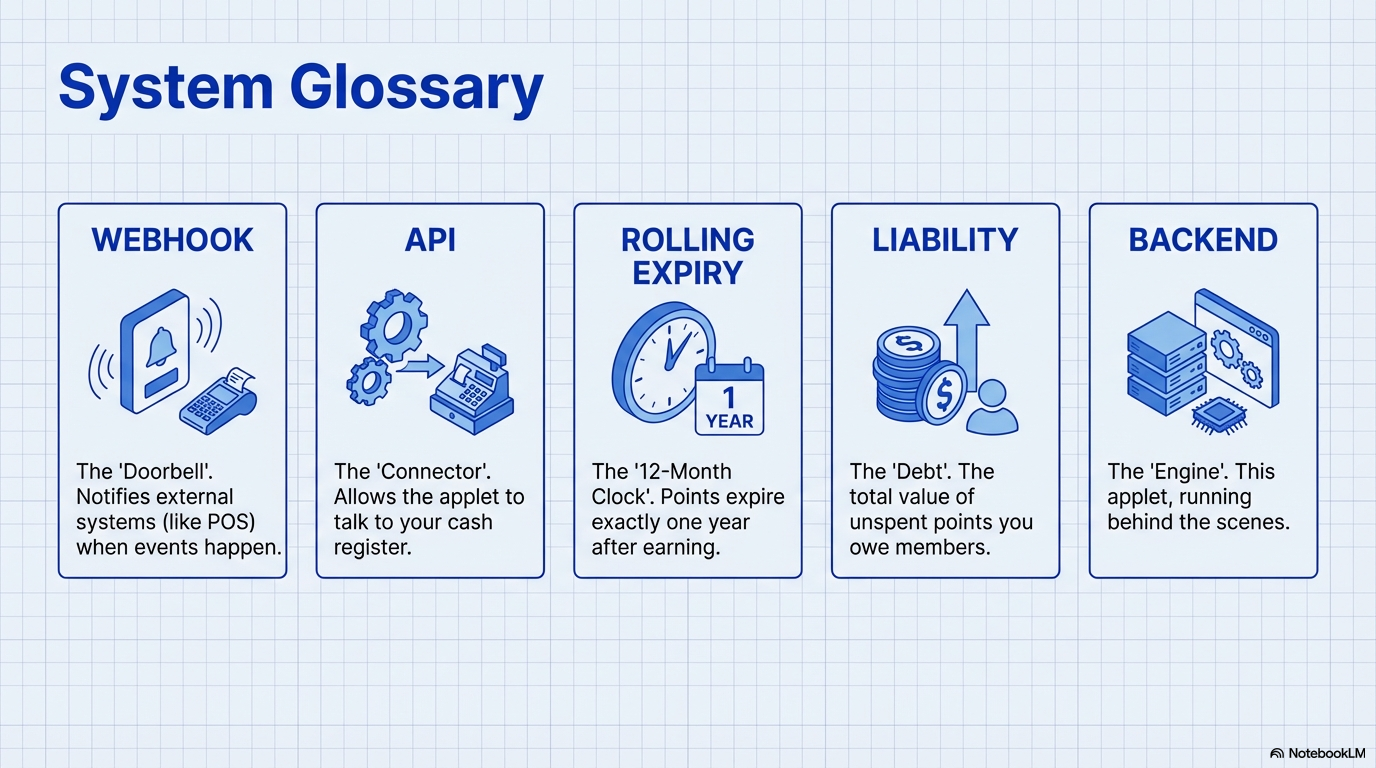
API (Application Programming Interface) A way for two software systems to talk to each other automatically (like your POS system talking to this membership system).
Backend The behind-the-scenes system that customers don’t see but that stores all the data and rules (this applet is the backend for your loyalty program).
Bulk Operations Doing many things at once instead of one-by-one (e.g., uploading 1,000 members from a file instead of typing them individually).
CSV File A simple spreadsheet file format (Comma-Separated Values) that most programs can read, often used for importing/exporting data.
Currency (in Points Context) A type of point in your loyalty program (like “Reward Points” or “Status Miles” — not actual money, but a unit of value your program uses).
Expiry Policy The rule that says when points become invalid and get removed (e.g., “Points expire December 31st each year”).
Integration Connecting your membership system to other systems (like your POS, website, or mobile app) so they can share data automatically.
Label (Member Label) A flexible tag you put on members to group them for marketing (like tagging all “Vegetarian” members so you can send them veggie promotions).
Liability (Points Liability) The total value of all outstanding points across all members — money your business owes if everyone redeemed at once (important for accounting).
Member Class (also called Member Privilege) A membership tier like Bronze, Silver, or Gold that gives different benefits at each level.
PII (Personally Identifiable Information) Sensitive personal data like ID numbers, birth dates, or addresses that need privacy protection under data laws.
POS (Point of Sale) Your store’s cash register or checkout system where customers pay for purchases.
Real-Time Happens instantly without delay (e.g., when you add points to a member, they see it immediately in their app).
Redemption When a member uses (spends) their points to get something (like a discount or free item).
Segmentation Dividing your members into groups based on shared traits (like age, spending habits, or interests) for targeted marketing.
Tier Upgrade/Downgrade Moving a member from one class to another (e.g., promoting from Silver to Gold when they hit spending targets).
Transferability Whether members are allowed to gift or send their points to other members.
Transaction History A complete record of every point a member has earned, spent, adjusted, or lost to expiry.
Webhook An automatic notification sent from one system to another when something happens (e.g., “Send a message to the POS system when a member upgrades to Gold”).
White-Glove Treatment Extra-special customer service given to VIP members (like dedicated support, priority handling, etc.).