Process Maintenance Applet
Purpose and Overview
The Process Maintenance Applet is where you define how your factory makes things. It’s the foundation layer that the Production Planning & Monitoring Applet builds on—without proper process configuration here, you can’t create Job Orders there.
Think of it as your manufacturing knowledge base: which machines do what, what materials go into each step, what comes out, and how steps combine into complete production sequences.
Who Uses This Applet
System Administrators:
- Initial setup of Machines and Process Types
- Define production capabilities
- Configure equipment specifications
Production Engineers:
- Create Process Templates (individual manufacturing steps)
- Build Job Templates (complete production sequences)
- Define input/output ratios and material requirements
Cost Accountants:
- Verify material consumption ratios
- Validate production costing accuracy
- Review input/output relationships
Key Features Overview
Key Concepts
| Concept | What It Means | Example |
|---|---|---|
| Machine | Physical production equipment | Armoring Machine A1, Cutting Line B2 |
| Process Type | Category of manufacturing operation | Cutting, Assembly, Testing, Packaging |
| Process Template | Single manufacturing step with inputs/outputs | “Armoring Process”: Steel wire (input) → Armored cable (output) |
| Job Template | Complete production sequence | “Armored Cable Job” = Armoring + Bedding + Cabling |
| Input Items | Materials consumed in a process | Raw materials, semi-finished goods |
| Output Items | Products created by a process | Semi-finished goods, finished products |
| Ratio | Quantity relationship | 4 legs (input) → 1 table (output) |
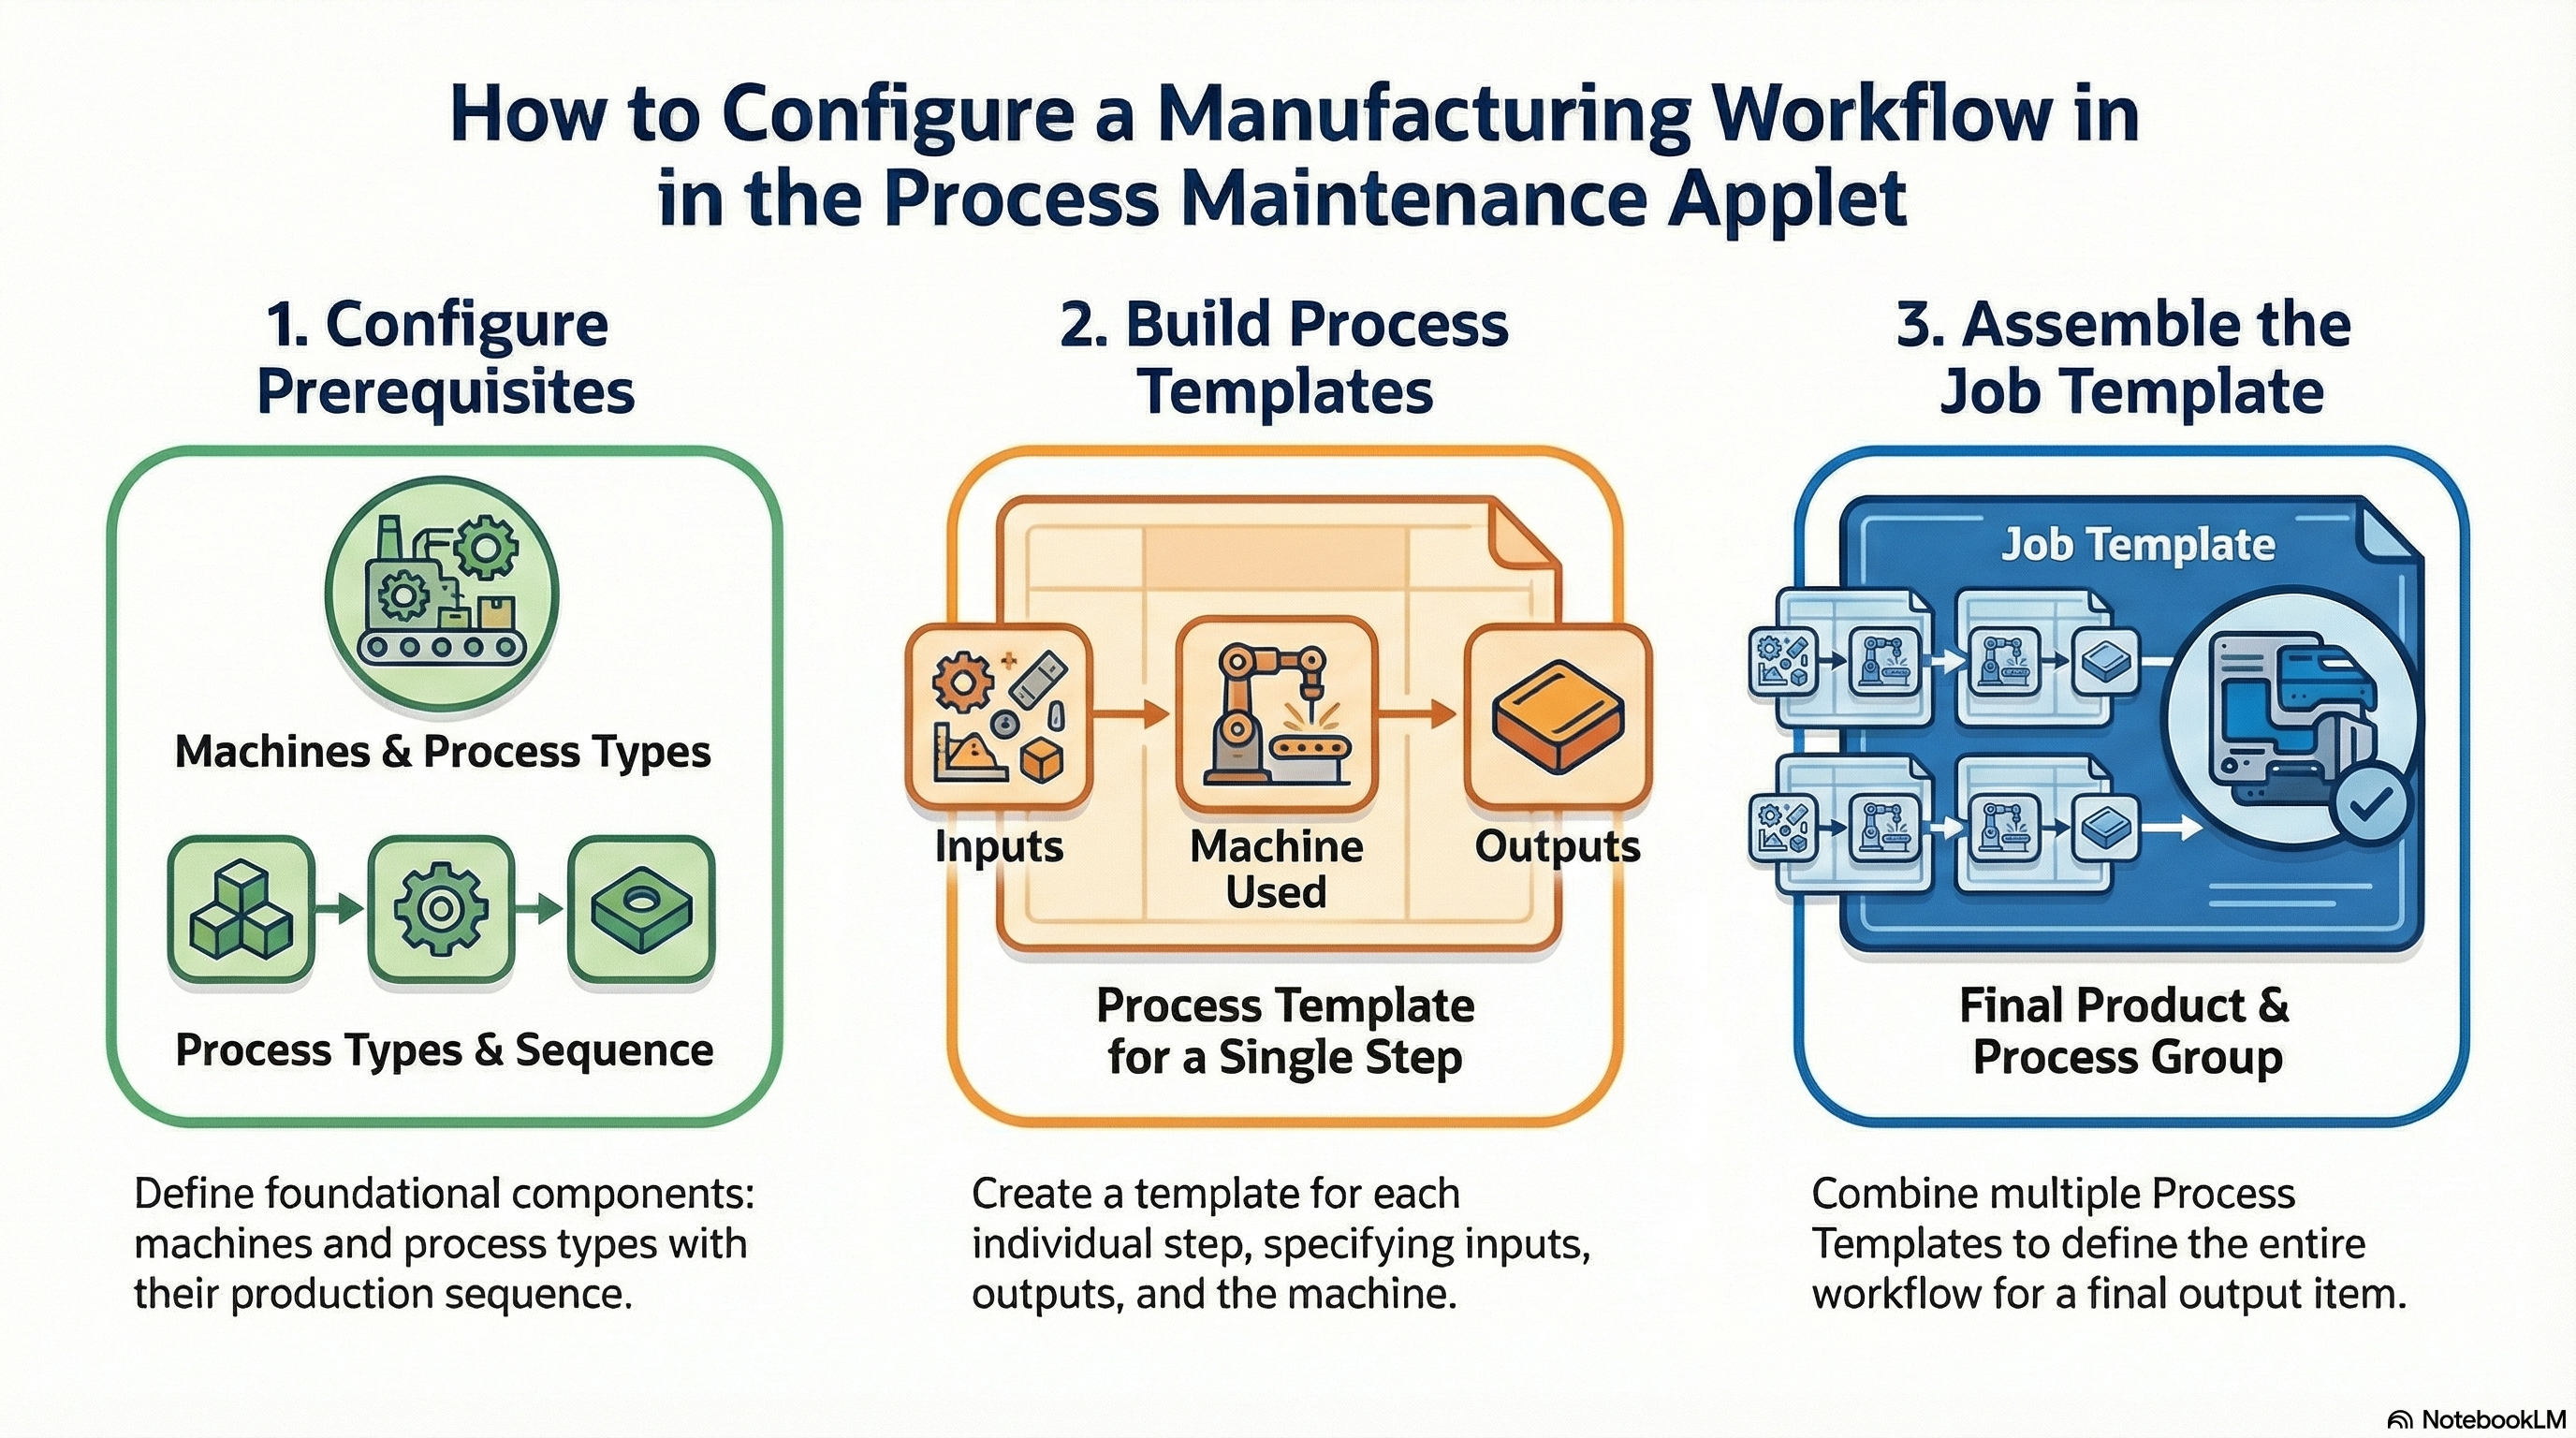
How It Works: The Configuration Flow
Machines + Process Types (Resources)
    ↓
Process Templates (Individual steps with inputs/outputs)
    ↓
Job Templates (Complete production sequences)
    ↓
Used by Production Planning Applet
    ↓
Job Orders created for factory floor
Prerequisites: Item Master Data
The Process Maintenance Applet can only reference items that are already registered in the system. If you try to add an input or output item that doesn’t exist, it won’t appear in the search.
Required Setup:
- Create all items in Item Data Hub
- Activate items in Doc Item Maintenance
- Then proceed with process configuration
1. Machine Configuration
Machines are your physical production assets. Define them once, then reference them in Process Templates.
Creating Machines
Navigate to the Machine menu and create entries for each piece of equipment on your factory floor.
Name/Code - Unique identifier for the machine. Use a consistent naming scheme that makes sense to your operators (e.g., “ARM-A1” for Armoring Machine A1, “BED-B2” for Bedding Line B2).
Type - Categorizes the machine’s function:
- Production Machine - Primary manufacturing equipment (cutting, assembly, processing)
- Packing Machine - Packaging and finishing equipment
The Type field helps with filtering and reporting but doesn’t restrict what processes can use the machine. That’s controlled at the Process Template level.
2. Process Type Configuration
Process Types categorize your manufacturing operations and define their sequence in production flows. This is where you establish the order of operations.
Creating Process Types
Navigate to the Process Type menu. Each Process Type represents a category of work.
Name - The operation category (Armoring, Bedding, Cabling, Testing, Packaging, etc.)
Sequence - This number determines the default order when Process Templates are combined into Job Templates. Lower numbers happen first.
Use gaps in your numbering (10, 20, 30, 40) rather than consecutive numbers (1, 2, 3, 4). This gives you flexibility to insert new process types later without renumbering everything. If you need to add a process between Armoring (10) and Bedding (20), you can use 15.
Independent Process - Check this for operations that don’t follow the standard sequence. Examples:
- Daily maintenance routines
- Quality inspections that can happen at any time
- Parallel operations that don’t depend on previous steps
3. Process Template Creation
Process Templates are individual manufacturing steps. Each one defines what goes in (inputs), what comes out (outputs), and which machines can perform the work.
Creating a Process Template
Navigate to Process Template menu and create a new template.
Template Name - Be descriptive and consistent. Good naming helps everyone understand what the process does at a glance.
Naming Convention:
[Department] - [Action] - [Target]
Examples:
- "Cable Dept - Armoring - 10mm Cable"
- "Wood Shop - Cutting - Oak Panels"
- "Assembly - Table Legs - Standard"
Process Type - Select from the types you created earlier. This determines where this step fits in the production sequence.
Defining Input and Output Items
This is the critical part—the recipe that drives material consumption and inventory transactions.
Output Items Tab:
Add the item(s) this process creates. For each output:
- Select the item code
- Define the ratio (quantity produced per cycle)
Example: If one cycle produces 5 meters of cable, the ratio is 5.
Input Items Tab:
Add the materials consumed. For each input:
- Select the item code
- Define the ratio (quantity consumed per cycle)
Example: If producing 5 meters of cable requires 5.2 meters of raw wire (accounting for waste), the ratio is 5.2.
Ratio Logic is Critical:
The system uses these ratios to calculate material requirements when Job Orders are created. If your ratios are wrong, your inventory will be wrong.
Example: Table Assembly
Output: 1 Table (ratio = 1)
Inputs:
- 1 Table Top (ratio = 1)
- 4 Table Legs (ratio = 4)
- 8 Screws (ratio = 8)
- 1 Instruction Sheet (ratio = 1)Machine Assignment
In the Machine tab, select which equipment can perform this process.
If multiple machines are capable (e.g., you have three identical cutting machines), check all of them. This gives the factory floor flexibility in machine assignment.
Set one as Default - This is the machine that will be pre-selected when Job Orders are created. Choose your primary or most efficient machine.
Machine Specifications
Use the Machine Spec tab to attach documentation:
- Equipment manuals (PDF)
- Setup instructions
- Quality specifications
- Safety procedures
- Photos or diagrams
This keeps all process-related documentation in one place, accessible to operators and engineers.
4. Job Template Creation
Job Templates combine multiple Process Templates into complete production sequences. This is your master recipe for making a finished product.
Creating a Job Template
Navigate to Job Template menu and create a new template.
Select the Final Output Item - What finished product does this Job Template produce? The system uses this to link the template to items in the Production Planning Applet.
Save to initialize the template. Now you can define the production routing.
Defining Options (Production Variations)
A single product might have multiple ways to manufacture it—different process sequences, alternative materials, or quality levels. These are called “Options.”
Navigate to the Option tab. The system shows all available Process Templates. Select the ones needed for this production route, and they’ll be sequenced automatically based on their Process Type sequence numbers.
Common Option Scenarios:
- Standard vs Express: Express skips certain quality checks for faster turnaround
- Material Variations: Different processes for steel vs aluminum components
- Quality Levels: Premium products get additional finishing steps
Finalizing the Process Group
Once you’ve selected your Process Templates for an Option:
- Select the Option you want to activate
- Enter a Group Name - typically the output item name or a descriptive variant (“Standard Armored Cable”, “Premium Finish Table”)
- Click Add Group
The system creates the Process Group, which is what appears in the Production Planning Applet when creating Job Orders.
Verify your work in the Process Group tab. You’ll see all Process Templates in sequence, with their input/output requirements. This is what production planners will use to create Job Orders.
5. Configuration Best Practices
Naming Conventions
Consistent naming makes the system easier to use and maintain.
Machines:
[Location]-[Type]-[Number]
Examples:
- MAIN-ARM-A1 (Main facility, Armoring, unit A1)
- BR2-CUT-C3 (Branch 2, Cutting, unit C3)
Process Types:
Use clear, standard terms
Good: Cutting, Assembly, Testing, Packaging
Avoid: Proc1, Step2, Misc
Process Templates:
[Department] - [Action] - [Target]
Examples:
- Cable Dept - Armoring - 10mm Cable
- Assembly - Table Legs - Oak
- QC - Testing - Electrical Safety
Job Templates:
[Product Name] - [Variant]
Examples:
- Armored Cable 10mm - Standard
- Office Table - Premium Finish
- Custom Assembly - Client Spec A
Sequence Number Strategy
Use a consistent numbering scheme for Process Types:
10 - Preparation
20 - Primary Processing
30 - Secondary Processing
40 - Assembly
50 - Testing
60 - Finishing
70 - Packaging
80 - Quality Control
Leave gaps for future insertions. If you need to add a process between Primary (20) and Secondary (30), use 25.
Input/Output Ratio Verification
Before finalizing Process Templates:
- Consult production team - They know the actual material consumption
- Account for waste - If 5% of material is scrap, factor that into input ratios
- Test with small batches - Create a Job Order and verify actual vs planned consumption
- Review regularly - Update ratios as processes improve or materials change
Documentation Standards
For Machine Specifications:
- File naming: Use descriptive names (ARM-A1-Manual.pdf, not doc1.pdf)
- Version control: Include dates or version numbers
- Accessibility: Ensure operators can access from the factory floor
- Updates: Review and update annually or when equipment changes
6. Common Issues
Can’t find an item when adding inputs/outputs?
- Item doesn’t exist in Item Data Hub
- Item not activated in Doc Item Maintenance
- Check item code spelling
Process Templates appear in wrong order in Job Template?
- Check Process Type sequence numbers
- Adjust sequence to change order
- Remember: lower numbers execute first
Can’t save Job Template?
- No default machine selected in Process Templates
- Missing input or output items
- Process Group name already exists
Material consumption doesn’t match actual usage?
- Input/output ratios incorrect
- Review ratios with production team
- Account for waste and scrap
- Update Process Template ratios
Job Template doesn’t appear in Production Planning Applet?
- Process Group not created (must click “Add Group”)
- Output item doesn’t match item in Job Order
- Job Template not saved properly
7. Integration with Production Planning
Once your Process Maintenance configuration is complete, here’s how it flows into production:
In Production Planning Applet:
- Planner creates a Job Order
- Selects an item to produce
- System shows available Job Templates (Process Groups) for that item
- Planner selects a Job Template
- Clicks “Generate Process Instance”
- System creates individual Process Instances from your Process Templates
- Each Process Instance includes:
- Machine assignment (from your default machine)
- Input requirements (from your input ratios)
- Expected outputs (from your output ratios)
- Sequence (from your Process Type sequence)
Your configuration drives:
- Material requirements planning
- Machine capacity planning
- Production costing
- Inventory transactions
- Work instructions for operators
8. Quick Reference
Configuration Sequence
- Create Machines (one-time setup)
- Create Process Types (one-time setup, define sequence)
- Create Process Templates (for each manufacturing step)
- Define inputs and outputs
- Assign machines
- Set ratios
- Create Job Templates (for each finished product)
- Select output item
- Define Options
- Create Process Groups
Key Relationships
| Element | Contains | Used By |
|---|---|---|
| Machine | Equipment specs | Process Templates |
| Process Type | Sequence number | Process Templates |
| Process Template | Inputs, outputs, machines | Job Templates |
| Job Template | Process sequence | Production Planning (Job Orders) |
Checklist Before Going Live
- All machines defined with clear names
- Process Types created with logical sequence numbers
- Process Templates created for all manufacturing steps
- Input/output ratios verified with production team
- Default machines assigned
- Job Templates created for all products
- Process Groups finalized
- Test Job Order created in Production Planning
- Actual vs planned consumption verified
- Documentation uploaded to Machine Specs