Production Planning & Monitoring Applet
Purpose and Overview
The Production Planning & Monitoring (PPM) Applet is your central hub for converting customer demand into factory floor instructions. It bridges Sales Orders with Manufacturing Operations, ensuring clear communication and complete traceability from order to delivery.
Who Uses This Applet
Production Planners:
- Create and manage Job Orders
- Approve/reject production requests
- Link orders to customer demand
- Monitor capacity and priorities
Sales Coordinators:
- Check production status for customer orders
- Get accurate delivery estimates
- Track order fulfillment
Factory Supervisors:
- Review daily production load
- Identify bottlenecks
- Prioritize urgent work
Key Features Overview
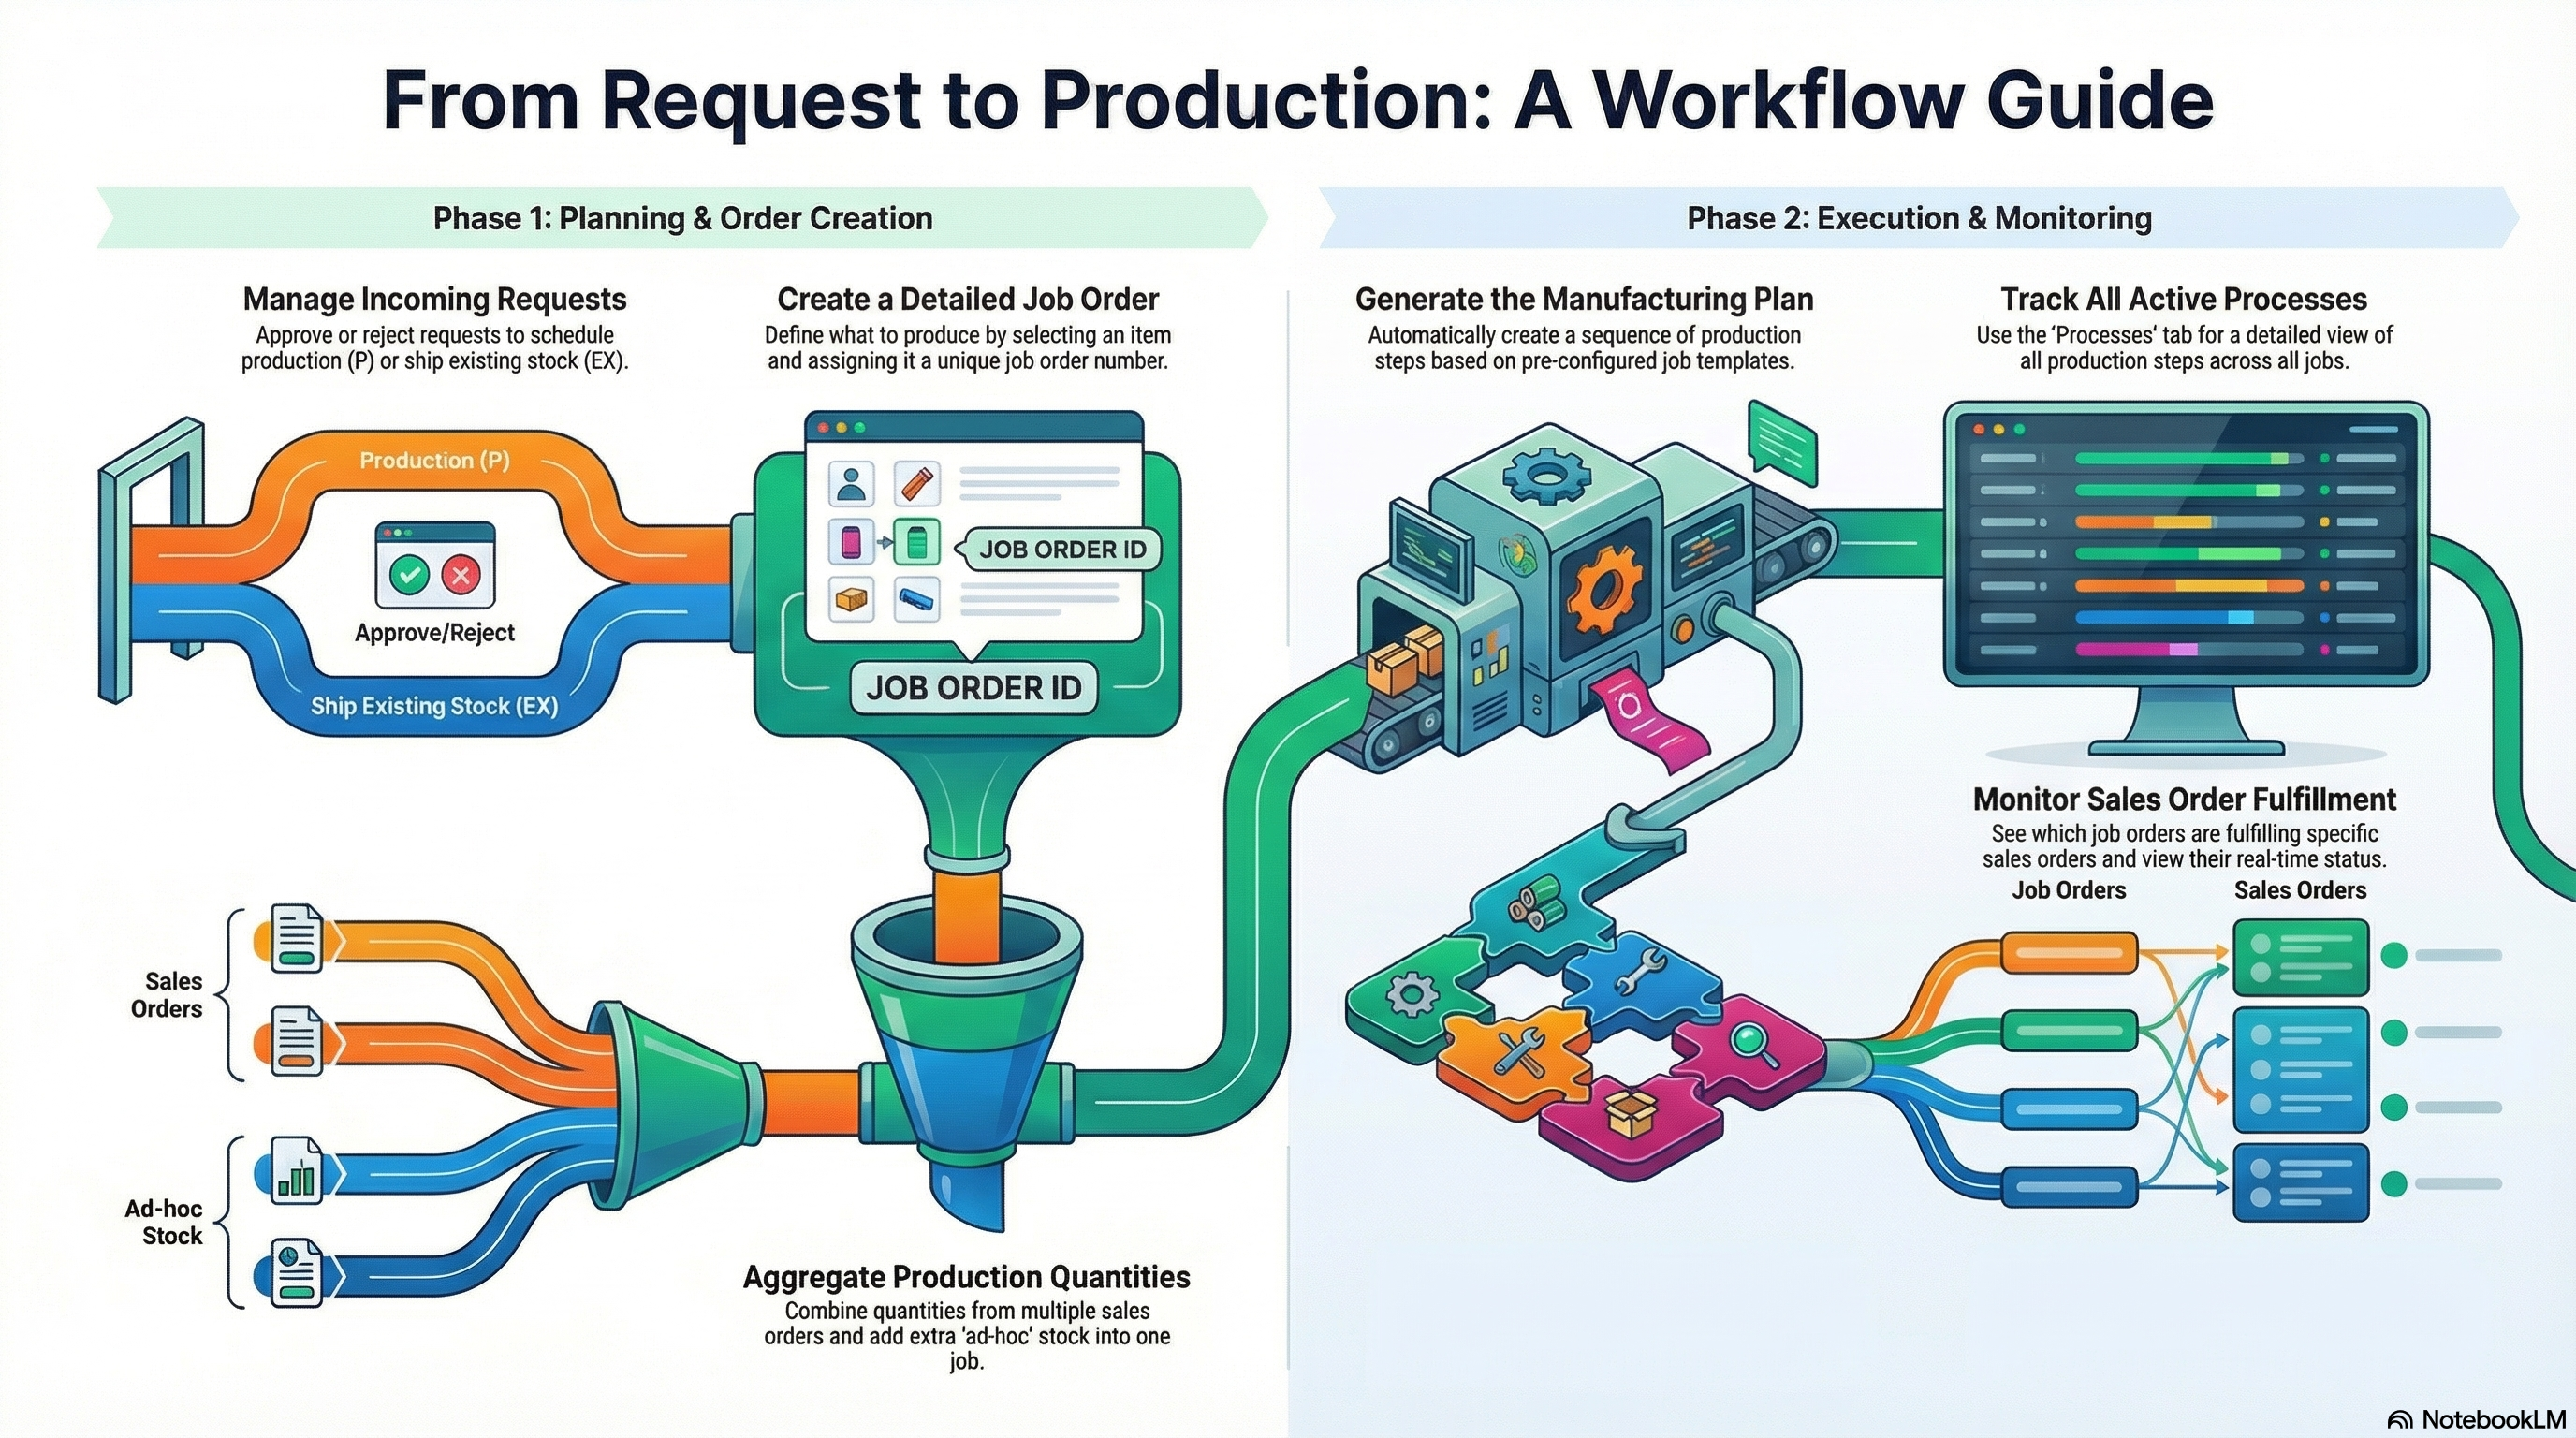
How It Works: The Planning Flow
Sales Order (Customer demand)
    ↓
Production Request (System-generated)
    ↓
Planner Decision (Produce / Use Stock / Reject)
    ↓
Job Order (Factory instruction)
    ↓
Process Instances (Manufacturing steps)
    ↓
Manufacturing Operations (Execution)
    ↓
Completed (Stock created, SO fulfilled)
Key Concepts
| Concept | What It Means | Example |
|---|---|---|
| Production Request | Auto-generated demand from Sales Orders | Customer orders 500m cable → System creates request |
| Job Order | Formal manufacturing instruction | JO-2024-001: Produce 500m Armored Cable |
| Job Template | Pre-defined process sequence | Armoring → Bedding → Cabling → Testing |
| Process Instance | Individual manufacturing step | “Armoring” step with materials and machine assigned |
| Make-to-Order | Produce for specific customer order | Link Job Order to SO-2024-001 |
| Make-to-Stock | Produce for inventory | Ad hoc quantity for warehouse |
Prerequisites: Master Data Setup
| Required Setup | What It Does | Example |
|---|---|---|
| Machines | Defines production equipment | Armoring Machine A1, Bedding Line B2 |
| Process Types | Categories of manufacturing steps | Armoring, Bedding, Cabling, Testing |
| Process Templates | Individual step definitions with inputs/outputs | “Armoring Process” requires steel wire, produces armored cable |
| Job Templates | Complete production sequences | “Armored Cable Job” = Armoring + Bedding + Cabling |
| Item Category Groups | Product classification for filtering | Cables, Assemblies, Components |
Setup Order:
- Define Machines and Process Types
- Create Process Templates (individual steps)
- Assemble Job Templates (combine steps into sequences)
- Configure Item Category Groups for filtering
See the Process Maintenance Applet documentation for detailed setup instructions.
Applet Structure: Four Main Menus
| Menu | Purpose | When to Use |
|---|---|---|
| Production Requests | Review incoming demand from Sales | Start here daily - approve/reject/mark as existing stock |
| Master List | Create and manage Job Orders | Main workspace - create Job Orders, generate processes, link to SOs |
| Processes | View all manufacturing steps across Job Orders | Set priorities, check material requirements, identify bottlenecks |
| Sales Orders | Track production status by customer order | Answer “when will it be ready?” questions from Sales team |
1. Managing Production Requests
Production Requests are auto-generated when Sales Orders are confirmed. This is your daily queue of what needs to be made.
Viewing Requests
Navigate to Production Requests menu to see all pending requests.
Status Indicators:
| Status | Meaning |
|---|---|
| P | Production request |
| S | Scheduled |
| Approved | Ready for Job Order creation |
| Rejected | Will not be produced |
| EX | Fulfill from existing stock |
Useful Filters:
- Location (production facility)
- Item Category Group (product type)
- Date Range
- Approved/Rejected status
Making the Decision
For each request, choose one of three actions:
| Action | When to Use | Result |
|---|---|---|
| Approve | Need to manufacture (no stock or insufficient) | Creates Job Order |
| Reject | Duplicate, invalid, or cancelled order | Removes from queue |
| Mark as EX | Sufficient stock available in warehouse | Fulfills from inventory, no production |
Outstanding Production Report
This report aggregates all pending production demand and shows you the gap between what’s requested and what you have in stock. It’s your capacity planning tool.
Click Filter and generate outstanding report, select your Location and Item Category Group (or leave broad for a complete view), and generate. The CSV export shows:
- Total Outstanding Quantity - Sum of all production requests
- Net Outstanding - The actual production needed after accounting for current stock
- Linked Sales Orders - Which customer orders are driving the demand
- Request dates - How long items have been waiting
The “Net Outstanding” column is what matters for planning. If you have 1000m requested but 300m in stock, you need to produce 700m. Use this to sequence your Job Orders, coordinate material procurement, and give realistic timelines to Sales.
Generate this daily for high-volume operations, weekly for moderate production, or monthly for project-based manufacturing. It’s also your go-to report for management updates on production load.
2. Creating Job Orders (Master List)
A Job Order is the formal manufacturing instruction that tells the factory floor what to make, how to make it, and what materials are needed.
Creating a Job Order
From Master List, click "+" to open the Job Order form. The key decisions here are:
Item Code - What you’re manufacturing. The system pulls in the item description and UOM automatically.
Branch - This is a dual-purpose field: it sets both your production location and where finished goods will be deposited. For multi-site operations, this matters for inventory accuracy.
Job Order Number - Leave blank for sequential auto-numbering (JO-2024-0001, etc.). Manual entry is available if you’ve enabled it in settings, useful for project-based numbering or legacy system integration.
Process Instance Group Name (Job Template) - This is your production recipe. Selecting “Armored Cable Production” automatically defines every manufacturing step, material requirement, and expected output. If the dropdown is empty, the item hasn’t been configured in Process Maintenance yet.
Optional fields (Start/End dates, Remarks, Priority) are useful for scheduling and communicating special requirements to the factory floor.
Generating Process Instances
Creating the Job Order doesn’t automatically generate the manufacturing steps—that’s a deliberate two-step process. Open your Job Order and navigate to the Process Instance tab. Click Generate Process Instance to expand the Job Template into individual, executable steps.
Each Process Instance represents one manufacturing operation with its own:
- Process Type and Sequence - What operation and in what order
- Machine assignment - Which equipment will be used
- Input Summary - Material requirements with quantities and stock locations
- Output Summary - Expected yield and where it goes next
This is your opportunity to verify material availability before releasing to the factory floor. Click into any Process Instance to see detailed input requirements—if you’re short on materials, you’ll know now, not when operators are standing at the machine.
Inactivating Unnecessary Steps
Sometimes you don’t need to run every step in the template. If you have semi-finished goods from a previous run sitting in the warehouse, or you’re doing a partial rework where certain steps were already completed correctly, you can inactivate those Process Instances.
Click on the Process Instance and select Inactivate. The system grays it out, removes its input requirements from your material plan, and assumes its output is coming from existing stock. The subsequent processes remain active and will look for that semi-finished good in inventory.
Common scenarios:
- Armored cable production where the armoring step is done but you need to complete bedding and cabling
- Rework situations where only specific operations need to be repeated
- Process optimization where the customer has approved an alternative sequence
Defining Quantities: Make-to-Order vs Make-to-Stock
Now you need to specify how much to produce and why. The system supports two approaches, and you can use both in the same Job Order.
Make-to-Order (Sales Order Linking)
For customer-specific production, open the Sales Order Link tab. You’ll see all confirmed Sales Orders for this item, showing the ordered quantity, balance remaining (not yet linked to production), and delivery date. Select the SO line, enter your production quantity—it can’t exceed the balance—and click Add. The link is established, the SO balance decreases, and your Job Order quantity updates.
This gives you complete traceability: you know exactly which customer gets which production batch. You can split one large Sales Order across multiple Job Orders for capacity reasons, or combine multiple small Sales Orders into one efficient production run.
Make-to-Stock (Ad Hoc Production)
For forecast-based production, simply enter an Ad Hoc Quantity in the Job Order. No Sales Order link required. The finished goods go to the warehouse and are available for any future order. This is your safety stock strategy—produce standard items in anticipation of demand.
Hybrid Approach: Link 300m to a confirmed customer order (Make-to-Order) and add 200m ad hoc (Make-to-Stock) in the same Job Order. You get efficient batch production while serving both immediate customer needs and future demand.
3. Monitoring Production
Processes Menu: Step-Level View
See all manufacturing steps across all Job Orders.
Use this to:
- Filter by Process Type (Armoring, Bedding, Cabling, etc.)
- Set High Priority flags for urgent work
- Check material availability (Input Summary)
- Verify expected outputs (Output Summary)
- Identify bottlenecks at specific machines
Setting Priorities:
- Click on Process Instance
- Mark as High Priority
- Operators see this flag in Manufacturing Operations Applet
Sales Orders Menu: Customer View
Track production status from the customer order perspective.
Status Categories:
| Status | Meaning |
|---|---|
| Production Not Started | Job Order created, work hasn’t begun |
| In Progress | Factory actively working |
| Production Complete | Manufacturing finished |
Shows:
- Customer Name and Order Date
- Delivery Date (deadline)
- Linked Job Orders
- Completion %
Use this to:
- Answer “when will it be ready?” questions
- Identify at-risk orders (approaching deadline, not started)
- Coordinate delivery for completed orders
Job Order Status Lifecycle
| Status | Meaning | What Happens Next |
|---|---|---|
| Planned | Job Order created, processes generated | Release to factory floor |
| Released | Available to Manufacturing Operations | Operators start work |
| In Progress | Operators working | Monitor progress |
| On Hold | Paused (material shortage, quality issue, machine breakdown) | Resolve blocker, resume |
| Completed | All processes finished, stock created | Fulfill Sales Order |
| Cancelled | Voided, will not be produced | Document reason |
Status Flow:
Planned → Released → In Progress → Completed
                          ↓
On Hold → Resume → In Progress4. Handoff to Manufacturing Operations
PPM Applet = Planning (what to make) Manufacturing Operations Applet = Execution (making it)
After you create Job Orders, operators use Manufacturing Operations to:
- View assigned work
- Start processes (changes status to In Progress)
- Consume materials (updates inventory)
- Record outputs (creates finished goods)
- Complete processes
- Report issues
Your role during execution:
- Monitor Job Order status progression
- Address material shortages
- Reprioritize based on urgency
- Communicate delays to Sales
- Analyze actual vs. planned output
5. Settings and Configuration
Job Order Numbering
Automatic (Recommended):
- Leave Job Order Number blank when creating
- System generates sequential numbers (JO-2024-0001)
- No duplicates
Manual:
- Enable in Application Settings → Master List Main Details
- Enter custom numbers
- Useful for legacy system integration
Item Category Groups
Configure in Application Settings to enable filtering.
Examples:
- Cables (all cable products)
- Assemblies (assembled products)
- Components (individual parts)
Benefits:
- Filter Production Requests by category
- Generate focused Outstanding Reports
- Assign planners to specific product lines
6. Common Issues
Can’t see Production Requests?
- Check if Sales Orders are confirmed
- Clear filters and refresh
Job Template dropdown empty?
- Configure in Process Maintenance Applet first
Process Instances didn’t generate?
- Click “Generate Process Instance” button
- Check Job Template has process steps defined
Can’t see Sales Order in Link tab?
- Verify SO is Confirmed status
- Check Item Code matches
- Check if SO already fully linked
Error when adding SO quantity?
- Quantity exceeds Balance Quantity
- Enter amount ≤ available balance
Job Order stuck in “Planned”?
- Release to Manufacturing Operations
- Check material availability
Process shows “On Hold”?
- Check remarks for reason
- Resolve blocker (materials, quality, machine)
7. Quick Reference
Daily Routine
Morning:
- Generate Outstanding Report
- Review Production Requests → Approve/Reject/EX
- Create Job Orders
- Set priorities
During Day:
- Monitor Job Order status
- Address material shortages
- Reprioritize as needed
End of Day:
- Review completion rates
- Update Sales team
- Plan tomorrow
Key Actions
| Task | Where | How |
|---|---|---|
| Review demand | Production Requests | Filter and approve/reject |
| Create production instruction | Master List | Create Job Order, generate processes |
| Link to customer order | Job Order → SO Link tab | Select SO, enter quantity |
| Set priority | Processes menu | Mark as High Priority |
| Check customer status | Sales Orders menu | View production status |
| Generate capacity report | Production Requests | Outstanding Report |