Purchase Report Applet
Purpose and Overview
The Purchase Report Applet is the consolidated reporting workspace for your organization’s procurement spend. It answers the most critical procurement question: “What did we buy, from whom, and at what cost?”
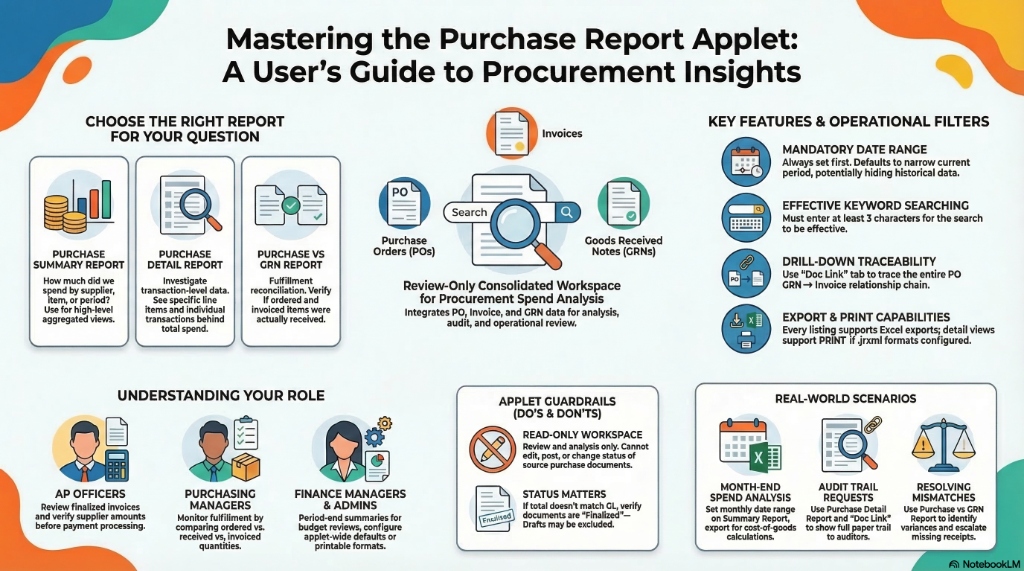
Instead of manually reconciling purchase orders, invoices, and GRNs across multiple screens, this applet brings together purchase document data into structured report views — giving AP teams, finance managers, and purchasing administrators a single place to review purchase activity, analyze supplier spend, and export data for audit or planning purposes.
Core Concept: Choose the report by your procurement question
- Use Purchase Report (by document) when the question is: “What specific transactions make up this spend?”
- Use Purchase Report By Item Code when the question is: “How much did we spend on each item across all suppliers?”
Which Report Should I Use First?
| If the user needs to know… | Start here | Why this is the right report |
|---|---|---|
| Line-item details behind a purchase figure | Purchase Report (by document) | It shows the individual transactions that make up the total. |
| Total spend or quantity by item code | Purchase Report By Item Code | It aggregates purchase data at the item level across all suppliers. |
| Who approved the spend | Any report filtered by Company or Branch | Filter the relevant report to focus on the approval context. |
Who Benefits from This Applet?
| Role | How they use it |
|---|---|
| AP Officers | Review purchase invoices and supplier spend, verify amounts before payment processing. |
| Purchasing Managers | Monitor purchase activity, review item-level spend, and compare quantities across branches. |
| Finance Managers | Run period-end purchase summaries for cost-of-goods calculations and budget reviews. |
| Finance Admins | Set default branch and location values and configure printable formats for exported reports. |
| Auditors and Reviewers | Open purchase document details, drill into line items, and trace document links for traceability. |
What Problems Does This Solve?
Without This Applet:
- Procurement teams pull data from purchase documents separately and reconcile manually in spreadsheets.
- Finance cannot quickly answer “How much did we spend with Supplier X this quarter?” without running multiple reports.
- AP teams struggle to see item-level totals without manually aggregating across documents.
- Period-end purchase reviews require effort from multiple teams to compile reliable numbers.
With the Purchase Report Applet:
- You get a shared purchase reporting workspace with filters for Supplier, Company, Branch, and Date Range.
- You can move from document-level detail to item-level summaries without leaving the applet.
- The report views support Export actions for Excel-compatible outputs at every level.
The Reporting Framework: Understanding the Screens
Before jumping into each report, it helps to understand what filters and behaviors are shared across the applet.
Common Filters Across the Listings
All main report listings use a shared advanced-search model.
| Filter / Search | What it does |
|---|---|
| Keyword Search | Searches the listing. Keyword must be at least 3 characters to be effective. |
| Supplier | Limits results to selected supplier entities. |
| Company | Limits results to selected companies. |
| Branch | Narrows results to one or more branches. |
| Date Range | Sets the start and end date for the report period. |
| Document Type | Switches the view between purchase order, purchase invoice, GRN, and related document types where applicable. |
What Users Can and Cannot Do Here
| This applet is good for… | This applet is not for… |
|---|---|
| Reviewing supplier spend by document type, date, or amount | Editing source purchase transactions |
| Drilling into line items and document detail for specific purchases | Posting payments, creating GRNs, or approving purchase orders |
| Exporting purchase data for audit, reconciliation, or planning | Replacing the source purchase order or invoice applets |
| Viewing the complete PO to Invoice audit trail | Changing purchase document status or finalizing documents |
Role-Based Quick Start Guides
For AP Officers: Review Purchase Transactions by Period
Your goal is to review finalized purchase invoices and supplier amounts for a given period.
- Open Purchase Detail Report from the sidebar.
- Set Supplier, Company, and Date Range to narrow the results.
- If you use keyword search, enter at least 3 characters.
- Run the search and review the listing columns: Document, Txn Date, Supplier, Amount, and Status.
- Click a document row to open the detail view.
- Review the tabs: Details, Line Items, Account, Settlement, and Doc Link.
- Use the listing-level Export button to export the current result set if needed.
For Purchasing Managers: Review Item-Level Spend
Your goal is to identify high-volume or high-spend items across all suppliers.
- Open Purchase Report By Item Code from the sidebar.
- Filter by Company, Branch, and Date Range.
- Review the grouped totals by item code, including Qty and Purchase Amount.
- Expand any item group row to see the individual transactions that make up the total.
- Export the result set to Excel for further analysis if needed.
For Finance Managers: Period-End Purchase Review
Your goal is to produce a purchase document review for cost-of-goods or budget review.
- Open Purchase Report from the sidebar.
- Set Company, Branch, and Date Range to cover the full review period.
- Review the listing columns: Document, Supplier, Amount, and Doc Type.
- Click a document row to open the detail view and review the tabs.
- Use Export to download the result set as an Excel file.
Deep-Dive: The Report Workspaces
1. Purchase Detail Report (The Transaction-Level Workspace)
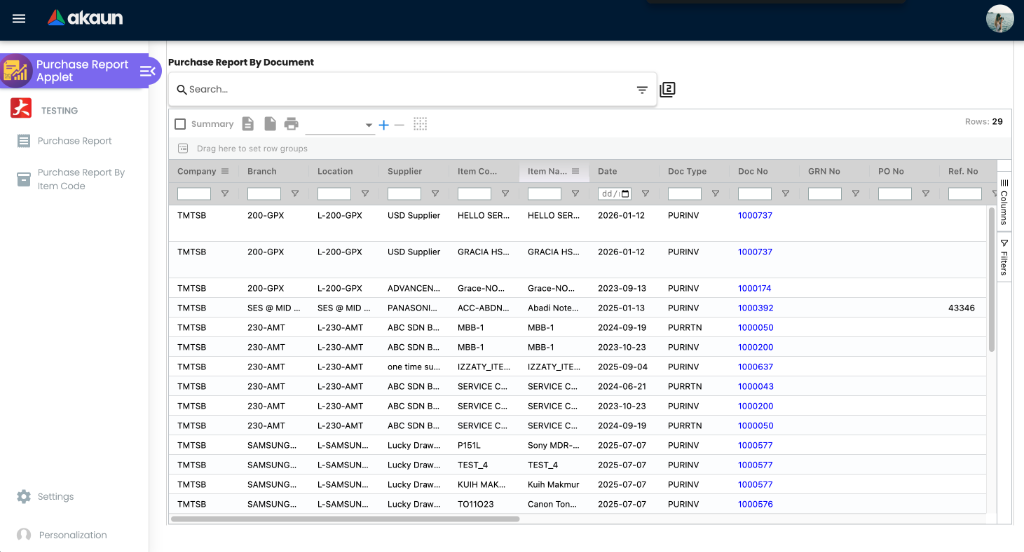
This is the default landing view for document-level purchase investigation.
Use this report when:
- AP needs to verify one specific invoice or credit note
- Finance needs to see the exact line items and amounts behind a purchase total
- An auditor requests the supporting documents for a purchase transaction
- A reviewer needs a comprehensive audit trail of a transaction
Report Columns:
| Column | What it shows |
|---|---|
| Document | The purchase document identifier (invoice number, PO number, etc.). |
| Txn Date | The transaction date for the document. |
| Supplier Code | The entity code of the supplier. |
| Supplier Name | The supplier or vendor name. |
| Company Name | Company code and company name combined in one column. |
| Branch | The branch associated with the document. |
| Currency | Transaction currency. |
| Amount | Document total amount. |
| Status | Current document status (e.g., Finalized, Draft, Cancelled). |
Document Detail Tabs:
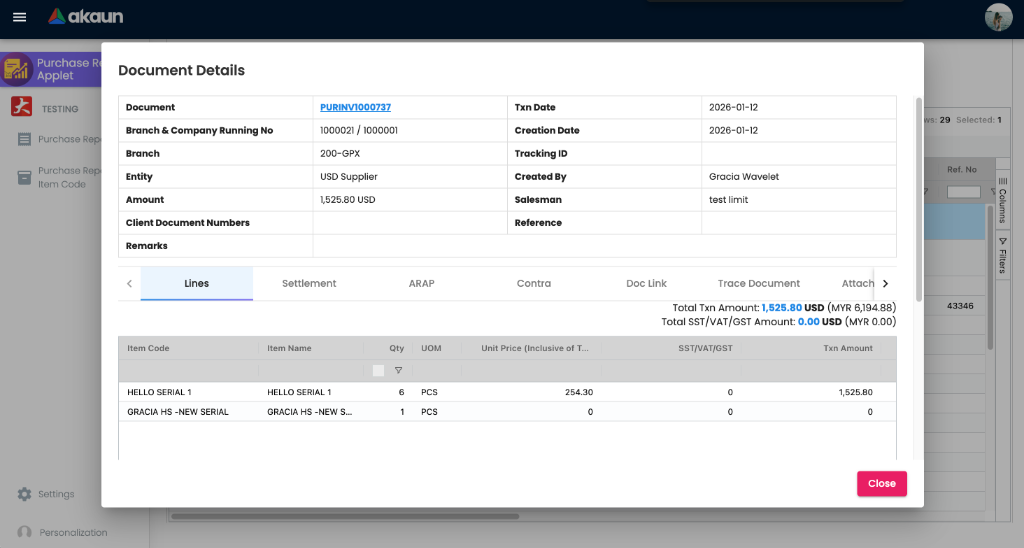
| Tab | Purpose |
|---|---|
| Details | Main document-level header information. |
| Account | GL account breakdown and accounting entries for the document. |
| Line Items | Individual line items on the purchase document. Users can drill into View Item for item-level detail. |
| Delivery Details | Delivery-related information when present. |
| Settlement | Settlement records linked to the document. |
| Department | Department and cost-center allocation. |
| Contra | Contra entries or offsetting records. |
| Doc Link | Linked documents and document relationships, tracing the PO → GRN → Invoice chain. |
2. Purchase Report By Item Code (The Item-Level Summary)
This screen provides an aggregated view of purchase activity grouped by item code, allowing for quick analysis of item-level spend and volume.
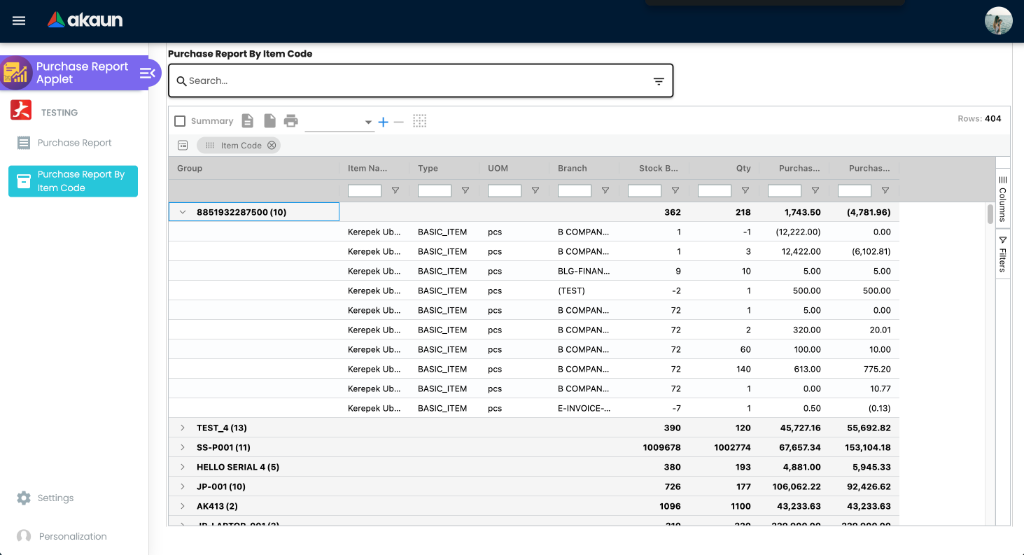
Use this report when:
- Purchasing needs to review the total quantity of a specific item purchased across all suppliers
- Management wants to identify high-volume or high-spend items for contract negotiations
- Inventory managers want to compare purchase totals against stock availability or demand
Report Columns:
- Item Code: The primary grouping for the report.
- Item Name: The descriptive name of the item.
- Type: Item classification (e.g., BASIC_ITEM).
- UOM: Unit of Measure.
- Branch: The branch where the item was purchased.
- Qty: Total quantity purchased for the period and filters.
- Purchase Amount: Total spend for the item.
Configuration & Settings
The Purchase Report applet is highly configurable. Administrators can tailor the workspace to hide unnecessary complexity or sensitive financial information from general staff, while enabling deep spend tracking for controllers.
1. Application Settings (System-Wide)
Accessed via Settings > Application Settings, these toggles change how the applet looks and functions for all users.
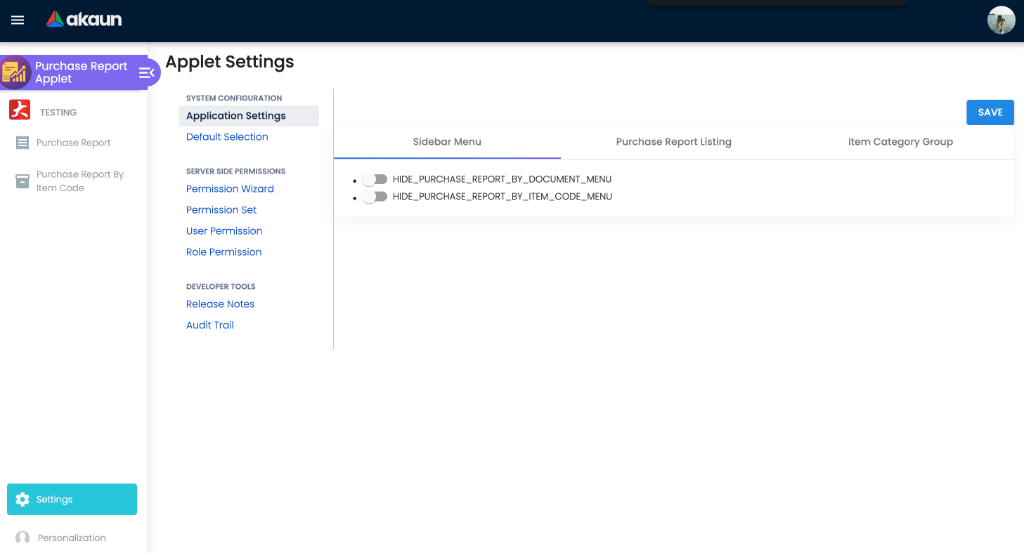
A. Tailoring the Sidebar (Menu Visibility) Administrators can hide sidebar menus that their layout doesn’t use.
| Setting | What It Does |
|---|---|
Sidebar Menu | Use these toggles to hide or show the Purchase Report and Purchase Report By Item Code menu items for all users. |
B. Tailoring the Report Listing (Field Visibility) If you need to protect sensitive financial data (like cost and margins) from general staff, or simplify the grid, you can toggle the visibility of specific columns on the report listing:
| Setting | What It Does |
|---|---|
Hide MA Cost | Hides the moving average cost column. Turn on if you only want users to see purchase amounts, not internal costs. |
Hide Quotation | Hides quotation reference columns. |
Hide GP | Hides the Gross Profit column, keeping margin data confidential. |
Hide Order | Hides the linked Purchase Order column. |
Hide Delivery Order | Hides the linked Delivery Order column. |
Hide Invoice | Hides the linked Invoice column. |
Hide Others | Hides generic reference columns to save screen space. |
C. Item Category Group Mapping
| Setting | What It Does |
|---|---|
Item Category Group (1-20) | Allows administrators to map up to 20 different item category groups for filtering. Use the eye icon to toggle visibility of these filters on the report listings. |
2. Default Selection
This screen provides applet-wide default values to speed up user workflows.
| Setting | Purpose |
|---|---|
| Default Branch | Preselects a specific branch automatically when opening the applet. |
| Default Location | Preselects a specific location automatically when opening the applet. |
3. Permissions Governance
Because this applet exposes complete procurement spend data, access is managed through a layered permission system in the Settings menu:
- Permission Wizard: A guided tool to set up basic view access.
- Role Permission: Grant access by job title.
- User/Team Permission: Grant granular exceptions to specific individuals or squads.
Personalization
Individual users can override certain system defaults to speed up their daily workflow via the Personalization sidebar menu.
Personal Default Settings
To save clicks when running reports daily, users should set their own defaults:
| Setting | Why use it? |
|---|---|
| Default Branch | If you only review purchases for the “Penang Hub”, set this so you never have to select it from the filter dropdown again. |
| Default Location | If you only verify invoices for “Warehouse A”, set this as your default location. |
Common Real-World Scenarios
Scenario 1: Month-End Purchase Spend by Item
The Situation: Finance needs total procurement spend per item for the month to support cost-of-goods calculations. The Workflow:
- Open Purchase Report By Item Code.
- Set Company and Date Range to cover the full month.
- Review the aggregated spend totals by item code.
- Export to Excel for further analysis or upload to the finance reporting tool.
Why this report fits the scenario: Item-level aggregation is faster than totaling individual documents, and the export supports downstream reconciliation.
Scenario 2: Investigate a Specific Purchase Document
The Situation: AP discovers a discrepancy in a specific purchase invoice and the team needs to review the full document details. The Workflow:
- Open Purchase Report (by document).
- Filter by the specific Supplier and the relevant Date Range.
- Click the document row to open the detail view.
- Review the tabs: Details, Lines, Settlement, and Doc Link.
- Escalate to the relevant team to resolve any discrepancies.
Why this report fits the scenario: This is the document investigation workspace. It provides the complete view of a single purchase transaction.
Scenario 3: Audit Trail for a Specific Purchase Document
The Situation: An external auditor requests the full supporting documentation for a large purchase invoice — including the original PO, the GRN receipt, and the invoice. The Workflow:
- Open Purchase Detail Report.
- Search for the invoice document number or filter by supplier and date.
- Open the document row in the detail view.
- Use Doc Link to show the full PO → GRN → Invoice trail.
- Export the detailed view or refer to the specific source document if necessary.
Why this report fits the scenario: This is the document investigation workspace. It provides the complete audit trail without leaving the applet.
FAQs
Q: Which report should I open first?
Start with the question you need to answer. Use Purchase Report (by document) for investigating specific transactions, and Purchase Report By Item Code for aggregated item-level spend totals.
Q: What filters are available on the listing pages?
The shared listing filters are Supplier, Company, Branch, Date Range, and Document Type, plus keyword search. Keyword searches must be at least 3 characters long.
Q: Why does my purchase total not match the GL balance?
Check three things:
- Ensure you are using the exact same date range in both the purchase report and the GL.
- Ensure you are filtering by the same Company and Currency.
- Verify that all relevant invoices have been Finalized/Posted. Draft or unposted documents may not appear in purchase reports but may exist in the GL.
Q: Can I edit or post documents from this applet?
No. This applet is for review, drill-down, export, and print. It does not expose posting or edit actions on source purchase documents. Use the relevant purchase order, GRN, or invoice applet for those actions.
Q: What is the difference between Purchase Report and Purchase Report By Item Code?
Purchase Report (by document) is document-level and used for transaction investigation and audit. Purchase Report By Item Code is aggregated by item and used for spend analysis and volume reviews.
Q: Can I export the report results?
Yes. Each main listing screen includes an Export button for the current grid results.
Q: Why are some purchase documents not showing in the report?
Check the Date Range, Company, and Document Type filters. Draft or unposted documents may be excluded from finalized report views. If records are still missing, ask your administrator to review the applet’s data scope configuration.