Sales Inquiry (Internal)
Records what a customer has asked about before anything is committed — customer, sales agent, lines with quantities and prices, delivery detail, optional collection and contra lines — at the front of the sales chain, before a quotation or an order. It moves no stock and posts no journal; FINAL locks the document and nothing else, there is no VOID, and a quotation or sales order is raised separately. The Convert tab is literal about its warning: it builds a receipt voucher from the inquiry’s Collection lines — not its item lines — and then deletes the inquiry, so export the PDF first if you need a record.
Overview
Sales Inquiry (Internal) records what a customer has asked about before anything is committed: the customer, the sales agent, line items with quantities and prices, delivery detail, optional collection and contra lines, and attachments. It sits at the front of the sales chain, before a quotation or a sales order.
Server document type INTERNAL_SALES_INQUIRY. The applet is fully localised — English, Chinese,
Malay, Arabic, Hindi and Indonesian bundles ship with it — and it renders either as a tab strip or
as a stack of expansion panels, depending on the tenant’s orientation settings.
Where it fits
| Document | What it does | |
|---|---|---|
| Upstream | — | An inquiry is normally the first document; lines can be seeded from a jobsheet, a quotation or an earlier inquiry |
| Line sources | Jobsheet (Internal), Sales Quotation (Internal), other sales inquiries | The Select Line Item panel has a tab for each |
| This applet | Sales Inquiry (Internal) | Records the inquiry. No stock, no journal |
| Downstream | Internal Receipt Voucher | The Convert tab creates one — and deletes the inquiry |
| Usual next step | Sales Quotation (Internal), Sales Order (Internal) | Raised separately once the customer commits; there is no automated conversion into either |
Screens and menus
The left menu has two entries:
| Menu item | Route | What it shows |
|---|---|---|
| Sales Inquiry | internal-sales-inquiry | The listing, the create panel and the view/edit panel |
| Line Items | line-items | A cross-document listing of inquiry lines with its own edit panel |
Listing
Columns: Sales Order No, Posting Status, Branch, Customer Name, Sales Agent, Amount Txn, Status,
Updated Date, Created Date, Transaction Date. One button above the grid, FINAL, which posts every
selected row whose posting status is not already FINAL; rows already final are skipped silently.
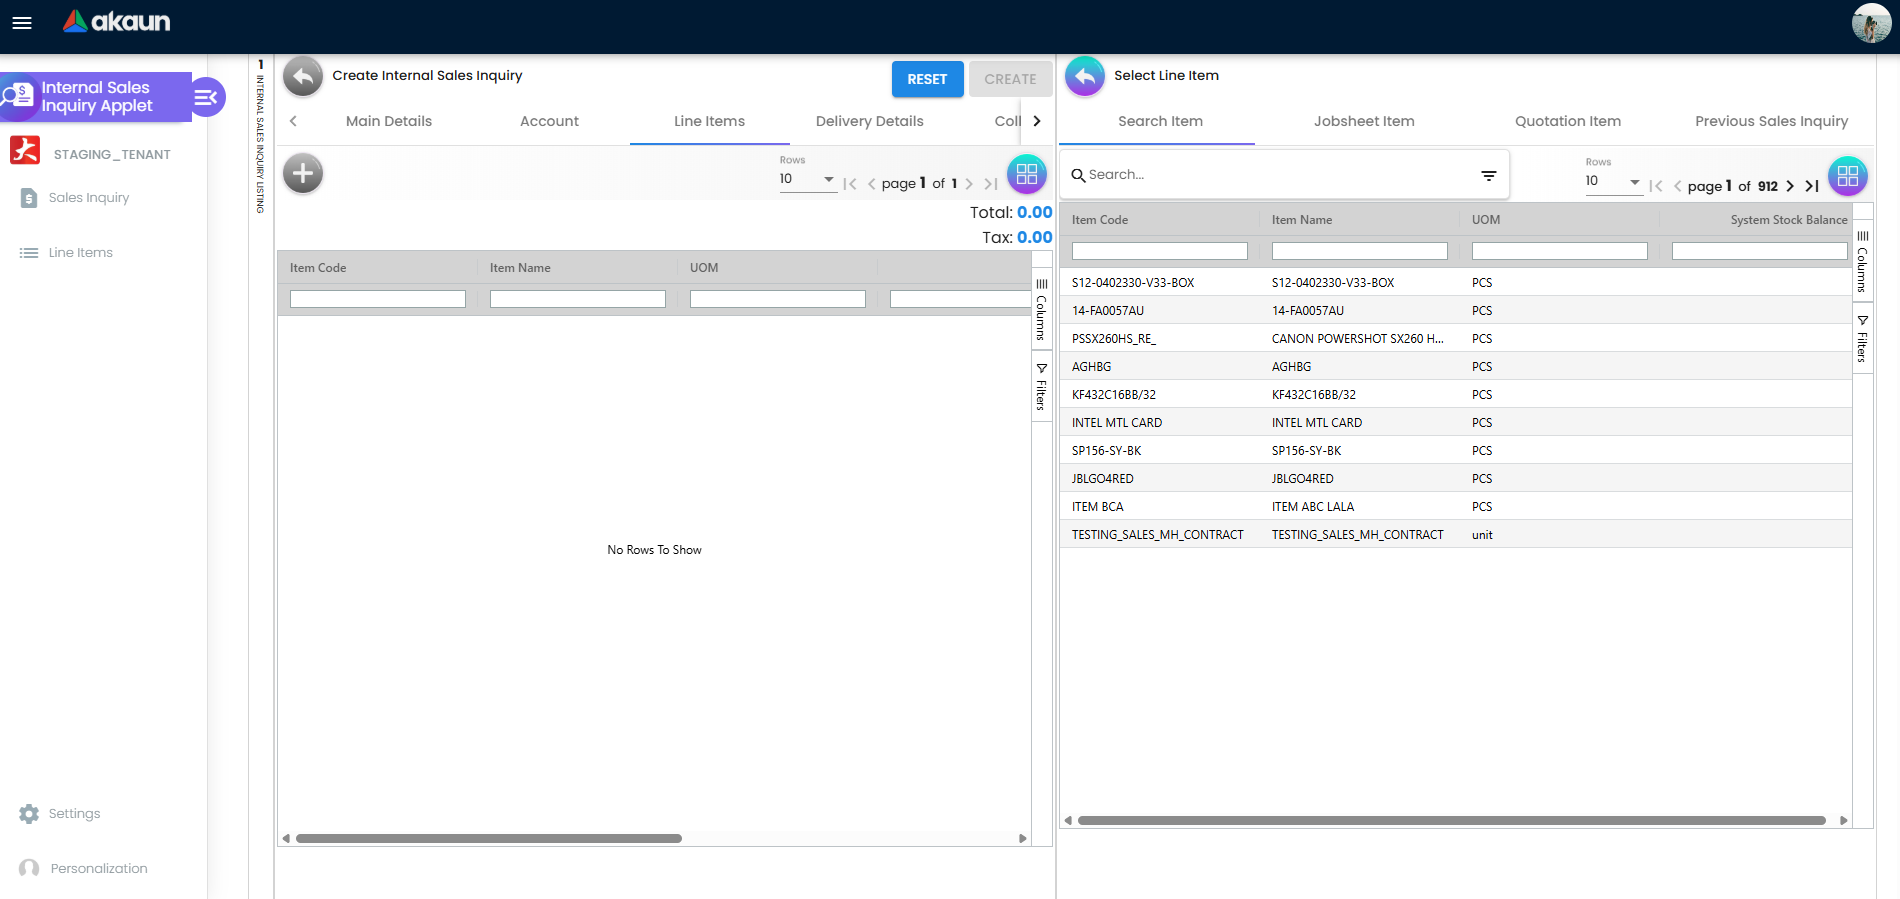
Create
Seven tabs: Main Details, Account, Line Items, Delivery Details, Collection, Department Hdr, Contra. Buttons: RESET and CREATE. CREATE stays disabled while the Main Details form is invalid.
View / edit
The same seven tabs plus Attachments, Export and Convert. Buttons: RESET, FINAL and SAVE
(SAVE is hidden by HIDE_GENDOC_SAVE_BUTTON), with a DELETE button under the tab strip that appears
only when the document is not FINAL and the applet-wide SHOW_DOCUMENT_DELETE_BUTTON setting is
on. No permission brings it back. Once posting status is FINAL the Main Details form is disabled except for Remarks.
Export offers four buttons; only Export as PDF works. Export as CSV, Export as DOCX and Export as ZIP are hard-disabled in the template — they are not configuration-dependent.
Convert shows one button, CONVERT TO INTERNAL RECEIPT VOUCHER, under the warning “This will cancel the current sales inquiry”. The warning is literal:
- A new document is built from this inquiry’s header, with
server_doc_typeandclient_doc_typeset toINTERNAL_RECEIPT_VOUCHER,amount_signum−1, all amount fields zeroed, and the document numbers, reference, remarks, member and contact links cleared. Every other header field — includingposting_status— is copied across as-is. - Its lines are the inquiry’s Collection (settlement) lines. The item lines are not carried over.
- The receipt voucher is POSTed. If that succeeds, the inquiry is DELETEd.
Convert while the inquiry is still a draft. The tab is offered on a FINAL inquiry too, and because the posting status is copied, converting one creates a receipt voucher that is born FINAL without ever running the FINAL step: it gets a tenant number but no company or branch number, no posting job is queued, and no cashbook or journal line is written — while the inquiry is gone. The deposit looks final in the receipt-voucher listing and never reaches the books. If a FINAL inquiry has already been converted, look in Receipt Voucher (Internal) for a FINAL voucher with no company or branch number and no cashbook line, and raise the deposit again properly (a known issue, reported to engineering).
If the POST succeeds and the delete fails you keep both documents; if the POST fails nothing is deleted and a failure toast is shown.
Panels instead of tabs
When the tenant has VERTICAL_ORIENTATION on and the user’s personal Default Tab Orientation is
not HORIZONTAL, every screen renders as a stack of expansion panels instead of a tab strip. Which
panels start expanded is controlled by the EXPAND_* settings below.
Side panels
The applet’s panel stack, in the order the pages service declares it: Internal Sales Inquiry Listing, View, Create, Select Line Item, Select Shipping Address, Select Customer, Select Billing Address, Add Line Item, Add Collection, Edit Line Item, Add Related Documents, Add Contra, Add Attachments, Edit Issue, Select Member, Create Customer, Select CRM Contact, Log Time.
Add Line Item has its own tabs: Item Details, Costing Details (when HIDE_COSTING_DETAILS is off
or the SHOW_COSTING_DETAILS permission is granted), Pricing Details and Issue Link. The Serial
Number, Batch Number and Bin Number tabs are commented out of the template.
Configuration
Before you can use it
| What | Where | Why |
|---|---|---|
| Branch and location | Organisation | Required on Main Details; CREATE stays disabled without them |
| A sales agent (employee) | Employee Maintenance | Required on Main Details |
| A currency | Organisation | Required on Main Details |
| A customer entity | Customer | Entity Id is required on the Account tab, and Credit Terms offers nothing until one is chosen |
| Document numbering for the inquiry | Organisation | Supplies the number shown in the listing |
| Items | Doc Item Maintenance | What Select Line Item → Search Item returns |
| Tax codes | Tax Configuration | Line tax; the selector is hidden by HIDE_TAX_CONFIG_SELECTION |
| A default printable format | Settings → Printable Format Settings, or Branch Settings → Printable Format | Export as PDF needs one |
No GL code is needed: this document posts nothing.
Applet settings
Settings live on the shared settings screen, Settings → Application Settings.
The settings menu has four entries: Application Settings (the shared screen), Default Selection, Printable Format Settings and Branch Settings. Personalization has one, Default Selection.
The shared settings screen and the applet’s model offer 99 keys for applet code
internal_sales_inquiry_applet (re-counted 2026-10-04 from the field-configuration export plus the
model). 36 are read by the applet’s code and the other 63 by nothing. The keys below are the ones
that are both offered on the screen and read:
| Group | Keys | What they control |
|---|---|---|
| Layout | VERTICAL_ORIENTATION | Switches every screen from tabs to expansion panels (unless the user’s personal orientation is HORIZONTAL) |
| Which panels open | EXPAND_MAIN_DETAILS, EXPAND_ACCOUNT, EXPAND_LINE_ITEMS, EXPAND_DELIVERY_DETAILS, EXPAND_DEPARTMENT_HDR, EXPAND_ATTACHMENT, EXPAND_EXPORT | In panel mode, which sections start expanded |
| Buttons | HIDE_GENDOC_SAVE_BUTTON, SHOW_DOCUMENT_DELETE_BUTTON | Hide SAVE on the view screen; show the DELETE button (this one is opt-in — the control appears only when the setting is on; no permission overrides it) |
| Line grid and item form | HIDE_QTY_BASE, HIDE_QTY_UOM, HIDE_UOM_TO_BASE_RATIO, HIDE_AMOUNT_TXN, HIDE_AMOUNT_NET_EXCL_TAX, HIDE_AMOUNT_STD_EXCL_TAX, HIDE_DISCOUNT_AMOUNT_EXCL_TAX, HIDE_UNIT_DISCOUNT, HIDE_UNIT_DISCOUNT_UOM_EXCL_TAX, and the eight HIDE_UNIT_PRICE_* keys | Hide individual quantity, price, discount and amount columns and fields |
| Line extras | HIDE_COSTING_DETAILS, HIDE_TAX_CONFIG_SELECTION, HIDE_WHT_CONFIG_SELECTION, HIDE_UNIT_PRICE_STD_PRICING_SCHEME | Hide the Costing Details tab, the tax and withholding-tax selectors and the pricing-scheme picker |
Each HIDE_* key above is paired with a SHOW_* client-side permission, and for this applet those
permissions are seeded — see below — so a tenant-wide hide can genuinely be reopened per role.
Read at runtime with no control on the shared screen:
EXPAND_CONTRA— the Contra panel asks for this key, but the shared screen only offersEXPAND_MAIN_CONTRA. The Contra panel can therefore never be made to start expanded.HIDE_DEPARTMENT_HDR_TAB— the panel list can hide the Department Hdr section with this key, but the shared screen does not offer its toggle for this applet.PRINTABLE,DEFAULT_BRANCH,DEFAULT_LOCATION,DEFAULT_COMPANY,DEFAULT_LANGUAGE_CODE,DEFAULT_ORIENTATION,DEFAULT_TOGGLE_COLUMN— set on the other settings screens below.
Default Selection (applet-wide) renders two controls, Default Branch and Default
Location, and saves DEFAULT_BRANCH, DEFAULT_LOCATION and DEFAULT_COMPANY (the company is
derived from the branch). There is no control for the default language — the applet-wide default
language cannot be set from here.
Personalization → Default Selection overrides those for one user and adds three more controls:
Default Language (DEFAULT_LANGUAGE_CODE), Default Toggle Column (DEFAULT_TOGGLE_COLUMN,
SINGLE or DOUBLE) and Default Tab Orientation (DEFAULT_ORIENTATION, HORIZONTAL or
VERTICAL).
Branch Settings opens a branch listing; picking a branch opens a read-titled View Branch Settings screen with five tabs — Branch Details, Item Category Filter, Pricing Scheme, Printable Format and Default Settlement Method. The container’s own SAVE button is commented out; Branch Details, Item Category Filter, Printable Format and Default Settlement Method each carry their own SAVE, and Pricing Scheme is a listing with none. A Menu List tab exists in the template but is commented out.
Printable Format Settings manages the formats offered to Export as PDF.
Document behaviour settings
| Behaviour | Governed by | Effect |
|---|---|---|
| SAVE visible on the view screen | HIDE_GENDOC_SAVE_BUTTON | Hides SAVE; the button is also disabled while Main Details is invalid |
| DELETE visible | SHOW_DOCUMENT_DELETE_BUTTON setting on, and posting status not FINAL | Two-click confirm (CLICK AGAIN TO CONFIRM) |
| Fields locked after FINAL | not configurable | The Main Details form is disabled, with Remarks re-enabled |
| FINAL from the listing | not configurable | Acts on the selection, skipping rows already FINAL |
There is no approval flow, no workflow designer and no VOID on this document.
Settings in other applets that control this applet
| Setting | Where it is set | Effect here |
|---|---|---|
| Branch pricing scheme, item category filter, default settlement method, default printable format | This applet’s own Branch Settings, per branch | Override the applet-wide equivalents for documents raised at that branch |
| The item record | Doc Item Maintenance | Search Item offers product-and-service items only, and the price in its grid is the first base-unit price stored on the item record. A wrong price there is corrected on the item, not on the inquiry. |
| Credit terms on the customer | Customer | Credit Terms offers only the terms held on the chosen customer’s own record. A customer with none leaves the list empty and the inquiry saves without terms, so whoever maintains customers adds the terms there, before the salesperson needs them. |
Feature visibility and permissions
Twenty-three client-side permission codes are seeded for this applet and twenty-three are checked in code — they line up almost exactly:
- Twenty-two
SHOW_*counterparts to theHIDE_*line and pricing settings, plusSHOW_COSTING_DETAILSandSHOW_TRANSACTION_DATE(which unlocks the Transaction Date field — without it the date is fixed). - One code is checked but not seeded:
EXCLUDE_ACCOUNT_CODE_ITEM_TYPE_AT_ITEM_SEARCH, which filters account-code item types out of the item search. No screen offers it for granting. SHOW_QTY_BASEis seeded twice; the duplicate row is harmless but should be cleaned up.
Server-side, the applet uses the generic-document permissions
TNT_API_DOC_INTERNAL_SALES_INQUIRY_CREATE_TGT_GUID, …_READ_…, …_UPDATE_… and …_DELETE_….
Fields
Main Details
The left column holds Branch, Transaction Date, Reference, Credit Terms, Sales Agent, Permit No, Sales Lead, Tracking ID and Due Date; the right column holds Location, Currency, CRM Contact and MemberCard; Remarks runs across the bottom. The form insists on four of them — Branch, Location, Sales Agent and Currency — and CREATE waits until all four are filled. The asterisks do not tell you which: Credit Terms is labelled with one and is optional, while Sales Agent carries none and is required (read from the code).
| Field | Required | What the screen does not tell you |
|---|---|---|
| Branch | Yes | Picking it fills Currency with the branch’s currency and Location with the branch’s main location, if the branch has one, and sets the company behind the scenes. Pick the branch first, then change Location or Currency if this inquiry needs something else. |
| Sales Agent | Yes | The list is your employees, searchable by name or employee code. If the Sales Man box on the Main Details tab of this applet’s field settings names employee categories, only employees in those categories are offered. The listing shows the agent’s name as it is on the employee record today, looked up each time the listing loads. The Sales Agent box under Branch Settings → Branch Details saves a default onto the branch record itself, not into this applet, and this applet does not use it to fill a new inquiry — choose the agent every time. |
| Transaction Date | — | Editable only with the SHOW_TRANSACTION_DATE permission |
| Credit Terms | — | The list is empty until a customer is chosen on the Account tab — the hint under the box says Entity ID must be selected first — and then offers only the terms on that customer’s record. Choosing a different customer clears it. Choosing a term fills Due Date, worked out from the date settings stored on the term itself rather than counted from the Transaction Date, and changing the Transaction Date afterwards does not move it. That calculation is read from the code, not tried: on one draft, pick a term, compare Due Date with the date you expected and overwrite it if it is wrong. |
| Due Date | — | A follow-up date, typed or filled by Credit Terms. Nothing acts on it: the listing has no Due Date column and Advanced Search cannot filter on it, so no one is reminded. The follow-up belongs to the sales agent’s own calendar, and the sales manager’s check is to open the listing each week, look at the inquiries still in DRAFT by Transaction Date and ask about the old ones. |
| Reference, Remarks | — | The listing’s keyword search looks in both, as well as the document number, so the customer’s own enquiry number or a project code typed into Reference is how anyone finds the inquiry again. It does not look in Permit No or Tracking ID. Remarks is the one field that stays editable after FINAL. Convert leaves both empty on the receipt voucher it builds. |
| Sales Lead | — | Two values, Corporate or Non-Corporate: a label on the inquiry, not a link to a lead in CRM. A new inquiry starts as Corporate, and one saved with none shows Corporate when it is opened, so a Corporate inquiry may simply be one nobody changed. If you intend to count inquiries by it, agree first that the salesperson sets it on every one. |
| MemberCard | — | Opens Select Member, which lists loyalty members and searches card number, name and phone. Once a member is linked the screen can replace it but cannot remove it, and Convert does not carry it to the receipt voucher (the removal is read from the code, not tried). If the wrong member went on a draft, pick the right one; if no member should be linked, delete the draft where DELETE is enabled and raise it again, or say so in Remarks. |
| CRM Contact | — | Opens Select CRM Contact, which searches a contact’s name, phone, e-mail or ID number. It behaves like MemberCard: it can be replaced but not removed, and Convert drops it. |
A Credit Limit entry exists in the field list but its template case is commented out, so no Credit Limit control renders. Group Discount and Group Discount Amount are likewise commented out.
Account
Three sub-tabs. Entity Details — Entity Id (required), Entity Name, Status, Entity Type, Identity Type, ID Number, Currency, GL Code, Description, Email, Phone Number, filled from the selected customer. Bill To and Ship To hold the two addresses, each with its own selection panel. A Create Customer panel lets you add a customer without leaving the applet.
Line items
Item Code, Item Name, UOM, UOM-to-base ratio, pricing scheme, the eight unit-price variants,
Quantity Base, unit and amount discounts, tax and withholding-tax codes and Remarks — each hideable
by its HIDE_* setting and re-showable by the matching permission. Costing Details and Pricing
Details are separate tabs on the add-line panel.
Collection and Contra
Collection holds settlement lines against the inquiry — and these, not the item lines, are what the Convert action copies onto the receipt voucher. Contra holds offset lines.
Lifecycle and effects
Status (posting_status) | Meaning | Allowed next |
|---|---|---|
empty / DRAFT | Saved and editable | FINAL, DELETE, or CONVERT |
FINAL | Locked; only Remarks stays editable | CONVERT (which deletes the inquiry — and from FINAL leaves a receipt voucher with no journal or cashbook line; see View / edit) |
An inquiry posts nothing: it moves no money and no stock, so no journal is built, no GL code is needed, and no inventory transaction is written. There is no VOID — nothing in the applet voids an inquiry, and there is nothing posted to reverse.
FINAL is available from the view screen or from the listing’s bulk button. It is one-way: nothing in the applet moves a document back to draft.
CONVERT is the only other exit, and it removes the inquiry — see View / edit above.
Related applets
- Sales Quotation (Internal) — the usual next document; also a line source for Select Line Item.
- Sales Order (Internal) — where a committed inquiry usually ends up; raised separately.
- Sales Invoice (Internal) — the eventual revenue document.
- Jobsheet (Internal) — a line source for Select Line Item.
- Customer — the entity on the Account tab, and the Create Customer panel writes here.
- Employee Maintenance — the required Sales Agent.
- Organisation — branches, locations, currencies and document numbering.
- Doc Item Maintenance — the items in Search Item.
- Tax Configuration — line tax codes.
Troubleshooting
| Symptom | Cause | Fix |
|---|---|---|
| CREATE stays greyed out | Main Details is invalid — Branch, Location, Sales Agent and Currency are all required | Fill all four |
| Credit Terms offers nothing, with the hint Entity ID must be selected first | No customer has been chosen on the Account tab, or the chosen customer has no credit terms on its record | Choose the customer first; if the list is still empty, add the terms to the customer record |
| Transaction Date cannot be changed | The SHOW_TRANSACTION_DATE client-side permission is not granted | Grant it under Settings → Client-Side Permission |
| Export as CSV / DOCX / ZIP do nothing | Those three buttons are hard-disabled in the template; only PDF is implemented | Use Export as PDF |
| Export as PDF produces nothing | No default printable format is set for the applet or the branch | Set one under Settings → Printable Format Settings, or Branch Settings → Printable Format |
| The inquiry disappeared after Convert | Convert creates the receipt voucher and then deletes the inquiry — that is what the on-screen warning means | Export the PDF first if you need a record |
| The receipt voucher created by Convert has no item lines | Convert copies the Collection (settlement) lines, not the item lines | Add the items to the receipt voucher directly |
| Both an inquiry and a receipt voucher exist after Convert | The receipt voucher was created but the inquiry delete failed | Delete the inquiry manually |
| Everything on a line’s Issue Link tab is the same dummy row | The grid is a mock-up with fixed sample data, and the Edit Issue screens behind it store nothing | Ignore them. |
| The Contra panel never starts expanded in panel mode | The panel reads EXPAND_CONTRA; the settings screen only offers EXPAND_MAIN_CONTRA | No workaround from the UI |
| No Department Hdr toggle on Application Settings | The shared screen does not offer tab-hide toggles for this applet | The key keeps whatever value the tenant already holds |
| An item you expect is missing from Search Item | Item search filtering, possibly EXCLUDE_ACCOUNT_CODE_ITEM_TYPE_AT_ITEM_SEARCH — which is checked, but no screen offers it for granting, so in practice it stays off | Check the item in Doc Item Maintenance |
| DELETE is not offered on a draft | The SHOW_DOCUMENT_DELETE_BUTTON setting is off, or the document is already FINAL | Switch the setting on; a FINAL inquiry cannot be deleted from the applet |
| The screen is a stack of panels instead of tabs | VERTICAL_ORIENTATION is on for the tenant and the user’s personal Default Tab Orientation is not HORIZONTAL | Set Personalization → Default Selection → Default Tab Orientation to Horizontal |