POS General Applet
Purpose and Overview
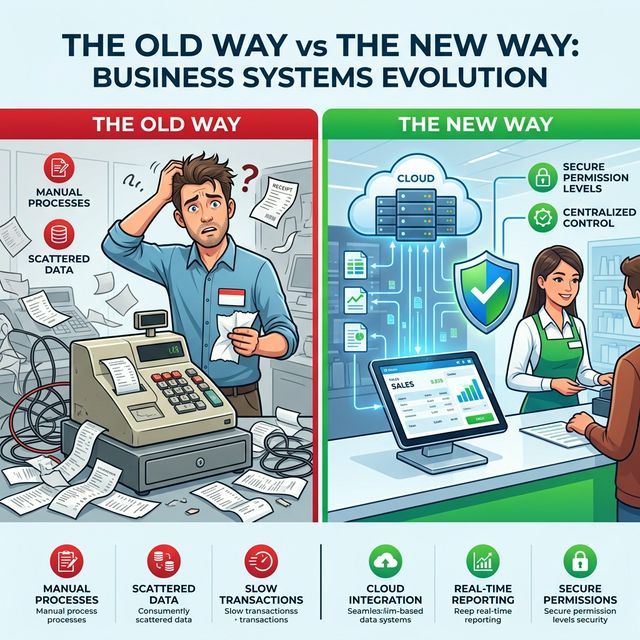
The BigLedger POS General Applet is a fast and easy-to-use tool designed for managing sales at the store counter. It helps you process customer orders quickly while keeping your records accurate across all your store locations. Managers can easily see and control all activities from one place, ensuring everything follows company rules and financial standards.
Who Benefits from This Applet?
Cashiers & Front-line Staff:
- Fast and easy interface for busy hours
- Simple ways to manage your sales and cash flow
- Instant view of available stock and item details
Store Managers & Supervisors:
- Real-time view of all sales activities
- Tools to reprint receipts or fix simple mistakes
- Easy ways to check daily totals and cash records
Finance & IT Administrators:
- Sales records automatically update your accounts
- Easy control over payment methods and staff access
- Secure and permanent history for tax and audit purposes
Business Owners & Executives:
- A single view of how all your stores are performing
- Reduced risk of cash errors or fraud
- Clear information to help make better business decisions
What Problems Does This Solve?
The “Disconnected Data” Problem:
Traditional sales systems often keep records only at the counter, which leads to:
- Mismatches between store records and the main office
- Trouble knowing exactly how much stock you have
- Waiting a long time for sales reports
The BigLedger POS Solution:
- Instant Updates - Every sale is updated across your entire business immediately
- Manage Everything in One Place - Control all your stores and counters from a single screen
- Automatic Bookkeeping - Sales go directly into your accounts, preventing manual errors
- Secure Records - Strict rules and automatic timestamps keep your records safe and honest
Video Tutorial
For a visual walkthrough of the POS General Applet, watch the video below:
Key Features Overview
Key Concepts
Understanding how POS works
Every sales system needs to track three basic things. The BigLedger POS makes this simple:
| Question | Component | Example |
|---|---|---|
| Where is the sale? | Store / Counter | Main Branch, Counter 1 |
| Who is selling? | Staff (Cashier) | Jane Smith (Staff ID 102) |
| How is it paid? | Payment Method | Credit Card, Cash, GrabPay |
How the System is Organized
Think of your store operations as a simple flow:
Company
│
├── Store / Counter ──→ WHERE does the sale happen?
│   │
│   └── Staff member ──→ WHO is making the sale?
│       │
│       └── Sales ──→ WHAT is being sold?
│
└── Accounting ──→ WHERE is the money recorded?
    │
    └── Payment Methods ──→ HOW is the customer paying?
Steps in the Flow:
- Company: Your overall business rules
- Store: The settings for each physical location
- Staff: Tracking who is responsible for each sale
- Sales: The actual items sold
- Accounting: The final place where all money is tracked
Quick Start Guide
For Staff: Cashier Daily Workflow
Goal: Open your counter and start selling in simple steps.
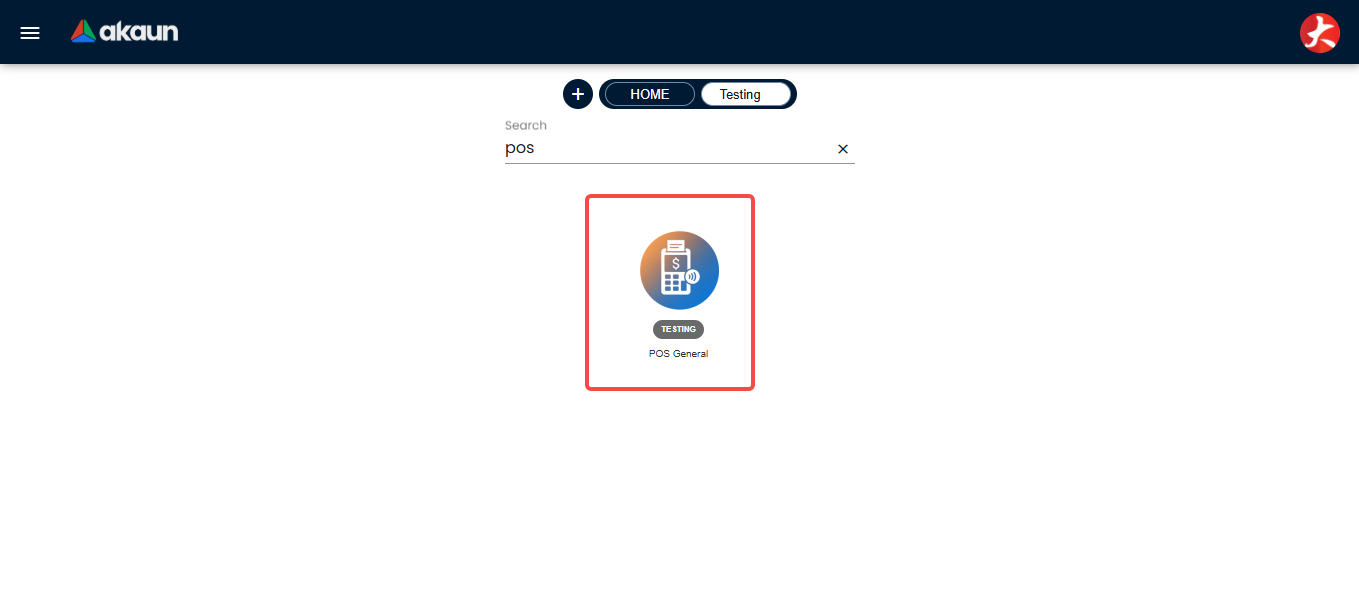
Open the Applet: Navigate to the POS General Applet from the main dashboard of your BigLedger account.
Navigate to the POS General Applet from your main account page. Set your Defaults: Go to Default Selection to ensure the correct Store and Staff name are selected. This usually only needs to be done the first time you use the system.
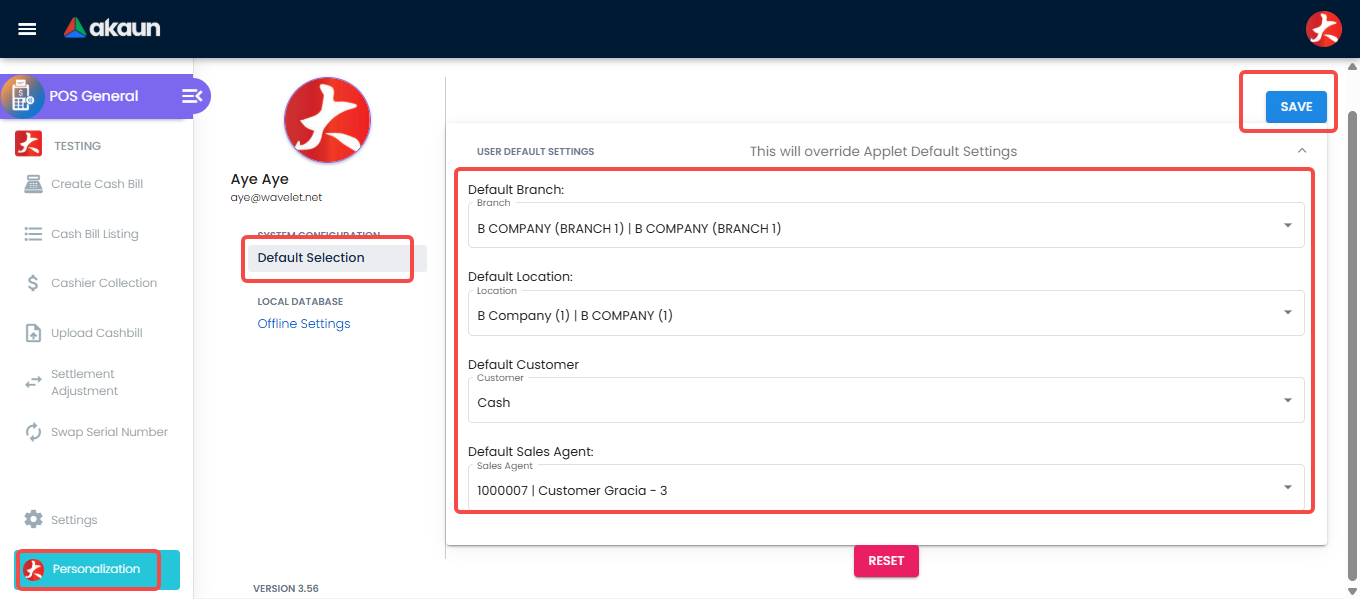
Configure your default store and staff settings. Make Sales: Follow the detailed process below to record transactions and accept payments.
Detailed Guide: Making a Sale
Follow these steps to process a customer transaction from start to finish.
Step 1: Create a New Cash Bill
Click the “New” or “Add” button to start a fresh transaction.
Step 2: Select or Change Customer
By default, the system selects your primary “Default Customer”. If you need to record the sale for a specific customer:
Click the Customer button.
Click on the Entity ID field to search.
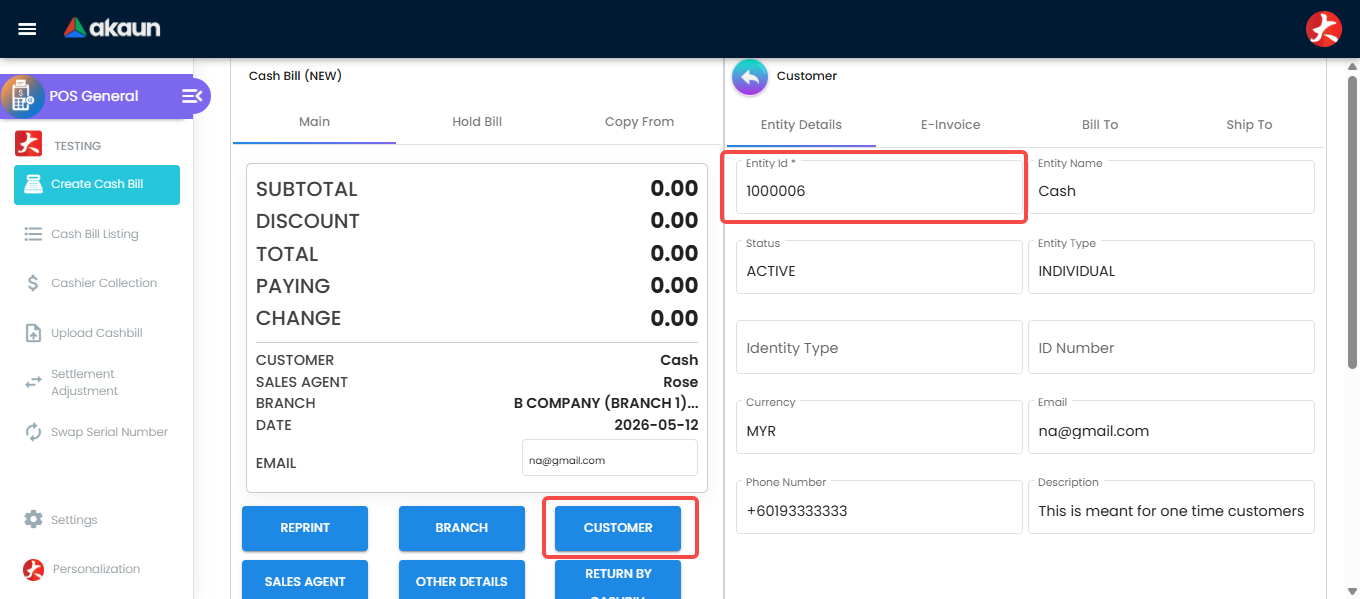
Click the Entity ID field to search for a specific customer. Search for the customer and select them from the list.
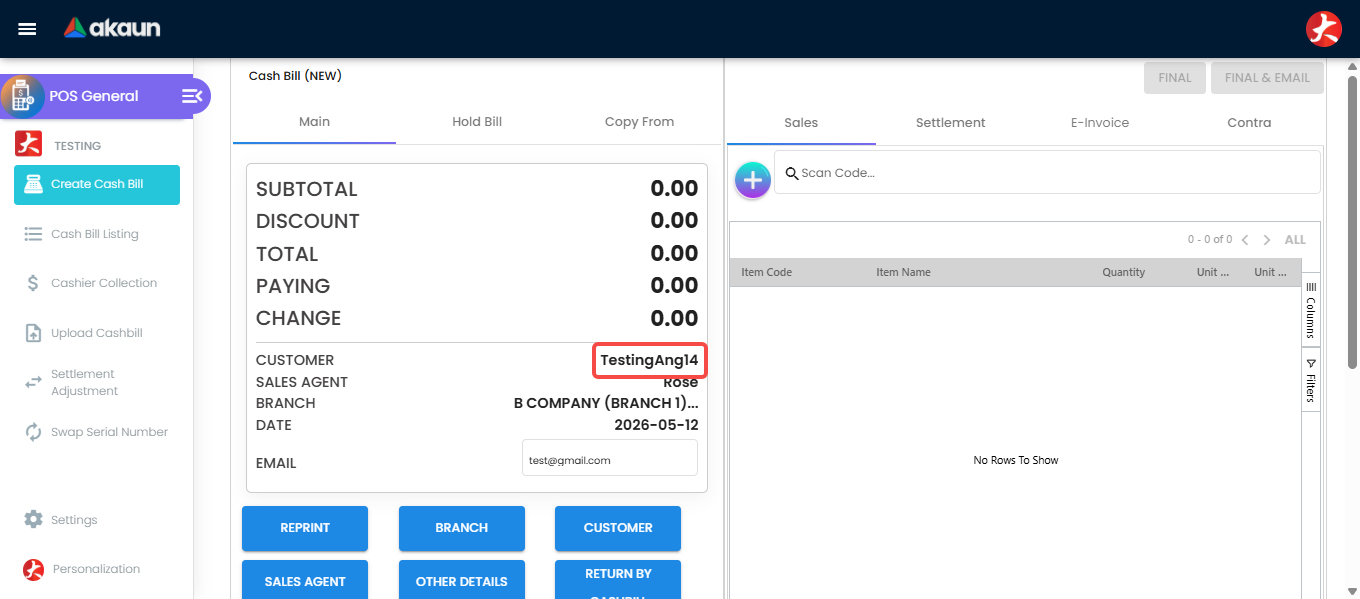
Search and select the correct customer record.
Step 3: Add Items to the Sale
You can add products in two ways:
- Scan: Use your barcode scanner directly in the search box.
- Manual: Click the Add button to manually select items.
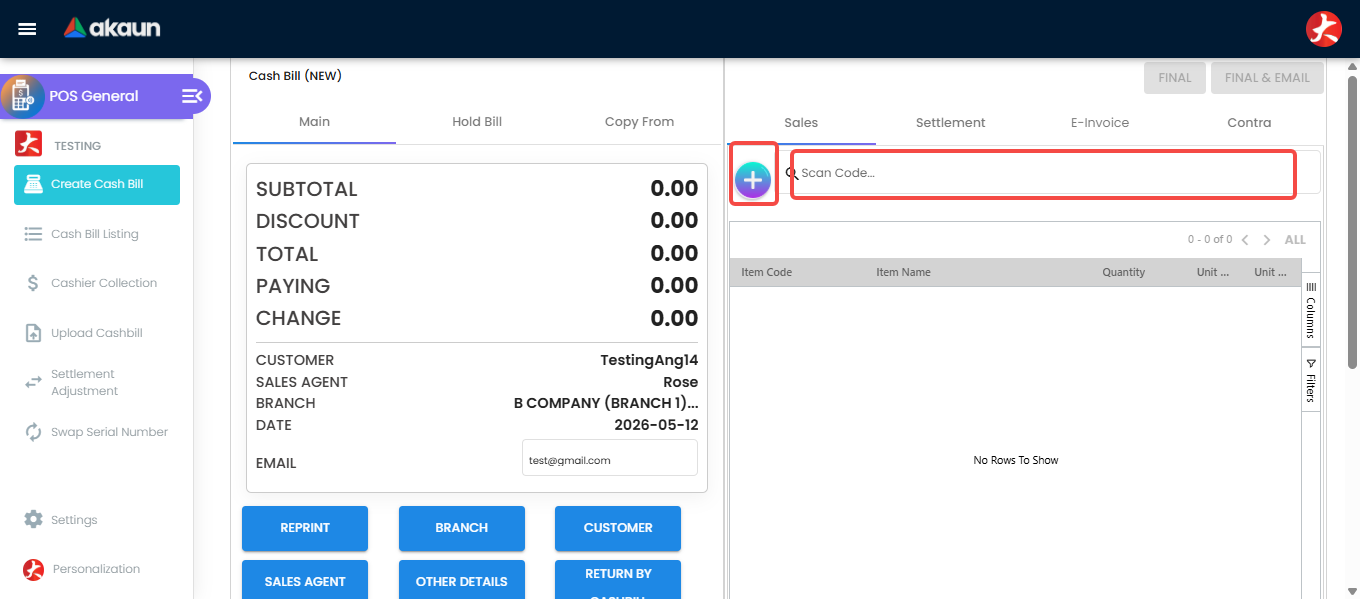
Scan barcodes or click 'Add' for manual selection.
For manual selection, search for the item name or code and click to select it.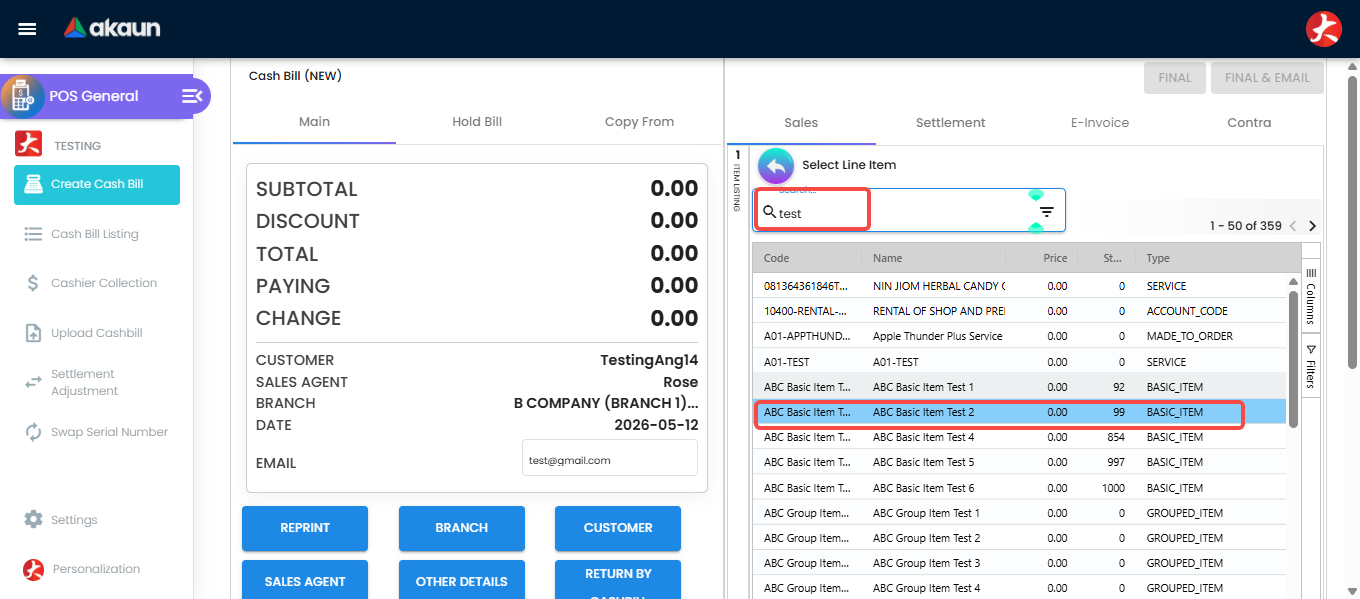
Step 4: Adjust Quantity and Price
Once an item is added, you can edit the Quantity or Price (if you have the necessary permissions).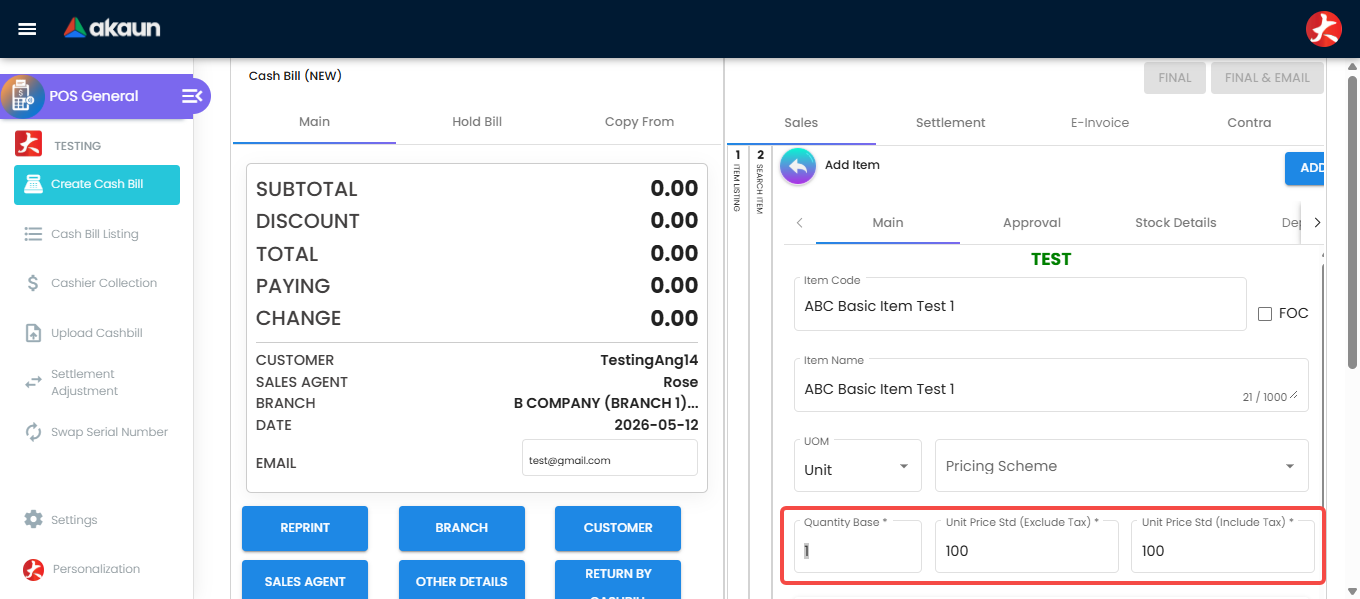
Continue adding items to the bill using the same method until the order is complete.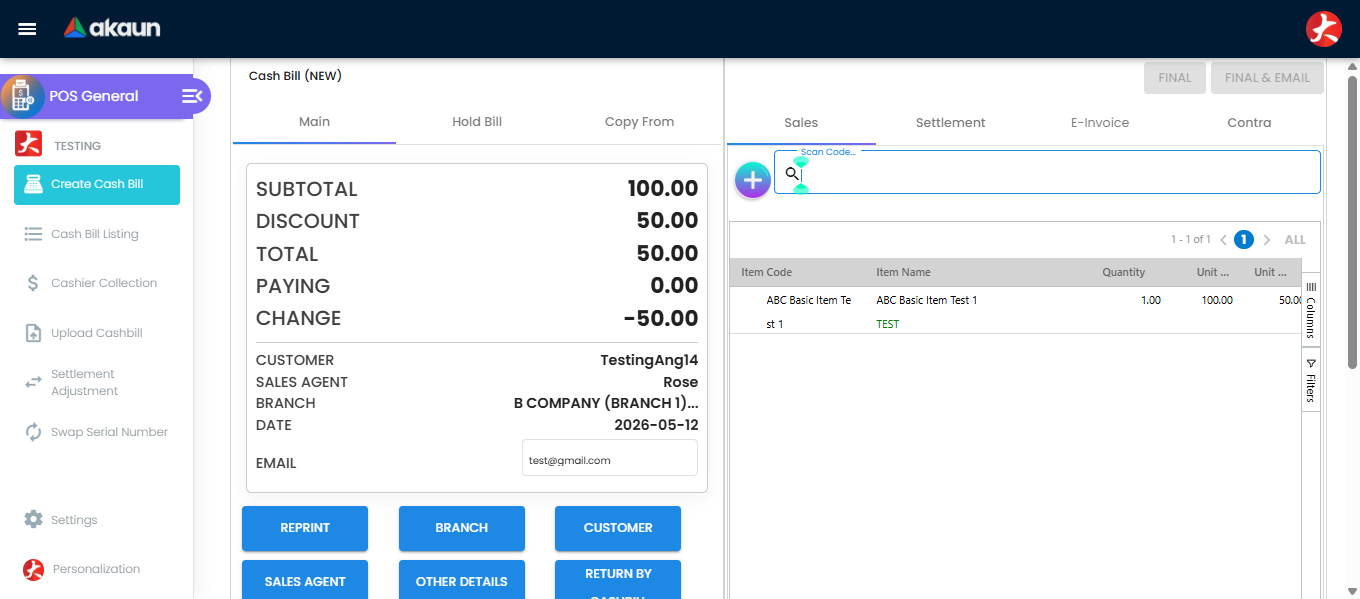
Step 5: Process Payment
When the customer is ready to pay:
Select the relevant payment method (e.g., Cash, Card, E-Wallet) by clicking the red payment button.
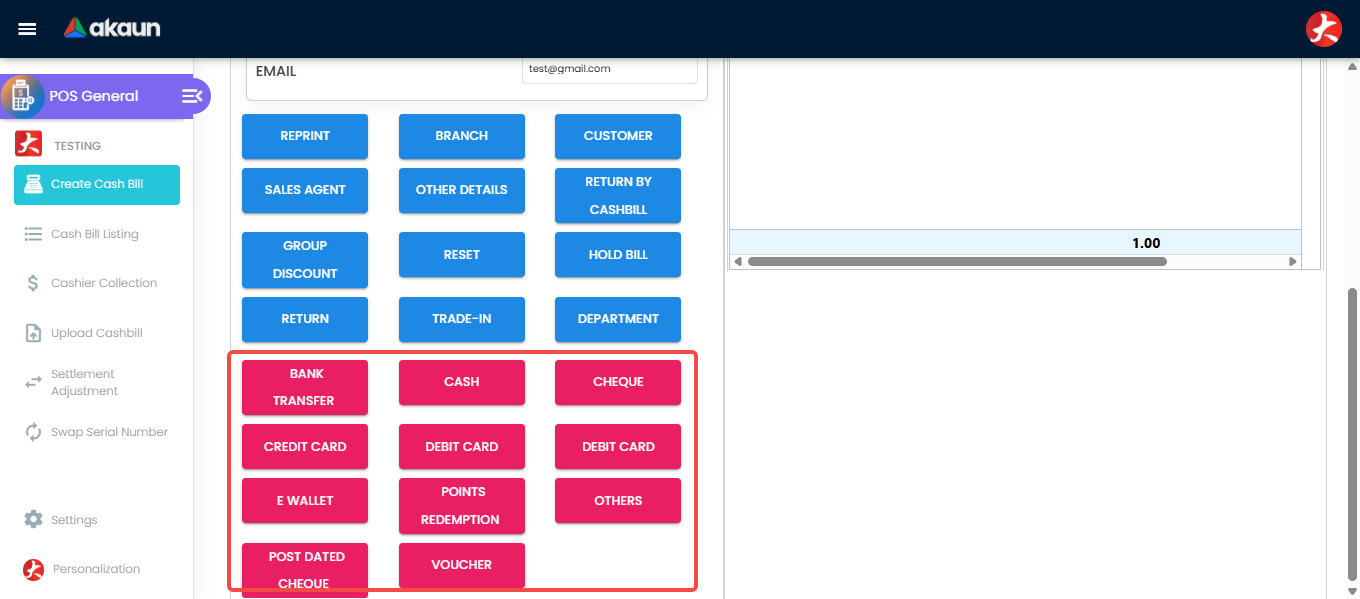
Select the payment method used by the customer. Enter the payment Amount and any other required information in the fields, then click Add.
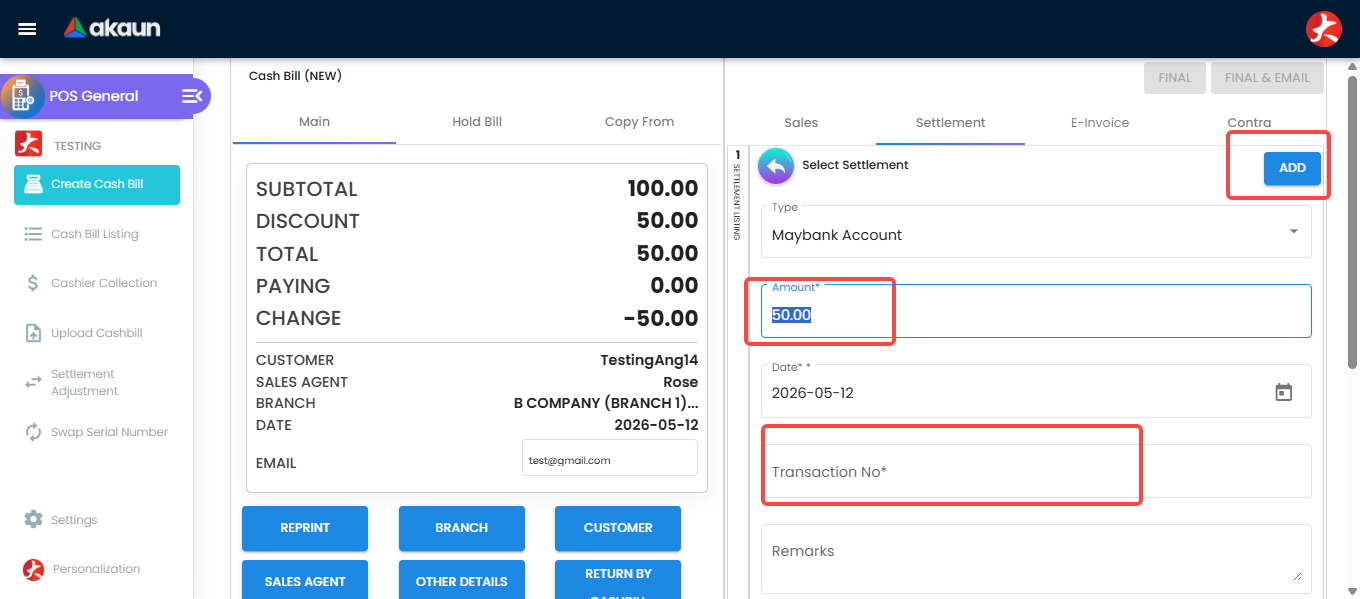
Key in the received amount and relevant payment details.
Step 6: Finalize the Sale
Review the transaction one last time. Once confirmed, click the Final button to complete the sale and update your records.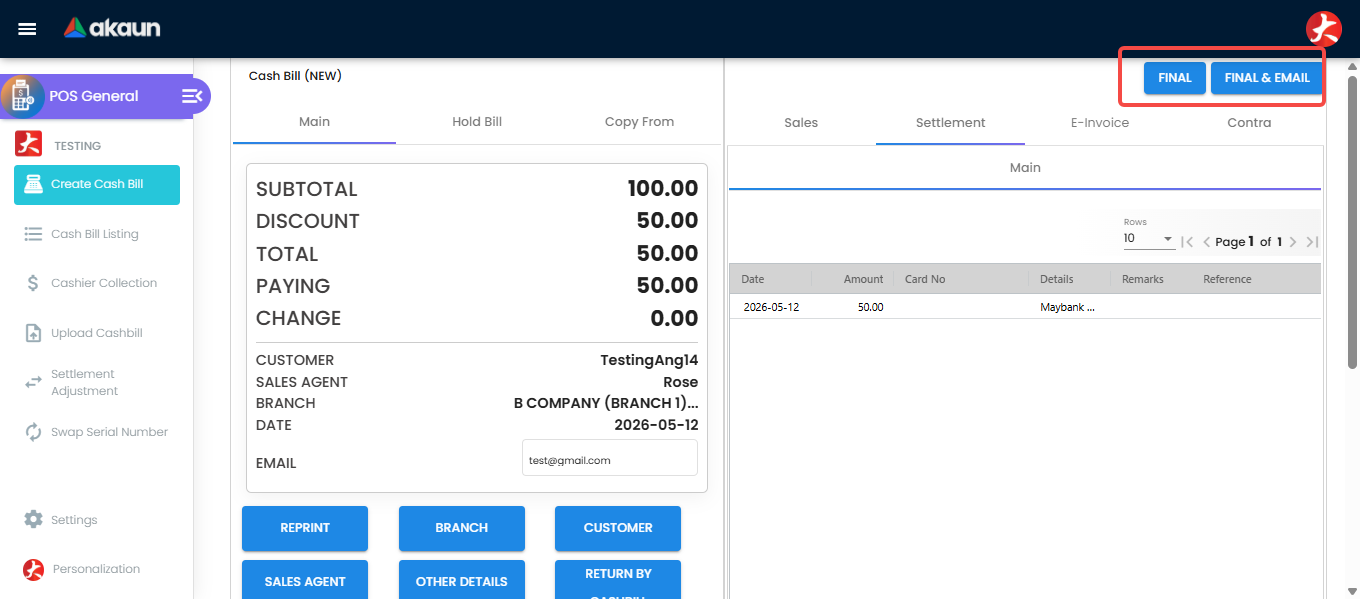
- Closing the Store: At the end of the business day, you must print a Z-Report to summarize your sales and collections.
- Select the relevant details to search for your Z-Report.
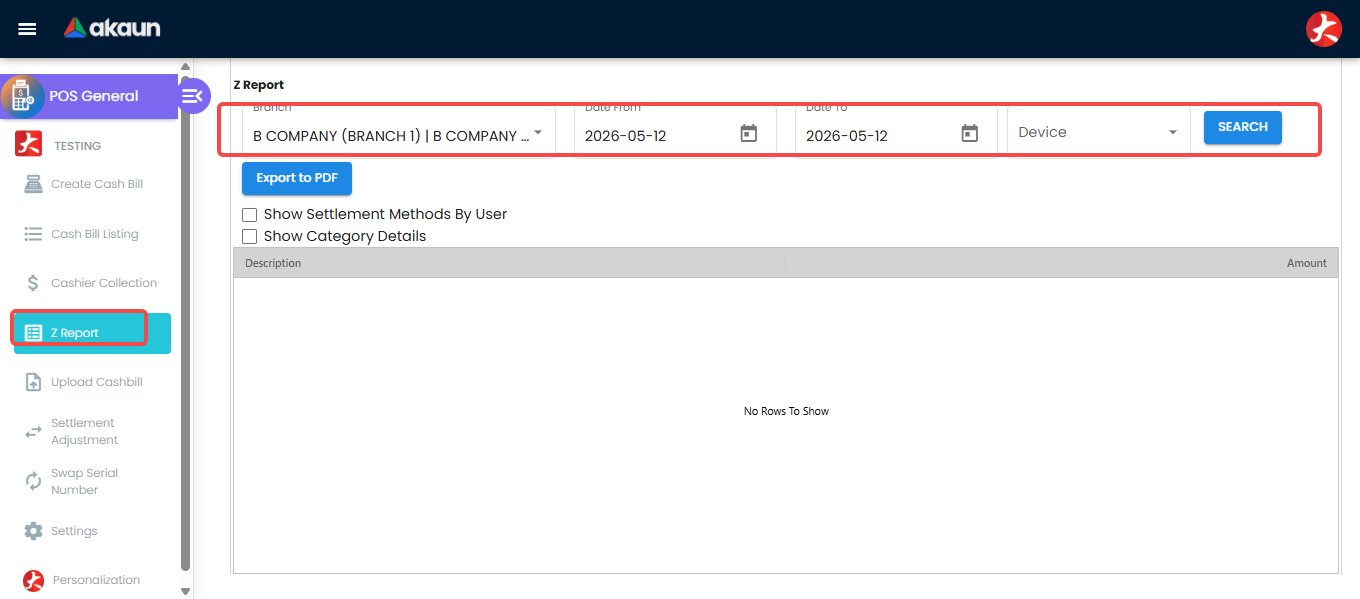
Search for the daily sales summary. - You can print the Z-Report by clicking the Export to PDF button.
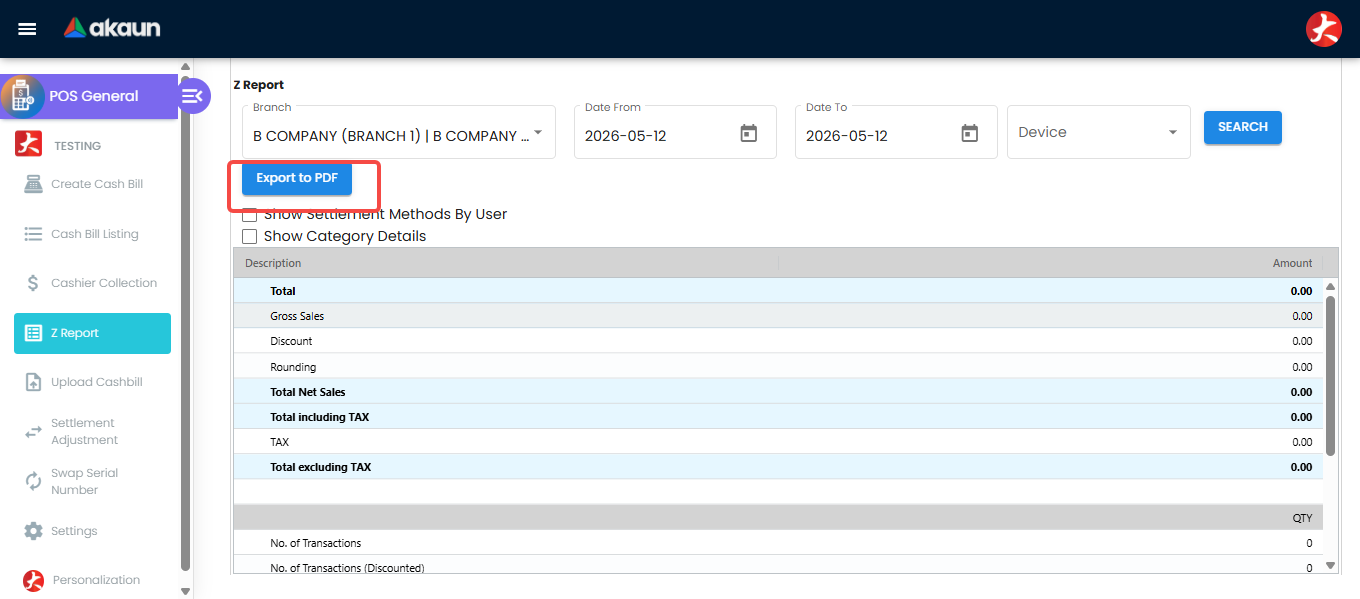
Click Export to PDF to generate the report. 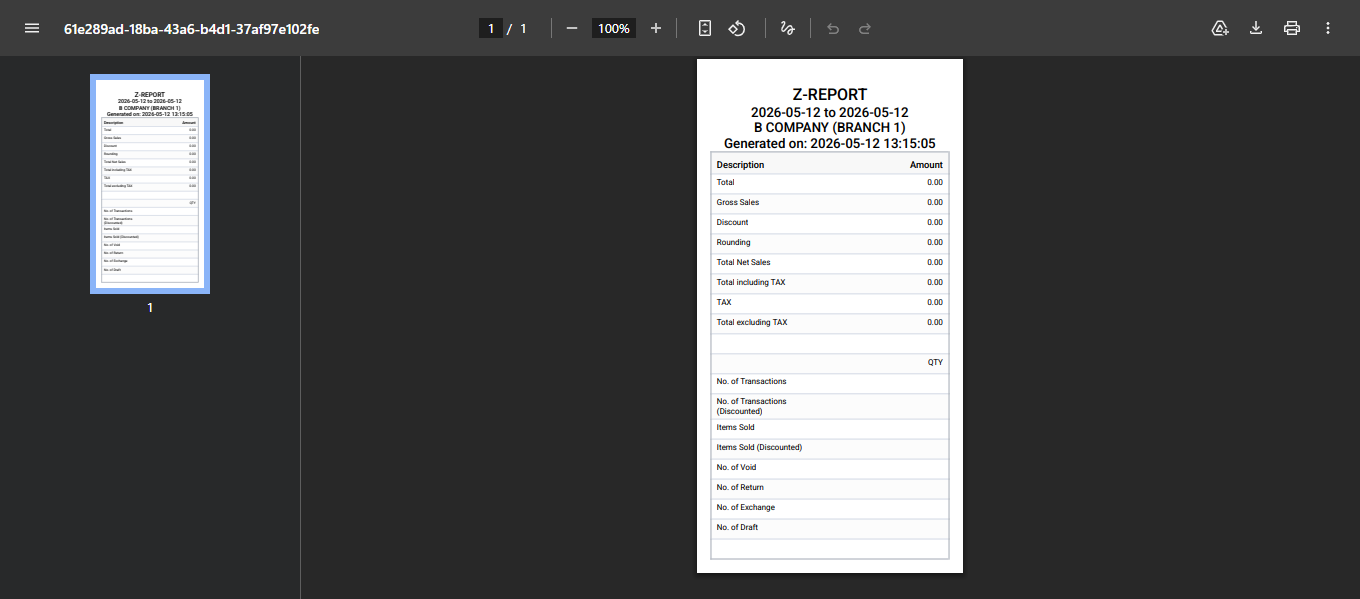
Print the generated PDF for your records.
What happens next? Your sales are instantly recorded in the main accounts and stock levels are updated.
For Managers: Supporting the Team
Goal: Help staff and make sure sales records are correct.
1. Check and Review Sales
Use the Cash Bill Listing to see all recent sales. You can use the Advanced Search to filter for specific dates or periods.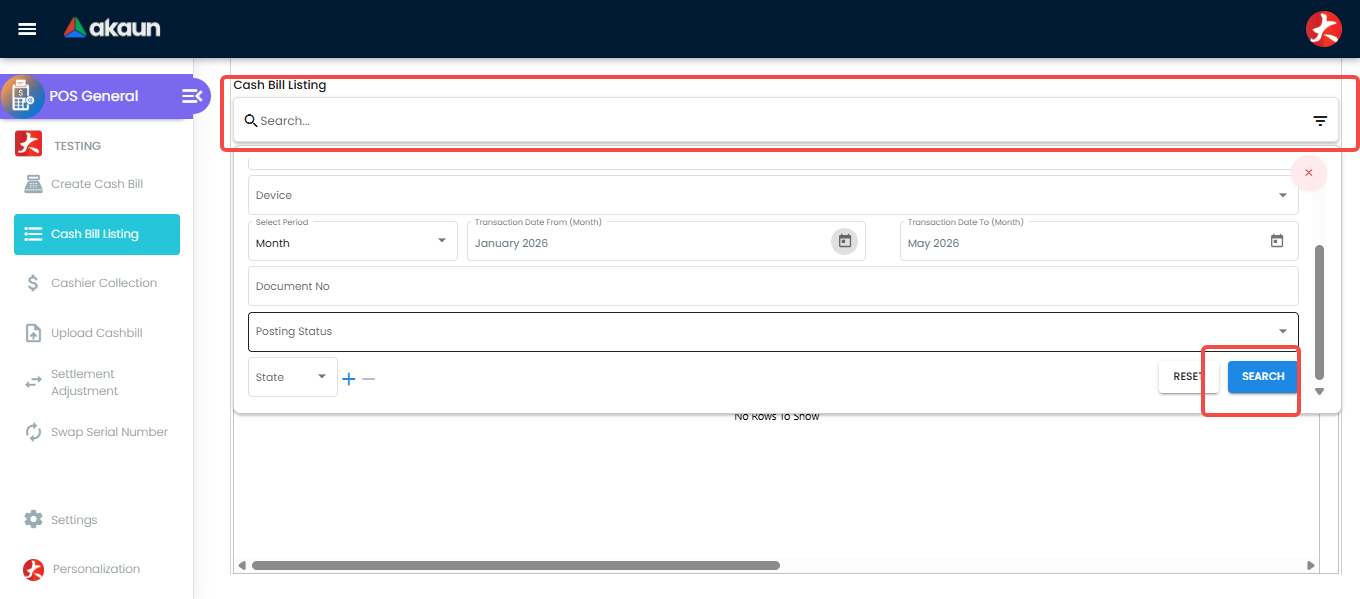
Click into a specific cash bill to review its details. From here, you can edit remarks or email the receipt directly to the customer.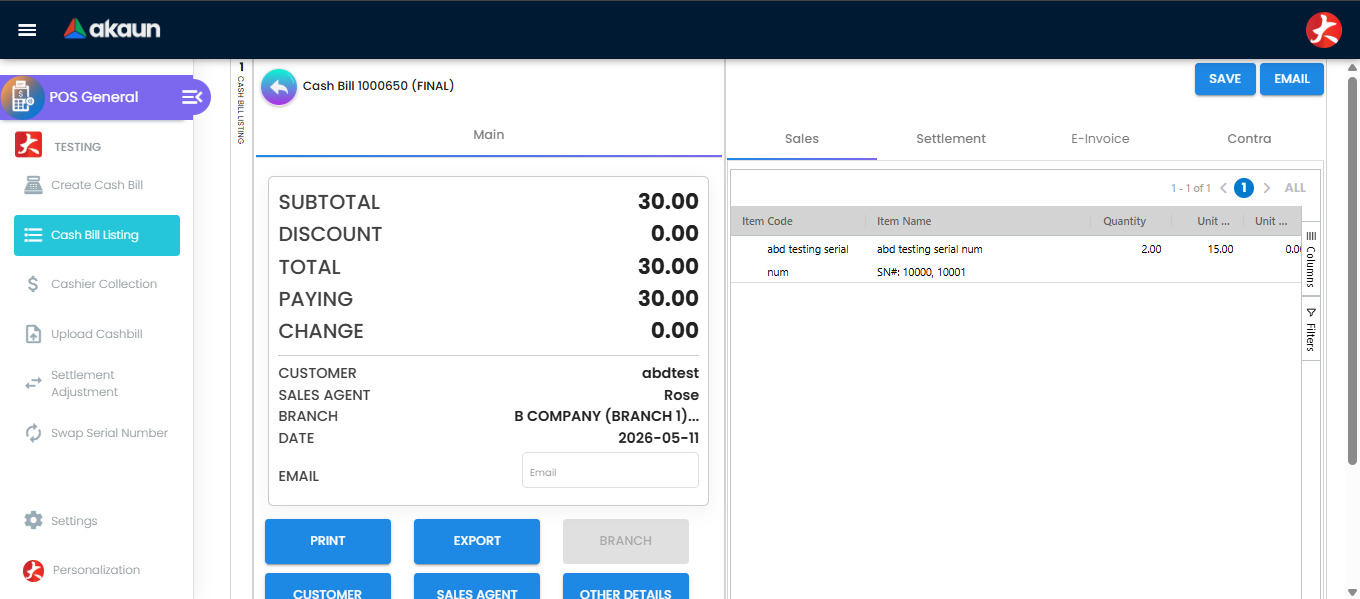
2. Reprint Receipts
If a customer needs another copy of a receipt:
- Select the cash bill from the listing.
- Click the Single/Multiple Print button to reprint.
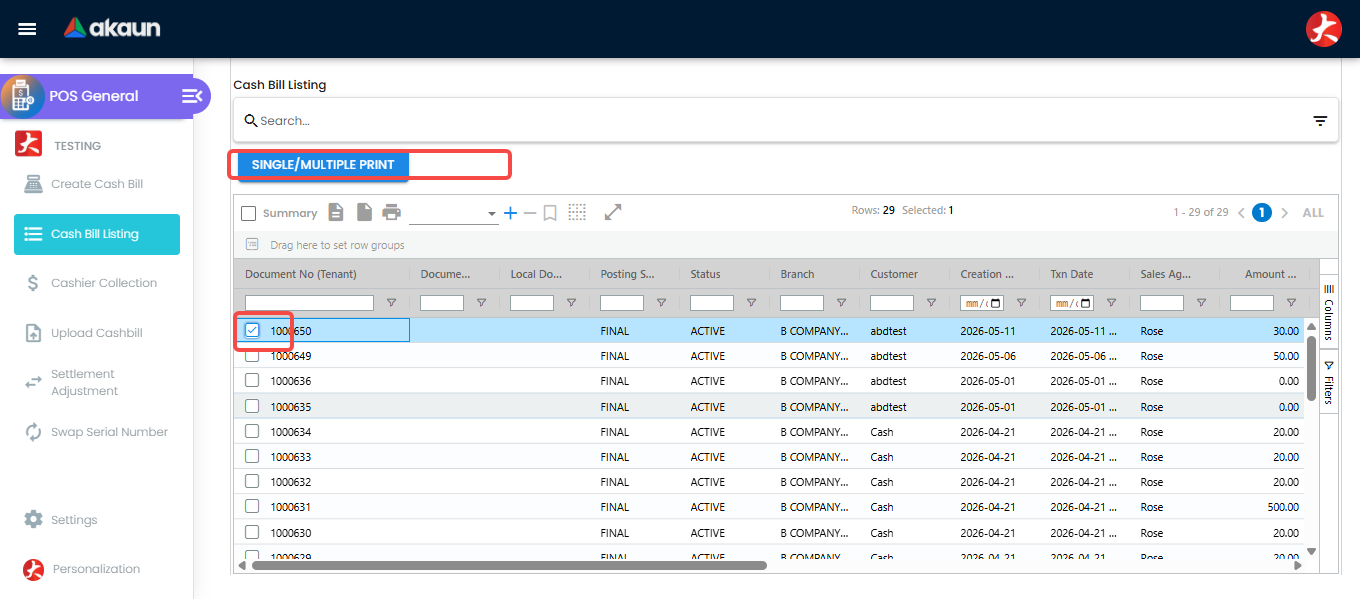
Reprint receipts directly from the listing.
3. Fix Serial Number Mistakes
If the wrong serial number was scanned:
Open the cash bill from the listing and click into the specific Item.
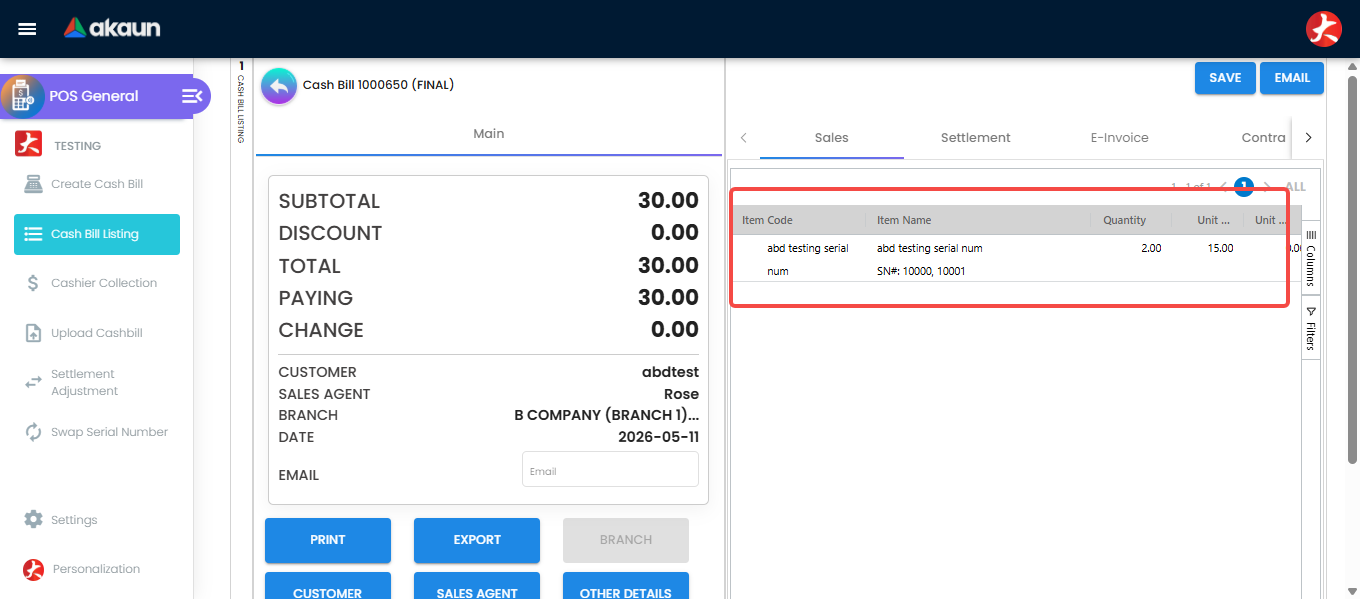
Navigate to the item details within the cash bill. Click the Swap Serial Number tab.
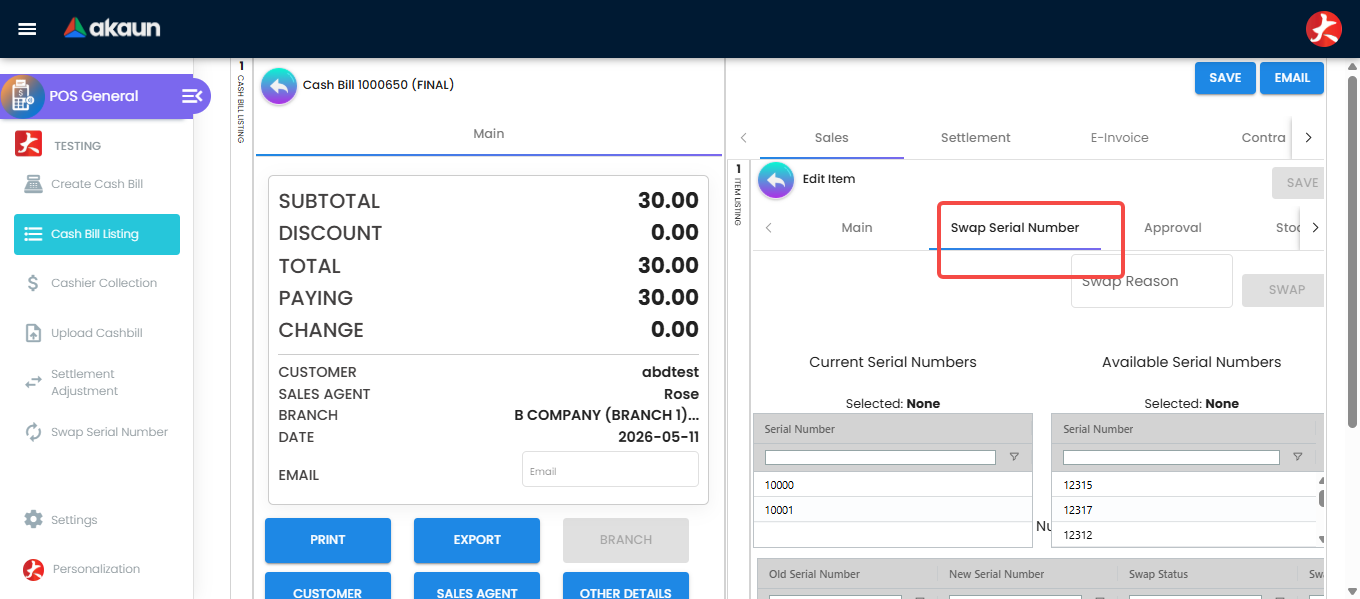
Access the serial number swap tool. Select the current serial number and choose the correct available serial number from the box to swap them.
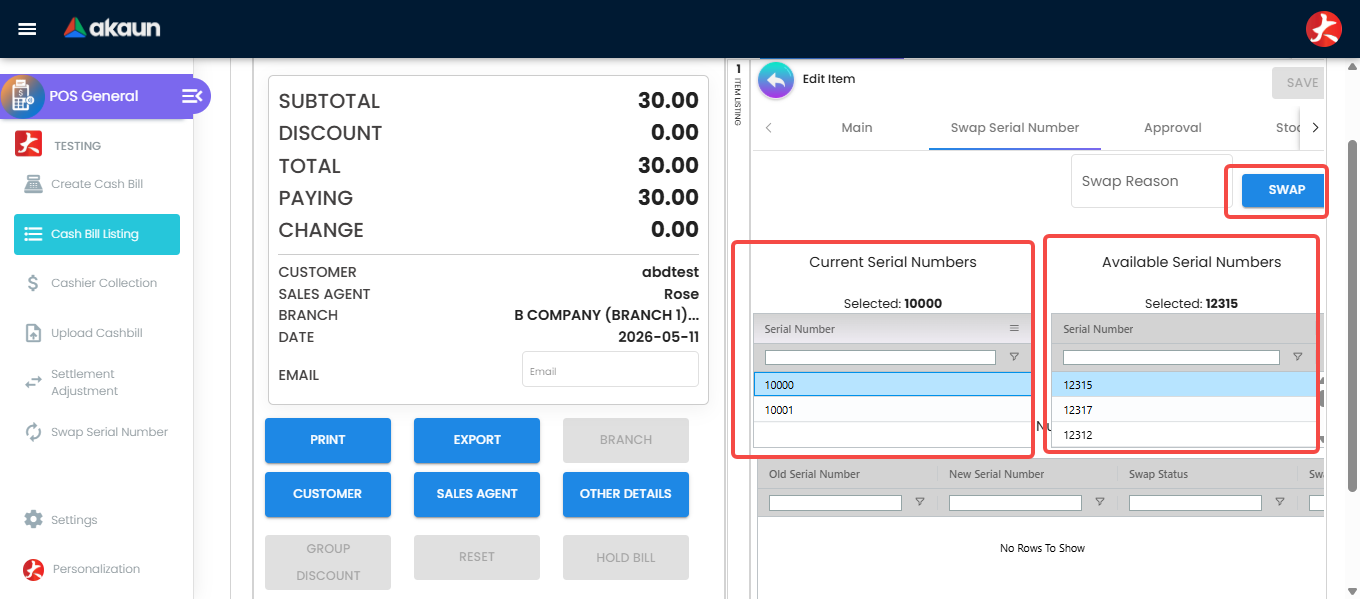
Select and swap the incorrect serial number.
You can view a history of all swapped serial numbers and their details in the Swap Serial Number menu.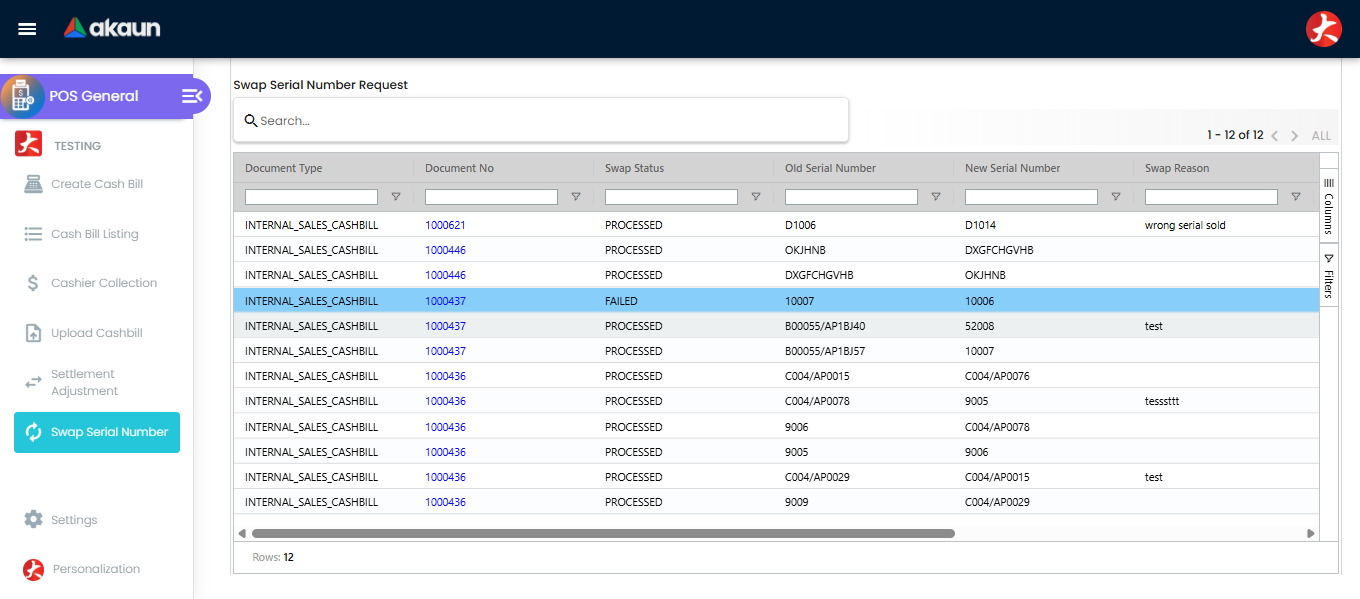
4. Settlement (Payment) Adjustments
If a staff member selects the wrong payment method, you can fix it using the Settlement Adjustment tool:
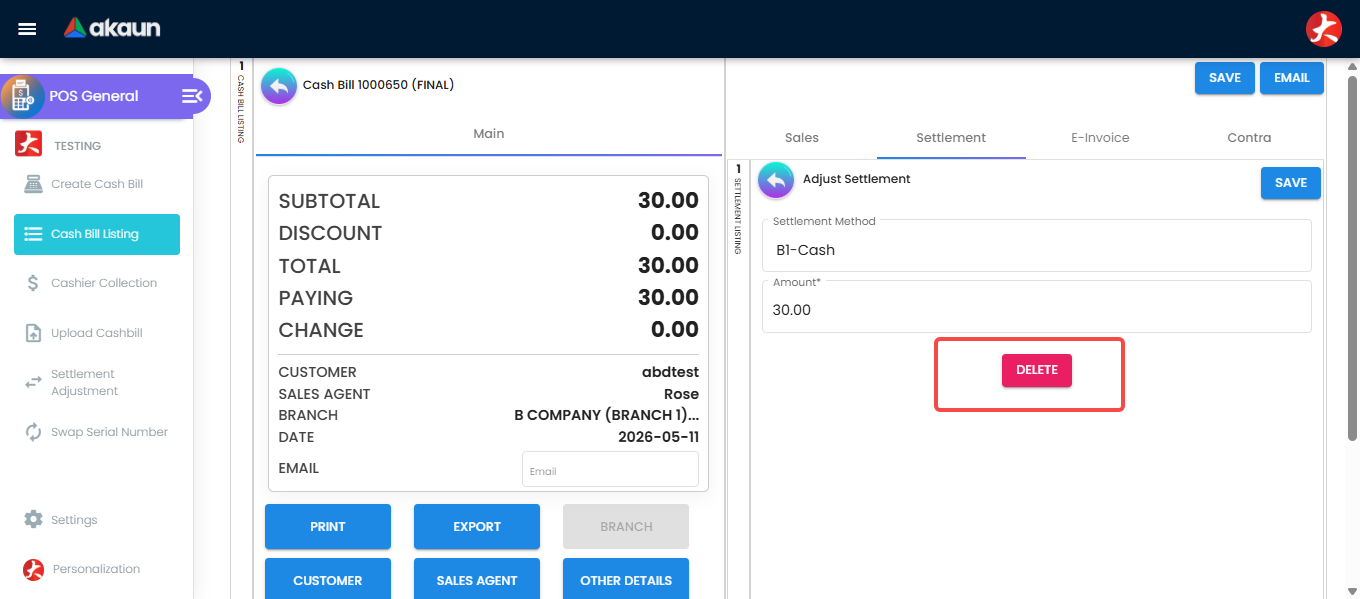
Go to the specific cash bill and click the Settlement tab.
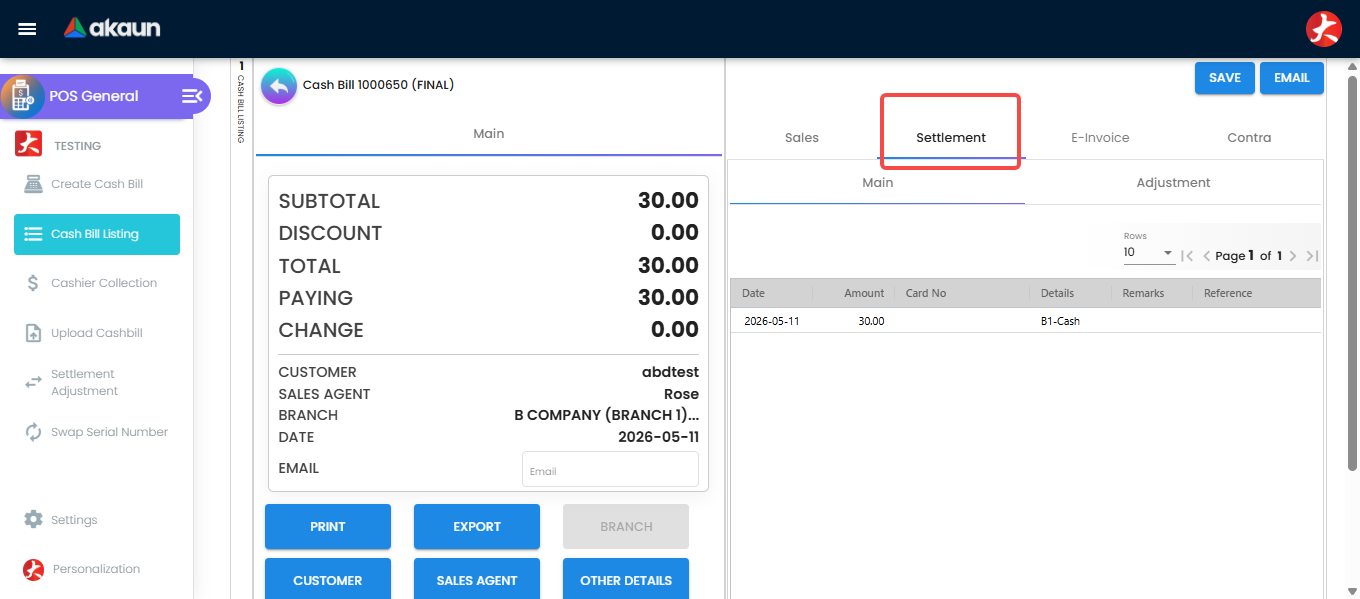
Navigate to the payment settlement details. In the Adjustment tab, click on the incorrect settlement method.
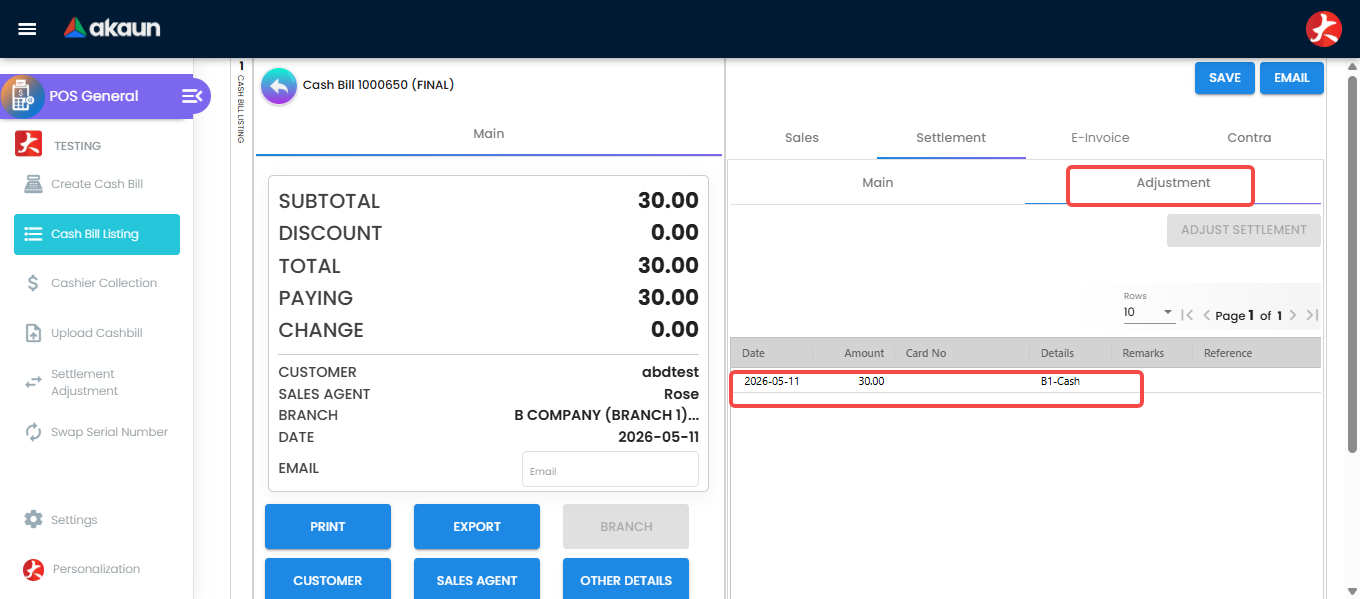
Select the payment method that needs to be removed. Click Delete to remove the wrong method.
Confirm the removal of the incorrect payment. Click the Add button to insert the correct settlement method.
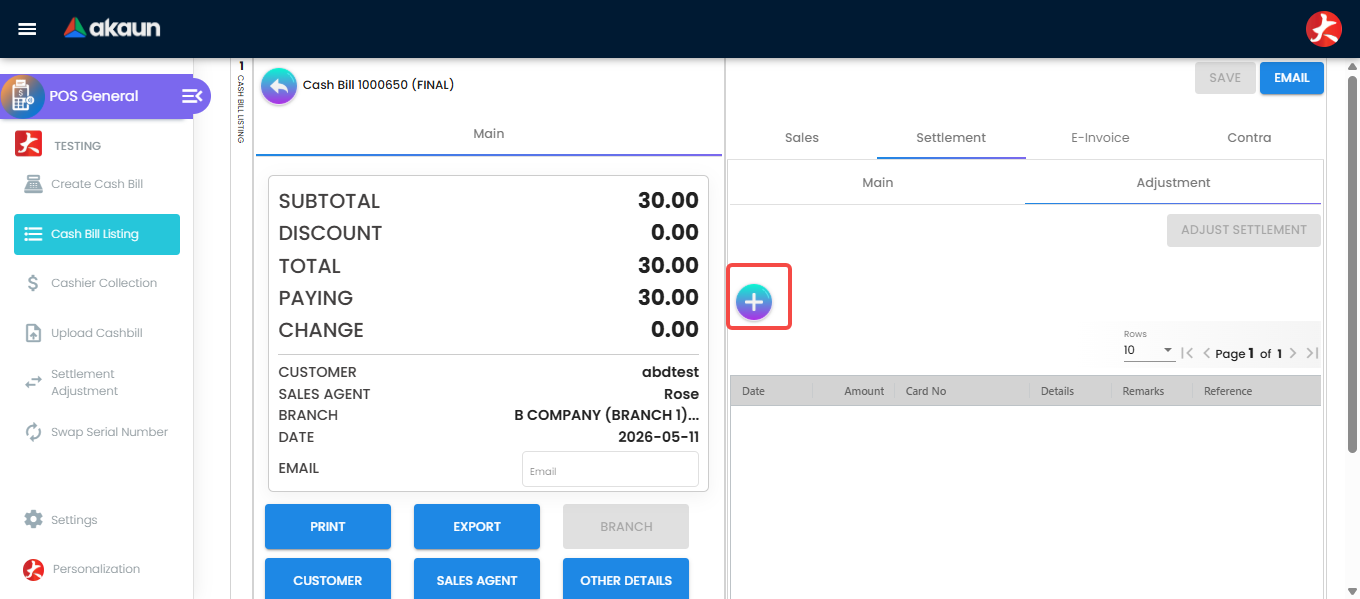
Initiate adding the correct payment method. Key in the correct payment details and click Add.
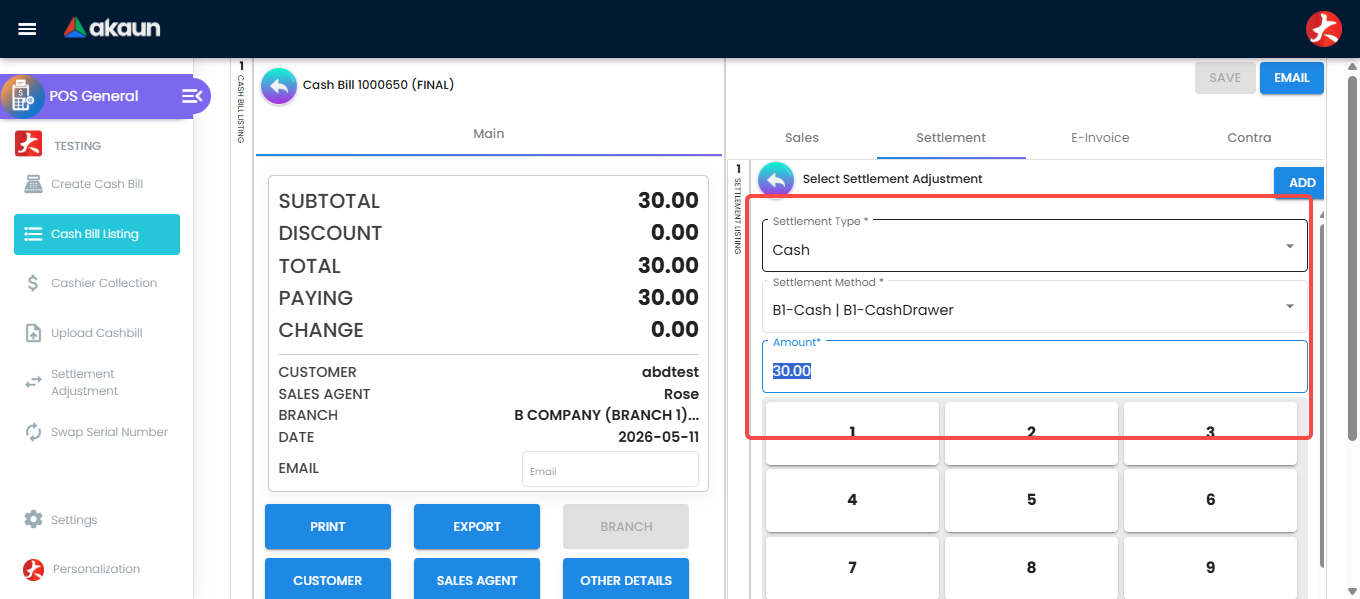
Enter the correct payment information. Finally, click the Adjust Settlement button to confirm and save the changes.
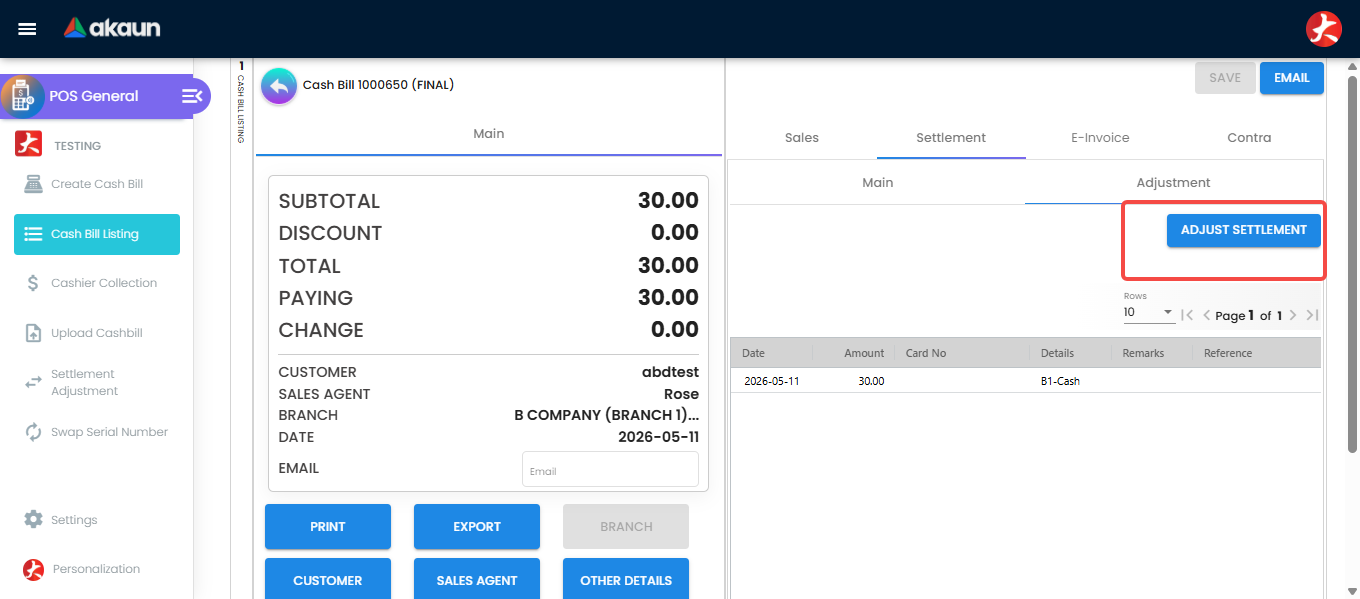
Click 'Adjust Settlement' to finalize the fix.
A history of adjusted payments can be found in the Settlement Adjustment menu.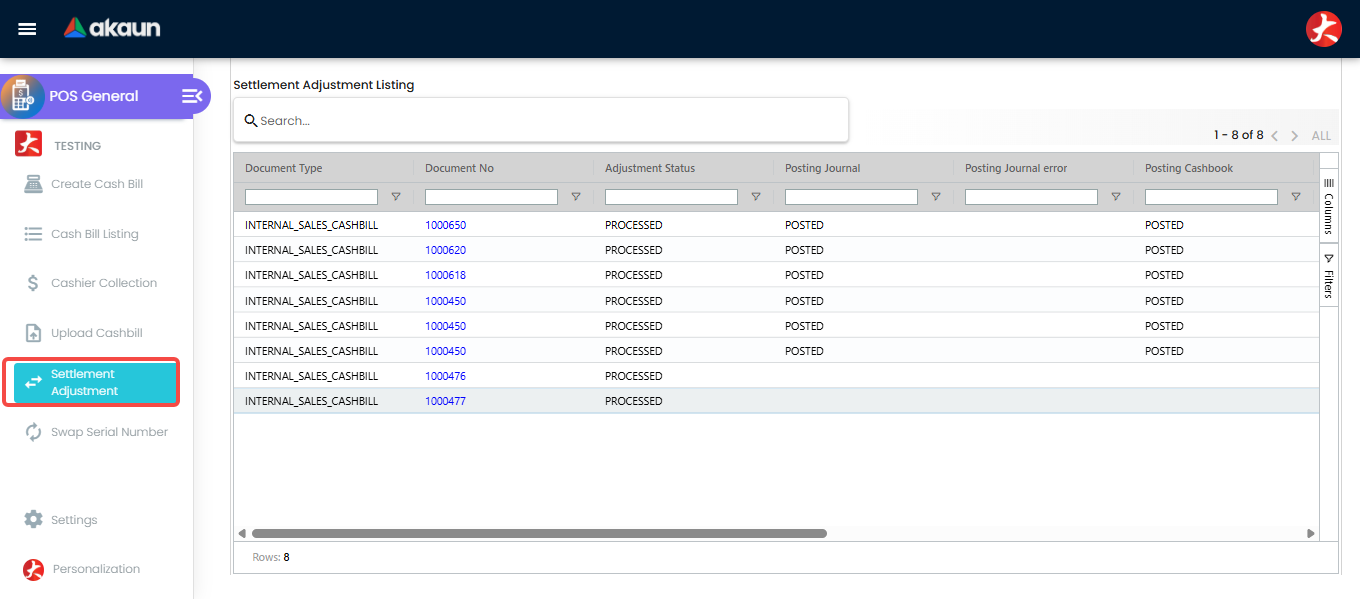
5. View Collections
Use the Cashier Collection tool to see how much money has been collected by each payment method. Use the Advanced Search to generate reports for specific periods.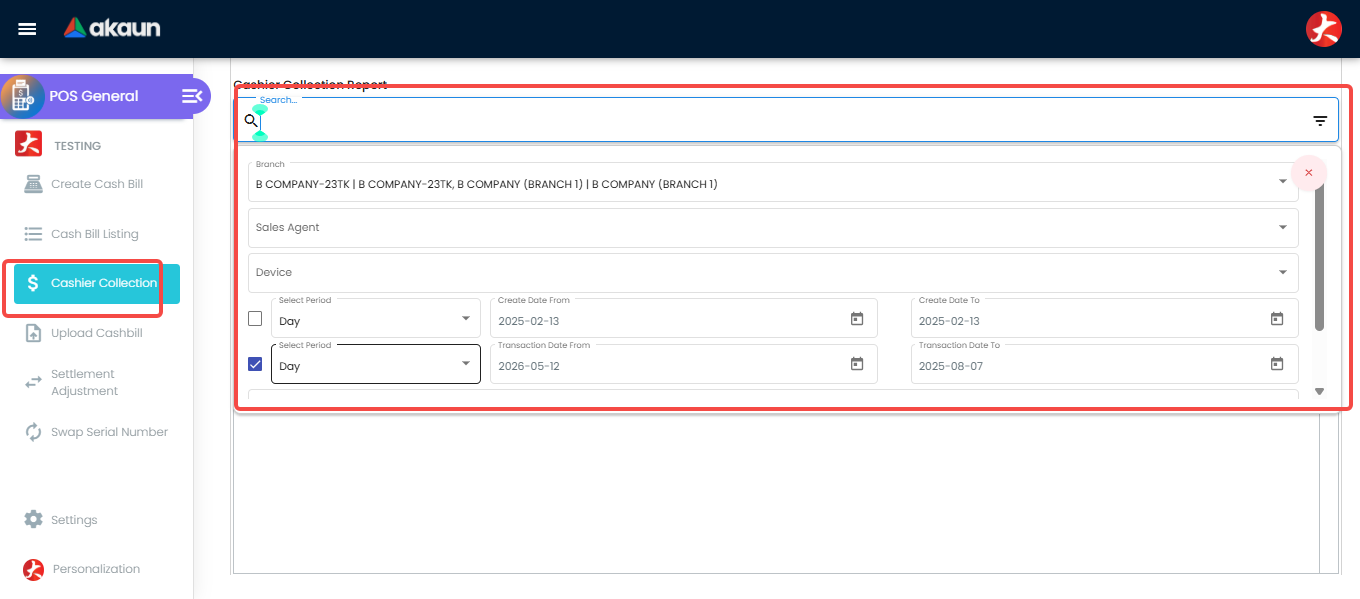
The report will automatically group your totals by settlement method (e.g., Cash, Card, E-Wallet).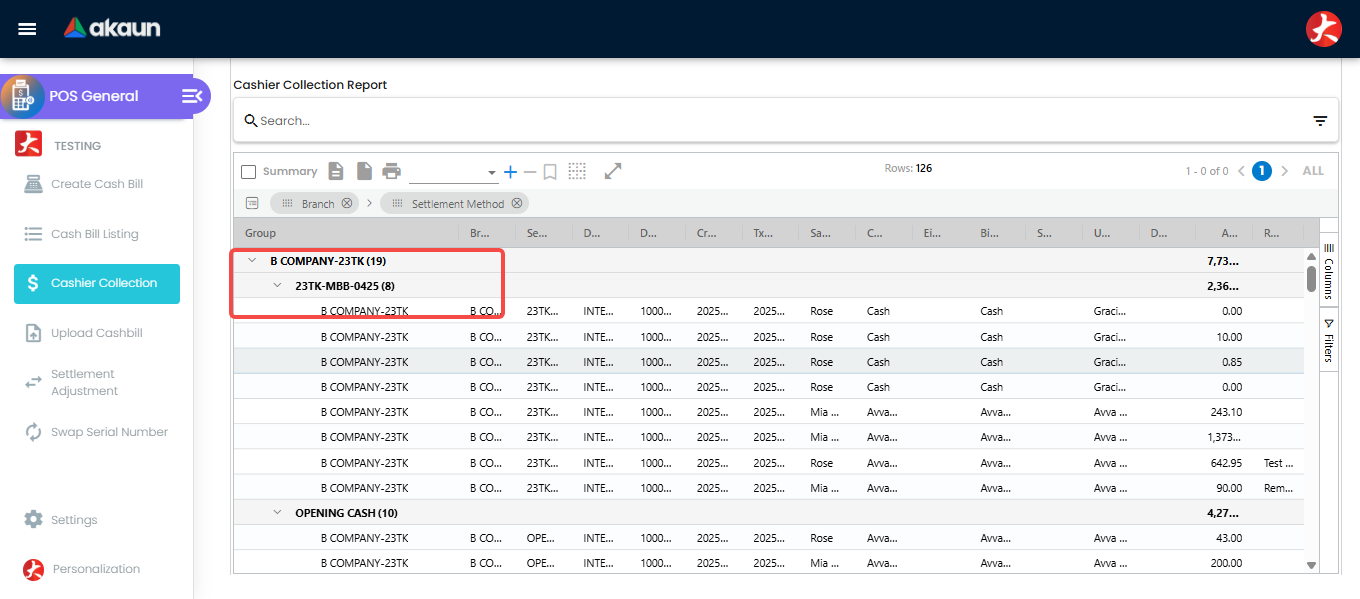
Need to check from home? You can see all store activity in real-time from any device with manager access.
Sales Reports and History
The BigLedger POS provides simple tools to help you track your sales and check your records at the end of the day.
Detailed Sales Records: Use the Cash Bill Listing to see every sale made. You can filter by date, store, or status to find exactly what you need.
Filter and search for any transaction in your history. Review individual sale details, remarks, and email history. Breakdown of Payments: The Cashier Collection tool shows you a list of all payments received. You can group them by payment type (like Cash or Card) to see how much you collected for each.
View totals grouped by payment method. Reconcile your physical collections against system records. Daily Sales Summary (Z-Report): This is your end-of-day report. It shows total sales, any rounding, canceled orders, and a summary of all collections.
Common Examples
Example 1: Paying with Cash and E-Wallet
Situation: A customer wants to pay RM 50 in cash and the rest (RM 150) using an E-Wallet.
Steps:
- Scan the items.
- Choose Cash and type “50”.
- Choose E-Wallet for the rest.
- The system finishes the sale.
- Result: Stock is updated immediately, and the money is recorded in the right place.
Example 2: Fixing a Serial Number Mistake
Situation: After the sale, you realize the wrong serial number was scanned for a product.
Steps:
- Open the Cash Bill Listing and find the sale.
- Click into the specific Item that has the wrong serial number.
- Select the Swap Serial Number tab.
- Select the current (wrong) serial number and choose the correct one from the available list.
- Save the changes. Result: The system fixes the stock records for both items immediately.
Example 3: Settlement (Payment) Adjustment
Situation: A customer paid by Credit Card, but the staff accidentally recorded it as Cash.
Steps:
- Open the cash bill and go to the Settlement tab.
- Under Adjustment, select the “Cash” entry and click Delete.
- Click Add and select “Credit Card” as the new payment method.
- Key in the correct details and click Adjust Settlement. Result: Your accounting records are corrected to show the money in the Bank/Card account instead of the Cash drawer.
Other Helpful Tools
Linked Apps
- Stock Management - Manage product details
- Customer Records - Manage customer information
- Accounting Vaults - Track your money
- Tax Settings - Set up sales tax
Related Guides
- Cashier Daily Tasks
- Store Inventory Tools
- Receipt Management
- Sales Reports