Unified Contact Center (UCC) Applet
Introduction
The Unified Contact Center (UCC) Applet is a comprehensive customer communication and task management platform now available in the Applet Store. UCC transforms how organizations handle customer interactions by consolidating all communication channels into a single, unified workspace, eliminating the need to switch between multiple applications and ensuring no customer message goes unnoticed.
A short introduction to the Unified Contact Center (UCC) Applet:
A Webinar to get to know about the functionalities of the Unified Contact Center (UCC) Applet:
Core Capabilities
Omnichannel Communication Management
UCC Applet handles omnichannel conversations and provides a superior customer service experience by allowing users to send and receive messages from multiple messaging platforms in a single, integrated interface. Whether customers reach out via WhatsApp, Telegram, Email, SMS, Facebook Messenger, or Voice calls, all communications flow into UCC where agents can respond efficiently without juggling multiple tools or losing context.
This unified approach ensures consistent service quality across all channels, maintains complete conversation history regardless of platform, and allows supervisors to monitor and manage all customer interactions from one central location. Customers can reach you through their preferred communication method while your team maintains a streamlined, efficient workflow.
Intelligent Task Management
Beyond message handling, UCC features a sophisticated task queue system that organizes, prioritizes, and routes work across your organization. Tasks are automatically created from customer interactions and can be assigned to teams or individual agents based on expertise, availability, or customer preference. The system supports both inbound tasks (responding to customer inquiries) and outbound tasks (proactive customer outreach), with specialized queues tailored to different organizational roles—from supervisors who need organization-wide visibility to individual agents who need focused personal workspaces.
Integrated Commerce Features
UCC goes beyond communication by providing shopping cart functionality that bridges the gap between customer service and sales. Users can send payment links directly to customers through conversations, streamlining the purchase process and reducing friction. Payment status updates appear automatically in UCC, giving agents real-time visibility into transaction progress and allowing them to provide informed support throughout the customer’s buying journey.
Social Media Management
The platform includes integrated social media management capabilities, allowing you to create, monitor, and manage content across platforms like Facebook directly from UCC. This eliminates the need to switch between social media management tools and customer service platforms, creating a truly unified communication hub.
Analytics and Insights
UCC provides comprehensive reporting and analytics through its dashboard and reporting modules. Supervisors can track key performance metrics, monitor agent productivity, analyze task completion rates, and understand communication volume patterns across channels. These insights enable data-driven decisions about staffing, training needs, and process improvements.
Real-Time Monitoring
The Live Dashboard gives supervisors real-time visibility into agent activity, showing who’s online, what they’re working on, and how long they’ve been engaged with specific tasks. This immediate visibility enables proactive management, allowing supervisors to identify bottlenecks, redistribute work, or provide support before small issues become major problems.
System Architecture
The UCC Applet is built around a cohesive architecture where incoming communications are intelligently managed, routed, and tracked. At its core is the relationship between conversations, sessions, and tasks. When a new conversation is initiated, the system starts one Session (a single, continuous interaction) and creates one Task in the Task Queue. This task is the trackable work item for an agent. When the agent ends the session (e.g., after resolving an inquiry), the task is closed. If a different agent replies to the same conversation after a session is closed, the system initiates a new session and a new task to ensure clear ownership and tracking. This ensures every customer interaction is accounted for as a manageable piece of work.
Underpinning this is a powerful Contact Merging algorithm. UCC automatically identifies conversations from different channels (e.g., Messenger, Telegram, Lazada, Email) as belonging to the same user, linking their profiles and consolidating their interaction history into a single, unified view. This provides agents with a true 360-degree view of the customer.
The UCC Applet consists of multiple integrated modules that leverage these core concepts:
Task Queue: The operational backbone where all work is organized, prioritized, and distributed. Includes specialized views (All Task Queue, Team Task Queue, My Task Queue) for different organizational roles and separate queues for inbound and outbound work.
Inbox: The primary communication hub where agents view and respond to customer messages across all channels. Provides unified conversation threading, customer detail access, and message composition tools.
Outbound: Dedicated workspace for managing proactive customer communications, campaign follow-ups, and agent-initiated outreach activities.
Social Media: Integrated social media management allowing direct posting, editing, and monitoring of social content without leaving UCC.
Dashboard: Visual analytics hub presenting key performance indicators, trends, and operational metrics through charts and graphs.
Reports: Detailed, exportable data about task performance and agent productivity, enabling deep analysis and record-keeping.
My Profile: Personal workspace where agents manage their identity, access permissions, and relationship-building tools like personalized QR codes.
Contacts: Centralized customer database consolidating all contact information across channels, with import/export capabilities and comprehensive contact management.
Broadcast: Mass communication tool for sending messages to multiple customers simultaneously, supporting both manual selection and bulk CSV import.
Live Dashboard: Real-time monitoring interface showing current agent activity, availability status, and active task engagement.
Configurations: Administrative control center for setting up projects, virtual contacts, teams, agents, automation rules, and other foundational system elements.
Settings: System-level configurations and preferences.
Personalization: Customization options allowing users to tailor UCC to their specific workflows and preferences.
Who Benefits from UCC?
For Agents: UCC eliminates the chaos of managing multiple communication tools, providing a single interface for all customer interactions. Agents can focus on providing great service rather than wrestling with technology.
For Team Leaders: UCC provides the visibility and control needed to manage team performance, distribute work effectively, and ensure consistent service quality across all customer touchpoints.
For Supervisors and Managers: UCC delivers the analytics, monitoring capabilities, and administrative controls needed to optimize operations, make data-driven decisions, and continuously improve customer service delivery.
For Organizations: UCC transforms customer communication from a collection of disconnected channels into a unified, manageable, and measurable system that scales with business growth while maintaining service quality.
Getting Started
This documentation will guide you through each module of UCC, explaining features, workflows, and best practices. Whether you’re an agent learning to manage customer conversations, a team leader organizing work distribution, or an administrator configuring the system, you’ll find detailed explanations and practical guidance for using UCC effectively.
1. Overview of WhatsApp Business Set-Up
The following are the steps required to set up the WhatsApp Business App for new customers.
Ask the Manager to permit Wavelet Facebook Business Settings.
Go to https://developers.facebook.com/apps/?show_reminder=true and create a new app as explained here: Get Started - WhatsApp Cloud API - Documentation - Meta for Developers
Configure the Webhook:
a. Download ngrok
b. Install and run grok on the terminal ⇒
grok http 80(windows) orngrok http 5000c. Copy the link next to “Forwarding”. It looks something like
https://3db9-121-121-122-11.ap.ngrok.iod. Follow the documentation for Callback URL pass ngrok link and endpoint from the code:
https://3db9-121-121-122-11.ap.ngrok.io/v1/integration/channels/whatsapp/receivee. If Webhook is set successfully, you will receive a message.
Add phone numbers:
a. Add the client’s phone number here: https://business.facebook.com/wa/manage/phone-numbers/?business_id=1329448660474352&waba_id=105748575486134
b. Do not sign up with the customer’s phone number with the WhatsApp Business app. If previously signed up with a customer phone number follow these instructions: https://developers.facebook.com/docs/whatsapp/embedded-signup/webhooks
c. Phone number will be approved after 6 hours and 1k free messaging limits will be granted depending on the quality rating.
2. Task Queue
The Task Queue system is the central hub for managing and distributing work across your organization. It provides three different views tailored to different user roles and responsibilities: All Task Queue, Team Task Queue, and My Task Queue.
Tasks can also be categorized into secondary queues (e.g., Instagram Queue, Default Queue, Sales Queue) which are used to group agents based on their expertise or channel focus. This ensures that tasks are routed to the agents best equipped to handle them.
2.1 All Task Queue
The All Task Queue provides a comprehensive, organization-wide view of every task in the system. This queue is designed for supervisory and administrative roles who need complete visibility and control over task distribution and management.
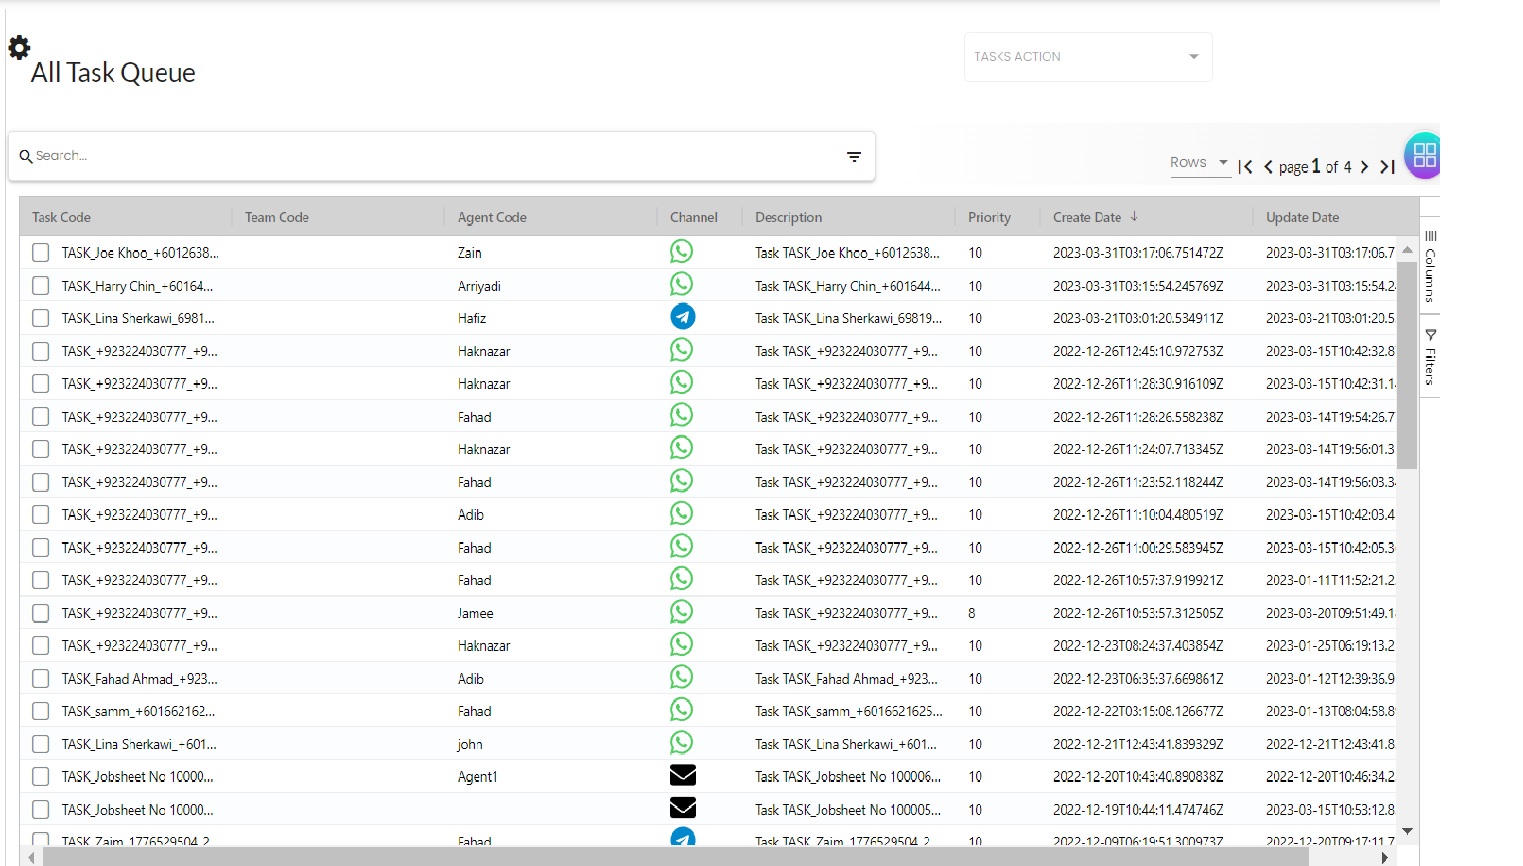
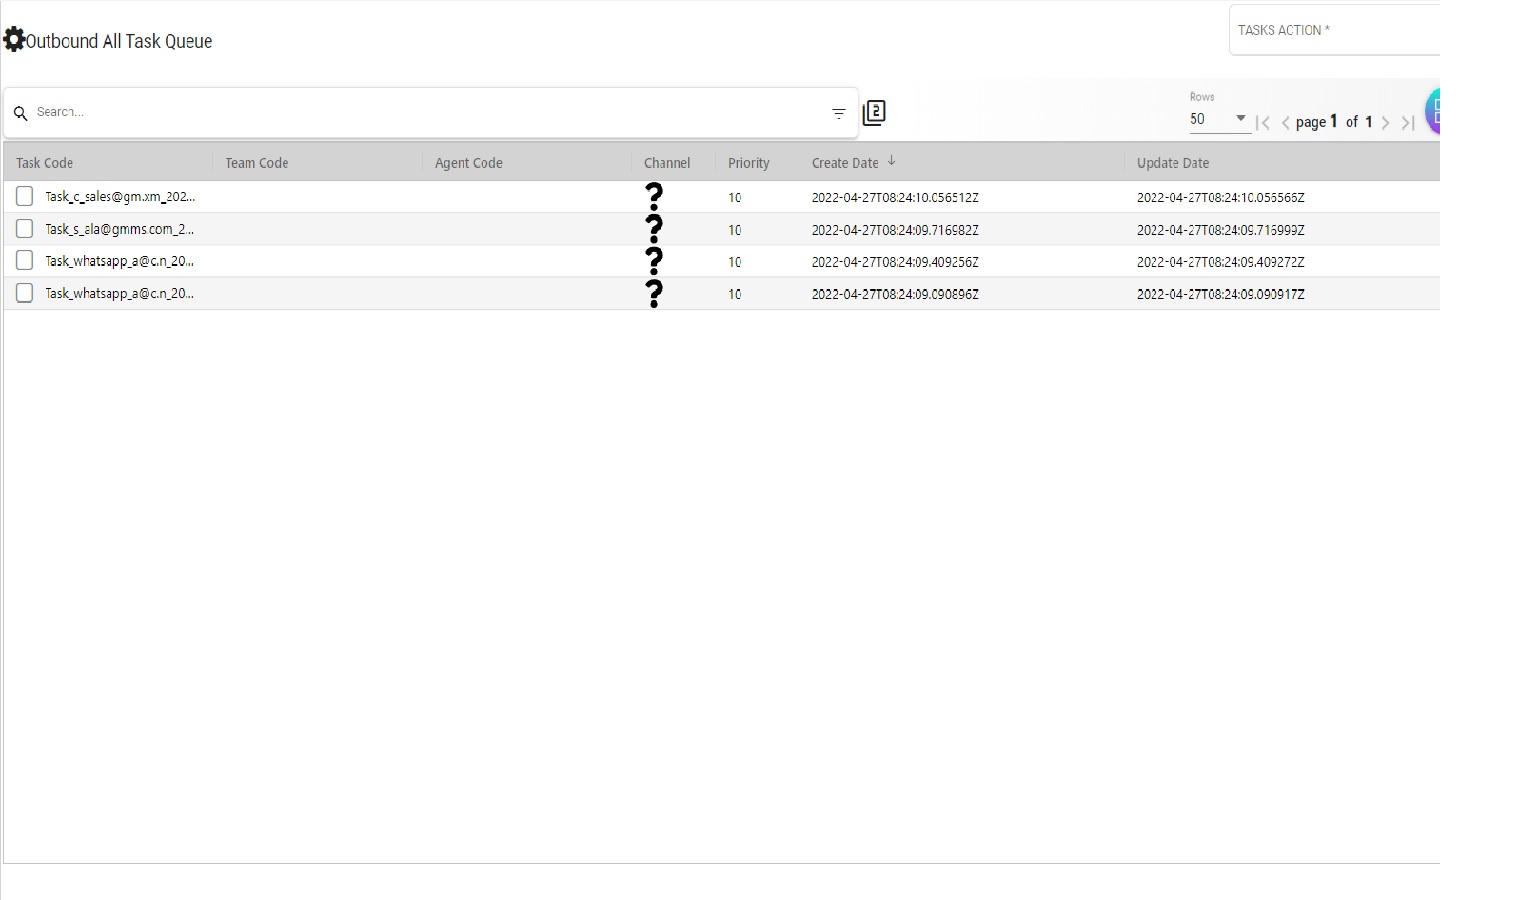
2.1.1 All Task Queue -> Listing page
All available tasks details including, their details and assignment status. This centralized view allows supervisors to monitor workload distribution, identify bottlenecks, and ensure tasks are properly assigned across teams and agents.
Fields Legends:
- Task Code: Unique identifier that provides a quick reference for searching, referencing in conversations, or tracking specific tasks across the system.
- Team Code: Identifies which team the task is currently assigned to. Tasks can be assigned to either a team (making them visible to all team members) or to a specific agent (making them exclusive to that person). This field will be empty if the task is assigned directly to an agent instead.
- Agent Code: Shows the specific agent the task is assigned to. This field will be empty if the task is assigned to a team instead.
- Channel: Indicates the communication channel through which this task originated or should be handled (WhatsApp, Email, SMS, Telegram Messenger, or Voice-Call). This helps agents understand the context and preferred communication method for the task.
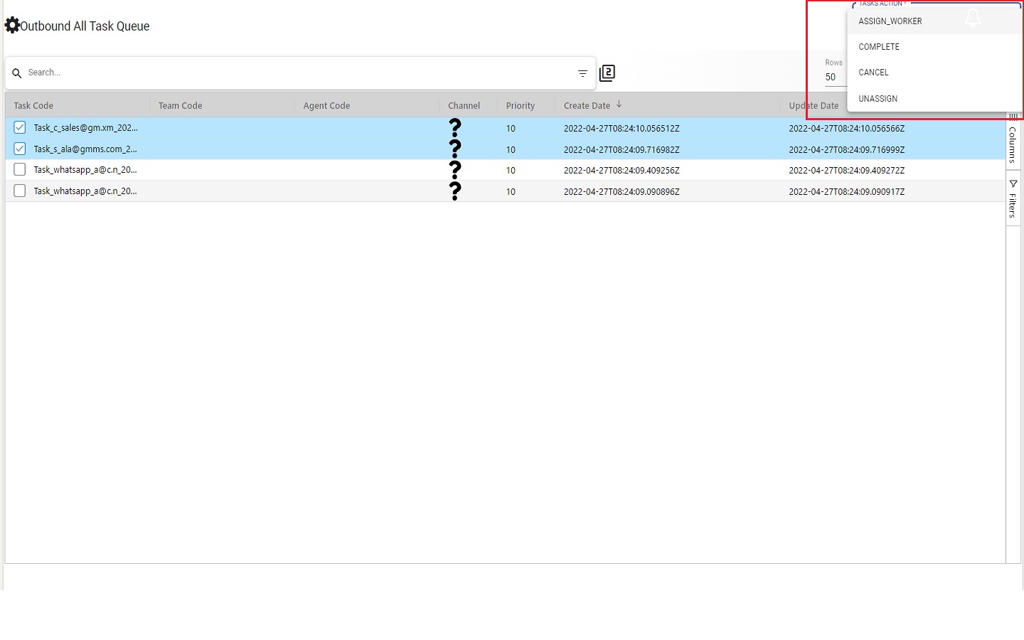
2.1.2 All Task Queue -> Listing Bulk Actions
When you select one or more tick boxes in the all task queue listing component, the bulk actions dropdown will become active, allowing you to perform operations on all selected tasks at once.
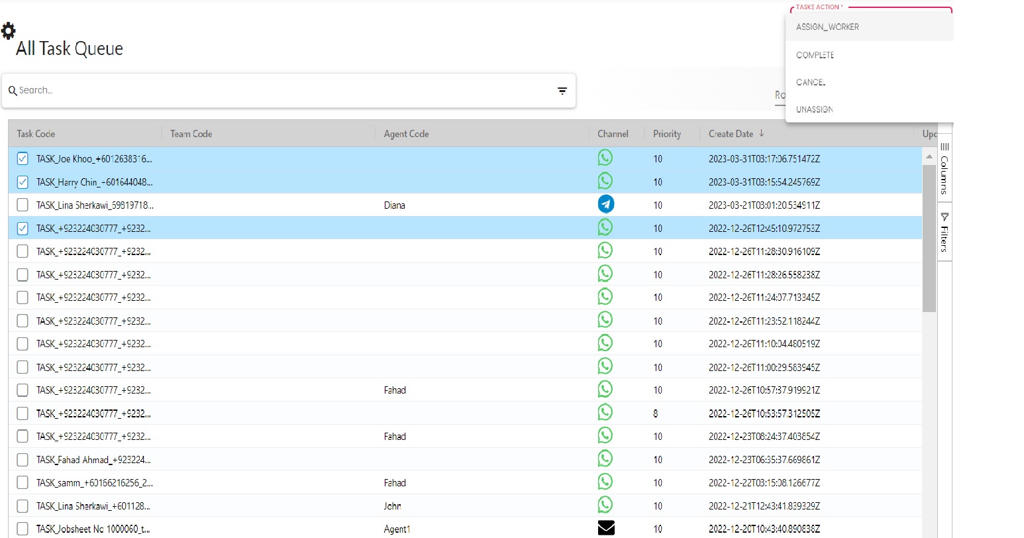
ASSIGN_WORKER Details:
The assignment process is a two-step workflow that first determines the type of assignment (team or individual), then selects the specific recipient.
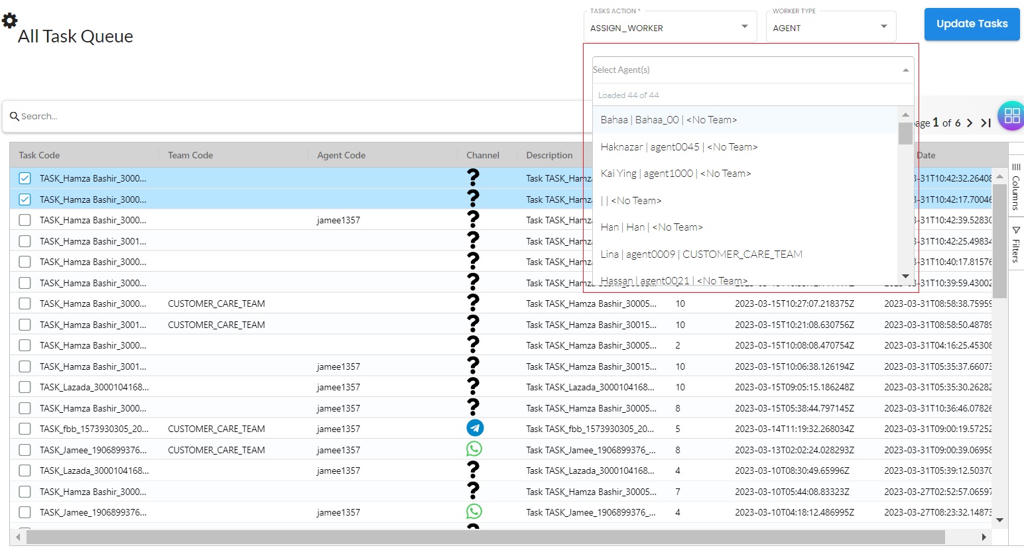
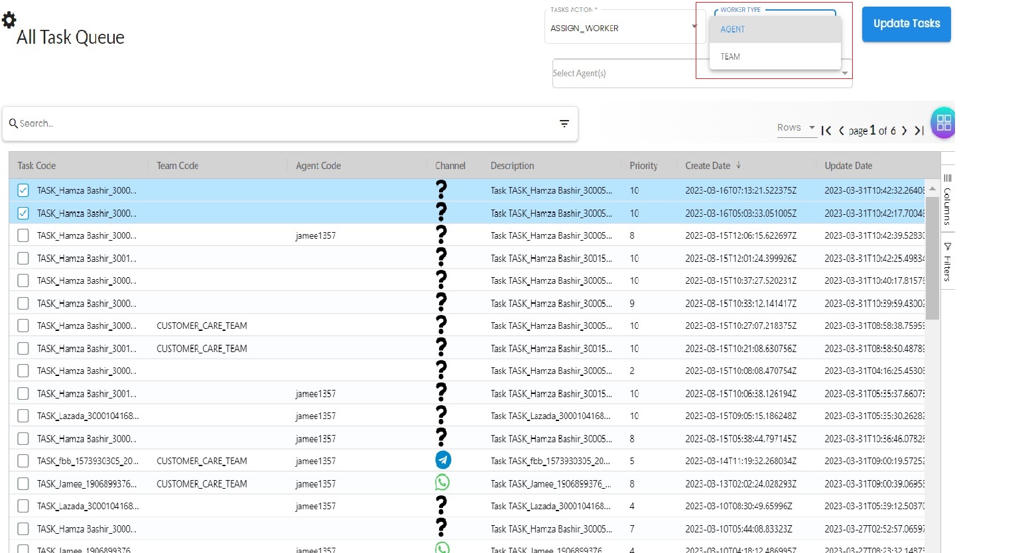
After selecting the ASSIGN_WORKER option from dropdown, the WORKER_TYPE field will be displayed where you can choose between “AGENT” (assigning to a specific individual) or “TEAM” (assigning to a group where any member can claim the task).

Once you’ve selected the worker type, the system will display a list of available agents or teams based on your selection. Choose the appropriate agent or team from this list to complete the assignment. All selected tasks will then be assigned to your chosen worker.
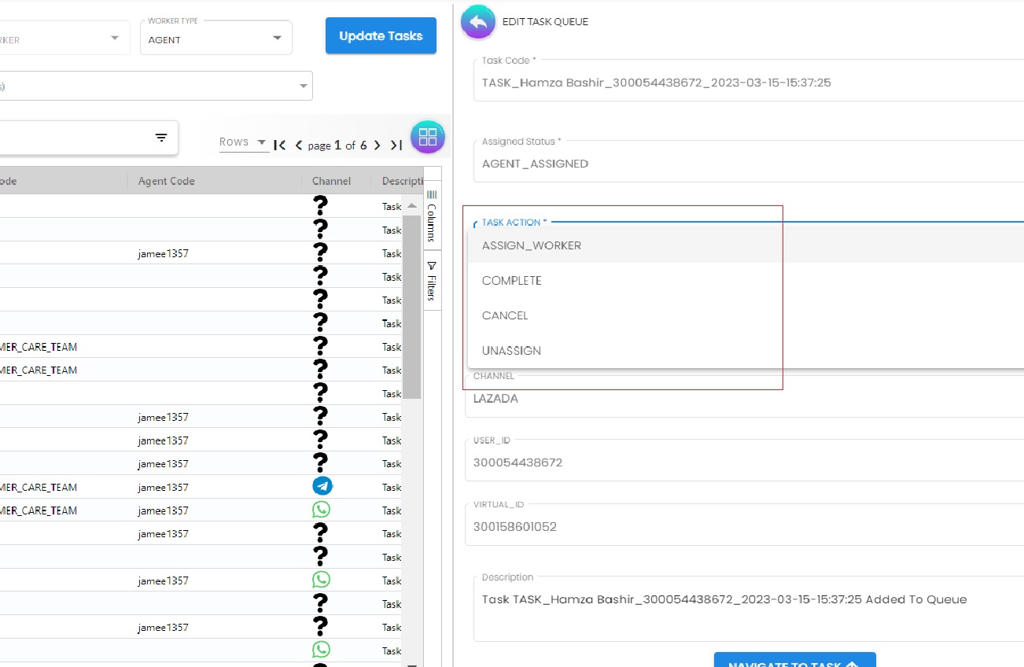
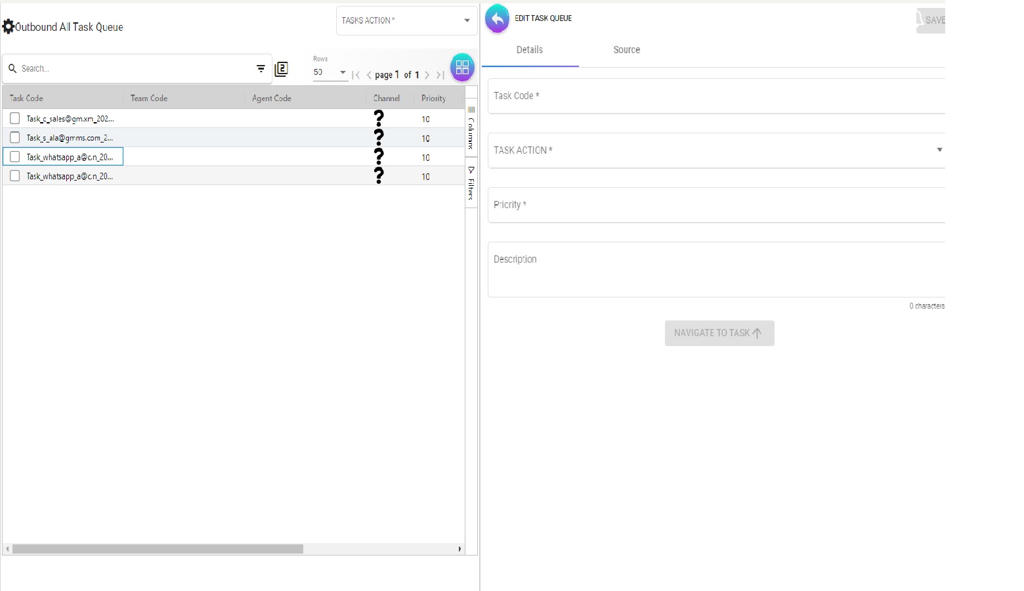
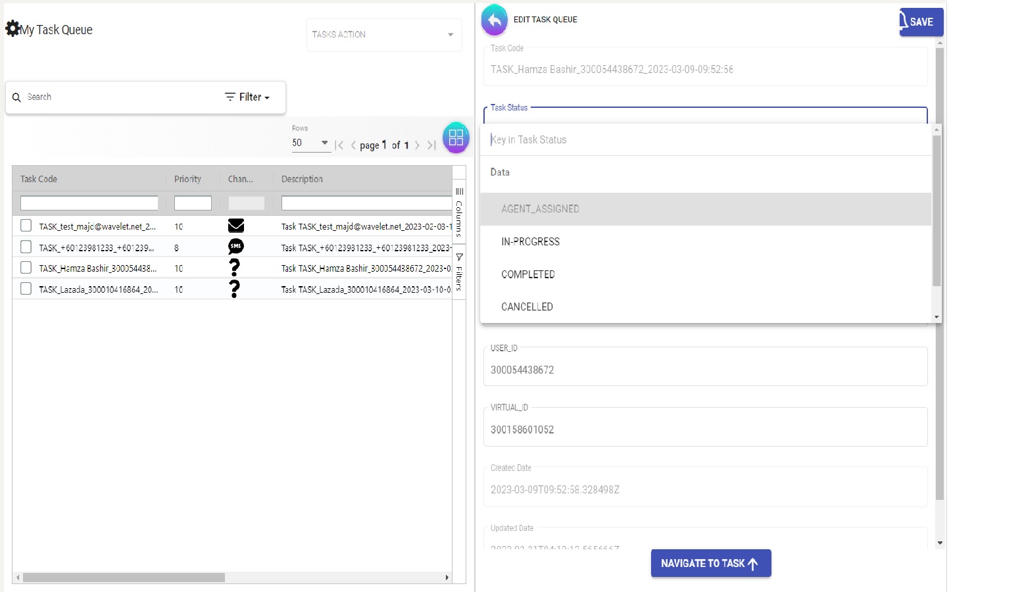
2.1.3 All Task Queue -> Edit page
The edit page provides detailed control over individual tasks, allowing supervisors to modify task information and manage both the task’s status and assignment. (Access this page by clicking on a specific task from the listing page)
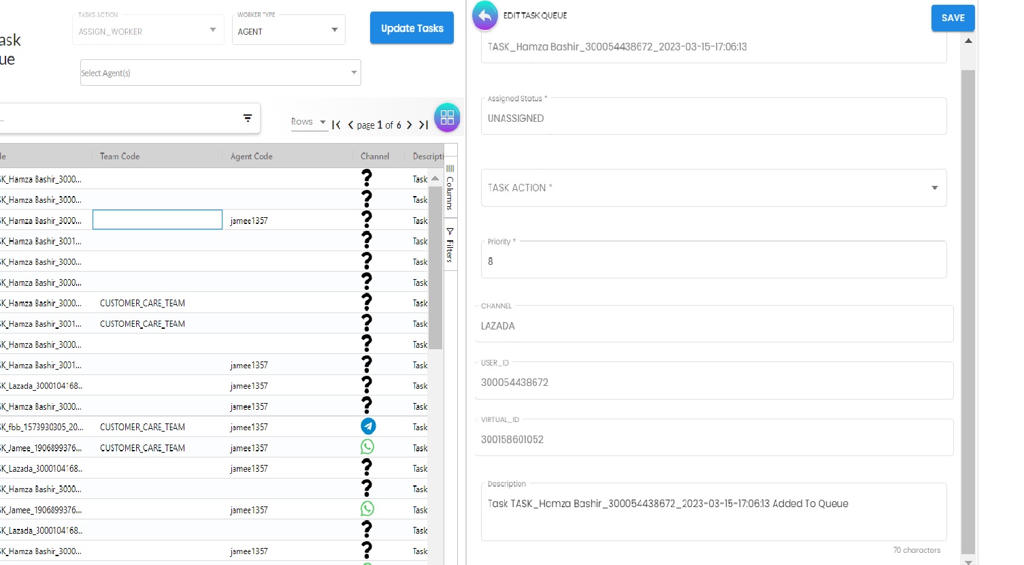
Task Actions:
This is where you can mark tasks as complete, cancel them, or move them to different agents or teams.
2.2 Team Task Queue
The Team Task Queue is designed for collaborative work environments where tasks are assigned to a group rather than specific individuals. This queue shows all tasks currently assigned to teams that the logged-in user is a member of, allowing team members to view available work and claim tasks they’re ready to handle.
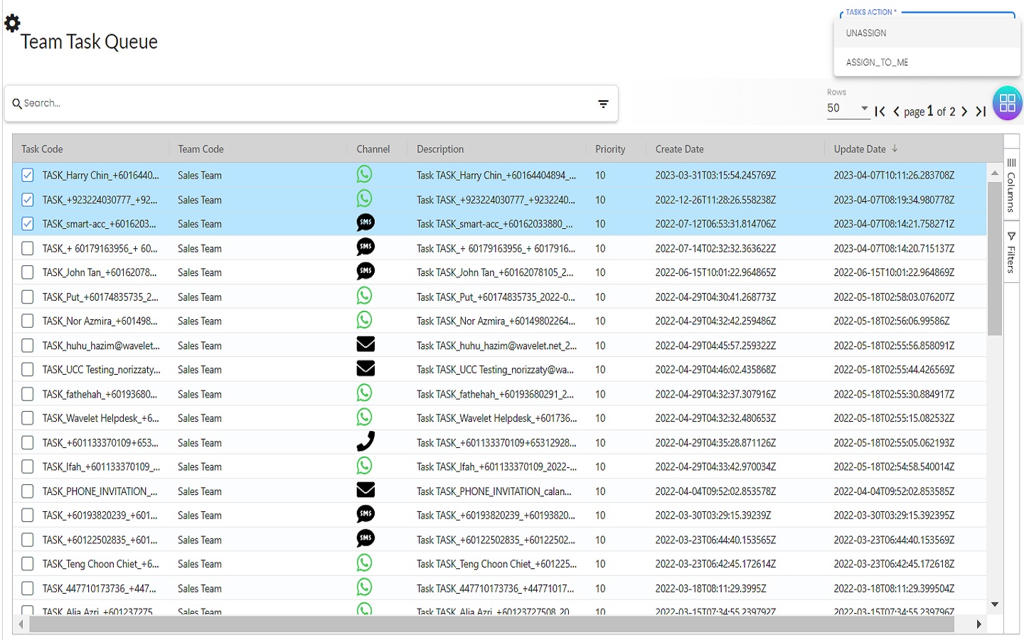
2.2.1 Team Task Queue -> Listing page
When a task appears in this queue, it means the task is available for any team member to claim and work on.
Fields Legends:
- Team Code: Shows which team the task is assigned to. Since this is the Team Task Queue, this will always show your team’s code.
- Channel: Indicates the communication channel (WhatsApp, Email, SMS, Telegram Messenger, or Voice-Call) associated with the task, helping you understand the nature and context of the work.
Note that the Agent Code field is not shown in this view because these tasks are assigned to the team as a whole, not to individual agents yet.

2.2.2 Team Task Queue -> Listing Bulk Actions
Team members can use bulk actions to efficiently claim multiple tasks at once or release tasks they’re unable to complete. When tick boxes are selected in the team task queue listing component, the bulk actions dropdown becomes active.
2.2.3 Team Task Queue -> Edit page
The team task queue edit page provides a simplified interface focused on task assignment actions. Team members can claim tasks for themselves or release tasks back to the team pool, but cannot modify task details like priority or description (those changes are reserved for supervisory roles in the All Task Queue).

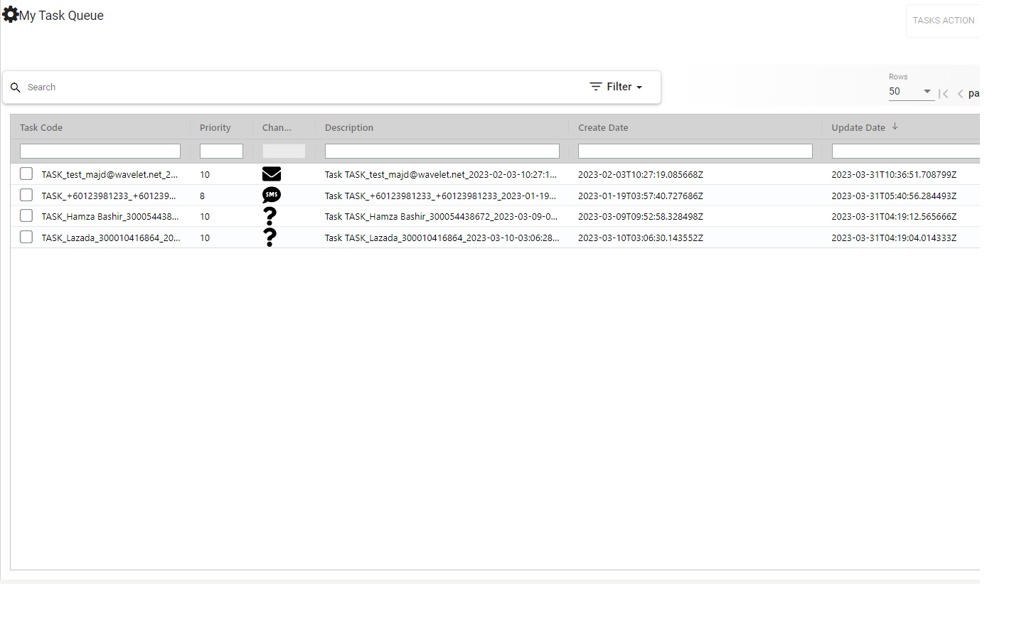
2.3 My Task Queue
The My Task Queue is your personal workspace showing only tasks that have been specifically assigned to you. This is where individual agents manage their day-to-day work, update task progress, and complete their assigned responsibilities.
2.3.1 My Task Queue -> Listing page
This listing page displays all tasks that are currently assigned directly to you, whether they were assigned by a supervisor or claimed by you from a team queue.
Fields Legends:
- Team Code: Shows which team this task is associated with, even though it’s now assigned to you individually. This provides context about the task’s origin.
- Channel: The communication channel (WhatsApp, Email, SMS, Telegram Messenger, or Voice-Call) for the task, indicating how you should interact with the customer or how the task originated.
2.3.2 My Task Queue -> Listing Bulk Actions
From your personal queue, you can efficiently update the status of multiple tasks simultaneously. Selecting tick boxes in the my task queue listing activates the bulk actions functionality.
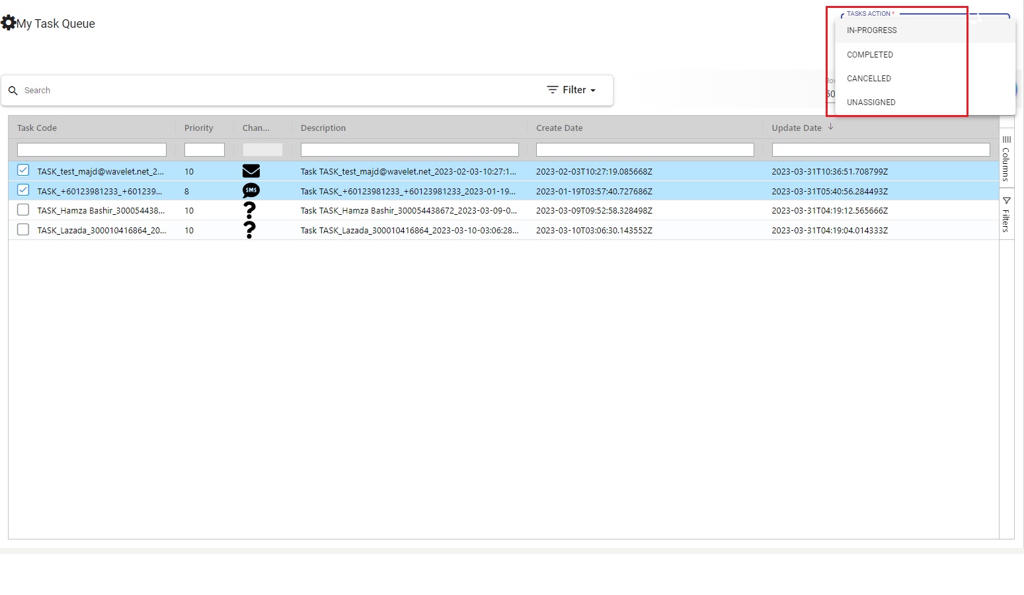
2.3.3 My Task Queue -> Edit page
The edit page for your personal tasks provides access to update both the task’s status (marking it as in-progress, completed, etc.) and its assignment (releasing it back to the team or unassigning it entirely).

3. Task Queue Outbound
The Task Queue Outbound system manages proactive, agent-initiated tasks where your team reaches out to customers or contacts, as opposed to responding to incoming requests.
These outbound tasks might include:
- follow-up calls
- scheduled check-ins
- marketing campaigns
- renewal reminders
- any scenario where your organization initiates contact.
Like the standard Task Queue, it provides three specialized views tailored to different organizational roles and workflows.
3.1 All Task Queue Outbound
The All Task Queue Outbound provides supervisors with complete visibility into all outbound tasks across the organization.
3.1.1 All Task Queue Outbound -> Listing page
The listing page lets Admins, Owners, and Managers view all available outbound tasks, their details, and assignment status.
Fields Legends:
- Task Code: A unique identifier that is used when coordinating outbound campaigns or tracking specific customer outreach initiatives.
- Team Code: Indicates which team is responsible for this outbound task. Outbound tasks can be assigned to an entire team (allowing any member to handle the outreach) or to a specific agent (for personalized or relationship-based follow-ups).
- Agent Code: Shows the specific agent assigned to handle this outbound task.
- Channel: Specifies the communication channel to be used for the outbound contact (WhatsApp, Email, SMS, Telegram Messenger, or Voice-Call).
3.1.2 All Task Queue Outbound -> Listing Bulk Actions
Selecting tick boxes in the all task queue outbound listing component activates the bulk actions functionality, allowing you to perform the same operation across multiple outbound tasks at once.
ASSIGN_WORKER Details:
The assignment workflow for outbound tasks follows a two-step process that first identifies whether the work should go to a team or individual, then selects the specific recipient. This flexibility allows you to match outbound tasks with the most appropriate resources.
After selecting the ASSIGN_WORKER option from dropdown, the WORKER_TYPE field will be displayed where “AGENT” or “TEAM” can be selected.
Once you’ve selected the worker type, a filtered list will appear showing only the available agents or teams based on your selection.

3.1.3 All Task Queue Outbound -> Edit page
Allows supervisors to refine task information and manage both the task’s status and assignment as circumstances change or new information becomes available. (Access this page by clicking on a specific outbound task from the listing to make adjustments)
Task Actions:
Beyond editing basic details, the Task Actions dropdown provides options to manage the task’s lifecycle—marking it complete, canceling it, or reassigning it to different workers.

3.2 Team Task Queue Outbound
The Team Task Queue Outbound is designed for collaborative outbound work where tasks are assigned to a team rather than specific individuals.
3.2.1 Team Task Queue Outbound -> Listing page
This listing page is where members of a team can view all outbound tasks assigned to their team. When an outbound task appears here, it’s available for any team member to claim and complete.
Fields Legends:
- Task Code: The unique identifier used for referencing in team discussions or tracking specific customer contacts.
- Team Code: Displays the team responsible for this outbound work.
- Channel: Shows the communication channel (WhatsApp, Email, SMS, Telegram Messenger, or Voice-Call) to be used for the outbound contact.
Note
the Agent Code field is not displayed in this view because these outbound tasks are assigned to the team as a collective, not to specific individuals yet. Once you claim a task, it will move to your personal My Task Queue Outbound.

3.2.2 Team Task Queue Listing Outbound -> Bulk Actions
Team members can use bulk actions to efficiently claim multiple outbound tasks at once or release tasks back to the team pool. Selecting tick boxes activates the bulk actions functionality.

3.2.3 Team Task Queue Outbound -> Edit page
Team members can claim outbound tasks for themselves or release them back to the team, but cannot modify task details like priority or description—those administrative functions are reserved for supervisory roles in the All Task Queue Outbound.

3.3 My Task Queue Outbound
The My Task Queue Outbound is your personal workspace for managing outbound tasks that have been specifically assigned to you. This is where you’ll find all the proactive customer contacts you’re responsible for.
3.3.1 My Task Queue Outbound -> Listing page
This listing page displays all outbound tasks currently assigned directly to you.
Fields Legends:
- Task Code: The unique identifier for the outbound task, used for referencing in notes, logs, or communications about your customer contacts.
- Team Code: This provides context about the broader campaign or initiative the task belongs previously, to gather more information about the task.
- Channel: Identifies the communication channel (WhatsApp, Email, SMS, Telegram Messenger, or Voice-Call) you should use for this outbound contact.

3.3.2 My Task Queue Listing Outbound -> Bulk Actions
From your personal outbound queue, you can efficiently update the status of multiple tasks at once. Selecting tick boxes in the my task queue outbound listing activates the bulk actions functionality.

3.3.3 My Task Queue Outbound -> Edit page
The edit page for your personal outbound tasks provides access to update both the task’s status (tracking your progress through the outbound contact process) and its assignment (releasing it if needed).
4. Inbox
The Inbox is the central hub for managing all incoming customer communications across multiple channels. It provides a unified interface where agents can view, respond to, and manage customer conversations, emails, and voice calls in one place.
The Inbox organizes work into three views:
- All Tasks (for supervisors)
- My Team Tasks (for team-level visibility)
- My Tasks (for individual agents)
4.1 Inbox -> All Tasks
The All Tasks view provides supervisors with comprehensive visibility into all incoming communications across the organization.
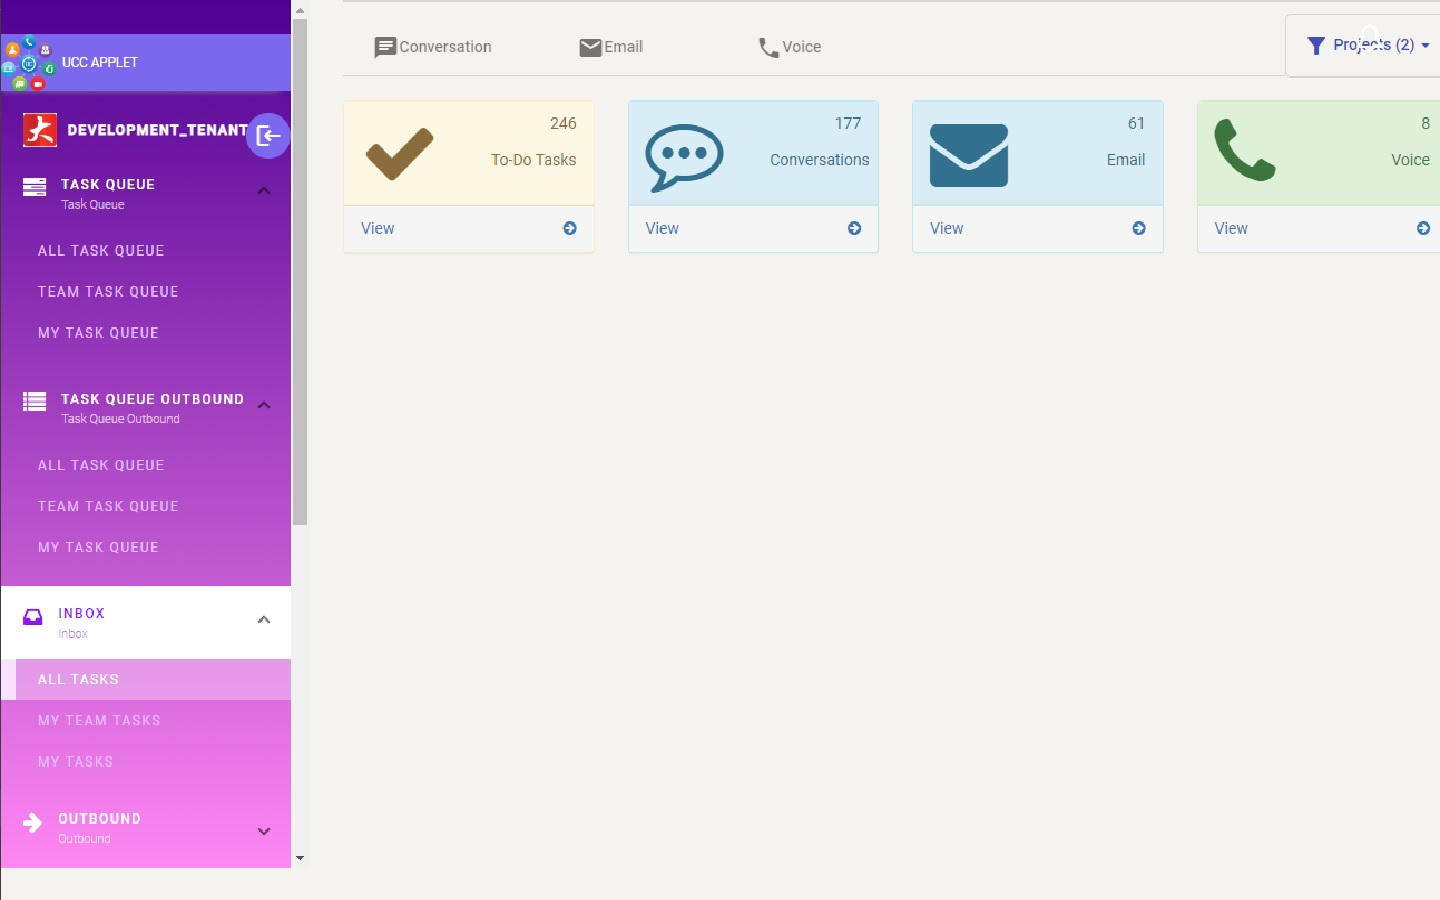
4.1.1 Inbox -> All Task -> Summary
This page provides a quick view of the total number of open Tasks, Conversations, Emails, and Voice calls. This summary view will only be available to higher-level users such as the Owner and Admin who need organization-wide visibility.
The summary cards display aggregate counts, giving you an at-a-glance understanding of how many active communications require attention across your entire organization.
4.1.2 Inbox -> All Task -> Conversation
Each tab—Conversation, Email, and Voice—filters the view to show only tasks from that specific channel.
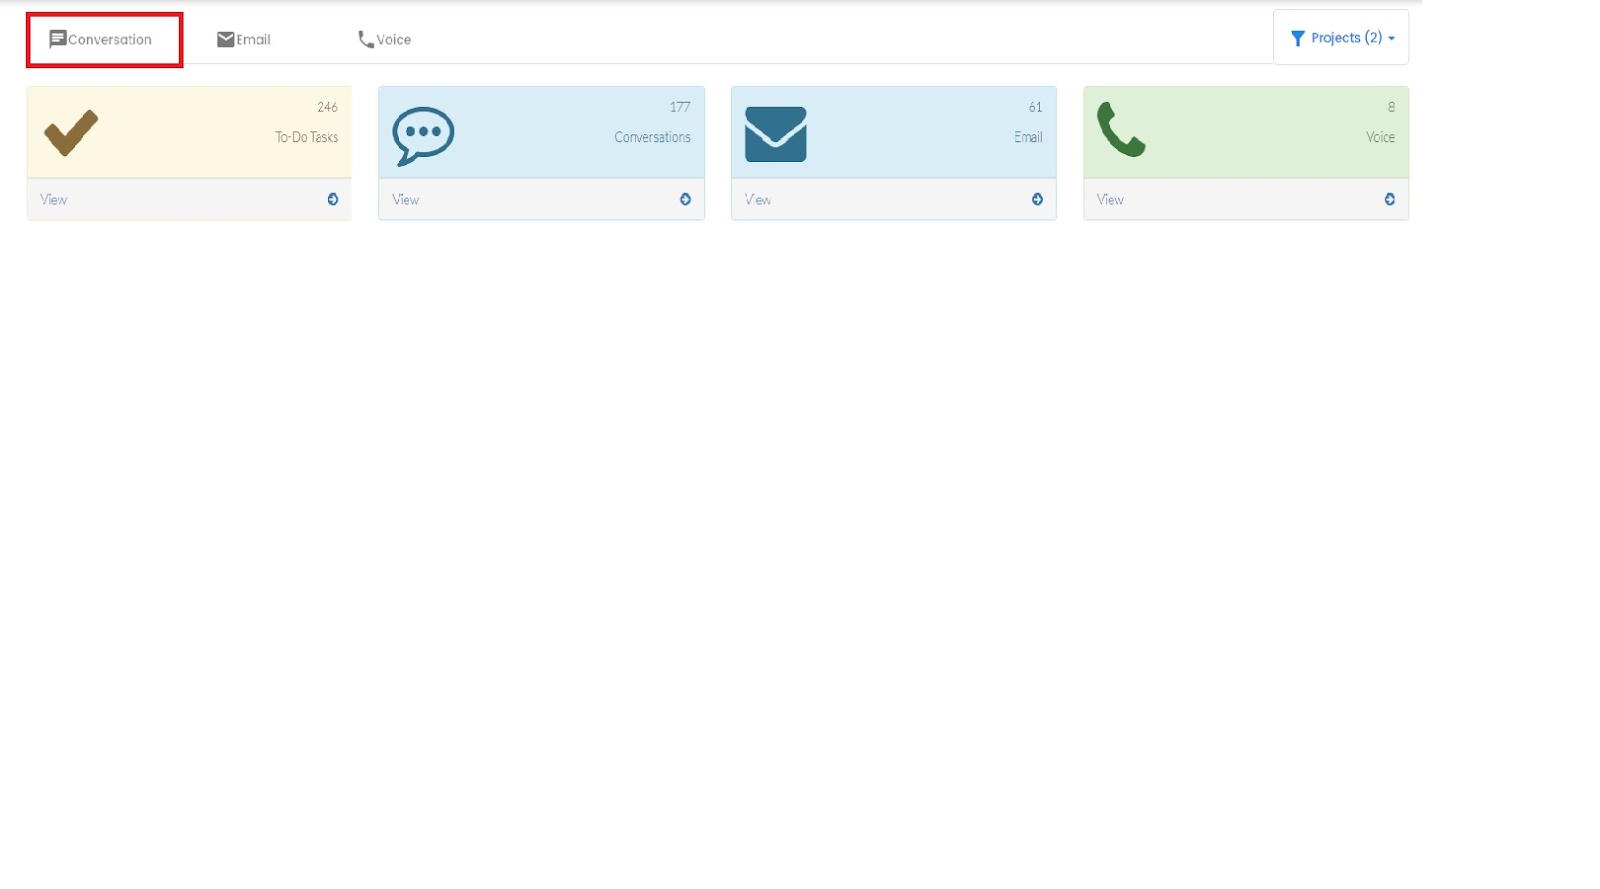
4.1.2.1 Inbox -> All Task -> Conversation -> Listing
After the conversation tab is selected, the listing page opens, displaying all active conversation-based communications. This list shows conversations from channels like WhatsApp, Telegram, and other messaging platforms.
The listing provides supervisors with a bird’s-eye view of all ongoing conversations, making it easy to spot conversations that need attention, have been waiting too long, or require reassignment.

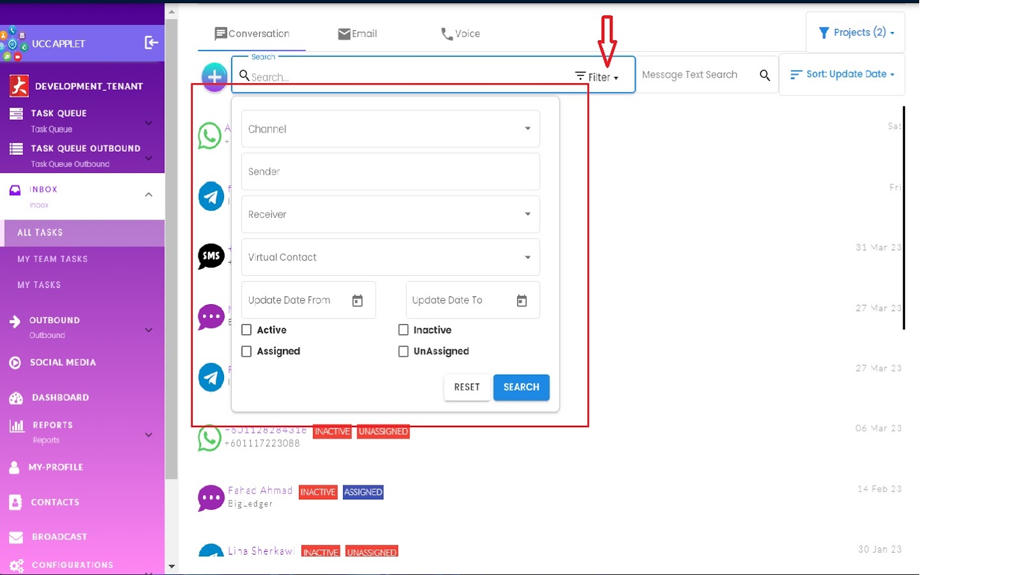
4.1.2.2 Inbox -> All Task -> Conversation -> Listing Filters
Filters provide powerful tools to narrow down the conversation list and focus on specific subsets of communications.
Filters allow the user to filter conversations via:
- Channel: Filter by communication platform (WHATSAPP, TELEGRAM, etc.) to focus on conversations from specific messaging services.
- Sender: Filter by customer name.
- Receiver: Filter by agent, also used for reviewing an agent’s workload or quality.
- Virtual Contacts: Filter by virtual contact numbers or identifiers used in your system for routing and organization.
- Date From - Date To
- Task Status: Filter by status (Active/Inactive/Assigned/Unassigned)
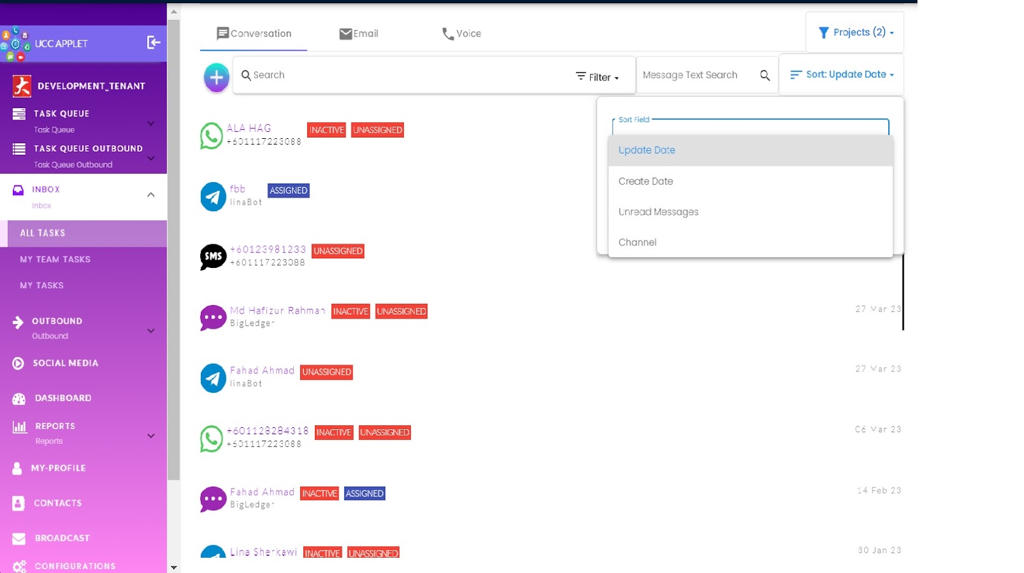
4.1.2.3 Inbox -> All Task -> Conversation Listing -> Sort
You can arrange conversations to surface the most urgent, oldest, or newest items first, helping you manage your workload strategically.
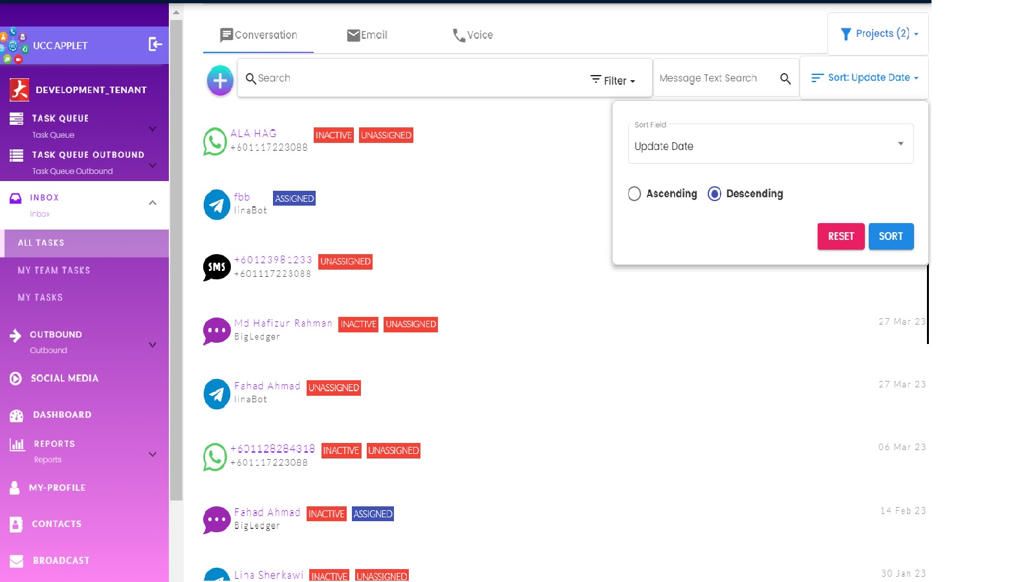
Users can sort in ASCENDING or DESCENDING order based on various criteria such as date received, customer name, priority level, or last activity timestamp.
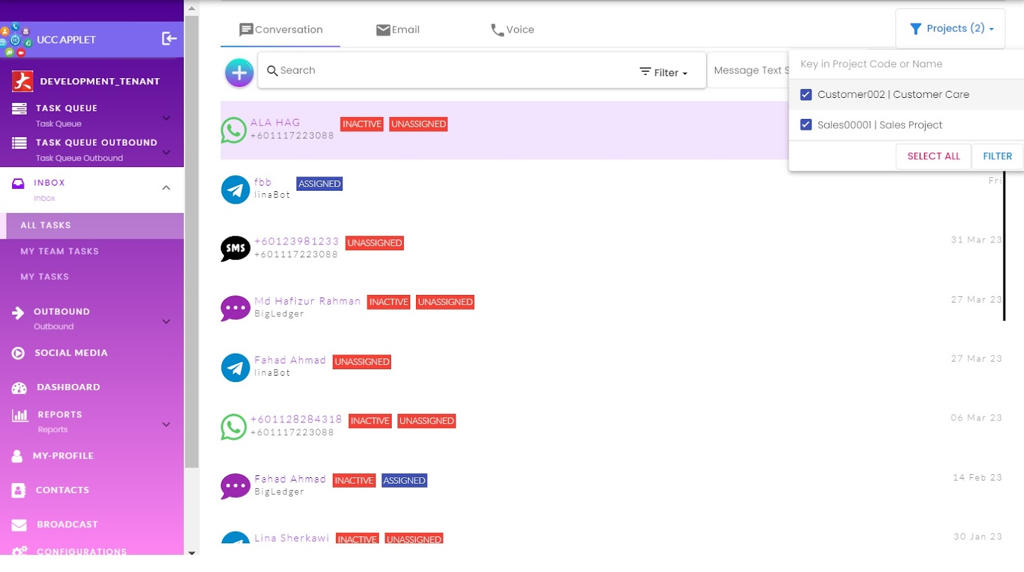
4.1.2.4 Inbox -> All Task -> Conversation -> Filter By Project
Project-based filtering allows you to organize and view conversations according to specific business initiatives, campaigns, or organizational structures.
Users can filter conversations by selecting a project from the “Projects” tab and applying the filter. This shows only conversations associated with that particular project, track project-specific customer interactions, or ensure proper handling of specialized inquiries.
4.1.2.5 Inbox -> All Task -> Conversation -> Messages Listing
When a conversation is selected from the list, the complete message thread appears.
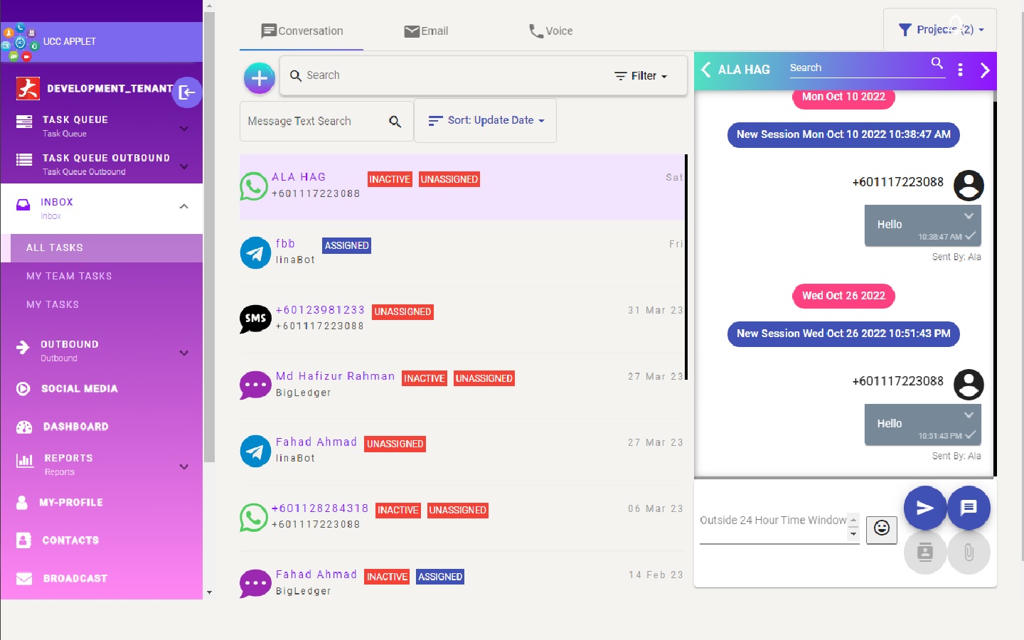
4.1.2.6 Inbox -> All Task -> Conversation -> Messages Session Close
Each session represents a distinct customer query or problem that needs resolution. This ensures proper tracking of individual issues even with long-term customers.
When a customer messages UCC, even if it is an existing customer, a new session is created. Sessions are meant to handle a single query or issue—for example, one session might address a billing question, while a later session handles a technical support request. After the problem is resolved and the customer’s needs are met, the session can be closed.
Closing a session signals that the particular issue has been resolved, helps keep active conversations focused on current needs, and maintains clean records of which problems have been addressed. Even after a session is closed, the conversation history remains accessible for future reference.

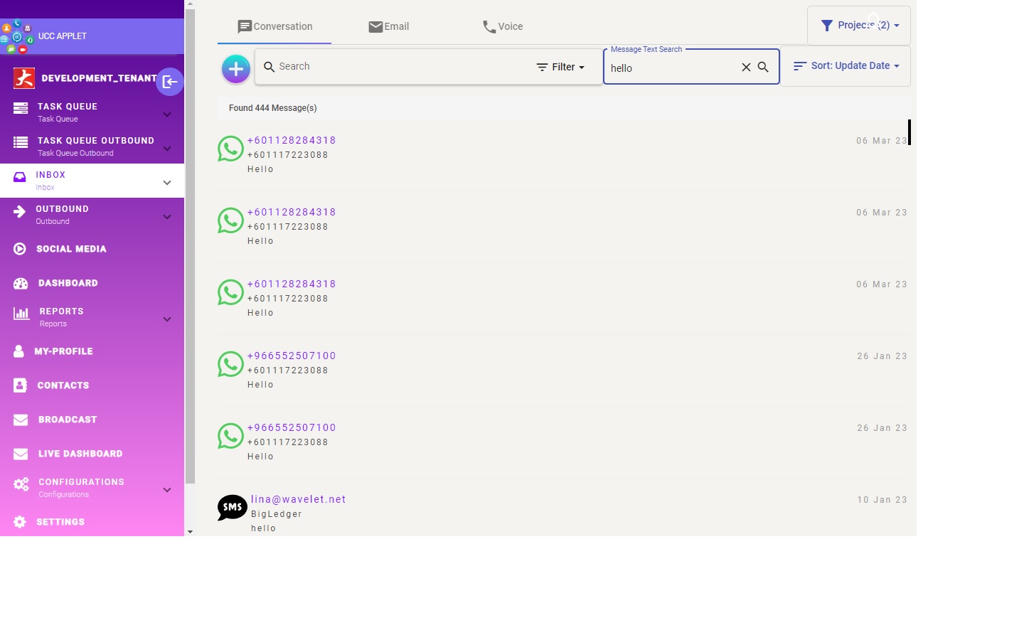
4.1.2.7 Inbox -> All Task -> Conversation -> Search By Message Content
The message search functionality allows you to find specific messages quickly by searching for keywords or phrases within the conversation content. The search is typically case-insensitive.
This feature is useful for locating specific discussions, such as:
- finding customer commitments
- referencing previous conversations about products or issues
- researching how similar questions were handled in the past
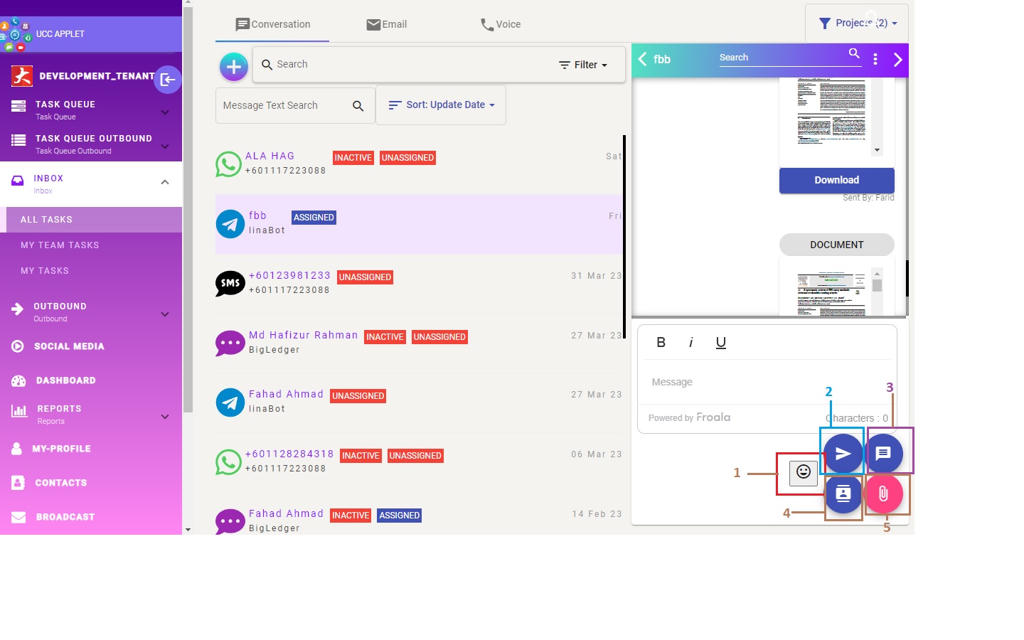
4.1.2.8 Inbox -> All Task -> Conversation -> Messages Sending Options
The message composition area provides multiple tools for creating effective customer responses:
- Usual Messager Utilities: Usual messager utilities that can be found on other apps like: Emoji picker and Add Attachment
- Send Predefined Message: Access templated responses for common scenarios to save time and ensure consistency.
- Send My Name Card Template Message: Share your agent details with the customer in a formatted card.
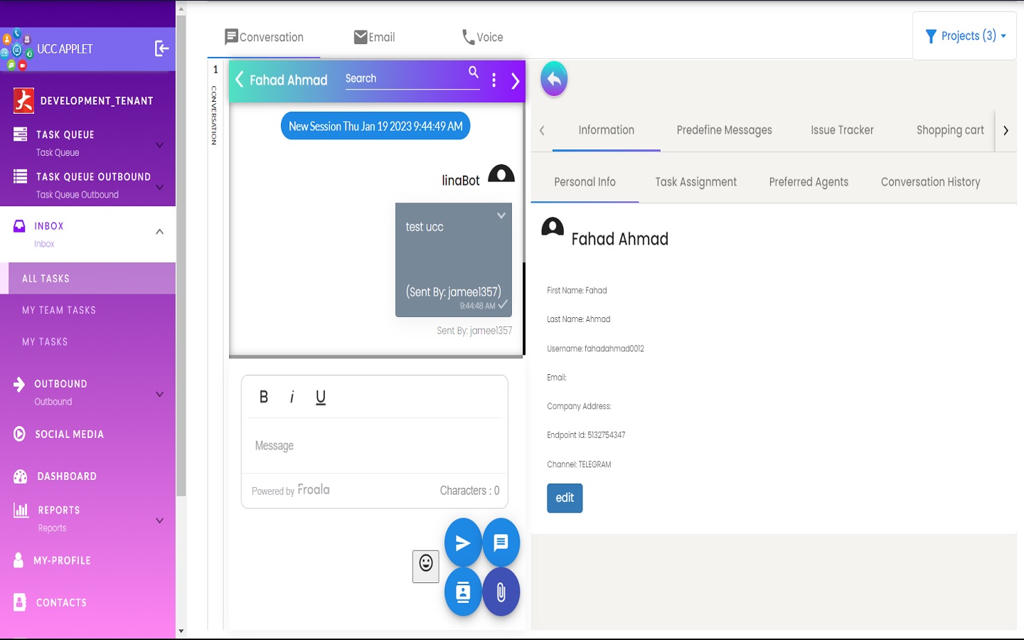
4.1.2.9 Inbox -> All Task -> Conversation Messages -> Customer Details
The customer details panel provides a comprehensive view of all available information about the customer you’re communicating with.
By clicking the arrow on the top right corner of the conversation message area, the customer details page will slide open. This page will provide an all-around view of all customer-related information obtained from other applets and integrated systems.
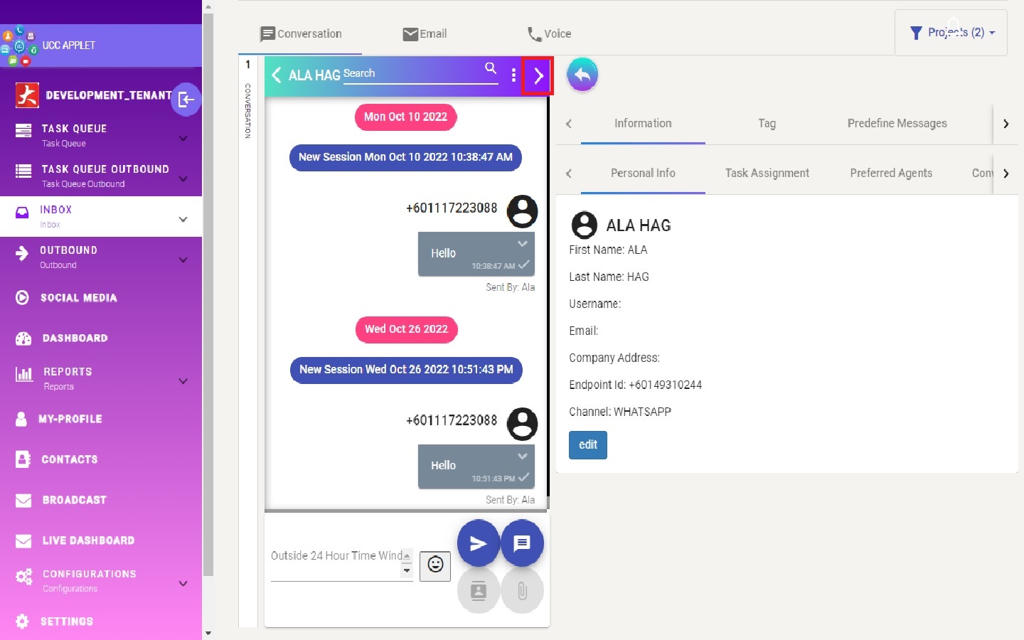
4.1.2.9.1 Inbox -> All Task -> Conversation -> Messages -> Customer Details -> Information -> Personal Info
The tab consolidates all identifying and contact information about the customer, which may include email, phone numbers, the channel from which the conversation originated, and other details from past interactions or integrated CRM systems.
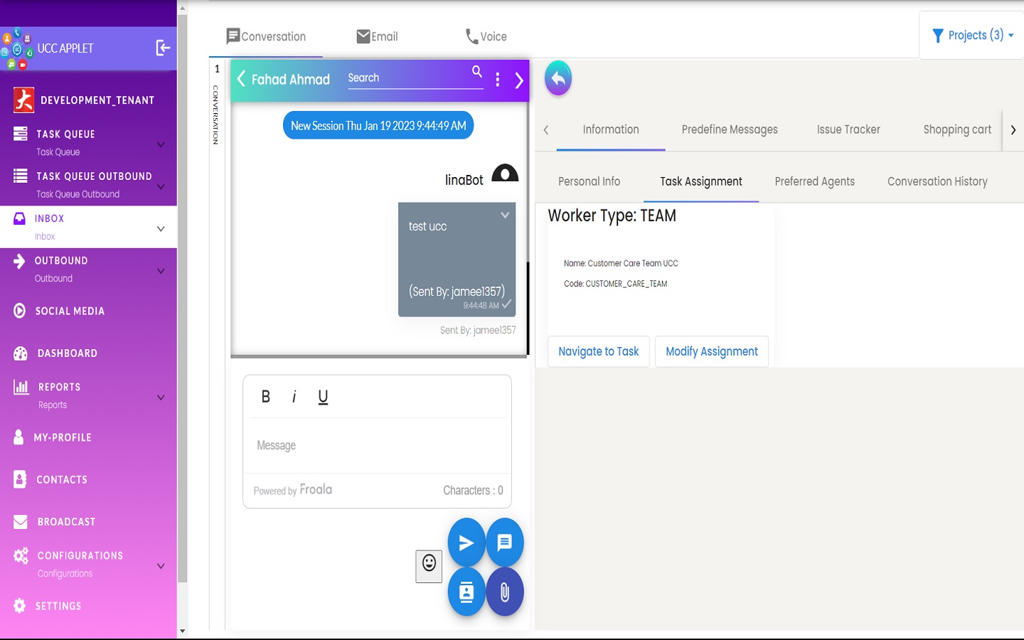
4.1.2.9.2 Inbox -> All Task -> Conversation -> Messages -> Customer Details -> Information -> Task Assignment
The Task Assignment tab shows any tasks that have been created from the conversation and assigned to an agent. The tab shows which agent or team the task is currently assigned to and allows for on-the-fly changes without leaving the conversation view.
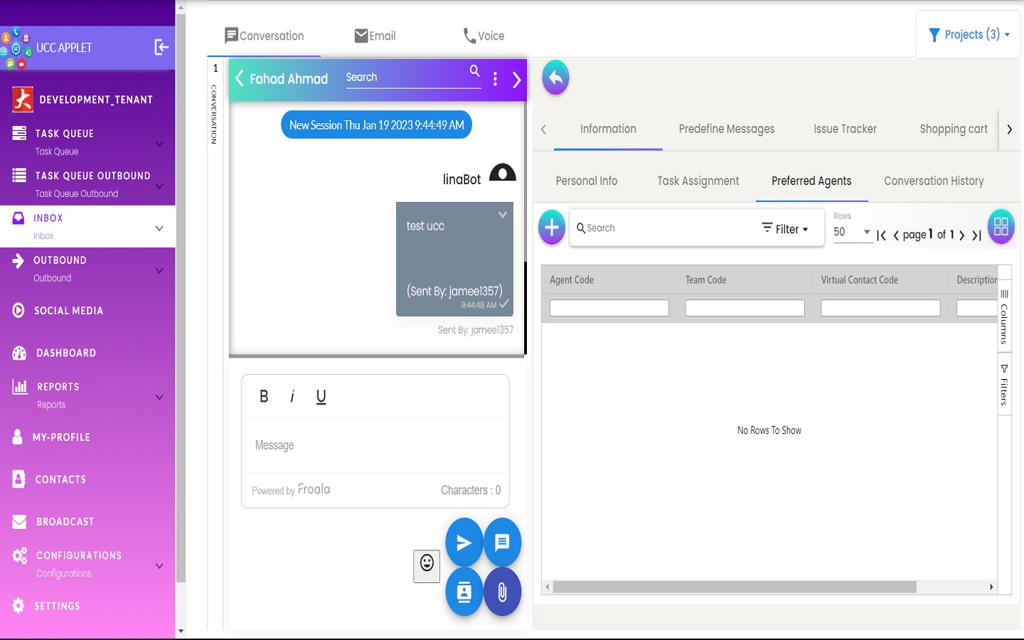
4.1.2.9.3 Inbox -> All Task -> Conversation -> Messages -> Customer Details -> Information -> Preferred Agent
The Preferred Agent tab displays a relationship-based assignment feature that honors customer preferences for working with specific team members. This feature is particularly valuable in relationship-driven businesses where customers benefit from working with familiar team members who understand their preferences.
The Preferred Agent tab shows the list of agents preferred by the customer. Customers can designate preferred agents by scanning an agent’s QR code and selecting them as their preferred contact.
4.1.2.9.4 Inbox -> All Task -> Conversation -> Messages -> Customer Details -> Information -> Conversation History
The Conversation History tab displays all previous conversations from the same user accross all platform. Using the contact merging feature, it identifies and consolidates interactions across different channels into a single chronological view.
4.1.2.9.5 Inbox -> All Task -> Conversation -> Messages -> Customer Details -> Tags
Tags allow agents to categorize conversations based on specific topics, urgency, or customer types. Agents can create new tags or select existing ones to label the conversation, making it easier to filter and organize interactions later.
4.1.2.9.6 Inbox -> All Task -> Conversation -> Messages -> Customer Details -> Predefined Messages
The Predefined Messages tab allows agents to quickly use templated messages (e.g., welcome, closing, or thank you messages) to expedite conversations. These messages are configured in the Configuration section and help ensure consistent, efficient communication for common scenarios.
4.1.2.9.7 Inbox -> All Task -> Conversation -> Messages -> Customer Details -> Issue Tracker
The Issue Tracker tab is used to track specific issues that have been created from the conversation. Agents can log details of the problem, assign categories, and attach relevant files, ensuring that customer complaints or technical problems are formally recorded and monitored through to resolution.
4.1.2.9.8 Inbox -> All Task -> Conversation -> Messages -> Customer Details -> Shopping Cart
The Shopping Cart tab facilitates integrated commerce by allowing an agent to create a new shopping cart for the user. It is linked to the Customer and Doc Item applets, allowing agents to select the necessary information to complete the transaction such as:
- branch
- location
- currency
- sales agent
- line items
- delivery details
- settlement options
4.1.2.9.9 Inbox -> All Task -> Conversation -> Messages -> Customer Details -> Transaction History
This tab provides a consolidated view of the customer’s past transactions across all platforms (e.g., Shopee, Lazada), merged under a single user contact via contact merging. Agents can view:
- order details
- amounts
- settlement status
- and a list of purchased items.
4.1.2.9.10 Inbox -> All Task -> Conversation -> Messages -> Customer Details -> E-Invoice
With the E-Invoice tab, agents can issue electronic invoices to customers upon request, which is especially relevant since e-invoice regulations became mandatory.
The tab also maintains a history of issued e-invoices, allowing agents to reuse a customer’s saved tax information for future invoices without having to ask for it again.
This history includes the validation status of each document with relevant authorities (e.g., IRB), confirming whether it has been successfully accepted.
4.1.2.9.11 Inbox -> All Task -> Conversation -> Messages -> Customer Details -> Product
Linked to the doc item applet, the Product tab displays products from marketplace platforms (like Shopee or Lazada). It allows agents to browse and share product links directly with customers.
4.1.2.9.12 Inbox -> All Task -> Conversation -> Messages -> Customer Details -> Marketing (Vouchers)
Under the Marketing tab, agents can access and share vouchers with customers. This feature supports syncing vouchers from marketplace platforms (like Shopee). Vouchers can be synced manually by the agent or updated automatically by a background process.
4.1.2.9.13 Inbox -> All Task -> Conversation -> Messages -> Customer Details -> Agent Handover
The Agent Handover feature links the UCC module with the Bot Applet. It is used when a conversation is initiated (e.g., via web chat) but no agents are available; agents can later use the bot feature to send an automated reply via email, ensuring the customer’s inquiry is acknowledged even during off-hours or busy periods.
4.2 My Team Tasks
My Team Tasks shows all conversations assigned to the team(s) you belong to. Think of it as your team’s shared inbox. Everyone on the team can see the same incoming work here.
This view works exactly like All Tasks (section 4.1), but it only shows items for your team. The features—sorting, filtering, conversation view, customer details, message tools, and assignment controls—are all the same.
When you claim a conversation from My Team Tasks, it moves into your personal My Tasks list.
4.3 My Tasks
My Tasks is your personal inbox. It shows only the conversations and work items assigned directly to you.
This view behaves exactly like All Tasks (section 4.1), but filtered to your own assignments. All the same tools are available: viewing conversations, checking customer details, sending replies, closing sessions, searching messages, and updating task assignments.
5. Outbound
The Outbound section handles messages sent from your organization to customers, instead of replies to incoming messages. This includes activities like:
- follow-up messages,
- scheduled notifications,
- marketing or promotional messages,
- proactive check-ins.
Outbound has the same structure as Inbox:
- All Tasks – supervisors see all outbound work,
- My Team Tasks – team-level outbound messages,
- My Tasks – your personal outbound assignments.
All features work the same way as described in section 4. The only difference is the purpose: Outbound tasks start from your organization rather than the customer.
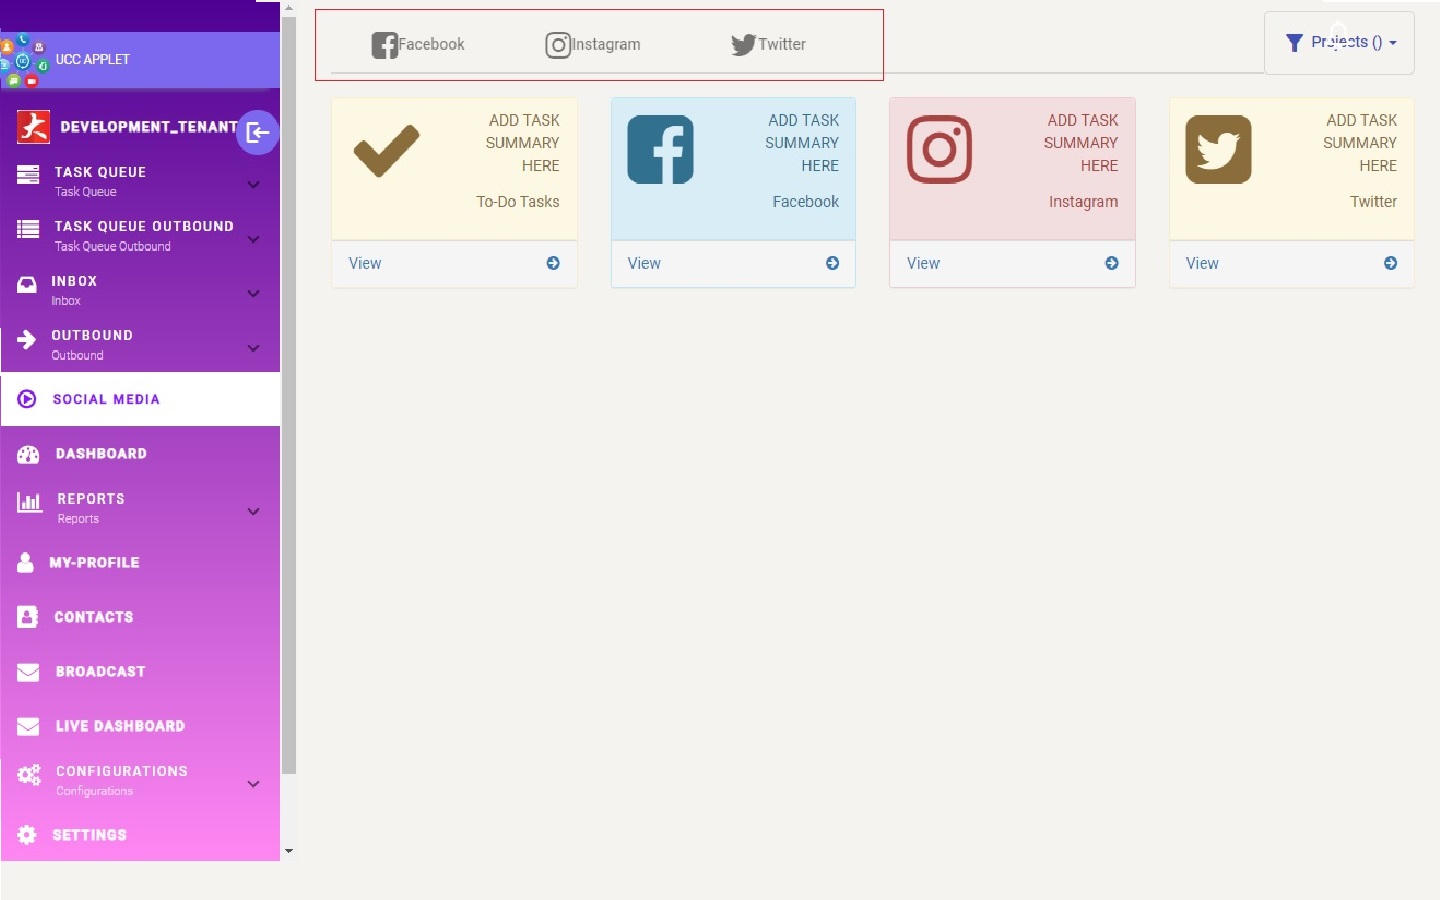
6. Social Media
The Social Media section lets you manage your organization’s social media accounts directly inside UCC. You can create posts, update content, respond to engagement (where supported), and switch between different managed platforms without leaving the system.
Each tab at the top represents a social platform. Selecting a tab switches the view to that platform’s management tools.
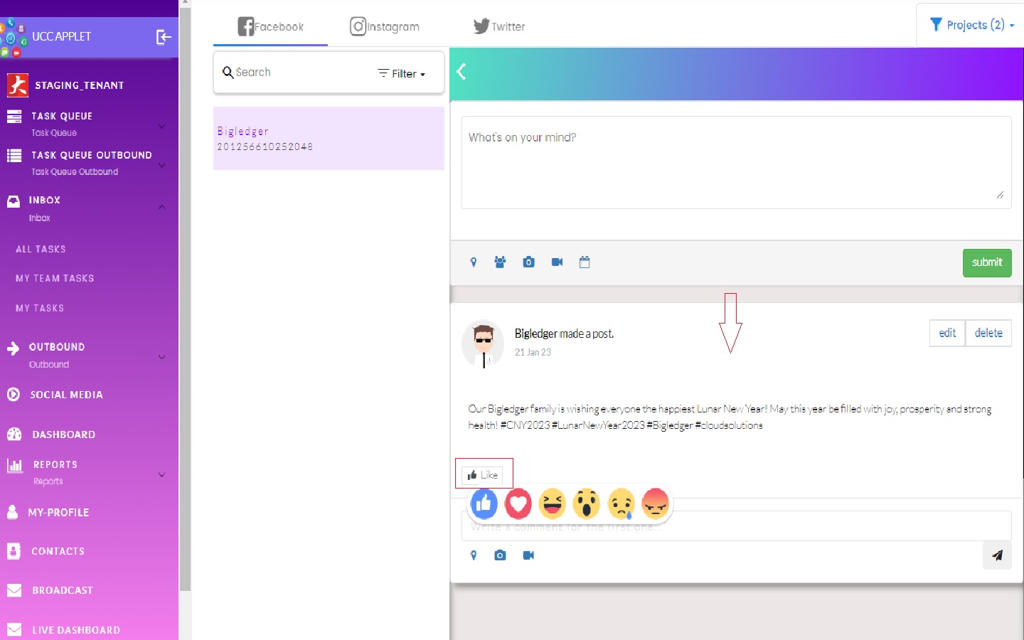
6.1 Facebook
The Facebook integration lets you manage your organization’s Facebook pages without opening Facebook. You can:
- view all pages you have access to,
- review all posts,
- create new posts,
- edit or delete existing posts.
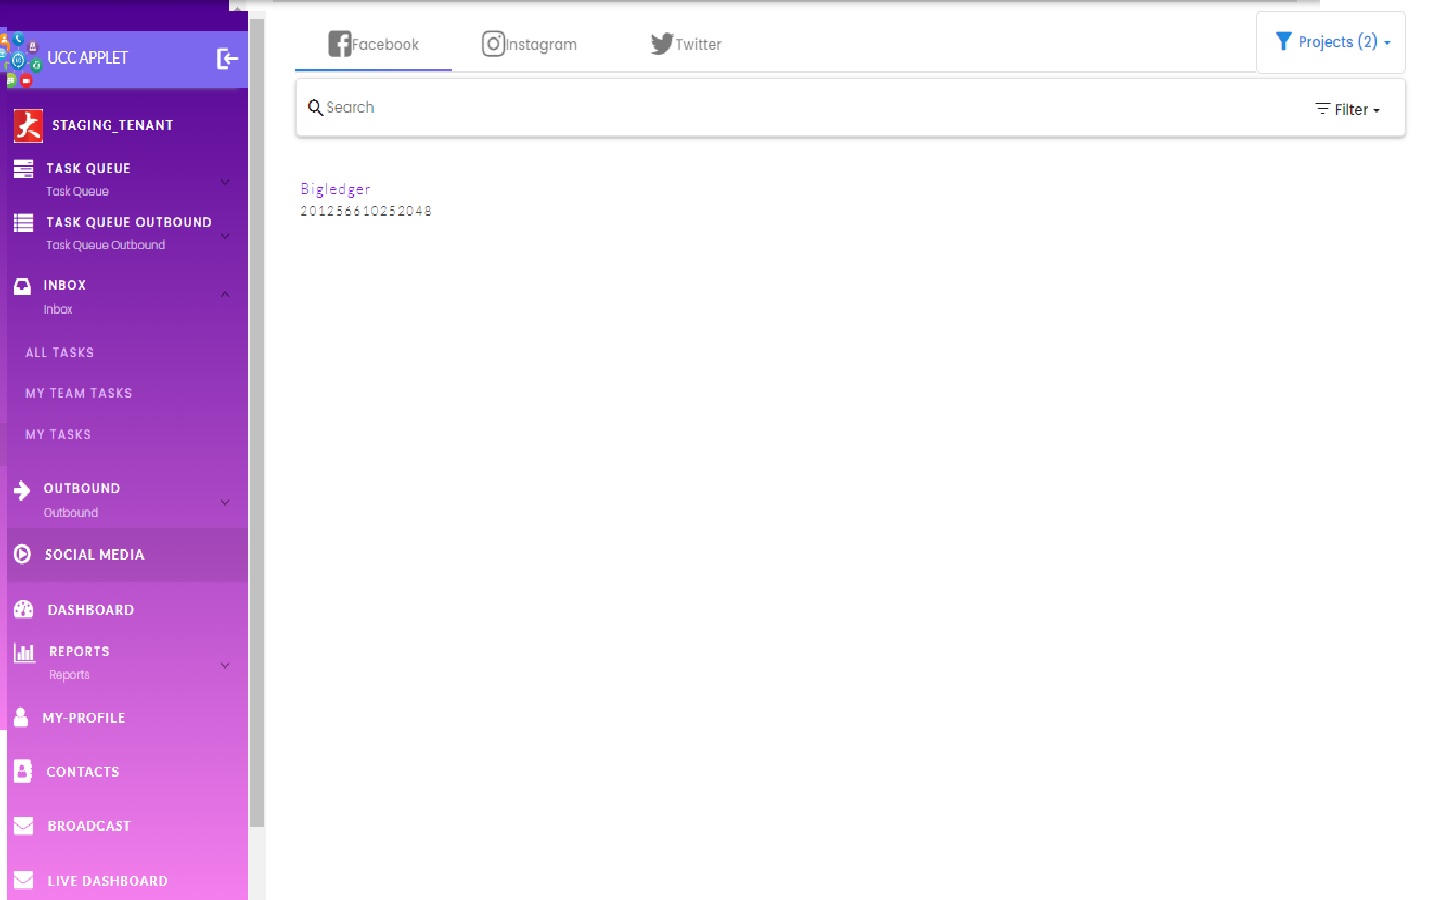
Post Listing:
You will see a list of pages you have permission to manage. Select a page to open its content.
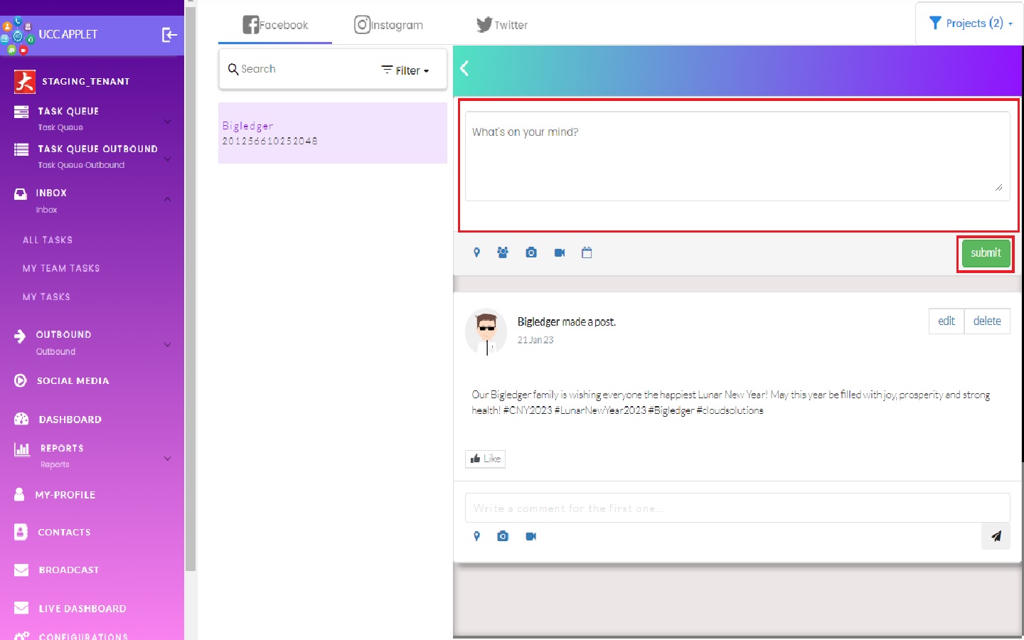
Post Create:
You can create new posts directly from UCC and publish the post directly to Facebook.
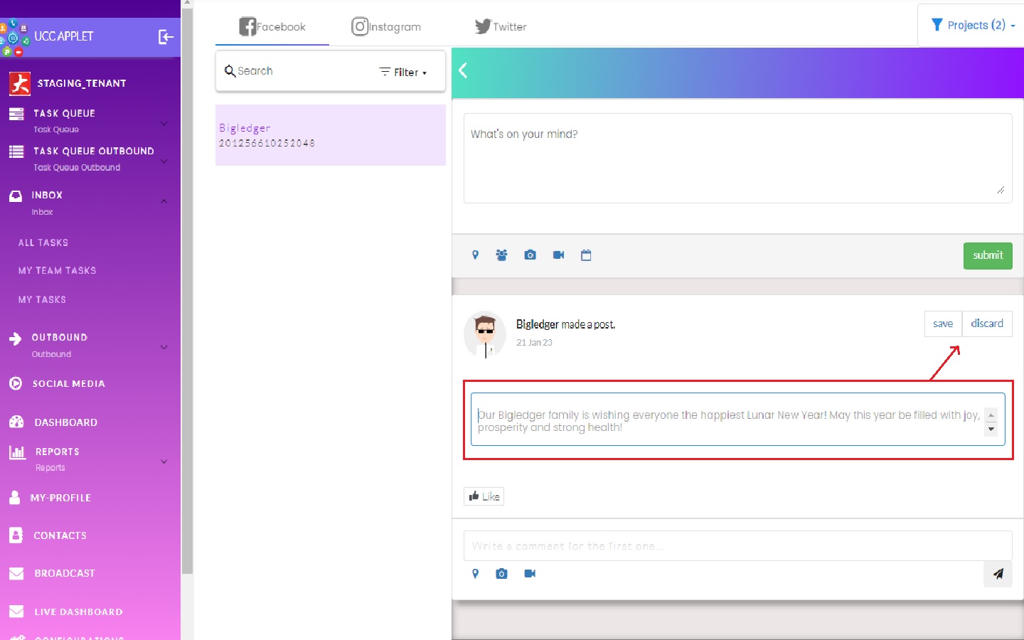
Post Edit or Delete:
You can edit a post to update its text or media. Saving pushes the changes to Facebook. If you no longer want the post visible, delete it.
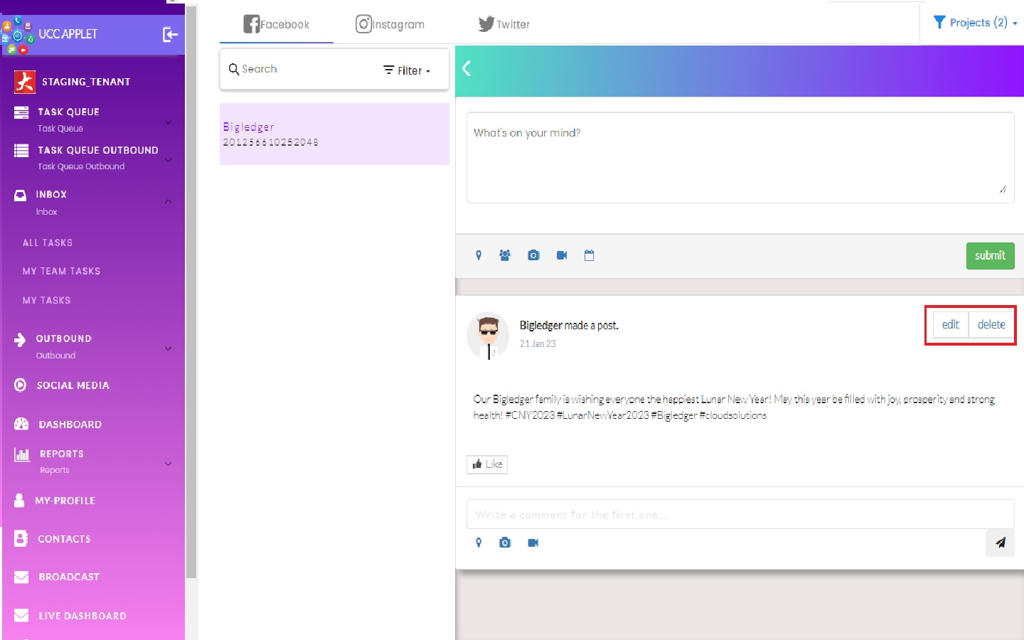
The Save and Discard options give you control over whether your changes go live, allowing you to review edits before committing them.
6.2 YouTube
(This part is under development)
The YouTube integration is currently being developed and will follow similar patterns to the Facebook integration, allowing you to manage your organization’s YouTube channel, videos, and engagement from within UCC. Check back for updates as this feature becomes available.
7. UCC Dashboard
The UCC Dashboard provides a comprehensive, visual overview of your organization’s communication and task management performance. This analytics hub transforms raw operational data into actionable insights through
- charts
- graphs
- key metrics
The dashboard is date-driven, allowing you to analyze performance over specific time periods.
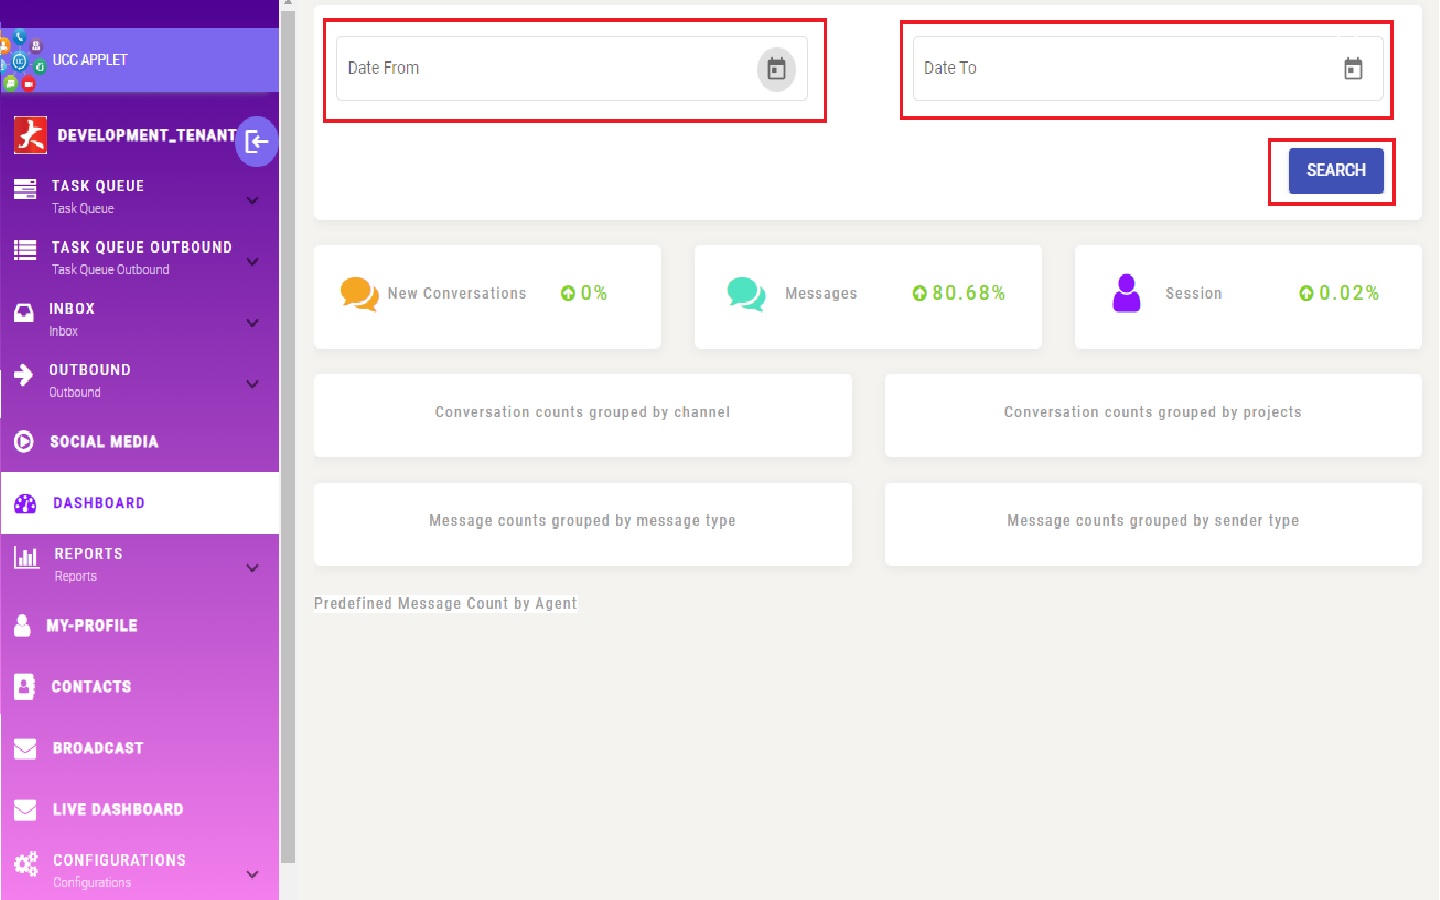
The dashboard continues with additional metrics and visualizations that provide deeper insights into specific operational areas. These might include time-series graphs showing how metrics change over your selected period, comparison charts showing performance across different teams or channels, and summary cards highlighting critical KPIs.
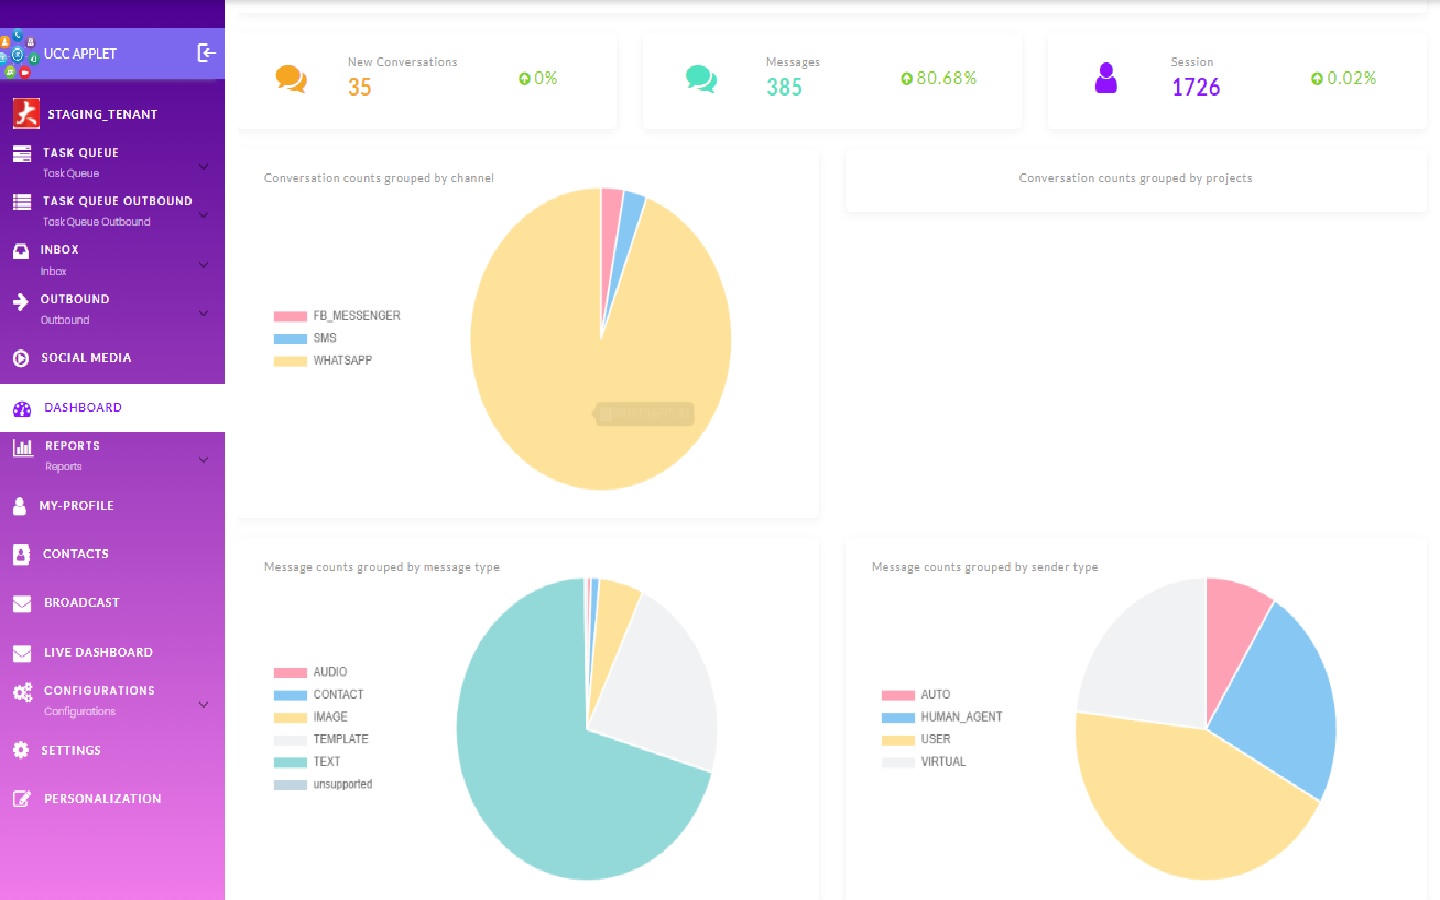
Further down the dashboard, you’ll find more specialized analytics that help you understand nuanced aspects of your operations—such as peak activity times, channel preferences, task type distributions, or agent utilization patterns.
8. Reports
The Reports section provides detailed, exportable data about your UCC operations. While the dashboard offers visual analytics, reports give you the raw data and detailed breakdowns needed for deeper analysis, record-keeping, or compliance.
8.1 Task Report
The Task Report provides a comprehensive, line-by-line breakdown of all tasks handled through UCC during your specified time period.
The task report shows a summary of the most important information for tasks in UCC, presenting each task as a separate row with key attributes. To generate the report, “Date From” and “Date To” need to be selected to define your analysis period, and the filter button needs to be clicked.
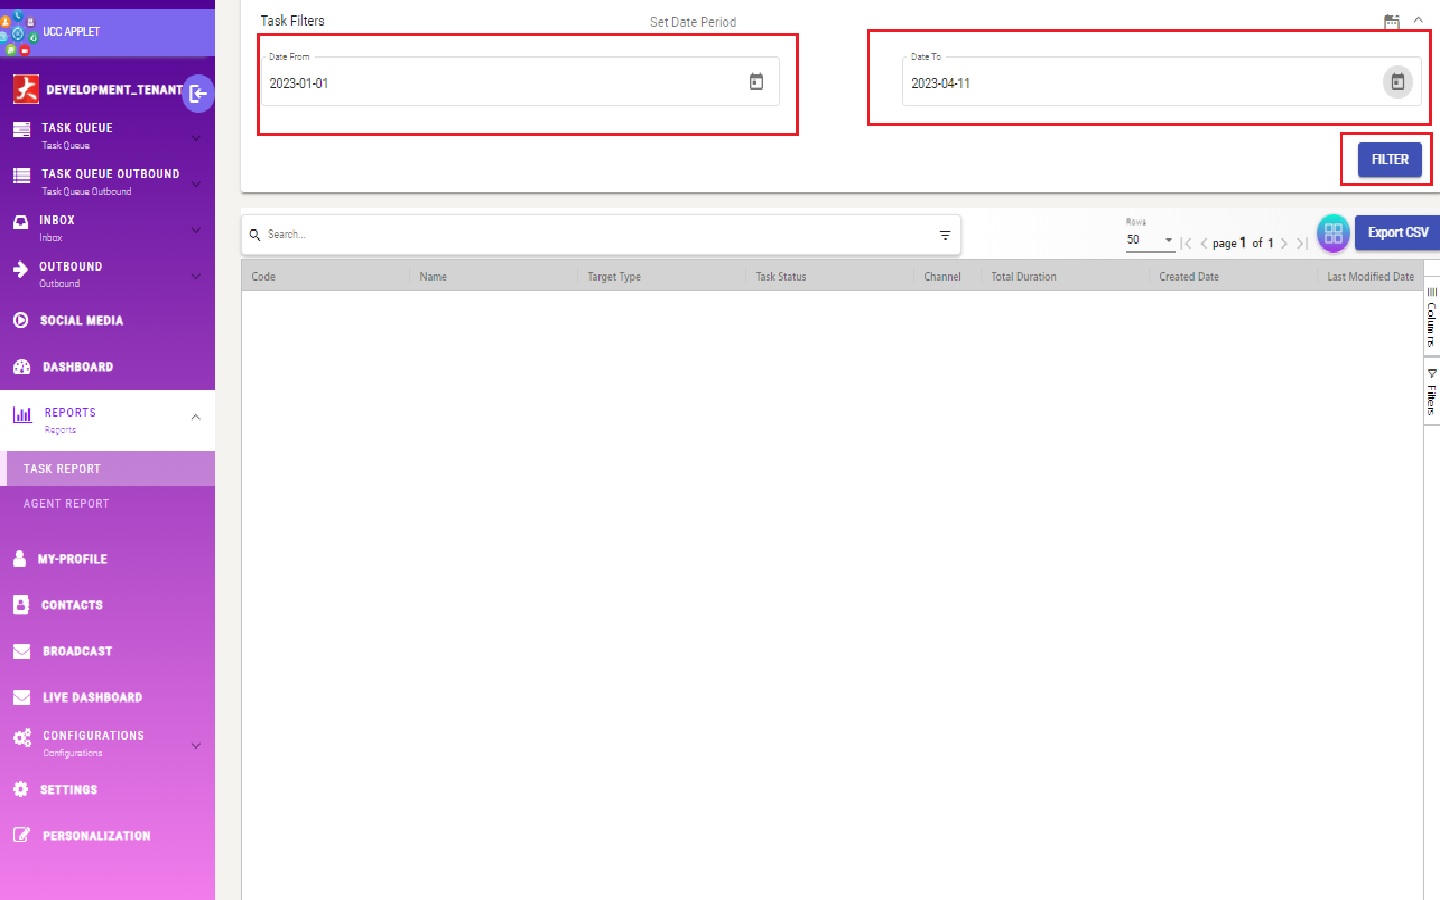
The task report shows the following information for each task:
- Target Type: Indicates the communication medium for the task—Conversation (messaging platforms), Email (email communications), or Voice (phone calls).
- Channel: Specifies the exact platform or service used, such as WHATSAPP, TELEGRAM, EMAIL, SMS, or VOICE.
- Total Duration: Shows how long the task has lasted from creation to completion (or current time if ongoing).
This comprehensive information can be exported using the “Export CSV” button.

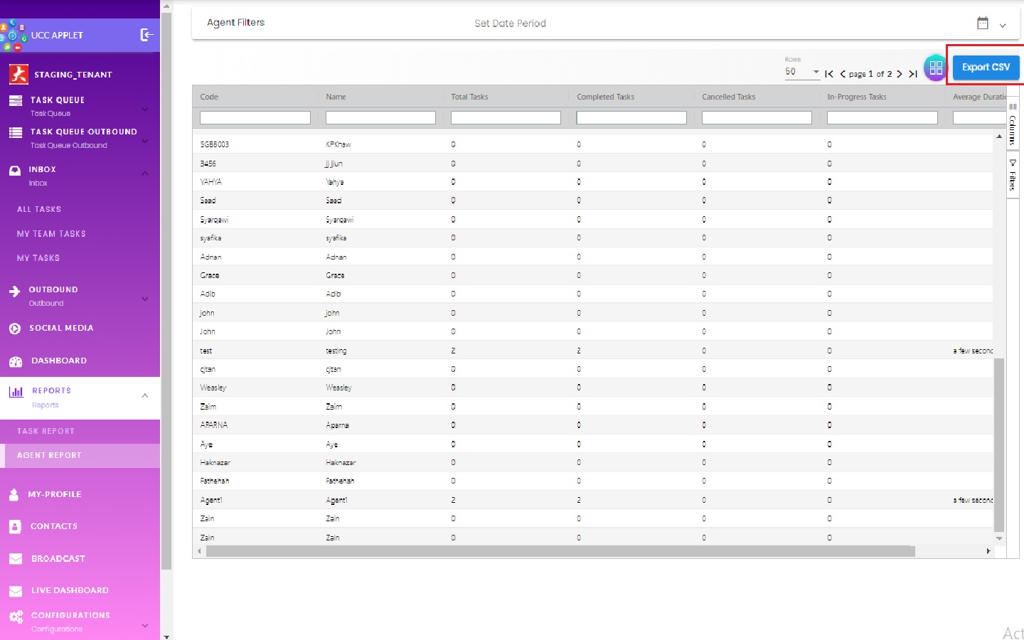
8.2 Agent Report
The Agent Report provides a performance-focused view of individual agent activity and productivity.
The Agent report shows a summary of agent activities in UCC, with each agent represented as a row containing their key performance metrics. To generate the report, “Date From” and “Date To” need to be selected and the filter button needs to be clicked.
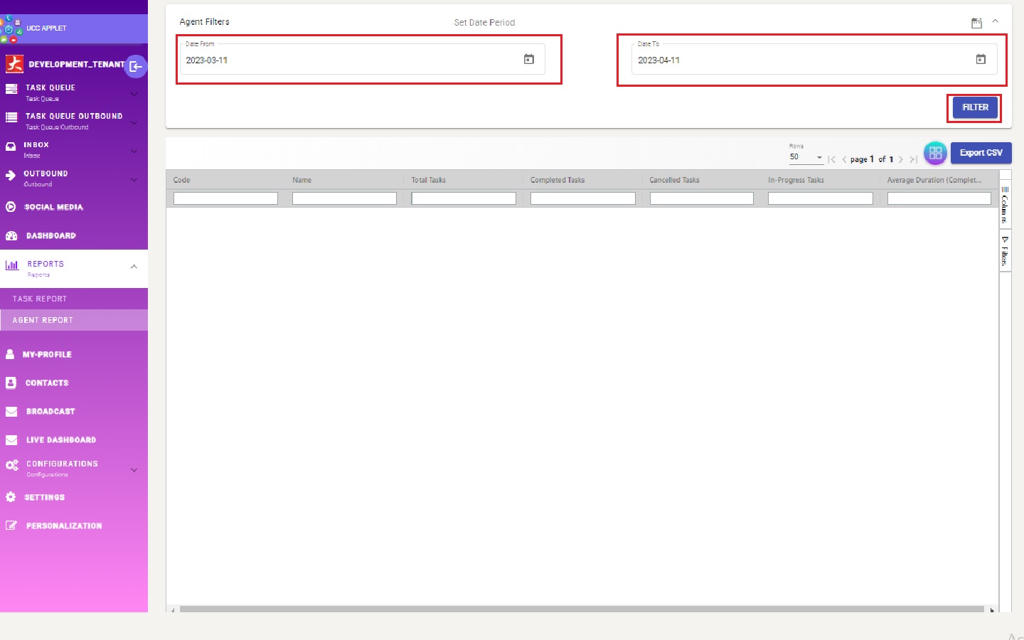
The report can also be exported as CSV using the “Export CSV” button.
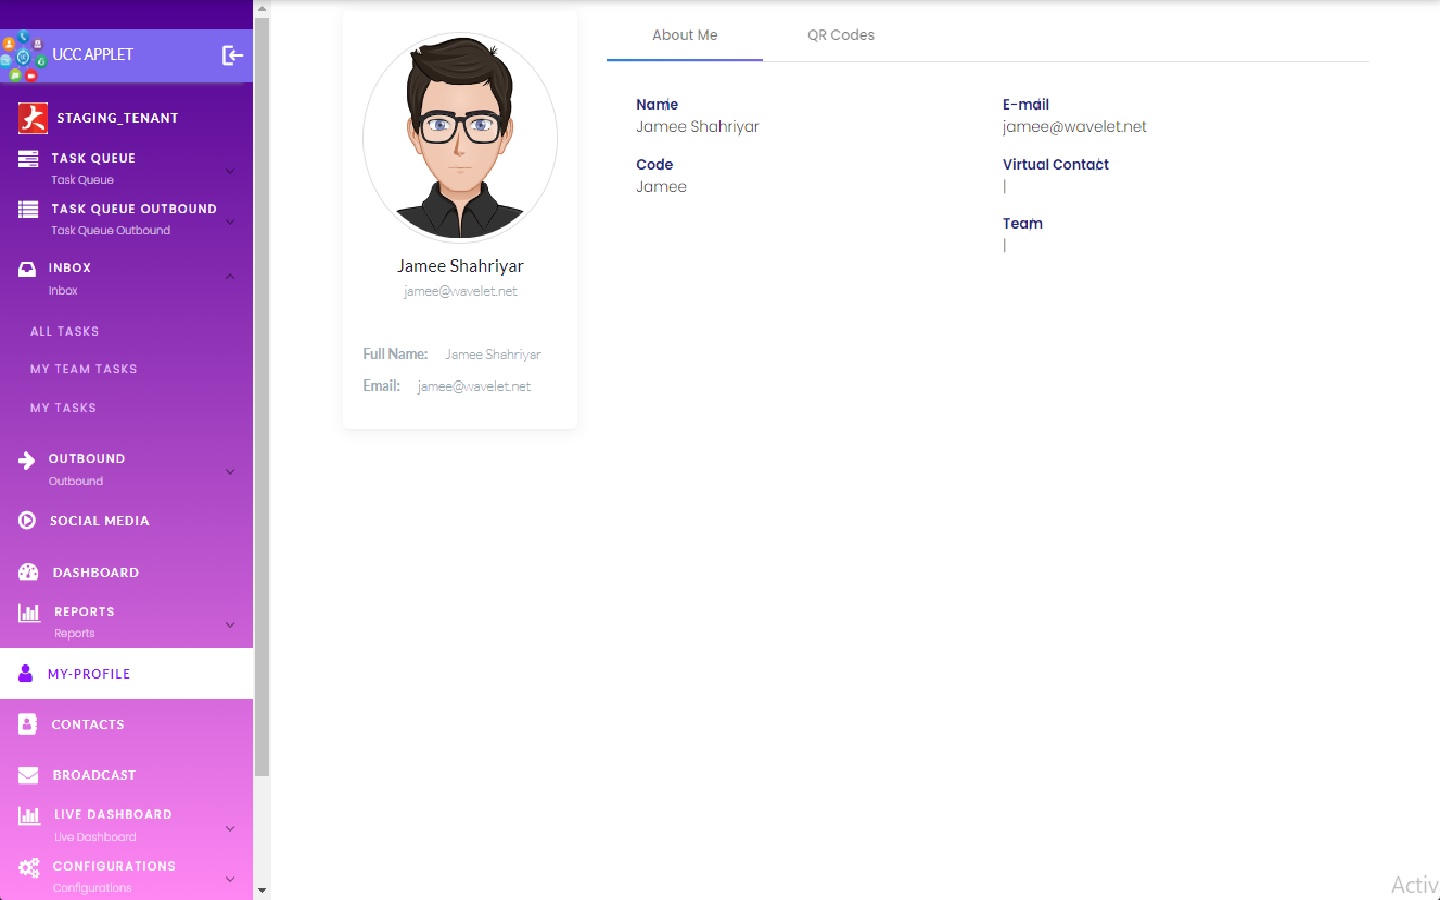
9. My Profile
The My Profile section is your personal workspace for managing your agent identity, preferences, and customer relationship tools within UCC.
9.1 About Me
The About Me page provides some quick view information regarding your agent profile, such as the virtual contacts (phone numbers, messaging accounts, or communication channels) you have access to for communicating with customers.
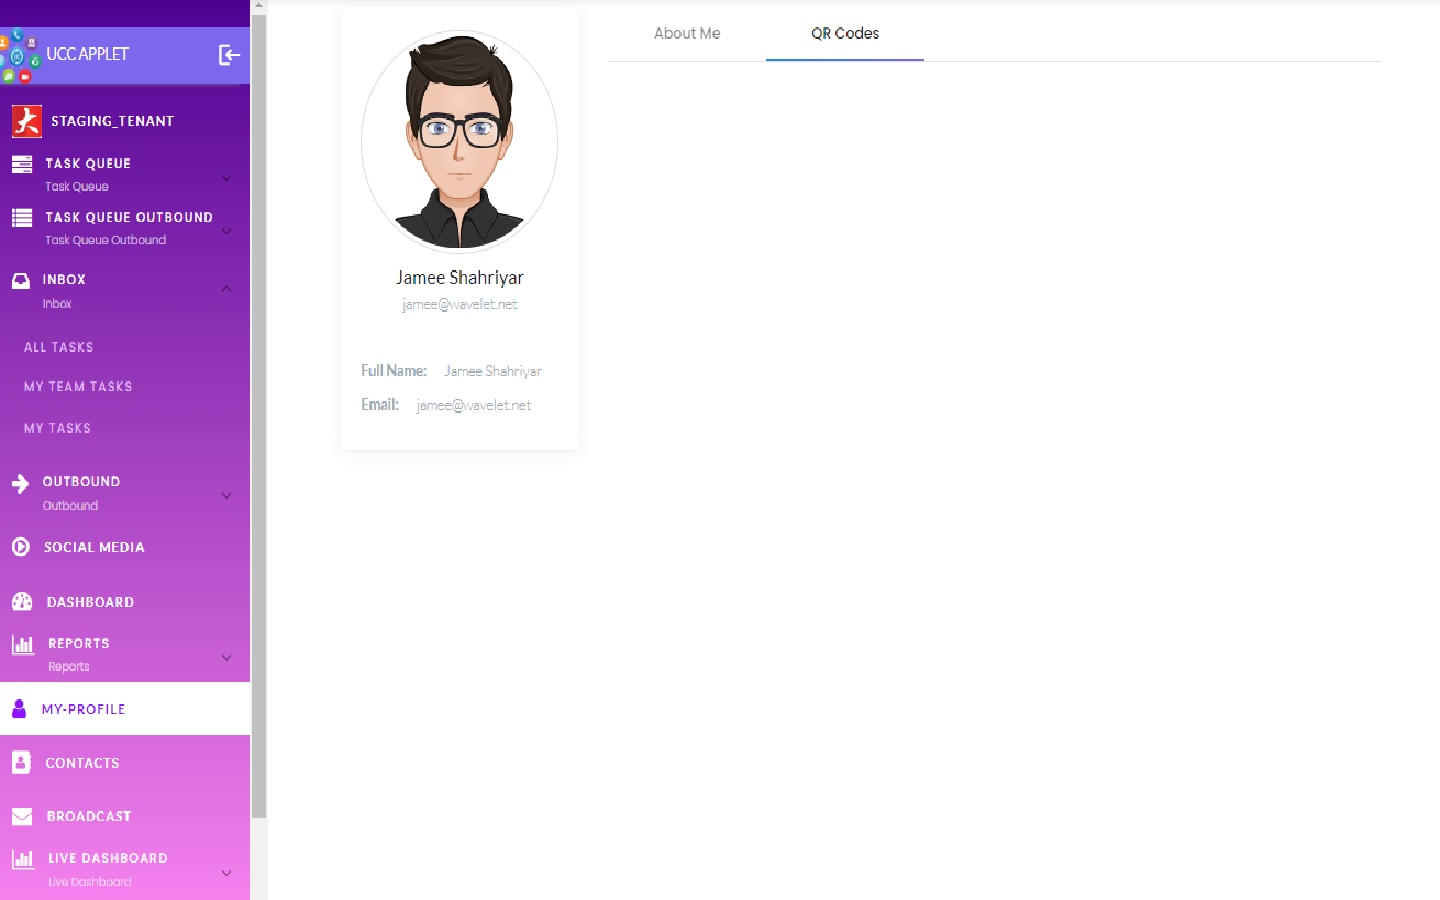
9.2 QR Code
The QR Codes tab generates a unique QR code specific to you which you can share with customers who want to specifically be helped by you and designate you as their preferred agent.
Note
This personal QR code for designating a preferred agent is distinct from the QR codes generated in the Configuration section, which are used on product packaging to initiate new support conversations.
10. Contacts
The Contacts section is your centralized customer database within UCC, consolidating all contact information gathered across all communication channels. This unified repository ensures agents have access to up-to-date customer information and provides a foundation for personalized service.
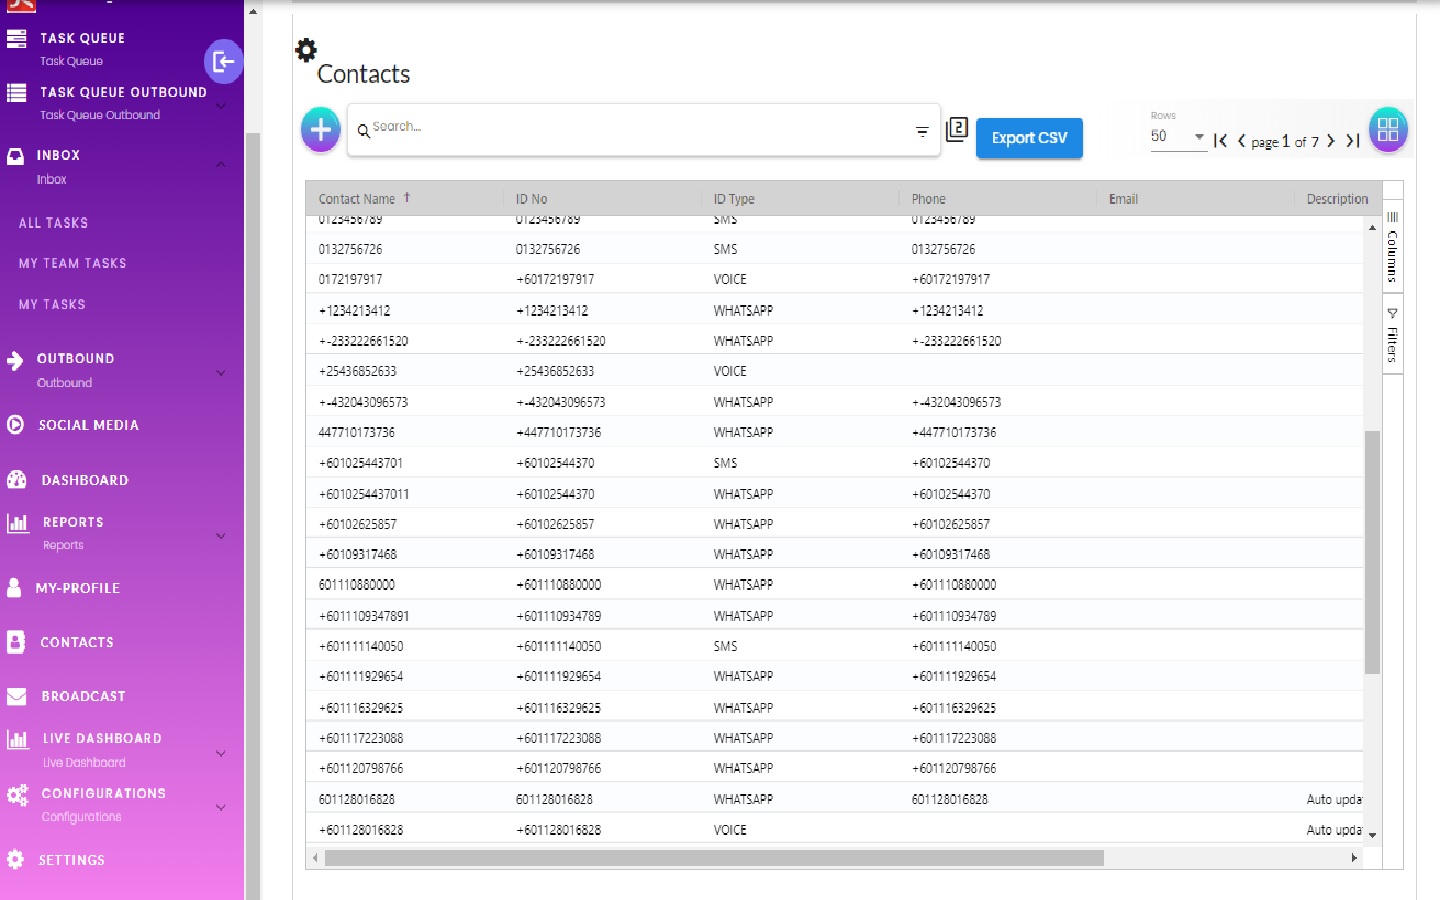
10.1 Contacts -> Listing
The contact listing page is the main view for browsing and searching your customer database. It shows all contacts accumulated by UCC, including those created automatically from new conversations, imported, or manually added by agents.
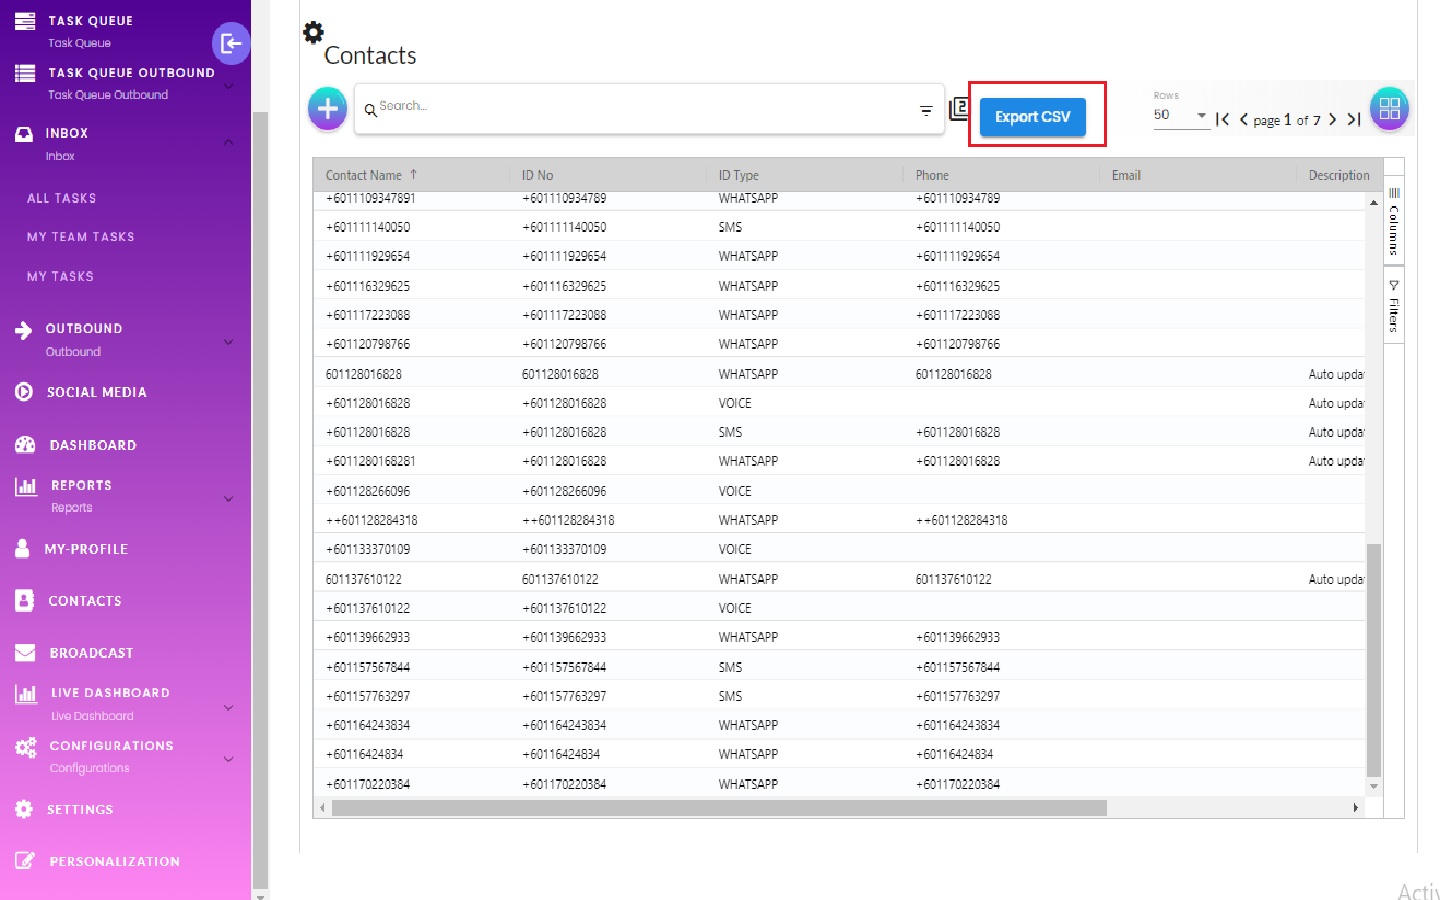
10.2 Contacts -> Listing Export As CSV
The export functionality allows you to generate a CSV file of your contact database for use in external tools, marketing campaigns, or for backup.
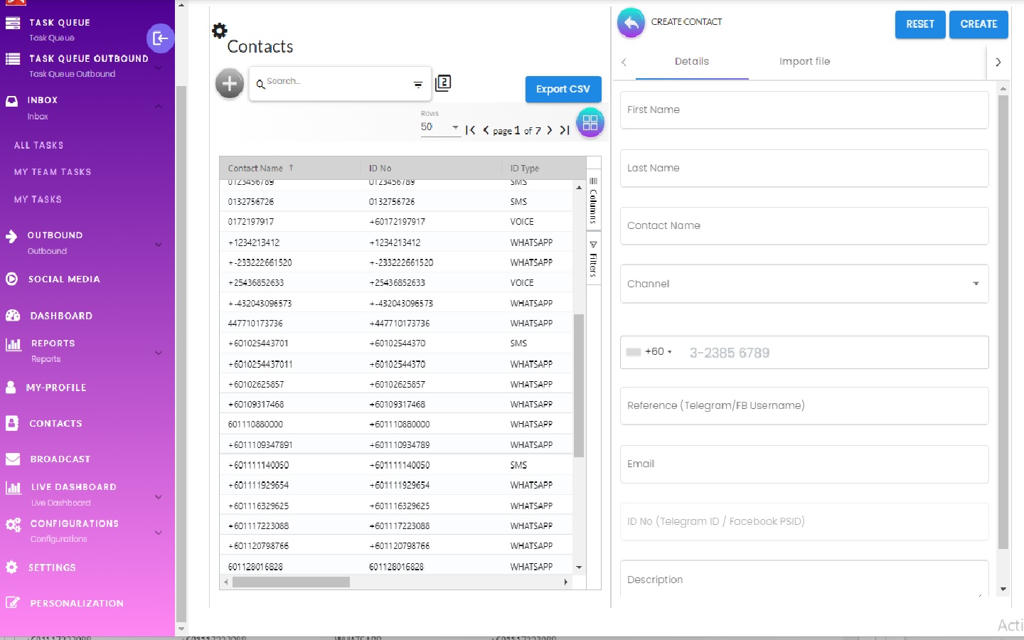
10.3 Contacts -> Create (Manual Creation)
You can proactively add customers to the database by creating contacts manually. You can enter comprehensive details, including:
- First Name & Last Name
- Contact Name: The customer’s username or phone number.
- Channel: The customer’s communication platform (e.g., SMS, WHATSAPP).
- Phone number
- Reference: The platform-specific identifier (e.g., Telegram handle).
- Description
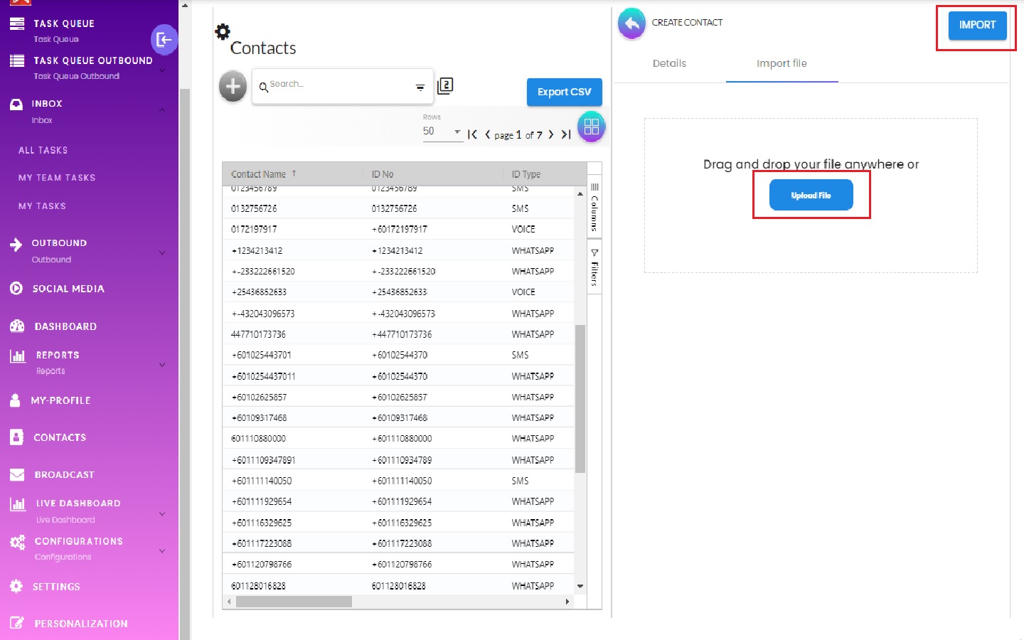
10.4 Contacts -> Create (Import Excel CSV)
Bulk contact import enables you to add large numbers of contacts efficiently from a CSV file.
On the “Import File” tab, you can upload a CSV file. The system will process each row to create a new contact, and will provide feedback on the import status, flagging any rows with errors.
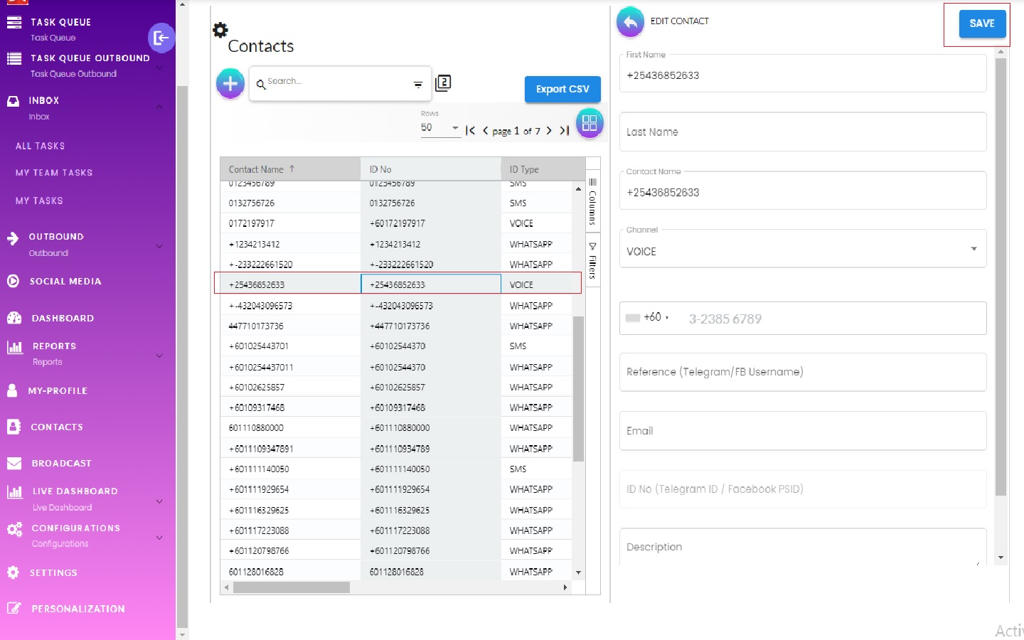
10.5 Contacts -> Update
You can update a contact’s information to keep the database accurate. Editable fields include the Contact Name, Channel, and Reference.
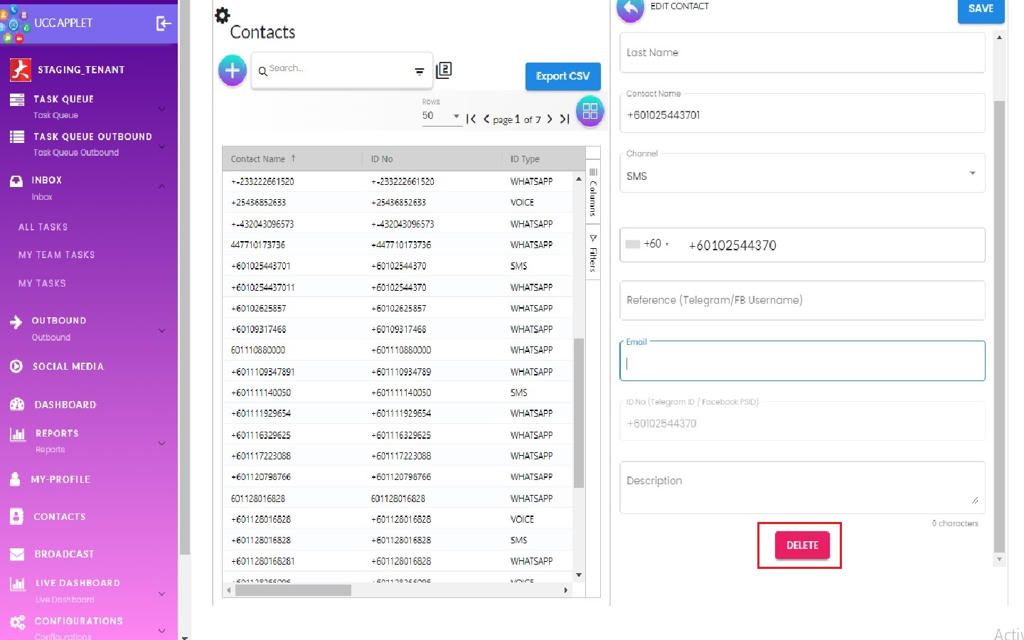
10.6 Contacts -> Delete
The delete function permanently removes a contact record from UCC.
11. Broadcast
The Broadcast feature enables mass communication with multiple customers simultaneously, which is essential for marketing campaigns, service announcements, or other important notifications.
Simple Broadcast (Advanced Broadcasts can be sent from Digital Marketing Applet)
This interface is designed for straightforward, one-time message distribution. The workflow guides you through the following steps:
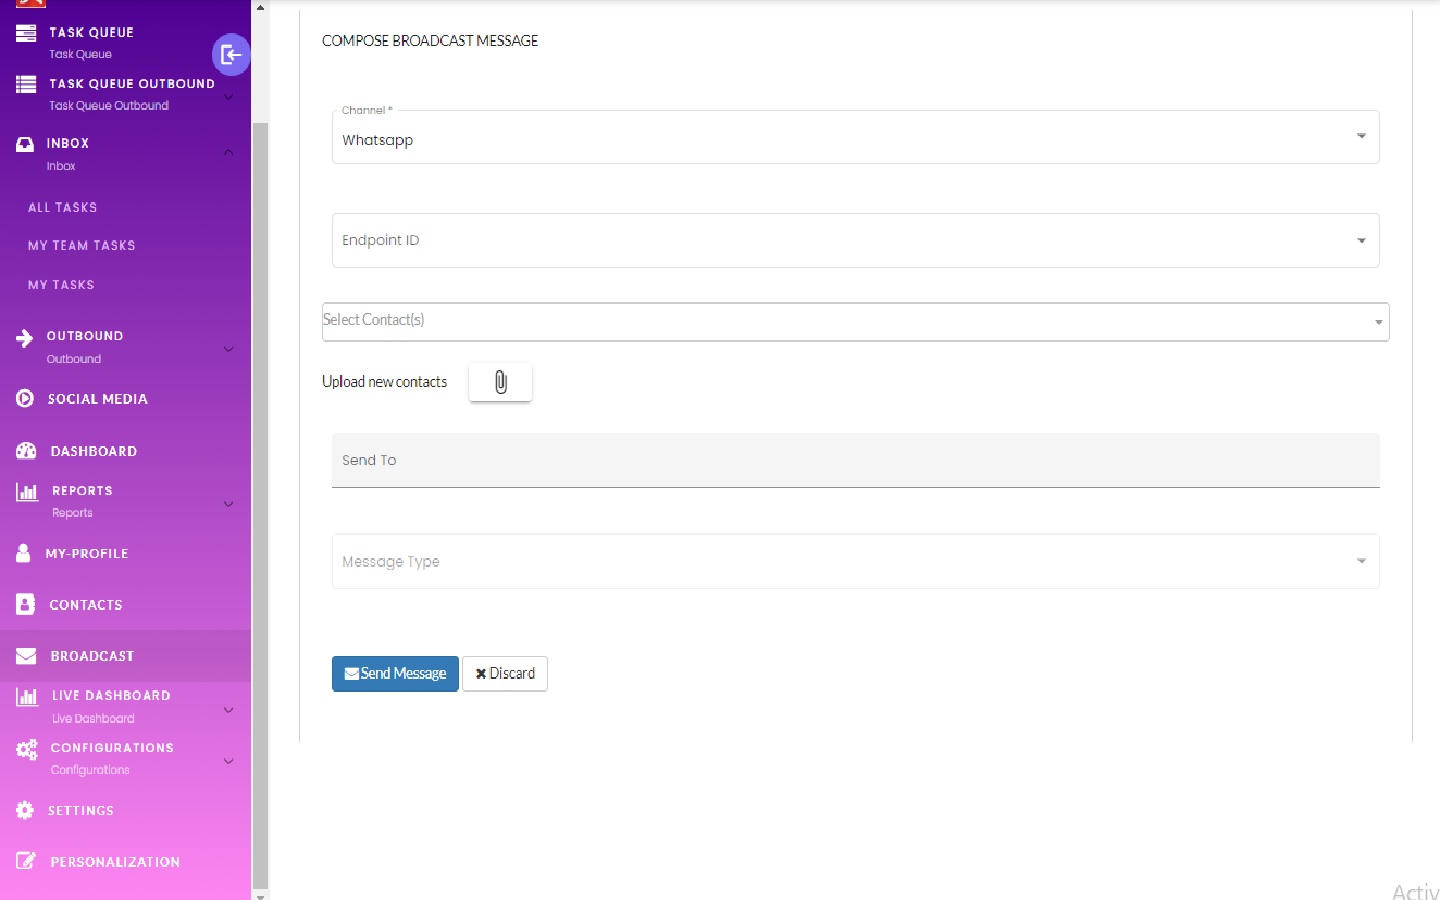
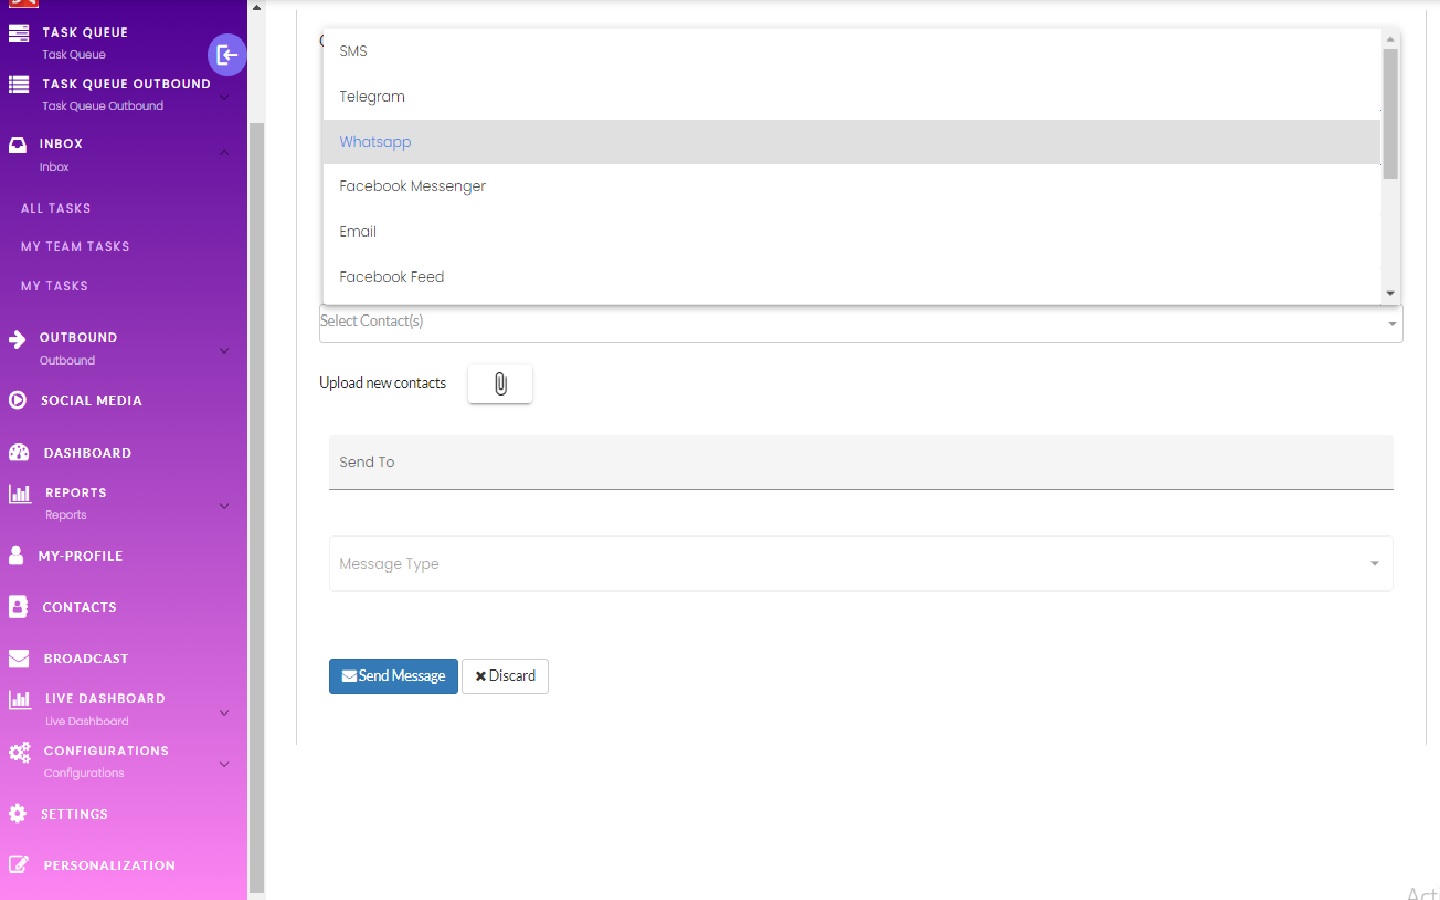
1. Select a Channel: Choose the communication platform for the broadcast (e.g., WhatsApp, SMS). The choice of channel affects deliverability, cost, and rich media support.
2. Select an Endpoint: An endpoint is the specific sending identity (e.g., company phone number) that the broadcast will come from.
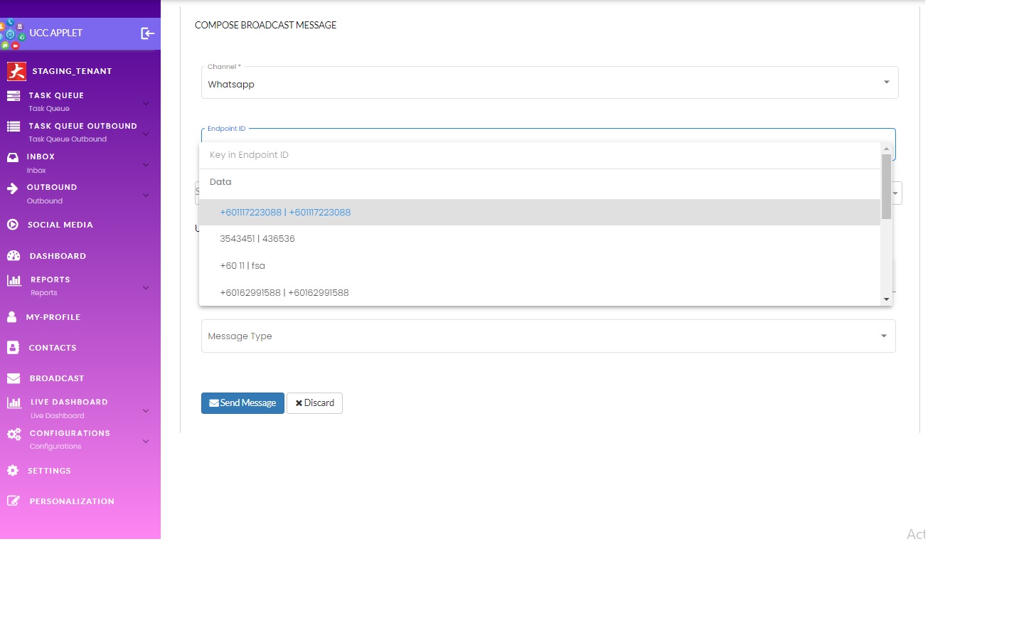
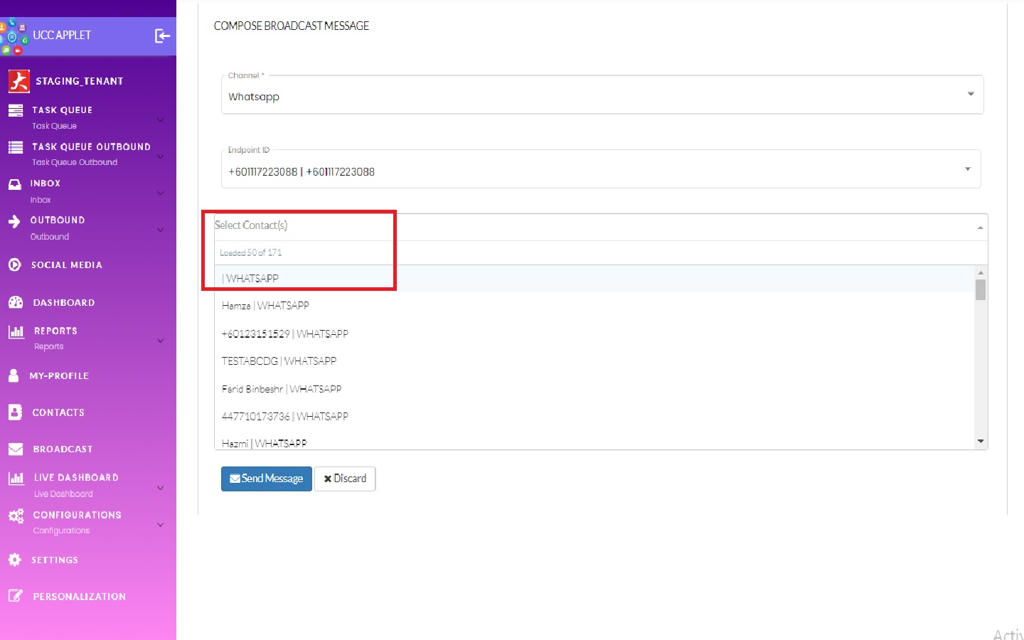
3. Select Recipients: You have two options for selecting contacts:
- Manual Selection: For smaller, targeted broadcasts, select contacts one by one from your UCC contact database.
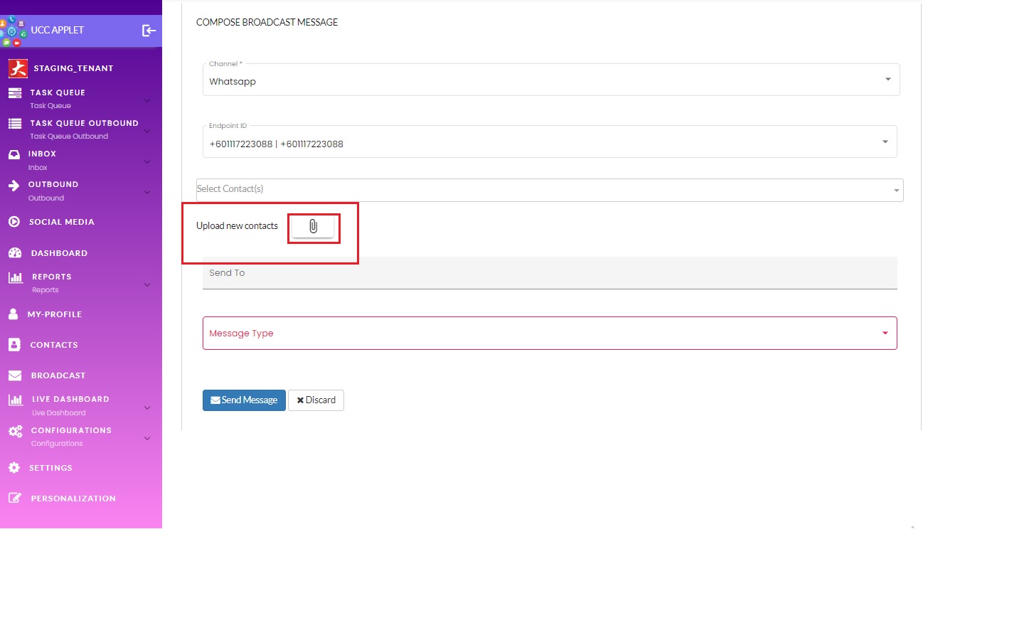
- Import CSV: For larger campaigns, import a CSV file of contacts. This is useful when working with segmented lists, such as those exported from the Contacts page.
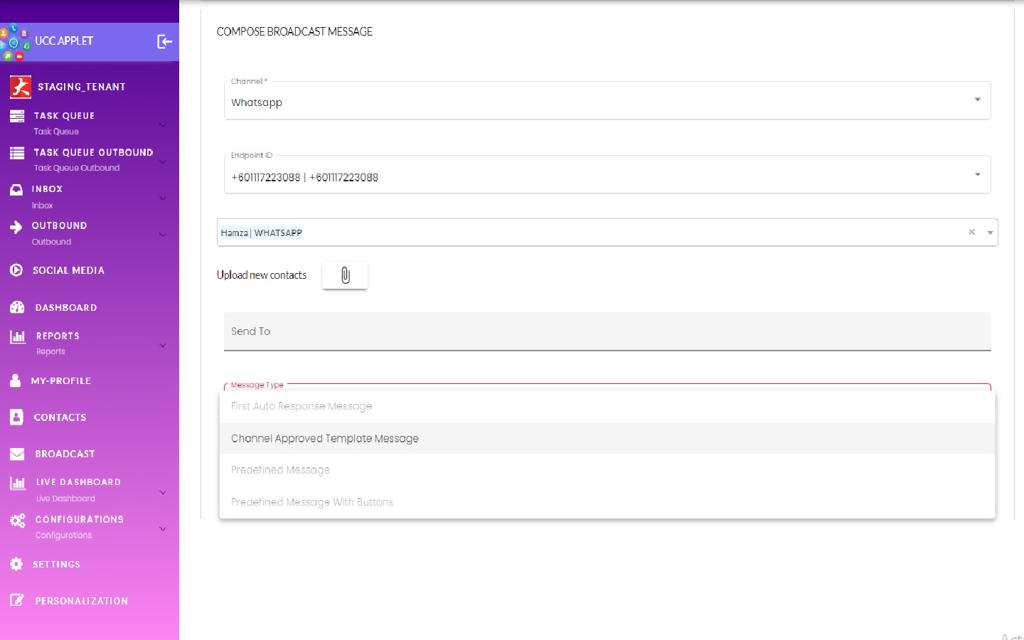
4. Compose and Send: Select the message type (e.g., plain text, image, document) and compose your content. Clicking “Send Message” initiates the broadcast to all selected recipients.
12. Live Dashboard
The Live Dashboard provides real-time visibility into agent activity, enabling supervisors to monitor operations as they happen, identify agents who need support, ensure adequate coverage, and make immediate adjustments to resource allocation.
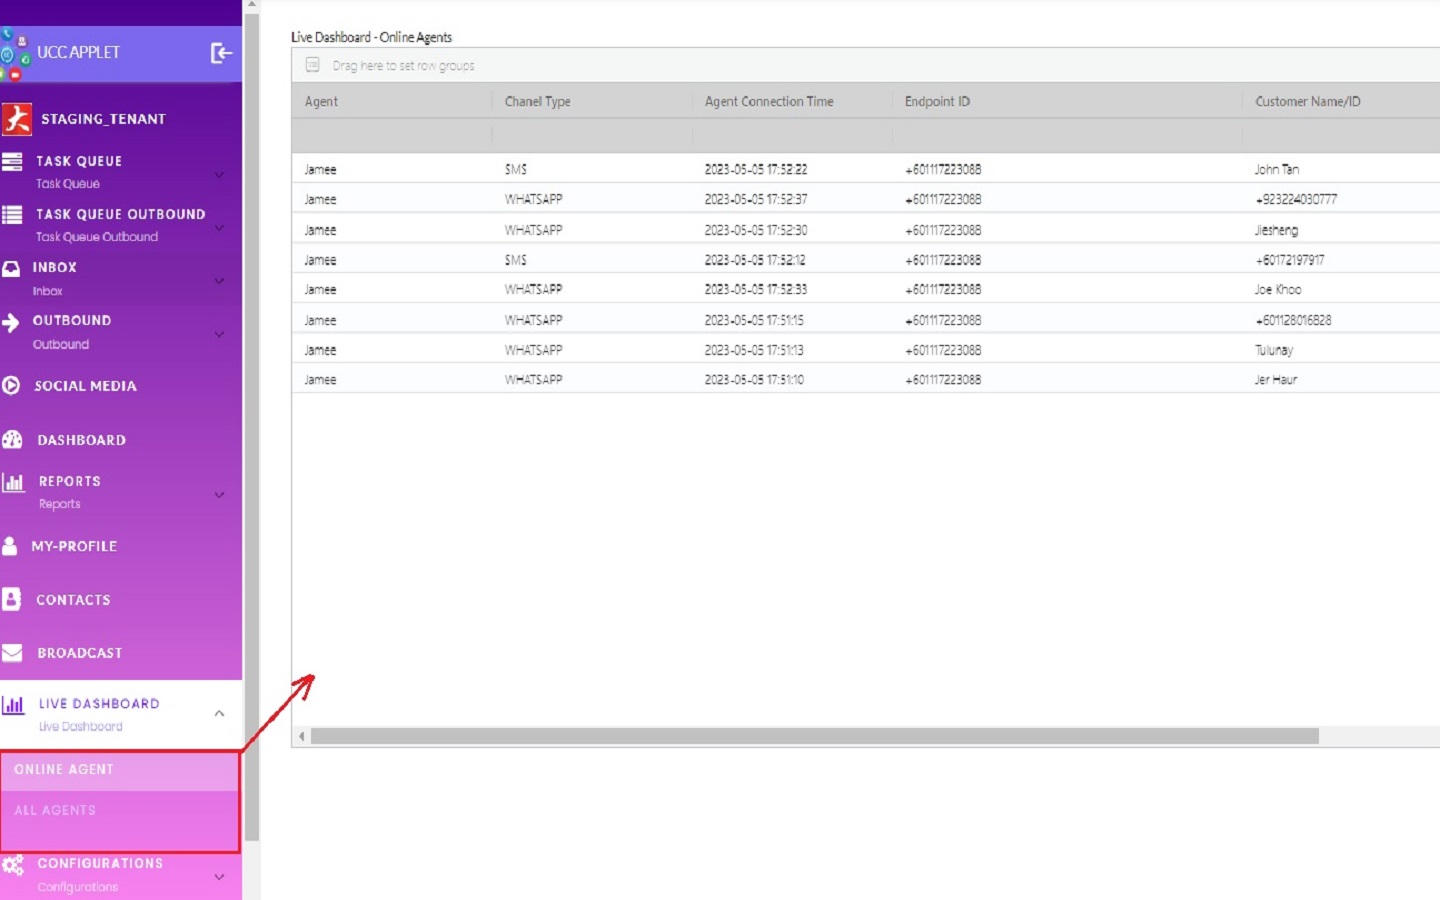
12.1 Online Agents
The Online Agents page presents a real-time view of all agents who are currently performing tasks such as answering conversations (messaging interactions), handling emails, or receiving voice calls and for how long.
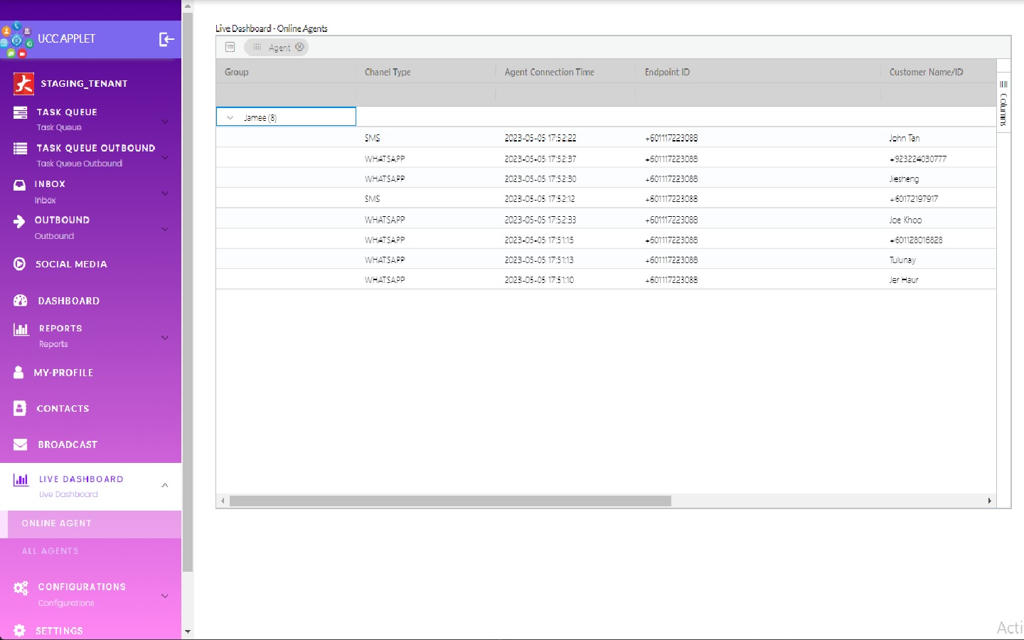
The interface includes powerful grouping functionality. By dragging the column headers highlighted in red to the grouping area, users can reorganize the data according to the contents of the dragged column.

In the screenshot below, the data has been grouped based on agent after the Agent column header was dragged to the grouping box above. This creates an organized view showing each agent and all their current tasks nested beneath them, making it easy to see each agent’s current workload at a glance.
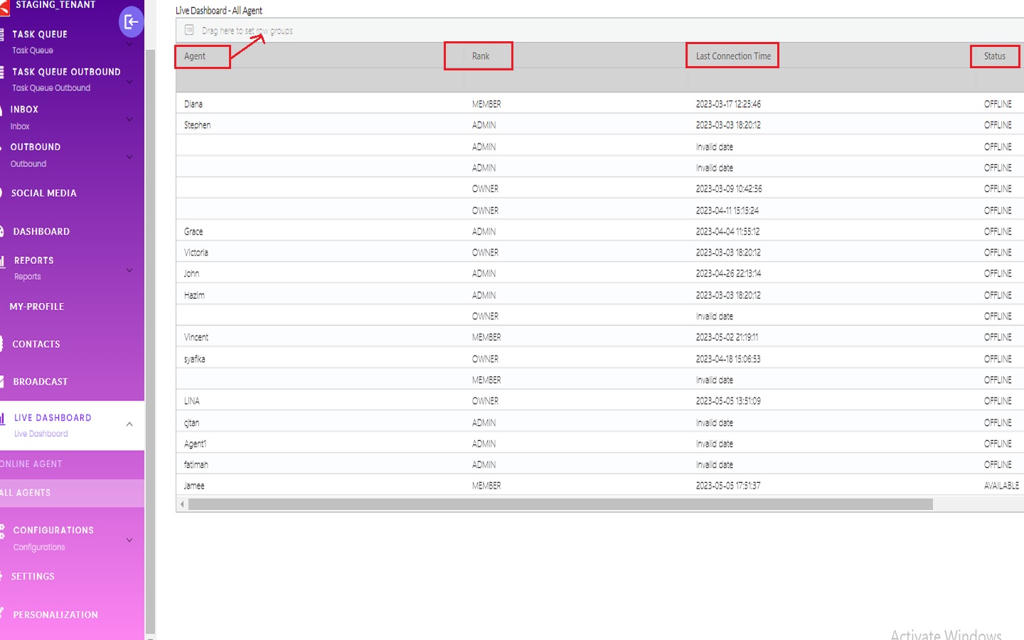
12.2 All Agents
The All Agents view shows every agent in the organization, together with their availability status:
- AVAILABLE
- OFFLINE
It also shows each agent’s last online time.
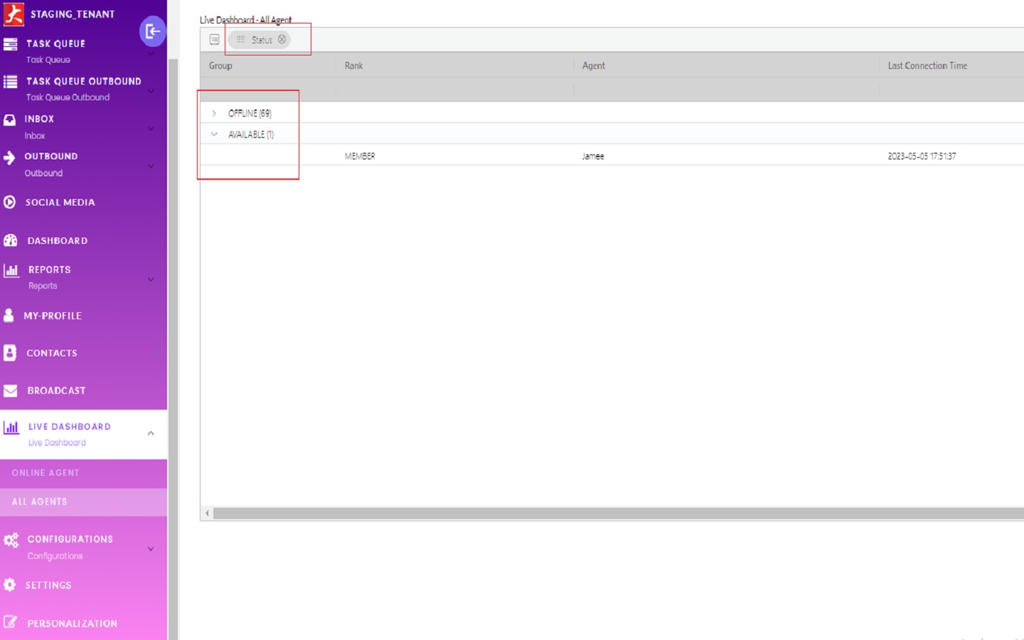
Grouping
This page also supports grouping. Drag any column header to the grouping bar to reorganize the list—for example, grouping by status to see all available and offline agents together.
The screenshot below shows the result after grouping—agents are organized in a hierarchical view that makes patterns immediately visible.
13. Task Router
The Task Router menu provides a technical view into the lifecycle of tasks as they move through the UCC system. It is separated into two main components representing live operations and historical records:
Router Queue: This contains all live, ongoing, and open tasks. When a new task is created, it appears here while waiting to be handled or while actively in progress. It represents the current, real-time state of work in the system.
Tasks: This serves as a comprehensive history table for all tasks that have been completed or closed. Once a task is finished, it moves from the
Router Queueto thisTaskslist. Here, you can review the full history of past work and audit the entire lifecycle of any interaction.
14. Configuration
The Configuration menu allows administrators and managers to set up the foundational elements of the UCC system, ensuring it aligns with organizational workflows and campaigns.
14.1 Projects
Projects are used to create and organize work around specific initiatives, such as marketing campaigns (e.g., “CNY Campaign”). You can assign specific agents and settlement details to a project, and configure settings like payment gateways and other links specific to that initiative.
14.2 Virtual Contacts
Virtual Contacts are used to create profiles and define the communication endpoints for your organization, such as WhatsApp, SMS, Voice, Email, and the web chat public profile. This setup defines how customers can reach you and identifies the “sender” identity for your outbound communications.
14.3 Teams and Skills
This section allows you to create teams and define the skills associated with them, which is critical for intelligent routing.
- Teams: Allows for the creation of teams, where each team can include multiple agents.
- Skills: Used to create skills that can be linked with a team. This allows the system to assign conversations that require specific skills to the most appropriate team.
14.4 Agents
The Agent menu is used for onboarding new customer support agents into the UCC system. This involves setting up their profiles and assigning them to relevant teams, projects, and skills.
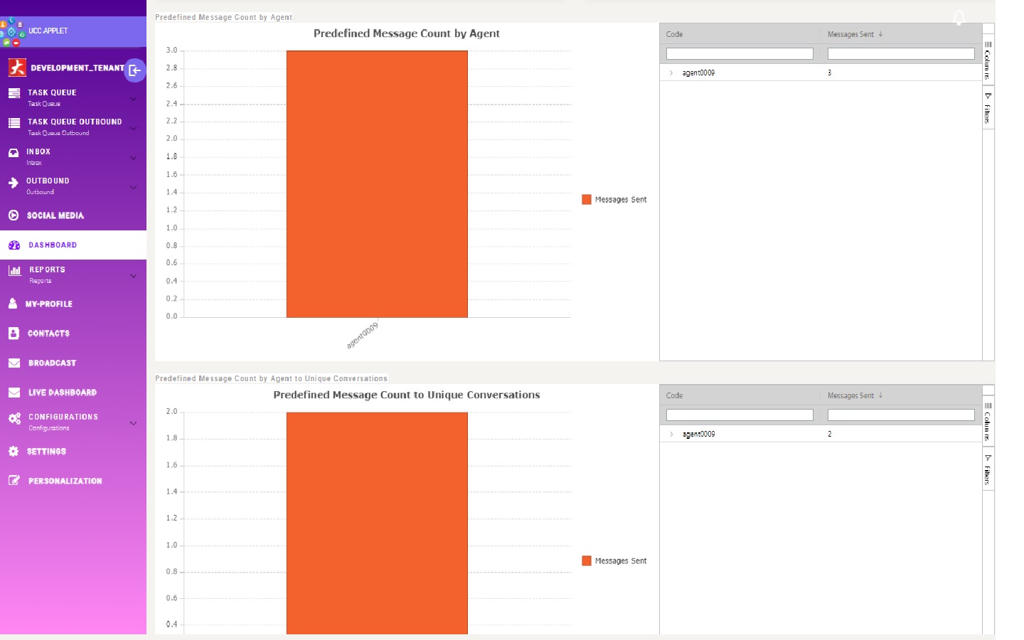
14.5 Predefined Messages
This is the configuration area where administrators can set up various Predefined Messages to standardize agent responses and improve efficiency. These message templates (e.g., for sending a thank you message after a purchase) are then made available to agents within the conversation interface.
14.6 QR Code
This is used to generate QR codes that can be attached to parcels or product packaging. When a customer scans the QR code (often linked to a keyword), it can initiate a conversation (primarily via the web chat feature) with the appropriate context, such as “Product Inquiry” or “Returns”.
Note
This QR code for product and parcel inquiries is distinct from the personal QR codes found in the My Profile section, which are used by customers to select a preferred agent.
14.7 Other Configurations
- Tasks: Configure task-related settings, workflows, and parameters that govern how inbound work is created, assigned, and managed through the system.
- Outbound Tasks: Set up configurations specific to outbound task management, including settings for proactive outreach campaigns and agent-initiated customer contacts.
- Automation Rule: Define automated behaviors that trigger based on specific conditions, helping streamline operations by automatically routing work, sending notifications, or taking actions without manual intervention.
- Rule: Configure conditional logic that determines when automation should occur, what criteria must be met, and how the system should evaluate different scenarios.
- Action: Set up specific actions that the system can take automatically, such as assigning tasks, sending messages, updating statuses, or triggering workflows.
Ready to Transform Your Customer Service?
The UCC Applet is more than just a messaging platform - it’s a complete customer engagement solution that will revolutionize how you interact with customers.