Opening Balance Migration Guide
Purpose
The opening balance process brings forward closing balances from your legacy accounting and inventory records into BigLedger. This ensures the new system reflects accurate stock levels, customer receivables, supplier payables, bank cash balances, and general ledger accounts from the exact day you transition into the new environment.
Note
Some final audited balances may only be available weeks after go-live. You can enter temporary balances and adjust them progressively using manual journal entries once finalized reports are issued.
Overview
Opening balance setup involves transferring existing data for the following five key areas:
| Step | Migration area | Purpose | Typical timing |
|---|---|---|---|
| 1 | Stock Balance | Record physical item quantities and cost values from the old system. | Before go-live |
| 2 | Customer Outstanding (AR) | Record unpaid customer invoices, credit notes, and advance deposits. | After go-live (temporarily disable e-invoice submission) |
| 3 | Supplier Outstanding (AP) | Record unpaid supplier bills, debit notes, and payment deposits. | After go-live (temporarily disable e-invoice submission) |
| 4 | Cashbook Balance | Establish starting cash and bank balances in active accounts. | After legacy bank reconciliations are finalized |
| 5 | General Ledger Balance | Record starting trial balance values (assets, liabilities, and equity). | After finalized previous months’ reports are completed |
The migration sequence
To maintain data integrity and prevent reconciliation discrepancies, you must perform opening balance imports in the following sequential order:
[1. Stock Balance] ──> [2. AR Outstanding] ──> [3. AP Outstanding] ──> [4. Cashbook Balance] ──> [5. GL Balance]Why this sequence is mandatory (data dependencies)
- Stock Balance First: Sets up physical inventory quantities and unit costs. This establishes your stock ledger valuation, which is a prerequisite for reconciling the inventory control account in the General Ledger.
- AR and AP Outstanding Second and Third: Creates historical customer and supplier invoice records. These documents are needed so that post-go-live payments and receipts can be matched and knocked-off against actual outstanding balances.
- Cashbook Balance Fourth: Establishes cash drawer and bank account starting balances. Reconciles the bank sub-ledger before consolidating into the General Ledger.
- General Ledger Balance Last: Inherits and consolidates the summary of all sub-ledgers. Any difference between sub-ledger totals and GL control accounts is easily identified and adjusted.
Before you fill in a template: how the file import reads your file
Steps 1, 2 and 3 all work the same way — you fill in a spreadsheet, upload it in the applet, and BigLedger turns each row into a document. Ten minutes here saves the afternoon most migrations lose to a file that comes back rejected five times for five different reasons.
The file is read by column name, not by position. Every value is looked up by its heading, so you can delete any column you are not using and leave the rest in any order. The templates ship with between 60 and 135 columns; an opening balance needs about ten of them, and deleting the other hundred changes nothing.
A heading BigLedger does not recognise fails the whole file before a single row is read. The upload
checks the first row twice — once for headings that must be there, once for headings that should not exist —
and reports ===> Wrong Columns: [...] and ===> Mandatory Columns Missing: [...]. No documents are
created. The cause is almost never a typo in the data: it is a spare column your team used for working
notes, a heading someone rewrote into something friendlier, or the empty column Excel leaves to the right
of a pasted range. Headings are matched exactly as printed, in capitals, so Branch_Code is both a wrong
column and a missing mandatory one and you get both messages at once.
Which headings must be present depends on the document type, and the differences are not obvious from the templates:
| Upload into this applet | Headings the file must contain |
|---|---|
| Purchase Invoice (Internal) — opening stock, supplier bills | BRANCH_CODE, TXN_DATE, HDR_REF_NO, SETTLEMENT_OR_ITEM_CODE, QTY |
| Sales Invoice (Internal) — customer invoices | BRANCH_CODE, TXN_DATE, HDR_REF_NO, SETTLEMENT_OR_ITEM_CODE, QTY |
| Sales Credit Note (Internal) | those five plus LOCATION_CODE, DOC_CURRENCY, AMOUNT_INCL_TAX |
| Purchase Debit Note (Internal) | those five plus LOCATION_CODE, DOC_CURRENCY, AMOUNT_INCL_TAX |
| Receipt Voucher (Internal) | BRANCH_CODE, TXN_DATE, HDR_REF_NO, DOC_CURRENCY, SETTLEMENT_OR_ITEM_CODE, AMOUNT_INCL_TAX — and no QTY |
| Payment Voucher (Internal) | BRANCH_CODE, TXN_DATE, HDR_REF_NO, DOC_CURRENCY, SETTLEMENT_OR_ITEM_CODE, AMOUNT_INCL_TAX — and no QTY |
ENTITY_CODE is on none of those lists, and that is the trap worth knowing about. A customer or
supplier file whose entity column was renamed, or lost in a copy-paste, passes the header check and
imports. The step that attaches customers and suppliers to the imported documents skips every row with no
entity code, so you end up with outstanding documents that nobody owes — and unlike the other four
failures, this one looks like success. Check the entity column is named ENTITY_CODE before you upload,
not after.
Choose the right delimiter, and check the file you were given
The upload asks you which separator the file uses — comma, pipe, semicolon or tab — and it does not guess.
Several templates ship in more than one flavour, and at least one is pipe-separated despite a name ending
in .csv: MasterData_Upload_InternalPurchaseDebitNoteData.csv is the Purchase Debit Note template used
in Step 3. Open it in a text editor before you start work on it. Upload a pipe file as a comma file and the
entire heading row is read as one column, so every mandatory heading is reported missing and the whole row
comes back as a wrong column — an alarming error message with a one-click cause.
AMOUNT_INCL_TAX beats UNIT_PRICE_INCL_TAX × QTY, silently
When a line carries both an amount and a unit price, the amount wins and the unit price is ignored. That
is why neither column is mandatory on the two invoice imports — either route produces a line value — and why
AMOUNT_INCL_TAX is mandatory on notes and vouchers, which have no quantity to multiply.
It also produces one of the harder opening-balance discrepancies to spot. On the Step 1 stock upload you
fill in QTY and UNIT_PRICE_INCL_TAX. If the template you are editing still has an AMOUNT_INCL_TAX
column carrying a figure from the legacy export, the stock value booked is that amount, not quantity ×
unit cost — the quantity on hand is right, the valuation is not, and nothing warns you. Delete the amount
column from the stock file.
POSTING_STATUS is read once per document, from its first line, and must be exactly FINAL
Every one of the six imports accepts a POSTING_STATUS column, and what it does is worth understanding
before Step 1 rather than after Step 3:
- Blank means
DRAFT. The documents are created and nothing is posted; you finalise them by hand in the applet, one at a time. FINALruns the real finalise, the same path as clicking FINAL on the screen — so stock moves, journals post, receivables appear. For a 22-branch stock load this is the difference between an afternoon and a week, and the Step 1 procedure below (import as draft, then click FINAL) is the manual alternative, not the only route.- The value is taken from the first line of each document only. On a multi-line invoice, a
POSTING_STATUSon line 2 or 3 does nothing at all. - The comparison is case-sensitive.
Finalorfinalis stored as written and never posts, and no error is raised anywhere — the documents simply sit unposted looking like a draft you forgot.
Warning
After a large import, filter the applet list for DRAFT rather than trusting the import’s own status.
A document is finalised only once its running number has been allocated, and the sales invoice import
polls for that number ten times before moving on to the next document without finalising it and without
recording an error. Under a big load a handful of documents can stay in draft while the file reports
success — and a draft invoice is missing from every receivables figure you are about to reconcile.
Where your legacy document number goes
The number you put in HDR_REF_NO becomes the imported document’s Reference, not its document number.
BigLedger allocates its own running number to every document it creates, so an invoice you migrated as
INV-2024-8891 will be listed under a BigLedger number with INV-2024-8891 in the reference field. This is
the first question most teams ask after go-live — “where has my invoice gone?” — and the answer is to
search the reference, not the document number. It is also why HDR_REF_NO is mandatory on all six imports:
without it there is nothing tying the new document back to the record your customer is looking at.
Step-by-step migration process
Stock balance upload
- Purpose: Import item quantities and cost values from the legacy system into BigLedger.
- Timing: Perform this process before go-live, after confirming physical stock counts.
- Preparation:
- Create a vendor named
ONE TIME SUPPLIERin the Supplier Applet. - Export the item balance report from the old system separately for each branch or warehouse location.
- Ensure item codes in your import CSV match the newly configured item codes in BigLedger exactly.
- For serialized items, prepare a single cell containing comma-separated serial numbers, matching the physical quantity.
- Create a vendor named
What to put in the stock upload template
Start from the Purchase Invoice (Internal) template and fill in these columns; delete the rest. The
separator, the header rules and the POSTING_STATUS behaviour are all described in
how the file import reads your file
above.
- One row per item per branch.
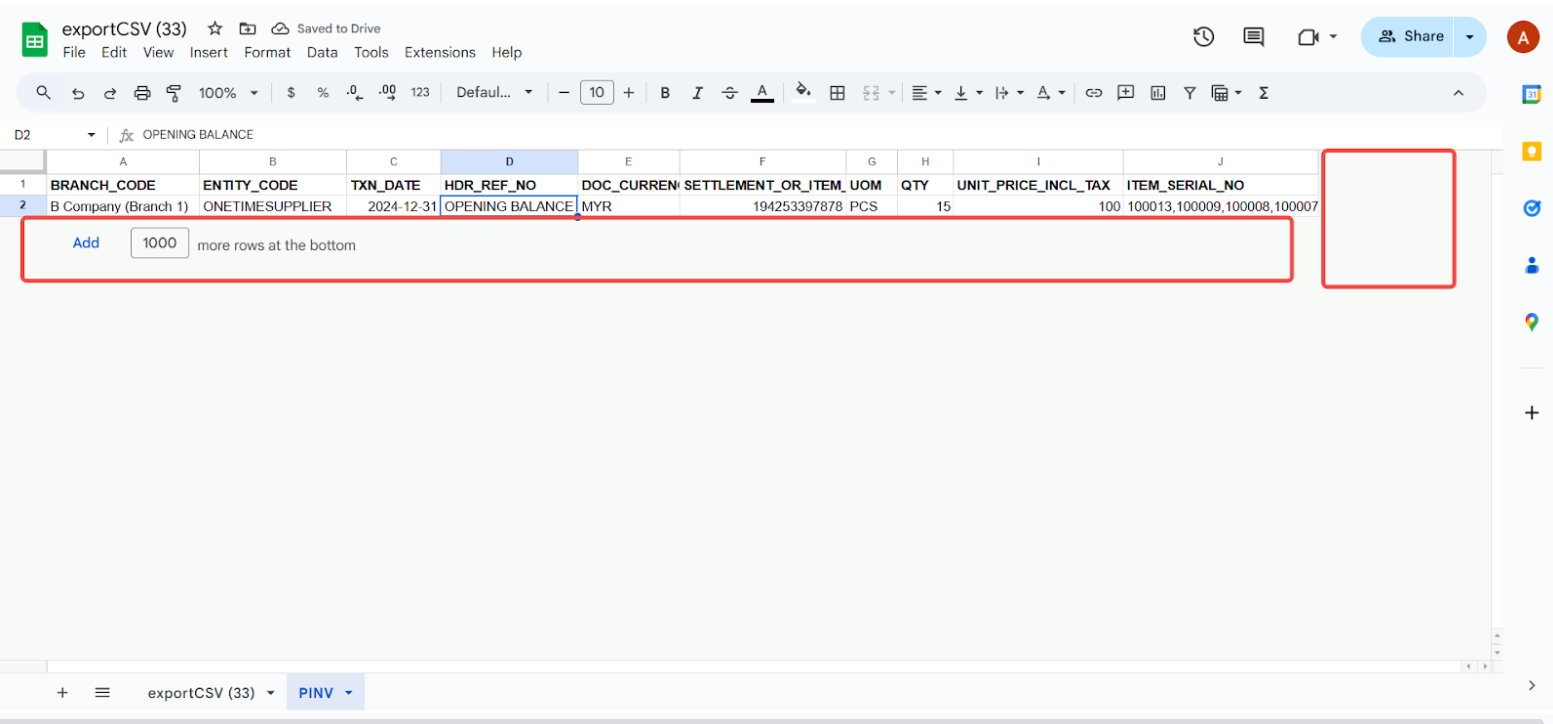
BRANCH_CODEis the destination branch — take it from the branch listing in the Organisation applet rather than from memory. The upload check only looks at the heading, so a wrong code gets through it and shows up later in the error column of the imported file, not at the top as a rejection. ENTITY_CODEisONE TIME SUPPLIER— the one-off vendor you created in preparation. Opening stock has to arrive from somebody, and this is the supplier the stock is “bought” from so the entry has a counterparty that will never appear in a real creditor report.TXN_DATEis your stock cutoff date, the same date on every row (2024-12-31in this guide).HDR_REF_NO— useOPENING BALANCE. It becomes the reference on the purchase invoice BigLedger creates, which is what makes the opening entry recognisable on a supplier ledger a year from now.SETTLEMENT_OR_ITEM_CODEis the BigLedger item code, andUOMthe unit of measure exactly as it is spelled in your item master.QTYis the counted quantity andUNIT_PRICE_INCL_TAXthe unit cost. Delete anyAMOUNT_INCL_TAXcolumn — if it carries a value it overrides quantity × unit cost and your stock valuation will be wrong while the quantity looks right.ITEM_SERIAL_NOonly for serialised items: one cell, serial numbers separated by commas, and as many of them as the quantity says.
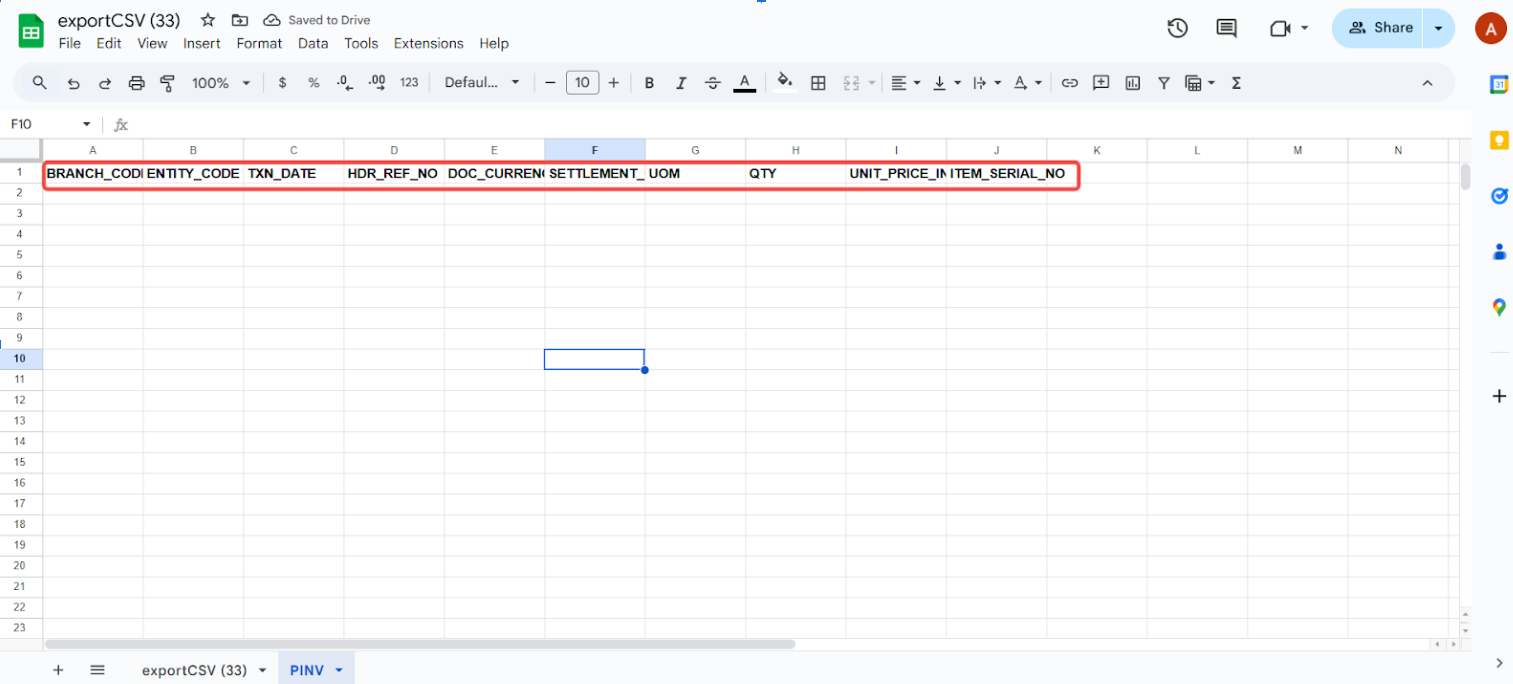
Updating the purchase invoice template
Branch code, transaction date, currency, HDR reference and entity code:
- Enter the branch code (check the correct branch code from the Organisation Applet branch listing).
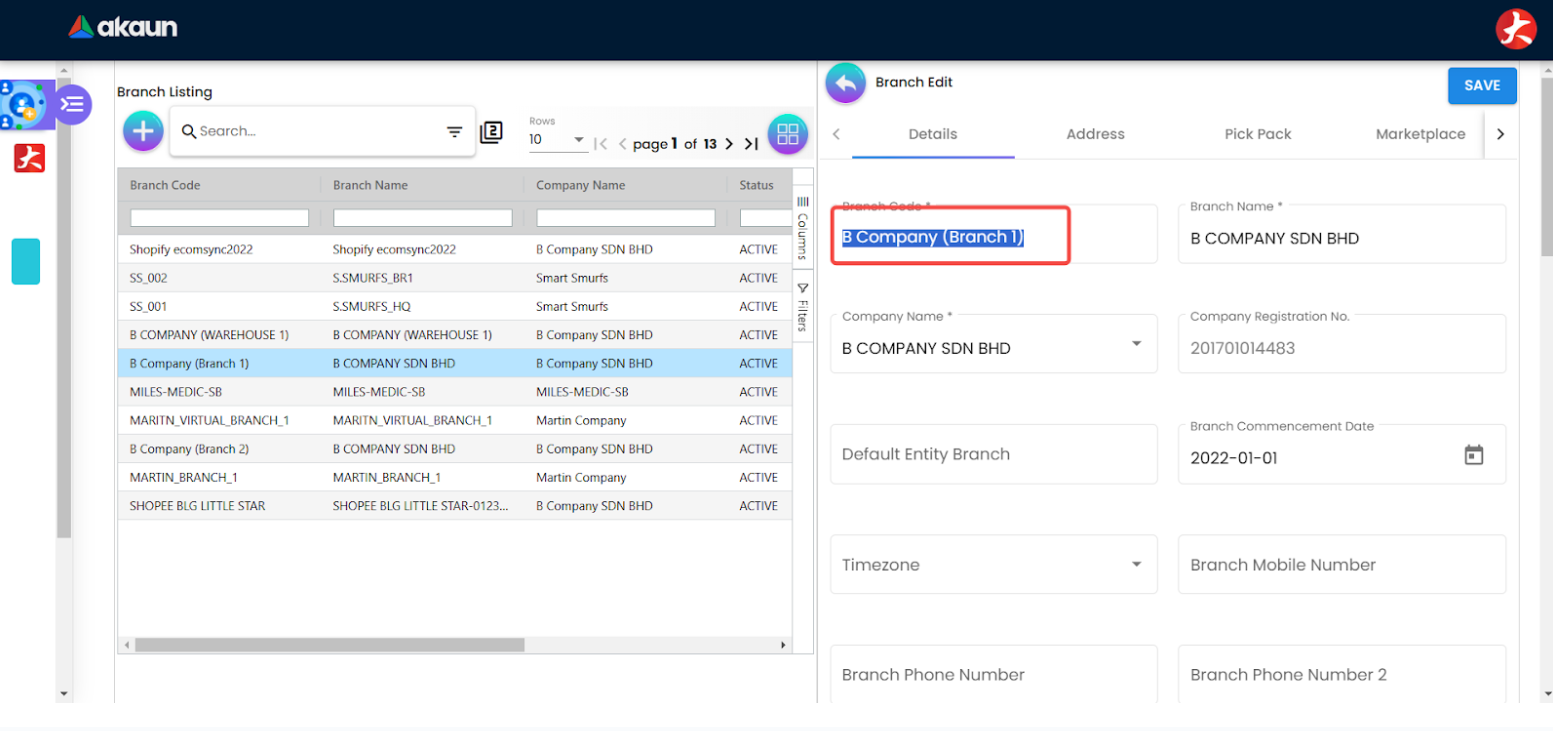
- Set the transaction date to
2024-12-31. - Enter
OPENING BALANCEfor the HDR Reference. - Enter
MYRfor the currency column. - Enter
ONE TIME SUPPLIERfor the Entity Code (ensure the supplier is created in the Supplier Applet first). - Enter the UOM based on your Item list in BigLedger (e.g.,
PCS,UNIT).
The capture that sat here was withdrawn: it showed an item listing whose Updated By column carried staff e-mail addresses on every row. A recapture from a synthetic demo tenant is on the list.
Item details:
- Update the following columns by copying from the legacy system reports to the Purchase Invoice template:
- Item Code
- Quantity
- Serial Number (use a comma
,to separate multiple serial numbers in one cell) - UNIT_PRICE_INCL_TAX
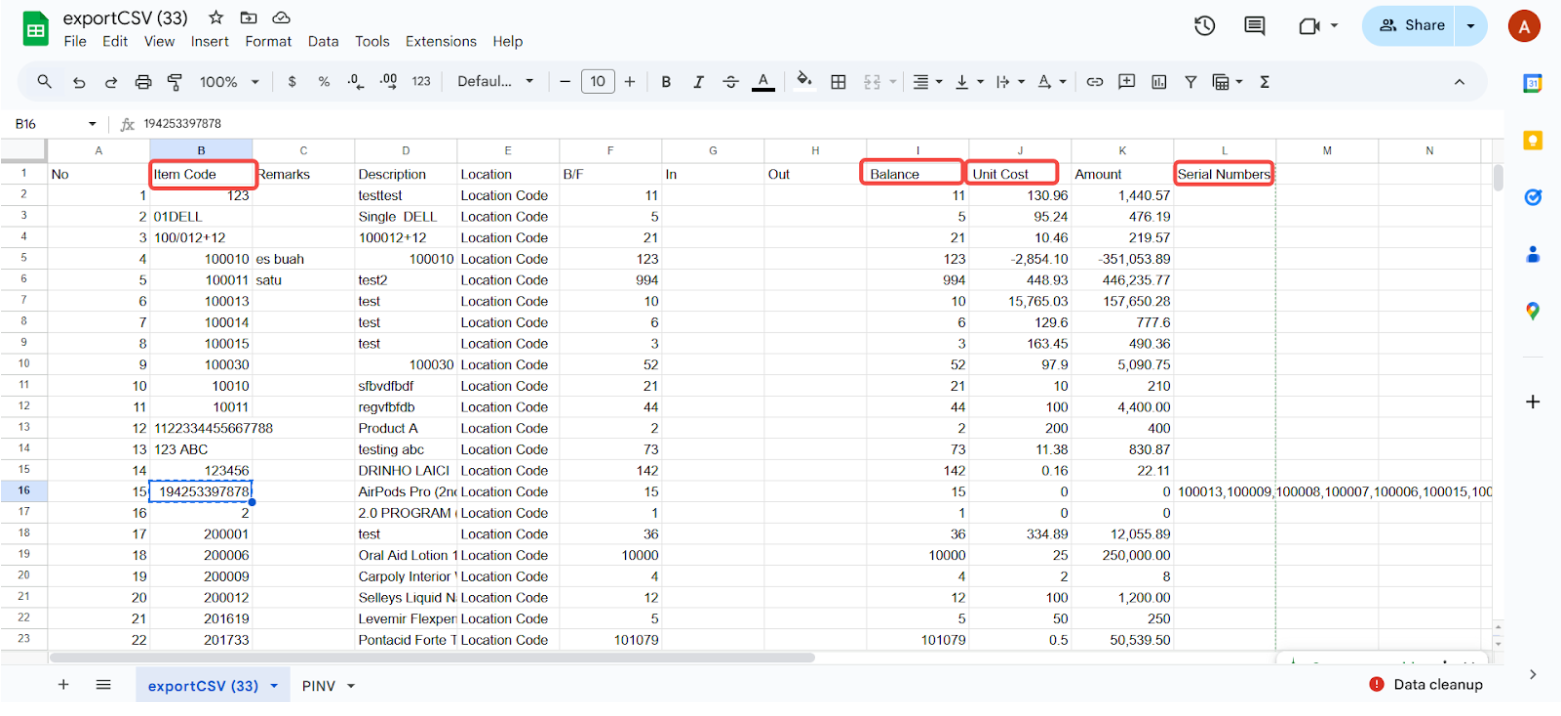
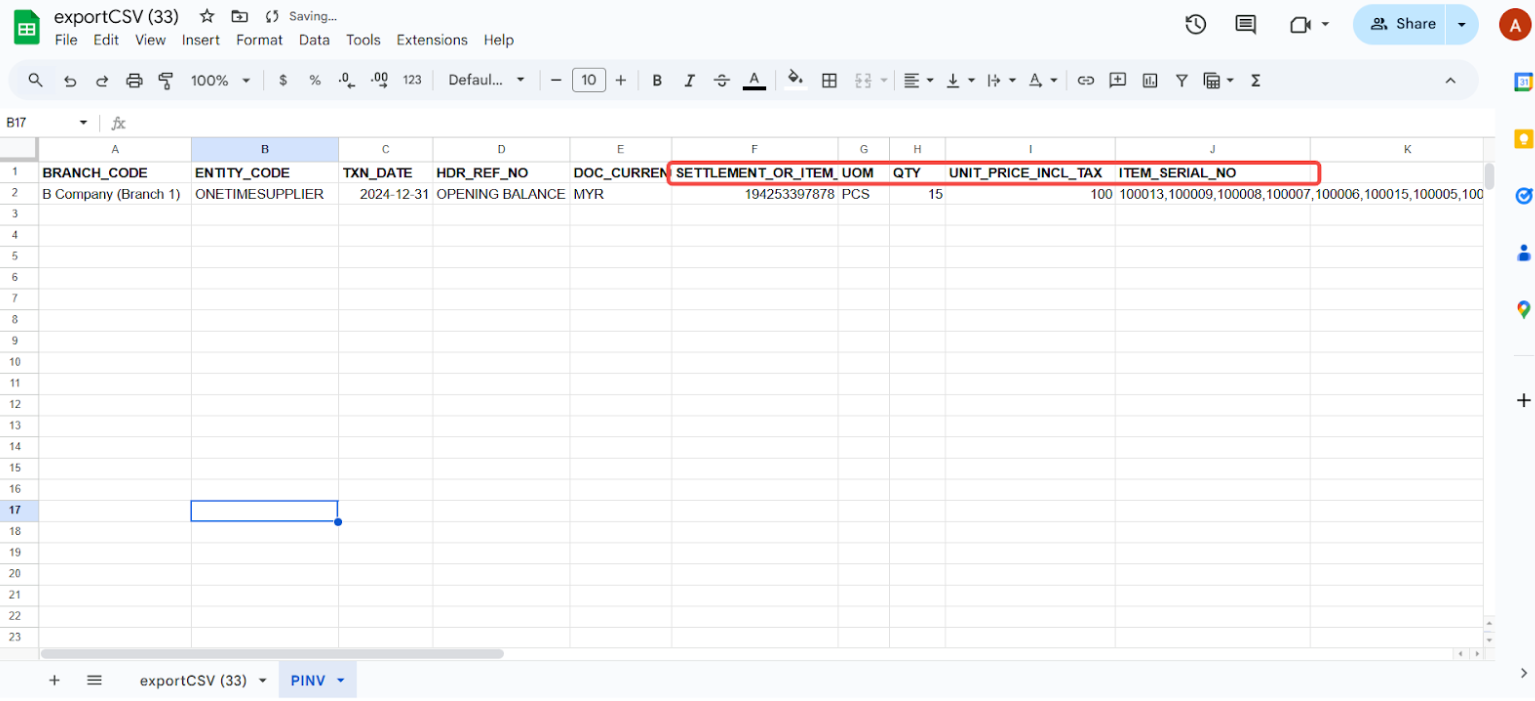
Finalizing the purchase invoice upload file
Validate data:
- Ensure all headers, quantities, costs, and serial numbers are accurate.
- Delete any extra or blank columns — an unnamed column left behind by a spreadsheet is reported as a wrong column and fails the whole file before any row is read.
Export and import to BigLedger:
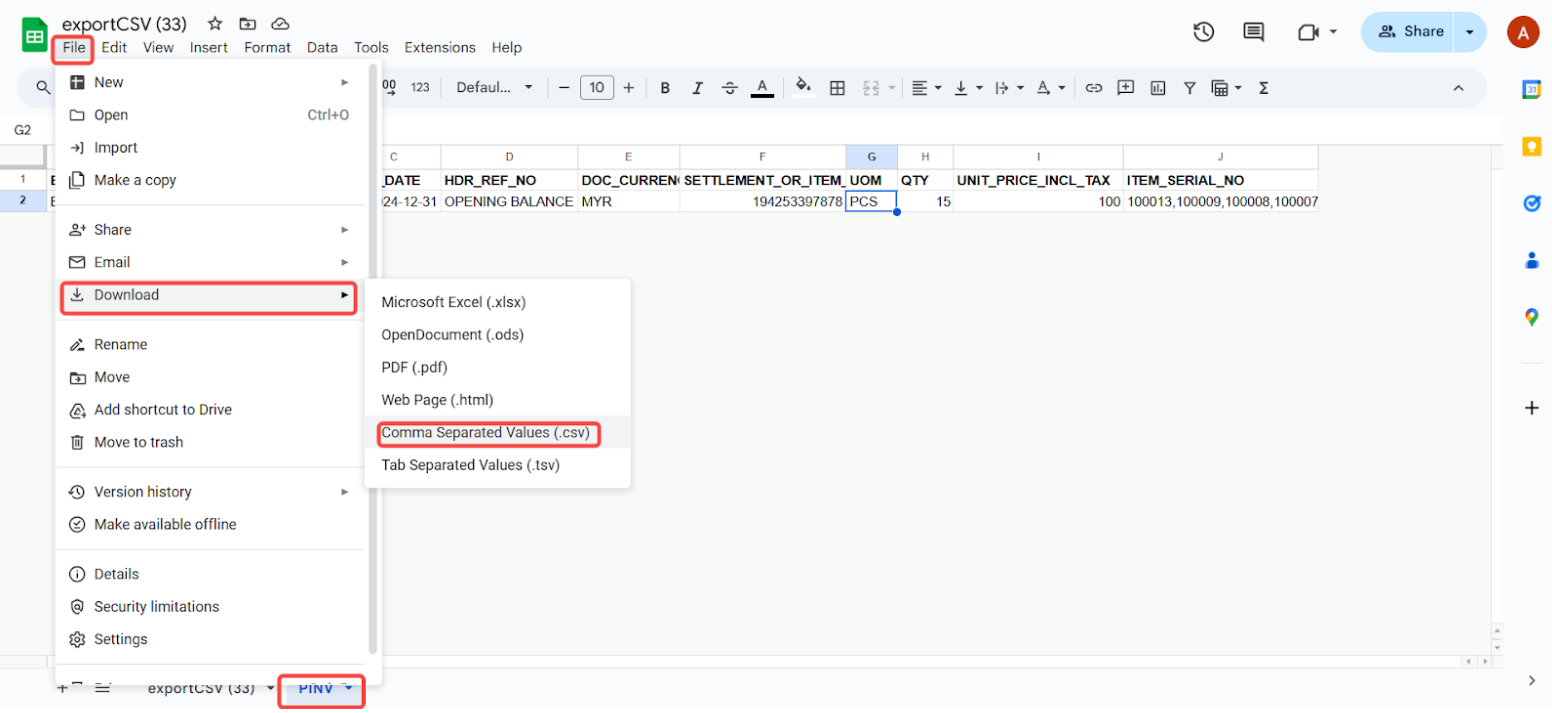
- Export as CSV: Download the updated template as a CSV file.
Executing the stock import
- Open the Purchase Invoice (Internal) Applet.
- Click Import File, click the + button, drag your prepared CSV file, and click submit.
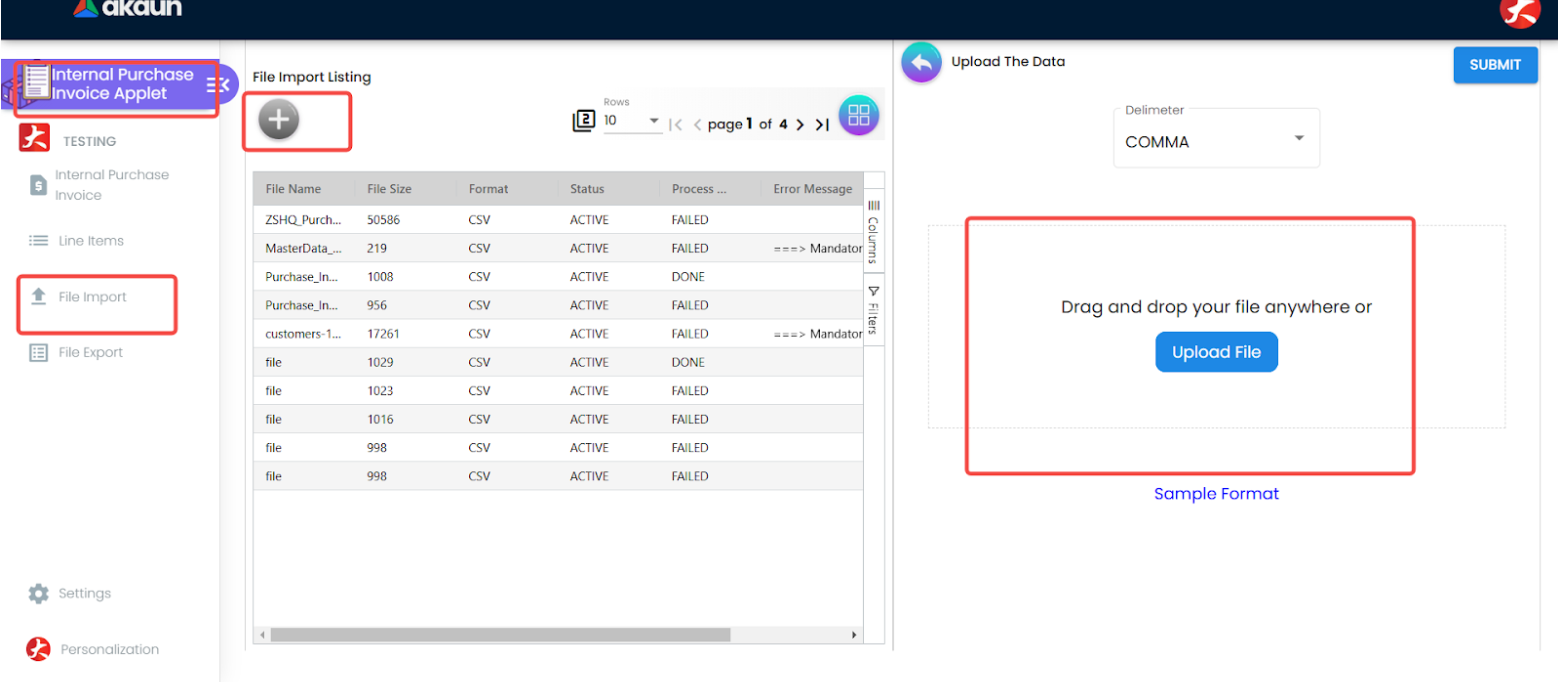
Upload the CSV file in the Purchase Invoice (Internal) Applet. - Check for errors by clicking into the imported file list. A status of
truemeans uploaded successfully;falseindicates errors. Scroll right to read the red error messages.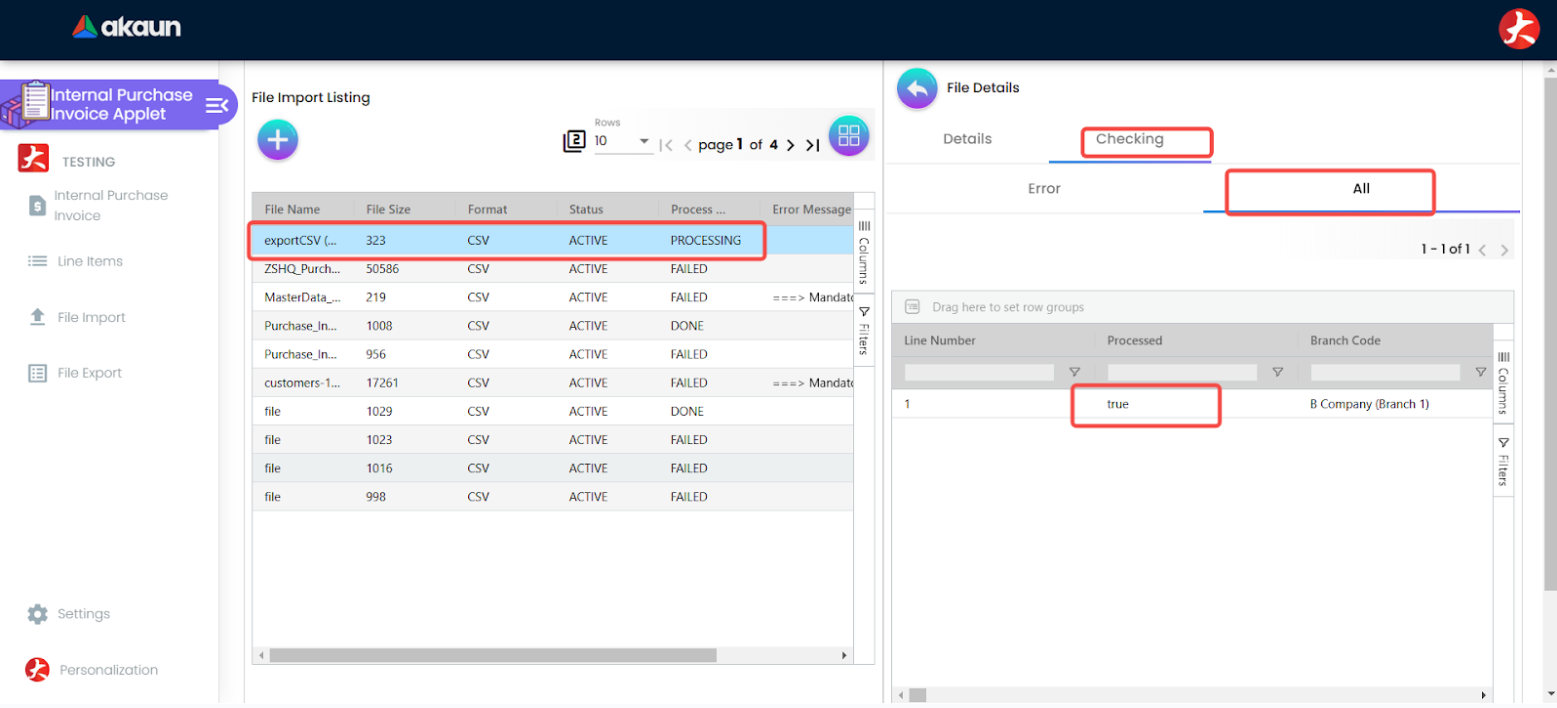
Check status and resolve errors in the import log. - Go to the Purchase Invoice (Internal) menu list. The imported data will be saved as
DRAFT. - Click into the draft document, verify line details, and click FINAL to post the stock opening balances.
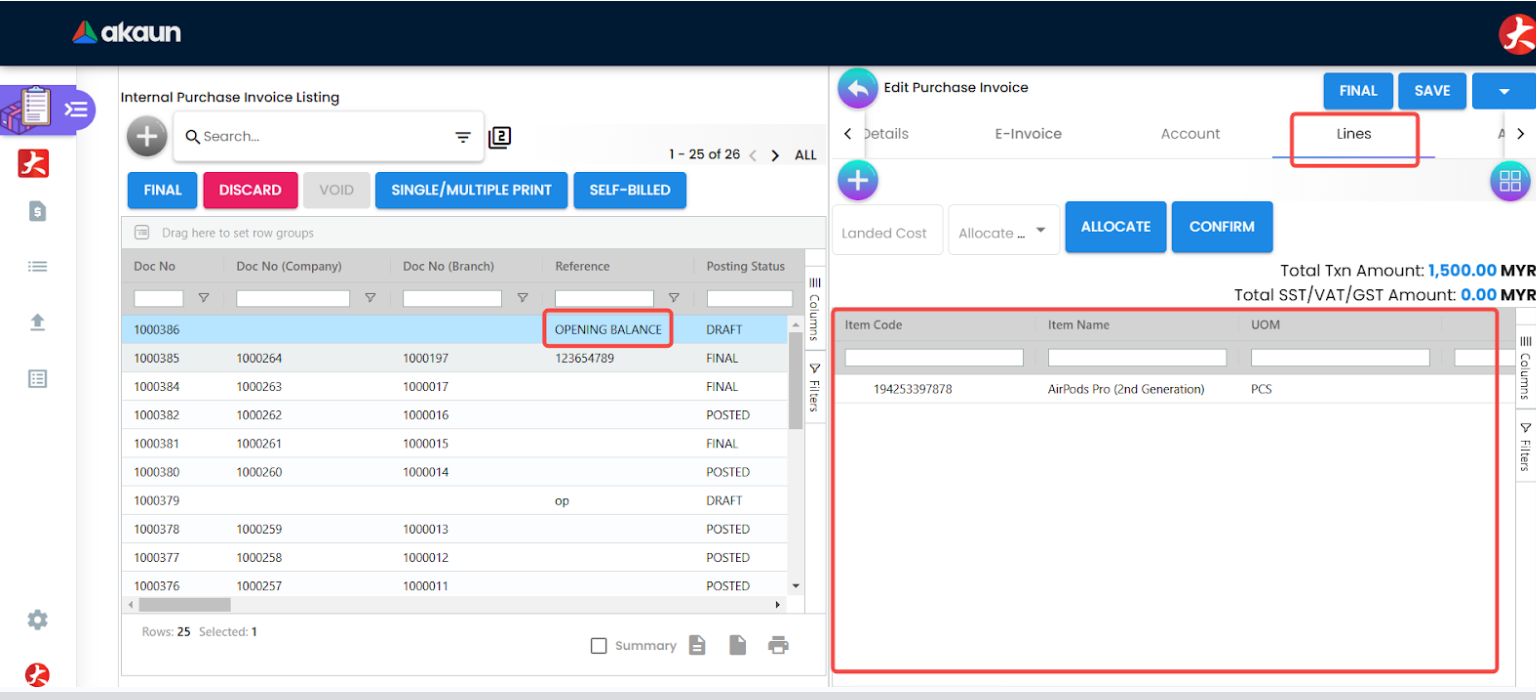
Review details and click Final to commit stock balances.
Post-upload verification
- Open the Stock Availability applet and filter by branch to verify that quantities and cost valuations match your legacy stock reports. The Purchase Invoice (Internal) is the document that books stock (quantity signum +1) — a plain Purchase GRN would record the receipt without moving stock, which is why this procedure uses the invoice.
Common mistakes
- A leftover
AMOUNT_INCL_TAXcolumn. The quantities are right, the valuation is not, and there is no error — the amount silently overrides quantity × unit cost. This is the one to check first when opening stock value does not agree with the legacy report but the quantities do. - Mismatched item codes. An item code that does not exist fails its row, not the file, so the import reports a partial success and you have to read the error column to find out which rows never arrived.
- Serial number count. The number of comma-separated serials in
ITEM_SERIAL_NOhas to equalQTYexactly. - Wrong UOM.
PCSandpcsare not the same string to your item master.
Customer outstanding (AR) balance upload
- Purpose: Bring forward unpaid customer invoices, credit notes, and advance deposits. This allows post-go-live customer receipts to be knocked-off against historical documents.
- Timing: After go-live, after temporarily disabling e-invoice submission.
- Preparation:
- Go to the Organisation applet, open the company, and on the E-Invoice tab set E-Invoice Status to
DISABLEDfor the duration of the import. A document finalised while the company isDISABLEDis never queued for MyInvois submission — not even retrospectively when you switch it back on — so the opening balance invoices stay out of the tax authority’s hands.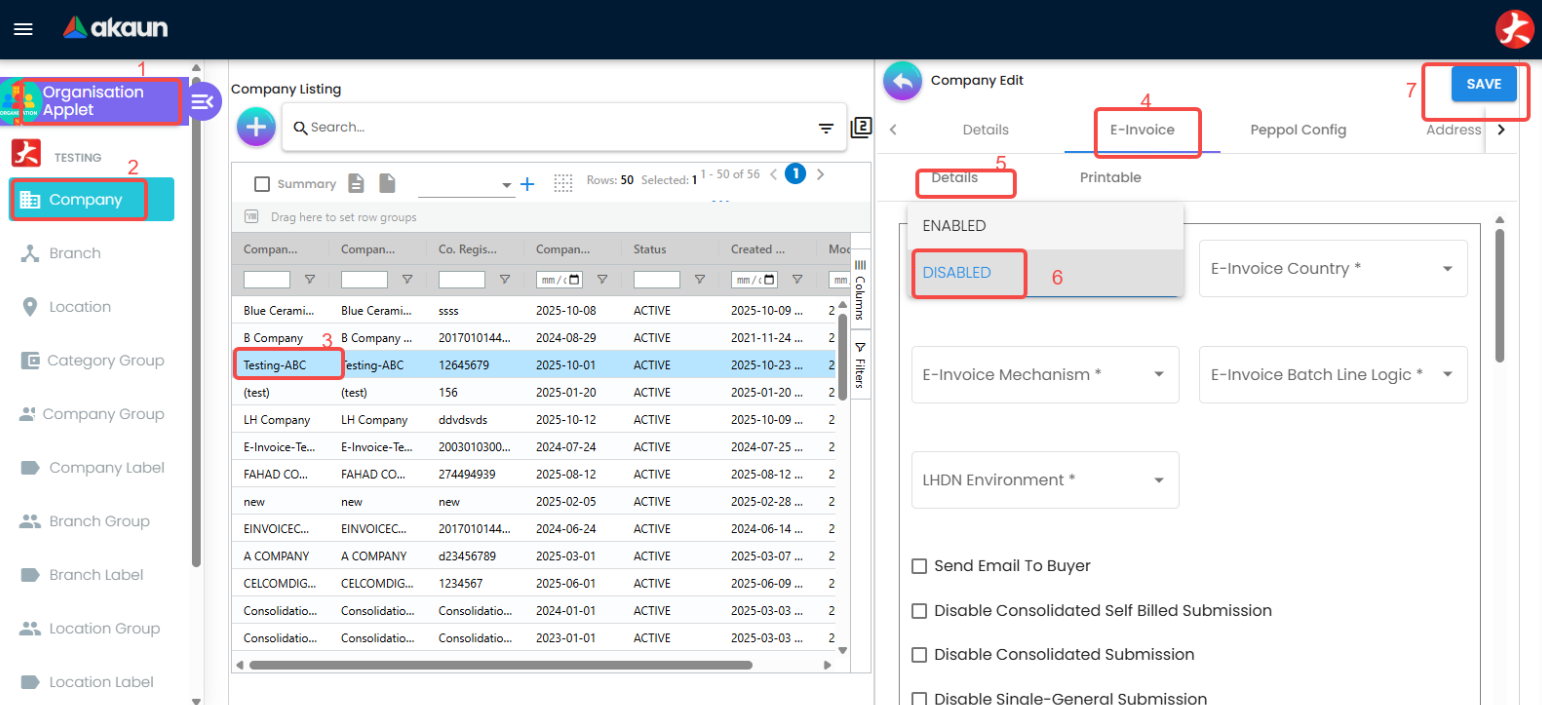
Disable e-invoice submissions before importing outstanding documents. - Create a service-type item named
OPENING BALANCEin the Doc Item Maintenance Applet. - Create a temporary
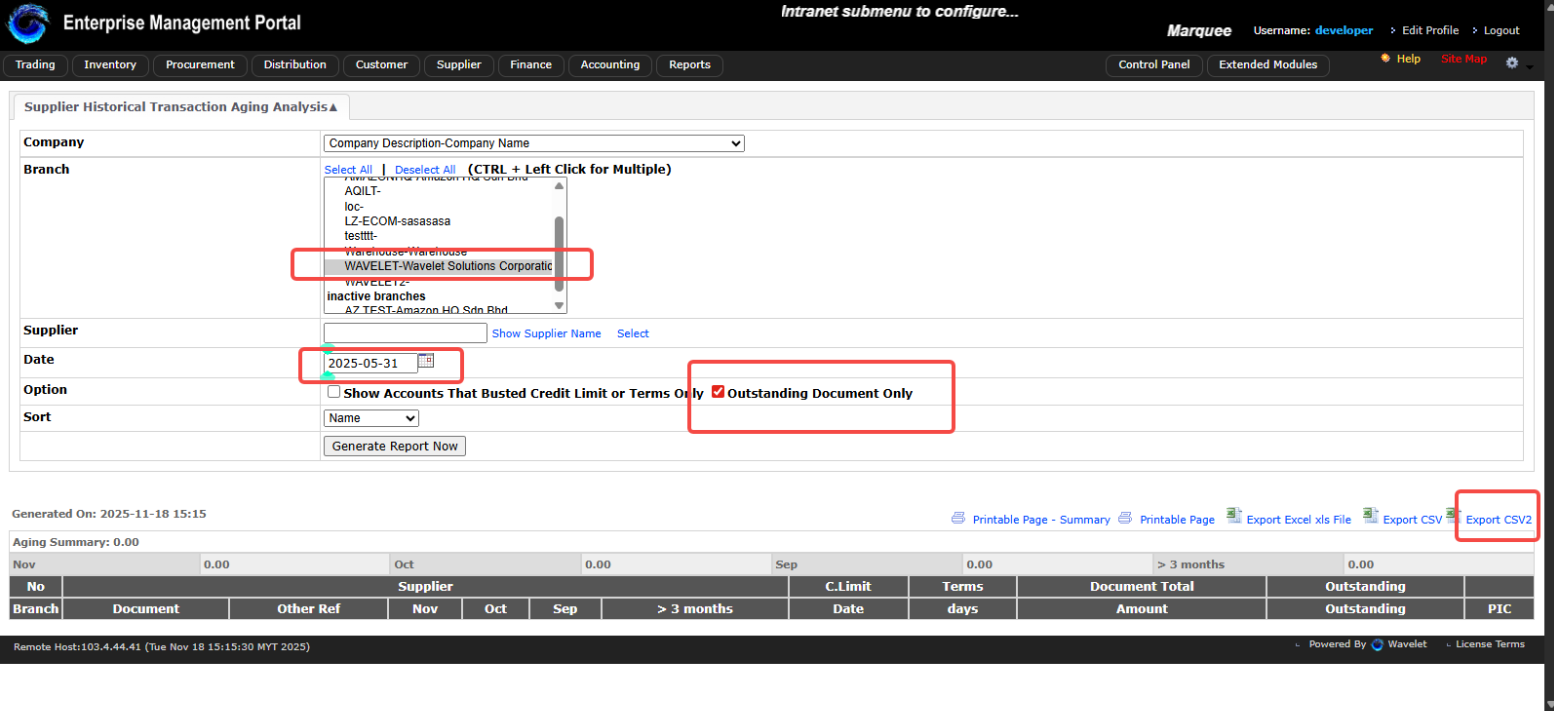
Opening Cashbookand settlement method in the Cashbook Applet to handle receipt voucher offsets. - Export legacy aging data (e.g., CC-07 Historical Transaction Aging Analysis aging reports) to a CSV file.
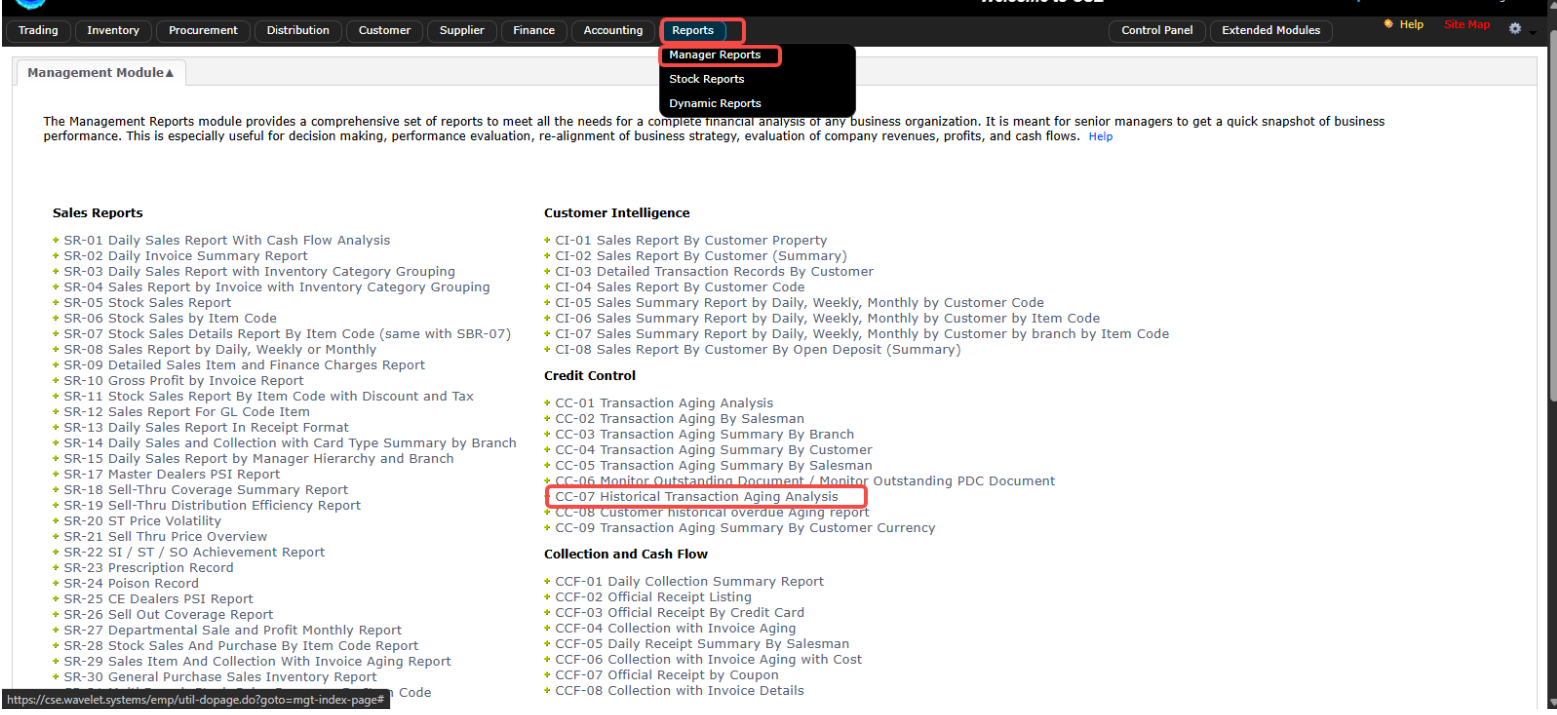
Export the historical aging report from the legacy system (Step 1). 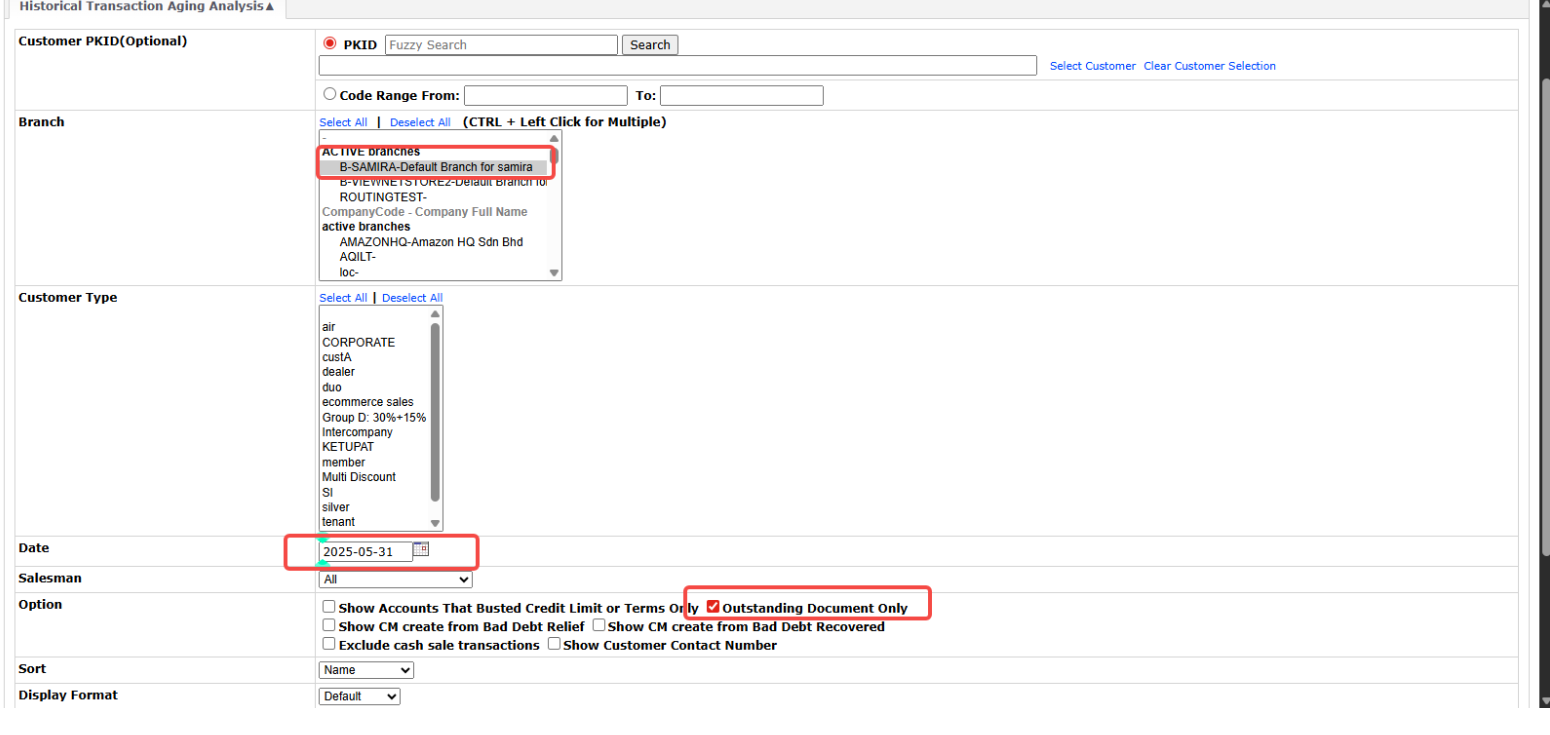
Choose the cutoff date (Step 2). 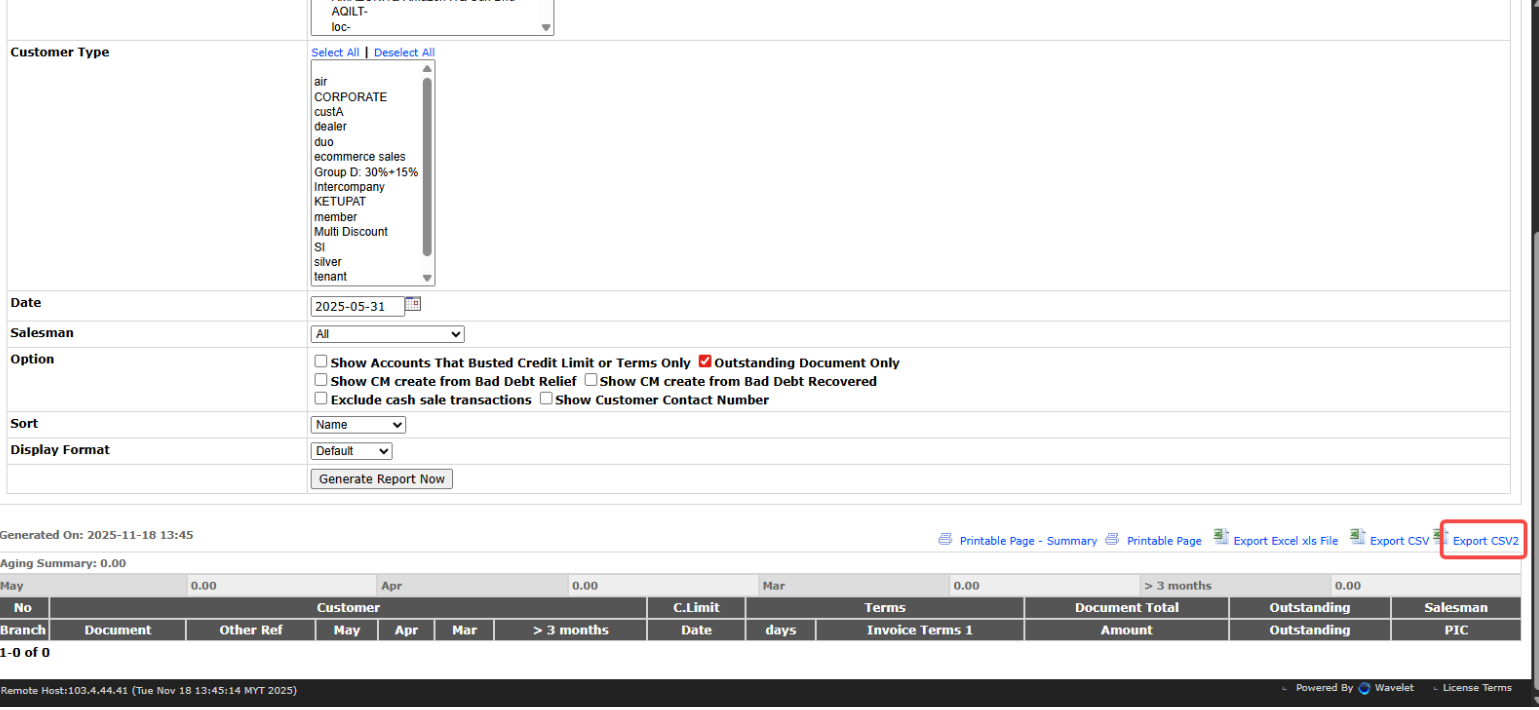
Export to CSV2 format (Step 3).
- Go to the Organisation applet, open the company, and on the E-Invoice tab set E-Invoice Status to
Data filtering and separation
Filter your legacy customer outstanding spreadsheet and split it into three separate tabs or CSV files:
- Sales Invoices: To be uploaded to the Sales Invoice (Internal) Applet.
- Sales Credit Notes: To be uploaded to the Internal Sales Credit Note Applet.
- Receipt Vouchers (unapplied customer prepayments): To be uploaded to the Receipt Voucher (Internal) Applet.
The capture that sat here was withdrawn: it showed a tenant’s transaction-aging export - roughly 9,400 rows of real receivables data, with customer codes, document numbers, dates, outstanding amounts and salesman identifiers. A recapture from a synthetic demo tenant is on the list. The capture that sat here was withdrawn: it showed the same aging export with the masking incomplete, exposing a customer code, a person’s full name and a receipt number. A recapture from a synthetic demo tenant is on the list.
What to put in the customer outstanding templates
All three files share the same shape: one row per outstanding document, the outstanding balance as the amount, and a service item standing in for whatever was originally sold. You are not re-creating the original invoices — you are re-creating what is still owed on them.
HDR_REF_NOis the original legacy document number. It becomes the imported document’s reference, and it is the only thing your customer and your collections team can both recognise, so get it right even on the rows you are tempted to rush.TXN_DATEis the original document date, not the cutoff date. Ageing is calculated from it, so a migration that dates everything2024-12-31reports a healthy ledger with nothing overdue on the first morning — and the ageing report is the first thing anyone opens.ENTITY_CODEis the customer code as it exists in BigLedger. Every customer must already be created; the header check will not catch a missing one and the row will simply carry no customer.SETTLEMENT_OR_ITEM_CODEis theOPENING BALANCEservice item on invoices and credit notes, and theOpening Cashbooksettlement method on receipt vouchers.QTYis1andAMOUNT_INCL_TAXis the outstanding balance — positive on every file, including credit notes and receipt vouchers. The document type carries the sign; a negative amount on a credit note reverses it into an invoice. If your legacy export has credits as negatives, wrap the column in=ABS(...)before you export.- Leave
UNIT_PRICE_INCL_TAXempty, or delete the column. When both are present the amount wins and the unit price is quietly ignored, which makes a line whose figures disagree with each other. POSTING_STATUSisFINALif you want the import to post; blank leaves everything in draft for you to review and finalise by hand. See the warning above about checking for drafts afterwards either way.
The credit note file additionally needs a LOCATION_CODE heading and a DOC_CURRENCY heading, which the
invoice file does not — they are in the mandatory list above, and leaving them out fails the whole file.
Executing the customer outstanding import
- Open the respective applet (e.g., Sales Invoice (Internal) Applet, Internal Sales Credit Note Applet, or Receipt Voucher (Internal) Applet).
- Click Import File and upload your prepared CSV file.
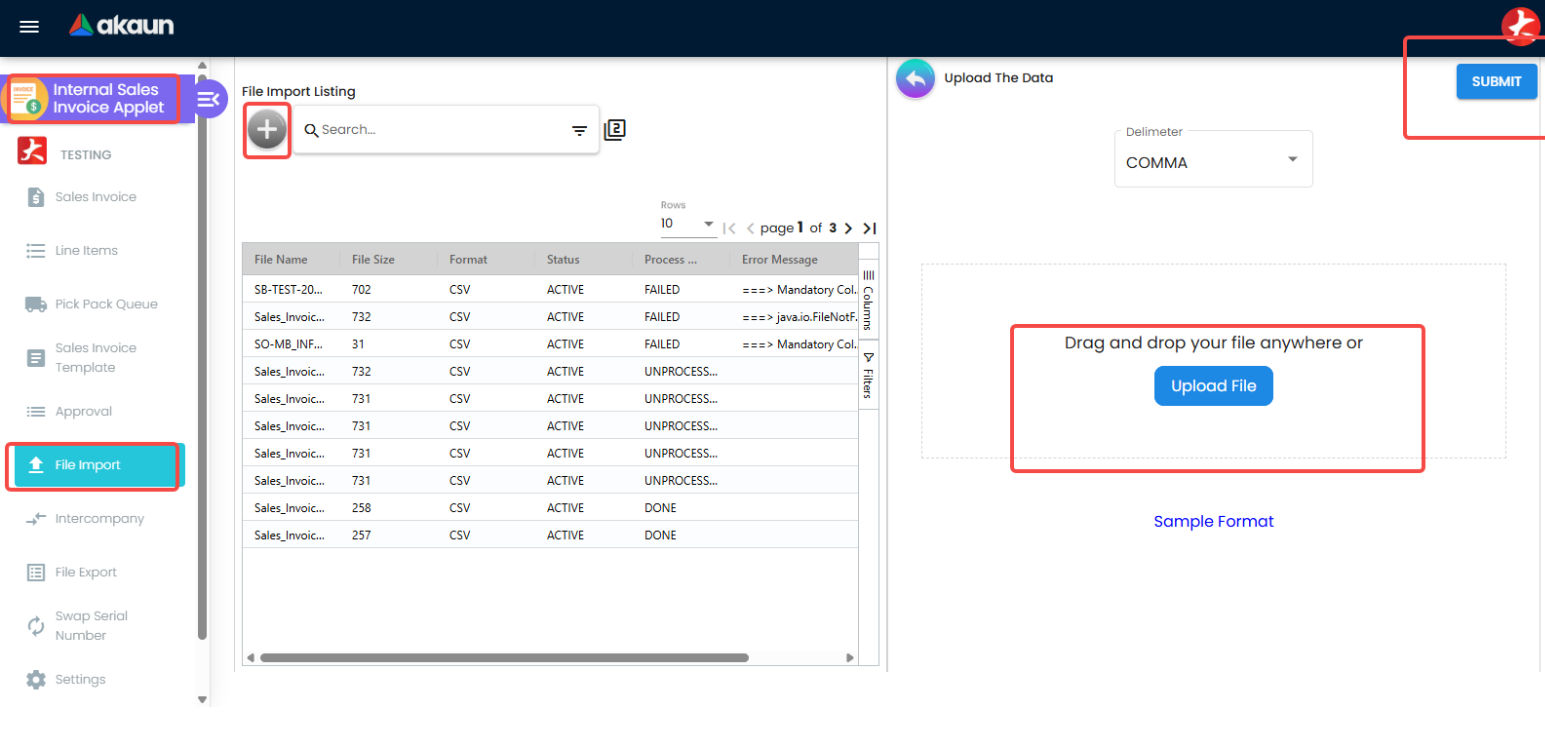
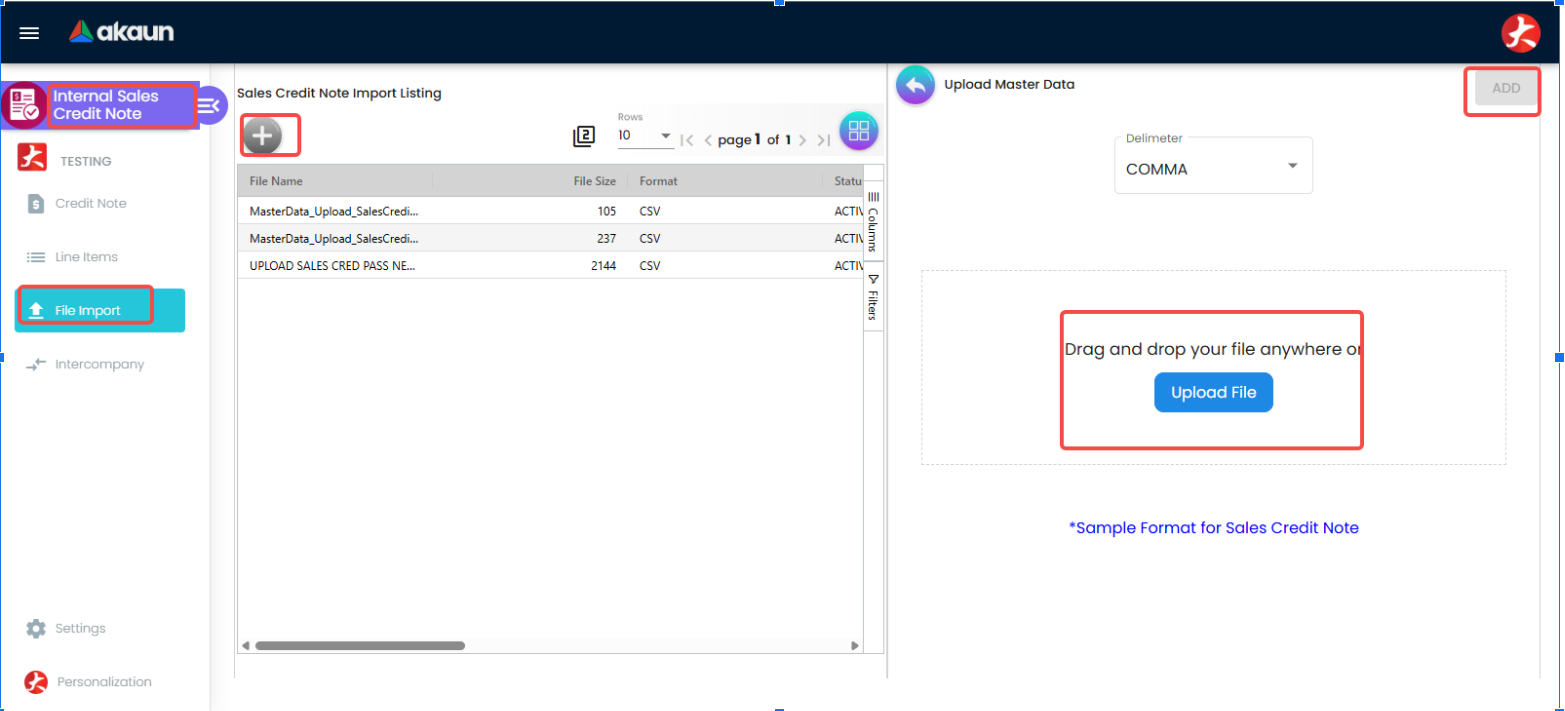
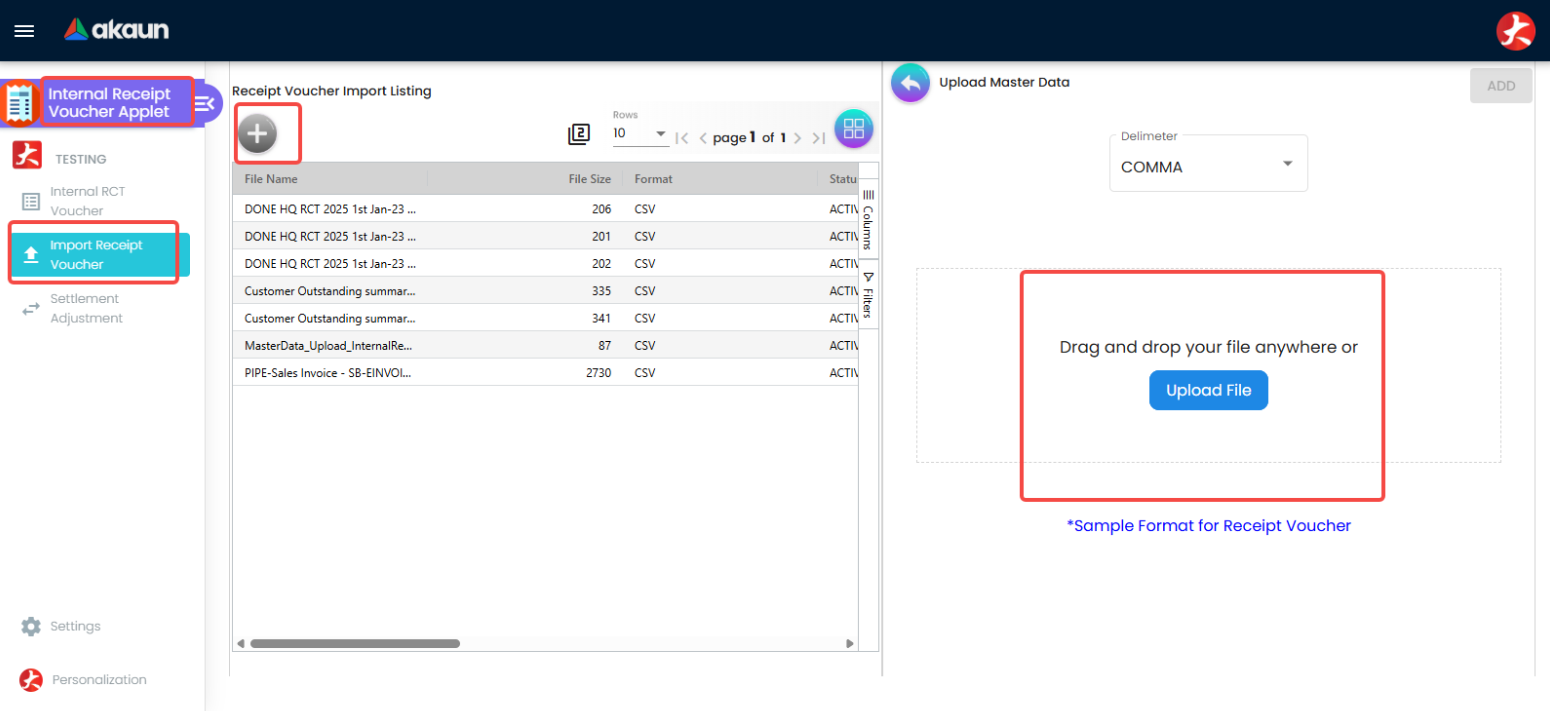
- Ensure all imported documents are posted and finalized.
Post-upload verification
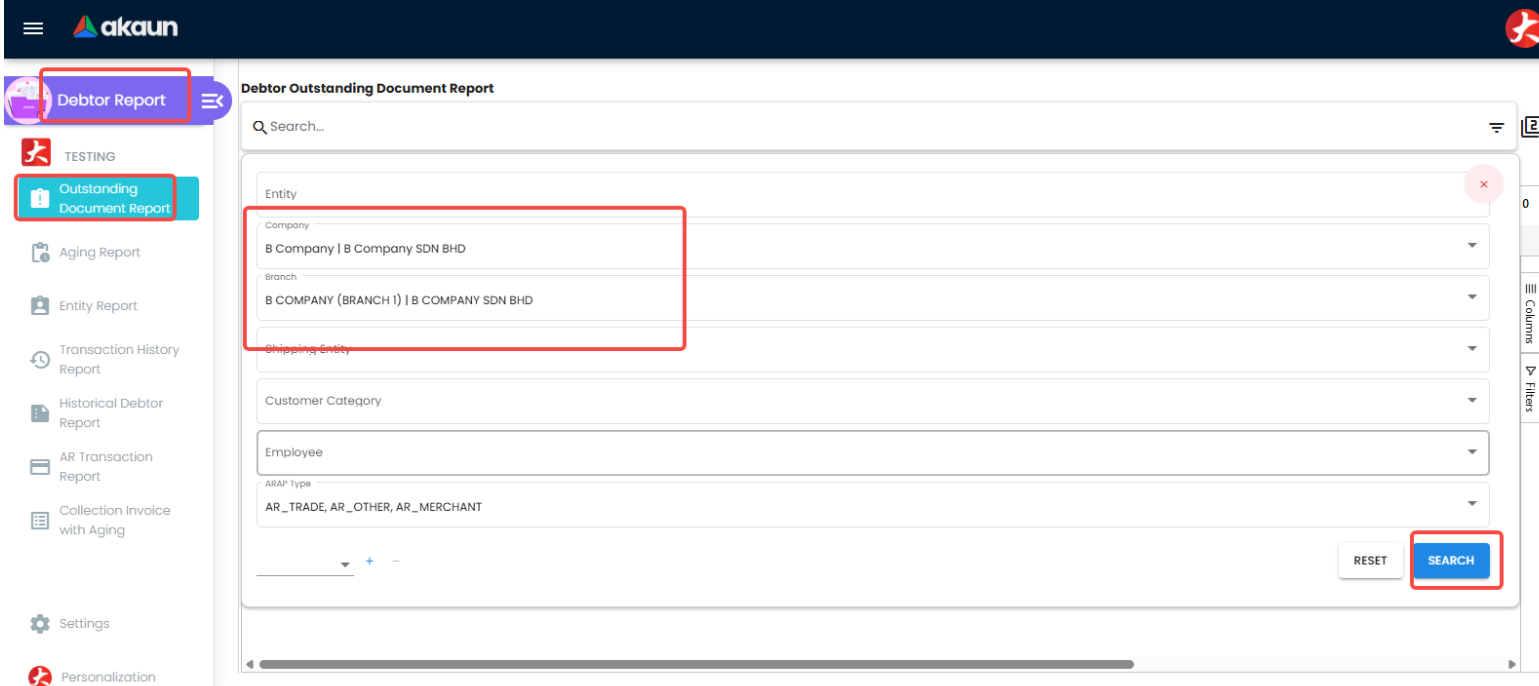
- Open the Debtor Report applet; its landing page is the Outstanding Document Report.
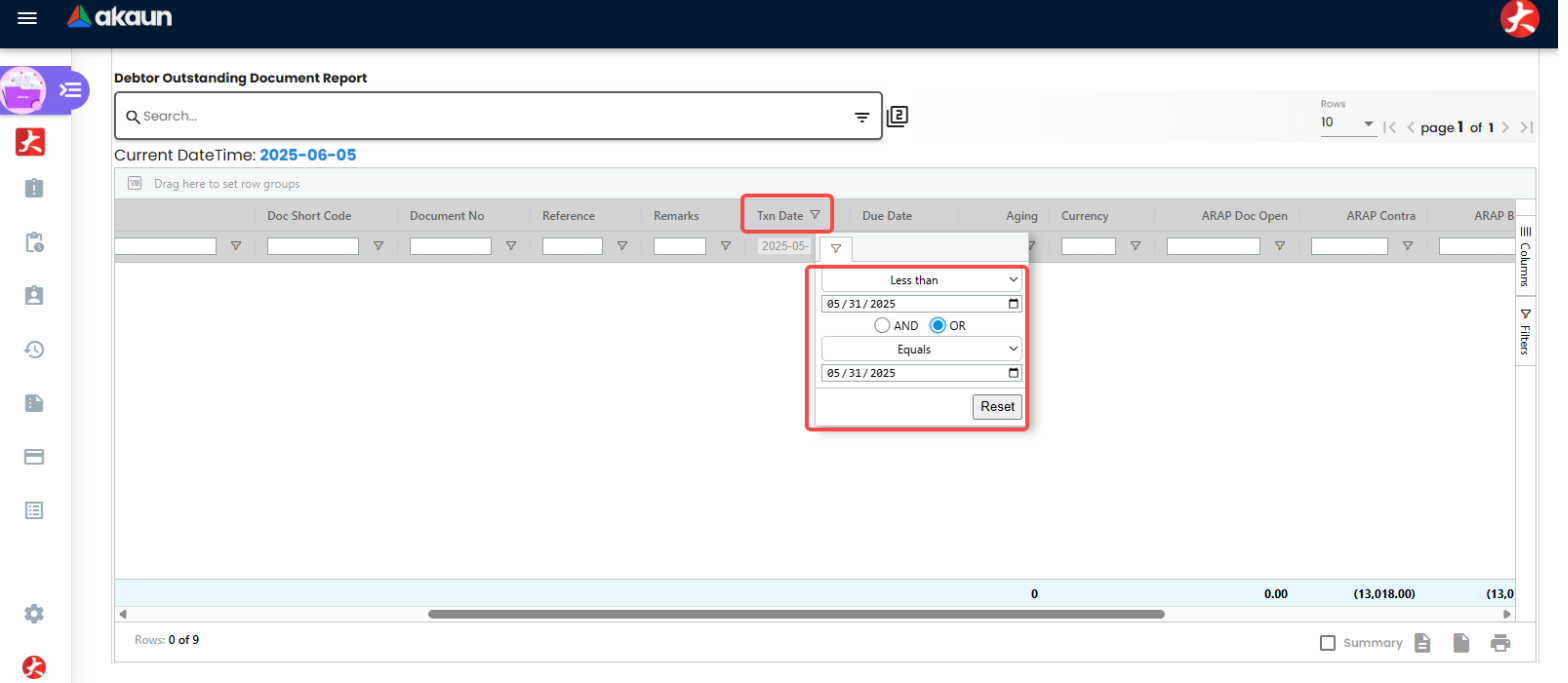
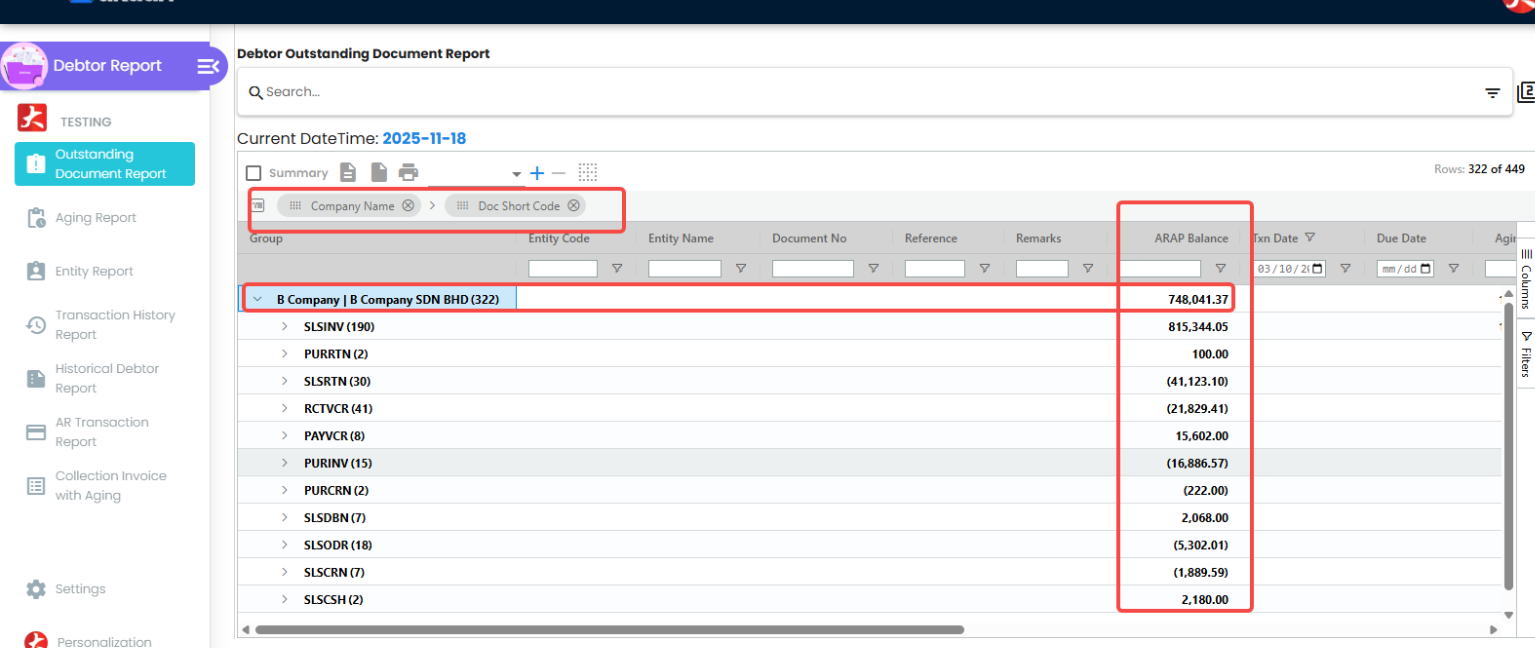
- Filter by branch and transaction date. Group the report by Company Code and Document Short Code to cross-check total outstanding amounts against legacy reports.
Common mistakes
- Negative amounts. Credit notes and receipt vouchers go in positive; the document type supplies the
sign. Wrap the column in
=ABS(value)before exporting. - Everything dated at the cutoff. The ledger balances and the ageing report is meaningless, because
ageing runs from
TXN_DATE. Use the original document dates. - Documents still in draft. A blank
POSTING_STATUS, aFinalin mixed case, or a document the import could not finalise in time all leave a draft behind — and a draft invoice is in no receivables figure. Filter the applet list forDRAFTbefore you reconcile, every time. - Missing customers. Every customer must exist before the import runs. Nothing in the upload check will tell you otherwise.
Supplier outstanding (AP) balance upload
- Purpose: Bring forward unpaid supplier bills, debit notes, and advance deposits. This allows post-go-live supplier payments to be matched and cleared.
- Timing: After go-live, after receiving finalized creditor aging reports.
- Preparation:
- Set the company’s E-Invoice Status to
DISABLEDin the Organisation applet (if self-billed e-invoices apply), as in the customer step.Disable e-invoice submissions before importing outstanding documents. - Ensure the
OPENING BALANCEservice item exists in the Doc Item Maintenance Applet. - Create a temporary
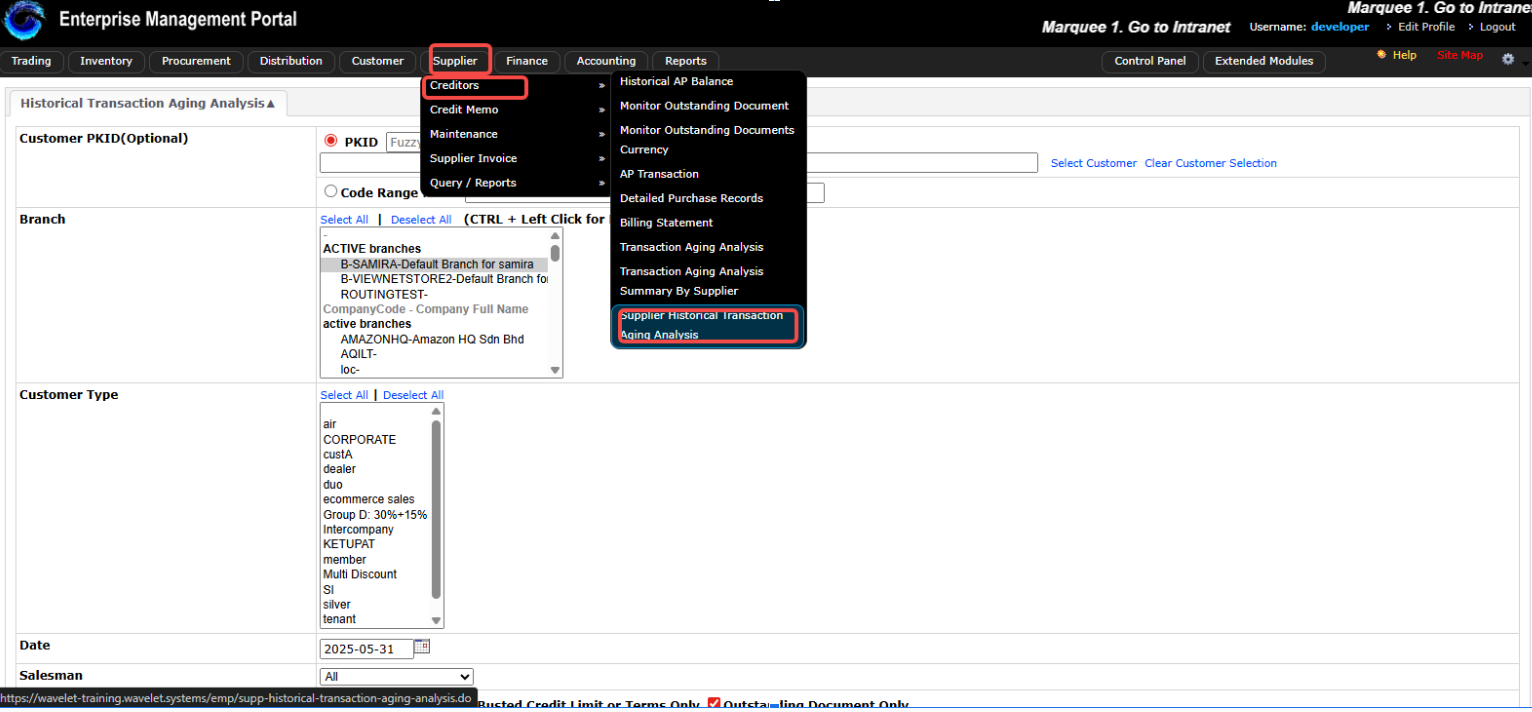
Opening Cashbookand settlement method in the Cashbook Applet for unapplied payment vouchers. - Export legacy creditor outstanding aging reports to a CSV file.
- Set the company’s E-Invoice Status to
Data filtering and separation
Filter your legacy supplier outstanding spreadsheet and split it into three separate CSV files:
- Purchase Invoices: To be uploaded to the Purchase Invoice (Internal) Applet.
- Purchase Debit Notes: To be uploaded to the Purchase Debit Note (Internal) Applet.
- Payment Vouchers (unapplied supplier prepayments): To be uploaded to the Payment Voucher (Internal) Applet.
The capture that sat here was withdrawn: it showed a tenant’s purchase-return and credit-memo export, with real document numbers, campaign descriptions, dates and outstanding amounts. A recapture from a synthetic demo tenant is on the list. The capture that sat here was withdrawn: it showed the same export with the column filter open, showing the same real document numbers and amounts. A recapture from a synthetic demo tenant is on the list.
What to put in the supplier outstanding templates
The supplier side mirrors the customer side exactly, with three differences worth calling out:
ENTITY_CODEis the supplier code, andHDR_REF_NOthe supplier’s own bill or debit note number — the number that will be quoted back at you in a statement query, so it is the one to be careful with.- Payment vouchers point
SETTLEMENT_OR_ITEM_CODEat the temporaryOpening Cashbooksettlement method, never at a live operating bank. A payment voucher against a real cashbook posts cash out of an account whose opening balance you are about to enter in Step 4, and you will be hunting that difference in the first bank reconciliation. - The debit note file needs
LOCATION_CODEandDOC_CURRENCYheadings that the purchase invoice file does not, and the debit note template ships pipe-separated — see the delimiter note above.
Everything else is the same as the customer files: original document dates rather than the cutoff date,
positive amounts on every file regardless of document type, QTY of 1 on invoices and debit notes (the
voucher imports take no quantity at all), the amount column winning over any unit price left in the sheet,
and POSTING_STATUS of FINAL only if you want the import itself to post.
Executing the supplier outstanding import
- Open the respective applet (e.g., Purchase Invoice (Internal) Applet, Purchase Debit Note (Internal) Applet, or Payment Voucher (Internal) Applet).
- Click Import File and upload your prepared CSV file.
- Ensure all imported documents are posted and finalized.
Post-upload verification
- Open the Creditor Report applet’s Outstanding Document Report. Filter by branch and transaction date to confirm totals match legacy reports.
Common mistakes
- A live cashbook on a payment voucher. Point them at the virtual
Opening Cashbooksettlement method. A voucher against a real bank cashbook posts cash out of an account whose opening balance you have not entered yet, and the difference surfaces in Step 4 looking like a reconciliation problem. - A pipe-separated file uploaded as comma-separated. The Purchase Debit Note template ships with pipes. Every mandatory heading is reported missing and the entire heading row is reported as one wrong column.
- Documents still in draft. As on the customer side: filter for
DRAFTafter the import rather than trusting its status.
Cashbook balance entry
- Purpose: Establish opening balances for your active operating bank accounts and cash drawers.
- Timing: After outstanding customer receipts (RVs) and supplier payments (PVs) are imported, and after final legacy bank reconciliations are completed.
- Preparation: Ensure all bank accounts and cash drawers are created as cashbooks and linked to their respective GL accounts in the Cashbook Applet and Chart of Accounts Applet.
How a cashbook balance is different from a GL balance
A cashbook’s balance (what Query Cashbook Transaction, Cash Level and Bank Reconciliation show) is the sum of cashbook transaction lines. Those lines are written only when a Receipt Voucher, Payment Voucher, POS settlement, Cash Transfer or Cash Adjustment reaches FINAL. A journal keyed in the Ledger and Journal applet — including the GL opening balance in Step 5 — creates no cashbook line. So if you enter your bank balances only as GL opening balances, the General Ledger is right but every cashbook starts at zero, and the first bank reconciliation can never agree.
Executing the cashbook setup
- Create a temporary cashbook named
Opening Cashbookin the Cashbook applet, pointing at an opening-balance suspense GL code, with a settlement method of its own. - For each real bank account and cash drawer, create a Cash Transfer from
Opening Cashbookto that cashbook for its reconciled balance at the cutoff date, and set it toFINAL. FINAL writes both the cashbook lines (the sending line negative, the receiving line positive) and the journal — Dr the receiving cashbook’s GL code / Cr the suspense code behindOpening Cashbook. - Because those transfers have already posted the bank GL balances, leave the bank and cash GL codes out of the GL opening balance in Step 5 — or the bank balance is posted twice. The suspense code behind
Opening Cashbookis cleared by the Step 5 entry instead.
Post-upload verification
- Open the Cashbook applet and view Query Cashbook Transaction and Cash Level. Confirm that each cashbook’s balance matches the reconciled bank statement as of the cutoff date.
- The unapplied Receipt and Payment Vouchers imported in Steps 2 and 3 also wrote cashbook lines into
Opening Cashbook(that is why their settlement method points there, not at a live bank) — they net against the transfers.
Common mistakes
- Double-counting: entering a bank balance both as a Cash Transfer and as a line of the GL opening balance journal posts it twice. Pick the transfer and exclude the bank codes from the journal.
- Zero cashbooks: entering bank balances only in the GL leaves every cashbook at zero, and Bank Reconciliation will show the whole opening balance as a permanent variance.
General ledger balance entry
- Purpose: Record starting trial balance values (assets, liabilities, and equity) to establish the general ledger opening balance.
- Timing: The final step of the migration process, executed only after all sub-ledger opening balances (Stock, AR, AP, Cashbook) are finalized and verified.
- Preparation: Retrieve the finalized trial balance or balance sheet report from the legacy system as of the cutoff date.
Executing the ledger entry
You can enter General Ledger opening balances using one of two methods:
Method A: Opening Balance Tab (Recommended)
- Open the Chart of Account applet, go to Companies, open your company and switch to the Ledgers tab.
- Click on your Primary Ledger (the Opening Balance tab exists on primary ledgers only).
- Open the Opening Balance tab and use Add GL Code to add a line per account.
- Input the debit or credit starting balance for each GL account as of the cutoff date — excluding the bank and cash codes already posted by the cash transfers in Step 4.
- Click Save. The balances are saved as an opening-balance journal on the primary ledger, and a Financial Report view of that journal (trial balance, profit and loss, balance sheet) opens from the same tab — use it for the check below.
Method B: Manual Journal Entry
- Open the Ledger and Journal applet.
- Create a new journal transaction dated as of the cutoff date (e.g.,
2024-12-31). - Debit all asset accounts (including bank, accounts receivable control, and inventory control).
- Credit all liability and equity accounts (including accounts payable control).
- Offset any trial balance imbalance temporarily to an Opening Balance Equity account to investigate discrepancies.
- Finalize the journal entry.
Warning
Ensure that the opening balance values entered for the Accounts Receivable Control, Accounts Payable Control, and Inventory Control GL accounts match the exact totals of the uploaded customer outstanding, supplier outstanding, and stock balances. Any mismatch will cause discrepancies between your sub-ledgers and the general ledger.
Post-upload verification
- If you used Method A, open the Financial Report view on the Opening Balance tab. If you used Method B, the Financial Report applet only shows the balances after you run Month End Processing for the cutoff month and create a snapshot — a snapshot reads the monthly summaries that month-end writes, not the journals directly.
- Confirm that Total Debits equal Total Credits, and that the Balance Sheet matches the legacy system’s finalized balance sheet.
Common mistakes
- Unmapped Retained Earnings: Ensure your company ledger’s default GL accounts tab has the Retained Earnings account correctly mapped before saving balances.
- Sub-ledger Mismatches: Entering GL balances that do not reconcile with the physical stock valuation, customer outstanding, or supplier outstanding totals.
What success looks like
Four numbers, and they either agree or they do not. Do this before anyone posts a live document.
- Open the Opening Balance tab on the primary ledger (Chart of Account → Companies → your company → Ledgers) and look at its trial balance view. Total debits equal total credits. If they do not, nothing below is worth checking yet.
- Open the Debtor Report applet, run the Outstanding Document Report as at the cutoff date, and compare its grand total with the Accounts Receivable control balance on that trial balance. They must match to the cent.
- Do the same with the Creditor Report applet against the Accounts Payable control balance.
- Open the Cashbook applet, Cash Level, and confirm every cashbook shows the reconciled bank balance as at the cutoff date — not zero.
All four agreeing means the sub-ledgers and the general ledger tell the same story, which is the only thing this migration had to achieve.
If AR or AP is out, the difference is almost always a document that was imported but left in draft — filter the outstanding report by status before you go looking for a bad number. If a cashbook shows zero, the bank balance went into the general ledger journal instead of a cash transfer, and Bank Reconciliation will carry that difference as a permanent variance until you fix it. If debits and credits do not balance, an account is missing from the opening journal rather than wrong in it; compare the account list against the legacy trial balance line by line.