Upload opening customer and supplier balances
Steps 2 and 3 of the opening balance migration: record what customers owe you and what you owe suppliers, and the deposits either side has paid in advance, as documents. These documents are needed so that payments and receipts after go-live can be matched and knocked off against actual outstanding balances (why the sequence is mandatory). They follow the stock upload. Read how the file import reads your file before you fill in a template.
Customer outstanding (AR) balance upload
- Purpose: Bring forward unpaid customer invoices, credit notes, and advance deposits. This allows post-go-live customer receipts to be knocked-off against historical documents.
- Timing: After go-live, after temporarily disabling e-invoice submission.
- Preparation:
- Go to the Organisation applet, open the company, and on the E-Invoice tab set E-Invoice Status to
DISABLEDfor the duration of the import. A document finalised while the company isDISABLEDis never queued for MyInvois submission — not even retrospectively when you switch it back on — so the opening balance invoices stay out of the tax authority’s hands.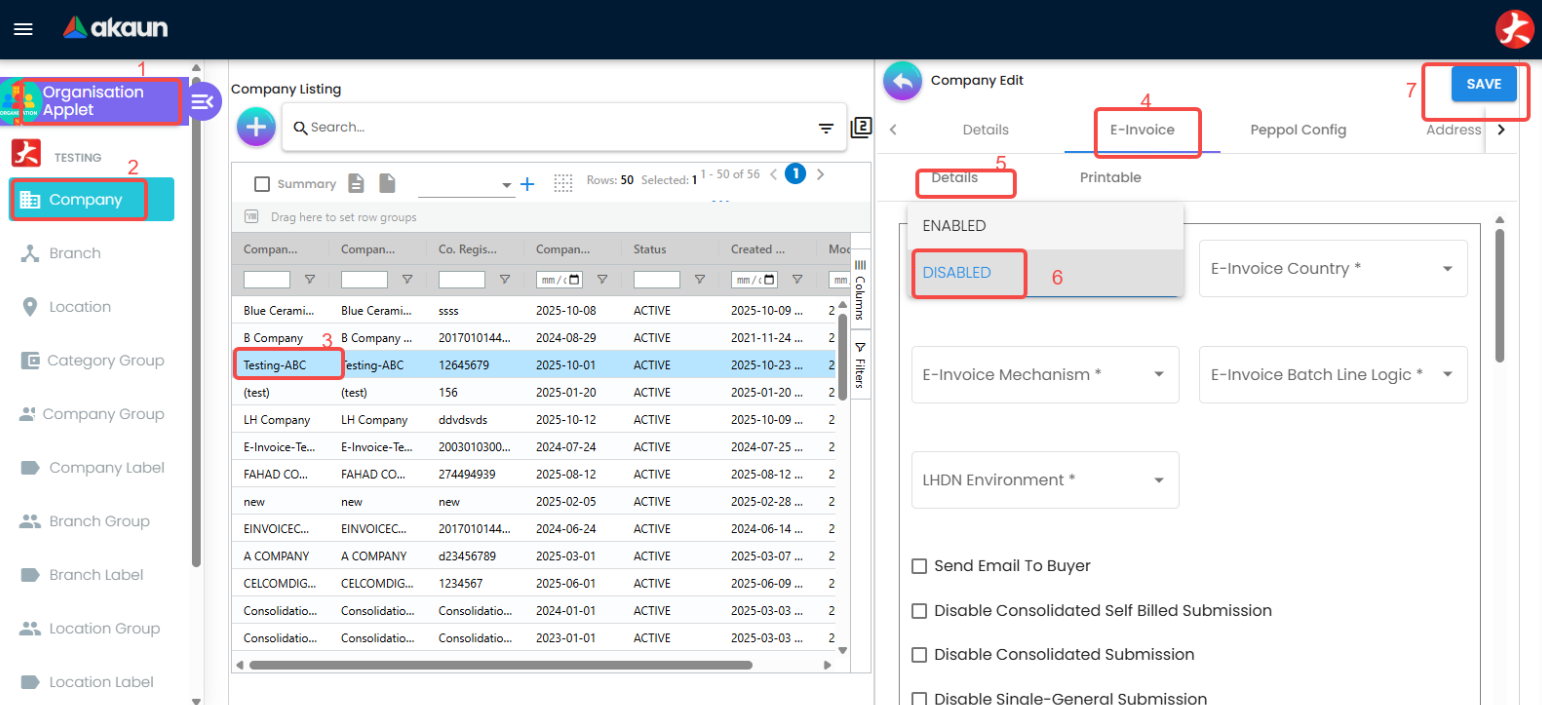
Disable e-invoice submissions before importing outstanding documents. - Create a service-type item named
OPENING BALANCEin the Doc Item Maintenance Applet. - Create a temporary
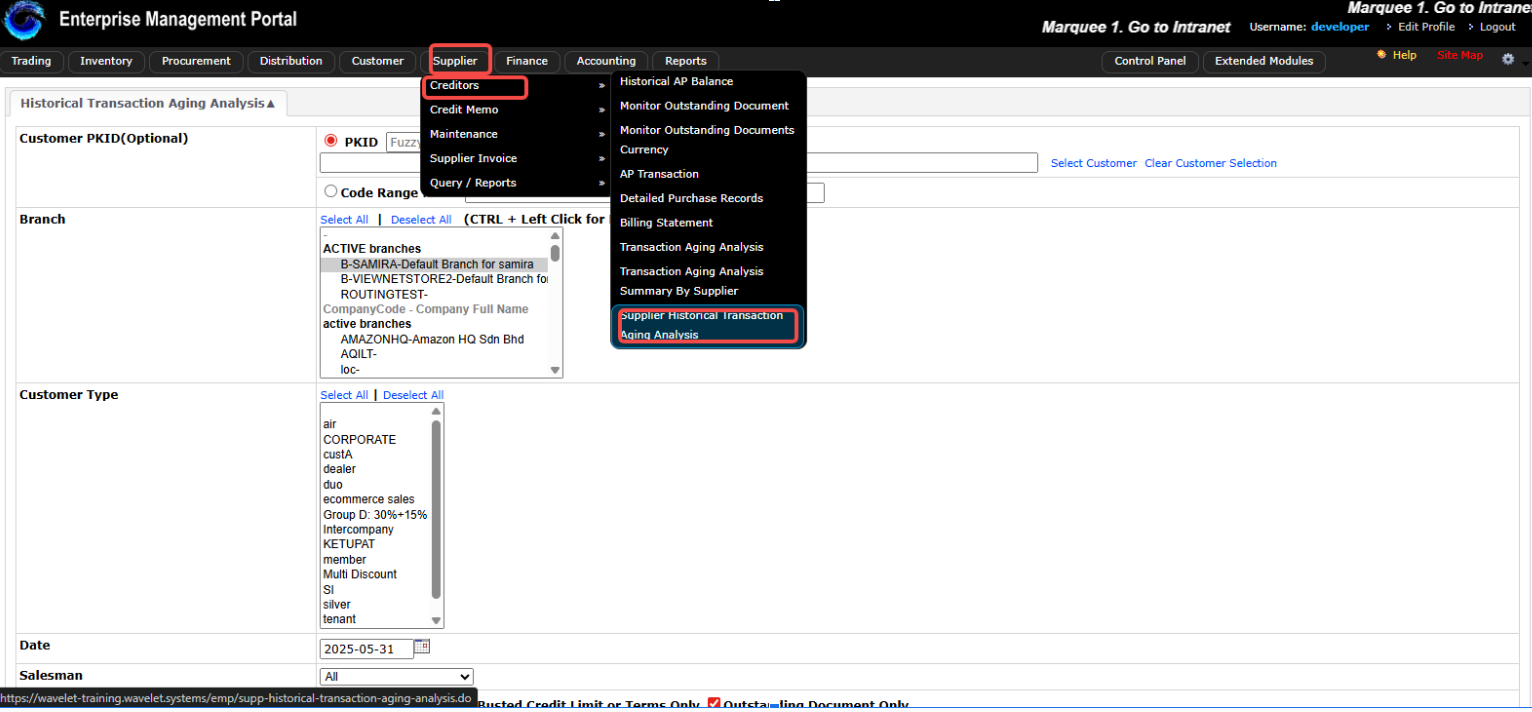
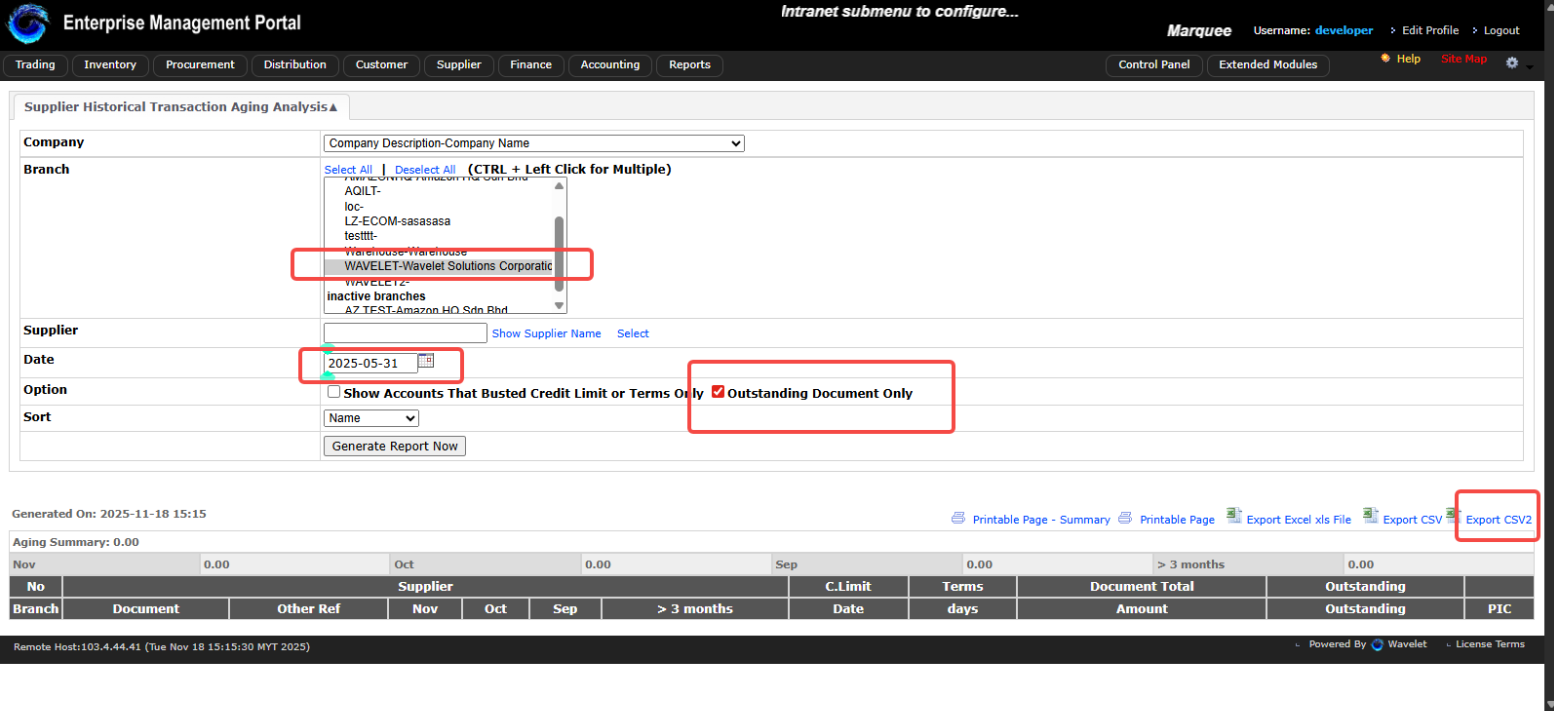
Opening Cashbookand settlement method in the Cashbook Applet to handle receipt voucher offsets. - Export legacy aging data (e.g., CC-07 Historical Transaction Aging Analysis aging reports) to a CSV file.
Screenshot withdrawn; a recapture from a demo tenant is on the list.
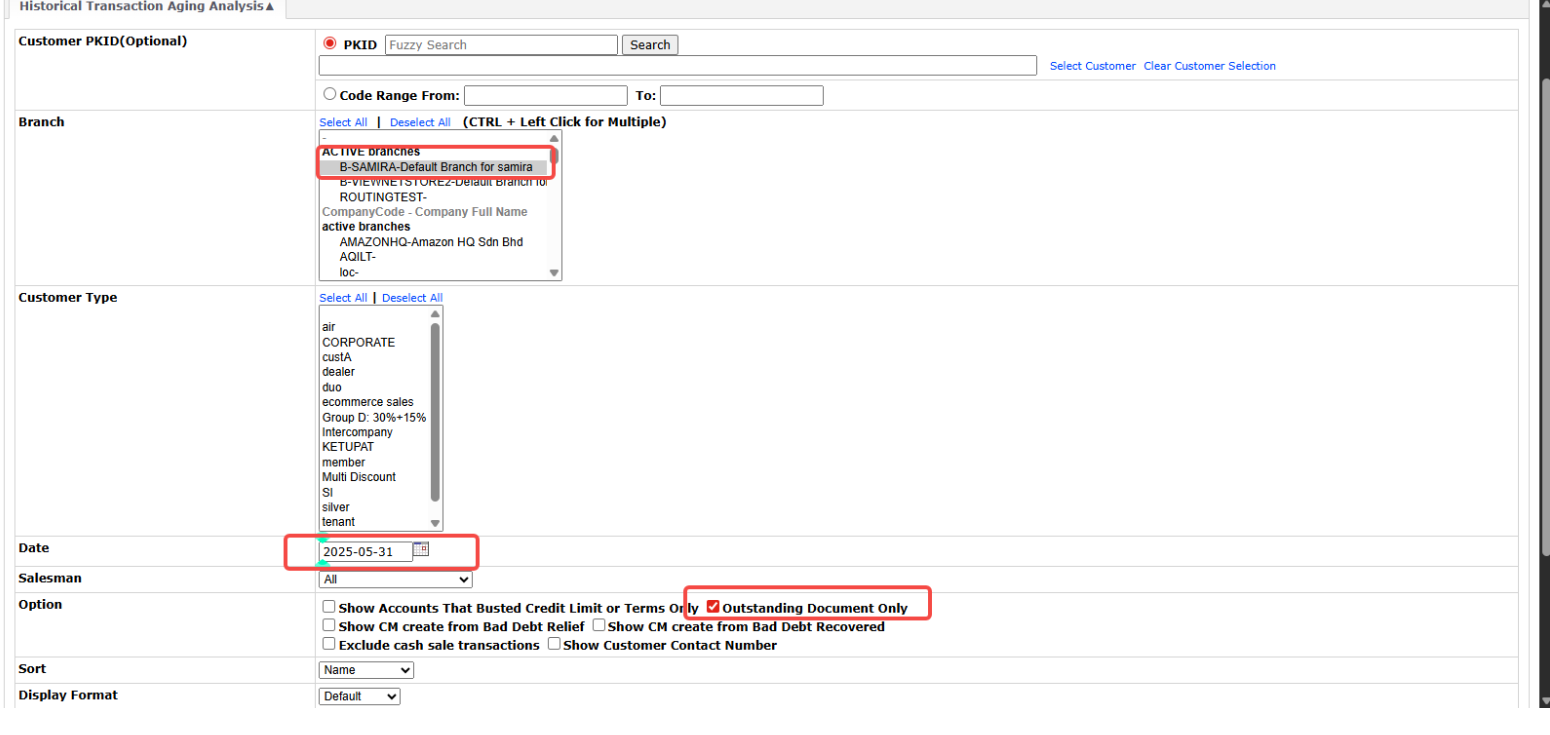
Choose the cutoff date (Step 2). 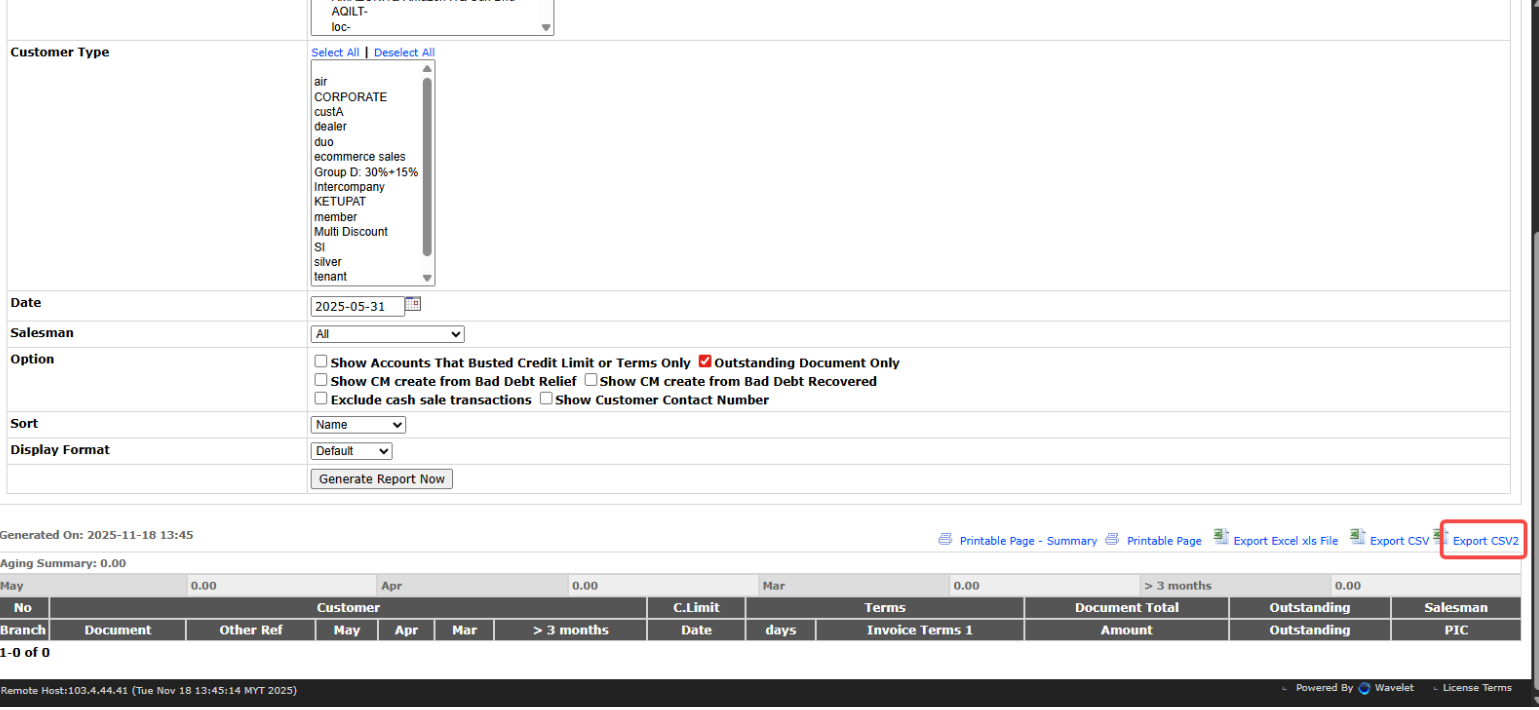
Export to CSV2 format (Step 3).
- Go to the Organisation applet, open the company, and on the E-Invoice tab set E-Invoice Status to
Data filtering and separation
Filter your legacy customer outstanding spreadsheet and split it into three separate tabs or CSV files:
- Sales Invoices: To be uploaded to the Sales Invoice (Internal) Applet.
- Sales Credit Notes: To be uploaded to the Internal Sales Credit Note Applet.
- Receipt Vouchers (unapplied customer prepayments): To be uploaded to the Receipt Voucher (Internal) Applet.
Screenshot withdrawn; a recapture from a demo tenant is on the list.
What to put in the customer outstanding templates
All three files share the same shape: one row per outstanding document, the outstanding balance as the amount, and a service item standing in for whatever was originally sold. You are not re-creating the original invoices — you are re-creating what is still owed on them.
HDR_REF_NOis the original legacy document number. It becomes the imported document’s reference, and it is the only thing your customer and your collections team can both recognise, so get it right even on the rows you are tempted to rush.TXN_DATEis the original document date, not the cutoff date. Ageing is calculated from it, so a migration that dates everything2024-12-31reports a healthy ledger with nothing overdue on the first morning — and the ageing report is the first thing anyone opens.ENTITY_CODEis the customer code as it exists in BigLedger. Every customer must already be created; the header check will not catch a missing one and the row will simply carry no customer.SETTLEMENT_OR_ITEM_CODEis theOPENING BALANCEservice item on invoices and credit notes, and theOpening Cashbooksettlement method on receipt vouchers.QTYis1andAMOUNT_INCL_TAXis the outstanding balance — positive on every file, including credit notes and receipt vouchers. The document type carries the sign; a negative amount on a credit note reverses it into an invoice. If your legacy export has credits as negatives, wrap the column in=ABS(...)before you export.- Leave
UNIT_PRICE_INCL_TAXempty, or delete the column. When both are present the amount wins and the unit price is quietly ignored, which makes a line whose figures disagree with each other. POSTING_STATUSisFINALif you want the import to post; blank leaves everything in draft for you to review and finalise by hand. See the warning about checking for drafts afterwards either way.
The credit note file additionally needs a LOCATION_CODE heading and a DOC_CURRENCY heading, which the
invoice file does not — they are in the mandatory list, and leaving them out fails the whole file.
Executing the customer outstanding import
- Open the respective applet (e.g., Sales Invoice (Internal) Applet, Internal Sales Credit Note Applet, or Receipt Voucher (Internal) Applet).
- Click Import File and upload your prepared CSV file.
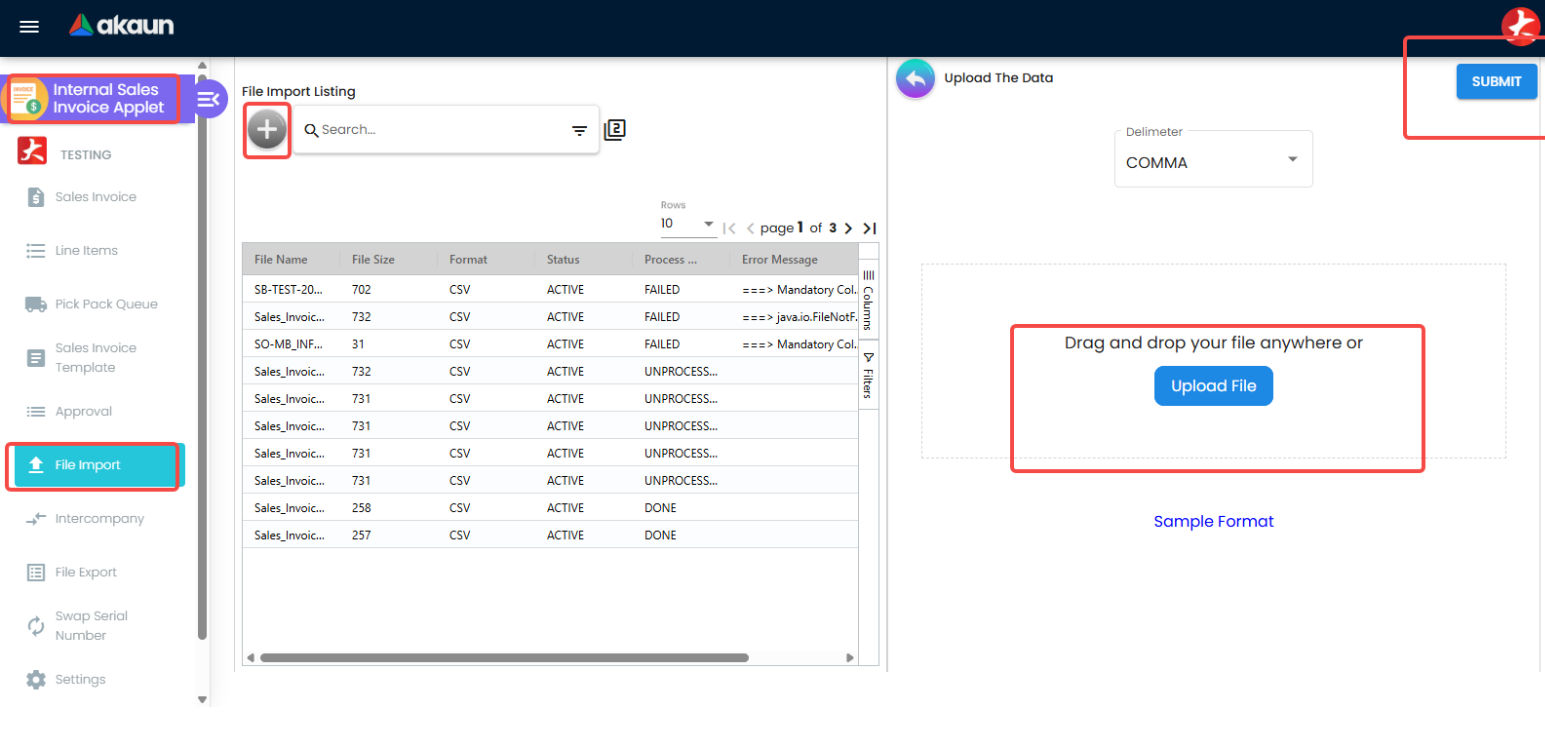
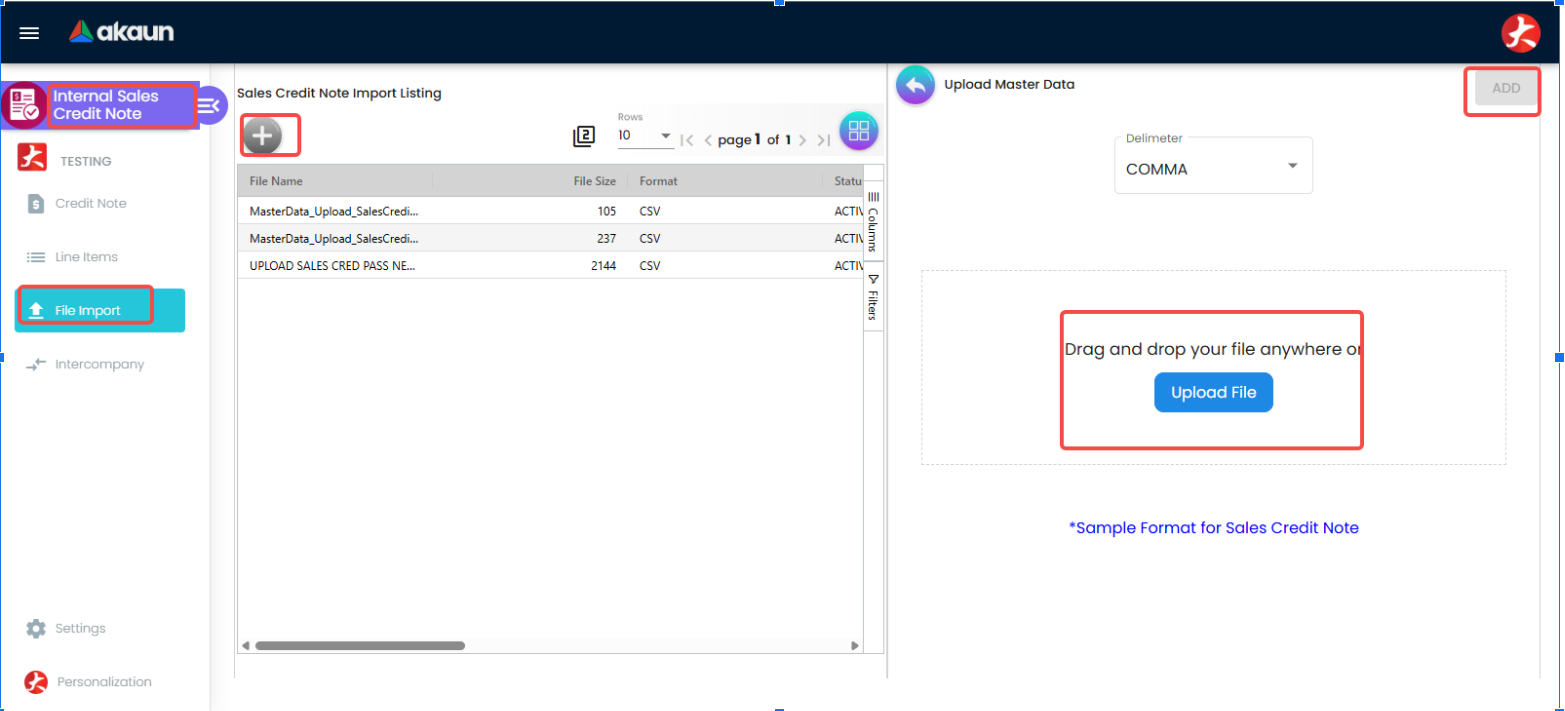
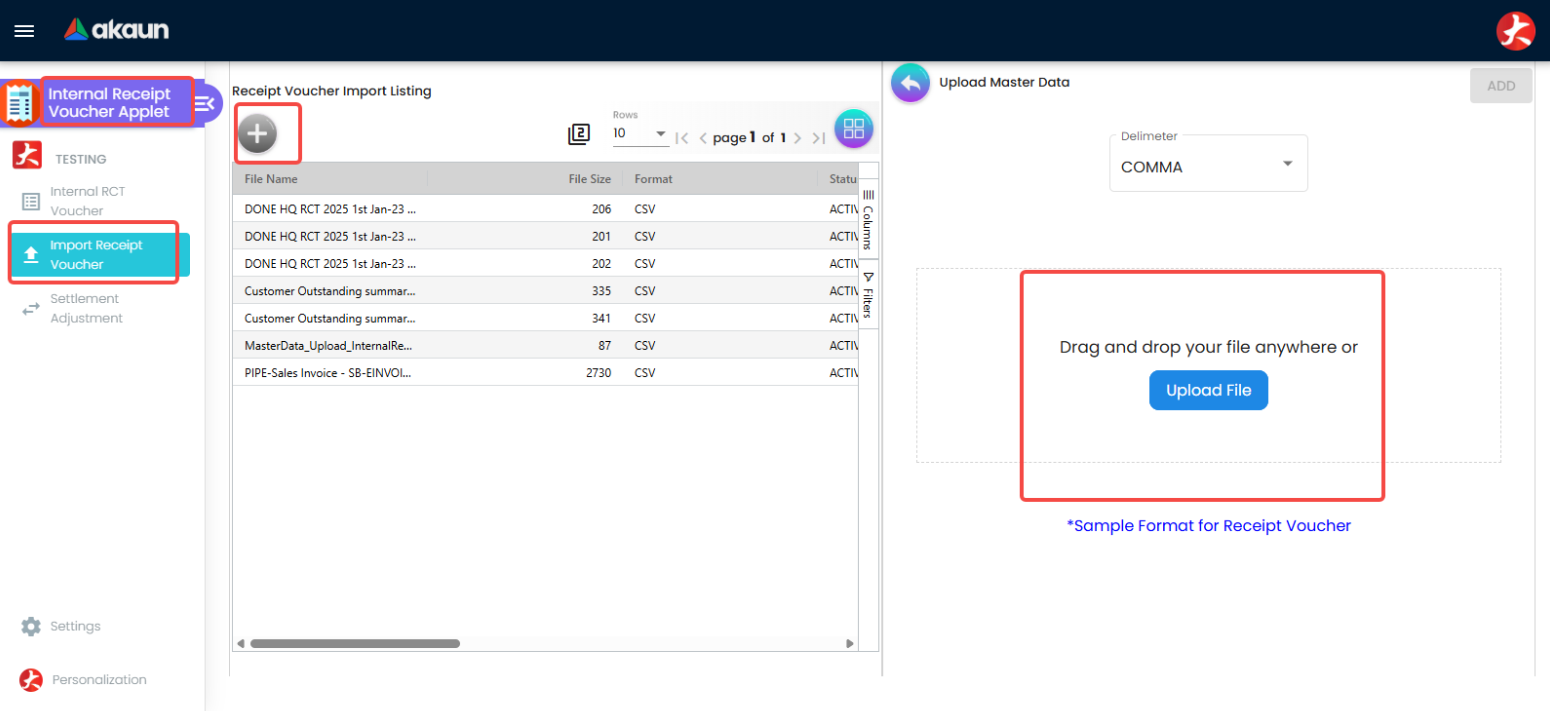
- Ensure all imported documents are posted and finalized.
Post-upload verification
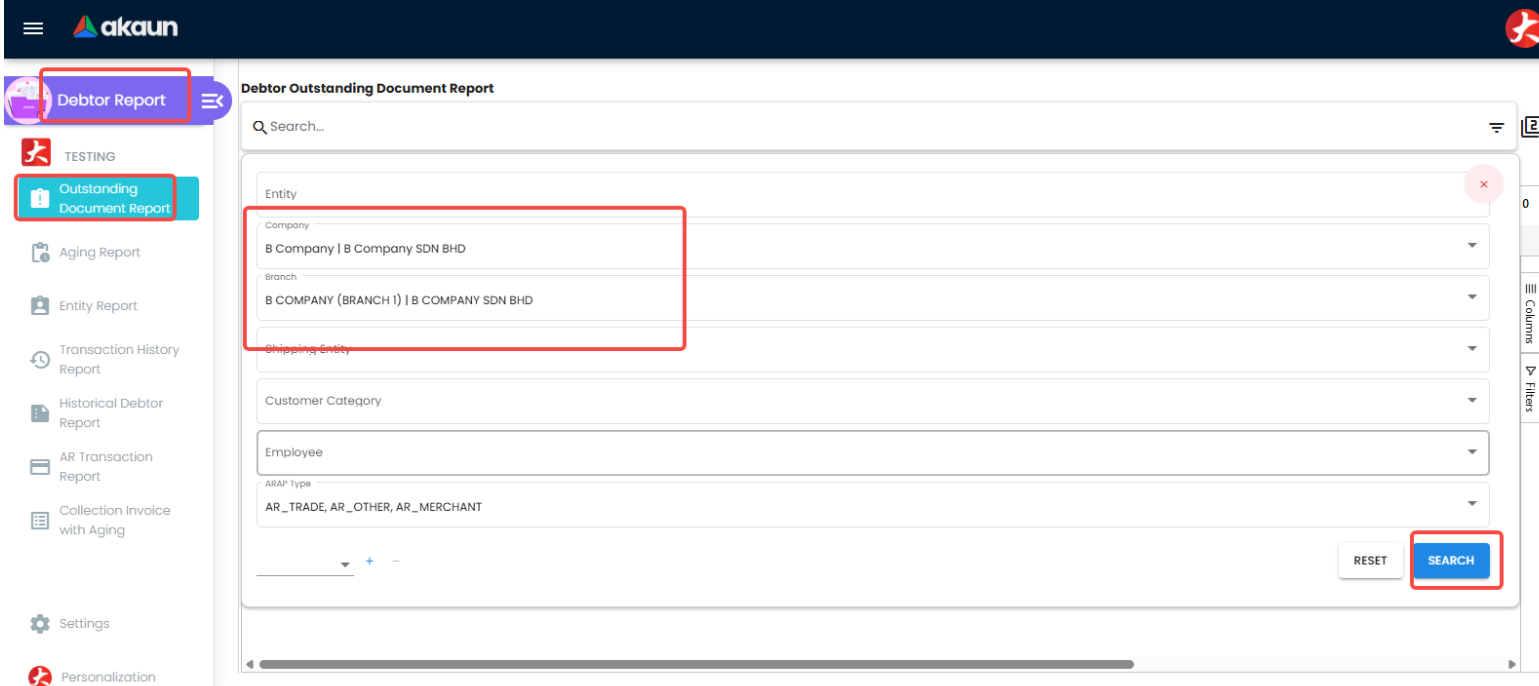
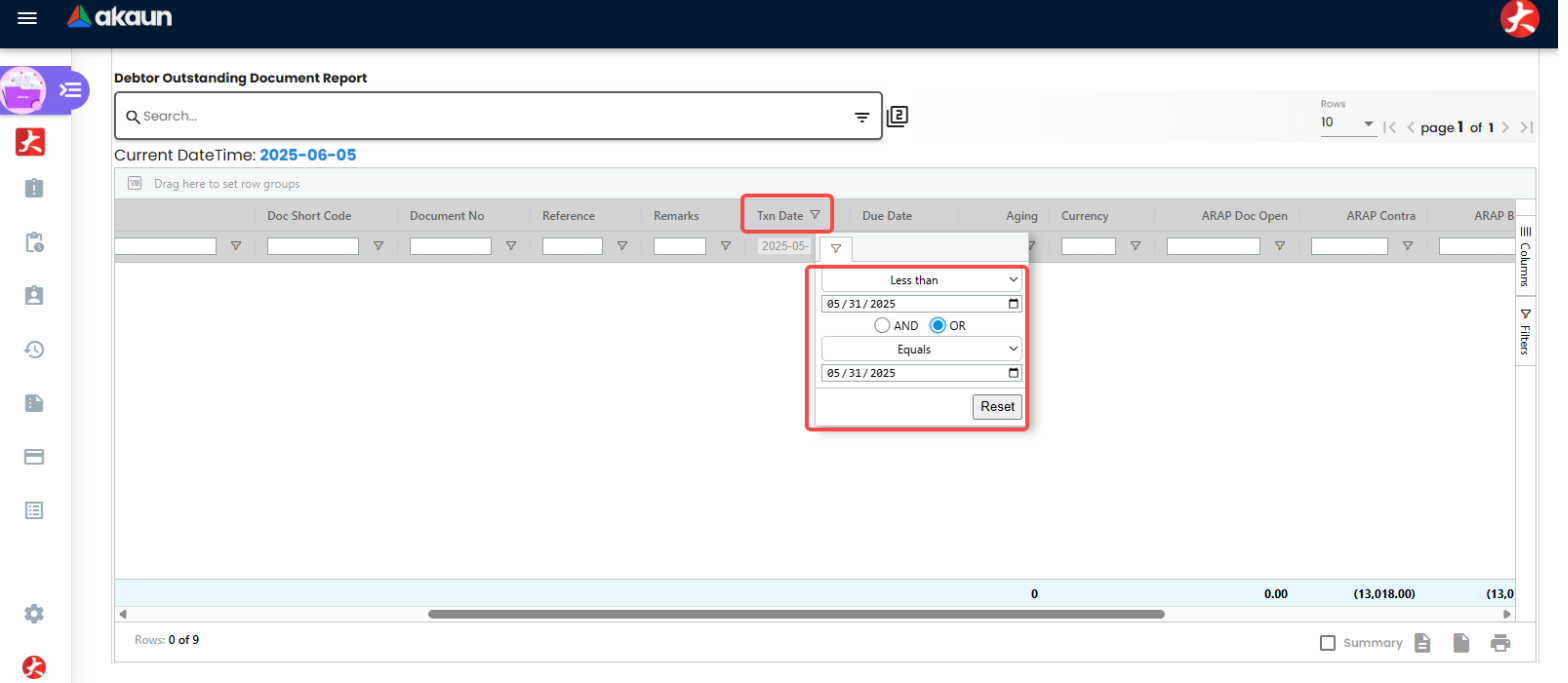
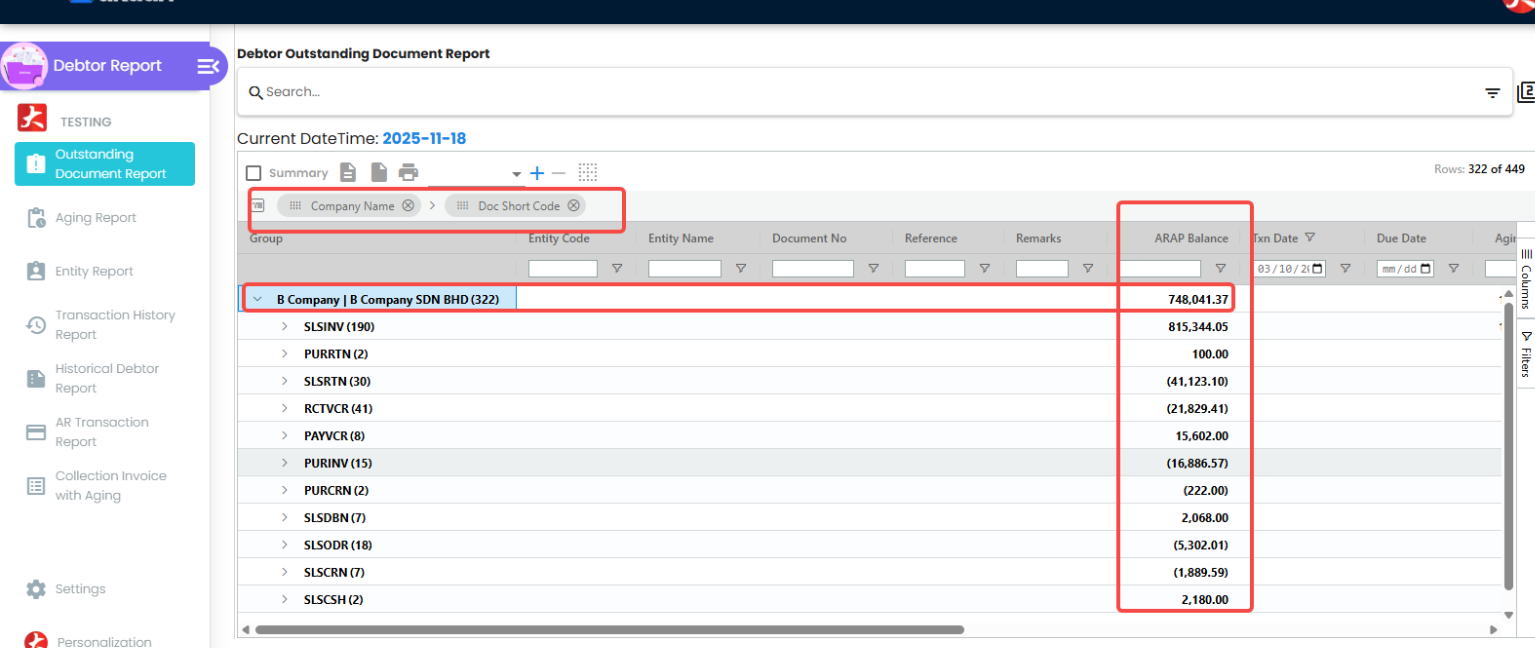
- Open the Debtor Report applet; its landing page is the Outstanding Document Report.
- Filter by branch and transaction date. Group the report by Company Code and Document Short Code to cross-check total outstanding amounts against legacy reports.
Common mistakes
- Negative amounts. Credit notes and receipt vouchers go in positive; the document type supplies the
sign. Wrap the column in
=ABS(value)before exporting. - Everything dated at the cutoff. The ledger balances and the ageing report is meaningless, because
ageing runs from
TXN_DATE. Use the original document dates. - Documents still in draft. A blank
POSTING_STATUS, aFinalin mixed case, or a document the import could not finalise in time all leave a draft behind — and a draft invoice is in no receivables figure. Filter the applet list forDRAFTbefore you reconcile, every time. - Missing customers. Every customer must exist before the import runs. Nothing in the upload check will tell you otherwise.
Supplier outstanding (AP) balance upload
- Purpose: Bring forward unpaid supplier bills, debit notes, and advance deposits. This allows post-go-live supplier payments to be matched and cleared.
- Timing: After go-live, after receiving finalized creditor aging reports.
- Preparation:
- Set the company’s E-Invoice Status to
DISABLEDin the Organisation applet (if self-billed e-invoices apply), as in the customer step.Disable e-invoice submissions before importing outstanding documents. - Ensure the
OPENING BALANCEservice item exists in the Doc Item Maintenance Applet. - Create a temporary
Opening Cashbookand settlement method in the Cashbook Applet for unapplied payment vouchers. - Export legacy creditor outstanding aging reports to a CSV file.
- Set the company’s E-Invoice Status to
Data filtering and separation
Filter your legacy supplier outstanding spreadsheet and split it into three separate CSV files:
- Purchase Invoices: To be uploaded to the Purchase Invoice (Internal) Applet.
- Purchase Debit Notes: To be uploaded to the Purchase Debit Note (Internal) Applet.
- Payment Vouchers (unapplied supplier prepayments): To be uploaded to the Payment Voucher (Internal) Applet.
Screenshot withdrawn; a recapture from a demo tenant is on the list.
What to put in the supplier outstanding templates
The supplier side mirrors the customer side exactly, with three differences worth calling out:
ENTITY_CODEis the supplier code, andHDR_REF_NOthe supplier’s own bill or debit note number — the number that will be quoted back at you in a statement query, so it is the one to be careful with.- Payment vouchers point
SETTLEMENT_OR_ITEM_CODEat the temporaryOpening Cashbooksettlement method, never at a live operating bank. A payment voucher against a real cashbook posts cash out of an account whose opening balance you are about to enter in Step 4, and you will be hunting that difference in the first bank reconciliation. - The debit note file needs
LOCATION_CODEandDOC_CURRENCYheadings that the purchase invoice file does not, and the debit note template ships pipe-separated — see the delimiter note.
Everything else is the same as the customer files: original document dates rather than the cutoff date,
positive amounts on every file regardless of document type, QTY of 1 on invoices and debit notes (the
voucher imports take no quantity at all), the amount column winning over any unit price left in the sheet,
and POSTING_STATUS of FINAL only if you want the import itself to post.
Executing the supplier outstanding import
- Open the respective applet (e.g., Purchase Invoice (Internal) Applet, Purchase Debit Note (Internal) Applet, or Payment Voucher (Internal) Applet).
- Click Import File and upload your prepared CSV file.
- Ensure all imported documents are posted and finalized.
Post-upload verification
- Open the Creditor Report applet’s Outstanding Document Report. Filter by branch and transaction date to confirm totals match legacy reports.
Common mistakes
- A live cashbook on a payment voucher. Point them at the virtual
Opening Cashbooksettlement method. A voucher against a real bank cashbook posts cash out of an account whose opening balance you have not entered yet, and the difference surfaces in Step 4 looking like a reconciliation problem. - A pipe-separated file uploaded as comma-separated. The Purchase Debit Note template ships with pipes. Every mandatory heading is reported missing and the entire heading row is reported as one wrong column.
- Documents still in draft. As on the customer side: filter for
DRAFTafter the import rather than trusting its status.
What success looks like for this part
The checks under each Post-upload verification above pass: the Debtor Report’s and the Creditor Report’s Outstanding Document Report totals match your legacy reports, and no imported document is left in DRAFT. When all five areas are loaded, run the whole migration’s success check.
Next: the cashbook and general ledger balances.
Related documentation
- Opening Balance Migration Guide: the sequence, the import rules every template follows, and the whole migration’s success check.
- Debtor Report and Creditor Report: the Outstanding Document Reports you reconcile against.