Audit Trail
A figure on a document is not what someone expected, and you need to establish what happened to it. By the end of this guide you will have found the exact change: who made it, when, and what the value was before. You will also know how to read what you find, which matters just as much when you are the one being asked. Plan on about 15 minutes. You will work entirely in the Tenant Admin applet.
Meet GadgetSphere Sdn Bhd
GadgetSphere Sdn Bhd runs 22 consumer-electronics branches across Malaysia. This morning a corporate customer forwarded the sales invoice they received in February and asked why the total on their copy, RM 12,400, is not the RM 11,900 now showing in BigLedger. Nobody in the sales office remembers touching it. Finance wants an answer before the payment run on Friday, and the audit trail is where you will find it.
A few terms to get straight
- Audit record. One row for one change to one record somewhere else in BigLedger. It does not contain the document. It contains a snapshot of the document’s data before and after, plus who and when.
- Action. What happened to the record: CREATED, UPDATED, DELETED, or DISCARD. On screen this is the Action Name column.
- Old data and new data. The two snapshots. An UPDATED record carries both, which is what lets you compare a figure before and after. A CREATED record carries only new data, and a DELETED record carries only the removed record. This is the heart of the whole feature.
- Table Name. The internal name of the table the changed record lives in, such as
bl_fi_generic_doc_hdrfor a sales, purchase or receipt document header. You do not need to understand the name, but you do need to type it exactly, so keep this guide open when you get to Step 2.
Before you start
- You need OWNER or ADMIN rank on the tenant. The Tenant Admin applet checks this on every screen, and without it you will not get in at all. An existing tenant admin can grant it under Tenant Admins.
- The Audit Trail menu must be visible. It can be switched off tenant-wide with the
HIDE_AUDIT_TRAIL_MENUsetting. If you cannot see it in the sidebar and you do have the rank, that setting is why. - Know roughly when the change happened. A week is fine, and a month is workable. You will use this in Step 3, and without it you are scrolling.
- Know which applet the document belongs to. A sales invoice is
salesInvoiceApplet, and a receipt voucher isinternal-receipt-voucher-applet. The audit trail shows the applet code in its own column, so if you are unsure, look at a few rows first and pick the one that matches.
Step 1: Open the audit trail
Tenant Admin → Audit Trail
The listing opens on every audited change in the tenant, ten rows to a page. Across the top: Applet Code, Table Name, Status, Action Name, Action By, Date Created, Date Updated.
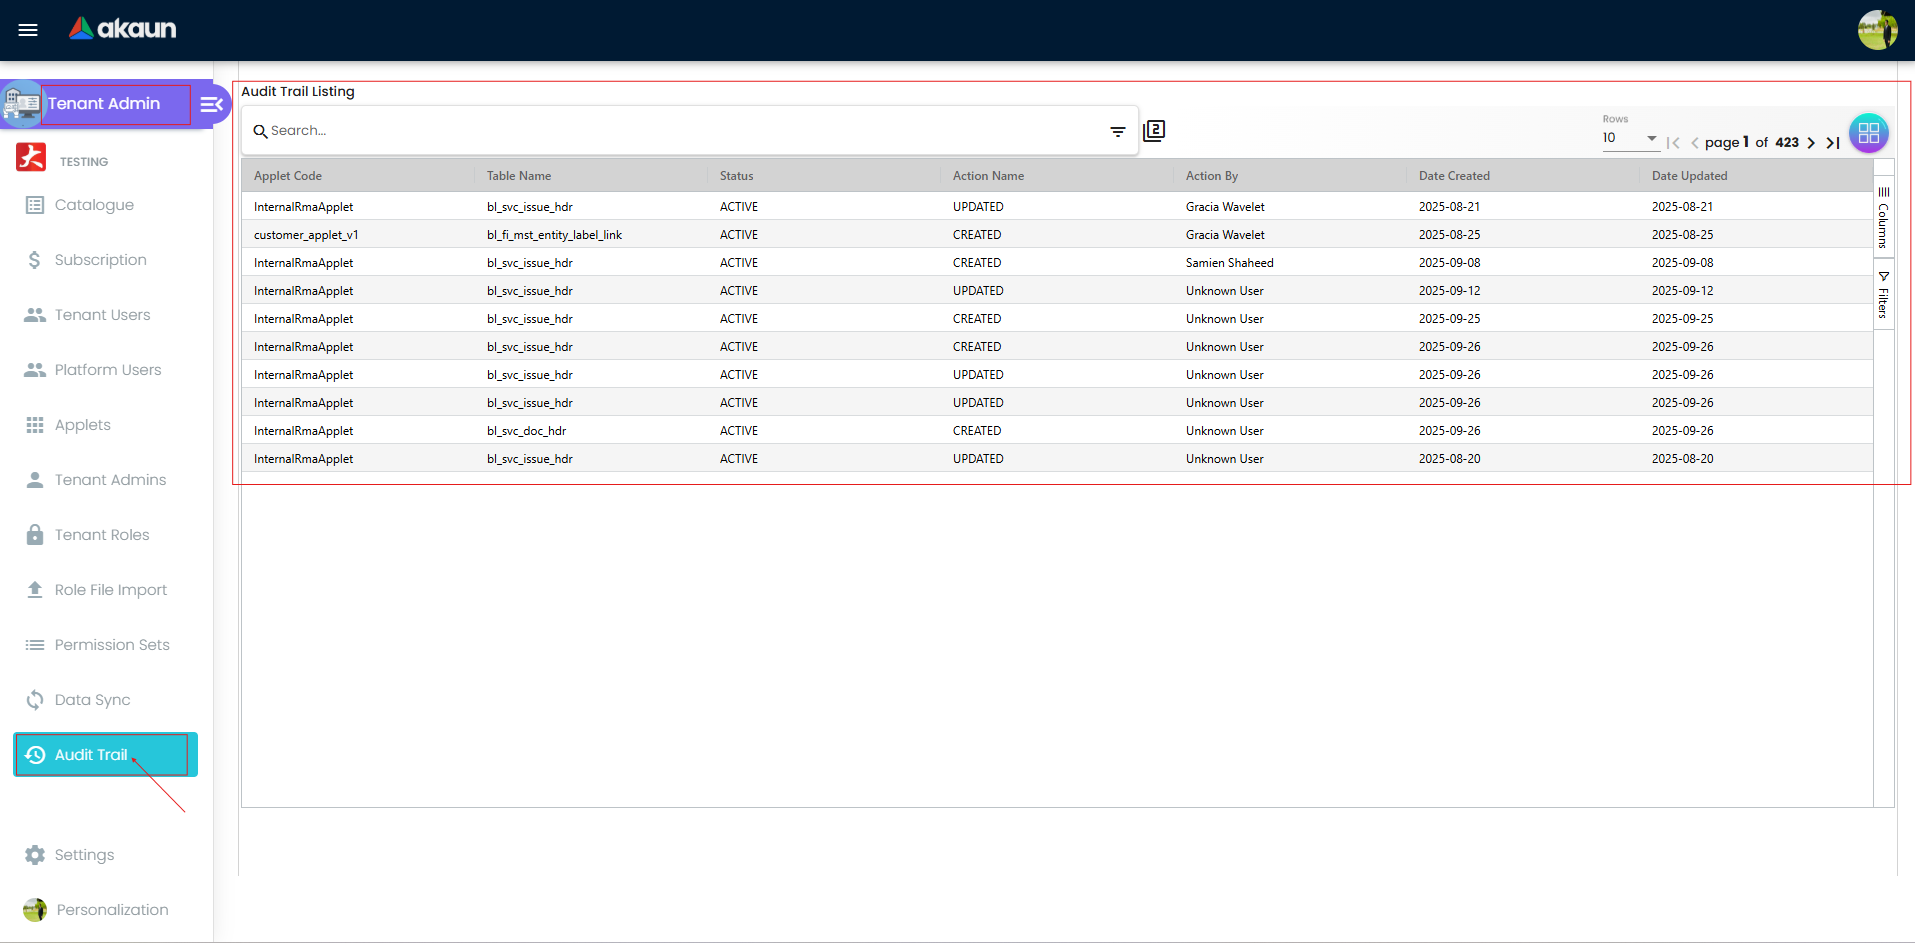
Two things to know about the listing before you go further.
- The list is not ordered by date. Read the Date Created column rather than going by a row’s position in the list.
- The Status column is the audit record’s own status, not the document’s. It will say ACTIVE on almost everything. A document that was voided still has ACTIVE audit records, and the voiding is recorded as its own row.
There is also a free-text Search box above the listing. To find a particular change, use the advanced search described in the next step.
Step 2: Narrow to the applet and table that hold the record
Click the filter icon at the right-hand end of the search box. The advanced search opens.
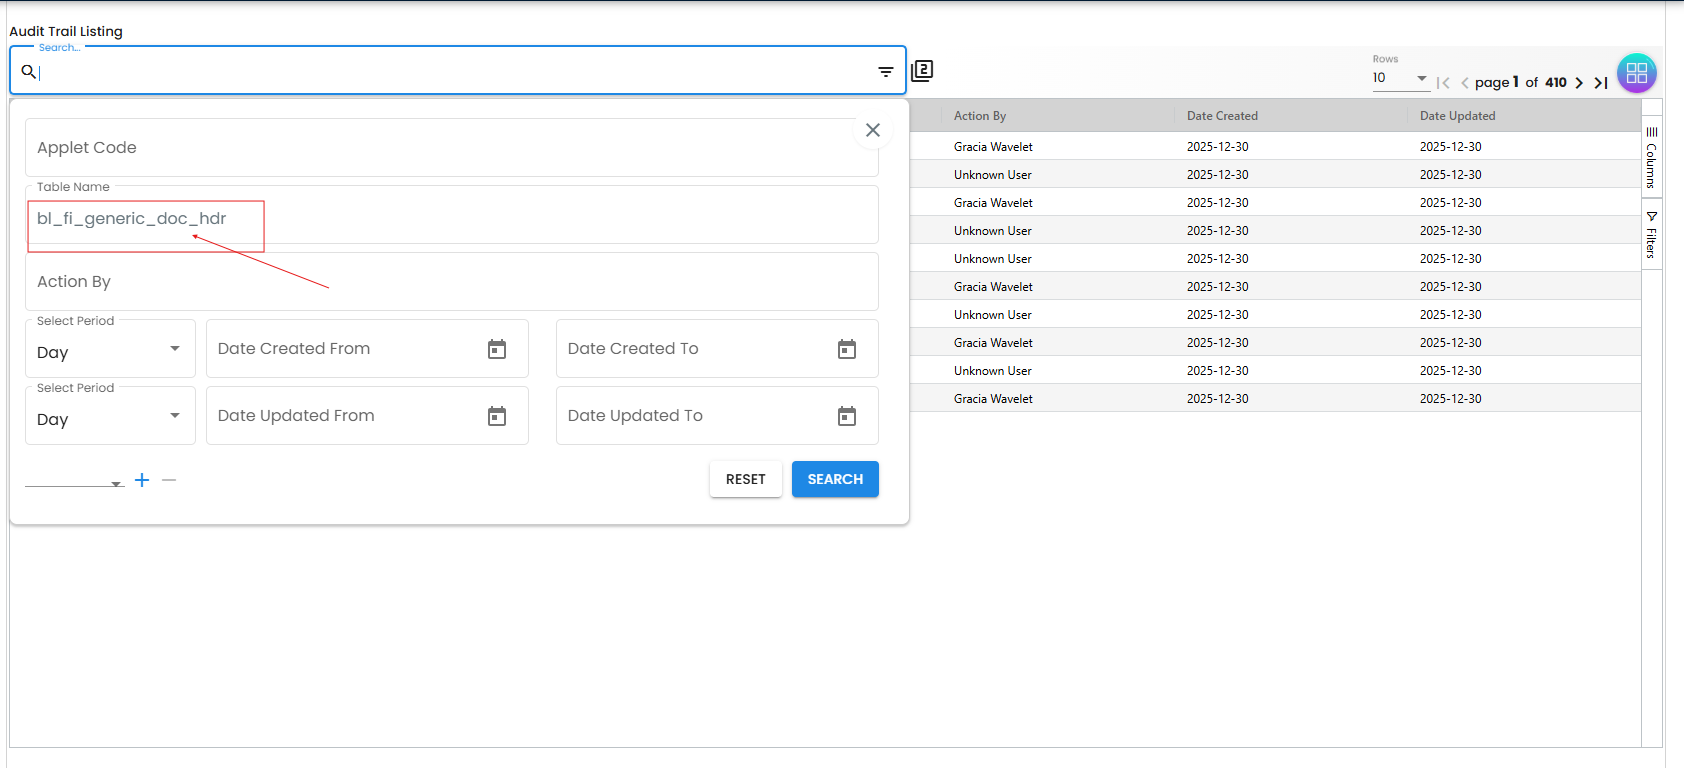
For GadgetSphere’s disputed invoice, fill in two boxes:
- Applet Code,
salesInvoiceApplet - Table Name,
bl_fi_generic_doc_hdr
Then click SEARCH.
Every one of these filters is an exact, case-sensitive match. Typing generic_doc in Table Name does not find bl_fi_generic_doc_hdr, it returns nothing. If a search comes back empty, this is almost always why. RESET clears everything if you get tangled.
Step 3: Narrow to the days around the change
Still in the advanced search, fill in the date range. The customer’s copy is from February and the invoice was correct then, so set:
- Date Created From,
2026-02-01 - Date Created To,
2026-02-28
Each date pair has a Select Period granularity beside it, which controls how the range is interpreted. Both ends are inclusive, so a change made on 28 February is included.
Click SEARCH again. You should now be looking at a page or two rather than hundreds.
Step 4: Find the UPDATED row and open it
Scan the Action Name column for UPDATED rows in your date range, and click one to open it.
The right-hand panel shows Basic Information (Applet Code, Action Name, Table Name, Status, Date Created, Date Updated and Action By) and below it a Details block holding the change itself.
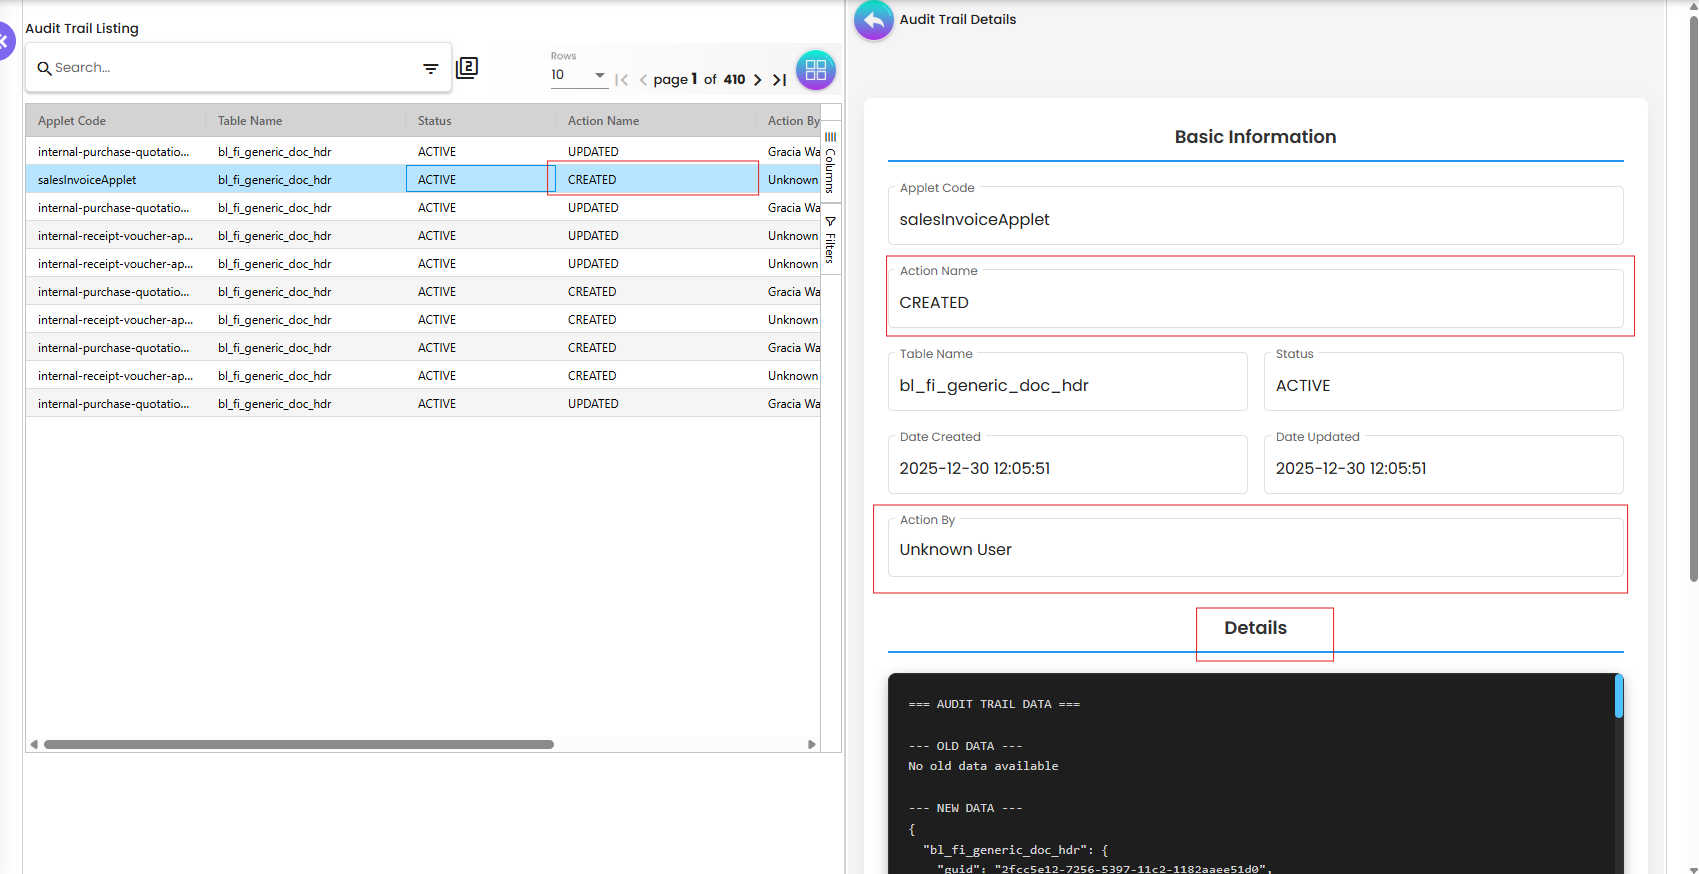
If the record you opened is the wrong one, click the next UPDATED row and the panel refreshes in place.
Step 5: Compare old data with new data
In the Details block you will see the change laid out under headings rather than as raw data:
=== AUDIT TRAIL DATA ===

--- OLD DATA ---
{ … the document as it was … }

--- NEW DATA ---
{ … the document as it became … }
Scroll the block and find the same field in both halves. For GadgetSphere’s invoice, the total appears in old data as 12400.00 and in new data as 11900.00, the RM 500 the customer is asking about, with a discount field that moved at the same time.
This is the moment the whole exercise exists for. Read both halves before concluding anything, because a figure that looks wrong on its own is often correct once you see what else moved with it.
If the block says No old data available, you are looking at a CREATED record, the document being made in the first place rather than edited. Go back and pick an UPDATED row.
Step 6: Confirm who made the change and when
Read Action By and Date Created in the Basic Information panel. Action By is the person’s stored profile name, so it is the name you will recognise from your user list.
If Action By says Unknown User, the change was made by something the system could not resolve to a named person, commonly an integration or an automated process rather than someone at a keyboard. That is still useful, because it tells you to go looking at an interface rather than at a colleague.
Write down the Date Created value exactly. Paired with the old and new figures from Step 5, that is the whole answer to the customer’s question.
What success looks like
You can say, in one sentence and without hedging: “The total on invoice X was changed from RM 12,400 to RM 11,900 by [name] on [date and time], and the discount field changed at the same moment.” If any of those five facts is missing, you have not finished. Go back to Step 4 and open a different UPDATED row.
Common mistakes
- Typing part of a table name.
generic_docreturns nothing, whilebl_fi_generic_doc_hdrreturns your rows. Every filter is an exact match, and this is the single most common reason a search comes back empty. - Assuming the newest change is at the top. The listing is not sorted by date. Always read the Date Created column rather than trusting position.
- Reading new data without old data. A figure in isolation tells you what it became, not what changed. The comparison is the evidence.
- Reading the Status column as the document’s status. It is the audit record’s status, and it says ACTIVE on nearly everything.
- Drawing a conclusion from an empty result. An empty result means nothing matched your filters. Widen the date range, or re-check the Applet Code and Table Name, before deciding what it tells you.
Good to know
Three things worth understanding before you rely on what you find.
- Each record is a snapshot, not a live view. It holds the data exactly as it stood at the moment of that change. A later edit creates its own record rather than updating this one, which is why a busy document has several rows.
- Audit records are written for the operations that support auditing. If a search comes back empty, widen the date range and re-check your Applet Code and Table Name values before drawing a conclusion.
- Access follows your permissions. Reading the trail needs the audit trail read permission on top of your tenant rank. If the menu is missing, or every search returns nothing, check that first.
Related documentation
- Tenant Admin Applet is the reference for every screen in this applet, including the full list of audit trail columns and the ones hidden by default.
- Audit Trail API covers the endpoints behind this screen, the complete field list, and the query filters available to an integration.
- Teams and Permissions explains granting the rank and permissions this guide assumes you already have.