Financial Accounting Module
1. Module Overview
The Financial Accounting Module is the financial backbone of BigLedger. It handles every accounting transaction — from journal entries and payment vouchers to bank reconciliation and financial reporting. It is the destination where all other modules post their financial impact.
Business Value:
- Real-time financial position visible at any moment — no waiting for month-end closing
- Complete audit trail from source document to general ledger entry
- Multi-currency and multi-entity support for regional and international operations
- Integrated budgetary controls prevent unauthorized spending before it happens
2. Key Concepts & Terminology
| Term | Definition |
|---|---|
| General Ledger (GL) | The master record of all financial transactions, organized by account. |
| Journal Entry | A manual or system-generated double-entry record that debits and credits accounts. |
| Payment Voucher (PV) | A document authorizing and recording an outgoing payment to a supplier or employee. |
| Receipt Voucher (RV) | A document recording an incoming payment received from a customer. |
| Bank Reconciliation | The process of matching bank statement lines to internal records to ensure accuracy. |
| Statement of Account | A periodic summary of all transactions between the company and a customer or supplier. |
| Budget | A planned financial target set for specific accounts, departments, or projects over a defined period. |
| Vote Book | A budgetary commitment register tracking allocated vs. spent amounts per budget line. |
| SST | Sales and Service Tax — Malaysia’s indirect tax regime. |
| Transaction Reconciliation | The matching of related transaction records across modules (e.g., invoice to payment). |
3. Included Applets
Core Accounting
| Applet | Purpose |
|---|---|
| Ledger & Journal Applet | View the general ledger, create journal entries, and manage posting periods. |
| General Ledger Applet | Query and analyze general ledger balances and transaction details. |
| Financial Report Applet | Generate Balance Sheet, Profit & Loss, Trial Balance, and Cash Flow reports. |
Payments & Receipts
| Applet | Purpose |
|---|---|
| Payment Voucher (Internal) Applet | Create and approve outgoing payment documents to suppliers, employees, or other entities. |
| Receipt Voucher (Internal) Applet | Record and manage incoming payments from customers. |
| MM Deposit Applet | Manage money market deposits and fixed deposit placements. |
Receivables & Payables
| Applet | Purpose |
|---|---|
| Debtor & Creditor Report Applet | View aging reports, outstanding balances, and entity-level transaction drill-downs. |
| Accounts Receivable Applet | Track and manage customer receivables and collection workflows. |
| Statement of Account Applet | Generate and send periodic account statements to customers or suppliers. |
Reconciliation & Controls
| Applet | Purpose |
|---|---|
| Bank Reconciliation Applet | Match bank statement entries against internal payment and receipt records. |
| Transaction Reconciliation Applet | Cross-reference and reconcile related transactions across modules. |
Budgets & Investments
| Applet | Purpose |
|---|---|
| Budget Applet | Create, monitor, and control budgets across departments, projects, and cost centers. |
| Vote Book Applet | Track budgetary commitments and available balances in real-time. |
| Revenue Management Applet | Define revenue recognition rules and track deferred vs. recognized revenue. |
| Asset Module Applet | Manage fixed assets, depreciation schedules, and asset disposal. |
Tax & Compliance
| Applet | Purpose |
|---|---|
| Tax Config Applet | Advanced tax configuration for multi-jurisdiction compliance. |
| SST Applet | Malaysian Sales and Service Tax reporting, filing, and reconciliation. |
4. Standard Business Workflows
Workflow 1: Procure-to-Pay (Supplier Payment)
Purchase Invoice ──▶ Payment Voucher Creation ──▶ Approval ──▶ Bank Payment ──▶ Reconciliation
    (from Purchasing)      (Finance team)         (Manager)     (Auto-post)    (Bank Recon Applet)
Steps:
- A Purchase Invoice arrives from the Purchasing Module.
- Finance creates a Payment Voucher in the Payment Voucher (Internal) Applet, referencing the invoice.
- The PV goes through the configured approval workflow.
- Once approved, payment is executed and the transaction auto-posts to the General Ledger.
- When the bank statement arrives, the payment is matched in the Bank Reconciliation Applet.
Workflow 2: Order-to-Cash (Customer Collection)
Sales Invoice ──▶ Receipt Voucher ──▶ Auto-Post to GL ──▶ Bank Reconciliation
  (from Sales)     (Finance team)       (System)           (Monthly)
Steps:
- A Sales Invoice from the Sales Module creates a customer receivable.
- When payment arrives, Finance creates a Receipt Voucher in the Receipt Voucher (Internal) Applet.
- The GL is updated automatically — debit Bank, credit Accounts Receivable.
- The deposit is matched during Bank Reconciliation.
Workflow 3: Monthly Close Process
Cut-off ──▶ Accrual Entries ──▶ Bank Recon ──▶ Aging Review ──▶ Trial Balance ──▶ Financial ReportsSteps:
- Finance closes the cut-off date — no new transactions for the closed month.
- Accrual journal entries are posted via the Ledger & Journal Applet.
- All bank accounts are reconciled using the Bank Reconciliation Applet.
- AR/AP aging is reviewed in the Debtor & Creditor Report Applet.
- Trial Balance is generated and reviewed for accuracy.
- Final Balance Sheet, P&L, and Cash Flow Statement are generated from the Financial Report Applet.
5. Roles & Permissions
| Role | Primary Applets | Key Responsibilities |
|---|---|---|
| Accounts Payable Clerk | Payment Voucher, Bank Recon | Create PVs, match supplier invoices, reconcile payments |
| Accounts Receivable Clerk | Receipt Voucher, Debtor Report | Record customer payments, chase overdue accounts |
| Accountant | Ledger & Journal, Financial Reports, Tax Config | Journal entries, month-end closing, tax filings |
| Budget Controller | Budget Applet, Vote Book | Set budget limits, monitor spending, approve exceptions |
| Finance Manager | All Finance applets | Approve PVs and RVs, review financial reports, strategic oversight |
| Auditor (Read-Only) | Financial Reports, GL, Bank Recon | View-only access for compliance audits |
6. Prerequisites / Initial Setup
Before going live with Financial Accounting, ensure:
- Core Module is fully configured (Organisation, COA, Cashbook, Tax Codes)
- Opening balances are imported (see the detailed Opening Balance Process below)
- All bank accounts are registered as Cashbooks
- Approval workflows for Payment Vouchers are configured via Workflow Design Applet
- Budget structure is defined (if using budgetary controls)
- Financial report templates are configured in the Financial Report Applet
- SST registration details are entered (for Malaysian entities)
Opening Balance Process
Purpose
The Opening Balance Process is used to bring forward balances from the previous accounting or inventory records into the current system. This process ensures the new system reflects accurate stock, receivables, payables, cash, and ledger balances after the company transitions into the new environment.
Note: Some balances may only be available after the previous period’s transactions are finalized or audited. These can be entered progressively once confirmed.
Overview
Opening balance setup involves transferring existing data for the following areas:
| No. | Area | Purpose | Typical Timing |
|---|---|---|---|
| 1 | Stock Balance | Record item quantities and cost values from previous system | Before go-live |
| 2 | Customer Outstanding | Record unpaid invoices or deposits from customers | After go-live (Disable E-invoice) |
| 3 | Supplier Outstanding | Record unpaid supplier bills or paid deposits | After go-live (Disable E-invoice) |
| 4 | Cashbook Balance | Bring forward bank and cash balances | After bank reconciliation confirmation |
| 5 | General Ledger Balance | Record account balances from balance sheet | After finalized previous months reportings |
Step-by-Step Process
1. Stock Balance Upload
- Purpose: To import all item quantities and cost values from the old system into the new system before go-live.
- Timing: Perform this process before go-live, after confirming all stock balances from the previous system.
- Preparation:
- Create One time supplier in Supplier Applet
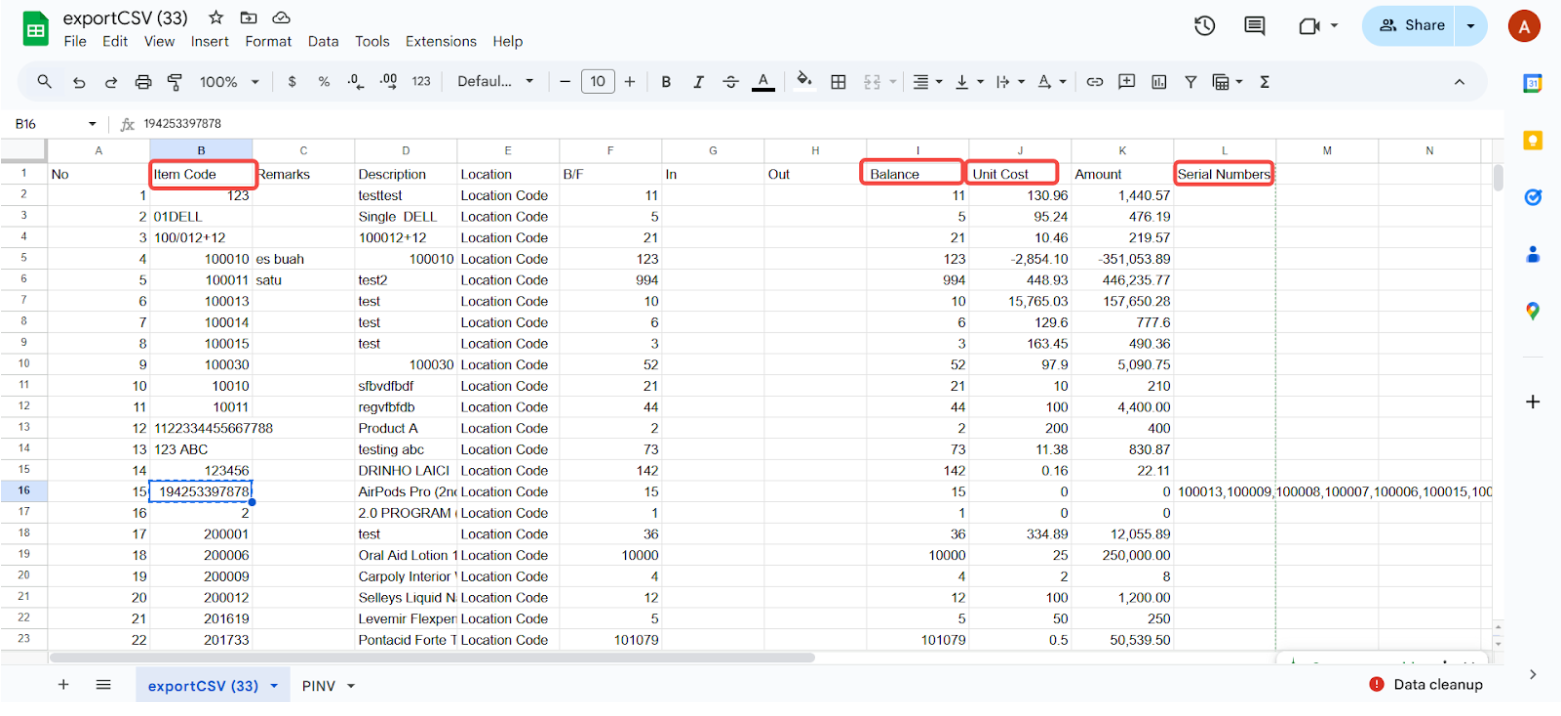
- Export item balance report from old system separately for each branch/location
- Include: Item Code, Description, Quantity, Unit Cost, Total Value, serial number, and branch.
- Ensure item codes are exactly the same between both systems.
- For serialized items, include:
- Serial Number column.
- Number of serial numbers = quantity count.
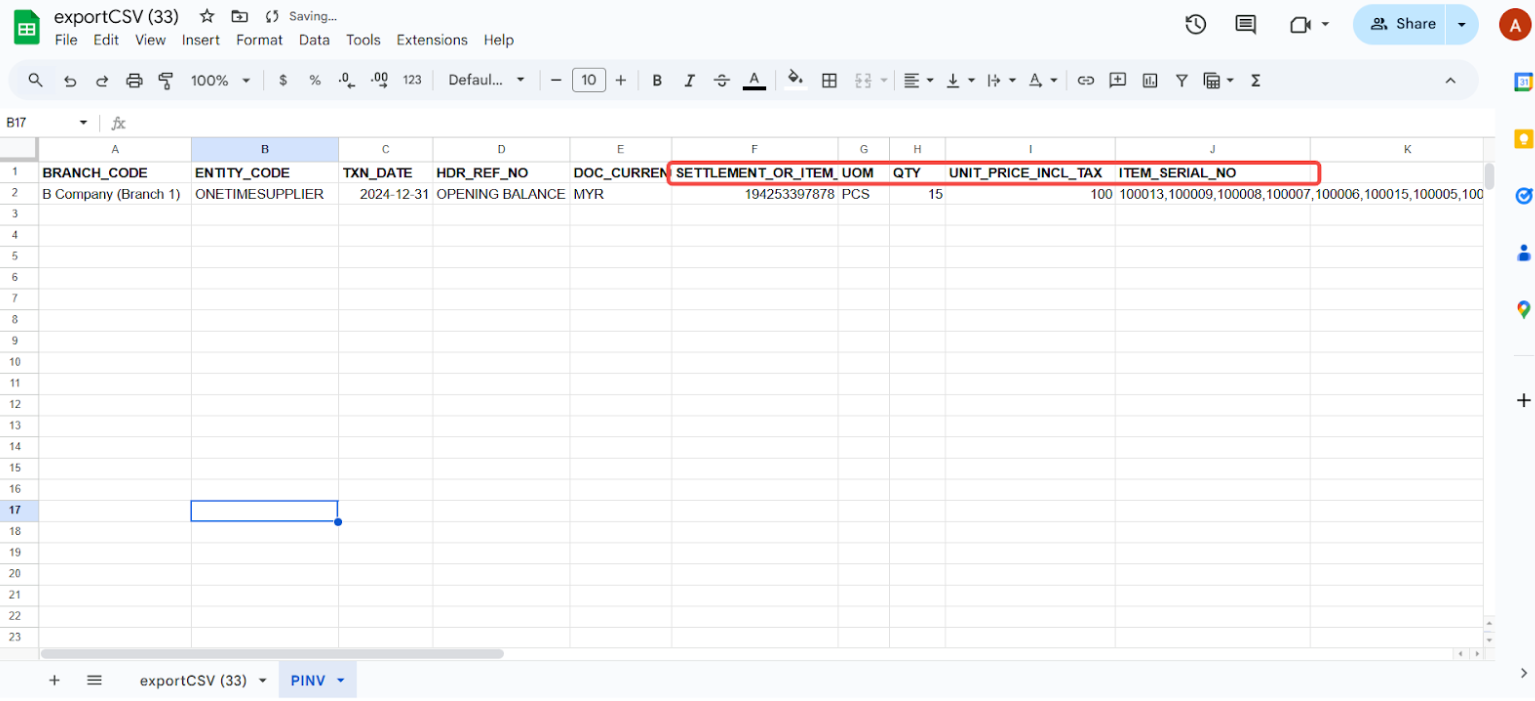
- Prepare the import file in the system’s purchase invoice template format.
| BRANCH_CODE | ENTITY_CODE | TXN_DATE | HDR_REF_NO | DOC_CURRENCY | SETTLEMENT_OR_ITEM_CODE | UOM | QTY | UNIT_PRICE_INCL_TAX | ITEM_SERIAL_NO |
|---|---|---|---|---|---|---|---|---|---|
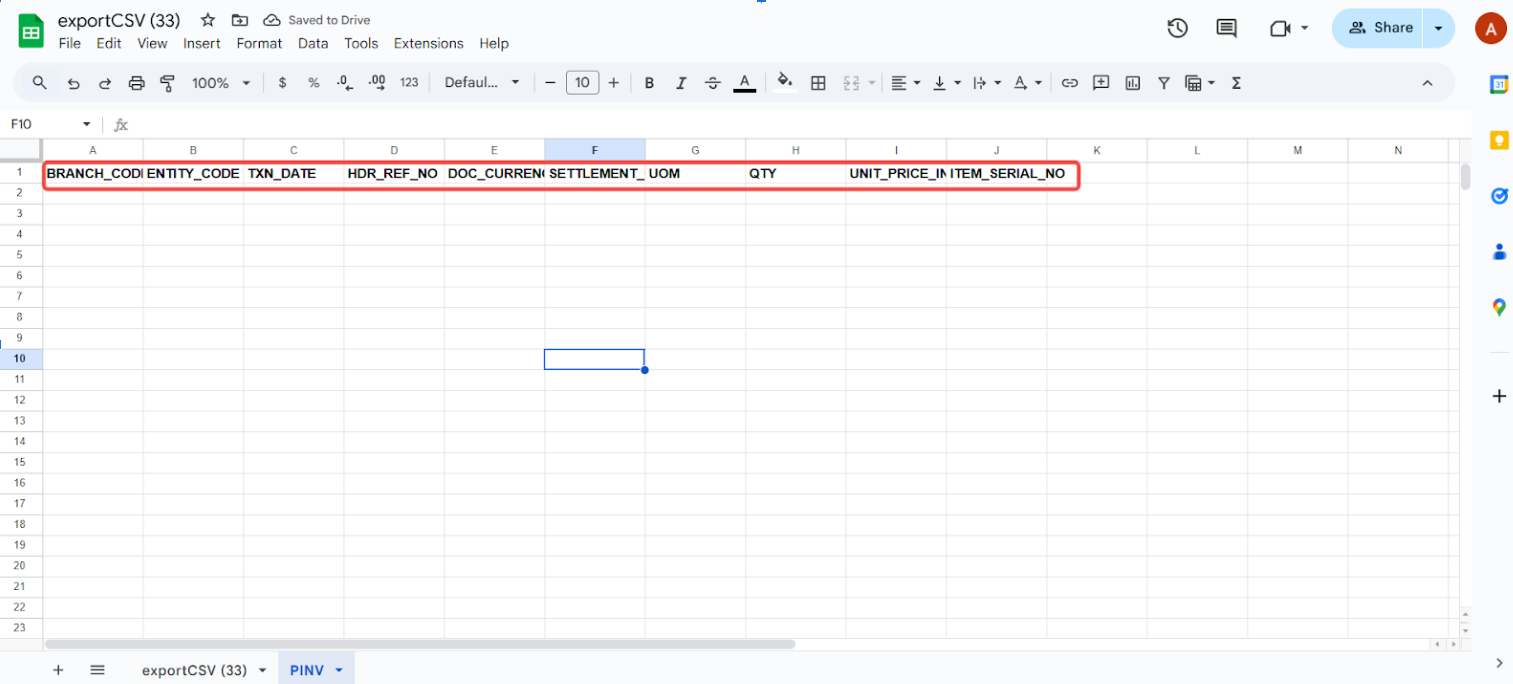
Updating of the purchase invoice template
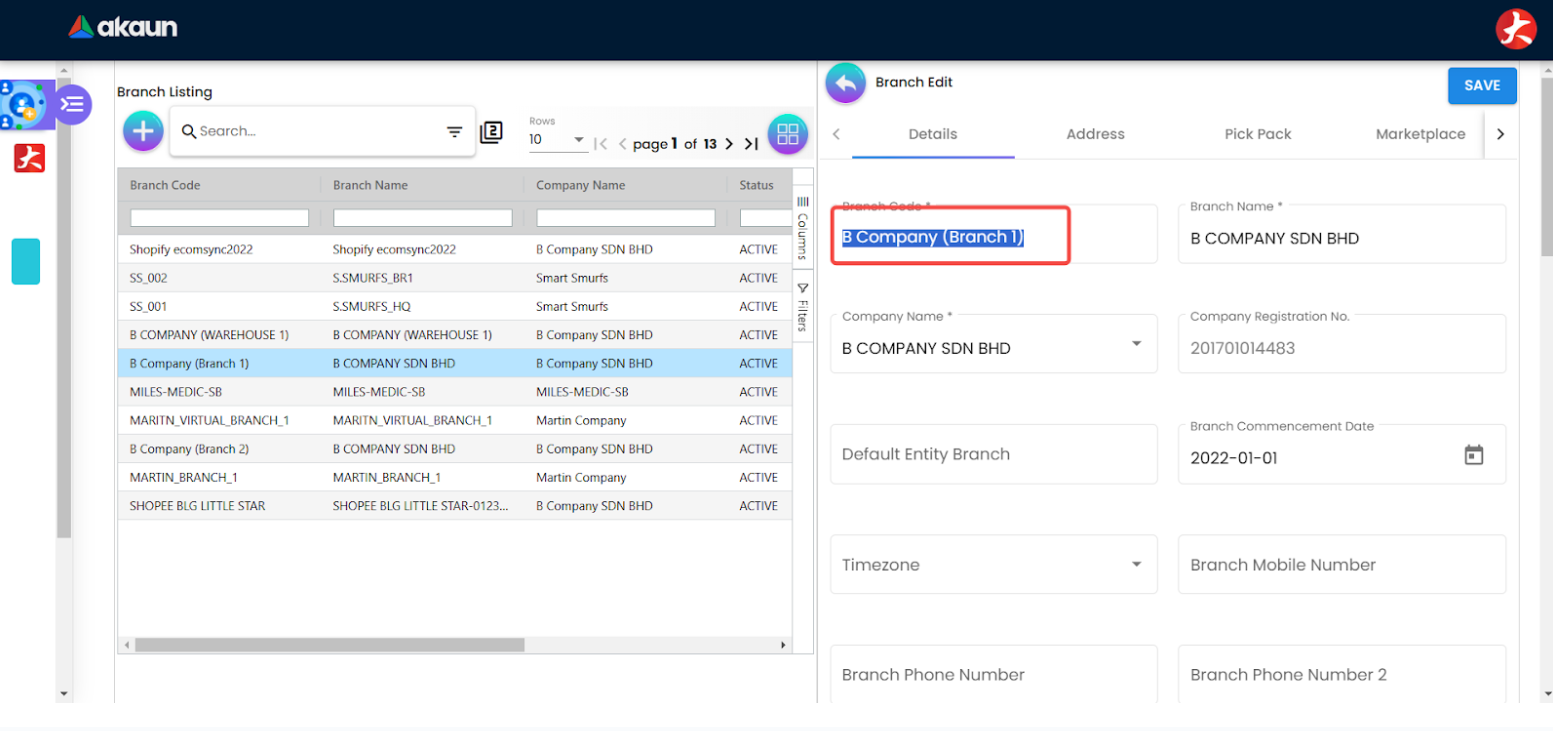
Branch Code, Transaction Date, Currency, HDR Reference and Entity Code:
- Enter the branch code (check the correct branch code from organization applet branch listing)
- Set the transaction date to
2024-12-31. - Put
OPENING BALANCEfor HDR Reference. - Put
MYRfor the currency column. - Put
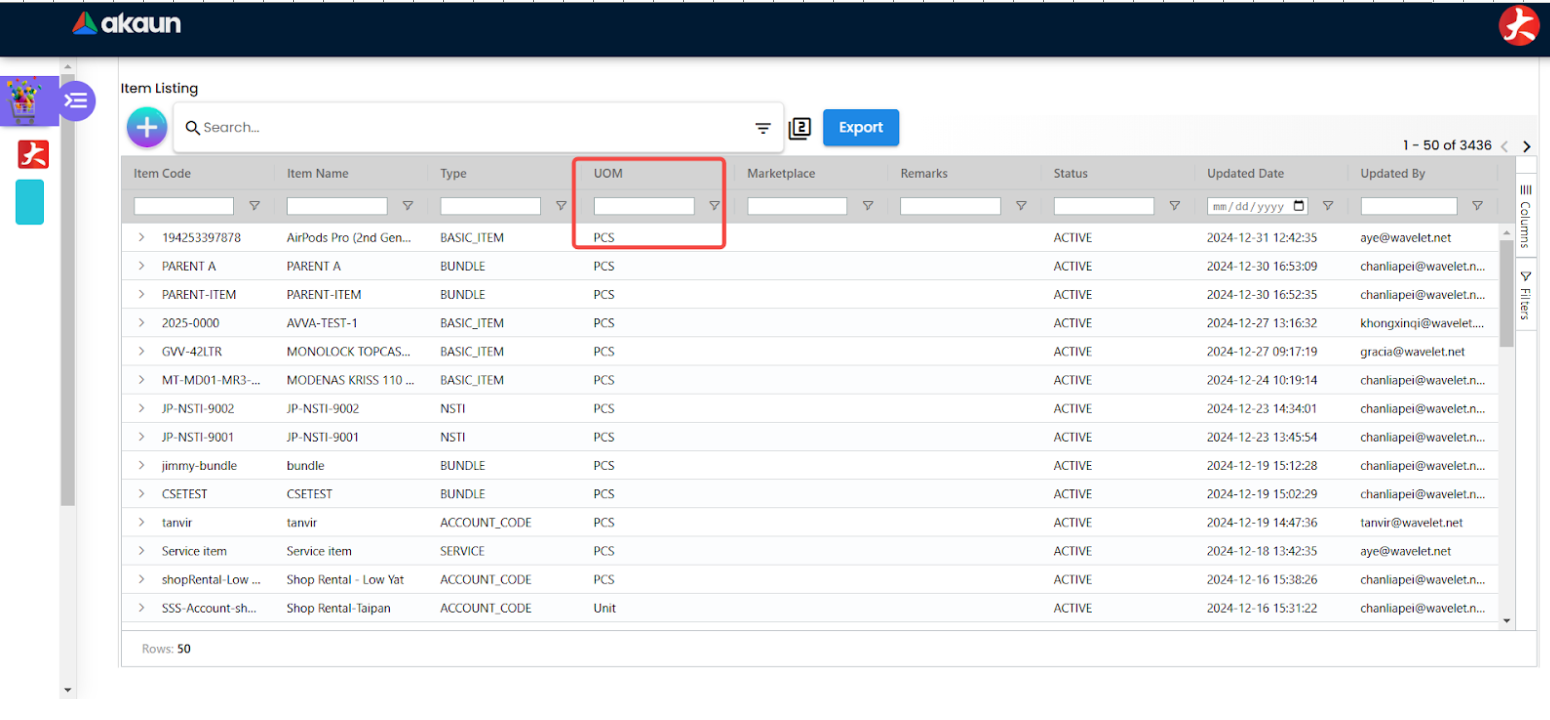
ONE TIME SUPPLIERfor the Entity code (Create theONE TIME SUPPLIERin Supplier Applet First). - Put the UOM based on your Item list in Bigledger (
PCSorUNITor Others).
Item Details:
- Update the following columns copy from old system reports to PINV Template:
- Item Code
- Quantity
- Serial Number - use comma (
,) to separate the serials numbers in one cell - UNIT_PRICE_INCL_TAX
Finalizing the Purchase Invoice upload file
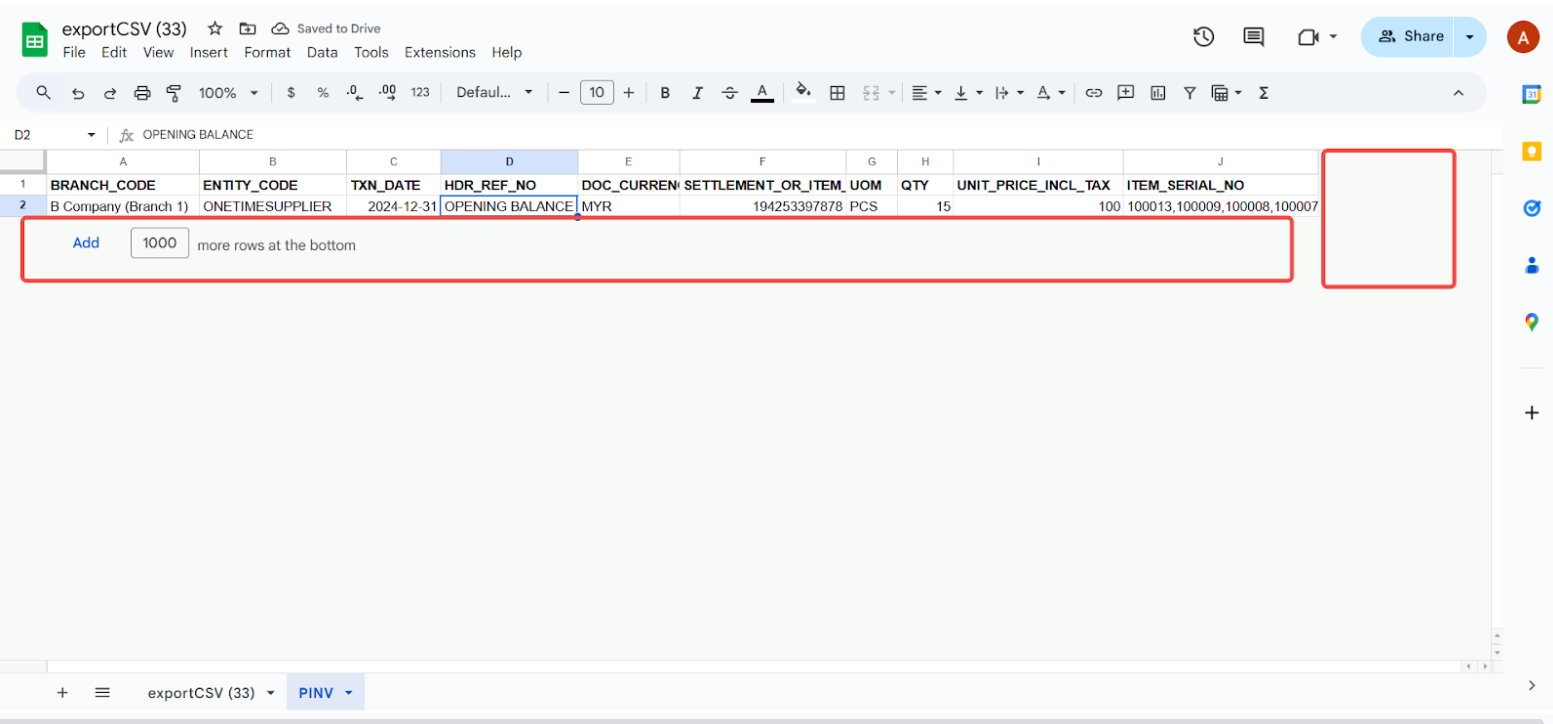
Validate Data:
- Ensure all headers, quantities, costs, and serial numbers are accurate and up to date.
- Extra columns must be deleted.
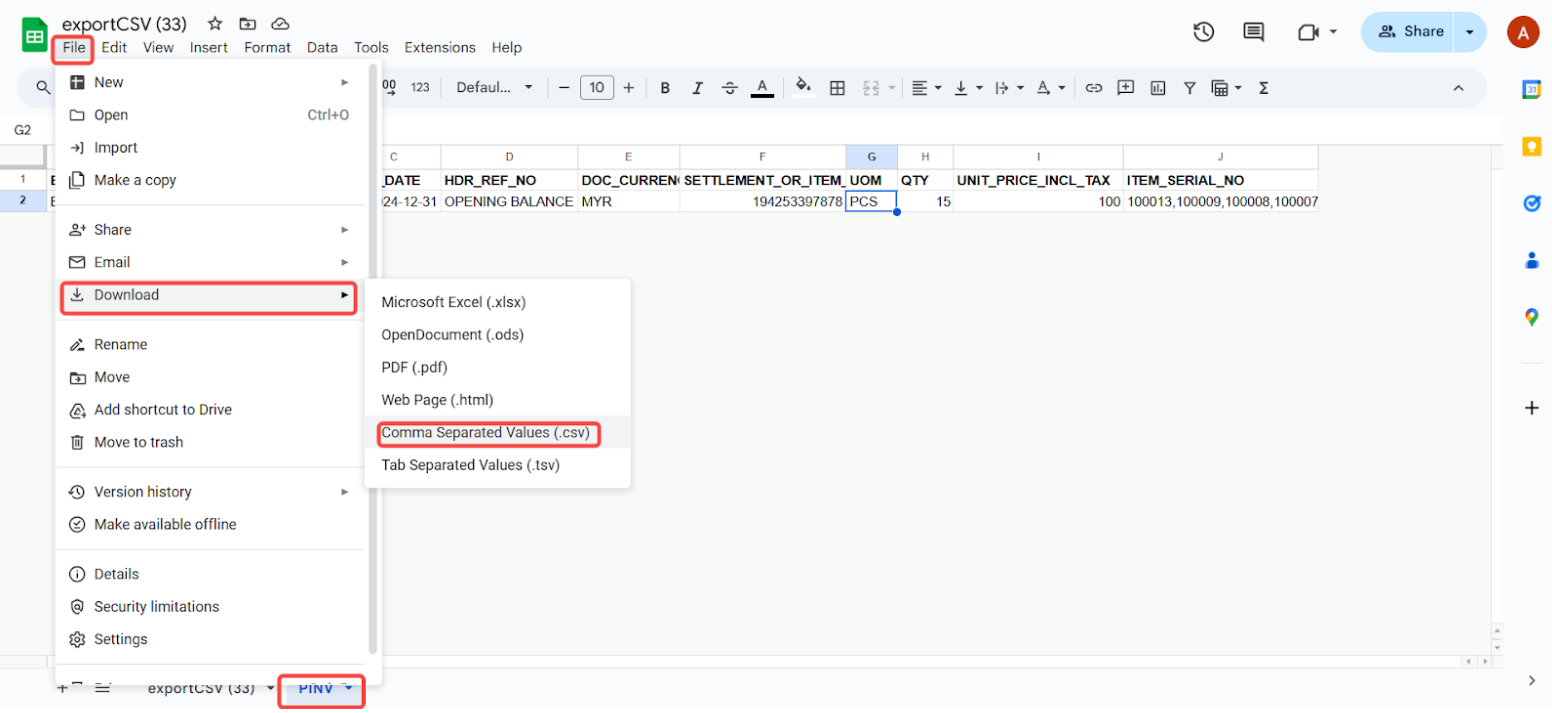
Export and Import to Bigledger
Export as CSV
- Download the updated template as csv
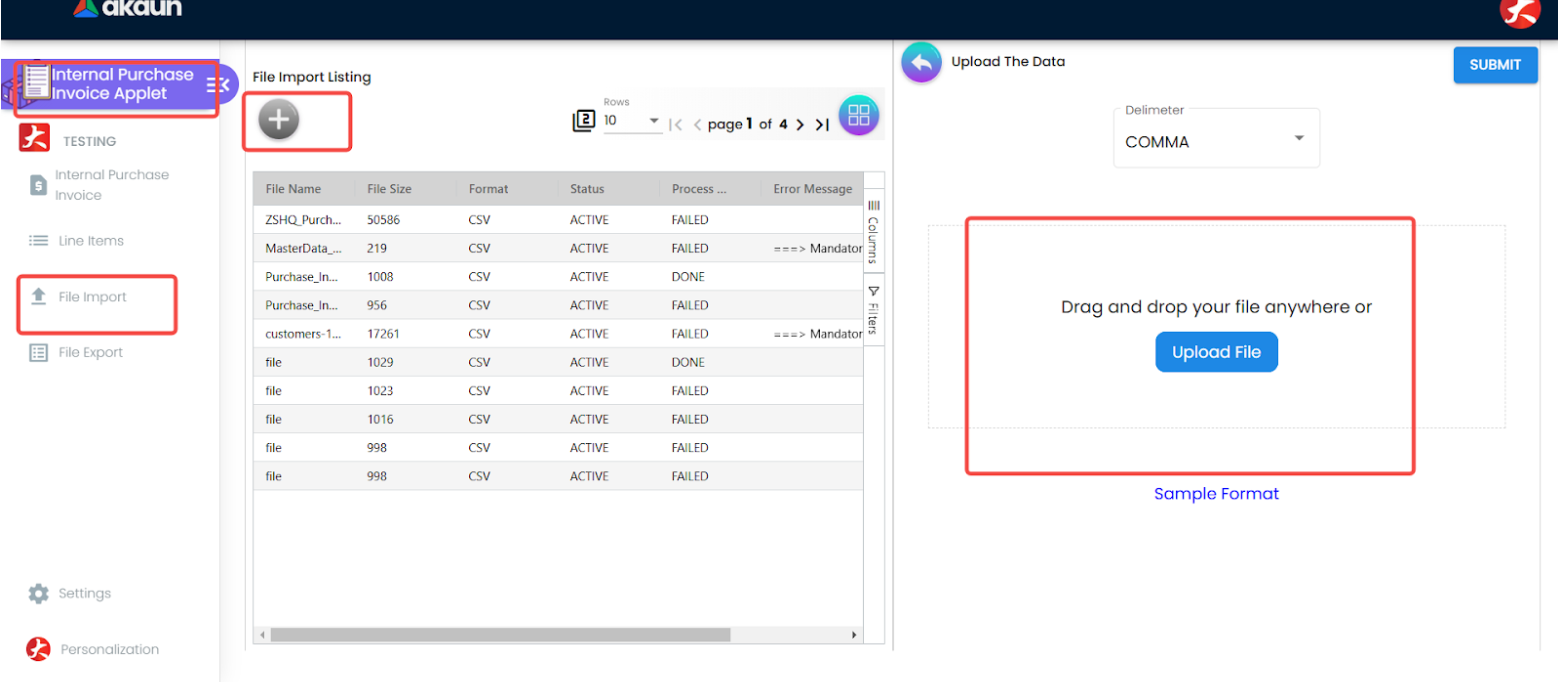
Import to Bigledger
- Open Purchase Invoice (Internal) Applet
- Click Import File
- Click + button
- Drag or upload the exported csv format file and submit
Checking the data
- After upload you may able to check the error by clicking into imported file (true means uploaded, false mean failed, you can scroll to right to check the error msg in red)
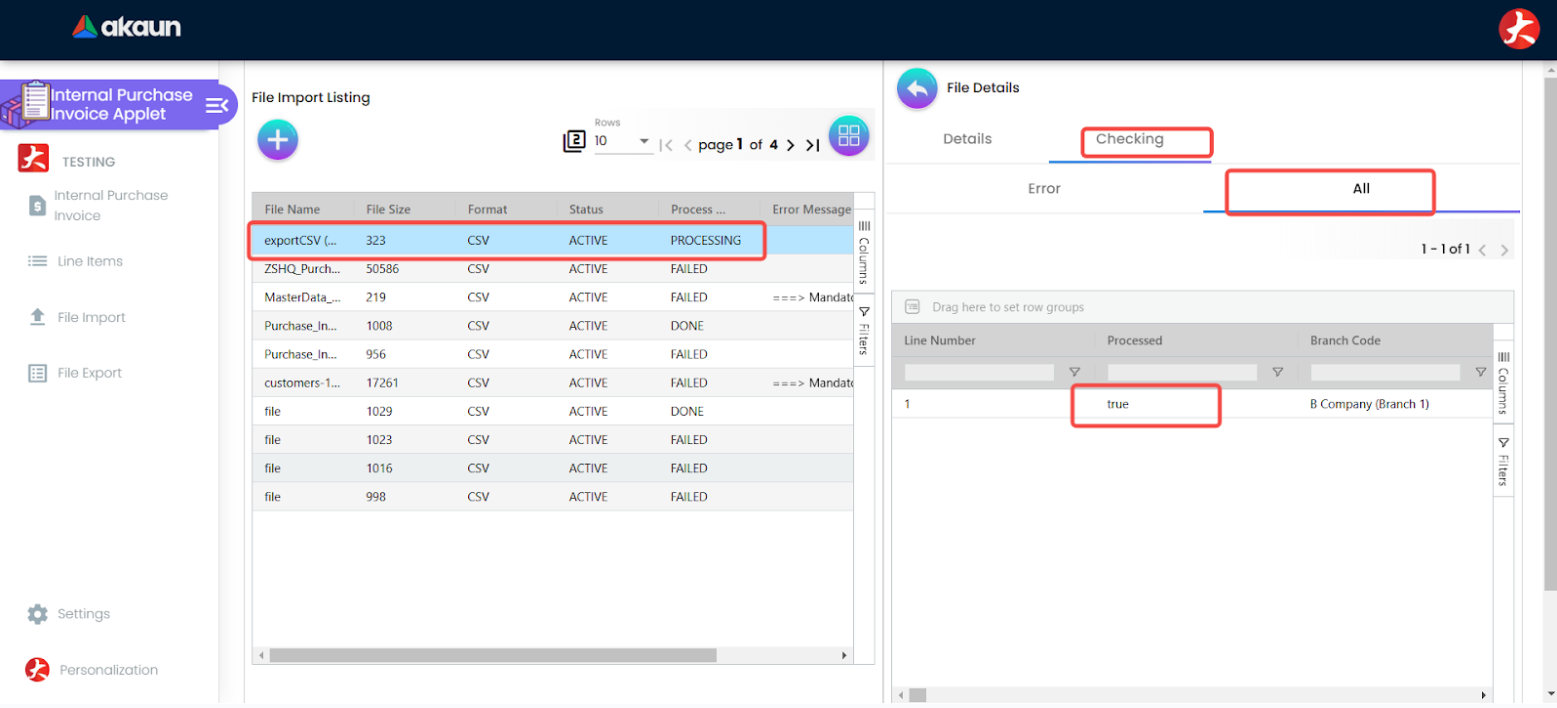
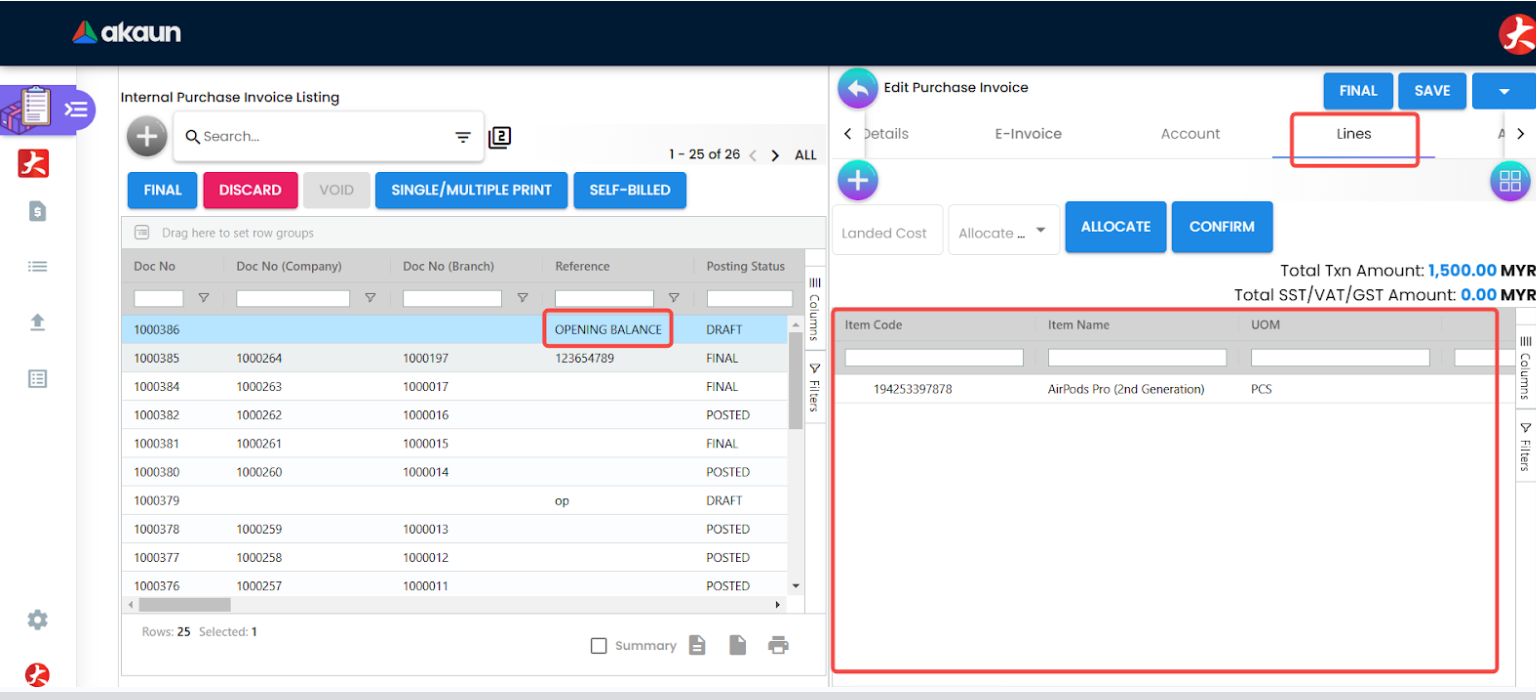
- Open Purchase Invoice (Internal) menu, and the uploaded csv file saved as Draft mode
- Click into check the line items details, and FINAL it once confirm
- You can open stock availability report applet to check the stock balance
Common Mistakes to Avoid
- Mismatched item code
- Forgetting to include serial numbers for serialized items.
- Number of serial numbers doesn’t match with item quantity
2. AR Balance (Customer outstanding) Upload
Purpose: The AR Balance Upload process is used to bring forward customer outstanding balances from the previous system into the new system. Their purpose is to ensure that any post-go-live customer payments are correctly applied against prior outstanding balances.
Timing: The upload is typically performed after go-live but after disabling e-invoice submission. This ensures no conflicts with automatic e-invoice submission.
Preparation:
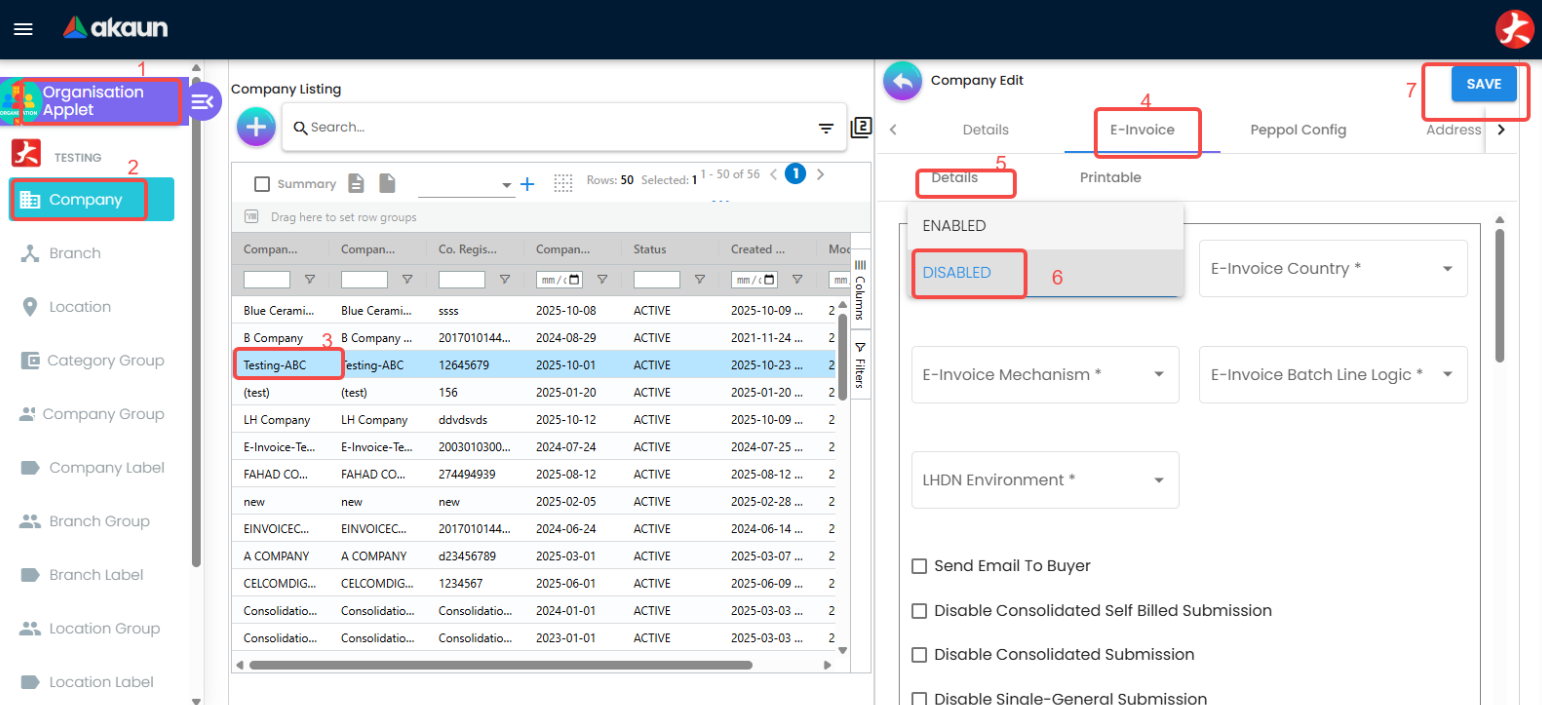
- Disable e-invoice submission for the relevant companies in the Organization Applet.
- Create
OPENING BALANCEitem In Doc item maintenance applet (Service type item). - Create Opening Cashbook and Opening Settlement method for each company in Cashbook Applet - this will be used for outstanding receipt voucher upload.
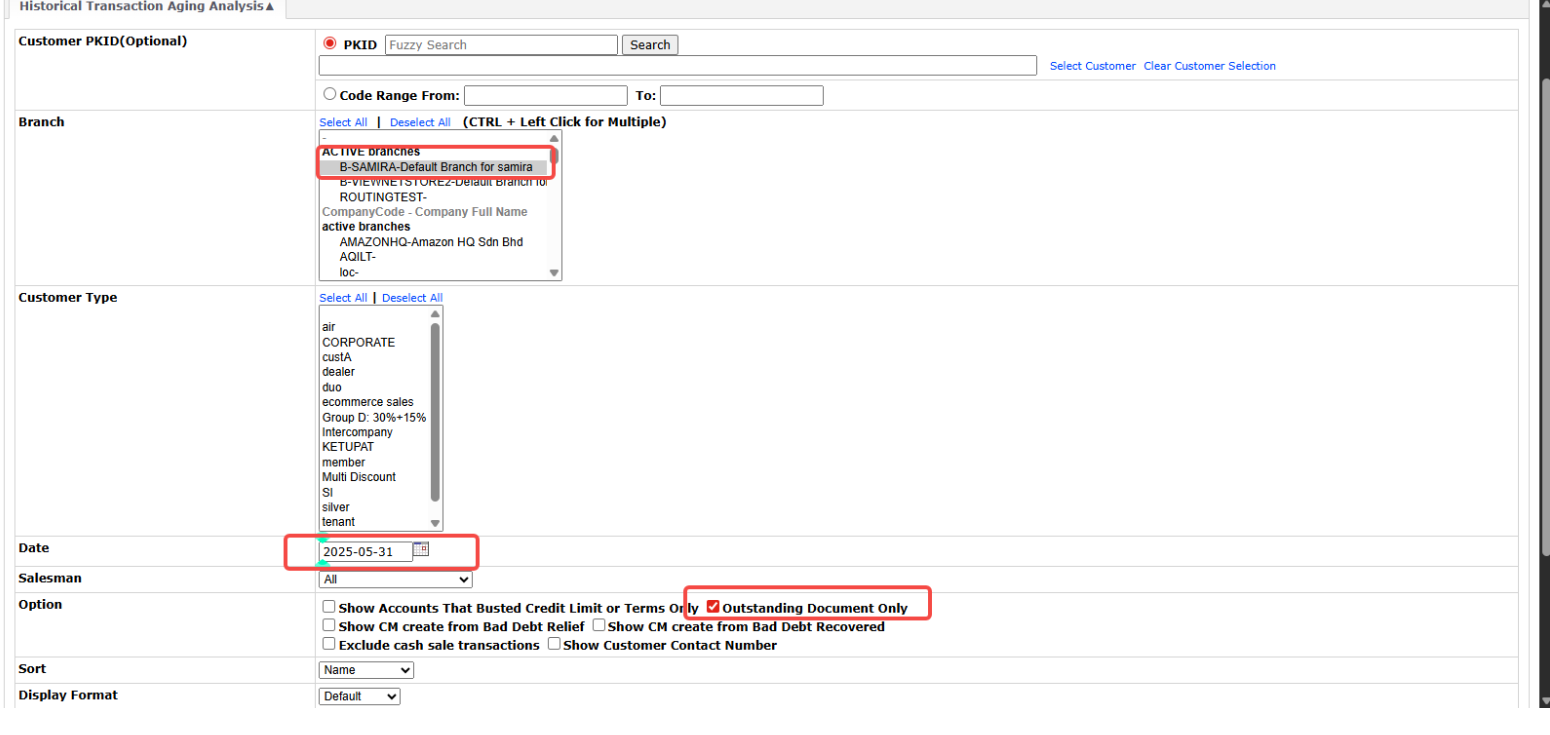
- Export Customer outstanding from previous system / EMP
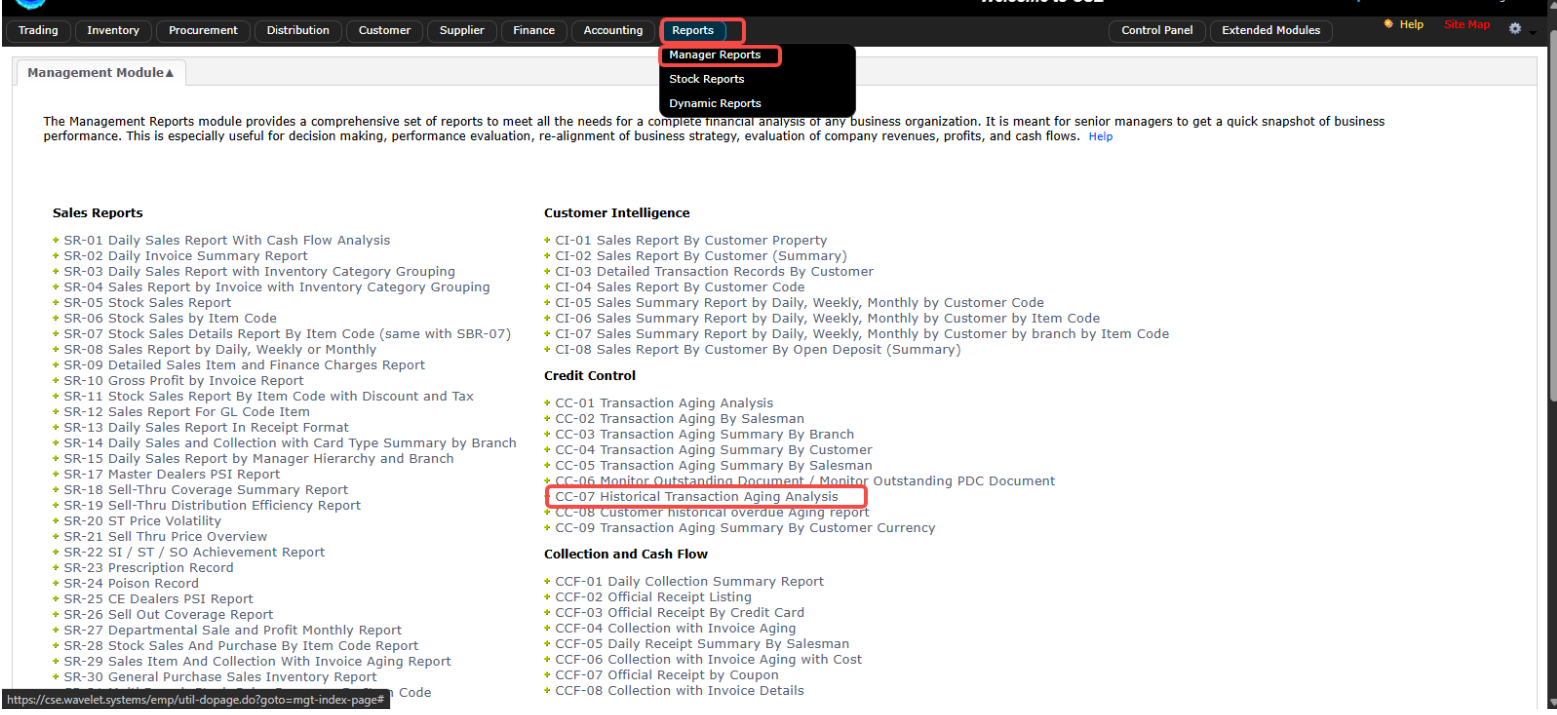
- EMP Customer:
- Navigate: Reports → Manager Reports → CC-07 Historical Transaction Aging Analysis
- Select one branch
- Set data date (e.g., 31 May 2025) - closing date (cutoff date for migration)
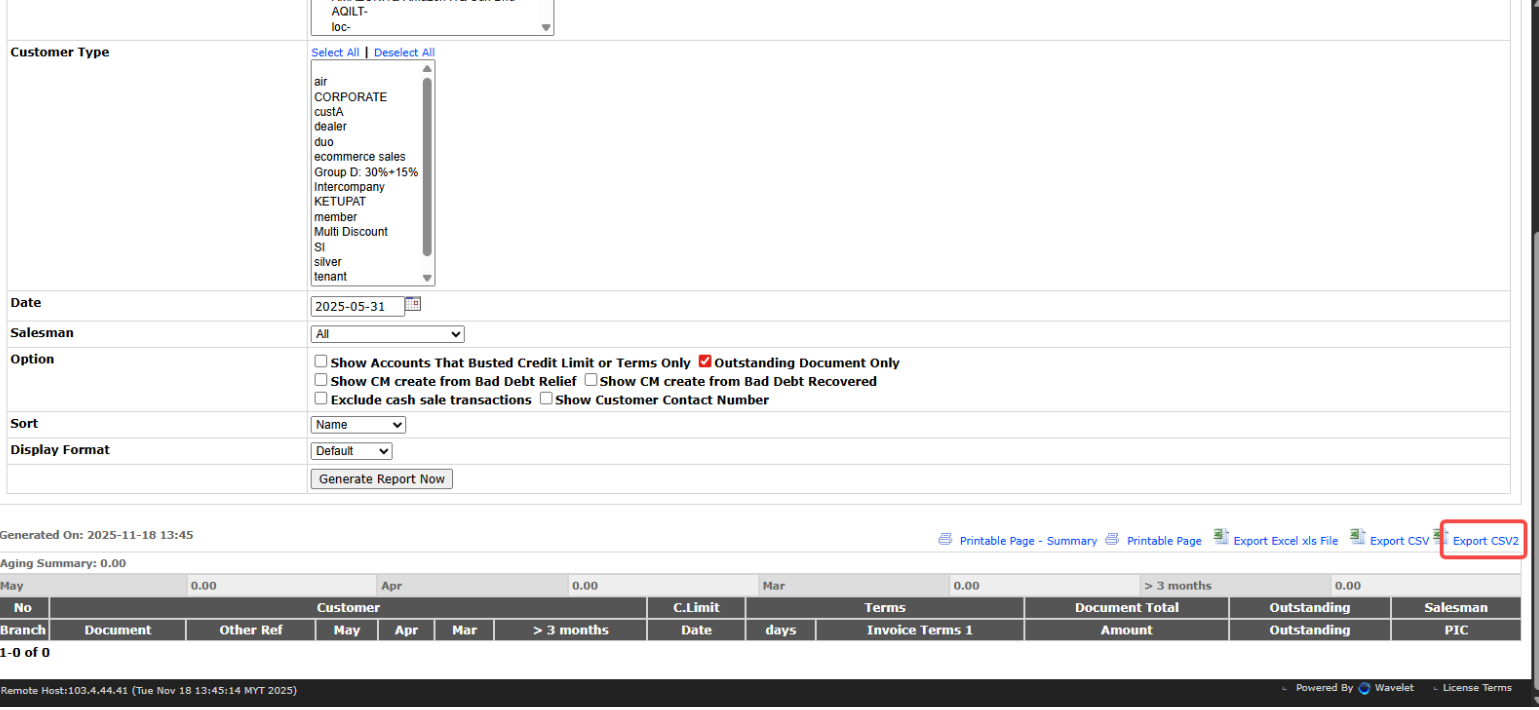
- Export using CSV2
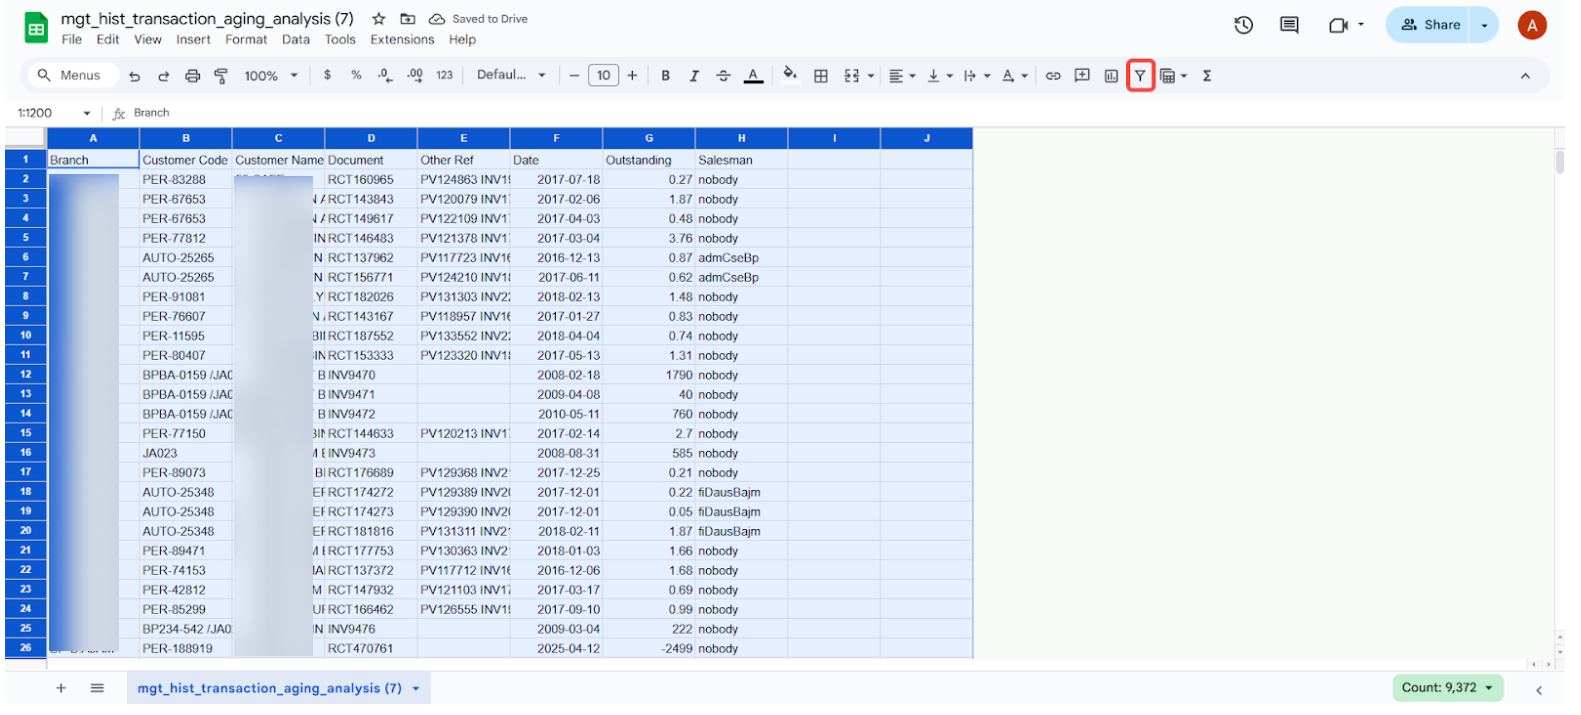
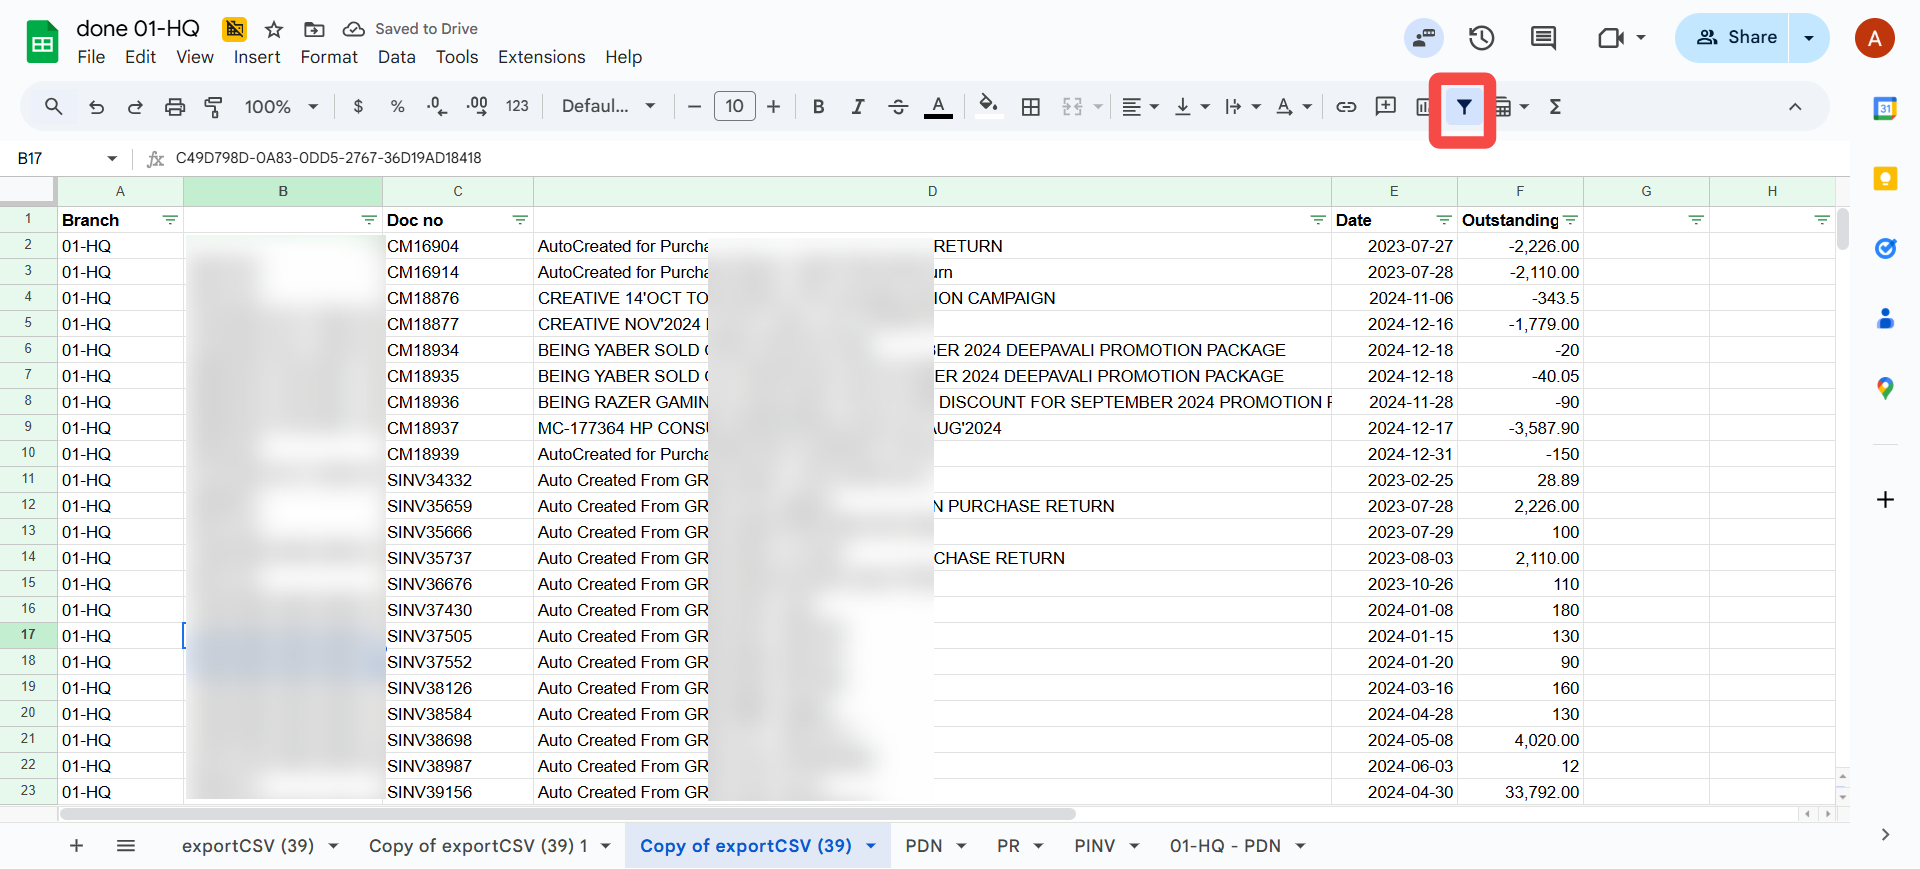
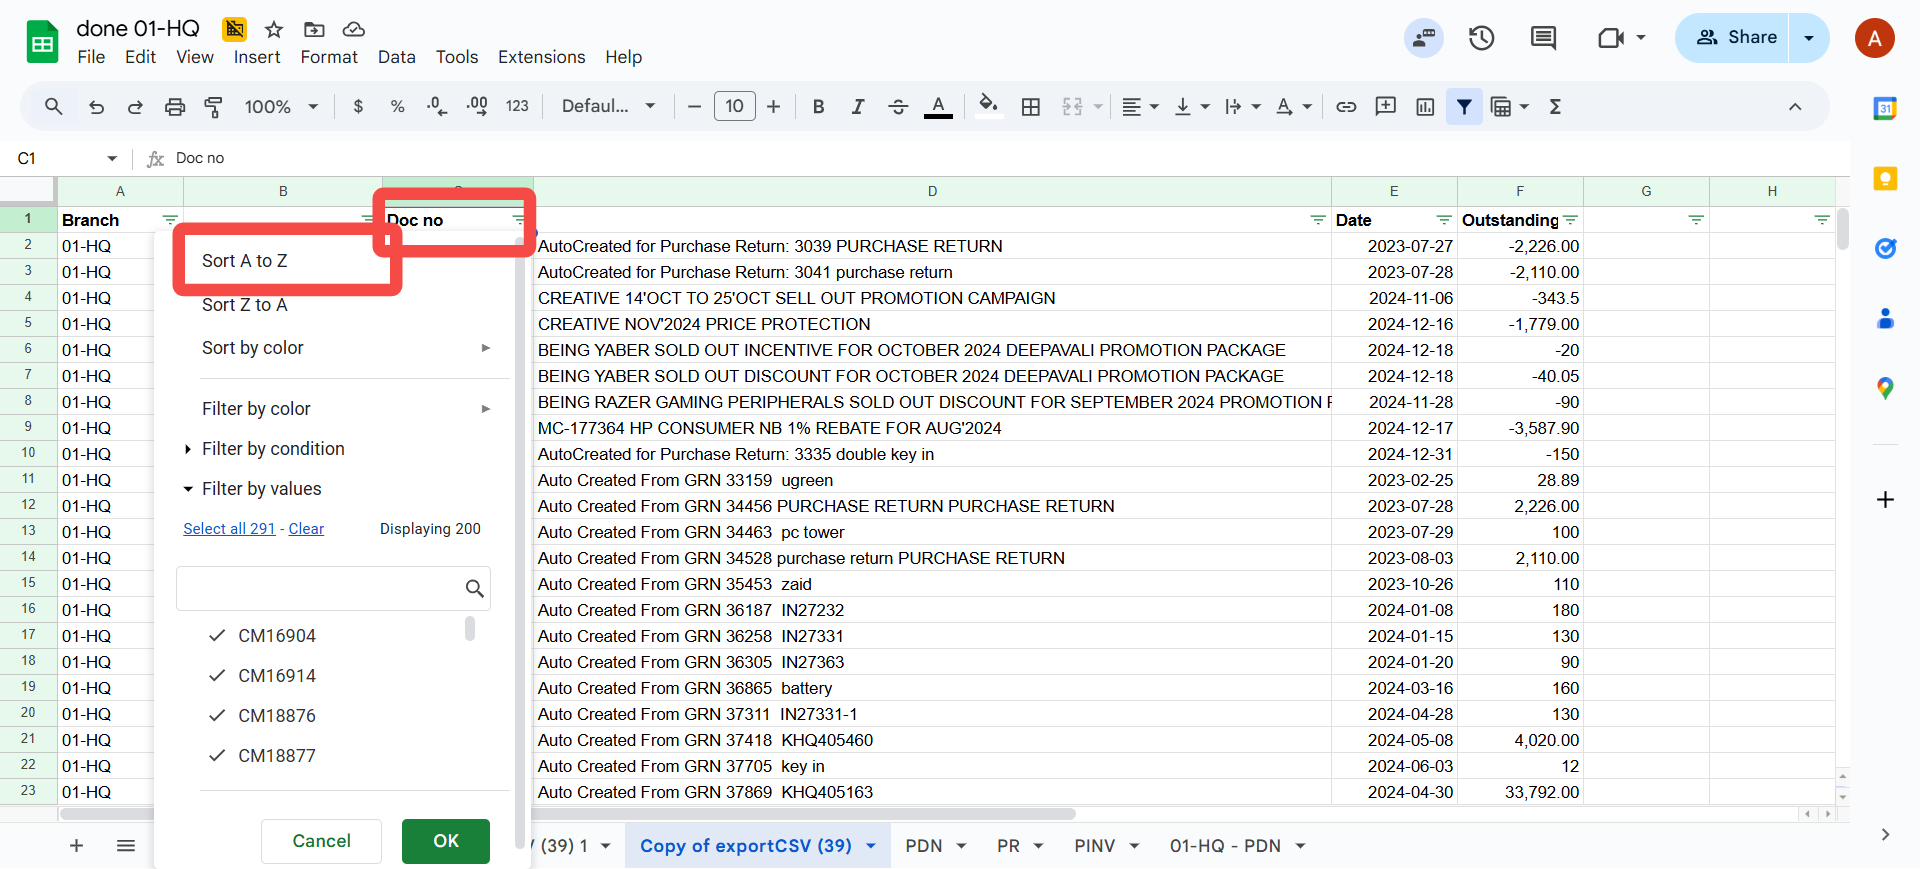
Filtering of the Data
- Open CSV in Excel or Google Sheets
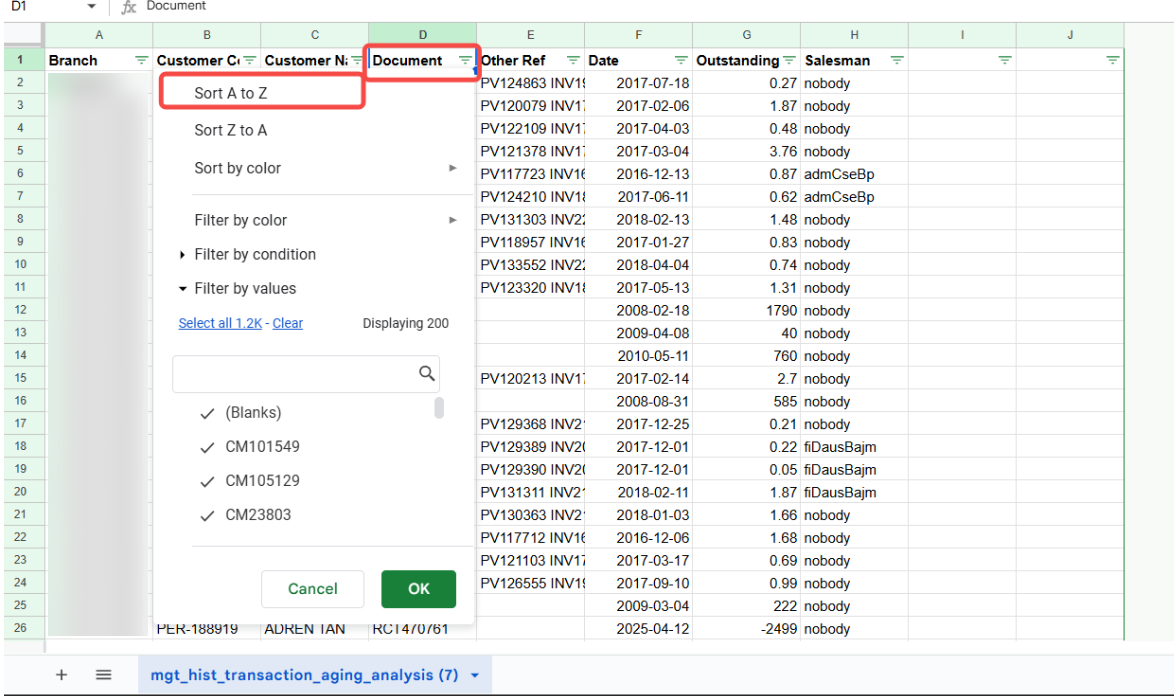
- Apply filters and sort Document (Column A) A → Z
- Create separate tabs for:
- Sales Invoice (Sales Invoice (Internal) Applet)
- Sales Credit Note (Internal Sales Credit Note Applet)
- Receipt Voucher (Receipt Voucher (Internal) Applet)
- Prepare upload templates for each document type.
Updating of Sales Invoice Template
Sales Invoice - Will be uploaded to Sales Invoice (Internal) Applet
- Branch code- Please follow the Branch code in BLG
DOC_CURRENCYalwaysMYRSETTLEMENT_OR_ITEM_CODE-OPENING BALANCEQTYalways 1UOMalwaysPCSPOSTING_STATUS-FINAL(if you putDRAFT, you need to final each doc manually in the applets)
| BRANCH_CODE | TXN_DATE | HDR_REF_NO | DOC_CURRENCY | SETTLEMENT_OR_ITEM_CODE | QTY | AMOUNT_INCL_TAX | HDR_REMARKS | ENTITY_CODE | UOM | POSTING_STATUS |
|---|---|---|---|---|---|---|---|---|---|---|
Updating of Sales Credit Note Template
Sales Credit Note - Will be uploaded to Internal Sales Credit Note Applet
- Branch code and location code- Please follow the Branch code and Location code in BLG
DOC_CURRENCYalwaysMYRSETTLEMENT_OR_ITEM_CODE-OPENING-BALANCEQTYalways 1UOMalwaysPCSPOSTING_STATUS-FINAL(if you putDRAFT, you need to final each doc manually in the applets)
| BRANCH_CODE | LOCATION_CODE | TXN_DATE | HDR_REF_NO | DOC_CURRENCY | SETTLEMENT_OR_ITEM_CODE | QTY | AMOUNT_INCL_TAX | HDR_REMARKS | ENTITY_CODE | UOM | POSTING_STATUS |
|---|---|---|---|---|---|---|---|---|---|---|---|
Mapping of the data with BLG upload template
- Copy relevant columns from EMP/Previous system to Map with Upload template
- Customer Code =
ENTITY_CODE - Document Running Number =
HDR_REF_NO - Other Ref =
HDR_REMARKS - Date =
TXN_DATE - Outstanding Amount =
AMOUNT_INCL_TAX- (useABSformula to make it positive if negative amount)
- Customer Code =
- Fill up the empty cells with
DEFAULTdata - Delete empty columns and rows
- Then the file is ready for upload, you can download it as CSV and upload to Relevant Applets
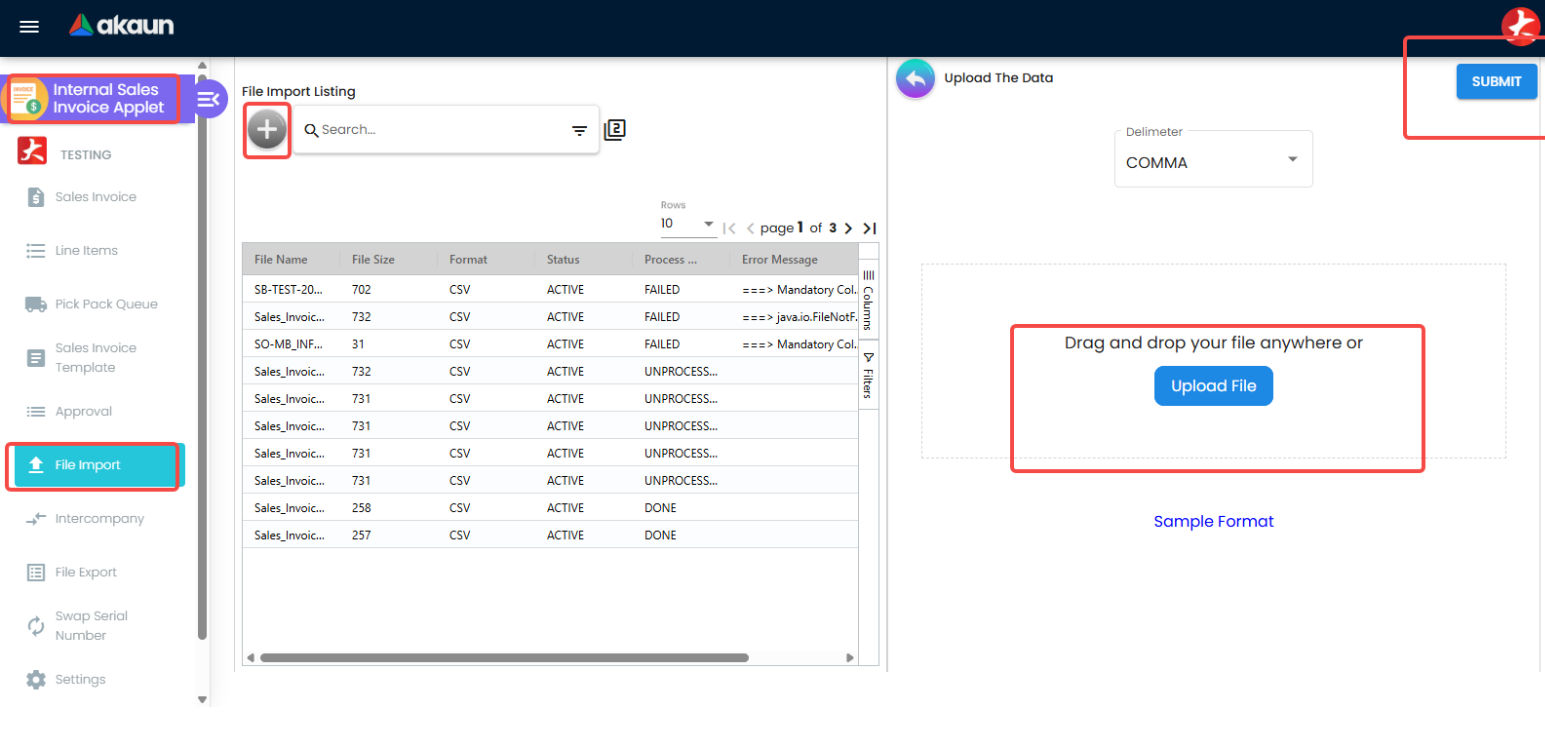
Sales Invoice (Internal) Applet File import
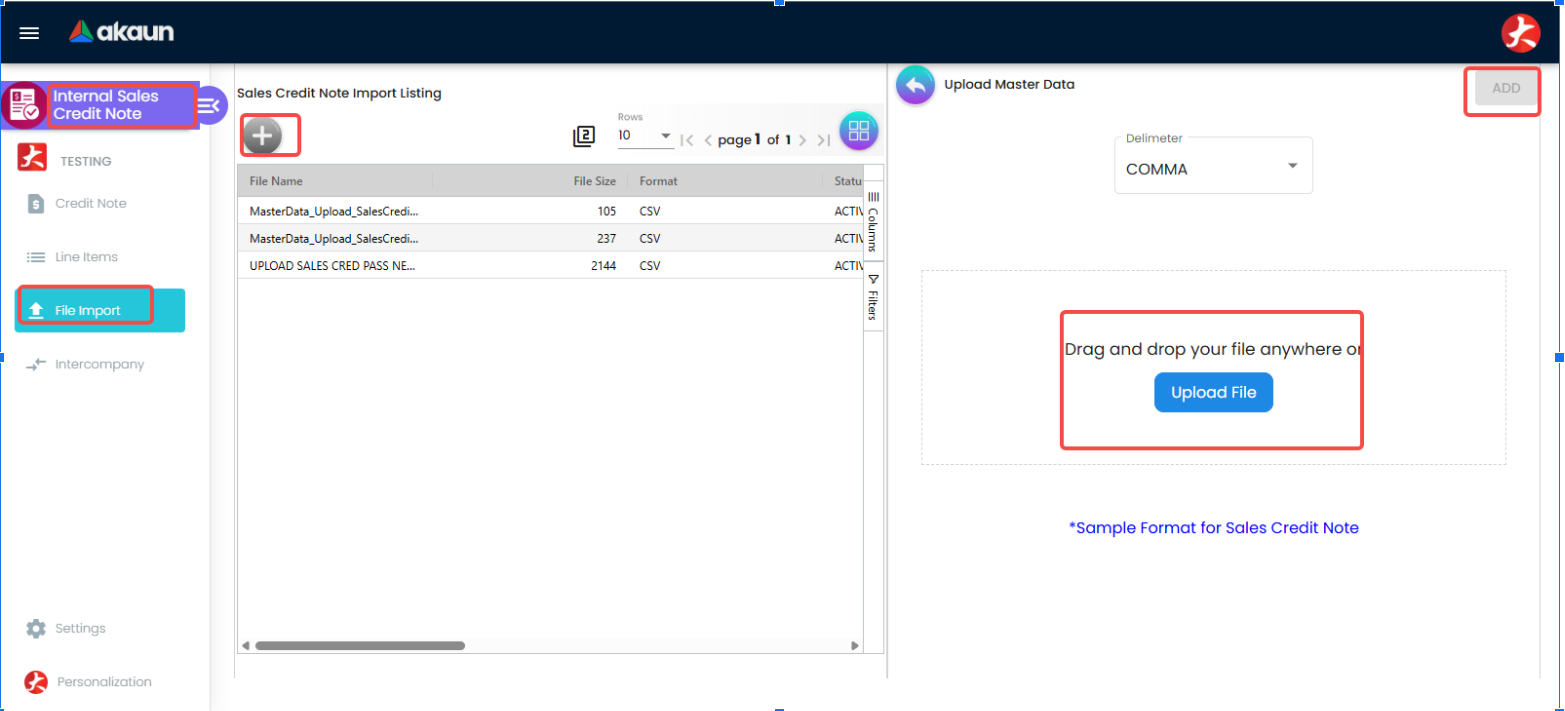
Internal Sales Credit Note Applet File import
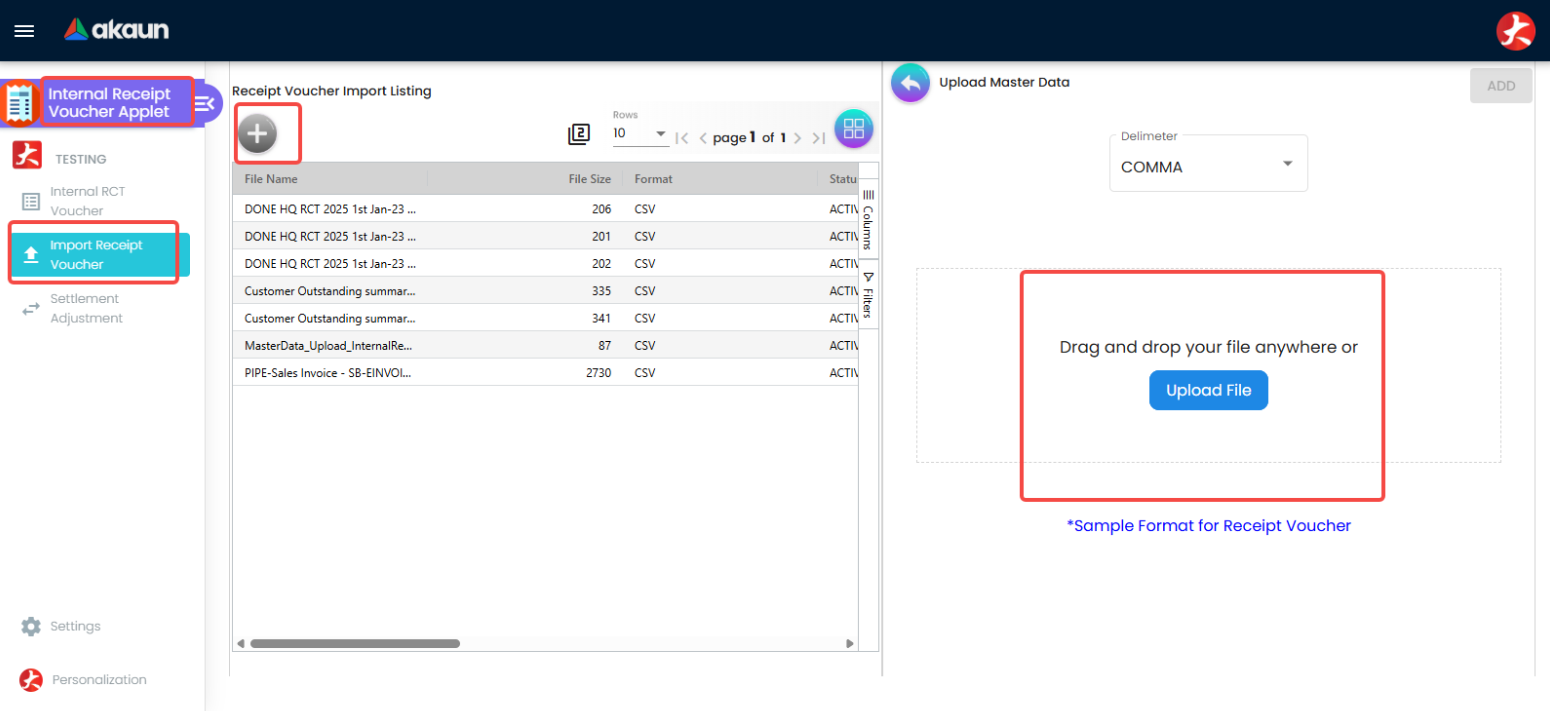
Receipt Voucher (Internal) Applet File import
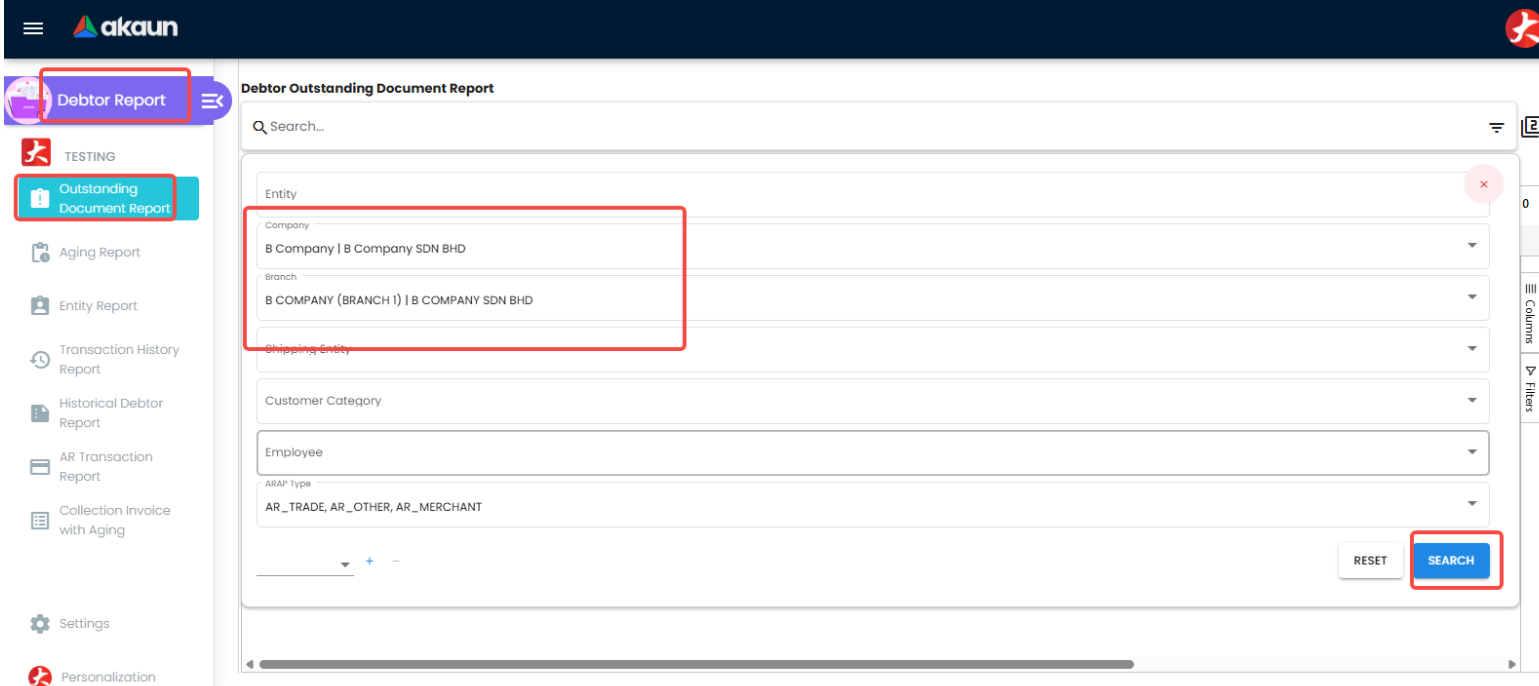
Post-Upload Verification
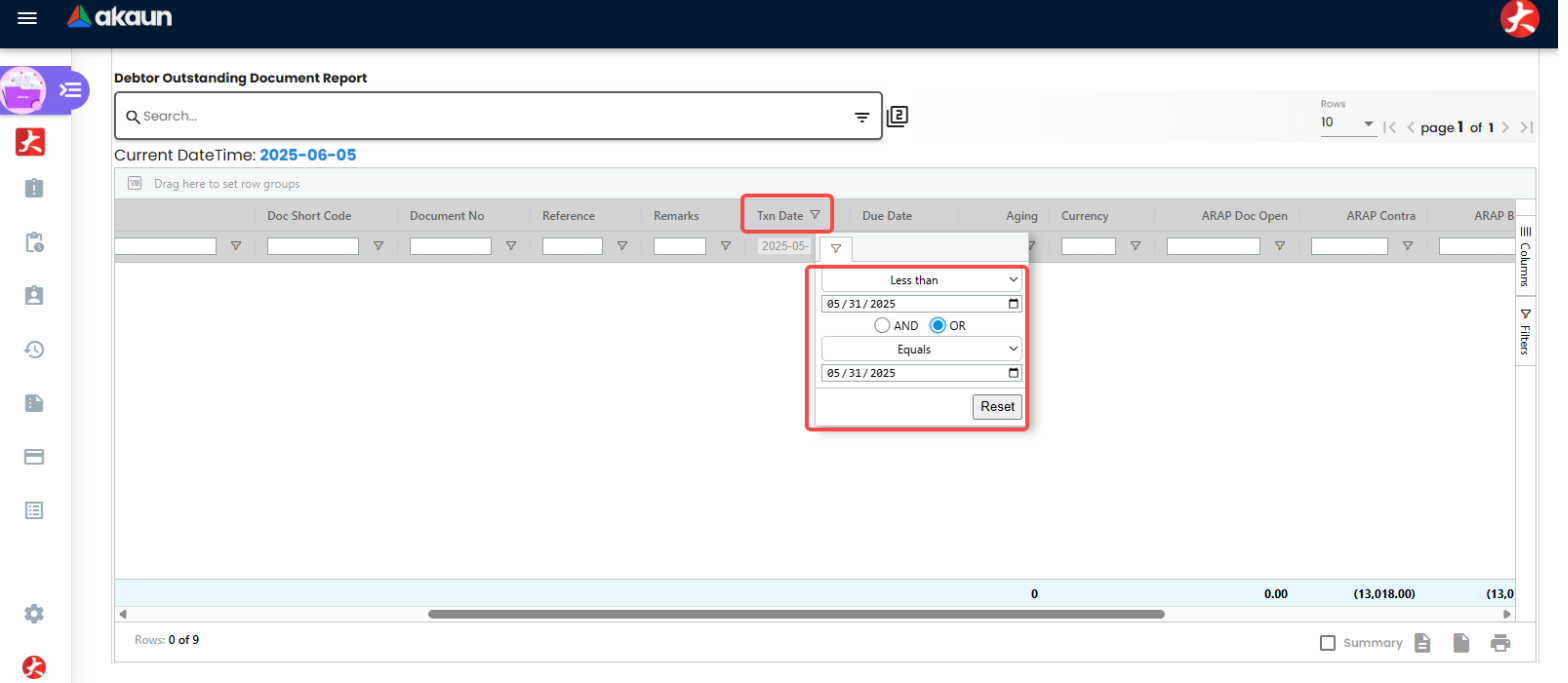
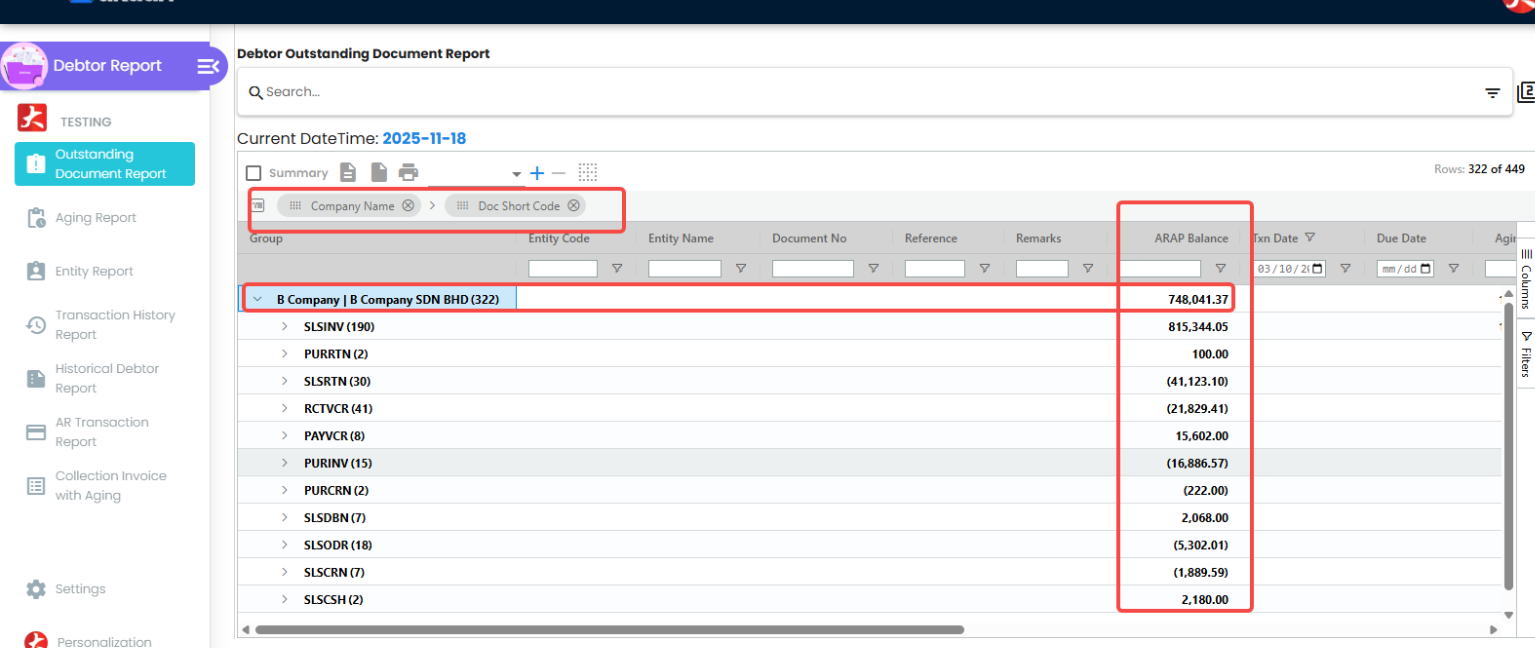
- Open Debtor Report Applet → Debtor Outstanding Document Report
- Filter by Branch
- Filter by Transaction Date
- Group by Company Code and Document Short Code
- Verify total amounts match expected opening balances.
Common Issues
- Incorrect branch/location code
- Missing customer master records
- Negative amounts not converted using (
ABS) - Posting status left as
DRAFT - Empty cells or rows in upload CSV
3. AP Balance (Supplier outstanding) Upload
Purpose: The AP Supplier Outstanding Upload process is used to bring forward supplier outstanding documents so the new system can offset any post-go-live payments against previous unpaid supplier bills.
Timing:
- After receiving the final supplier outstanding listing from the previous system.
- After go-live, if suppliers continue to submit invoices late, or if final audited balances are only confirmed later.
Preparation:
- Disable e-invoice submission for the relevant companies in the Organization Applet. - Only required if Supplier need self billed e-invoice
- Create
OPENING BALANCEitem In Doc item maintenance applet (Service type item) - can be used same item code used for AR Balance Upload - Create Opening Cashbook and Opening Settlement method for each company in Cashbook Applet - this will be used for outstanding Payment voucher upload - can be used same settlement code used for AR Balance Upload
- Export Supplier outstanding from previous system / EMP
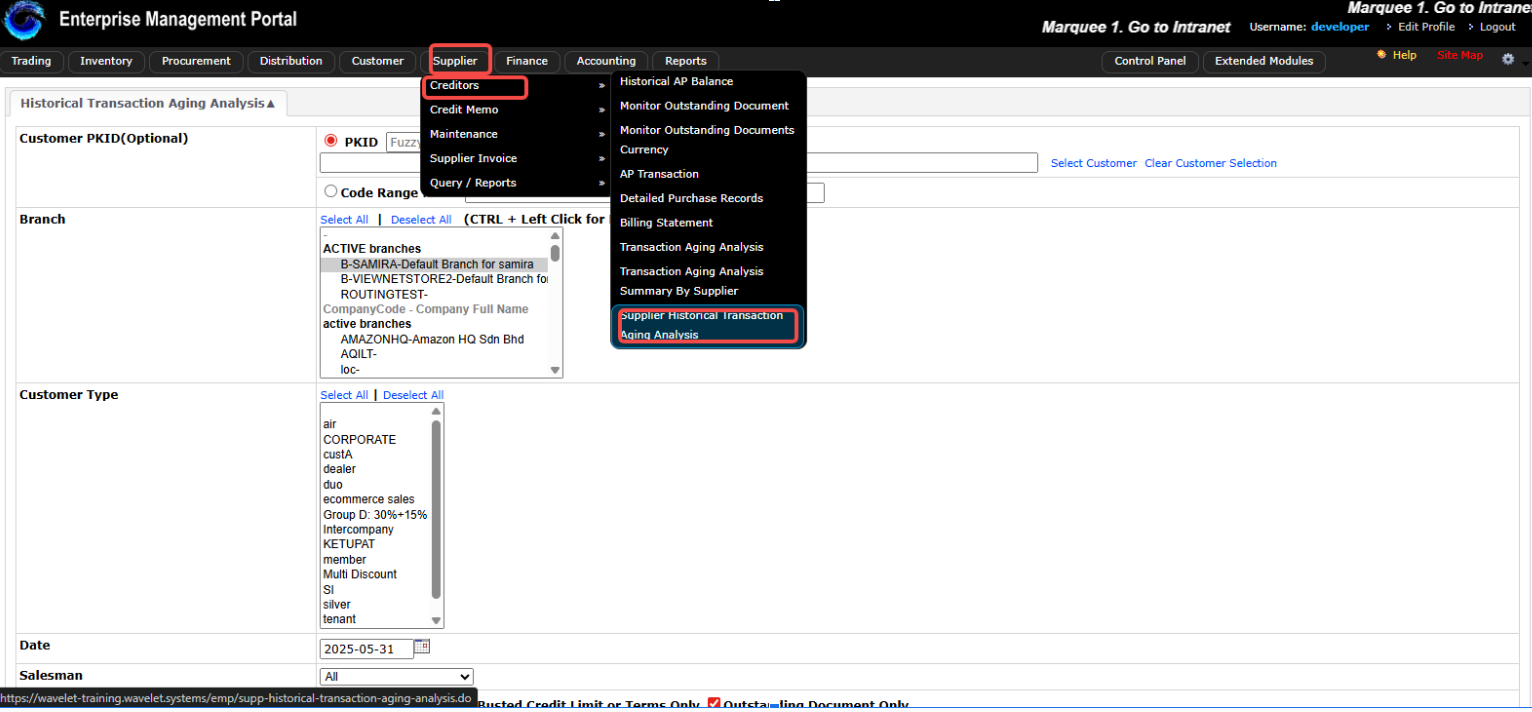
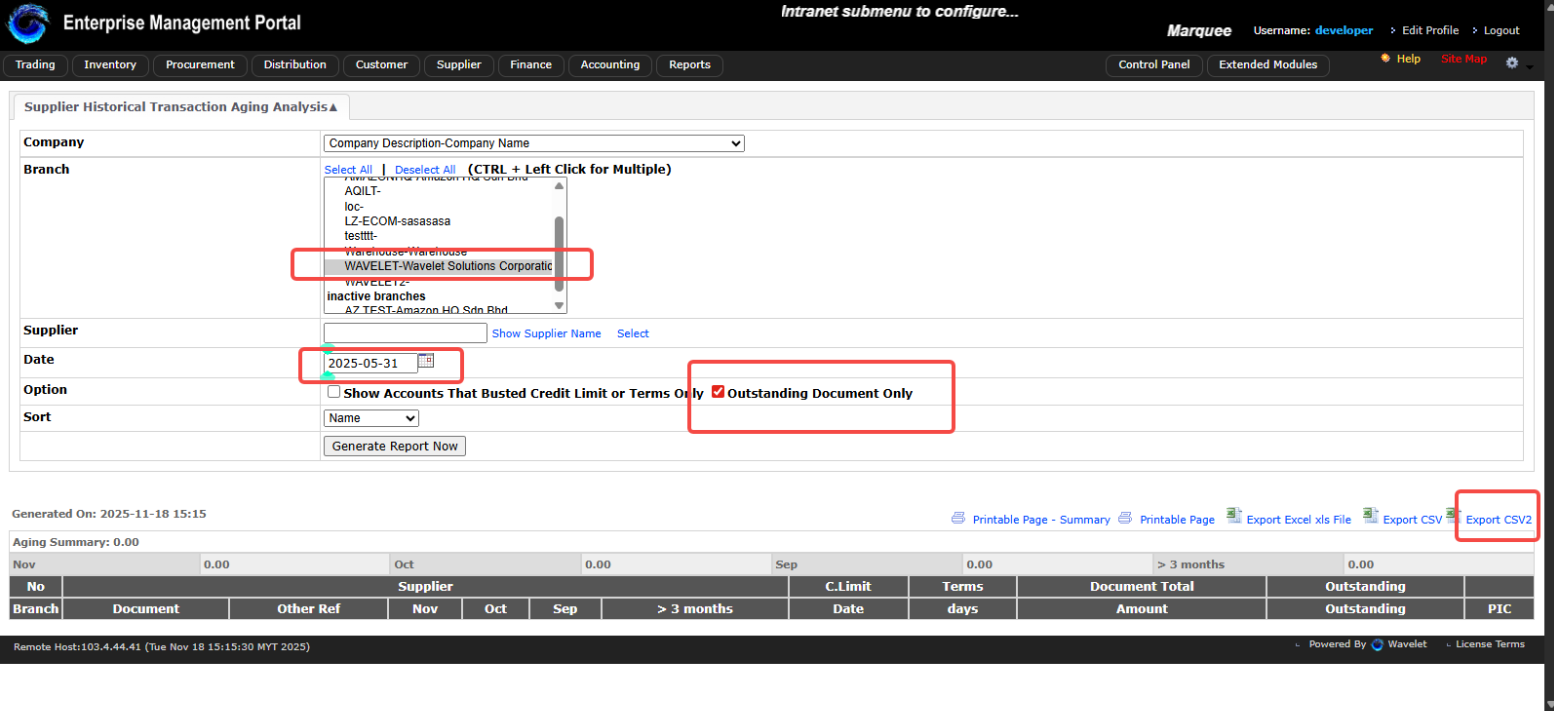
- EMP Customer:
- Navigate: Supplier > Creditors > Supplier Historical Transaction Aging Analysis
- Select one branch
- Set data date (e.g., 31 May 2025) - closing date (cutoff date for migration)
- Export using CSV2
Filtering of the Data
- Open CSV in Excel or Google Sheets
- Apply filters and sort Document (Column A) A → Z
- Prepare upload templates for each document type.
Updating of PurchaseInvoice Template
Purchase Invoice - Will be uploaded to Purchase Invoice (Internal) Applet
- Branch code- Please follow the Branch code in BLG
DOC_CURRENCYalwaysMYRSETTLEMENT_OR_ITEM_CODE-OPENING BALANCEQTYalways 1UOMalwaysPCSPOSTING_STATUS-FINAL(if you putDRAFT, you need to final each doc manually in the applets)
| BRANCH_CODE | TXN_DATE | HDR_REF_NO | DOC_CURRENCY | SETTLEMENT_OR_ITEM_CODE | QTY | AMOUNT_INCL_TAX | HDR_REMARKS | ENTITY_CODE | UOM | POSTING_STATUS |
|---|---|---|---|---|---|---|---|---|---|---|
Updating of Purchase Debit Note Template
Purchase Debit Note - Will be uploaded to Purchase Debit Note (Internal) Applet
- Branch code and location code- Please follow the Branch code and Location code in BLG
DOC_CURRENCYalwaysMYRSETTLEMENT_OR_ITEM_CODE-OPENING-BALANCEQTYalways 1UOMalwaysPCSPOSTING_STATUS-FINAL(if you putDRAFT, you need to final each doc manually in the applets)
| BRANCH_CODE | LOCATION_CODE | TXN_DATE | HDR_REF_NO | DOC_CURRENCY | SETTLEMENT_OR_ITEM_CODE | QTY | AMOUNT_INCL_TAX | HDR_REMARKS | ENTITY_CODE | UOM | POSTING_STATUS |
|---|---|---|---|---|---|---|---|---|---|---|---|
Updating of Payment Voucher Template
Payment Voucher - Will be uploaded to Payment Voucher (Internal) Applet
- Branch code - Please follow the Branch code in BLG
DOC_CURRENCYalwaysMYRSETTLEMENT_OR_ITEM_CODE-ABC-Opening cashbook(for ABC Company only)QTYalways 1UOMalwaysPCSPOSTING_STATUS-FINAL(if you putDRAFT, you need to final each doc manually in the applets)
| BRANCH_CODE | TXN_DATE | HDR_REF_NO | DOC_CURRENCY | SETTLEMENT_OR_ITEM_CODE | QTY | AMOUNT_INCL_TAX | HDR_REMARKS | ENTITY_CODE | UOM | POSTING_STATUS |
|---|---|---|---|---|---|---|---|---|---|---|
Mapping of the data with BLG upload template
- Copy relevant columns from EMP/Previous system to Map with Upload template
- Customer Code =
ENTITY_CODE - Document Running Number =
HDR_REF_NO - Other Ref =
HDR_REMARKS - Date =
TXN_DATE - Outstanding Amount =
AMOUNT_INCL_TAX- (useABSformula to make it positive if negative amount)
- Customer Code =
- Fill up the empty cells with
DEFAULTdata - Delete empty columns and rows
- Then the file is ready for upload, you can download it as CSV and upload to Relevant Applets
7. FAQs & Troubleshooting
Q: The Trial Balance isn’t balancing. What should I check? A: First, verify all journal entries have matching debits and credits in the Ledger & Journal Applet. Then check for unposted or draft transactions that may need to be finalized.
Q: A Payment Voucher was approved but the bank balance hasn’t changed. Why? A: The PV records the accounting entry (debit Accounts Payable, credit Bank). The actual bank balance shown in Bank Reconciliation only updates when you import or enter the bank statement and match the transaction.
Q: How do I correct a posted journal entry? A: BigLedger does not allow editing or deleting posted entries (audit trail compliance). Instead, create a reversing journal entry in the same period, then post the corrected entry.
Q: Can I generate financial reports for a specific branch only? A: Yes. All financial reports support branch-level filtering. Use the branch selector in the Financial Report Applet to generate segmented reports.