Opening Balance Migration Guide
Purpose
The opening balance process brings forward closing balances from your legacy accounting and inventory records into BigLedger. This ensures the new system reflects accurate stock levels, customer receivables, supplier payables, bank cash balances, and general ledger accounts from the exact day you transition into the new environment.
Note
Some final audited balances may only be available weeks after go-live. You can enter temporary balances and adjust them progressively using manual journal entries once finalized reports are issued.
Overview
Opening balance setup involves transferring existing data for the following five key areas:
| Step | Migration area | Purpose | Typical timing |
|---|---|---|---|
| 1 | Stock Balance | Record physical item quantities and cost values from the old system. | Before go-live |
| 2 | Customer Outstanding (AR) | Record unpaid customer invoices, credit notes, and advance deposits. | After go-live (temporarily disable e-invoice submission) |
| 3 | Supplier Outstanding (AP) | Record unpaid supplier bills, debit notes, and payment deposits. | After go-live (temporarily disable e-invoice submission) |
| 4 | Cashbook Balance | Establish starting cash and bank balances in active accounts. | After legacy bank reconciliations are finalized |
| 5 | General Ledger Balance | Record starting trial balance values (assets, liabilities, and equity). | After finalized previous months’ reports are completed |
The migration sequence
To maintain data integrity and prevent reconciliation discrepancies, you must perform opening balance imports in the following sequential order:
[1. Stock Balance] ──> [2. AR Outstanding] ──> [3. AP Outstanding] ──> [4. Cashbook Balance] ──> [5. GL Balance]Why this sequence is mandatory (data dependencies)
- Stock Balance First: Sets up physical inventory quantities and unit costs. This establishes your stock ledger valuation, which is a prerequisite for reconciling the inventory control account in the General Ledger.
- AR and AP Outstanding Second and Third: Creates historical customer and supplier invoice records. These documents are needed so that post-go-live payments and receipts can be matched and knocked-off against actual outstanding balances.
- Cashbook Balance Fourth: Establishes cash drawer and bank account starting balances. Reconciles the bank sub-ledger before consolidating into the General Ledger.
- General Ledger Balance Last: Inherits and consolidates the summary of all sub-ledgers. Any difference between sub-ledger totals and GL control accounts is easily identified and adjusted.
Step-by-step migration process
Stock balance upload
- Purpose: Import item quantities and cost values from the legacy system into BigLedger.
- Timing: Perform this process before go-live, after confirming physical stock counts.
- Preparation:
- Create a vendor named
ONE TIME SUPPLIERin the Supplier Applet. - Export the item balance report from the old system separately for each branch or warehouse location.
- Ensure item codes in your import CSV match the newly configured item codes in BigLedger exactly.
- For serialized items, prepare a single cell containing comma-separated serial numbers, matching the physical quantity.
- Create a vendor named
Field mapping for stock upload template
| Column Header | Required | Format | Description |
|---|---|---|---|
| BRANCH_CODE | Yes | Text | The destination branch code in BigLedger (e.g., HQ, BR01). |
| ENTITY_CODE | Yes | Text | Set this to ONE TIME SUPPLIER. |
| TXN_DATE | Yes | YYYY-MM-DD | The date of the stock cutoff (e.g., 2024-12-31). |
| HDR_REF_NO | Yes | Text | Use OPENING BALANCE for identification. |
| DOC_CURRENCY | Yes | Text | Currency code (typically MYR). |
| SETTLEMENT_OR_ITEM_CODE | Yes | Text | The BigLedger item code (e.g., ITEM-001). |
| UOM | Yes | Text | Unit of measure in BigLedger (e.g., PCS, UNIT). |
| QTY | Yes | Number | The physical stock count quantity. |
| UNIT_PRICE_INCL_TAX | Yes | Number | The unit cost price including tax. |
| ITEM_SERIAL_NO | No | Text | Comma-separated serial numbers (e.g., SN001,SN002). |
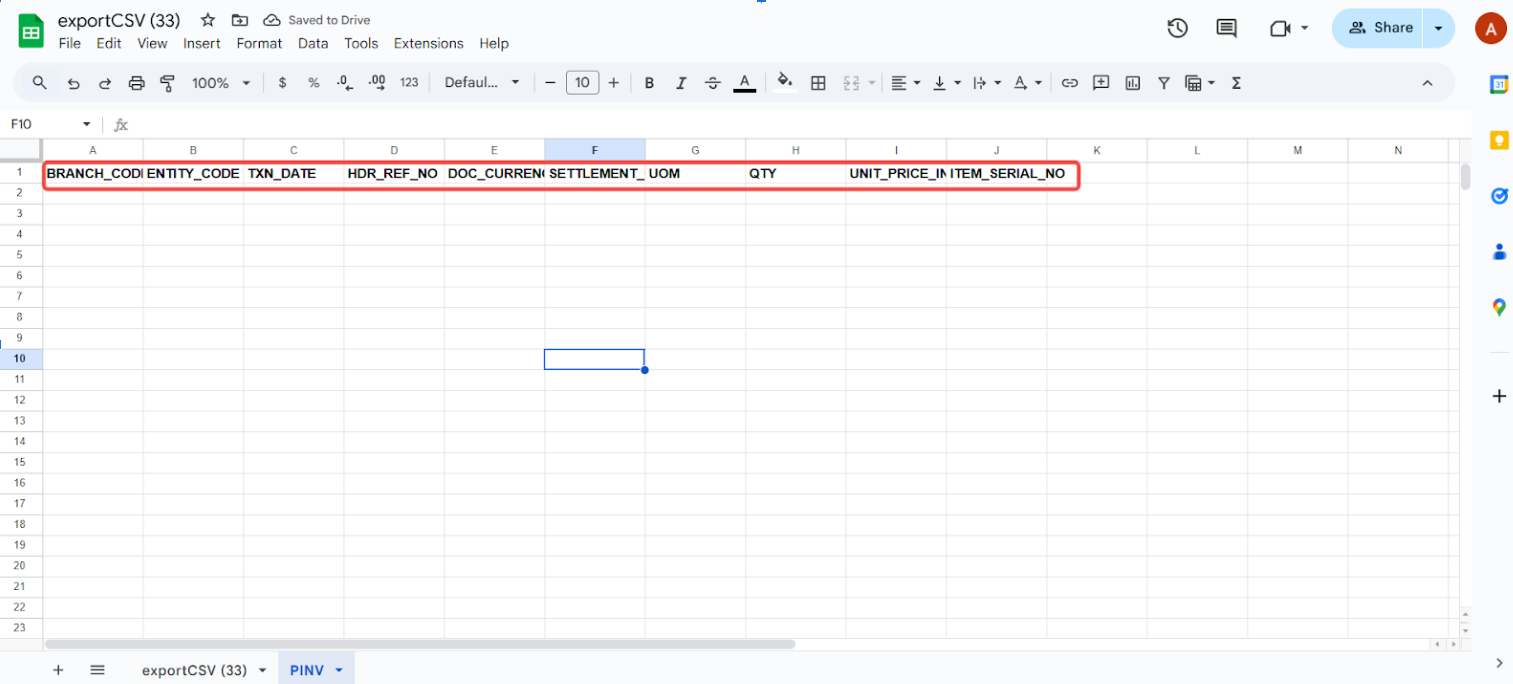
Updating the purchase invoice template
Branch code, transaction date, currency, HDR reference and entity code:
- Enter the branch code (check the correct branch code from the Organisation Applet branch listing).
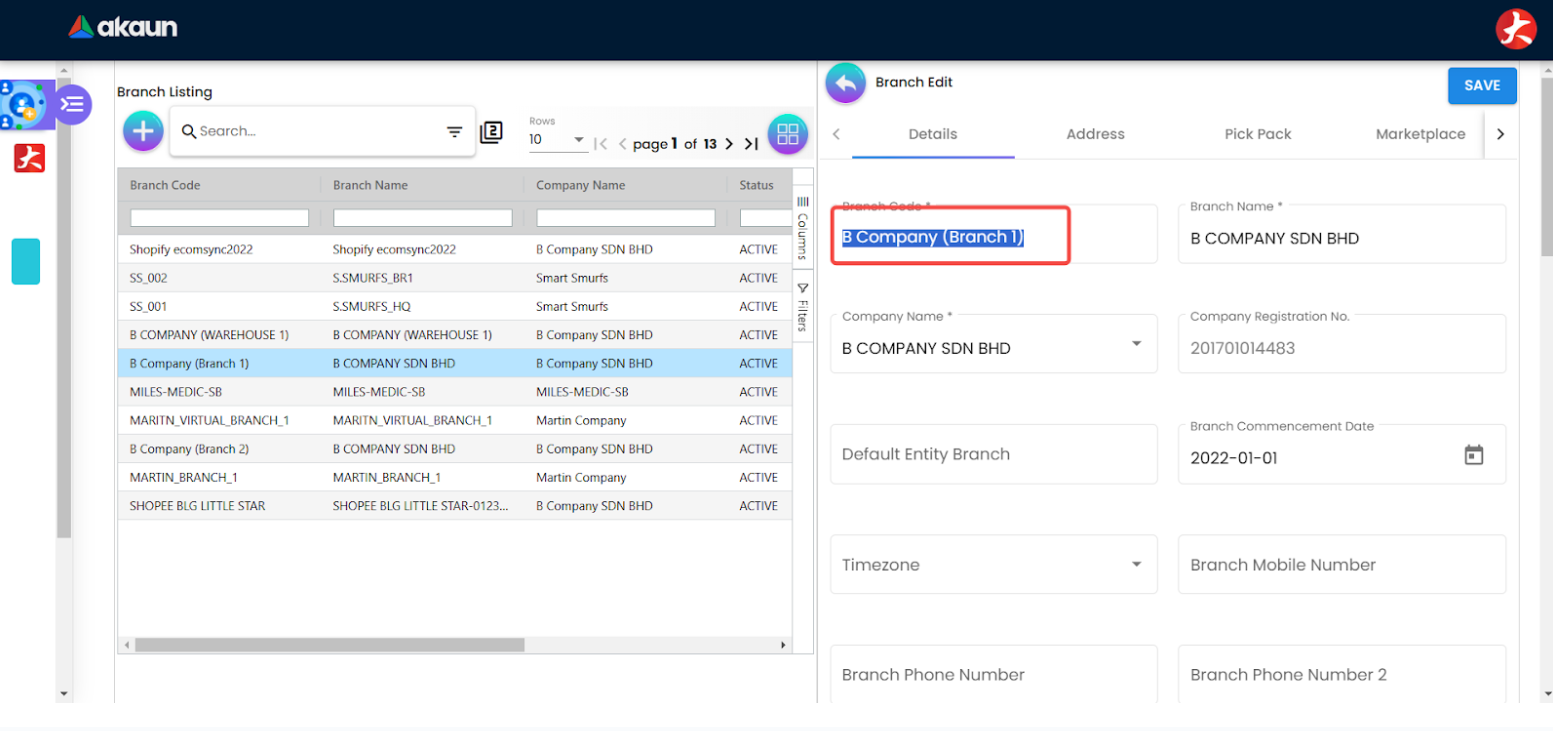
- Set the transaction date to
2024-12-31. - Enter
OPENING BALANCEfor the HDR Reference. - Enter
MYRfor the currency column. - Enter
ONE TIME SUPPLIERfor the Entity Code (ensure the supplier is created in the Supplier Applet first). - Enter the UOM based on your Item list in BigLedger (e.g.,
PCS,UNIT).
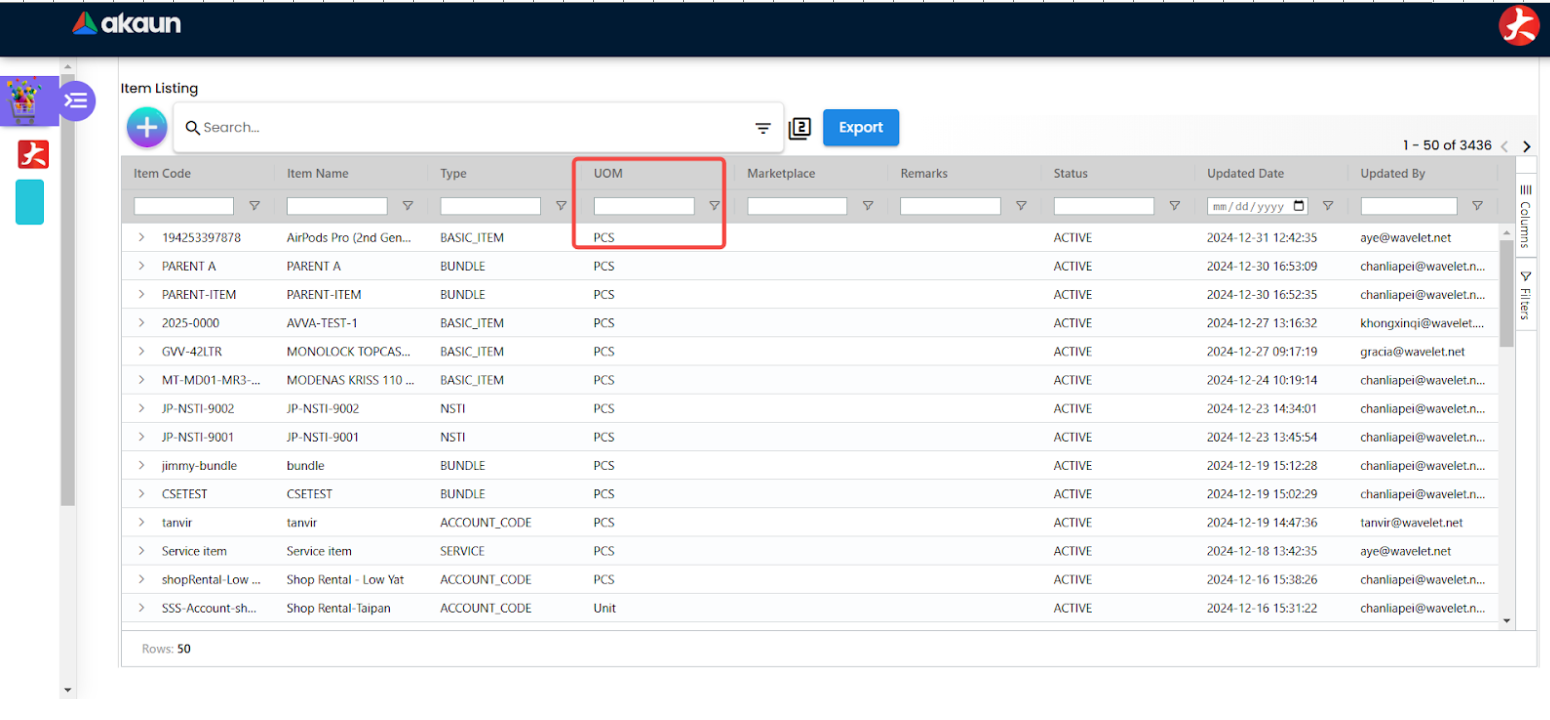
Item details:
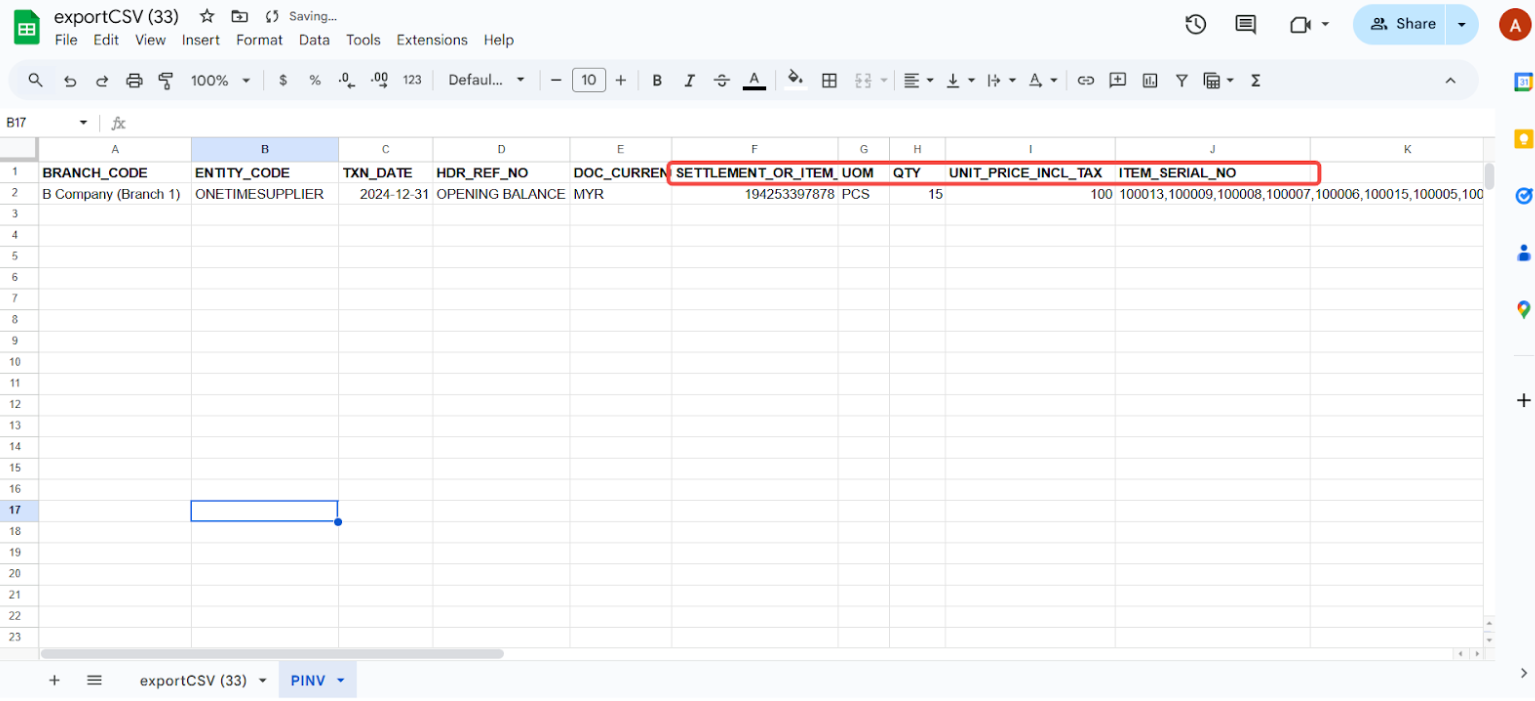
- Update the following columns by copying from the legacy system reports to the Purchase Invoice template:
- Item Code
- Quantity
- Serial Number (use a comma
,to separate multiple serial numbers in one cell) - UNIT_PRICE_INCL_TAX
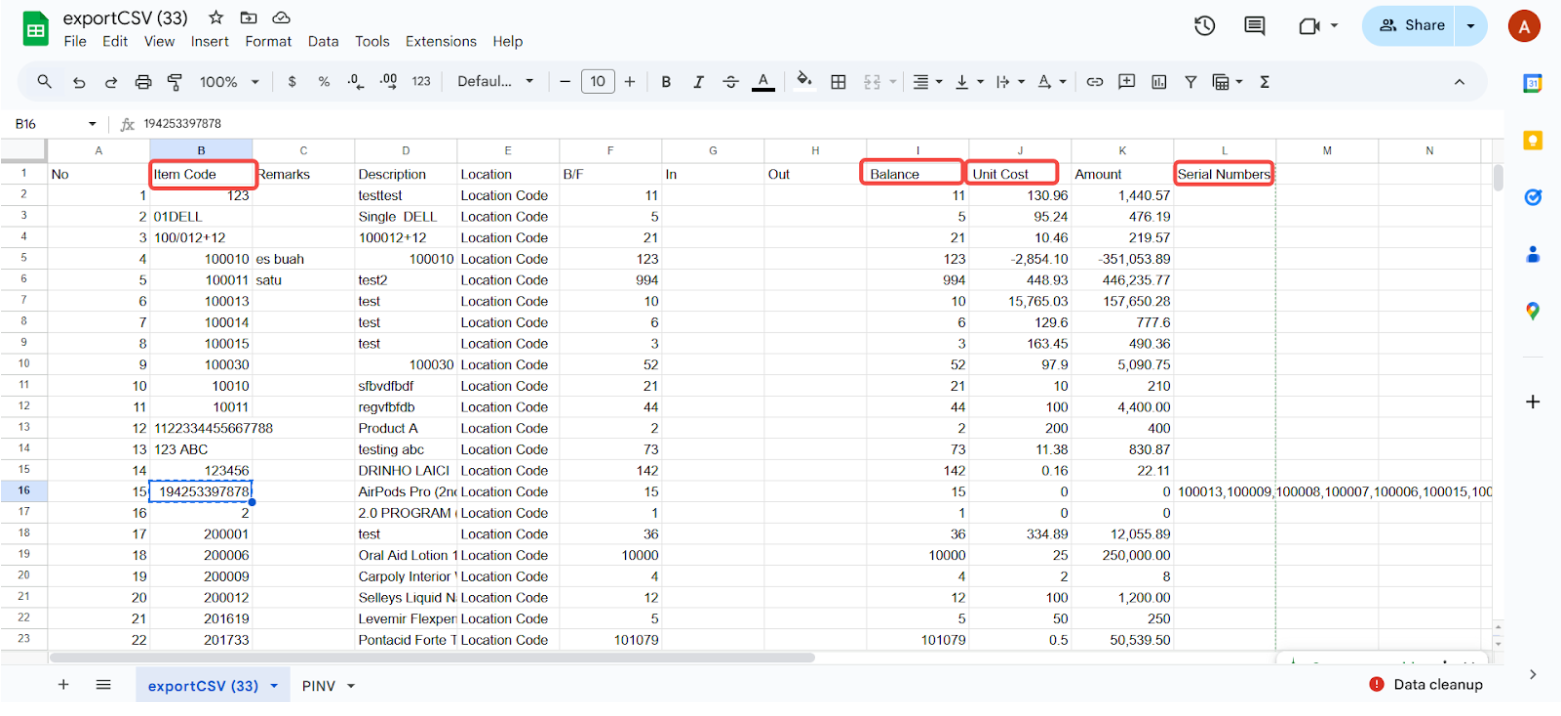
Finalizing the purchase invoice upload file
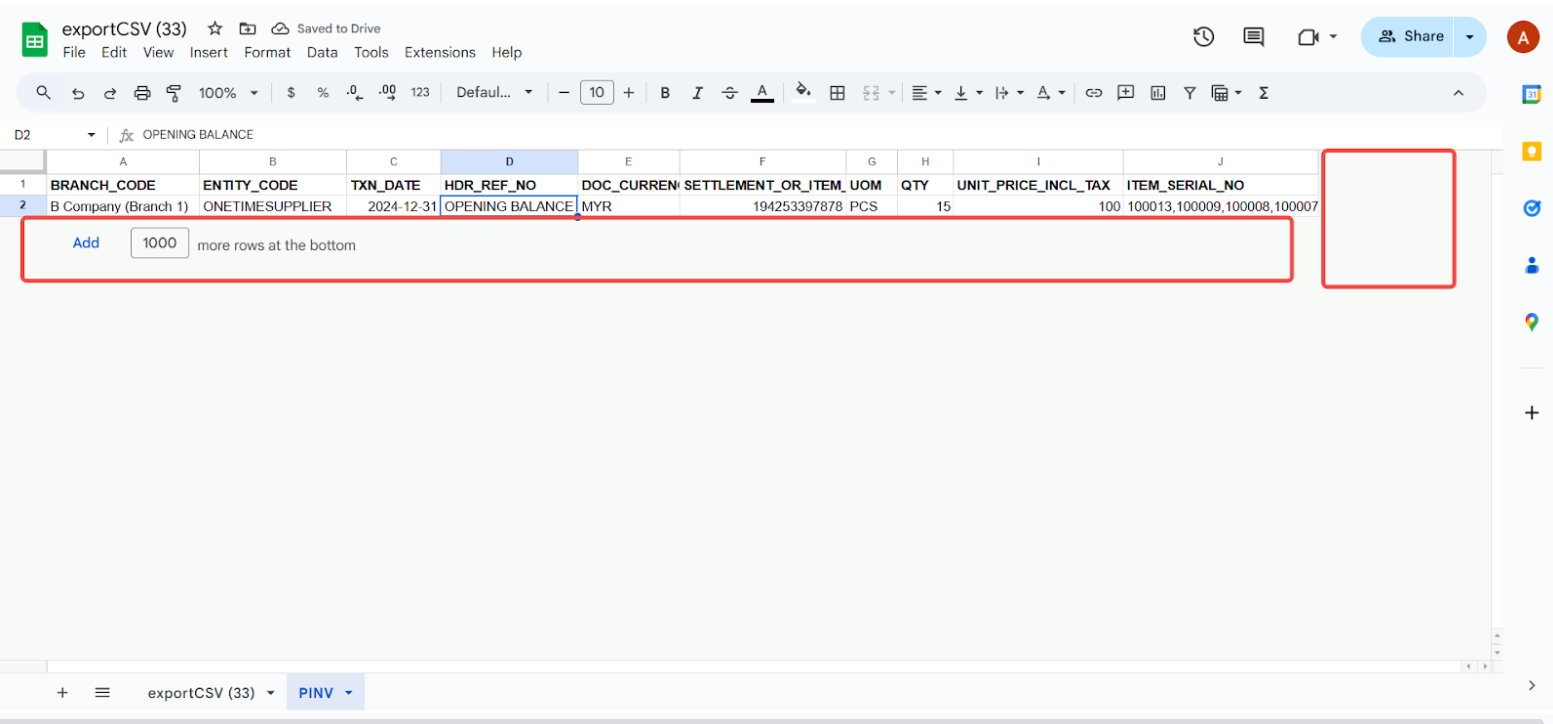
Validate data:
- Ensure all headers, quantities, costs, and serial numbers are accurate.
- Delete any extra or blank columns.
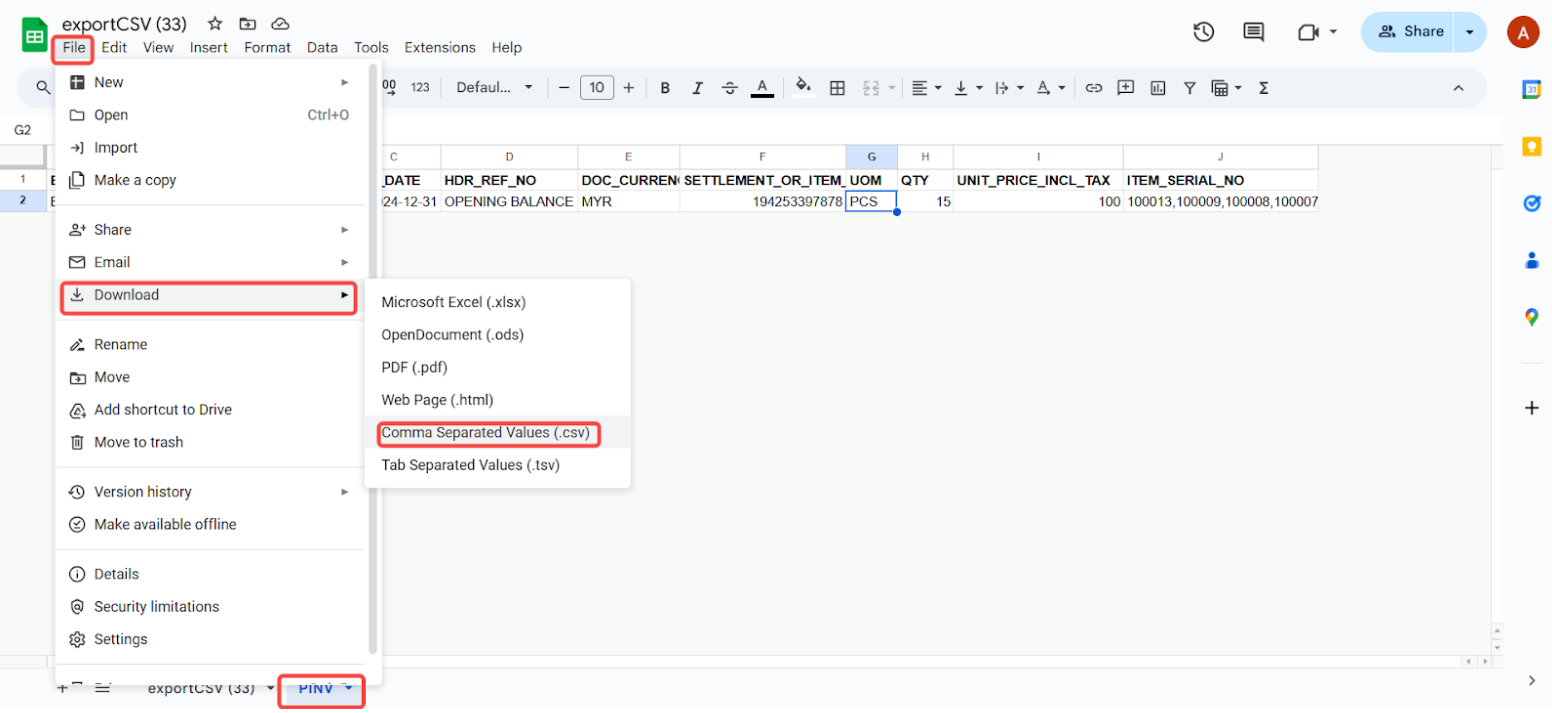
Export and import to BigLedger:
- Export as CSV: Download the updated template as a CSV file.
Executing the stock import
- Open the Purchase Invoice (Internal) Applet.
- Click Import File, click the + button, drag your prepared CSV file, and click submit.
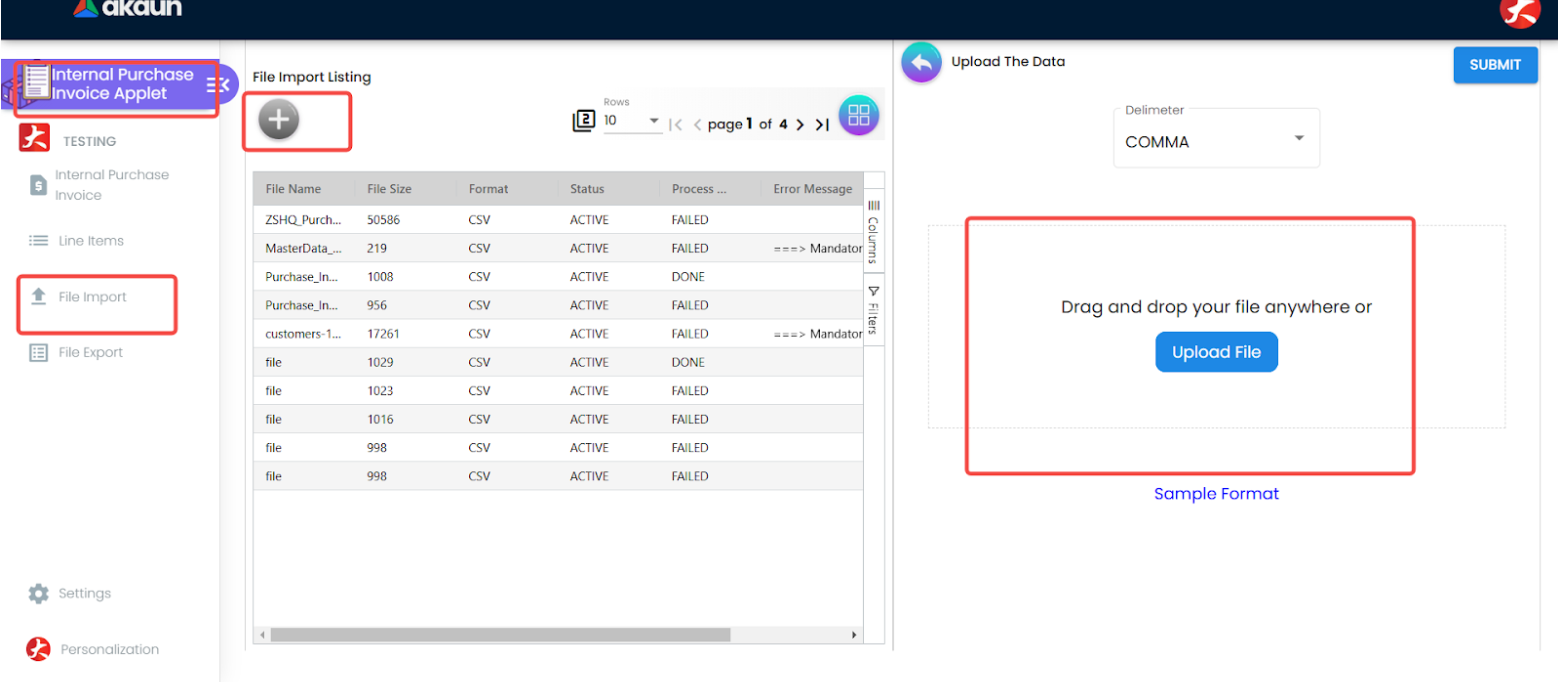
Upload the CSV file in the Purchase Invoice (Internal) Applet. - Check for errors by clicking into the imported file list. A status of
truemeans uploaded successfully;falseindicates errors. Scroll right to read the red error messages.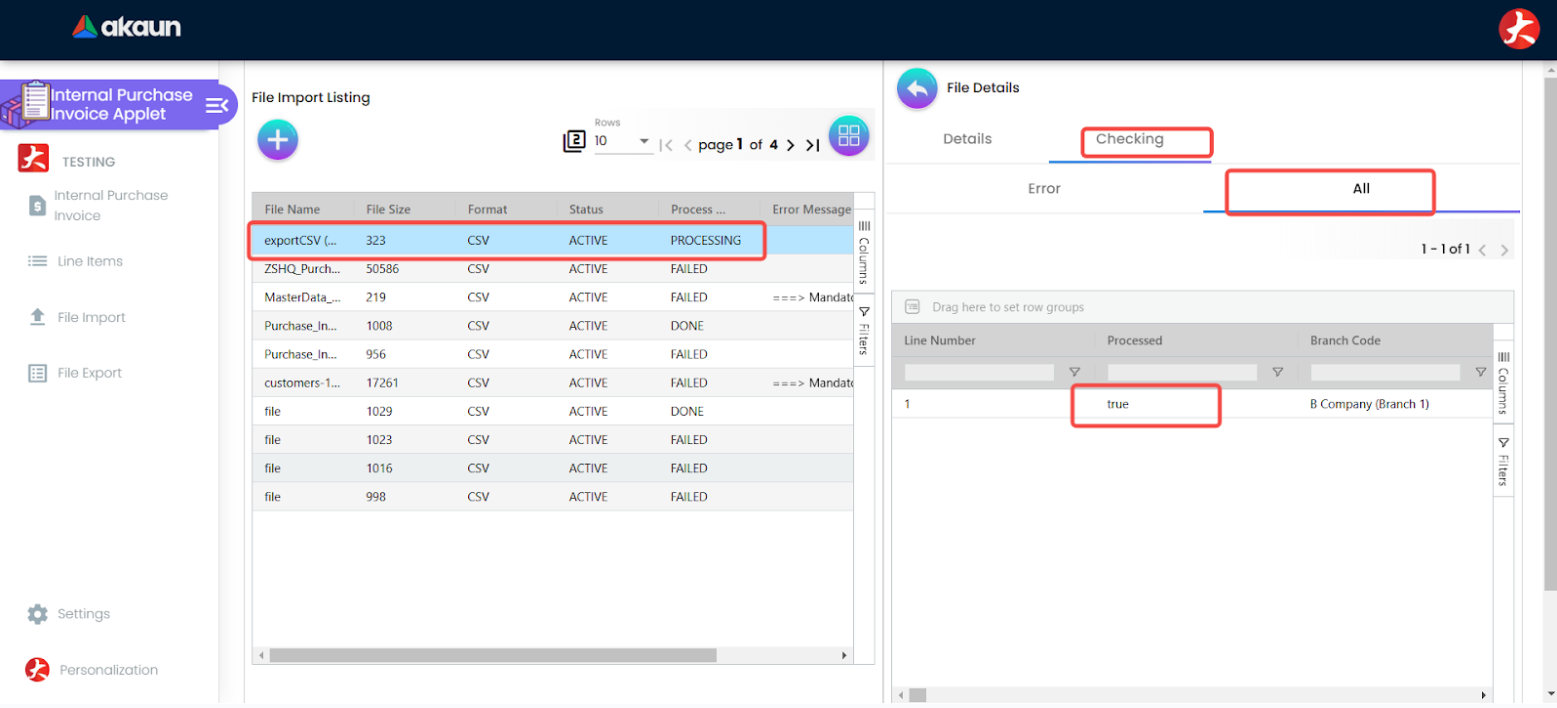
Check status and resolve errors in the import log. - Go to the Purchase Invoice (Internal) menu list. The imported data will be saved as
DRAFT. - Click into the draft document, verify line details, and click FINAL to post the stock opening balances.
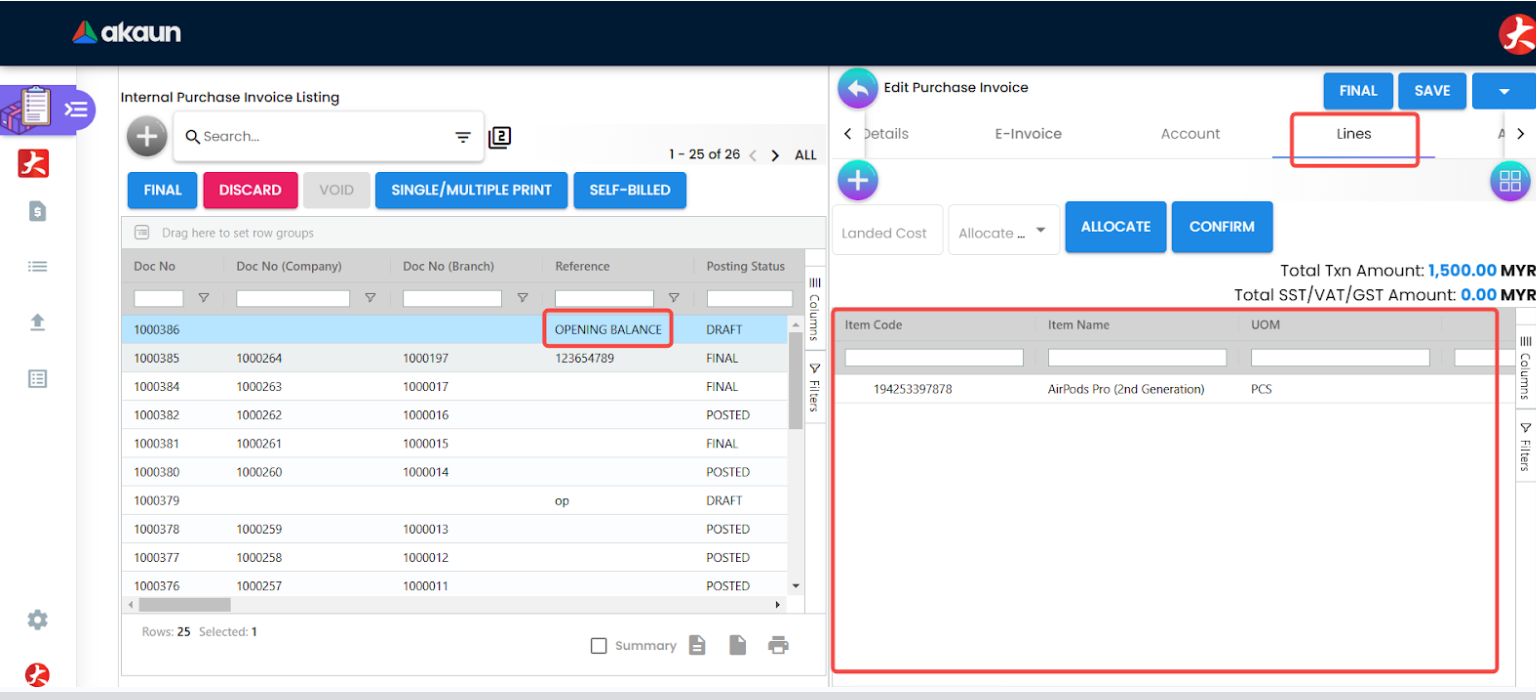
Review details and click Final to commit stock balances.
Post-upload verification
- Open the Stock Availability Report Applet and filter by branch to verify that physical quantities and cost valuations match your legacy stock reports.
Common pitfalls to avoid
- Mismatched Item Codes: Uploads will fail if item codes do not exist in BigLedger.
- Serial Number Count Discrepancy: Ensure the number of comma-separated serial numbers in
ITEM_SERIAL_NOmatches the value inQTYexactly. - Wrong UOM: Verify that UOM strings (e.g.,
PCSvspcs) match your master data setup.
Customer outstanding (AR) balance upload
- Purpose: Bring forward unpaid customer invoices, credit notes, and advance deposits. This allows post-go-live customer receipts to be knocked-off against historical documents.
- Timing: After go-live, after temporarily disabling e-invoice submission.
- Preparation:
- Go to the Organisation Applet and temporarily disable e-invoice submission for your company. This prevents the system from submitting opening balance invoices to tax authorities.
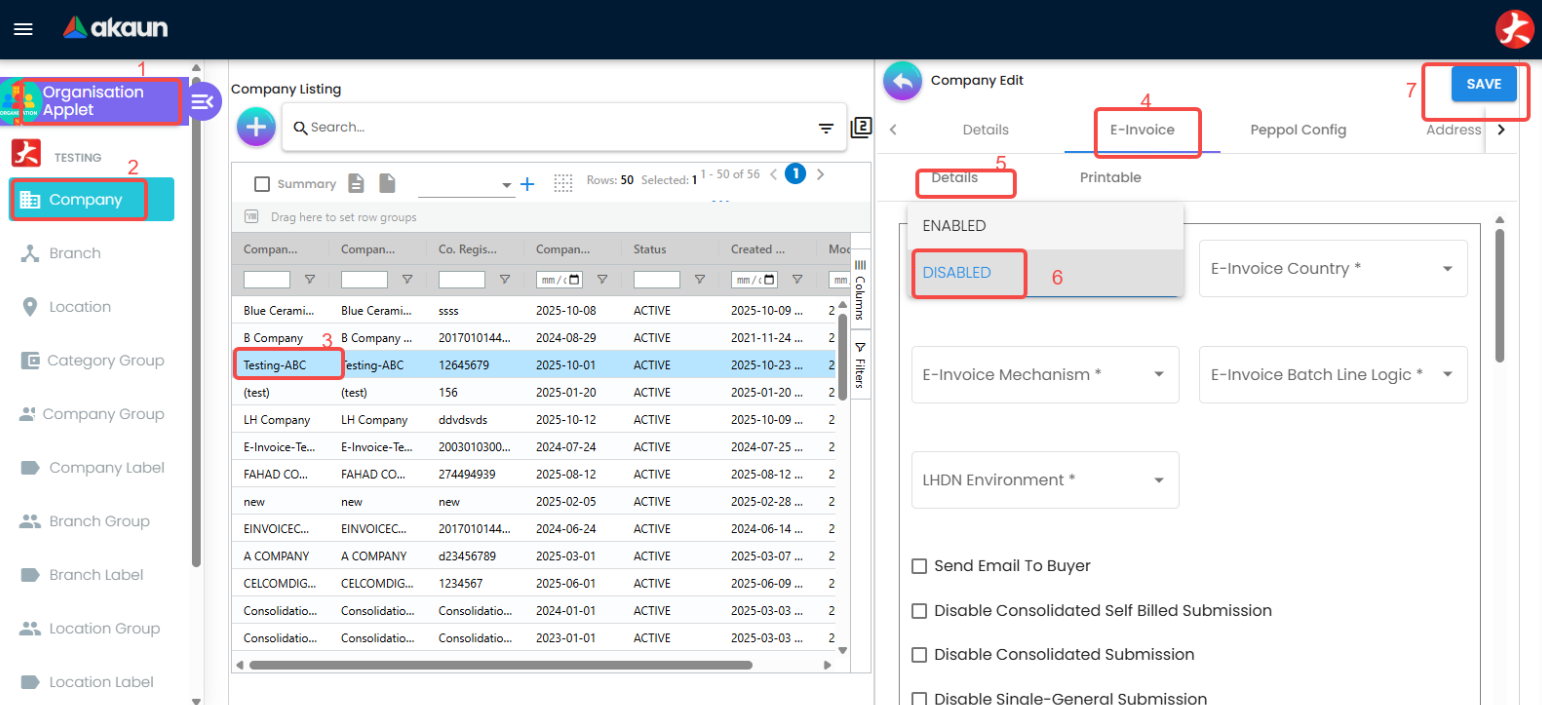
Disable e-invoice submissions before importing outstanding documents. - Create a service-type item named
OPENING BALANCEin the Doc Item Maintenance Applet. - Create a temporary
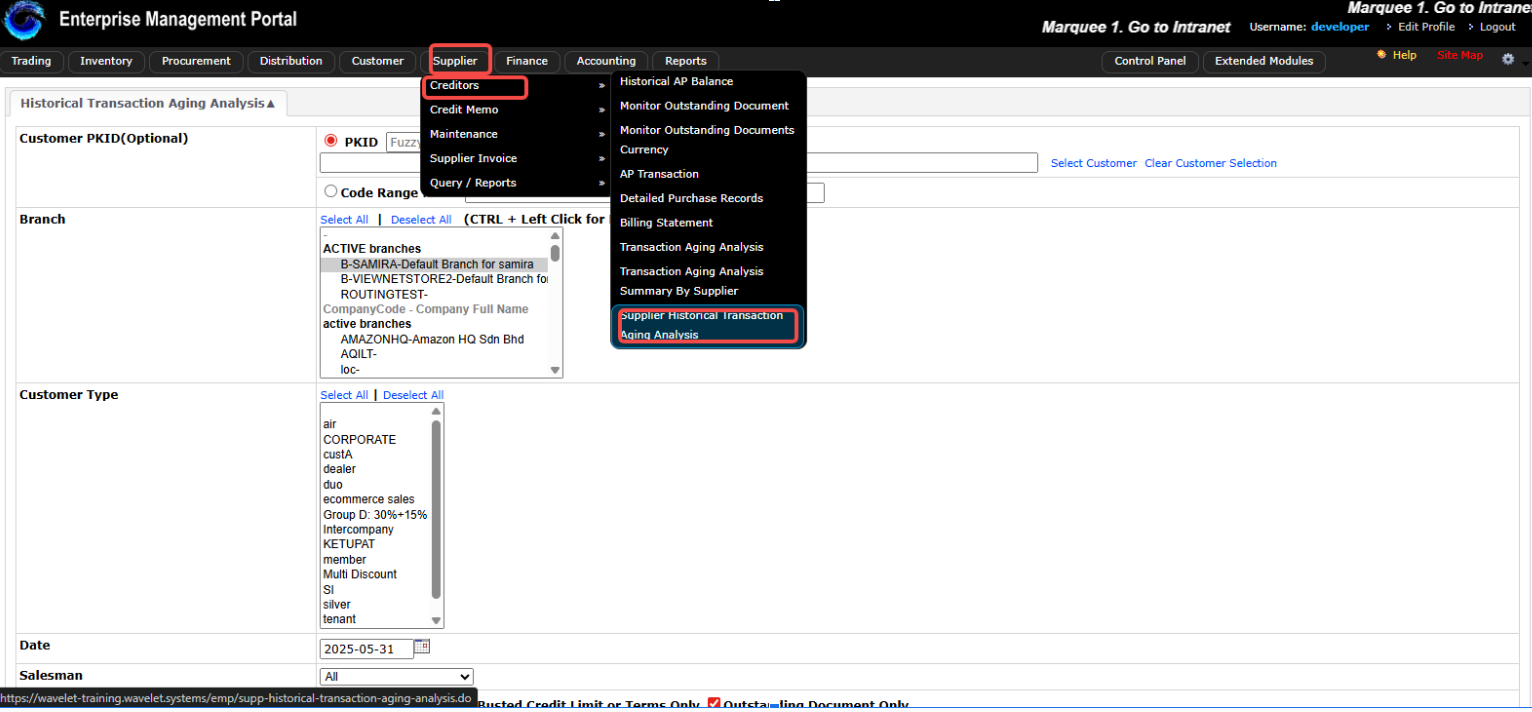
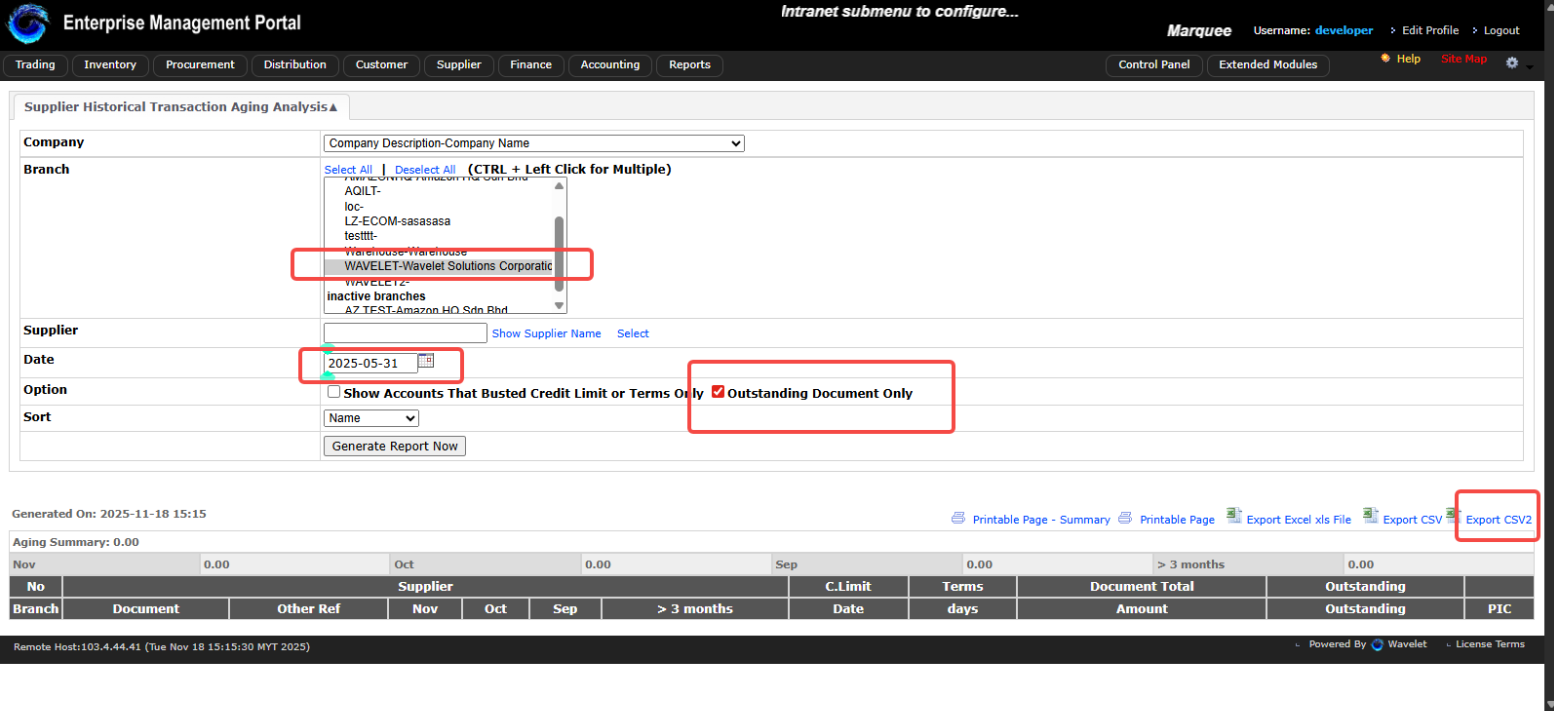
Opening Cashbookand settlement method in the Cashbook Applet to handle receipt voucher offsets. - Export legacy aging data (e.g., CC-07 Historical Transaction Aging Analysis aging reports) to a CSV file.
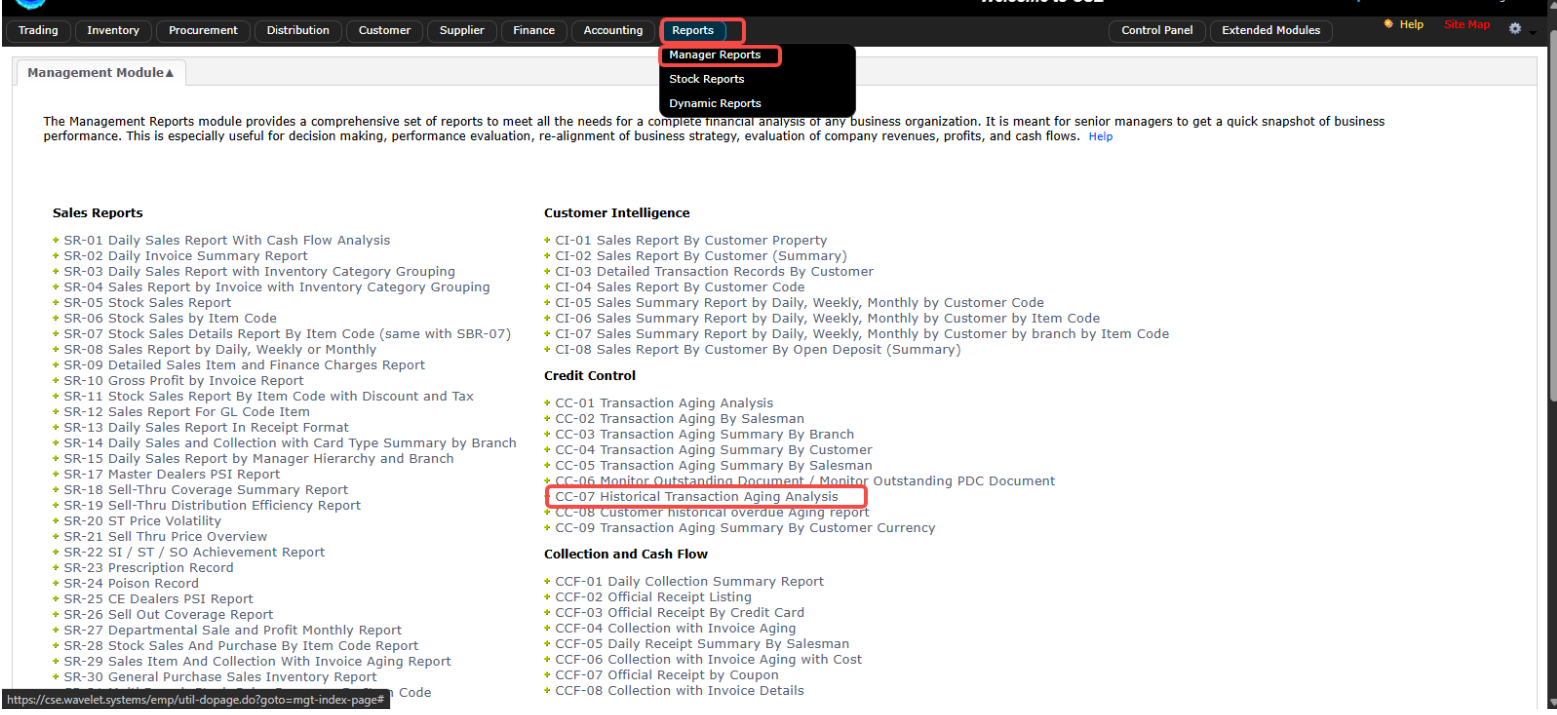
Export the historical aging report from the legacy system (Step 1). 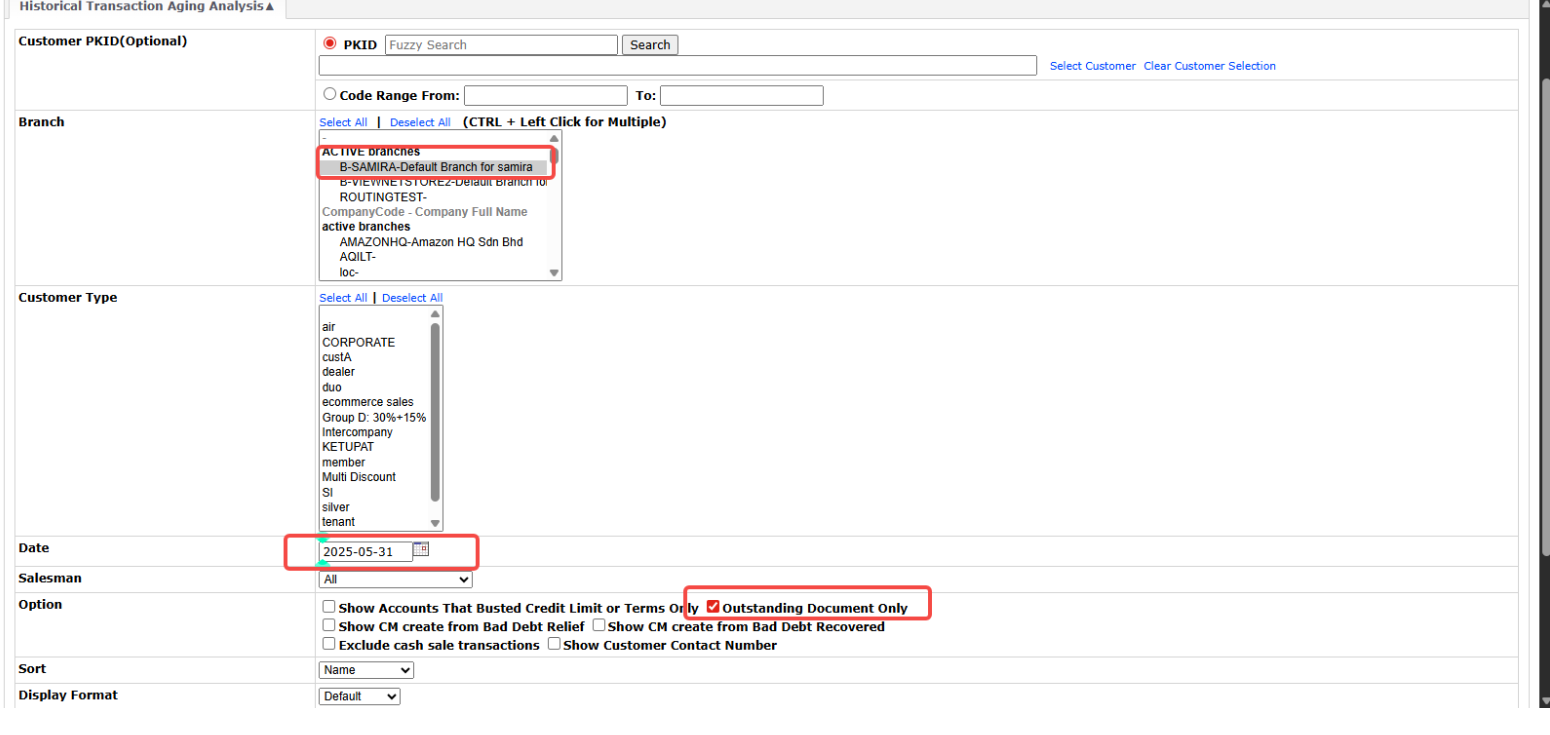
Choose the cutoff date (Step 2). 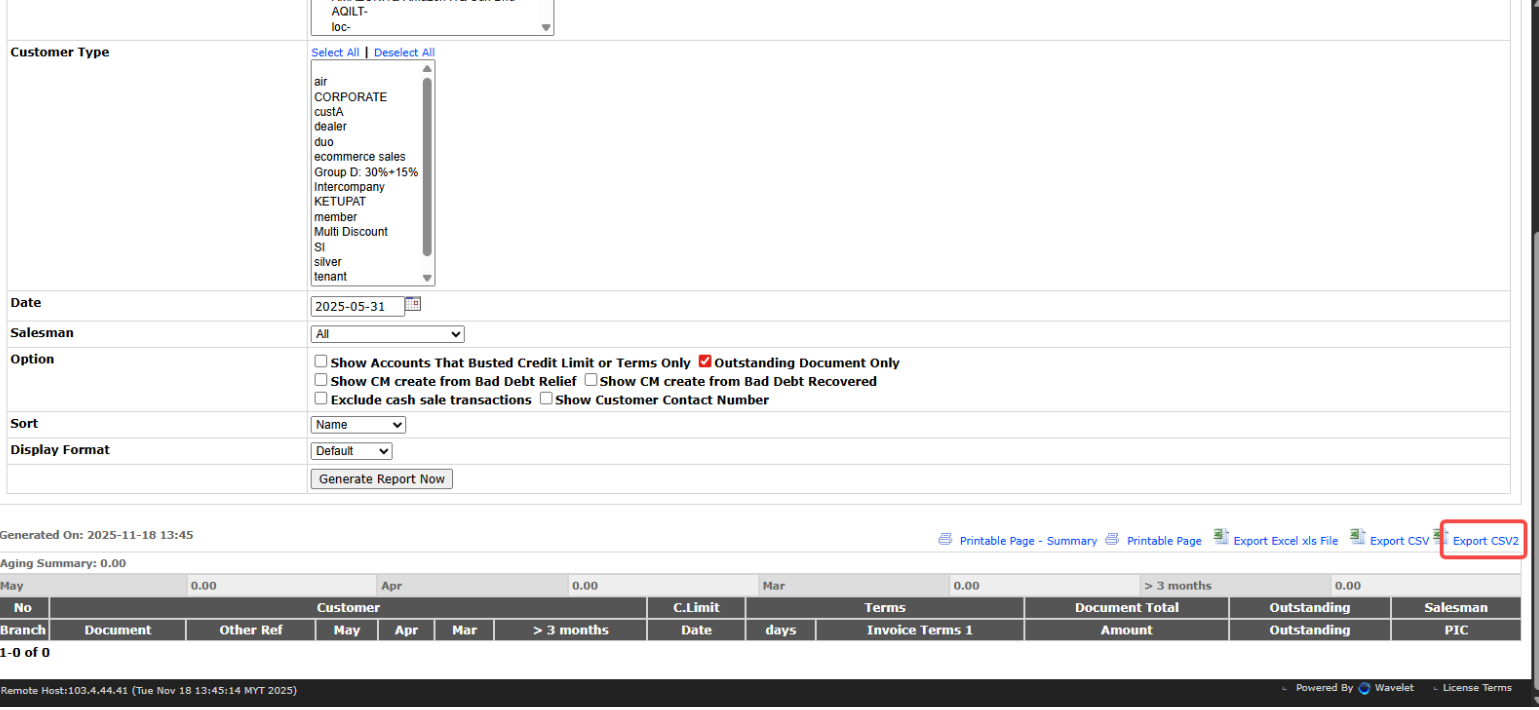
Export to CSV2 format (Step 3).
- Go to the Organisation Applet and temporarily disable e-invoice submission for your company. This prevents the system from submitting opening balance invoices to tax authorities.
Data filtering and separation
Filter your legacy customer outstanding spreadsheet and split it into three separate tabs or CSV files:
- Sales Invoices: To be uploaded to the Sales Invoice (Internal) Applet.
- Sales Credit Notes: To be uploaded to the Internal Sales Credit Note Applet.
- Receipt Vouchers (unapplied customer prepayments): To be uploaded to the Receipt Voucher (Internal) Applet.
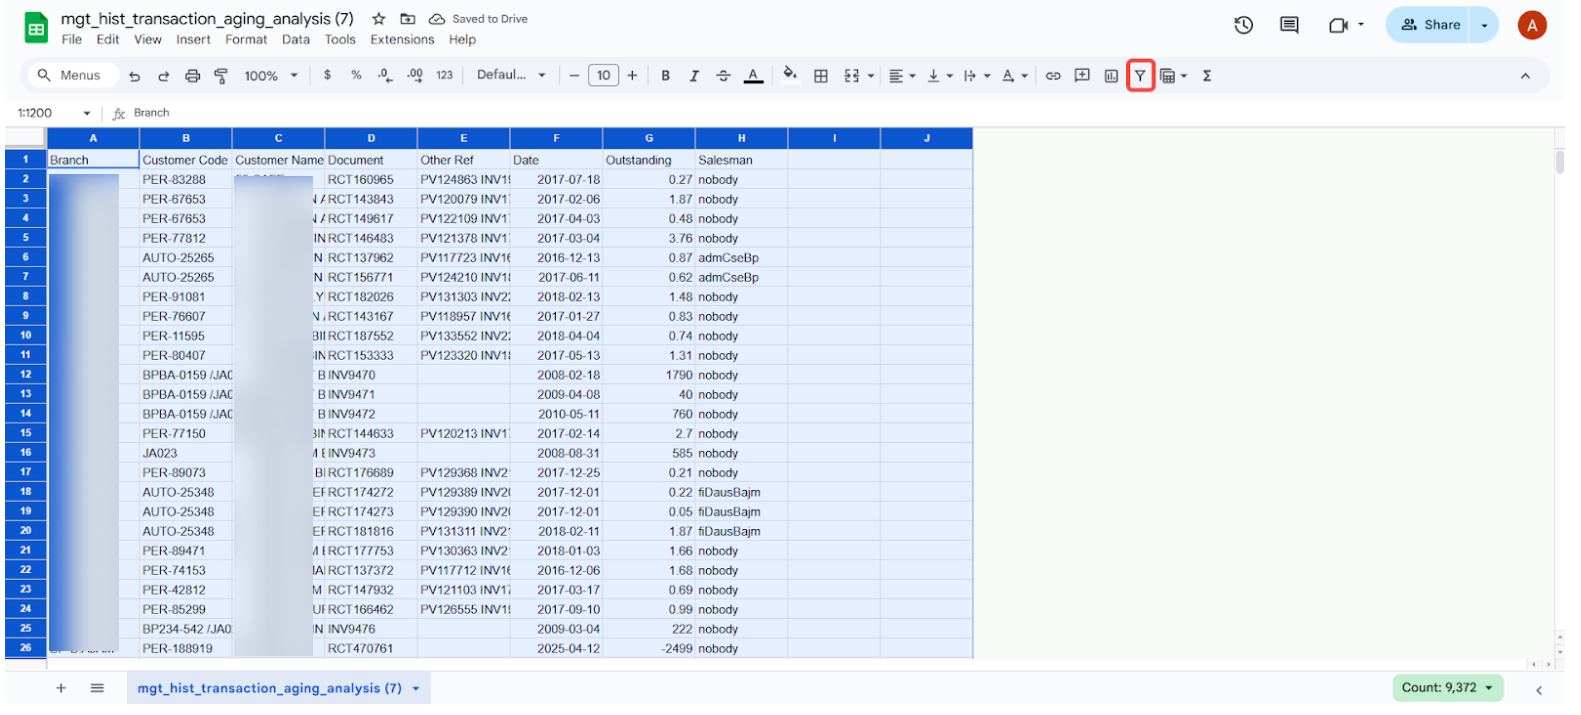
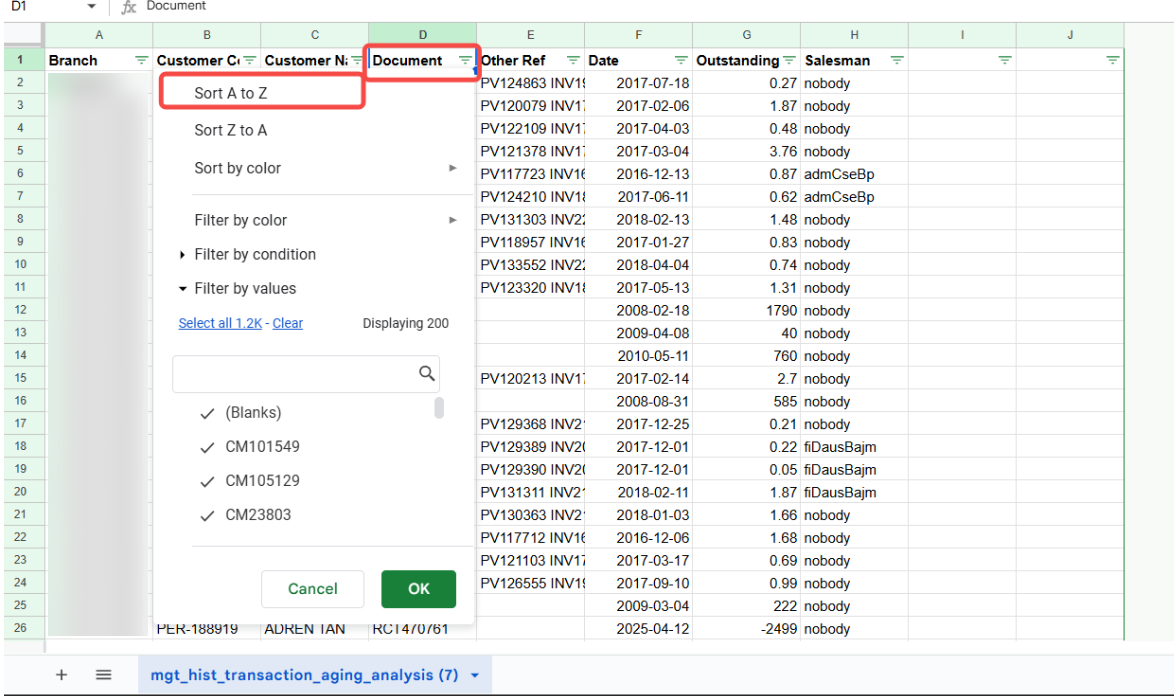
Field mapping for customer outstanding templates
Sales Invoice (Internal) Import Template:
| Column Header | Required | Default Value | Description |
|---|---|---|---|
| BRANCH_CODE | Yes | Variable | BigLedger branch code. |
| TXN_DATE | Yes | Cutoff Date | Date of original legacy invoice (e.g., 2024-12-31). |
| HDR_REF_NO | Yes | Invoice No | Original legacy invoice number. |
| DOC_CURRENCY | Yes | MYR | Transaction currency. |
| SETTLEMENT_OR_ITEM_CODE | Yes | OPENING BALANCE | The service item code created earlier. |
| QTY | Yes | 1 | Default quantity. |
| AMOUNT_INCL_TAX | Yes | Number | Outstanding invoice balance (must be a positive number). |
| HDR_REMARKS | No | Text | Original invoice reference or comments. |
| ENTITY_CODE | Yes | Customer Code | Customer code in BigLedger. |
| UOM | Yes | PCS | Unit of measure. |
| POSTING_STATUS | Yes | FINAL | Auto-posts to GL. Use DRAFT for manual review. |
Sales Credit Note Import Template:
| Column Header | Required | Default Value | Description |
|---|---|---|---|
| BRANCH_CODE | Yes | Variable | BigLedger branch code. |
| LOCATION_CODE | Yes | Variable | BigLedger location code. |
| TXN_DATE | Yes | Cutoff Date | Date of original legacy credit note. |
| HDR_REF_NO | Yes | Credit Note No | Original legacy credit note number. |
| DOC_CURRENCY | Yes | MYR | Transaction currency. |
| SETTLEMENT_OR_ITEM_CODE | Yes | OPENING-BALANCE | The service item code. |
| QTY | Yes | 1 | Default quantity. |
| AMOUNT_INCL_TAX | Yes | Number | Credit note balance (convert negative values to positive). |
| HDR_REMARKS | No | Text | Reference comments. |
| ENTITY_CODE | Yes | Customer Code | Customer code in BigLedger. |
| UOM | Yes | PCS | Unit of measure. |
| POSTING_STATUS | Yes | FINAL | Auto-posts to GL. |
Executing the customer outstanding import
- Open the respective applet (e.g., Sales Invoice (Internal) Applet, Internal Sales Credit Note Applet, or Receipt Voucher (Internal) Applet).
- Click Import File and upload your prepared CSV file.
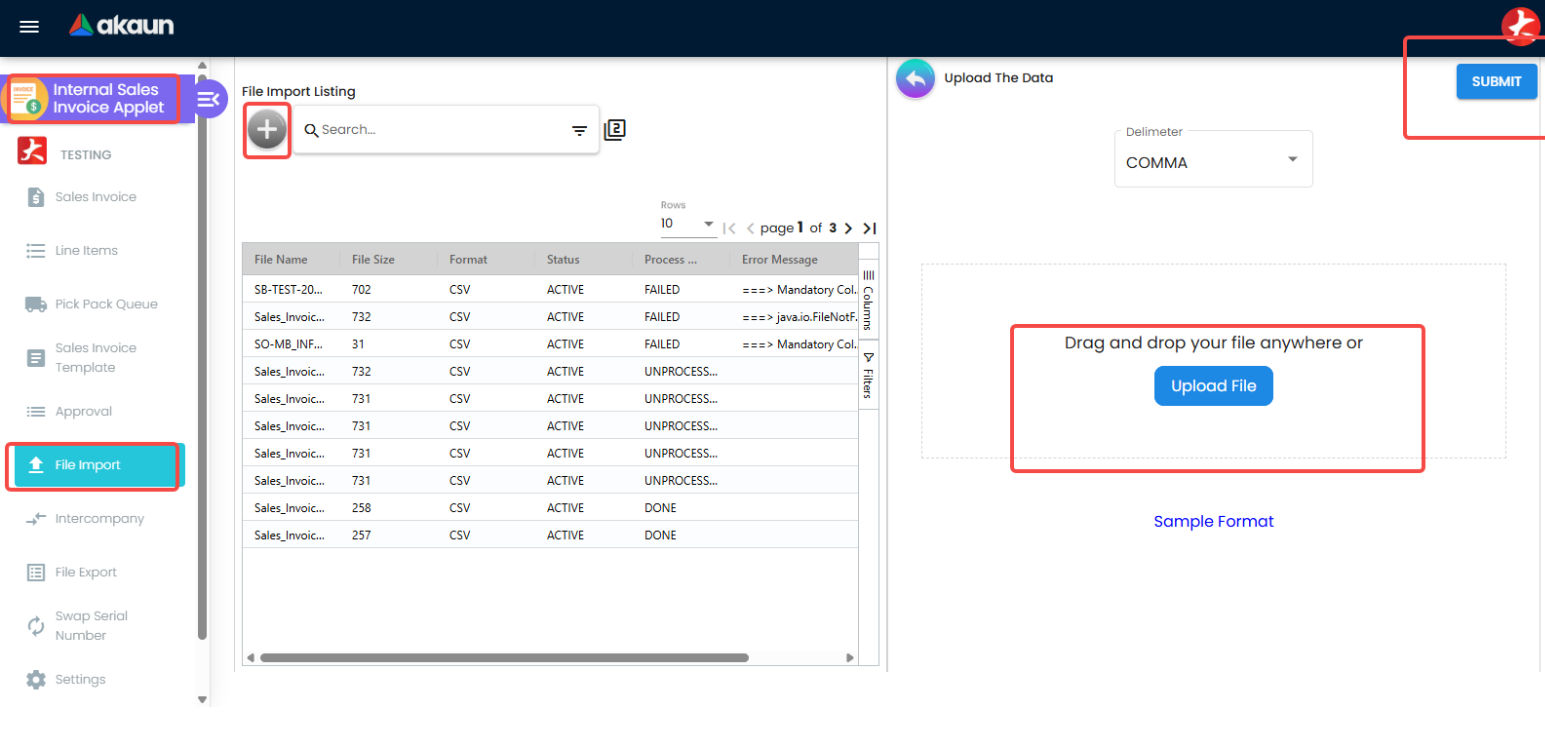
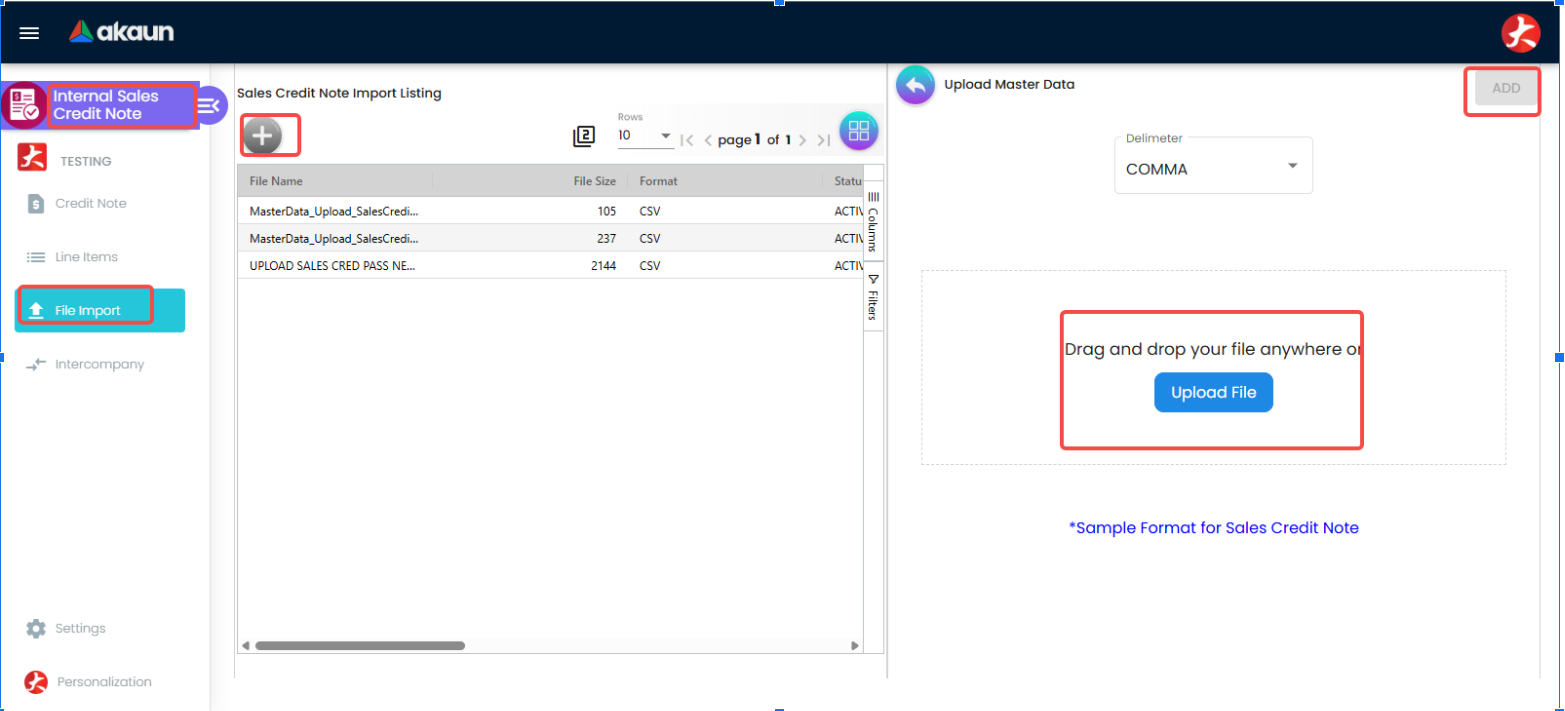
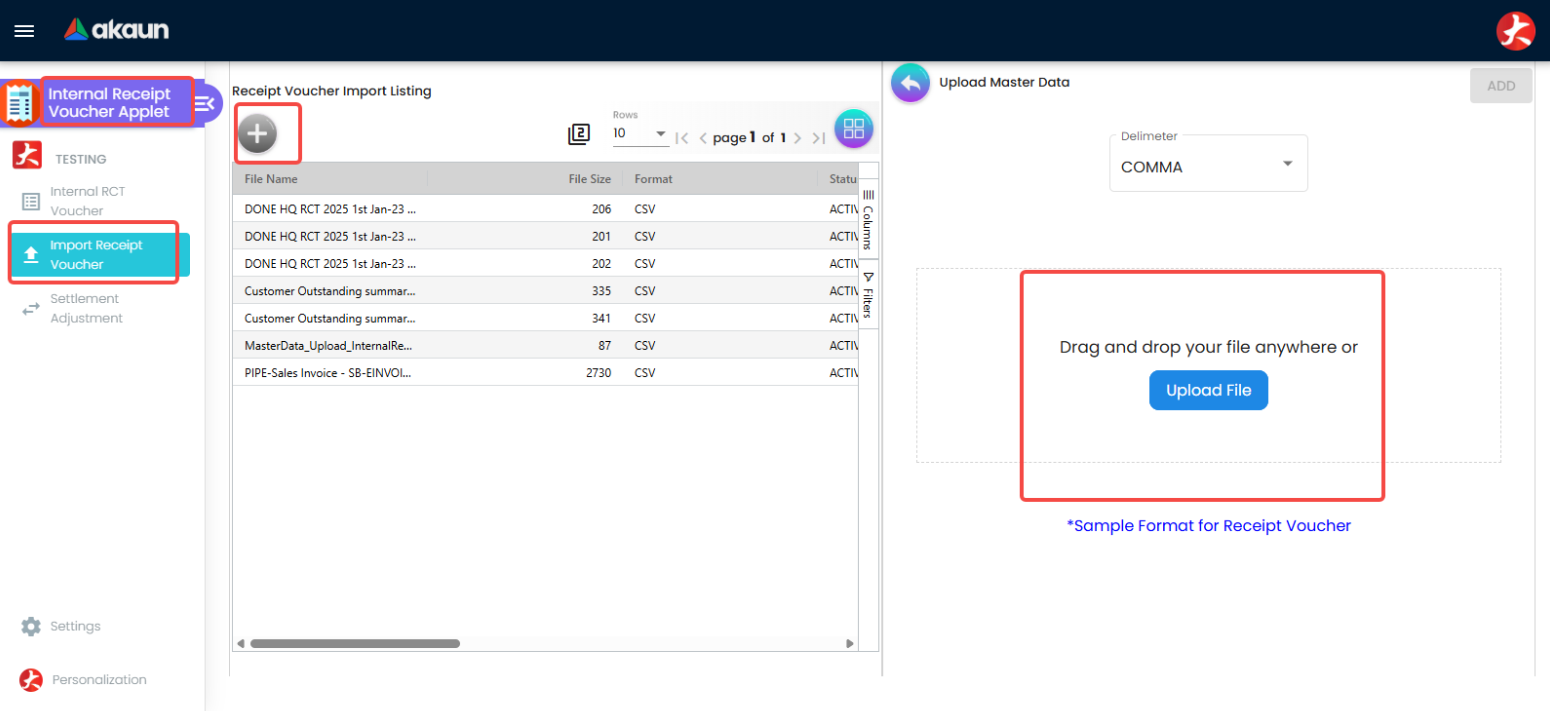
- Ensure all imported documents are posted and finalized.
Post-upload verification
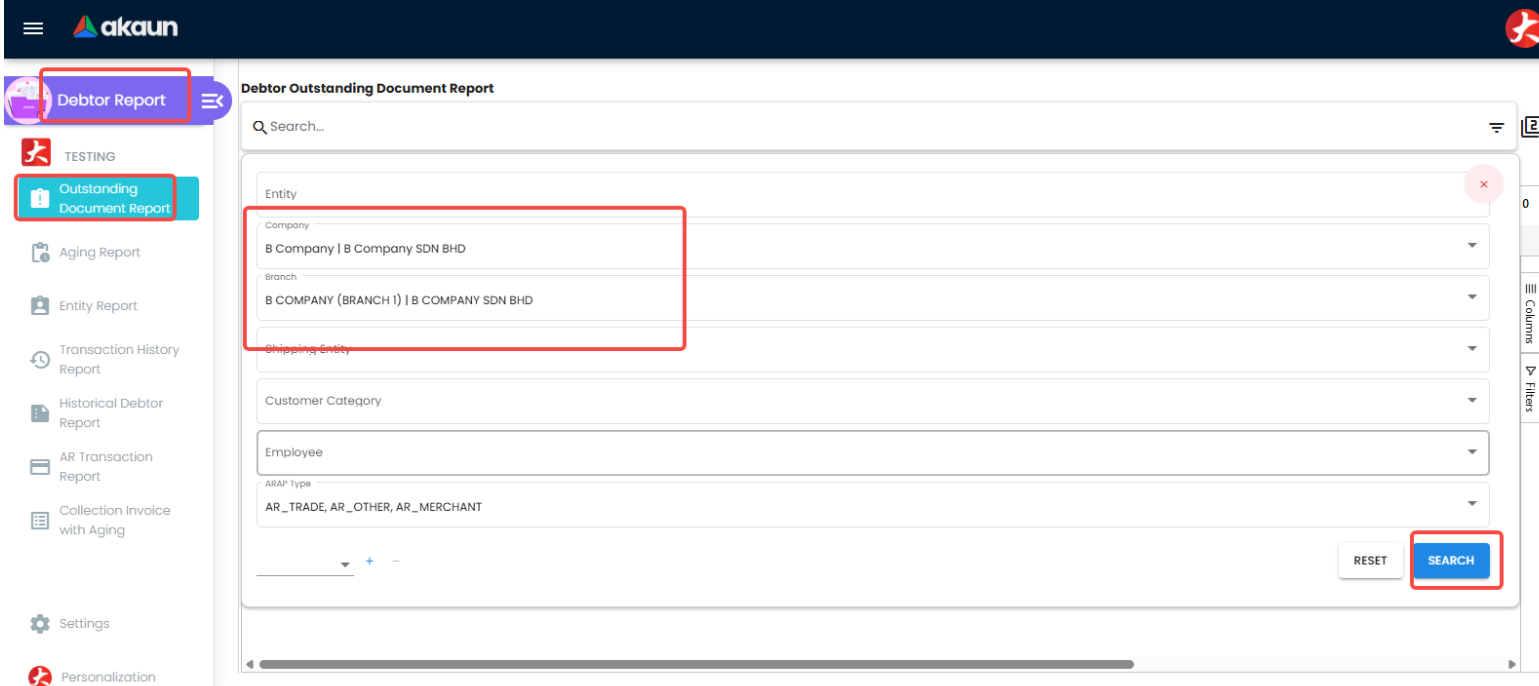
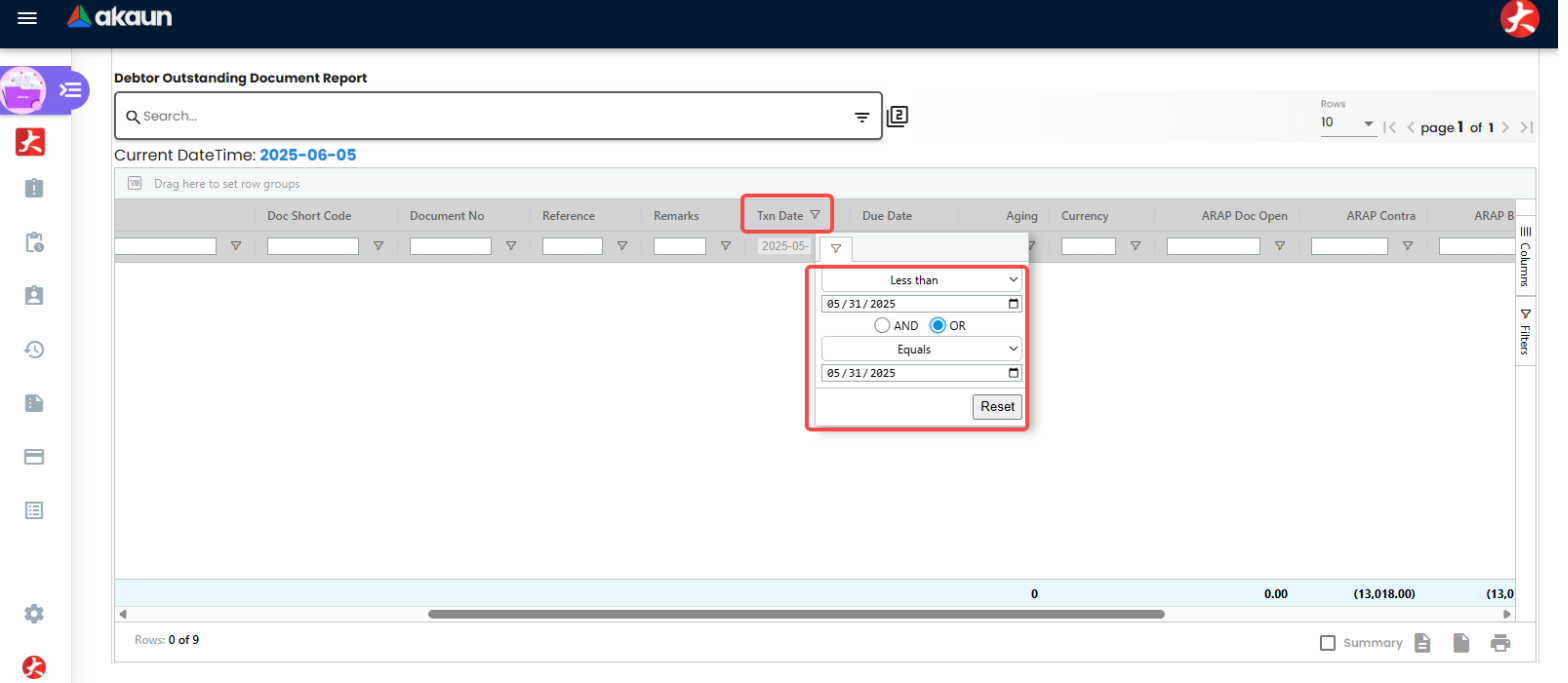
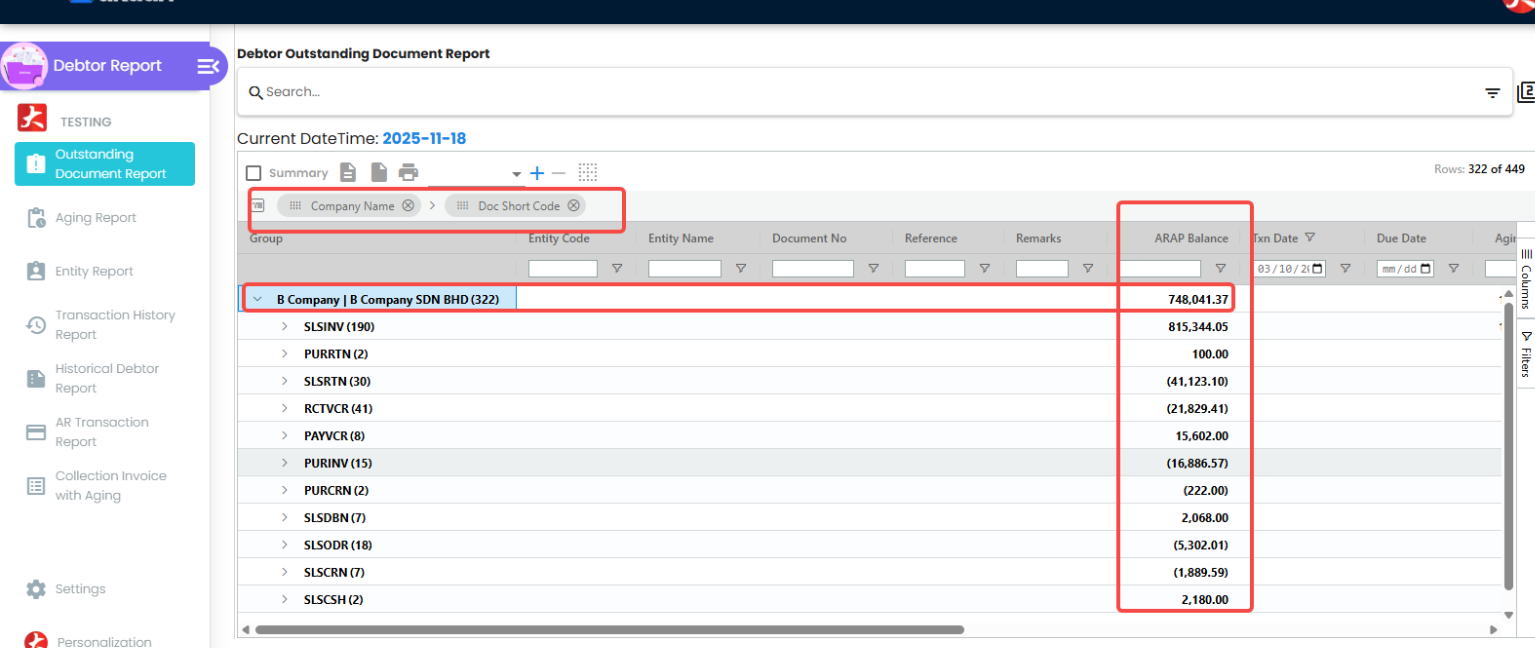
- Open the Debtor Report Applet and run the Debtor Outstanding Document Report.
- Filter by branch and transaction date. Group the report by Company Code and Document Short Code to cross-check total outstanding amounts against legacy reports.
Common pitfalls to avoid
- Negative Amounts: Ensure all outstanding amounts are positive. Use the Excel absolute value formula
=ABS(value)before exporting. - Draft Status: If
POSTING_STATUSis left blank or set toDRAFT, documents will not post to the ledger. You must manually finalize them in the applet. - Missing Customers: Ensure all customer records exist in BigLedger before importing outstanding balances.
Supplier outstanding (AP) balance upload
- Purpose: Bring forward unpaid supplier bills, debit notes, and advance deposits. This allows post-go-live supplier payments to be matched and cleared.
- Timing: After go-live, after receiving finalized creditor aging reports.
- Preparation:
- Disable e-invoice submission in the Organisation Applet (if self-billed e-invoices apply).
Disable e-invoice submissions before importing outstanding documents. - Ensure the
OPENING BALANCEservice item exists in the Doc Item Maintenance Applet. - Create a temporary
Opening Cashbookand settlement method in the Cashbook Applet for unapplied payment vouchers. - Export legacy creditor outstanding aging reports to a CSV file.
- Disable e-invoice submission in the Organisation Applet (if self-billed e-invoices apply).
Data filtering and separation
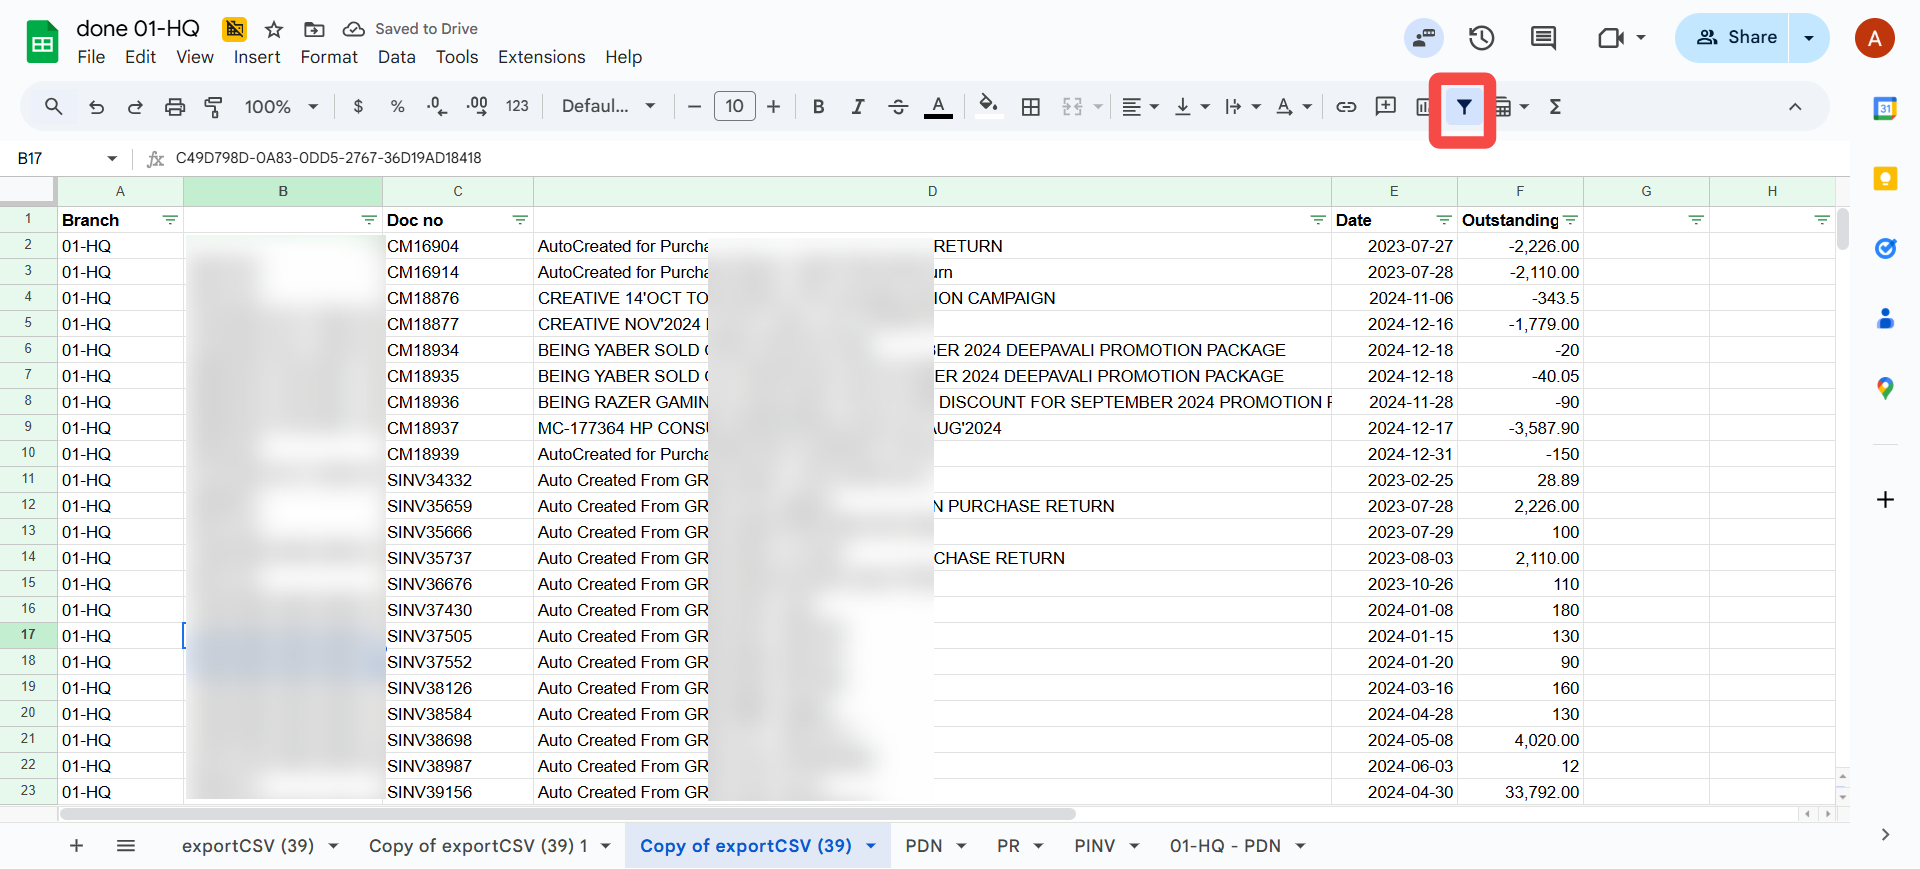
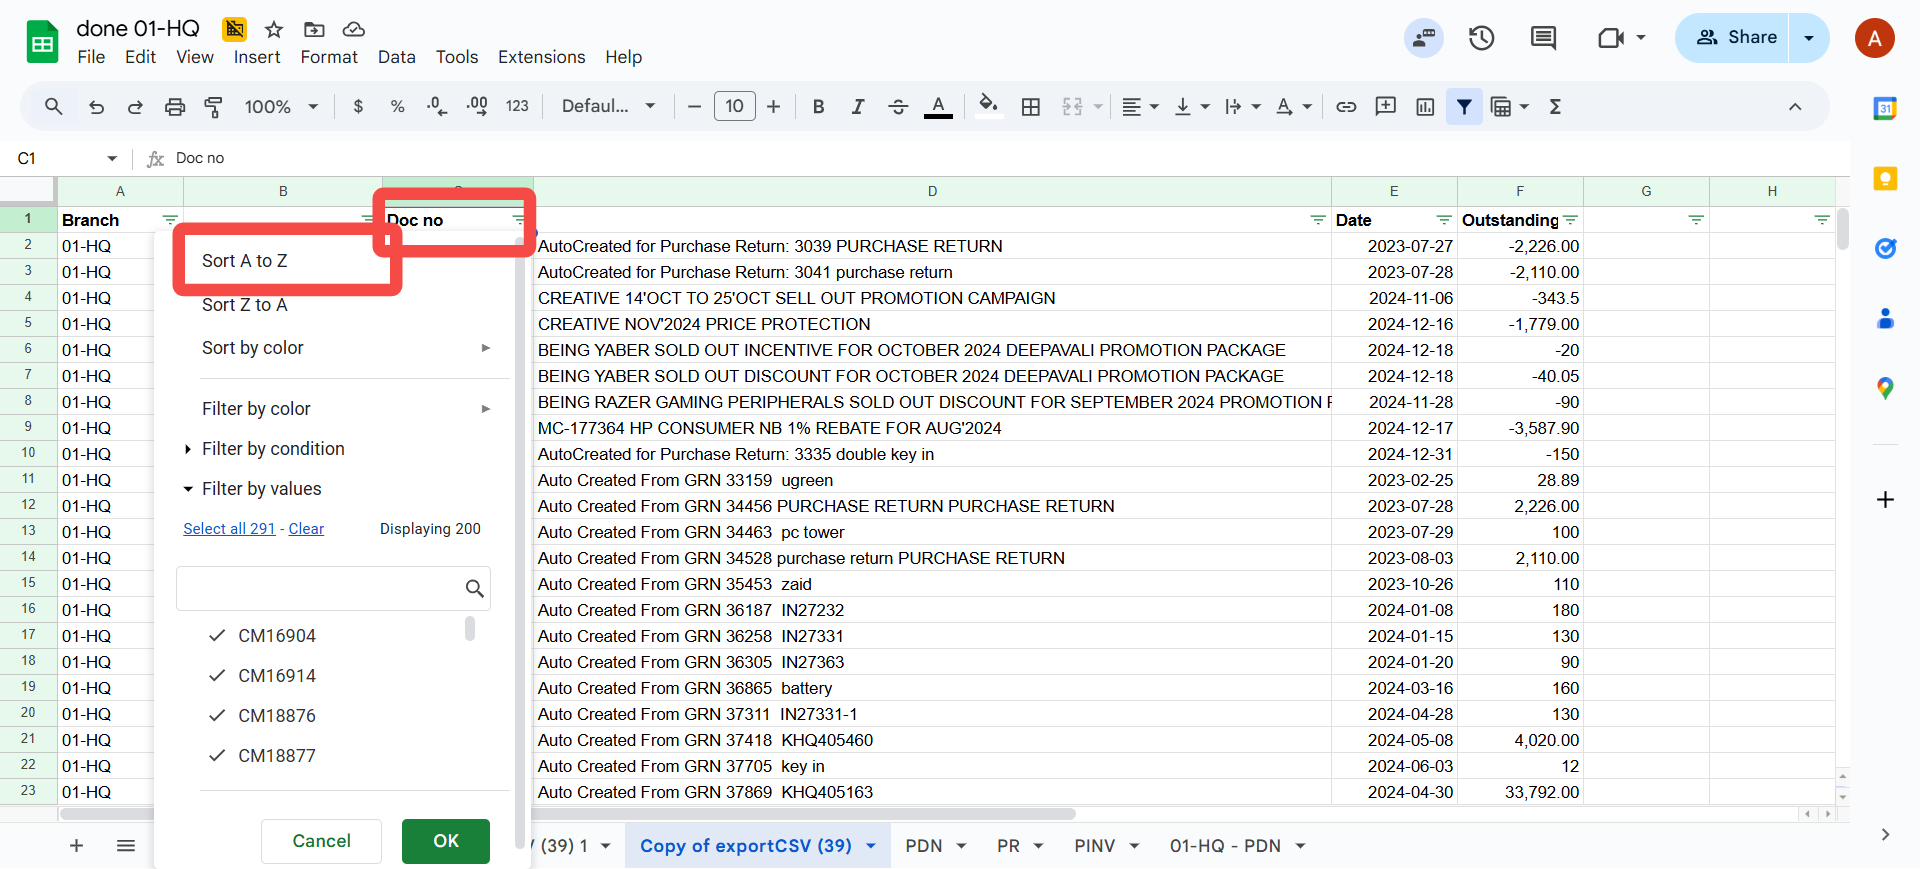
Filter your legacy supplier outstanding spreadsheet and split it into three separate CSV files:
- Purchase Invoices: To be uploaded to the Purchase Invoice (Internal) Applet.
- Purchase Debit Notes: To be uploaded to the Purchase Debit Note (Internal) Applet.
- Payment Vouchers (unapplied supplier prepayments): To be uploaded to the Payment Voucher (Internal) Applet.
Field mapping for supplier outstanding templates
Purchase Invoice (Internal) Import Template:
| Column Header | Required | Default Value | Description |
|---|---|---|---|
| BRANCH_CODE | Yes | Variable | BigLedger branch code. |
| TXN_DATE | Yes | Cutoff Date | Date of original legacy bill (e.g., 2024-12-31). |
| HDR_REF_NO | Yes | Bill No | Original legacy bill or invoice number. |
| DOC_CURRENCY | Yes | MYR | Transaction currency. |
| SETTLEMENT_OR_ITEM_CODE | Yes | OPENING BALANCE | The service item code. |
| QTY | Yes | 1 | Default quantity. |
| AMOUNT_INCL_TAX | Yes | Number | Outstanding bill balance (positive number). |
| HDR_REMARKS | No | Text | Original invoice reference or comments. |
| ENTITY_CODE | Yes | Supplier Code | Supplier code in BigLedger. |
| UOM | Yes | PCS | Unit of measure. |
| POSTING_STATUS | Yes | FINAL | Auto-posts to GL. |
Purchase Debit Note Import Template:
| Column Header | Required | Default Value | Description |
|---|---|---|---|
| BRANCH_CODE | Yes | Variable | BigLedger branch code. |
| LOCATION_CODE | Yes | Variable | BigLedger location code. |
| TXN_DATE | Yes | Cutoff Date | Date of original legacy debit note. |
| HDR_REF_NO | Yes | Debit Note No | Original legacy debit note number. |
| DOC_CURRENCY | Yes | MYR | Transaction currency. |
| SETTLEMENT_OR_ITEM_CODE | Yes | OPENING-BALANCE | The service item code. |
| QTY | Yes | 1 | Default quantity. |
| AMOUNT_INCL_TAX | Yes | Number | Debit note balance (convert negative values to positive). |
| HDR_REMARKS | No | Text | Reference comments. |
| ENTITY_CODE | Yes | Supplier Code | Supplier code in BigLedger. |
| UOM | Yes | PCS | Unit of measure. |
| POSTING_STATUS | Yes | FINAL | Auto-posts to GL. |
Payment Voucher (Internal) Import Template:
| Column Header | Required | Default Value | Description |
|---|---|---|---|
| BRANCH_CODE | Yes | Variable | BigLedger branch code. |
| TXN_DATE | Yes | Cutoff Date | Date of original legacy payment. |
| HDR_REF_NO | Yes | PV No | Original legacy payment voucher number. |
| DOC_CURRENCY | Yes | MYR | Transaction currency. |
| SETTLEMENT_OR_ITEM_CODE | Yes | Opening Cashbook | Link to the temporary opening settlement method. |
| QTY | Yes | 1 | Default quantity. |
| AMOUNT_INCL_TAX | Yes | Number | Unapplied prepayment balance (positive number). |
| HDR_REMARKS | No | Text | Original reference details. |
| ENTITY_CODE | Yes | Supplier Code | Supplier code in BigLedger. |
| UOM | Yes | PCS | Unit of measure. |
| POSTING_STATUS | Yes | FINAL | Auto-posts to GL. |
Executing the supplier outstanding import
- Open the respective applet (e.g., Purchase Invoice (Internal) Applet, Purchase Debit Note (Internal) Applet, or Payment Voucher (Internal) Applet).
- Click Import File and upload your prepared CSV file.
- Ensure all imported documents are posted and finalized.
Post-upload verification
- Open the Creditor Report Applet and run the Creditor Outstanding Document Report. Filter by branch and transaction date to confirm totals match legacy reports.
Common pitfalls to avoid
- Incorrect Cashbook Code: Payment vouchers must reference the virtual
Opening Cashbookor settlement method rather than active operating bank cashbooks to prevent duplicate cash postings. - Draft Status: Verify that the imported transactions are not sitting in draft status.
Cashbook balance entry
- Purpose: Establish opening balances for your active operating bank accounts and cash drawers.
- Timing: After outstanding customer receipts (RVs) and supplier payments (PVs) are imported, and after final legacy bank reconciliations are completed.
- Preparation: Ensure all bank accounts and cash drawers are created as cashbooks and linked to their respective GL accounts in the Cashbook Applet and Chart of Accounts Applet.
Executing the cashbook setup
- Cashbook opening balances are automatically established when you enter the starting balances of their linked bank GL accounts in Step 5: General ledger balance entry.
- If you need to enter cashbook balances directly without posting to the GL (e.g., for sub-ledger reporting only), use the Cash Transfer function in the Cashbook Applet to transfer starting balances from the temporary
Opening Cashbookinto active operating cashbooks.
Post-upload verification
- Open the Cashbook Applet and view the Query Cashbook Transaction and Cash Level reports. Confirm that the starting balance matches the reconciled bank statement as of the cutoff date.
Common pitfalls to avoid
- Double-Counting: Do not enter cashbook opening balances via manual Cashbook receipts if you are also entering them in the General Ledger trial balance journal. This will double-post the starting bank balance.
General ledger balance entry
- Purpose: Record starting trial balance values (assets, liabilities, and equity) to establish the general ledger opening balance.
- Timing: The final step of the migration process, executed only after all sub-ledger opening balances (Stock, AR, AP, Cashbook) are finalized and verified.
- Preparation: Retrieve the finalized trial balance or balance sheet report from the legacy system as of the cutoff date.
Executing the ledger entry
You can enter General Ledger opening balances using one of two methods:
Method A: Opening Balance Tab (Recommended)
- Open the Chart of Accounts Applet and navigate to the Company Ledgers tab.
- Click on your Primary Ledger.
- Open the Opening Balance Tab.
- Input the debit or credit starting balance for each GL account as of the cutoff date.
- Click Save to commit the balances.
Method B: Manual Journal Entry
- Open the Ledger and Journal Applet.
- Create a new journal transaction dated as of the cutoff date (e.g.,
2024-12-31). - Debit all asset accounts (including bank, accounts receivable control, and inventory control).
- Credit all liability and equity accounts (including accounts payable control).
- Offset any trial balance imbalance temporarily to an Opening Balance Equity account to investigate discrepancies.
- Finalize the journal entry.
Warning
Ensure that the opening balance values entered for the Accounts Receivable Control, Accounts Payable Control, and Inventory Control GL accounts match the exact totals of the uploaded customer outstanding, supplier outstanding, and stock balances. Any mismatch will cause discrepancies between your sub-ledgers and the general ledger.
Post-upload verification
- Run the Trial Balance and Balance Sheet reports in the Ledger and Journal Applet.
- Confirm that Total Debits equal Total Credits, and that the Balance Sheet matches the legacy system’s finalized balance sheet.
Common pitfalls to avoid
- Unmapped Retained Earnings: Ensure your company ledger’s default GL accounts tab has the Retained Earnings account correctly mapped before saving balances.
- Sub-ledger Mismatches: Entering GL balances that do not reconcile with the physical stock valuation, customer outstanding, or supplier outstanding totals.