Budgetary Management Module
Budgetary Applet Overview
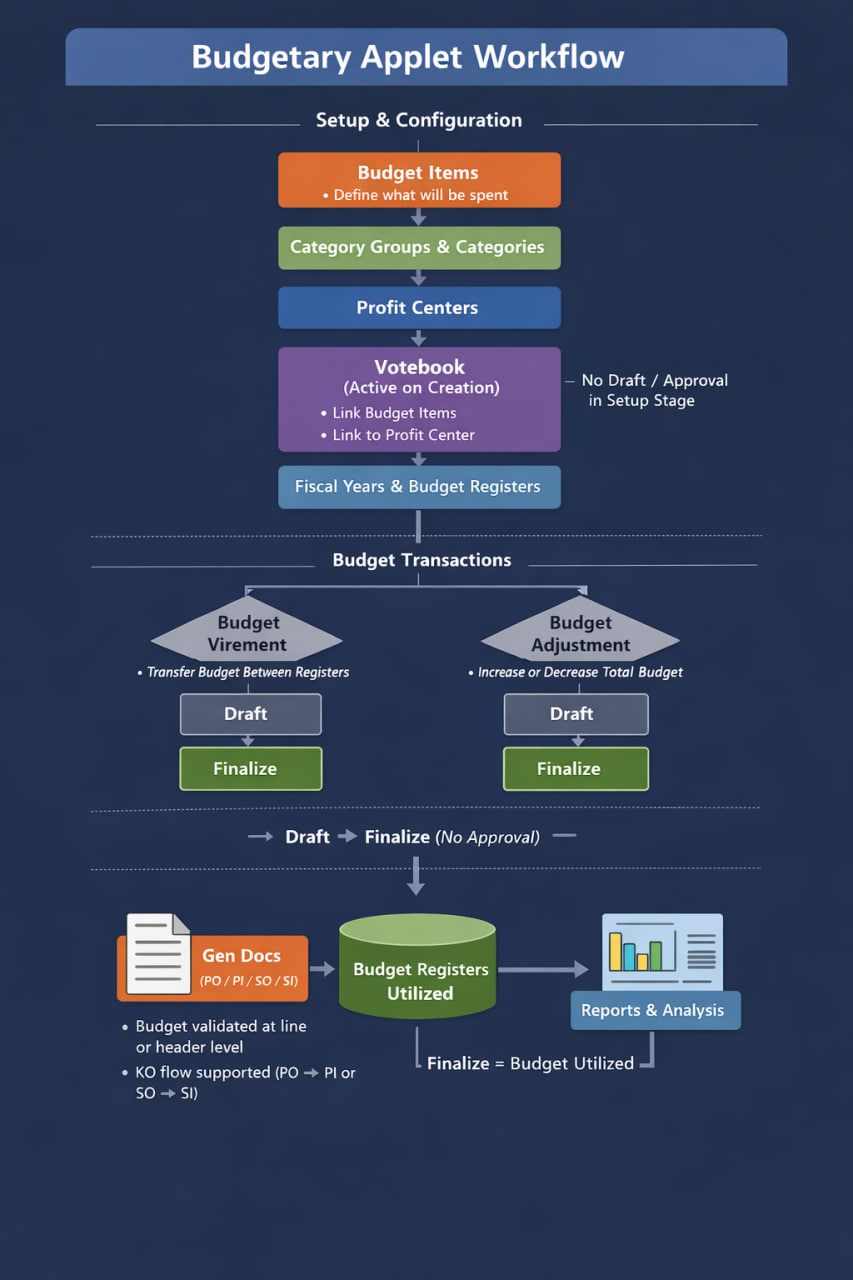
Legend
• Budget Item – What will be spent
• Category / Category Group – How spending is classified
• Profit Center – Who is responsible for spending
• Votebook – Budget container for a fiscal year
• Register – Period-based allocation
How to Read This Diagram
This workflow illustrates the end-to-end lifecycle of budgets in the system:
• Setup & Configuration – Define what, who, and how budgets are created
• Budget Transactions – Manage reallocations and adjustments
• Utilization & Reporting – Track spending through Gen Docs and reports
💡 Tip: If you are new to the Budgetary Applet, review this diagram before proceeding to individual modules.
Module 1: Budget Item Management
Purpose & Concept
The Budget Item module defines the specific items or cost components that make up a votebook’s budget allocation. Each budget item represents an element of spending — for example Office Supplies, Advertising, or Maintenance — that can later be linked to Categories and Votebooks.
Think of Budget Items as the building blocks of every budget plan.
Accessing the Module
Navigate to Budgetary Applet → Items. You’ll see the Item Listing, which displays all existing budget items with columns such as:
- Item Code
- Item Name
- Description
Use the Search Bar or Filter to quickly locate specific items.
 Figure 1.1 – Budget Item Listing Screen
Creating a New Budget Item
- Click the “+ Add” button.
- The Create Item panel will open.
- Fill in the required details:
- Item Code* – Unique identifier (e.g., MKTG001)
- Item Name* – Descriptive name (e.g., Marketing Expenses)
- Description – Optional contextual notes
- Click Save to create the item.
Tip: Use a consistent naming format such as DEPT-TYPE (e.g., HR-TRAIN).
 Figure 1.2 – Create Budget Item Panel
Editing a Budget Item
Click an existing record from the list. The Edit Item panel will appear, containing three tabs:
- Details
- Category
- Votebook
Modify necessary fields and click Save to update.
 Figure 1.3 – Edit Budget Item Panel
Details Tab
Displays the item’s key information such as:
- Item Code, Name, Description
- Created / Modified By and timestamps
Items linked to active votebooks cannot be deleted.
Category Tab
The Category Tab allows users to assign one or more Categories to a Budget Item. This determines what type of expense the item represents (e.g., Training, Maintenance, Equipment Purchase) and ensures all spending is classified consistently across reports.
Configuring Category Groups
Before assigning categories, administrators can define which Category Groups are available for selection under: Settings → Field Settings → Budget Item Settings
Here, up to 10 Category Groups can be configured. Each group (e.g., FAKULTI-SAINS, FAKULTI-EKONOMI) can also be marked as Mandatory if users must select a category under it when creating or editing Budget Items.
 Figure 1.4 – Applet Settings: Category Group Configuration
Assigning Categories to Items
When editing a Budget Item, navigate to the Category Tab. You’ll see up to 10 Category fields (Category 0 – 9) — each corresponding to one of the defined Category Groups.
For each field:
- Select the appropriate Category from the dropdown.
- Repeat for additional Category levels as required.
- Click Save to link them.
Tip: Multi-level category selection allows detailed expense tracking. Example: Category 0 → Faculty of Science Category 1 → Laboratory Equipment Category 2 → Maintenance
 Figure 1.5 – Edit Budget Item: Category Tab with Multi-Level Categories
Purpose and Benefits
- Provides structured expense classification across faculties or departments.
- Ensures reporting accuracy in budget and utilization summaries.
- Allows flexibility — some organizations may use only 3 levels, others all 10.
Votebook Tab
Displays all votebooks linked to the selected item. You can view or add associations here so that the same item can be reused across multiple votebooks or fiscal years.
 Figure 1.6 – Votebook Tab for Linked Items
Deleting a Budget Item
Items can only be deleted if not linked to any active votebook. Use the Delete option under the Details tab.
Example
| Item Code | Item Name | Linked Category | Linked Votebook |
|---|---|---|---|
| HR001 | Training Program | Training & Development | Faculty of Economics |
Summary
Budget Items define the foundation of every spending plan. They ensure uniformity and clarity across the budgeting system before categorization and allocation begin.
Module 2: Category Group & Category Management
Purpose & Concept
The Category Group and Category modules define what money is being spent on. They classify and group all Budget Items into structured categories for reporting and analysis.
- Category → Describes what is being spent on (e.g., Advertising, Training, Repairs).
- Category Group → Groups multiple categories under a broader umbrella (e.g., Faculty, Department, or Expense Type).
In short: Category Group = Department / Faculty Category = What they’re spending on
 Figure 2.1 – Category Group Listing
Relationship Overview
| Element | Description | Example |
|---|---|---|
| Category Group | Broader grouping level | FAKULTI-SAINS, FAKULTI-EKONOMI |
| Category | Specific type of spending under the group | Maintenance, Equipment Purchase, Training |
1️⃣ Category Group Module
Accessing the Module
Navigate to Budgetary Applet → Category Groups. You’ll see the Category Group Listing showing:
- Code
- Name
- Status
- Modified Date
Creating a New Category Group
- Click “+ Add”.
- Enter: • Category Group Code (e.g., FAKULTI-SAINS) • Category Group Name • Status – Active or Inactive
- Click Create to save.
 Figure 2.2 – Add Category Group Panel
Editing a Category Group
Select a group to open the Edit panel. Update fields such as name, status, or linked categories. Click Update to confirm.
Linking Categories to a Group
In the Edit view, go to the Categories Tab. Click “+ Add Category”. Select from existing categories or create a new one. Click Add or Create to link.
 Figure 2.3 – Edit Category Group and Link Categories
Deleting a Category Group
Only possible if no active categories are linked. Open the record → click Remove to delete.
2️⃣ Category Module
Accessing the Module
Navigate to Budgetary Applet → Categories. The Category Listing displays:
- Category Code
- Category Name
- Category Group
- Status
 Figure 2.4 – Category Listing View
Creating a Category
- Click “+ Add”.
- Fill in: • Category Group • Category Code • Category Name • Description
- Click Create.
 Figure 2.5 – Add Category Panel
Editing / Deleting
Editable fields include group, name, status, and description. Optional tabs include Manage Image and Items Listing (linked items). A category can be deleted only if not linked to any items.
 Figure 2.6 – Edit Category Panel
Example
| Category Group | Category | Description |
|---|---|---|
| FAKULTI-SAINS | Laboratory Equipment | Purchases of microscopes and lab tools |
| FAKULTI-EKONOMI | Training Expenses | Staff courses and development |
Summary
Category Groups and Categories organize budget data into logical structures, enabling reports to show what funds are being used for across faculties or departments.
Module 3: Profit Center Management
Purpose & Concept
The Profit Center module defines who is doing the spending within the organization. Each Profit Center represents a department, faculty, or division that manages its own budget through associated Votebooks. This module ensures every expenditure is traceable back to a responsible unit, providing clear accountability and departmental spending reports.
In simple terms: Profit Center = Who is spending Category = What is being spent on Item = The detailed spending component
Relationship Overview
| Entity | Description | Example |
|---|---|---|
| Profit Center | The unit or faculty responsible for the budget | Faculty of Economics, Faculty of Science |
| Votebook | The yearly spending book linked to the Profit Center | Budget 2025 – Faculty of Science |
| Items / Categories | What the Profit Center spends on | Training, Equipment, Marketing |
Accessing the Module
Navigate to Budgetary Applet → Profit Center. You will see a Profit Center Listing which displays:
- Profit Center Code
- Profit Center Name
- Description
- Status
- Creation & Modified Dates
 Figure 3.1 – Profit Center Listing View
Creating a Profit Center
Click the “+ Add” button. The Create Profit Center panel will appear on the right.
| Field | Description |
|---|---|
| Profit Center Code* | Unique identifier (e.g., FAC_A) |
| Profit Center Name* | Name of the department or unit (e.g., Fakulti A) |
| Description | Optional – brief explanation of the unit |
| Ref 1 / Ref 2 Codes | Optional references (e.g., campus, division) |
| Status | Active / Inactive |
Click Save to create the Profit Center.
 Figure 3.2 – Create Profit Center Panel
Editing a Profit Center
Click on an existing Profit Center in the listing. The Edit Profit Center panel will open. Update fields such as:
- Name or Description
- Reference details
- Status (Active / Inactive) Click Save to confirm changes.
 Figure 3.3 – Edit Profit Center Panel
Deleting a Profit Center
A Profit Center can only be deleted if it is not linked to any active votebooks or transactions. To remove: open the record and click Remove.
Once deleted, all associations with linked votebooks will be lost.
Example Structure
| Profit Center Code | Profit Center Name | Description | Status |
|---|---|---|---|
| FAC_A | Fakulti A | Faculty of Arts | Active |
| FAC_B | Fakulti B | Faculty of Business | Active |
| FAC_C | Fakulti C | Faculty of Computing | Active |
How Profit Center Connects to the Budget Flow
| Stage | Module | Description |
|---|---|---|
| 1️⃣ | Profit Center | Defines who is responsible for spending |
| 2️⃣ | Votebook | Allocates yearly budgets under the Profit Center |
| 3️⃣ | Budget Item & Category | Defines what those budgets are spent on |
Example Flow: Faculty of Science (Profit Center) → creates Votebook 2025 → includes Budget Item: Laboratory Equipment → tagged under Category: Maintenance → Category Group: FAKULTI-SAINS
 Figure 3.4 – Profit Center to Votebook Relationship Flow
Summary
The Profit Center module is essential for:
- Structuring budget responsibility by department
- Linking Votebooks and Items to organizational units
- Generating departmental budget utilization reports
Profit Center = Who spends Category = What they spend on Votebook = How and when funds are allocated
Module 4: Votebook Management
Purpose & Concept
The Votebook module defines who is spending and manages how funds are distributed across Budget Items and Fiscal Periods. It connects:
- Profit Centers (who is doing the spending)
- Budget Items (what is being spent on)
Think of it as the “spending ledger” of each department or faculty.
Workflow Overview
- Create a Votebook → Link it to a Profit Center
- Attach Budget Items → Specify which items this votebook will manage
- Generate Fiscal Year → Automatically creates Budget Registers for each period and item
- Allocate Initial Amounts → Distribute funds evenly across all periods by default
Figure 4.1 – Overall Votebook Workflow
Creating a Votebook
- Navigate to Budgetary Applet → Votebook
- Click “+ Add” and fill in:
- Votebook Code and Name
- Linked Profit Center
- Description / Notes
- Click Save
 Figure 4.2 – Create Votebook Panel
Linking Budget Items
After creating the Votebook:
- Open the Items Tab
- Click “+ Add Item” to link Budget Items that this votebook will manage
- Each linked item inherits its category classification from the Items module
 Figure 4.3 – Add Budget Item to Votebook
Generating Fiscal Year
From the Votebook’s Fiscal Year Tab, click Generate Fiscal Year. The system automatically:
- Creates Budget Registers for each fiscal period (e.g., Jan–Dec)
- Links each register to the respective Budget Item

 Figure 4.4 – Generate Fiscal Year Screen
Allocating Initial Amounts
- Open the Budget Register under the fiscal year.
- Enter the Initial Amount once.
- The system automatically spreads the value equally across all months or periods.
Example: Enter RM 10,000 → automatically distributed as RM 833.33 per month for a 12-month fiscal year.
 Figure 4.5 – Initial Budget Allocation by Period
Summary
| Step | Action | Outcome |
|---|---|---|
| 1 | Create Votebook | Defines the spending entity |
| 2 | Link Budget Items | Determines what will be spent on |
| 3 | Generate Fiscal Year | Creates registers for each month/item |
| 4 | Allocate Initial Amount | Distributes funds evenly across periods |
Votebook = Who is spending Item & Category = What is being spent on
Module 5: Budget Virement Management
Overview
The Budget Virement module allows users to transfer allocated amounts between two budget registers within the same Votebook and Fiscal Year. It’s primarily used to reallocate existing funds — not to increase or decrease the total budget.
Figure 5.1 – Budget Virement Listing
Process Flow
A Budget Virement document consists of two parts:
- Header (Details Tab) – Defines the document information
- Lines Tab – Specifies the individual register transfers
After completing both, the user must Create the document first. Only after creation can the document be Finalized, applying the fund transfers to the registers.
Steps to Create a Virement
1️⃣ Fill in Header Details
Navigate to Virement → + Create Budget Virement and fill in:
| Field | Description |
|---|---|
| Votebook | Select the relevant votebook |
| Fiscal Year | Choose the active fiscal year |
| Fiscal Period | Specify the accounting period |
| Issue Date | Auto-filled with current timestamp |
| Reference # / Tracking ID | Optional internal tracking |
| Remarks / Description | Add notes describing the reason for transfer |
 Figure 5.2 – Virement Header Entry Screen
2️⃣ Add Lines
Switch to the Lines Tab → click the “+” button to add new transfer lines. For each line:
| Field | Description |
|---|---|
| Item Code / Name | Select the budget item |
| Fiscal Period | Select the source period |
| Budget Register From / To | Choose where to transfer funds from and to |
| Amount Allocated | Displays the current available balance |
| Amount To Transfer | Enter the amount to be reallocated |
 Figure 5.3 – Adding Transfer Lines in Virement
3️⃣ Create the Document
After filling in both Header and Lines, click Create. The document is saved in Draft state. You can review all lines before finalizing.
4️⃣ Finalize
Once verified:
- Click Finalize to confirm the virement.
- The system automatically updates the relevant registers:
- Budget Register From → reduced by transfer amount
- Budget Register To → increased by transfer amount
- Finalization locks the document, preventing further edits.
 Figure 5.4 – Finalized Virement Document Example
Summary
| Step | Action | Status |
|---|---|---|
| 1 | Fill in Votebook & Fiscal Year | Draft Header |
| 2 | Add Virement Lines | Draft Lines |
| 3 | Create Document | Saves as Draft |
| 4 | Finalize | Applies register updates |
Module 6: Budget Adjustment Management
Overview
The Budget Adjustment module allows users to increase (Adjust In) or decrease (Adjust Out) the total amount allocated to a budget register. It’s used when the overall budget ceiling changes, unlike Virement which only redistributes within the same total.
 Figure 6.1 – Budget Adjustment Listing
Process Flow
A Budget Adjustment document contains:
- Header (Details Tab) – Defines general document info
- Lines Tab – Contains each individual item adjustment
After both sections are filled, the user must Create the document first. Only then can it be Finalized, applying the adjustment values to the registers.
Steps to Create an Adjustment
1️⃣ Fill in Header Details
Navigate to Adjustment → + Create Budget Adjustment. Fill in:
| Field | Description |
|---|---|
| Votebook | Select the votebook to adjust |
| Fiscal Year | Select the applicable fiscal year |
| Issue Date | Auto-filled with current date/time |
| Reference # / Tracking ID | Optional tracking identifier |
| Remarks / Description | Provide context for the adjustment |
 Figure 6.2 – Adjustment Header Details
2️⃣ Add Lines
Move to the Lines Tab → click “+ Add Item”. For each line:
| Field | Description |
|---|---|
| Item Code / Name | Choose the item being adjusted |
| Fiscal Period | Select the relevant period |
| Budget Register | Displays the active register for that period |
| Amount Allocated | Shows current allocation |
| Adjustment Type | Select Adjust In (increase) or Adjust Out (decrease) |
| Amount To Adjust | Enter the amount to add or remove |
 Figure 6.3 – Adjustment Lines Entry
3️⃣ Create the Document
Once Header and Line information are complete, click Create. The document is saved as a Draft. Review all entries before finalizing.
4️⃣ Finalize
When ready:
- Click Finalize to apply the adjustments.
- The selected registers are automatically updated:
- Adjust In → adds to the register total
- Adjust Out → deducts from the register total
 Figure 6.4 – Finalized Adjustment Document
Summary
| Step | Action | Status |
|---|---|---|
| 1 | Fill in Header | Draft Header |
| 2 | Add Item Lines | Draft Lines |
| 3 | Create Document | Saves as Draft |
| 4 | Finalize | Updates register balances |
Key Difference: Virement vs Adjustment
| Feature | Virement | Adjustment |
|---|---|---|
| Purpose | Transfer funds between registers | Increase/decrease total budget |
| Impact | No change in total allocation | Changes total allocation |
| Fields | Register From → To | Single Register |
| Adjustment Type | Always a transfer | Adjust In / Adjust Out |
| Finalization | Updates both registers | Updates one register |
Figure 6.5 – Comparison: Virement vs Adjustment Flow
Module 7: Reports
Overview
The Reports module provides users with an analytical view of all budget-related transactions, allocations, virements, and adjustments performed across votebooks and fiscal years. It allows users to monitor budget performance, utilization, and remaining balances at both summary and detailed transaction levels.
This module consists of two main reports:
- Budget Report
- Budget Register Transaction Line Report
1️⃣ Budget Report
Purpose
The Budget Report provides a high-level summary of each Budget Item’s financial position, showing how much has been allocated, utilized, and remains available. It helps users to track utilization trends and identify underused or overused allocations.
Interface Overview
The report displays the following key columns:
| Column | Description |
|---|---|
| Item Code / Name | Identifies the specific budget item |
| Initial Amount Allocated | The original amount allocated during budget creation |
| Latest Amount Allocated | Reflects the current total after adjustments or virements |
| Amount Reserved | Funds that are earmarked but not yet utilized |
| Amount Utilized | The actual amount spent or used |
| Utilization % | Automatically calculated as (Utilized ÷ Latest Allocated) × 100 |
| Remaining Balance | Displays unutilized funds remaining in the allocation |
Figure 7.1 – Budget Report Summary View
Actions
| Action | Description |
|---|---|
| Generate Utilization Chart | Visualizes utilization percentages for easier interpretation |
| Search / Filter | Search or filter by votebook, item, or fiscal period |
| Export Excel / PDF | Export for documentation or analysis |
Tip: Positive utilization values indicate spending, while negative values (from reverse adjustments) reflect fund recovery or reallocation.
 Figure 7.2 – Budget Utilization Chart Example
2️⃣ Budget Register Transaction Line Report
Purpose
The Budget Register Transaction Line Report provides a detailed audit trail of all transactions affecting each budget register. It lists every entry—whether it originates from Budget Creation, Virement, or Adjustment—for transparent and traceable budget tracking.
Interface Overview
| Column | Description |
|---|---|
| Budget Votebook | The votebook under which the transaction occurred |
| Budget Fiscal Year | The fiscal year tied to the transaction |
| Budget Fiscal Period | The accounting period of the transaction |
| Budget Item / Name | The affected item within the budget |
| Item Code | Unique identifier for the item |
| Transaction Source | Origin of the change (e.g., Creation, Virement, Adjustment, Utilization) |
| Amount | Amount applied to the register |
 Figure 7.3 – Budget Register Transaction Line Report
Actions
| Action | Description |
|---|---|
| Search / Filter | Filter by votebook, fiscal period, or item code |
| Sort Columns | Click column headers for quick ascending/descending sorting |
| Pagination | Navigate across multiple pages of records |
Note: This report is often used by accountants or auditors to trace every movement (allocation, adjustment, utilization) linked to a specific register.
Usage Summary
| Report Type | Purpose | Key Users | Export Options |
|---|---|---|---|
| Budget Report | Summary of allocations, utilization, and remaining balances | Budget Officers, Department Heads | Excel, PDF |
| Budget Register Txn Line Report | Detailed register-level transactions | Accountants, Auditors, Finance Teams | Excel, PDF |
Module 8: Budget Virement vs Adjustment Overview
While Virement and Adjustment documents are created separately, they often complement one another during the budget management cycle. This module reinforces their distinction for users performing financial revisions.
| Feature | Virement | Adjustment |
|---|---|---|
| Purpose | Reallocate funds within the same total | Increase or decrease total allocation |
| Impact | Moves existing funds between registers | Alters the total budget ceiling |
| Affects | Two budget registers (From → To) | One register only |
| Validation | Ensures balance between transfers | Verifies adjustment consistency |
| Approval Requirement | Optional (depends on organization) | Usually requires managerial sign-off |
| Finalization Effect | Transfers funds | Adds or removes funds |
Figure 8.1 – Comparison Chart of Virement vs Adjustment
Module 9: Budget Utilization & Validation
Overview
This module explains how the Budgetary Applet integrates with the General Document (Gen Doc) Applets — namely:
- Purchase Orders (PO)
- Purchase GRNs (PGRN)
- Purchase Invoices (PI)
- Sales Orders (SO)
- Sales Invoices (SI)
to ensure real-time budget control through automated validation and utilization tracking.
When users process transactions involving budget-linked items, the system validates the available funds from the assigned budget registers. Upon finalization of the document, the corresponding budget amounts are utilized (deducted) from the remaining balance.
Budget Field Placement (HDR & Lines)
Budget-related fields can be selected at two levels within the Gen Doc modules:
- Header (HDR) Level – where budget values are applied to the document as a whole
- Line Level – where each item can be linked to its own budget configuration
There is also a system configuration setting that allows Lines to follow HDR values. When enabled, line items will automatically inherit the Budget Votebook, Fiscal Year, Period, Item, and Register selected in the Header — reducing manual entry and ensuring consistency.
Figure 9.1 – Budget Fields at Header Level and “Lines Follow HDR” Setting
Validation Process
During item entry in any Gen Doc (e.g., Purchase Invoice), users must specify or inherit the following:
| Field | Description |
|---|---|
| Budget Votebook | Defines which budget the expense or revenue is tied to |
| Budget Fiscal Year & Period | Identifies the active financial window |
| Budget Item | Links to the specific expense or revenue classification |
| Budget Register | Represents the active register holding the allocation amount |
As soon as an item is added, the system performs validation to ensure:
- Sufficient funds exist in the selected register
- The total transaction amount does not exceed the remaining balance
If limits are exceeded, a warning appears such as:
“Budget exceeded for Sales FY2026 October 2026 (Used 10,000.00, Available 393.33)”
The affected line will be highlighted in red to alert the user before saving.
 Figure 9.2 – Validation Message for Exceeded Budget Limit
Utilization Process
Upon finalization of the Gen Doc (PO, PI, SO, or SI):
- The utilized amount is deducted from the linked Budget Register
- Updated balances are reflected in the Budget Utilization Report
- All utilization entries are captured under the Budget Register Transaction Line Report
This ensures accurate and real-time tracking of fund consumption across all departments or profit centers.
Figure 9.3 – Finalized Document Reflecting Budget Deduction
Knock-Off (KO) Transactions and Budget Data Carryover
When a document is carried forward (KO) from one module to another:
- Purchase Order → Purchase Invoice (PO→PI)
- Sales Order → Sales Invoice (SO→SI)
the budget-related data is automatically copied over, including:
- Budget Votebook
- Budget Fiscal Year
- Budget Period
- Budget Item
- Budget Register
This preserves linkage, consistency, and eliminates redundant data entry. When the subsequent document (e.g., PI) is finalized, the system:
- Validates the remaining funds
- Updates the utilization under the same register
- Ensures full traceability from the originating document
Key Highlights
| Step | Process | Description |
|---|---|---|
| 1 | HDR & Line Field Setup | Budget fields can be defined on HDR or Lines; inheritance setting available |
| 2 | Validation (Pre-Finalization) | Ensures sufficient funds before committing |
| 3 | Utilization (Post-Finalization) | Deducts utilized amounts from registers |
| 4 | Knock-Off Handling | Automatically transfers budget linkage across related docs |
| 5 | Reporting | Full visibility via Budget Report & Register Txn Line Report |
Module 10: Budget Subline Management
Purpose & Concept
The Budget Subline feature provides greater flexibility in allocating portions of a transaction line to multiple budget registers. It allows users to split a single item’s budget usage across several Votebooks, Fiscal Periods, or Budget Items.
Think of it as distributing one line’s cost among multiple budgets for accurate cost-sharing.
Accessing Budget Subline
Budget Sublines are available under the Budget Sub Line Tab within item entry forms across Gen Doc applets (e.g., Purchase Invoice, Sales Order)
 Figure 10.1 – Budget Sub Line Tab in Item Details
Adding a Budget Subline
- Within the document, open Item → Budget Sub Line Tab.
- Click Add Subline.
- Fill in the required fields:
| Field | Description |
|---|---|
| Budget Votebook | The votebook to which this sub-allocation belongs |
| Budget Fiscal Period | Specifies the financial period (e.g., November 2026) |
| Budget Item | The budget item being utilized |
| Budget Register | The register from which funds will be drawn |
| Amount | Amount allocated to this subline |
| Percentage | Optional percentage of total line amount |
- Click Save to record the subline.
The subline will now appear in the Budget Sublines Table below.
Figure 10.2 – Adding a Budget Subline Entry
Editing or Deleting a Budget Subline
Each subline can be:
- Edited – to update amount, percentage, or linked budget
- Deleted – if not yet finalized or utilized
This ensures easy adjustments during drafting stages without affecting finalized transactions.
Figure 10.3 – Managing Budget Sublines (Edit/Delete)
How Subline Utilization Works
When a document is finalized:
- The total line amount is distributed according to the subline proportions (by amount or percentage).
- Each related budget register is updated independently, allowing multi-budget tracking within one transaction line.
For example: If a RM 1,000 item has two sublines —
- RM 700 (Budget A)
- RM 300 (Budget B)
Then each register reflects the correct utilization upon finalization.
Figure 10.4 – Example of Budget Subline Utilization Split
Benefits
- Enables multi-department cost sharing on a single document line.
- Improves accuracy of utilization reporting by reflecting distributed spending.
- Maintains auditability, showing all subline allocations per transaction.
Summary
| Action | Outcome |
|---|---|
| Add Subline | Allocate partial cost to multiple budgets |
| Edit/Delete Subline | Manage entries before finalization |
| Finalize Document | Utilization applied per subline allocation |